Post Syndicated from Akshata Ketkar original https://aws.amazon.com/blogs/compute/simplify-aws-outposts-lifecycle-management/
AWS Outposts extends AWS infrastructure, services, and APIs to customer-managed locations for workloads that require low latency, local data processing, or data residency. AWS has continuously improved the Outposts delivery and operational experience. However, managing the lifecycle from ordering through renewal has required coordination with multiple AWS teams for tasks like configuration, cost estimates, and end-of-term decisions.
With this feature launch, we have introduced self-service capabilities that give you direct control over the full Outposts lifecycle. A new configuration and quoting tool generates configurations with real-time cost estimates, so you can independently compare options and place orders. Subscription details, including term dates and billing, are now visible directly in the AWS Outposts console and through the AWS Command Line Interface (AWS CLI) or Outposts API. When your term ends, new workflows let you renew or decommission Outposts without contacting AWS.
In this post, we walk through each capability and show you how to get started.
Self-service configuration and quoting
The new quoting tool lets you build Outposts configurations, get real-time cost estimates, and place orders directly from the console or API.
Three capabilities make this powerful:
- Real-time cost estimates across different configurations, payment options, and term lengths to compare configurations and cost estimates.
- Reduced time to order by removing the need to engage AWS teams for cost estimates and configuration.
- Proactive validation that identifies issues like account readiness gaps or regional constraints before you submit an order.
You can request quotes for new deployments or for adding capacity to existing Outposts. When you quote for an existing Outpost, your current capacity and configuration details are pre-populated. The tool integrates with AWS Identity and Access Management (IAM), so you can restrict who generates quotes using standard IAM policies.
The quote-to-order process follows three steps. First, get a quote by specifying your requirements. Next, place your order after reviewing cost estimates. Then, await delivery and installation. Quotes are generated within seconds and are valid for 30 days.
To generate a quote using the console, follow these steps:
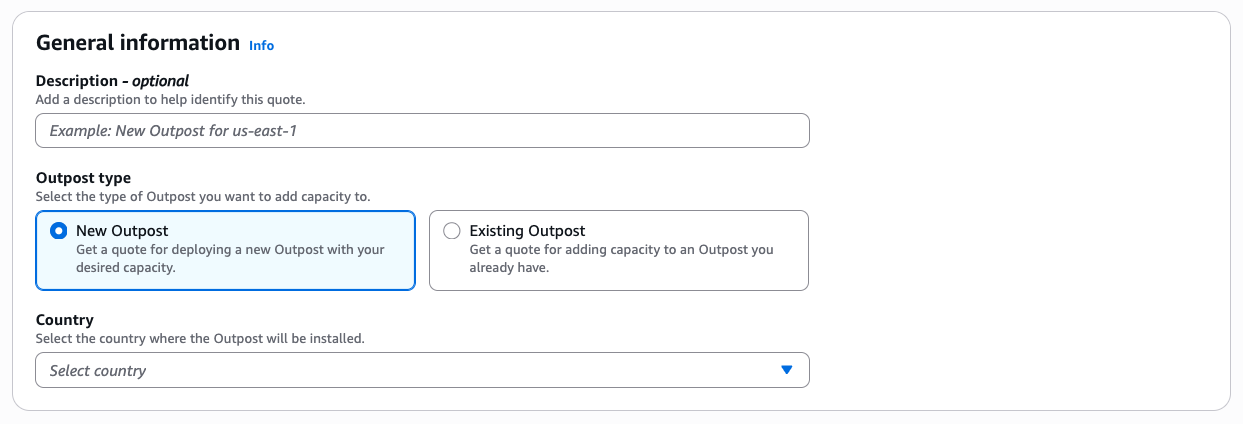
- Log in to your AWS Outposts console, select Quotes from the left navigation pane, then choose Get Quote.
- Under General Information, select New Outpost for a new deployment, or Existing Outpost to add capacity to a deployed Outpost. For new Outposts, select the country where your Outpost will be installed (this affects cost estimates and determines regional availability). For existing Outposts, select the Outpost ID.
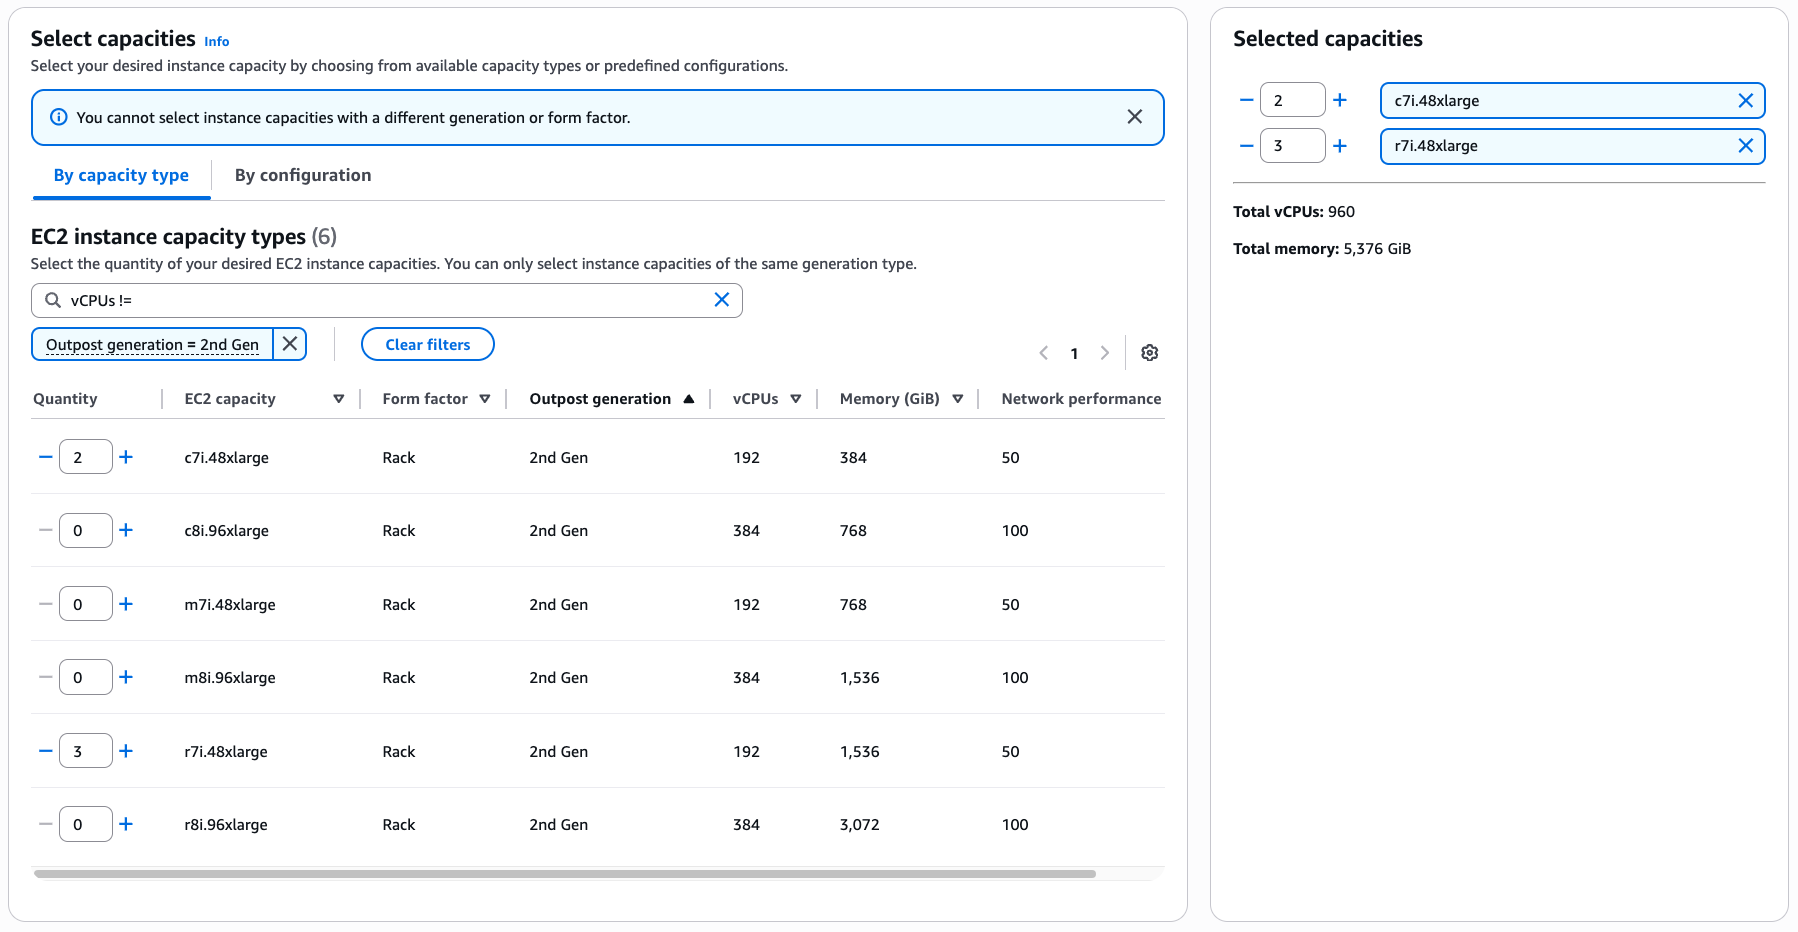
- Select your compute capacity. You have two options:
- By capacity type: Select individual Amazon Elastic Compute Cloud (Amazon EC2) instance types and quantities that match your compute requirements.
- By configuration: Choose from predefined configurations designed for common use cases or reuse previously ordered configurations from your account history.
Use the filter capability to narrow results by Outpost generation, form factor, vCPUs, or other properties. You can only select instance capacities from the same Outpost generation. When you add capacity, the wizard automatically calculates and displays total vCPUs and memory.

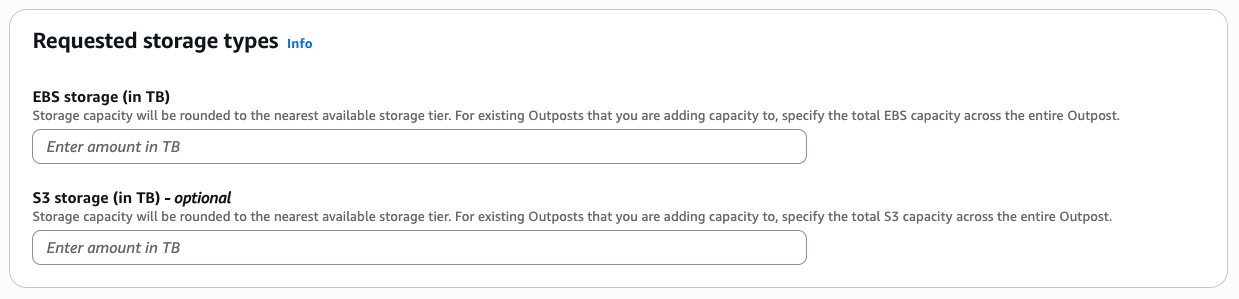
- Specify your storage requirements:
- Amazon Elastic Block Store (Amazon EBS) storage (in TB): Required for new Outposts. Provides persistent block storage for your EC2 instances.
- Amazon Simple Storage Service (Amazon S3) storage (in TB): Optional. Adds Amazon S3 on Outposts capacity for local object storage.
Storage is provisioned in fixed tiers. Your requested amount is rounded up to the nearest supported tier.
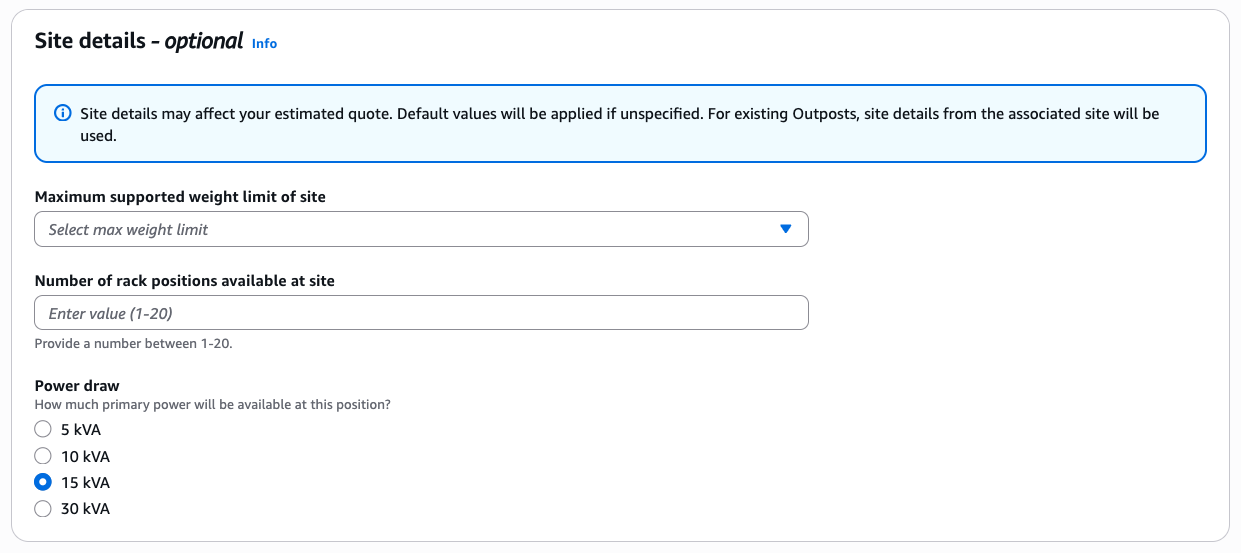
- Optionally provide site details. Although these do not affect cost estimates, they help confirm the recommended configuration fits your facility:
- Maximum supported weight limit: The maximum weight (in pounds) your site’s floor can safely support for a single rack. Check your floor’s load rating with your facilities team.
- Number of rack positions available: Count the empty available floor positions at your site, see first-generation Outposts racks and second-generation Outposts racks site requirements for exact space needed.
- Power draw: The maximum power (in kVA) your site can supply to a single rack. Check the capacity of your circuit breakers or power distribution units (PDUs).
Although site details are optional for quotes, full site information (including operating address, shipping address, and rack physical properties) is required to place your order.
- Choose Get Quote. The tool generates a detailed quote containing the following:
- Recommended rack configurations showing what your setup looks like.
- Cost estimates across all available payment options (All Upfront, No Upfront, Partial Upfront).
- Selectable term lengths (1, 3, or 5 years).
- A summary of the inputs you provided.
For capacity addition quotes, cost estimates are prorated to align with the remaining term of your current Outpost commitment, so you only pay for the remaining period.
- Review your quote and choose Download a PDF to create a shareable summary for stakeholders.
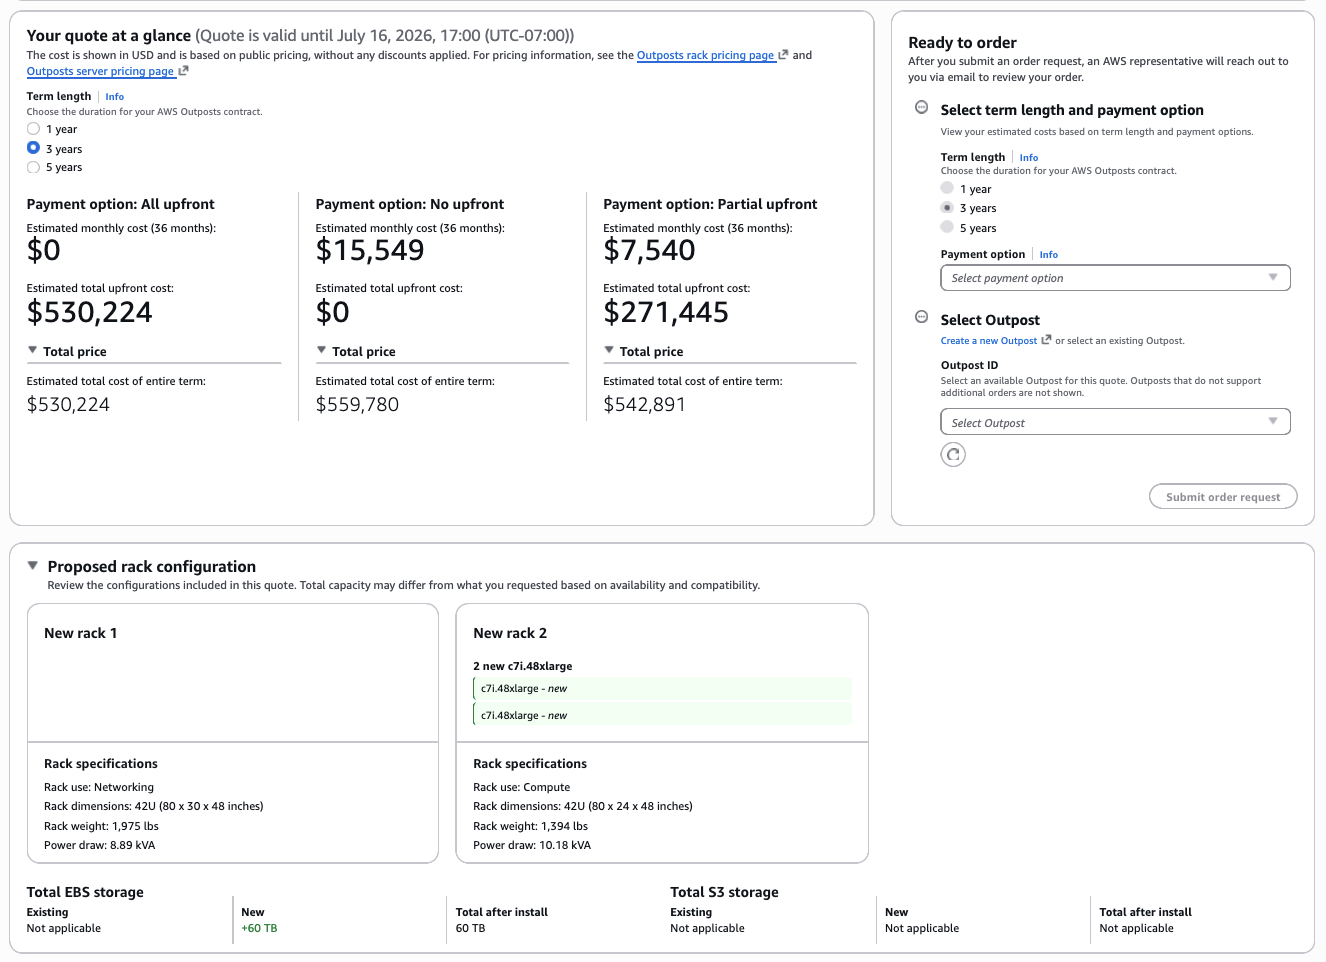
You can save multiple quotes, compare configurations, and revisit them later. If a quote expires after 30 days, use the Refresh quote button to populate a new form with your previous selections and receive updated cost estimates. You can also edit existing quotes directly from the console.
Placing an order
Once you have reviewed your quote, you can convert it to an active order. Once you have placed an order, order details cannot be modified. Before placing an order, verify you have:
- An Outpost created with an associated site.
- An active AWS Enterprise Support or AWS Unified Operations plan.
- Full site details including operating address, shipping address, and rack physical properties.
To place your order, follow these steps:
- Navigate to your quote in the AWS Outposts console and choose Place order.
- Select your payment terms (term length and payment option).
- If your quote was created with only a country selected, select an Outpost before proceeding.
- Resolve any issues flagged by validation (incomplete site details, unsupported configurations, or account requirements).
- Confirm your order. You receive an order confirmation email with next steps.
AWS Outposts follows the Shared Responsibility Model. AWS secures the underlying infrastructure, while you are responsible for securing your workloads, OS, network configuration and, additionally, the physical location of the Outpost. After placing your order, an AWS team will finalize site preparation requirements, schedule a site assessment, coordinate installation, and complete any regional compliance requirements. Once validated, your Outpost is manufactured, delivered, and installed by an AWS technician who coordinates with onsite resources who power on the rack, perform activation, and validate encrypted connectivity to the AWS Region. For details on how Outposts communicates securely with the parent Region, see Security in AWS Outposts.
Outpost subscription details
When you order an Outpost, you commit to a subscription term of 1, 3, or 5 years. Your chosen payment option determines the monthly payments for the duration of the term. Tracking subscription end dates is essential for planning ahead, whether that means renewing, adding capacity, or decommissioning at end of term.
Previously, viewing this information required contacting AWS. Subscription details are now available directly in the AWS Outposts console and programmatically through the AWS CLI or Outposts API. The information includes subscription start and end dates, payment terms, upfront costs, and monthly charges. If you have added capacity to your Outpost during the term, you see multiple subscriptions with individual pricing for each. Because subscription and pricing details might be sensitive, you can use IAM policies to restrict access to GetOutpostBillingInformation.
Viewing subscription details in the AWS Outposts console
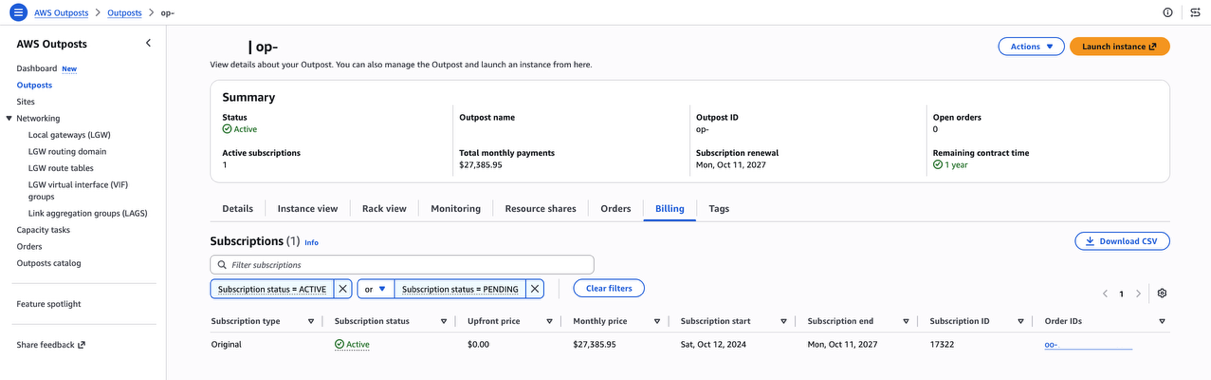
Open the AWS Outposts console, select Outposts from the left navigation pane, then choose the Outpost you want to inspect.
The summary page shows your renewal date, total monthly payments, and remaining contract time.
For detailed billing information, select the Billing tab. You can filter subscriptions by status (Active, Pending) and download the data as a CSV file.
Viewing subscription details through the AWS CLI
You might prefer using the AWS CLI or Outposts API for viewing subscription data. To support this, a new CLI and API action is available: get-outpost-billing-information / GetOutpostBillingInformation.
For example, to request billing information for a single Outpost with ID op-1234567890abcdefg, run the following command:
By default, the resulting output is in JSON format and includes all the information visible in the AWS Outposts console:
Self-service renewal and decommissioning
At end of term, you no longer need to open a support case. New self-service workflows guide you through the renewal or decommission of your Outpost directly in the AWS Outposts console.
Renewing your Outpost
You can initiate a renewal after your subscription is within 3 months of the end date by following this process:
- Open the AWS Outposts console and select Outposts from the left navigation pane.
- Select the Outpost you want to renew, choose Actions, then choose Renew Outpost.
- Review your current contract terms. Select a new term length (1, 3, or 5 years) and payment option. These do not need to match your original contract.
- Choose Review to see a summary including any upfront charges that are applied immediately and when monthly charges will begin.
- Choose Submit to confirm the renewal.
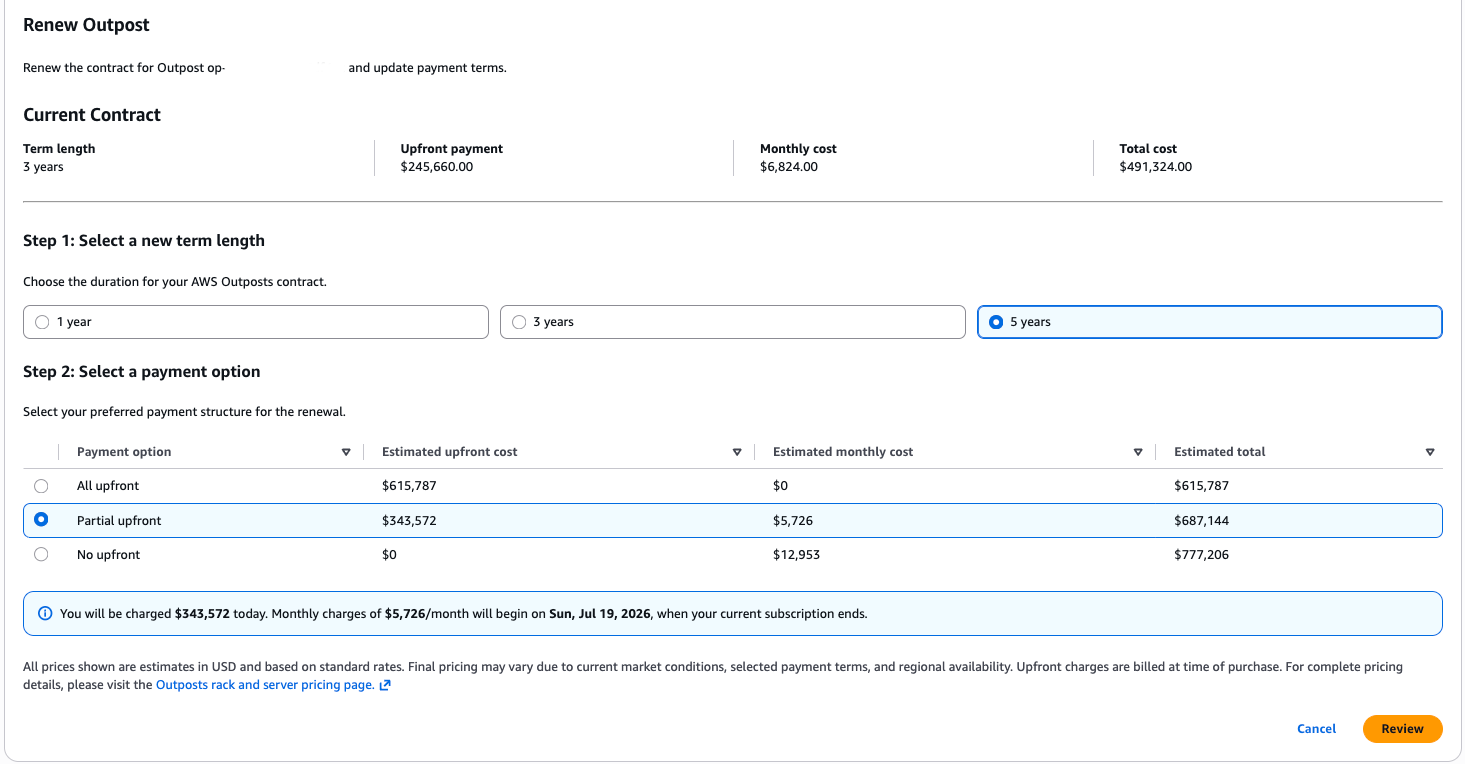
After submission, the renewal appears in the Billing tab with a subscription type of Renewal. If you select all upfront or partial upfront, the upfront payment is charged at the point of submission. Monthly charges begin on the renewal start date shown during the review step.
Decommissioning your Outpost
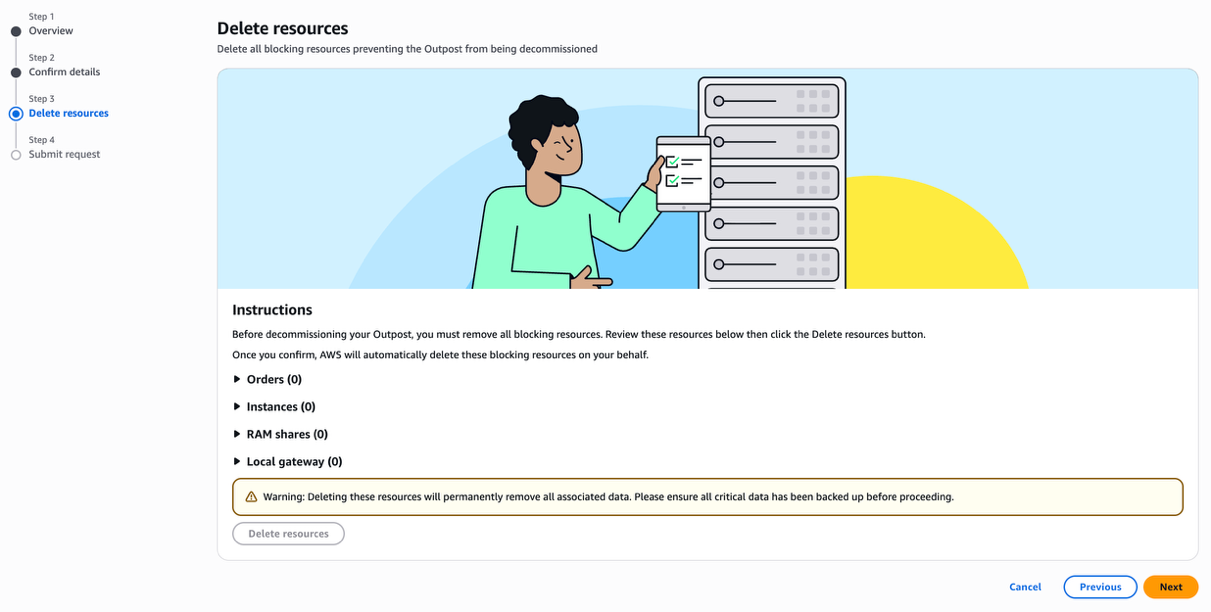
Unlike renewals, you can choose to decommission your Outpost at any point during the term. To decommission through the console, follow these steps:
- Open the AWS Outposts console and select Outposts from the left navigation pane.
- Select the Outpost you want to decommission, choose Actions, then choose Decommission Outpost.
- Review the process overview explaining the steps that are taken, then choose Next.
- Confirm the Outpost ID and installed location.
- Review active resources running on the Outpost in your account (EC2 instances, AWS Resource Access Manager (AWS RAM) shares, virtual interfaces). Choose Delete Resources to have AWS automatically remove them, or delete them manually and return to the workflow. Before decommissioning, we recommend creating Amazon EBS snapshots of any volumes you want to retain. Snapshots are stored in the parent Region and remain encrypted with the same AWS Key Management Service (AWS KMS) key. If you choose to automatically remove resources, AWS does not take any snapshots of data stored, and no resources can be recovered after removal.
- After all resources are removed, review the final summary and choose Submit Request.
Decommissioning does not cancel outstanding subscription charges. You remain responsible for any remaining payments. Month-to-month charges are not prorated and are always charged for a full month. To avoid additional charges, submit your decommissioning request at least 5 days before your next billing date.
Considerations
These new features let you build, quote, and order configurations without involving AWS teams. Consider the following factors when you use these tools:
Planning and sizing
- Capacity planning: Provision at least N+1 hosts for each instance family to protect against host failure. Your resilience requirements might dictate additional spare capacity.
- Minimum configurations: All quotes are subject to minimum requirements that vary by type:
- New first-generation rack orders: minimum 4 compute hosts without Amazon EBS capacity, or 2 compute hosts with Amazon EBS capacity.
- New second-generation rack orders: minimum compute capacity of 960 vCPUs.
- Capacity additions: minimum 3 compute hosts or any storage tier increase.
- Generation compatibility: Outposts hardware cannot be mixed between Outposts generations. For example, C7i or M8i capacity cannot be added to a first-generation Outpost.
- Storage tiers: Amazon EBS and Amazon S3 are provisioned in fixed step tiers. Your requested amount is rounded up to the nearest supported tier.
Quoting and ordering
- Quote validity: Quotes expire after 30 days and must be refreshed. Use the Refresh quote button to quickly regenerate with current cost estimates.
- Capacity addition requirements: Your Outpost must have a valid subscription with at least 30 days remaining. Month-to-month subscriptions cannot have additional capacity provided and must be renewed to a valid term of 1, 3, or 5 years.
- Enterprise Support required: An active AWS Enterprise Support or AWS Unified Operations plan is required to place an order.
Operational limits
- Capacity reduction: Reducing Amazon EBS or Amazon S3 storage, or decommissioning individual compute hosts within an Outpost, is not supported.
- Decommissioning: When you use automatic resource deletion as part of the decommissioning workflow, AWS does not take snapshots or backups of any data. After resources are removed, they cannot be recovered. Verify that you back up your data and transfer it off the Outpost before removing resources.
Conclusion
In this post, we introduced new self-service capabilities for managing the full AWS Outposts lifecycle: configuration and quoting, subscription visibility, and end-of-term renewal and decommissioning. These capabilities reduce the time and coordination previously required, giving you direct control over your Outposts from evaluation through end of term. These tools are available now in all commercial AWS Regions that support AWS Outposts. To learn more, see the AWS Outposts documentation. To get started, open the AWS Outposts console.
To discuss Outposts with an expert on any of these topics, submit this contact form.