Tag Archives: Engineering

How we make AI coding more cost efficient without sacrificing task quality

Post Syndicated from Erik Kristensen original https://github.blog/ai-and-ml/github-copilot/how-we-make-ai-coding-more-cost-efficient-without-sacrificing-task-quality/


Output quality is important when working with AI coding agents, but true efficiency comes from getting work done quickly, efficiently, and with the right context.

That’s why token count of individual interactions alone isn’t a meaningful measure of efficiency. The goal shouldn’t be to use fewer tokens, but to tap into the right amount of context to move a task forward. A concise tool response can sometimes require additional calls or work if it leaves out information the agent needs, ultimately making the task slower and more expensive.

That’s why we want to optimize for the outcome rather than the tool call. This post examines four changes in GitHub Copilot that put that principle into practice:

  • Preserve useful context while reducing repetitive output.
  • Remove formatting that adds no value to the task.
  • Shorten instructions without changing useful behavior.
  • Deliver completed background work without an extra retrieval step.

Possible changes were evaluated offline using agentic coding benchmarks. The most promising changes were then validated through controlled online experiments before shipping. The examples in this post come from GitHub Copilot CLI. Multiple other Copilot products, such as the GitHub Copilot app and Copilot code review, use the same underlying harness and also become more efficient through these improvements.

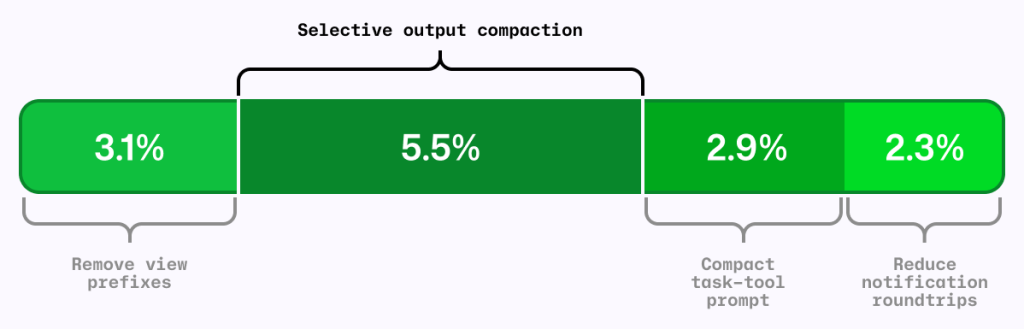
Chart showing 3.1% 'Remove view previxes', 5.5% 'Selective output compaction', 2.9% 'Compact task-tool prompt', and 2.3% 'Reduce notification roundtrips'.
Figure 1: Four independent A/B experiments using the same AI-credit metric. The segments are shown together for comparison; their effects are not necessarily strictly additive. 

The local metric trap

It’s common to shorten the output from each tool call as a way to reduce agent costs. RTK (Rust Token Killer) is a utility that shortens shell output before an agent reads it. We evaluated its effect on GitHub Copilot using our agentic coding benchmarks.

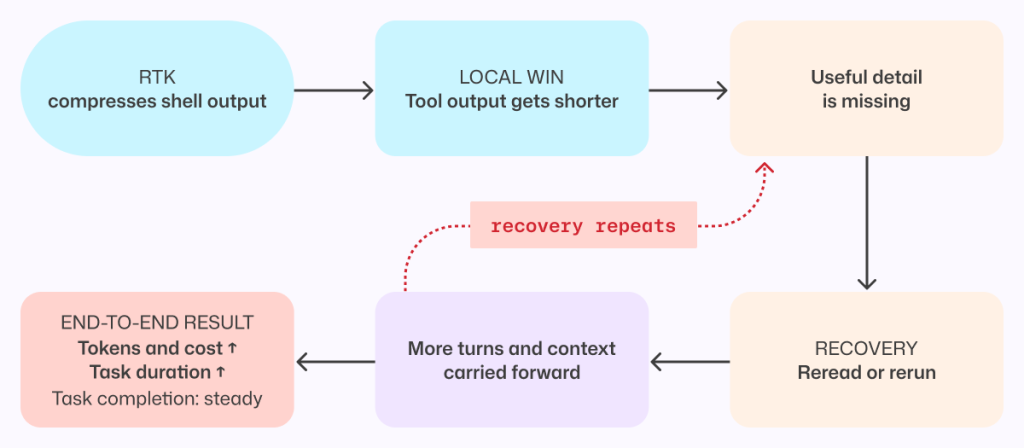
In our harness and benchmark configuration, RTK shortened some responses, but when the omitted text mattered, the model sometimes reopened the original output or reran the command to recover what it needed.

Those recovery steps added turns and carried more context forward. The individual tool response was shorter, but on average, the task used more tokens and took longer. We saved tokens locally and spent more globally.

Flow chart showing: RTK, compresses shell output > Local win, tool output gets shorter > Useful detail is missing > Recovery, reread or rerun > More turns and context carried forward. Then the option of finishing at 'End-to-end result, Tokens and cost up, Task duration up, Task completion: steady,' or 'Recovery repeats' going back to 'useful detail is missing'.
Figure 2: A shorter tool response can make the completed task more expensive when missing details force the agent to reread output, rerun commands, and carry more context forward. 

This result applies to the integration and workloads we tested, not to every RTK configuration or to output compression in general. This meant that tokens per tool call is the wrong objective. An efficiency change has to be evaluated across the complete task, from the user’s request through the final result.

More useful was to look at what can we remove without making the model repeat work.

Compress noise, preserve useful information

The goal was to shorten repetitive output while preserving the context an agent needs to complete its task without retracing steps.

Analysis of benchmark runs showed that install, build, test, and lint output often contains repetitive noise, while source-like output and arbitrary command results are more likely to contain the information an agent needs. That analysis informed a selective output compressor, informed in part by RTK and similar approaches.

The prototype was evaluated on agentic coding benchmarks and a range of open source repositories, exercising their build, test, and lint systems.

Early versions were too aggressive. They made the model repeat work or read the full saved output, increasing end-to-end cost and reducing task success. For example, we initially compressed git diff but removed that filter after benchmark tasks showed agents reopening the original output to recover missing information.

Those early failures led to a three-part policy:

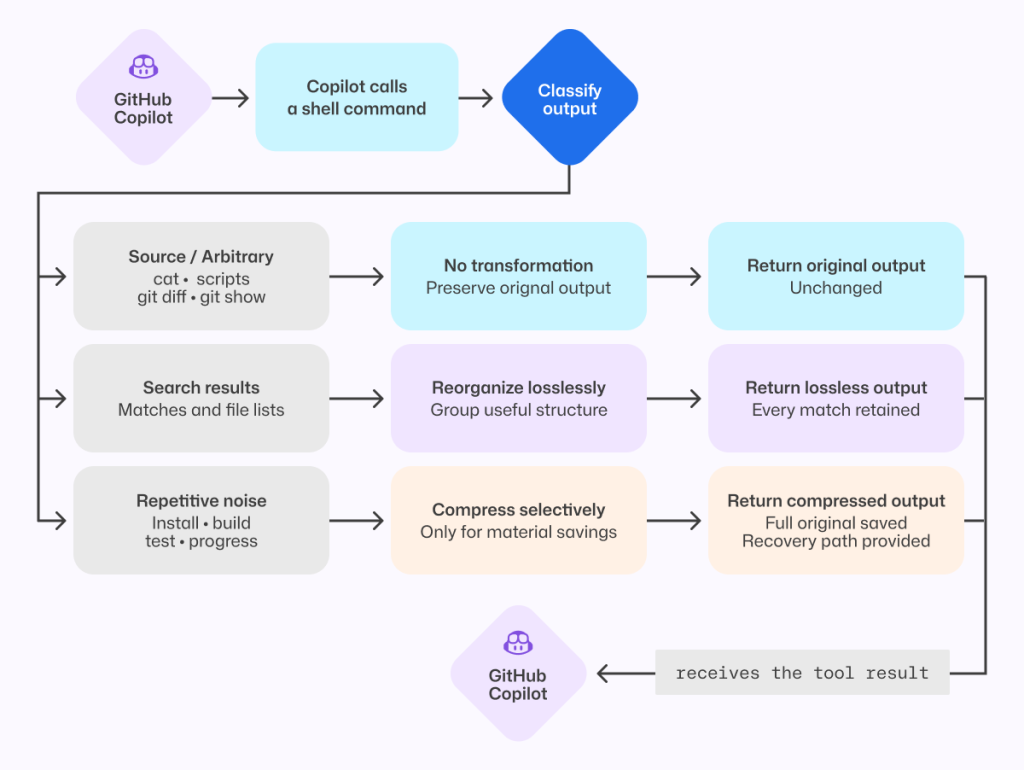
  1. Preserve source-like and arbitrary output. Commands such as cat, git diff, git show, and arbitrary scripts are returned unchanged.
  2. Reorganize search results without dropping content. Matches and file lists from tools such as grep can be grouped more efficiently while retaining every result.
  3. Compress repetitive noise selectively. Install, build, test, and progress output is compressed only when the savings are substantial.

The shipped version emerged through repeated evaluation and refinement. It is conservative not because the goal was to build a conservative compressor, but because that is what the evaluations supported.

When output is compressed, the agent can still retrieve the complete original through a direct recovery path.

Flowchart showing how GitHub Copilot handles shell-command output. Copilot calls a shell command, classifies the output, then chooses one of three paths: keep arbitrary/source output unchanged, reorganize search results without losing any matches, or selectively compress repetitive noise (like install/build/test logs) while preserving full output and providing a recovery path. The processed result is returned to Copilot.
Figure 3: The shipped compressor preserves source-like output, reorganizes search results without loss, and compresses only predictable repetitive noise while retaining the full original.

That recovery path is both a safety mechanism and an evaluation signal. We tracked whether the agent opened the saved original, reran commands, repeated exploration, narrowed its searches, or took additional turns. Frequent recovery would indicate that the compressor had removed something valuable.

On offline tasks where output compression triggered, no statistically significant task-success regression was detected, and agents extremely rarely opened the saved originals. In the online experiment, average cost decreased slightly with no material regression detected in the tracked quality metrics.

Remove formatting before removing information

One clean token optimization came from the view tool, which agents use to read file contents into context.

Previously, view prefixed every line with a number before showing the contents to the model. Earlier file-editing tools used those numbers to target changes, but current tools instead match surrounding code and do not use line numbers. The line-number prefixes remained even though the normal workflow no longer used them.

Each prefix was small. Repeated across every line and every file read, however, that unused formatting accumulated throughout a session. So, we removed it.

Before-and-after image of code snippets. The line-number prefixes re removed from the 'After' image.
Figure 4: Removing line-number prefixes preserves the source exactly while eliminating formatting that was repeated across every file read.

Line numbers remain useful in diffs and short snippets. They were wasteful here because they were attached to every file read without serving the current editing workflow.

Removing them caused model-inference cost to fall by roughly 5% in offline agentic coding benchmarks. Success rates stayed within the expected run-to-run variance, and edit failures did not increase.

We then tested the change with Copilot CLI users. The online experiment reduced average daily model-inference cost per user by about 3%, with no material regression detected in the quality or satisfaction metrics we tracked.

For developers, that means more of the context window is available for the work itself rather than formatting the agent does not use.

This was the ideal change: no new instructions for the model, no source of information to recover, and no additional decision to make. The file contents reached the model unchanged.

Compress prompts without compressing intent

Prompts carry instructions that shape how an agent works, and they are sent to the model on every turn. Shortening them only improves efficiency if the agent keeps the behaviors developers depend on.

In GitHub Copilot, the task tool launches specialized agents for parallel work. Its guidance had accumulated across tool descriptions, schemas, agent definitions, system instructions, and companion tools.

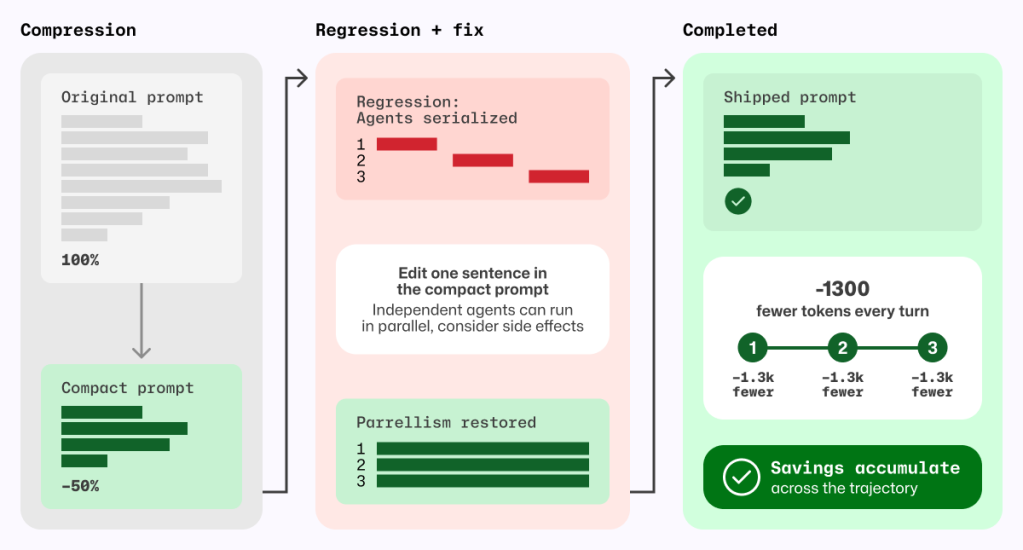
A meta-prompting loop, in which Copilot iteratively wrote its own prompt, reduced that prompt by roughly half. Copilot produced and refined smaller candidates, and targeted behavioral tests checked the requirements we wanted to preserve.

The first online experiment found a regression that the initial offline evaluations had missed. The meta-prompting loop had rewritten cautious parallelism guidance into a hard scheduling policy, causing independent custom agents to run sequentially.

We stopped the experiment. Before changing the prompt again, we wrote a regression evaluation for the behavior users had exposed. The eventual fix replaced an explicit allowlist and denylist with one sentence:

Independent agents can run in parallel; consider side effects.

That sentence was shorter and less restrictive; it deferred the choice of whether to run sub-agents in parallel to the model instead of the previous explicit guidance. With it, our new behavior test passed without causing any existing behavioral tests to fail.

Prompt behavior needs tests. If a behavior is not tested, a shorter prompt can remove it without anyone noticing. 

Three-stage diagram labeled Compression → Regression + fix → Completed. Left panel shows an original prompt compressed by about 50%. Middle panel highlights a regression where agents became serialized, then a fix by editing one sentence to restore parallelism. Right panel shows final shipped prompt with restored behavior and cumulative savings of about 1,300 fewer tokens per turn across steps.
Figure 5 Prompt compression became safe only after a regression test exposed serialized agents and a one-sentence fix restored parallelism; the resulting token savings recur on every model turn.

The shipped prompt removes about 1,300 task-tool prompt tokens per turn, corresponding to approximately 1.8% fewer total prompt tokens per session and 2.9% lower normalized cost per active hour, with no quality regression detected in the measured evaluations.

Deliver completed background work without an extra retrieval turn

Agents often run independent work in the background, such as a long-running shell command alongside a sub-agent investigation. Notifications let the agent continue until that work is ready without spending a tool call waiting.

If the agent does not explicitly wait for either task, the harness wakes the model and notifies it when the shell command or sub-agent finishes.

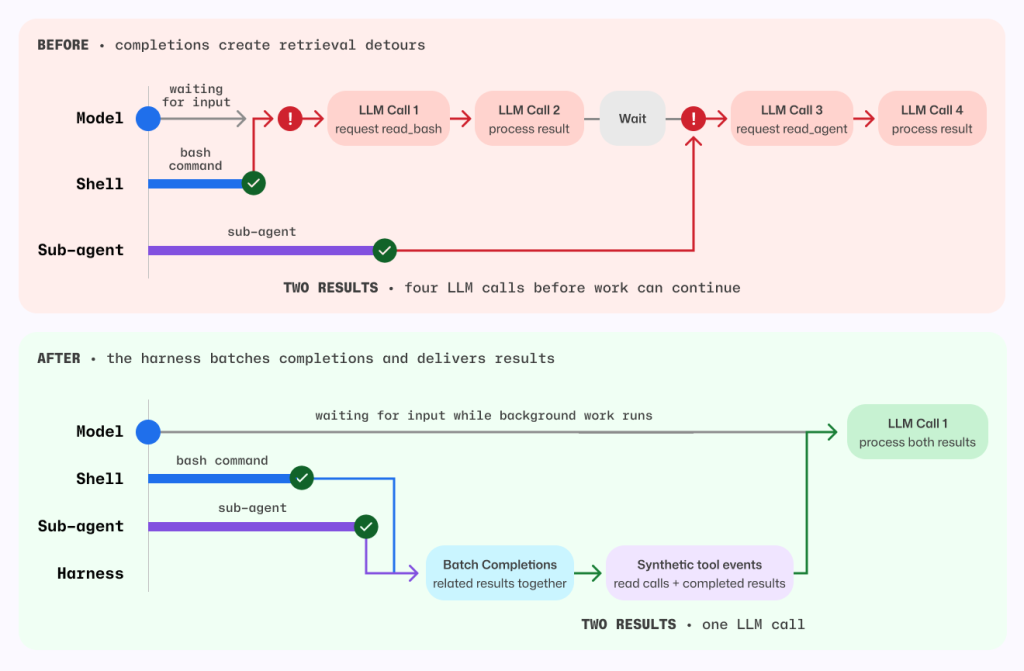
Previously, that notification did not include the completed result, so the agent had to spend another turn retrieving output Copilot had already received. When several tasks finished close together, that detour could repeat. Copilot now batches eligible completion notifications and delivers completed results directly in the existing tool-result format. The agent can continue with the information it needs, without spending an extra turn asking for it again. Explicit reads for work that is still running behave as before.

Before-and-after sequence diagram comparing orchestration behavior.

Before: model waits on separate shell and sub-agent completions, causing retrieval detours and four LLM calls to process two results.
After: a harness batches related completions and emits synthetic tool events so background work continues while waiting; both results are processed together in a single LLM call.
The visual emphasizes reduced latency and fewer model round trips.
Figure 6 Before, each background completion could wake a retrieval-only model turn. After, the harness batches eligible completions and delivers completed results in the existing tool-result format.

Before this change, each completed task required one model call to request its result and another to process it. For the shell command and sub-agent shown above, that meant four model calls before work could continue.

Now, the harness batches both completions and supplies their results together, so a single model call can process both. Removing those retrieval detours also avoids carrying the full session context through unnecessary calls.

By delivering completed results directly, without compressing, summarizing, or withholding anything, the harness reduced average token-related usage, as measured in AI Credits, by about 2.3%.

Measure changes in context

A change that saves tokens in one Copilot workflow can increase costs in another.

For example, a tighter set of file-tool instructions was inspired by positive results in Copilot code review. In a Copilot CLI online experiment, it increased cost, so we did not ship it.

By contrast, removing line-number prefixes and selectively compressing output each reduced average prompt tokens per review by roughly 5% in independent evaluations across a large set of Copilot code review tasks using the production model. We detected no material change in the tracked review-quality metrics.

These findings are separate from the earlier migration of Copilot code review to the shared file tools, which, together with review-instruction tuning, reduced code review cost by about 20%.

Each change needs to be measured in the workflow where it runs.

Five lessons for building efficient AI coding agents

  1. Optimize the completed task, not the tool call. Shorter output is not cheaper if the agent spends more turns recovering what was removed.
  2. Optimize orchestration, not just model output. Eliminate model turns that perform work the harness can complete deterministically.
  3. Compress by what the output represents. Preserve exact content, prefer lossless transformations, and measure how often agents use the recovery path.
  4. Prompt rewrites sometimes have unintended consequences. Validate that intended behavior is preserved.
  5. Evidence is local to the workload. Re-evaluate changes in offline benchmarks, online experiments, and every product surface where they ship.

None of these changes made the model smarter. They removed work the model never needed to do.

The changes described in this post are shipping across GitHub Copilot experiences that use the same underlying harness.

Bring agentic workflows to your terminal
with GitHub Copilot CLI >

The post How we make AI coding more cost efficient without sacrificing task quality appeared first on The GitHub Blog.

Data Mesh at Grab (Part III): Operationalizing data reliability with automated DPIs

Post Syndicated from Grab Tech original https://engineering.grab.com/data-mesh-at-grab-part-three

Introduction

In the first two parts of this series, we described how Grab approaches data mesh through the Signals Marketplace: a way for teams to publish, discover, and reuse trusted data products across domains. Part II introduced the foundational tools behind certification: Hubble for metadata and ownership, Genchi for data quality observability, and the Data Contract Registry for explicit producer-consumer guarantees.

Certification is the starting point for a trusted data marketplace. It gives downstream consumers confidence in an asset’s ownership, documentation, lineage, and quality controls. Certification does not eliminate runtime failure. A certified table can still arrive late. A certified metric can still be affected by a broken dependency. A certified Kafka stream can still violate a freshness expectation.

Keeping certified data products reliable in production requires more than defining standards upfront. Teams need a consistent way to detect failures, diagnose the root cause, fix the issue, and verify recovery. That is where Data Production Issues (DPIs) come in. At Grab, DPIs turn data quality signals into an operational workflow.

The DPI lifecycle

A good DPI should be clear enough to act on, and it should close automatically when the underlying condition recovers. From the beginning, we designed the DPI lifecycle to be automated, with minimal human-in-the-loop.

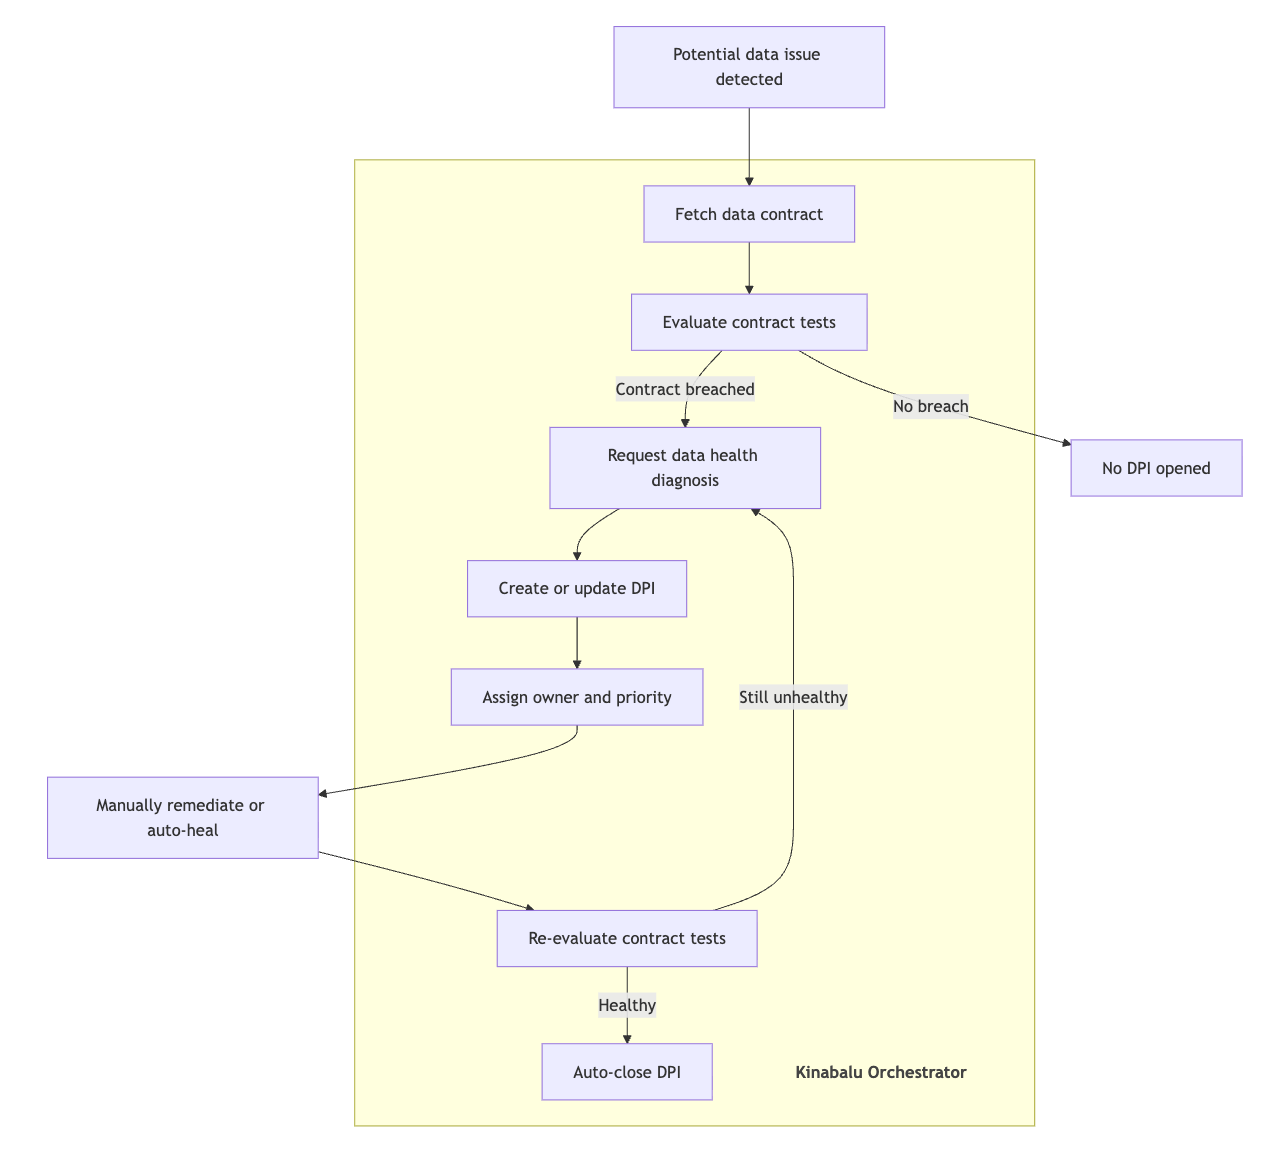
The lifecycle starts when Kinabalu, Grab’s incident orchestrator, observes that a data asset may no longer satisfy its contract. The contract captures the reliability expectations that matter for the asset, along with the health checks, exposed through Test Health application programming interfaces (APIs), that evaluate those expectations.

The orchestrator stays decoupled from platform internals. It does not need to know how each platform computes freshness, completeness, or other quality dimensions. It only needs to ask whether the relevant contract tests are healthy. If one or more contract tests are unhealthy, the contract is considered breached, and the DPI lifecycle begins.

Diagram of the automated Data Production Issue workflow from contract-test evaluation through triage, diagnosis, resolution, and close.
Figure 1. Automated DPI workflow.

Triaging DPIs: From alerts to confirmed contract breaches

Data platforms emit many alerts. An Airflow schedule may be delayed, a data quality test may fail, or a pipeline job may exit unexpectedly. These alerts are useful, but they are not automatically DPIs. Triage decides whether an alert represents a real contract breach for a data asset.

As introduced in Part II, a data contract is an explicit, versioned agreement between a data producer and its consumers. It outlines the data’s schema, freshness, completeness, and other semantic guarantees. These guarantees are codified and enforced through data quality tests in Genchi.

When the incident orchestrator evaluates contract tests, it distinguishes an individual test run result from the overall health of a test. A test run can pass or fail at a point in time, but the test itself may only be considered healthy after the underlying issue has been fully resolved. For example, consider a completeness test that checks whether the T-1 daily partition is complete. If the test failed two days ago but passed yesterday and today, the test may still be considered unhealthy until the partition from two days ago has been backfilled and verified as complete.

The orchestrator also deduplicates around the active unhealthy condition. If an asset already has an open DPI for the same breach, new signals update the existing DPI with additional context rather than creating parallel issues. DPIs that share the same underlying root cause can also be grouped. This keeps responders focused on solving the underlying issue rather than chasing a stream of repetitive alerts.

During triage, the workflow also gathers context for the DPI: affected asset, breached contract, unhealthy tests, data interval, and upstream and downstream dependencies. Not every alert becomes a DPI. Triage protects the operational workflow from noise by promoting only meaningful contract breaches into production issues.

Diagnosing DPIs: Assigning owners with root cause analysis (RCA)

Once a DPI is created, the system must answer why the data is unhealthy, who should fix it, and how.

Not every data issue should be assigned to the data asset owner. A data product may be unhealthy because of a platform incident, a failed producing job, or a delayed upstream dependency. Assigning every issue to the asset owner creates unnecessary handoffs and slows down resolution.

This is where the Data Health API matters. It answers the question: “What kind of failure made this asset unhealthy?” The Data Health API keeps the error taxonomy small:

  • UPSTREAM_ERROR: the asset is unhealthy because an upstream dependency is late, failed, or unavailable.
  • PLATFORM_ERROR: the asset is unhealthy because the underlying platform or infrastructure is impaired.
  • JOB_ERROR: the asset is unhealthy because the producing job or pipeline failed.
  • DATA_ERROR: the asset is unhealthy because the produced data violates quality expectations.

The taxonomy is not meant to replace platform-specific diagnostics. The high-level Data Health API gives the orchestrator just enough structure to assign DPIs and manage their lifecycle consistently. An ingestion platform, streaming platform, metrics platform, or machine learning (ML) platform can still maintain detailed internal error catalogs, logs, retry states, and debugging tools. Platforms remain free to evolve their internals, while the incident orchestrator consumes a stable API contract, so the DPI workflow can interoperate across heterogeneous systems.

A simplified Data Health API response might look like this:

Disclaimer: The fields in this API response are mock data generated for demonstration purposes and do not represent real operational metrics.

{
  "assetId": "urn:li:dataset:(urn:li:dataPlatform:hive,schema.table_A,PROD)",
  "healthStatus": "UNHEALTHY",
  "errorCategory": "UPSTREAM_ERROR",
  "context": {
    "upstreamAsset": "urn:li:dataset:(urn:li:dataPlatform:hive,schema.table_B,PROD)",
    "reason": "upstream data has not arrived for the expected data interval."
  },
  "lastCheckedAt": "2026-06-15T08:30:00Z"
}

From this response, the orchestrator can see that table_A is unhealthy because of an upstream dependency rather than a problem in the asset itself. It then traces the active DPI for the upstream asset and links the table_A DPI to that upstream issue. The downstream DPI can inherit the same owner as the upstream DPI, keeping related failures grouped under the team best positioned to resolve the root cause.

The DPI process works only when the issues it raises can be assigned and fixed. If DPIs are frequently noisy, duplicated, or difficult to act on, users will eventually learn to ignore them. Diagnostic accuracy matters because it keeps DPIs useful for the people who receive them. It also creates a forcing function for each data-producing platform to improve its diagnostics. To produce accurate RCA, platforms need to incorporate signals from their dependencies and surrounding systems, not just their own local failure state.

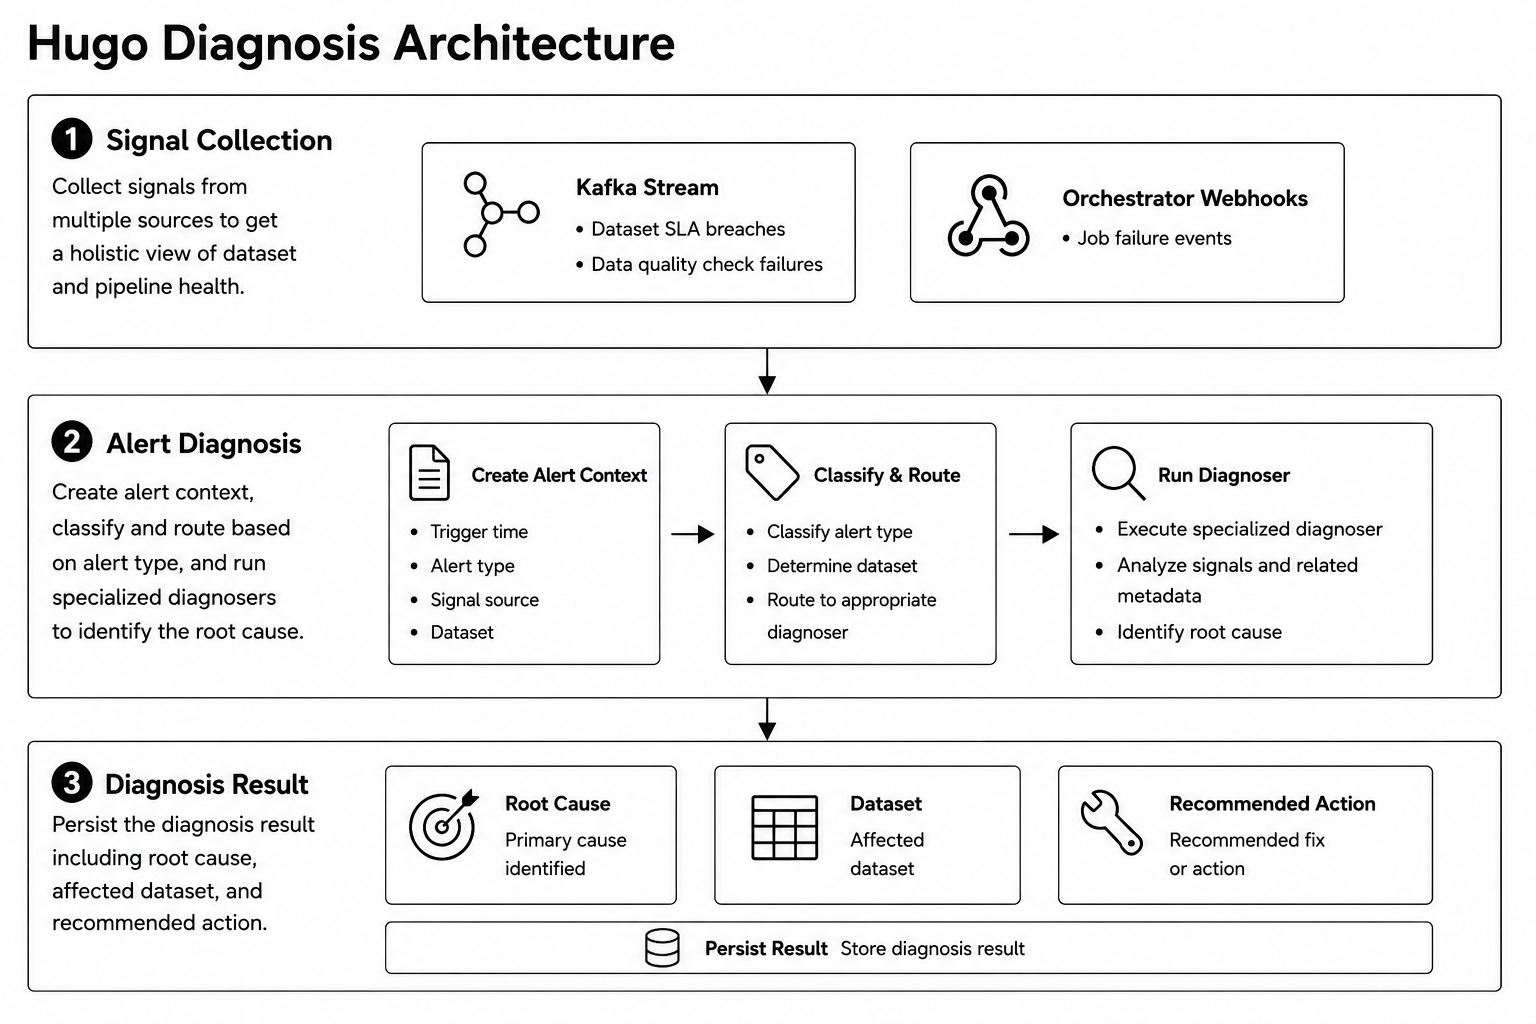
Grab operationalizes DPI diagnosis across its internal data platforms. Our ingestion platform, Hugo, is a primary example of this approach, as outlined in a previous tech blog. Hugo’s intelligent diagnosis architecture uses a three-layered system to automatically detect, analyze, and troubleshoot data pipeline failures within its domain, as shown in Figure 2.

Diagram of Hugo's three-stage diagnosis architecture: signal collection, alert diagnosis, and diagnosis result.
Figure 2. Hugo diagnosis architecture.

Modern data platforms generate alerts from many independent systems. Individually, these signals show only a partial view of a dataset. Hugo consolidates platform-specific signals into a unified diagnostic workflow to pinpoint root causes and recommend pipeline remediations. The diagnosis architecture consists of three stages:

  1. Signal collection collects events from multiple signal sources to build a full view of the dataset and pipeline health.
  2. Alert diagnosis creates a structured alert context, classifies the alert, routes it to the appropriate diagnoser, and identifies the root cause using specialized diagnosis logic.
  3. Diagnosis result persists the structured diagnosis output, including the identified root cause, affected dataset, and recommended fix or action.

For example, when a dataset fails, the workflow orchestrator notifies Hugo with a job failure event. Hugo then routes the alert to its internal diagnostic layer to check for conditions such as upstream database replica lag, storing both the diagnosis and recommended fix alongside the affected dataset.

Decoupling signal ingestion, diagnosis, and result management makes it straightforward to add new signal sources and specialized diagnosers. Immediate RCA removes the need for manual log inspection, which shortens remediation and feeds directly into automated resolution workflows.

Resolving DPIs: Auto-healing first, human judgment when needed

After triage and RCA, the final stage of the DPI lifecycle is resolution. The lifetime of a DPI is a proxy for data downtime: it begins when a contract breach is detected and ends when the affected dataset becomes healthy again. Reducing that window requires more than identifying the correct issue. It also depends on recovering safely and consistently from recurring failure modes.

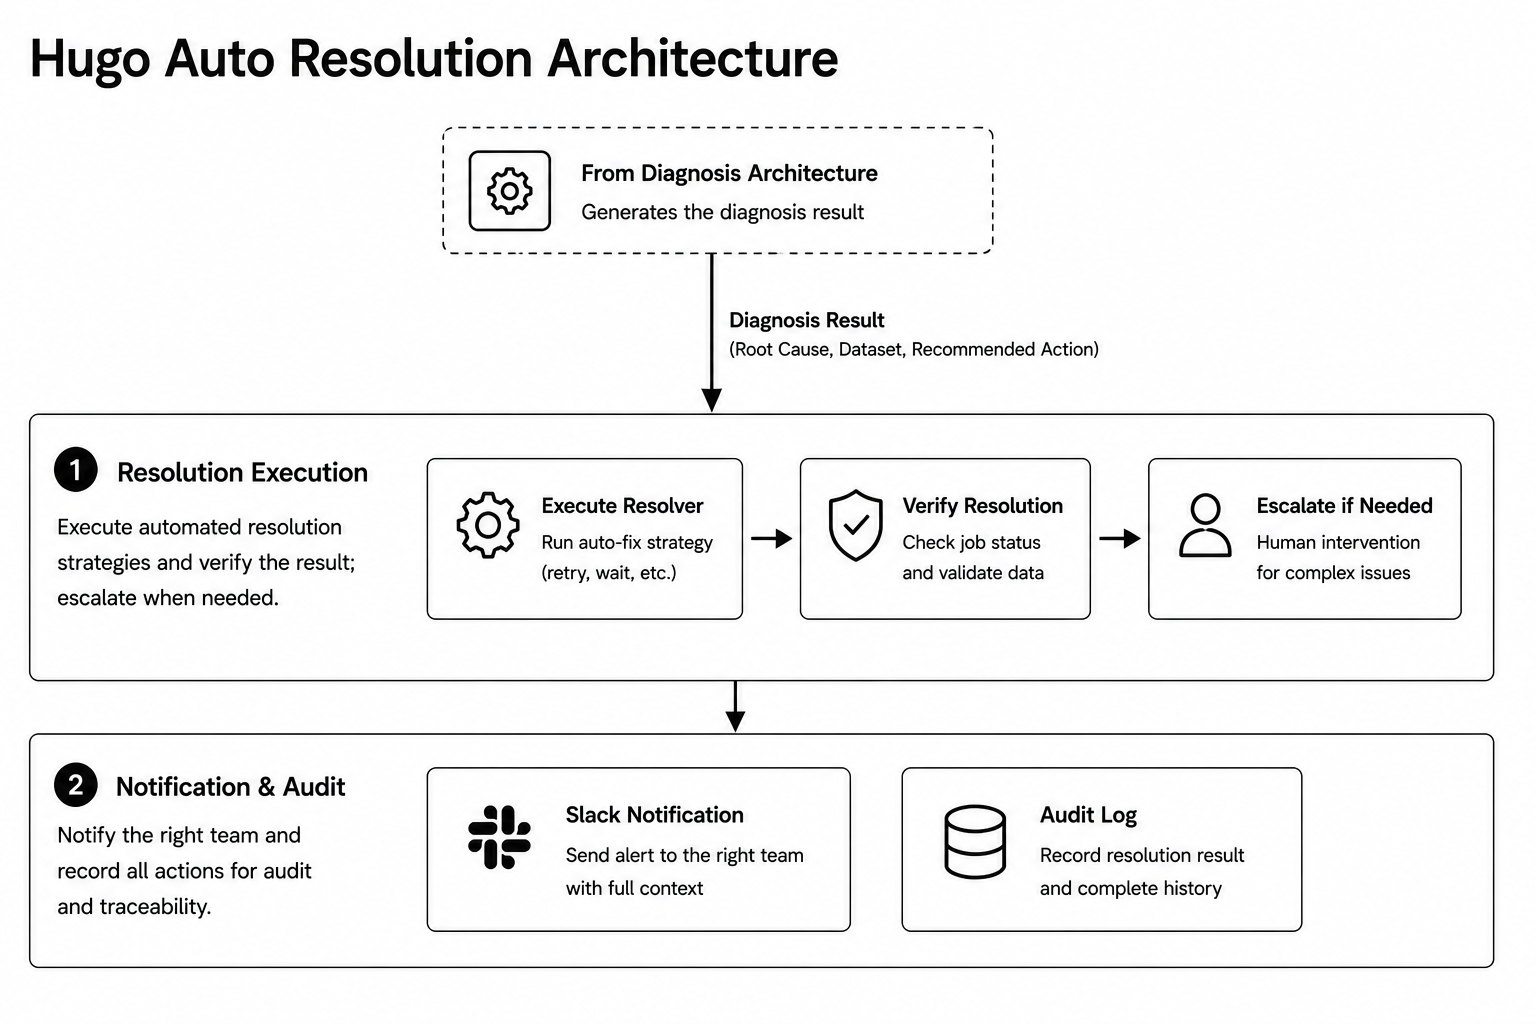
Many incidents are routine and recoverable, such as transient compute interruptions, database connection timeouts, S3 throttling, or upstream pipelines that are delayed rather than permanently broken. Instead of relying on manual intervention for every incident, Hugo automates recovery for these well-understood failure patterns. Once the diagnosis workflow identifies the root cause, it produces a structured diagnosis result containing the affected dataset, the root cause, and the recommended resolution strategy. The auto-resolution workflow then consumes this result to execute the appropriate remediation automatically. Figure 3 shows Hugo’s auto-resolution architecture in two stages.

Diagram of Hugo's auto-resolution architecture, covering resolution execution plus notification and audit.
Figure 3. Hugo auto-resolution architecture.
  1. Resolution execution applies the recommended resolution strategy, such as retrying a failed job, waiting for an upstream dependency, or executing a custom resolver. After the action completes, the system verifies both pipeline health and data correctness to confirm the issue has been fully resolved. If a failure cannot be resolved safely through automation, such as in cases of data corruption, invalid records, or application code defects, the workflow escalates the incident for human intervention.

  2. Notification and audit records every resolution attempt and its outcome, while notifying the appropriate engineering teams. That record supports operational analysis, auditing, and later improvements to resolution policies.

For example, a dataset may miss its freshness Service Level Agreement (SLA) because the workflow orchestrator becomes temporarily unresponsive and fails to submit the scheduled ingestion job. The diagnosis workflow identifies the incident as a pipeline execution failure and recommends a retry strategy. Hugo automatically retries the job, verifies that the pipeline completes and data health is restored, then logs the recovery and notifies the responsible team. This end-to-end process, from incident detection to resolution, runs automatically without manual intervention.

Hugo closes the loop between detection, diagnosis, and recovery. Rather than stopping at identification, the platform turns diagnosis results into targeted remediation, so routine operational issues can be resolved automatically while preserving human oversight for complex or high-risk incidents. Separating diagnosis from execution also lets new diagnosis capabilities and resolution strategies evolve independently without changing the overall architecture.

The impact is already evident in production. 86.9% of DPI incidents were automatically resolved, significantly reducing manual operational effort. By automating routine recoveries, engineers spend less time performing repetitive operational tasks and more time building new platform capabilities, while overall data downtime is significantly reduced.

Conclusion

Certified data products still need to prove their reliability in production. Freshness delays, upstream failures, platform incidents, and data quality violations can all break consumer trust, even when an asset has already met certification standards.

Automated DPIs are the operating model for managing these failures. By turning contract breaches into structured production issues, the DPI lifecycle makes data reliability operational: triage separates real breaches from alert noise, diagnosis identifies the likely failure domain, ownership routing reduces handoffs, and resolution closes the loop through auto-healing or human intervention when needed.

The most important outcome is not simply that issues are detected faster. It is that data downtime becomes visible, measurable, and reducible. With every DPI tracked from detection to recovery, teams can understand where time is spent, which failure modes repeat, and where automation can safely reduce operational toil. To date, more than 95% of DPIs are raised automatically rather than by humans, with a mean time to resolve (MTTR) that is 6 times faster for automated DPIs than for manually raised ones.

For Grab, this shifts data reliability from reactive firefighting to a managed production workflow. Automated DPIs help keep trusted data products trustworthy after certification, so downstream teams can depend on them with greater confidence.

What’s next

Across the three-blog series, the story is how Grab turns data mesh from an operating principle into an artificial intelligence (AI)-ready foundation for the company.

  • Part I: Building trust through certification. Grab needed the Signals Marketplace because the business had scaled across mobility, deliveries, financial services, and many data-producing domains. The old model of relying on a central Data Engineering team could no longer keep up. Certification became the mechanism for making high-quality data products visible, reusable, and accountable. With clear ownership, data contracts, and measurable adoption, Grab moved more consumption toward trusted assets, reduced duplication, and created stronger incentives for teams to curate the data they publish.

  • Part II: The foundational tools behind certification. Trust becomes operational through platforms. Hubble covers discovery, lineage, ownership, and the certification engine. Genchi runs continuous data quality observability across freshness, completeness, schema, and business-rule checks. The Data Contract Registry formalizes producer-consumer expectations as versioned, enforceable contracts. Combined, these systems keep data certification an actively maintained standard rather than a static label.

  • Part III: Operationalizing data reliability with automated DPIs. Certification tells consumers which data products should be trusted; DPIs keep that trust true in production. Kinabalu evaluates contract breaches, deduplicates noisy alerts, assigns ownership, and tracks recovery. Data Health APIs make RCA portable across platforms, while Hugo’s diagnosis and auto-resolution patterns show how common failures can be remediated faster and with less operational toil. The result is a measurable reduction in time to resolve and a stronger feedback loop back into certification.

The bigger takeaway is that Grab’s data moat is not just the volume of data we have. It is the system that makes our data trustworthy, discoverable, reusable, and continuously reliable. This foundation is what lets us embrace the agentic world: AI agents can search certified assets, reason over contracts and lineage, trust quality signals, detect production issues, draft RCA, and eventually suggest or execute safe remediation. In that world, data reliability becomes a compounding advantage. The better our foundations are, the more confidently Grab can build agentic experiences on top of them.

We would like to thank all the data practitioners across Grab, including engineers and analysts to data scientists and product teams, who have invested in certification, contracts, and data quality to build a solid foundation for AI agents and AI-powered experiences. We are equally grateful for the unwavering sponsorship, strategic guidance, and hands-on support from our leadership (Mohan Krishnan and Nikhil Dwarakanath), without which this long-term data foundation initiative would not have been possible.

Join us

Grab is Southeast Asia’s leading superapp, serving over 900 cities across eight countries (Cambodia, Indonesia, Malaysia, Myanmar, the Philippines, Singapore, Thailand, and Vietnam). Through a single platform, millions of users access mobility, delivery, and digital financial services, including ride-hailing, food delivery, payments, lending, and digital banking via GXS Bank and GXBank. Founded in 2012, Grab’s mission is to drive Southeast Asia forward by creating economic empowerment for everyone while delivering sustainable financial performance and positive social impact.

Powered by technology and driven by heart, our mission is to drive Southeast Asia forward by creating economic empowerment for everyone. If this mission speaks to you, join our team today!

How we saved 100 terabytes of memory by optimizing 1.1.1.1’s DNS cache

Post Syndicated from Sebastiaan Neuteboom original https://blog.cloudflare.com/dns-cache-memory-optimization-1111/

Big Pineapple, the platform behind 1.1.1.1, Gateway DNS, DNS Firewall, AS112, and several other Cloudflare DNS services, stores over 250 billion DNS cache entries at any given time. At that scale, wasting a single byte per entry costs more than 250 gigabytes of memory across our fleet.

Five successive changes to how cache entries are stored in memory cut the per-entry footprint by over 50%. Across our fleet, these changes freed up roughly 100 terabytes of memory, equivalent to the amount of RAM in 130 of our Gen 13 servers. The cache also got faster. Insert throughput rose 43% and lookup latency dropped 19%, as fewer allocations and better memory locality meant we did not trade speed for space.

What we cache

On cold start, Big Pineapple starts out with an empty cache. As DNS queries arrive, the cache fills until it hits its maximum entry count, at which point we evict older or less popular items to make room.

The exact cache size varies by data center. When EDNS Client Subnet (ECS) is in use, authoritative servers return different answers depending on the client's network, so we cache multiple versions of the same query. This increases both the number of entries and the memory each one consumes, making the optimizations in this post especially impactful for ECS-heavy locations.

Each item in the cache is a key-value pair. The key identifies what was queried:

The value stores the DNS response itself: the answer, authority, and additional record sections, along with metadata like the creation time, a hit counter, and the Time-to-Live (TTL).

Both structs have room for improvement. Several fields use types that carry overhead we don't need once the entry is stored.

Benchmarking memory usage

To measure the impact of each change, we benchmark by filling the cache with randomly generated entries that roughly match the traffic distribution we see in production: 56% A records, 25% AAAA, and 19% TXT. Each entry contains between one and four records.

TXT records serve as a stand-in for all non-A/AAAA record types in the benchmark. Their size is randomized between 64 and 224 bytes, close to the average response size we see for variable-length record types.

We track memory usage using a custom allocator that wraps Rust’s System allocator and records the number and size of allocations per cache entry. Alongside memory, we measure insert throughput and lookup latency across the full cache flow to make sure memory savings don’t come at the cost of performance.

These inputs approximate production rather than reproduce it exactly. Process memory also depends on traffic mix, cache occupancy, allocator state, and memory used outside the cache. We therefore measured resident memory across production instances during the rollout.

The cost of capacity

Vec<T> stores three fields: a pointer to heap-allocated data, the current length, and the total capacity. When you push an item, Vec checks whether the length exceeds the capacity and reallocates if needed. If there’s room, it just appends the item and increments the length.

Once we store a DNS response in the cache, however, we never modify it again. The capacity field serves no purpose, but still costs 8 bytes per Vec. The over-allocated heap space is wasted as well, as a Vec with capacity for eight items but only five stored leaves three slots unused on the heap.

Using Box<[T]> solves both problems. It can’t grow after creation, so it doesn’t need a capacity field or reserve space for future elements. The same applies to String, which also carries a capacity field. Box<str> drops it.

Each cache entry stores 8 Vec and String fields. Replacing them with Box<[T]> and Box<str> saves 8 bytes per field, 64 bytes per entry. It also eliminates the excess heap memory that Vec reserves for future growth. The combined savings add up to over 15 terabytes with over 250 billion cache entries.

Fewer lists, fewer pointers

Rather than storing the answer, authority, and additional sections in separate lists, we can store a single list with offsets to the start of each section. Since DNS record counts per section fit in a u16, we can use a u16 (2 bytes) for each offset, compared to the 8-byte pointer and 8-byte length that each separate Box<[T]> requires.

This removes two lists, each with an 8-byte pointer and 8-byte length, and replaces them with two 2-byte offsets, saving 28 bytes per entry.

These savings do not always map directly to the number of bytes removed from individual fields. Rust inserts padding to satisfy alignment requirements and rounds a struct’s size up to a multiple of its alignment. Removing a small field can therefore eliminate additional padding. For example, we also packed several boolean fields into a single bitflag. This reduced the surrounding padding, causing the struct to shrink by more than the size of the individual booleans.

Dropping the owner

Each DNS record has an owner, the domain the record belongs to. In many cases, this owner is identical to the domain being queried. For example, a query for example.com A returns two records with the same owner:

But when a CNAME is involved, for example, the record owner can differ from the queried domain:

The DNS wire format handles repeated owners using name compression, as defined in RFC 1035. Rather than encoding the same domain twice, subsequent occurrences store a 2-byte pointer to the first occurrence. A domain like www.example.com can encode just www followed by a pointer to where example.com already appeared in the message.

This works well on the wire, but in our cache we store the full owner name alongside each record. Following compression pointers during cache lookups is expensive on the hot path, so we trade memory for speed.

Most records, however, have an owner identical to the queried domain. For those, we can drop the owner entirely and infer it at read time. When the owner differs, such as the A records behind a CNAME, we store the full name.

When owner is None, response construction restores the queried domain from the cache key, avoiding a heap allocation. This means the record is no longer self-contained, but the cache key is already available during every lookup. When the owner differs, Some stores a pointer to the full name on the heap.

In practice, most cached records have an owner identical to the queried domain, so the majority require no heap allocation for the owner field.

Enum sizing

Rust enums are sum types: each variant can carry different data, but the enum is always the size of its largest variant.

Option is either Some and holds a value, or None and holds nothing. Both variants take the same amount of memory. The enum stores a tag indicating the active variant, followed by space large enough for the largest variant’s data. When the variant is None, that space is unused.

For record data, it seems natural to store each DNS record type as an enum variant:

But the enum is always as large as its largest variant. In our case, that’s NAPTR at 136 bytes. It stores three variable-length text fields, a domain name, and two integers. As a result, the full enum, including the variant tag and padding, becomes 144 bytes.

An A record only needs 4 bytes, and an AAAA record needs 16 bytes. A and AAAA make up over 80% of our traffic, so most records waste over 120 bytes on padding. Since a single cache entry can store many records this quickly adds up.

Boxing the variants

To solve this problem, we can box the larger variants of the enum, moving them to a separate heap allocation. The enum then stores an 8-byte pointer to the heap, where the data takes up only the size it actually requires.

For A and AAAA records, this saves 120 bytes per record. Smaller variant types like TXT and CNAME also benefit. They still occupy the 24-byte enum, but their heap allocation is sized to their actual data rather than padded to 144 bytes. NAPTR, the largest variant, actually pays slightly more. It now adds the cost of a heap pointer and allocation overhead. But NAPTR records are rare in practice, so the tradeoff is worth it.

But boxing the larger record variants introduces costs of its own.

The costs of boxing

Boxing has two costs. The first is allocator overhead. Each boxed variant becomes a separate heap allocation, and allocators round up to the nearest size class. Big Pineapple uses jemalloc, an allocator designed for multithreaded, allocation-heavy workloads. jemalloc groups allocations of similar sizes into fixed-size bins. A TXT record requests 32 bytes and fits exactly into a 32-byte bin, wasting nothing, but an MX record requests 40 bytes and rounds up to 48, wasting 8 bytes.

The second cost is poor memory locality. Without boxing, the record enum values for a cache entry sit in a single contiguous allocation. With boxing, data for each boxed variant lives in a separate heap region. Reading it requires following a pointer, and when that pointer lands far from the rest of the entry, the CPU has to fetch a new cache line. With millions of cache entries, boxed data ends up scattered across the heap rather than packed together.

Neither cost is catastrophic on its own, but eliminating both, as the next section shows, yields a measurable improvement in both memory usage and lookup latency.

Storing records in wire format

An obvious next step would be to store the full DNS response in wire format, patching only per-client fields like the message ID on each lookup. But this has drawbacks. DNSSEC records are only included when the client sets the DO (DNSSEC OK) flag. Storing a complete wire format message means either caching two variants, one with DNSSEC and one without, or filtering them out of an already-built message. There is also a cost to parsing the full message on every lookup, which the enum approach we just described avoids by storing already-parsed records.

As a middle ground, we store just the record data as raw bytes, while keeping the rest of the cache entry as structured fields. Instead of a list of parsed enum variants, we store the records as a single Box<[u8]> containing each record encoded as a 2-byte length prefix followed by its raw bytes.

This eliminates the per-variant enum overhead and the boxed heap allocations from the previous optimization. The data also becomes packed contiguously, which improves CPU cache locality. The tradeoff is that records can no longer be randomly indexed. We have to iterate through the buffer sequentially. This adds some complexity for features like round-robin rotation of A/AAAA records, but since record counts per entry are small, the cost is negligible.

When building a DNS response from cached records, most record types can be copied directly from the buffer into the outgoing message. Previously, each parsed record had to be serialized field by field back into DNS wire format. The new layout skips that work for A, AAAA, TXT, and all DNSSEC record types by copying their encoded bytes directly. Only records containing domain names, such as CNAME, NS, MX, and SOA, still require parsing so we can apply DNS name compression. Since records that support direct copying make up the vast majority of our traffic, this change reduces work on the lookup path. Combined with improved memory locality, this reduced cache lookup latency by 5% in our benchmarks.

To build the record data buffer, we write into a reusable scratchspace buffer that persists across cache insertions. Since previous writes have already grown it, the buffer rarely needs to be reallocated. Records vary in size, so we do not know the exact buffer size until they have been serialized. Once the records are in the scratchspace buffer, we allocate a Box<[u8]> and memcpy the data into it. This replaces the separate allocation for each boxed record with one allocation for all record data. It also avoids the waste from shrinking a Vec<u8>, where the allocator may not be able to reclaim the unused tail of the original allocation. In our benchmark, this change alone increased cache insert throughput by 13%.

The results

The production measurements show how the benchmarked per-entry savings translated to whole-process resident memory. The graph below shows p90, p98, and p99 memory usage across Big Pineapple instances. The first dashed line marks the start of the rollout on May 18, 2026, and the second marks its completion across all services on July 6, 2026. Each release introduced one or more of the optimizations described above, so memory usage dropped in steps rather than all at once.

As each release rolled out, restarted instances began with empty caches and consumed more memory as those caches filled. The stable plateaus therefore represent steady-state memory usage better than the initial dips.

Per-instance memory usage dropped across all percentiles. At p99, memory dropped from 9.3 GB to 5.3 GB, a 43% reduction in resident memory. At p90, memory dropped from 6.5 GB to 3.8 GB, a 42% reduction. Instances with fuller caches saw the largest absolute savings.

In our benchmarks, these five optimizations reduced the per-entry memory footprint from 953 bytes to 420 bytes, a 56% reduction. Per-entry allocations dropped from 1.1 KB to 461 bytes. The reductions measured in production are smaller because resident memory includes the cache alongside all other process data. After the rollouts settled, aggregate working-set memory across the fleet was roughly 100 terabytes lower.

Performance also improved. Cache insert throughput increased by 43%, while lookup latency dropped by 19%.

We plan to reinvest the freed memory into increasing cache capacity without increasing our memory usage, which improves cache hit rates and reduces upstream query volume. We're also exploring further optimizations to the cache itself.

To learn more about Big Pineapple, see How Rust and Wasm power Cloudflare's 1.1.1.1. If you work on DNS or other large systems, share the optimizations that have worked for you in the Cloudflare Community or on the Cloudflare Developers Discord.

Your alt text passes automated checks. That doesn’t mean it’s any good.

Post Syndicated from Taarik Ashenafi original https://github.blog/engineering/user-experience/your-alt-text-passes-automated-checks-that-doesnt-mean-its-any-good/


More than one in four images on the web’s most popular home pages have alt text that’s missing, vague, or copied from adjacent images.

That’s from WebAIM’s 2026 WebAIM Million report, which found that alt text,an HTML attribute containing text describing the content of an image, was missing on 16.2% of images across the top million home pages. Among the images that did have alt text, another 10.8% provided an undescriptive attribute, such as alt="image", a raw filename, or a description duplicated from a neighbor.

While automated tooling reliably flags missing alt text, it isn’t as good at fixing poorly written alt text. Most alt text checkers test whether an accessible name for an image exists, not whether the provided alt text says anything useful about the associated image, and that’s a deliberate design choice: a quality-oriented rule with false positives is a rule teams switch off. So alt="IMG_2847.png" passes. So does the same alt="3/5 stars" on five different star-shaped icons.

We built an alt text plugin for the GitHub Accessibility Scanner to help improve your alt text. This post covers where we drew the line between what a checker can prove and what it can only suspect, why our worst bug turned out to be a layout problem rather than a parsing one, and what changed once we let a model into the loop.

If you’re building automated checks of your own, for accessibility or otherwise, the tradeoffs should transfer.

Proving a string is wrong without seeing the picture

Presence of alt text is an objective fact; the attribute is there or it isn’t. Quality is often a judgment call. A machine can’t prove whether a sentence adequately describes a picture in context from markup.

However, not all quality is subjective. There’s several checks you can perform based on the alt text alone, with no need to consult the image content:

  • The attribute is absent (not empty) or whitespace-only.
  • The alt is a filename, such as hero.png, IMG_2847.jpg.
  • The alt is a placeholder somebody meant to replace, such as TODO, tbd.
  • The alt is one generic word naming the medium instead of the content, such as image, logo, chart.
  • The same alt repeats across adjacent images.

Every one of those is a claim about a string, and that became our dividing line. Five deterministic rules run by default which need no credentials for running AI models or network calls. One opt-in rule calls a model with provided image content and surrounding context, for judgments an alt text string can’t support on its own.

First, we had to determine which images to judge on a scanned webpage. We use Playwright’s role-based locator rather than querySelectorAll('img'), so anything not included in the browser’s accessibility tree drops out, including anything carrying alt="". That last exclusion matters most. An empty alt is the author explicitly saying the image is decorative, and flagging it would punish exactly the behavior you want to encourage.

So, how strict should it be? A quality checker lives or dies on false positives, so we chose closed sets over clever heuristics. The vague-alt rule normalizes a string, then checks it against a curated list of words that carry no information on their own. It fires only on an exact match:

  • alt="image" gets flagged.
  • alt="image of the login screen with the SSO button highlighted" doesn’t.

Rules this literal miss plenty of bad alt text. We took the miss over the false positive, because a reliable checker that developers enable beats one that gets switched off.

Repetition is a layout problem, not a DOM problem

Repeated alt text presented an interesting problem. Picture a row of five star-shaped icons that each say "3/5 stars". A screen reader user hears the same thing five times and learns nothing new from four of them.

Our first version walked the images in document order and flagged any run sharing the same normalized alt. It caught things it shouldn’t have. For example, a footer “GitHub” logo and a header “GitHub” logo might sit next to each other in the extracted list but nowhere near each other on screen, so nobody experiences them as a group.

What matters is where images land on screen, not where they sit in the markup. So the rule now checks page layout, and only extends a run when the gap between two bounding boxes is small compared to the boxes themselves:

const gap = Math.max(horizontalGap, verticalGap) 
const largerDim = Math.max(a.boundingBox.width, a.boundingBox.height, 
                           b.boundingBox.width, b.boundingBox.height) 
return gap > GAP_MULTIPLIER * largerDim

Two details worth noting:

  • The multiplier is a judgment call, not a number we derived from anything. It’s the kind of value you tune against real pages instead of trusting from a spec.
  • When either image has no measurable box, the check fails open and the run continues. A missing finding is invisible; a wrong one isn’t.

Getting a model to act like a reviewer, not a critic

Deterministic rules only need the alt string. Anything smarter needs to know what the page is about, and none of that is tracked by the image element. Whether alt="a smiling person" is fine depends entirely on what surrounds it: on a generic mood shot, it’s probably works. But under a heading where a specific person is named, it doesn’t provide enough detail.

In our optional alt-text-qualitycheck, we extract page context alongside each image: the nearest heading, the page title, any <figcaption>, whether the image sits inside a link or button, and up to 600 characters of nearby prose.

The link signal matters most, because when an image is a link’s only content, its alt becomes the link’s accessible name. The right alt then names the destination instead of describing the picture.

One caution: The plugin only records that an image sits inside a link. We don’t check whether it’s the link’s only content, which is the part that actually turns alt into a link name. So right now both cases look identical to the model.

That context, the alt, and the image go to a vision model through GitHub Models. Our failure modes were rarely the model misreading a picture. They were the model having opinions. Given perfectly good alt text, our first version of the checker would suggest different alt text, because “could this be better?” is a question a language model always answers yes to. Every image becomes a finding, so the signal disappears.

Three changes fixed it:

  • A decision procedure instead of an instruction. The prompt walks four ordered steps, stops at the first that matches, and emits that step’s verdict: decorative, redundant with a caption, functional, or informative.
  • Explicit anti-nitpick rules. Trust the author’s framing. Separate redundant prefixes (“Image of…”) from semantic ones (“Photograph of…”). Treat a short alt as correct when the surrounding prose already analyzes the image.
  • Structured output with a forced field order, so reasoning is generated before verdict and the model has to build an argument before it picks a label.

None of that makes the model unfailingly correct. It makes it consistent enough to iterate against. The repository carries an offline grading harness built from published teaching material: WebAIM, the W3C images tutorial, and POET. The rule and the harness share one prompt, so what you tune offline is what runs in CI. That harness only tests the model’s judgment, though, not the whole pipeline. A case can score perfectly there and never reach the model in a real scan.

Sending images to a model is a privacy and cost decision

The moment a check calls an external model with webpage data, it stops being just a lint rule and requires careful data flow design. A few things follow from that:

  • The rule is off by default. It won’t run unless you deliberately enable it in your plugin configuration, and it needs a token with access to GitHub Models.
  • URLs get redacted. Image URLs and link hrefs often carry signed CDN tokens or session identifiers, so query and fragment are stripped from anything entering the model context or the rule’s error logs. For the same reason, src and srcset are replaced with (omitted) in the markup we send.
  • Everything in that context window is untrusted input. Titles, headings, and prose all come from the page being scanned, and a page can contain text written to steer a model. Structured output constrains the shape of a response, not the reasoning behind it.

One caution, because that list is easy to over-read: findings still carry the real page URL and original HTML into the scanner’s normal reporting pipeline. That’s on purpose, since you can’t fix an image you can’t locate. Redaction narrows what reaches the model and the logs, not what lands in your own issues. And if you set up Azure AI Vision credentials, an optional OCR pre-pass sends image bytes to a second place. Nothing requires Azure, but a data-flow review needs to cover both paths.

Cost follows the same shape. In the common case this is one model call per image per scan, which on an image-heavy site dominates the cost of the whole run. That’s reason enough to put it on a schedule rather than on every commit.

What this still can’t do

  • The deterministic rules are literal. They catch alt text that’s obviously unwritten, not alt text that’s fluent and wrong. They also read the alt attribute rather than the computed accessible name, so an aria-label that fixes the problem won’t stop the finding.
  • The model-backed rule produces false positives. Every finding is a prompt for human attention, not a verdict.
  • Silence isn’t coverage. That rule re-fetches images outside the browser session, so anything behind authentication can fail to load. Fetch and model errors are logged and skipped, which means a page can come back clean because nothing got checked.
  • Suggested alt text is a draft. A model that sees the image and a few nearby words can’t account for your audience, your house style, or the job that image is doing on the whole page.
  • Some findings double up with the scanner’s built-in checks, since our missing-alt rule covers the same ground.
  • We only check HTML <img> tags. SVG, role="img" containers, CSS backgrounds, and canvas aren’t covered yet.
  • This is new code with limited real-world feedback. Rules like these improve when they meet the variety of markup and content found across real sites. This plugin hasn’t had that yet, so treat early findings accordingly.
  • Passing isn’t conformance. Automated checks are a floor. Testing with people who use assistive tech is the goal.

What we’d tell you if you’re building something similar

Separate what you can prove from what you can only suspect, and give them different defaults. Checks that prove something should be cheap, predictable, and on by default. Checks that only suspect something should be opt-in, and should read as a suggestion rather than a verdict. Then, ask what the user experiences rather than what the DOM says. Every gap still open in this plugin has that second shape. We record that an image is inside a link, not that it is the link. We read an attribute, not a computed name.

That distance is the real boundary, and a better model doesn’t close it. Deciding what the functionality of an image is for a user who can’t see it still requires human judgment. What automation buys you is making sure that human is giving the right images a second examination.

Try the alt-text plugin in your accessibility scanning workflow. If it tells you the wrong thing, please report it. Open an issue with the finding and, if public, a link to the affected page.

The post Your alt text passes automated checks. That doesn’t mean it’s any good. appeared first on The GitHub Blog.

Grab Bench: Evaluating AI on Grab-shaped production work

Post Syndicated from Grab Tech original https://engineering.grab.com/grab-bench-evaluating-ai

Introduction

What worried us wasn’t the hallucination, it was the subtle plausibility. Answers an engineer could easily read past and accept: a right-looking Structured Query Language (SQL) query, a plausible tool call, an innocent profile update, or a patch that satisfied the surface tests.

When we analyzed the row-level failures, a clear pattern emerged:

  • SQL generation: kept the query shape but changed the underlying metric.
  • Tool calling: selected the right tool family but drifted on parameters.
  • Profile updates: cited every event instead of only the evidence that supported the claim.
  • Coding agents: passed visible tests while missing a hidden stateful invariant.

Grab Bench bridges this exact gap. Grab Bench is a configurable eval (evaluation) harness for artificial intelligence (AI) systems on Grab-shaped work. It runs model providers through task plugins, records one row per case/model pair, and uses deterministic scorers or large language model (LLM) judges depending on the task. We treat the eval like software: version it, run baselines, keep score records, and make the failure modes visible enough for a team to debug.

This write-up focuses on the design choices behind that work.

The problem: plausible is not correct

Public leaderboards are still useful; we read them too. They just answer a different question. A product team needs to know whether a model can preserve a metric definition, obey an internal tool contract, stay cautious with weak evidence, or make a code change without breaking behaviour hidden from the prompt.

The hard part is that real examples are rarely reusable as-is. Production traces, schemas, user records, and internal workflows need protection. So the benchmark has to preserve the shape of the work without depending on the work itself.

That constraint shaped Grab Bench from the beginning. Some surfaces stay internal. Others use synthetic or redacted cases. Either way, the case has to keep the thing that makes the work hard: metric faithfulness, tool-parameter discipline, evidence grounding, safety boundaries, or repository-level behaviour.

What Grab Bench runs

The harness is deliberately ordinary. A YAML configuration defines providers, models, task settings, sampling, concurrency, judge settings, and output paths. The runner loads rows, checks whether each model supports the required modality and application programming interface (API) family, calls the task plugin, and writes row-level records plus model summaries for dashboards.

The unusual part is that each task owns its contract:

  • Query generation cares about preserving metric and schema intent.
  • Tool use compares canonical tool names and parameters.
  • Multimodal pair matching scores constrained yes/no decisions.
  • Passenger-profile reasoning checks grounded claims, evidence, uncertainty, action quality, and safety.
  • Agentic coding runs visible and hidden workspace tests, plus hard-failure and anti-gaming checks.

This is why the row record matters. A leaderboard can tell us that one model is ahead. It cannot tell us whether the loss came from a fabricated evidence identifier (ID), a weak action, a hidden invariant, latency, cost, or a genuine capability gap.

Each run also keeps the unglamorous fields that make reruns possible: token use, latency, judge latency where applicable, skip reasons, resolved configurations, and dashboard-ready summaries. Without those fields, the next comparison starts from memory instead of evidence.

Figure 1 is deliberately boring: add a plugin; providers, records, and dashboards stay shared.

Figure 1. Grab Bench keeps execution shared while task plugins own request shaping, parsing, and scoring.

Design choice 1: make the cases safe, not generic

A useful eval case should feel familiar to the people who own the system. It should include distractors, stale context, ambiguous evidence, and the kind of boundary conditions that make production work tricky.

In passenger-profile reasoning, each case is a synthetic evidence ledger: rides, food, support, app events, saved places, promotions, and noise. All cases use synthetic data with no live user records. The model must return strict JavaScript Object Notation (JSON). Claims must come from an ontology; values must be valid for that claim; evidence IDs must exist; weak or sensitive inferences should be suppressed, not laundered into confident prose.

The scorer is deliberately mechanical where it can be: schema validity, claim correctness, evidence faithfulness, confidence calibration, action quality, and safety. It distinguishes required claims from acceptable auxiliary claims and forbidden claims, so a model can get credit for useful extra evidence without getting a pass on unsafe or unsupported inferences.

A simplified case might ask whether a passenger has a stable weekday commute:

  • The evidence ledger contains repeated morning rides from a home-like saved place to an office-like area, plus unrelated food orders and stale support contacts.

  • A good answer returns a claim such as weekday_commute = likely_home_to_office_commute, cites only the commute evidence IDs, and keeps confidence within the allowed range.

  • The scorer checks that the claim and value exist in the ontology, that every cited evidence ID exists, and that the cited rows actually support the claim.

  • If the model cites every event, fabricates an ID, adds a dietary-preference claim from one old order, or recommends an unsafe action, the row gets explicit failure tags or a score cap.

  • The result is still a number, but the row also says what failed, which is what an engineer needs to fix the prompt, scorer, data, or model choice.

For agentic coding, the repository is synthetic too, but it asks for a real-shaped change: default ride insurance across backend services, API compatibility, mobile helpers, analytics events, rollout controls, migration compatibility, idempotency, concurrency, and cancellation lifecycle. A patch that only satisfies visible tests is not enough.

The safety comes from using synthetic data. The pressure comes from keeping the real contract intact.

Design choice 2: score contracts, not confidence

LLM judges are useful for open-ended tasks such as SQL, where correctness can depend on business intent and query shape. But for many surfaces, the benchmark should not ask another model whether an answer seems good.

Grab Bench uses deterministic scoring when the task contract allows it. Passenger-profile reasoning scores ontology values and evidence IDs. Tool use compares canonical tool names and parameters. Multimodal pair matching scores exact labels. Agentic coding scores visible and hidden tests, maintainability, efficiency, and hard-failure gates.

The audit trail is the point. A fluent answer should not get credit for missing the contract. The row needs to say whether the model misunderstood the task, ignored a constraint, exceeded a budget, or produced something plausible but unsupported.

Design choice 3: make shortcuts visible

Benchmarks get weaker when shortcuts work. The scorer has to make those shortcuts visible.

In the reasoning benchmark, fabricated evidence IDs, unsupported claims, broad cite-everything behaviour, unsafe actions, and forbidden sensitive claims trigger penalties or caps. In the coding benchmark, hidden-test tampering, network-access patterns, oversized patches, case-id leakage, visible-only overfit, and implausible difficulty curves are blocked or investigated.

Baselines make that visible. Empty output, schema-only output, cite-all-evidence output, unsafe-sensitive output, no-op coding agents, and reference agents are not busywork; they are checks on the scorer. If a shortcut baseline can pass, the benchmark is not ready.

This is not about assuming bad faith. It is about refusing to reward behaviour that would fail the moment it left the harness. A profile update that cites every event has not shown evidence discipline. A SQL answer that changes the metric has not preserved intent. A coding agent that passes only visible tests has not earned trust.

Internal reproducibility and hidden pressure

The package has to be inspectable and hard to overfit at the same time. Engineers need to rerun the harness, read score records, and understand failures. Certification still needs unseen cases, or we end up optimising prompts against the examples everyone can see.

Grab Bench handles this with a split between teaching artifacts and certification artifacts. Teaching artifacts explain the task contract, scorer, examples, baselines, and canaries. Certification artifacts keep hidden splits, seeds, raw outputs, and full comparison evidence behind the right access boundaries.

One dataset cannot do all of that honestly. Shared examples are for learning the method. Hidden cases are for checking generalisation. Row-level outputs are for debugging. Aggregates are for comparison.

Before a comparison run is trusted, the package also has to pass gates: oracle or reference solutions behave as expected, weak baselines fail, redaction passes where applicable, score spread remains useful, and canaries catch harness regressions. Here, a canary is a deliberately simple or malformed case with a known expected result, such as a no-evidence profile update that must be rejected.

Figure 2. Teaching artifacts and certification artifacts share the same harness but need different access boundaries.

What we learned

The most useful Grab Bench output is often not the leaderboard. It is the failure taxonomy.

We saw that more reasoning is not a universal good. It can help planning-heavy tool use and hurt tasks that need literal schema discipline. Evidence selection is also part of reasoning: citing everything is not safer when only a few rows are direct support. For agentic coding, category-level results matter because a model can handle API contracts while missing stateful invariants.

We also learned not to treat prompt or model settings as universal. A setting that helps one task can make another worse. That pushed us toward task-level reports, not one global recommendation, and toward comparisons that show failure tags alongside scores.

Most of all, evals need hygiene: versions, baselines, gates, dashboards, and scope limits.

One limit is worth stating plainly: synthetic evals do not prove production uplift. They tell us whether a model respects the contract under controlled pressure. Live retrieval quality, user impact, and rollout decisions still need separate evidence.

What comes next

Next, we want the benchmark surfaces to look more like pipelines. Instead of scoring only the final answer, we want to separate retrieval, reasoning, action selection, latency, cost, and safety where the task supports it.

We also want packages to be easier for other teams to reuse. A good eval should not depend on one team remembering how it works; it should be documented, versioned, and safe enough for others to run.

Grab Bench is our attempt to make AI evaluation boring in the useful way: configuration in, rows out, failures explained, shortcuts caught. The question is not which model wins in the abstract. It is which model is ready for this work, under these constraints, with these failure modes.

The test I would apply to any eval is simple. If a cite-everything baseline can pass, the eval is not measuring evidence discipline. If a visible-test-only agent can pass, it is not measuring production behaviour. The useful conversation starts when the benchmark can show the shortcut and make it fail.

Join us

Grab is Southeast Asia’s leading superapp, serving over 900 cities across eight countries (Cambodia, Indonesia, Malaysia, Myanmar, the Philippines, Singapore, Thailand, and Vietnam). Through a single platform, millions of users access mobility, delivery, and digital financial services, including ride-hailing, food delivery, payments, lending, and digital banking via GXS Bank and GXBank. Founded in 2012, Grab’s mission is to drive Southeast Asia forward by creating economic empowerment for everyone while delivering sustainable financial performance and positive social impact.

Powered by technology and driven by heart, our mission is to drive Southeast Asia forward by creating economic empowerment for everyone. If this mission speaks to you, join our team today!

Using the GitHub Copilot SDK for Java

Post Syndicated from Edward Burns original https://github.blog/engineering/using-the-github-copilot-sdk-for-java/


Java developers no longer have to rely on Java framework-specific approaches to drive AI from their enterprise apps.

While it is true that Langchain4j empowered developers by disintermediating specific AI vendors, you still had a dependency on Langchain4j. And with Spring AI, well, of course you had a dependency on design choices made by Spring, if not on Spring itself.

Now, GitHub Copilot SDK for Java is the first truly framework agnostic way to drive AI from Java. And with its BYOK support, GitHub Copilot SDK for Java is also AI vendor neutral.

💡 Even though it’s called GitHub Copilot SDK, you can use it with any direct model provider, such as OpenAI, Azure, Anthropic, or OpenAI-compatible endpoints, by passing a provider/ProviderConfig with your own baseUrl + apiKey (or bearer token). No Copilot subscription required.

The GitHub Copilot SDK for Java is a client library that empowers your server-side Java code to create Copilot agent sessions, register tools, send prompts, and receive structured responses—all programmatically. It works in server environments, including Jakarta EE and Spring. If you’ve been building enterprise Java for any length of time, this SDK will feel like home: CompletableFuture, annotations, lambdas, virtual threads, it’s all here.

This post shows you how to use the SDK, walks through a complete Jakarta EE 11 sample application, and leaves you with concrete next steps to try it yourself. I chose Jakarta EE 11 for my demo because I was the lead release coordinator for that release. I believe in open standards as the best way to empower developers. For more on Jakarta EE 11 see this InfoQ article.

This sample app is an agent harness using Jakarta EE 11. But, of course, developers can build their own agent harness using the well-known Java frameworks and libraries of their choice.

Clone the sample app and try it yourself >

Where to get it

The SDK is available as a Maven dependency:

<dependency>
    <groupId>com.github</groupId>
    <artifactId>copilot-sdk-java</artifactId>
    <version>1.0.7-preview.1</version>
</dependency>

Prerequisites:

  • JDK 17 or 25 (25 recommended — unlocks virtual threads and other modern features)
  • Maven 3.9+
  • A GitHub account with an active Copilot subscription
  • The Copilot CLI installed locally at version 1.0.71 or later.

Walk through the sample app

The best way to see the SDK in action is to run this sample application.

Get the code

git clone https://github.com/microsoft/Build26-BRK206-your-agent-anywhere-multiclient-multidevice-with-github-copilot-sdk.git
cd Build26-BRK206-your-agent-anywhere-multiclient-multidevice-with-github-copilot-sdk/src/java-agent-orchestrator
mvn clean package liberty:run
# Open http://localhost:9080/index.xhtml

The Java demo is built on:

Concern Technology
Runtime Open Liberty 26.0.0.5
Platform Jakarta EE 11 (Faces 4.1, CDI 4.1, WebSocket 2.2, Data 1.0, Persistence 3.2)
UI PrimeFaces 15.0.16
AI orchestration Copilot SDK for Java 1.0.7-preview.1
Database H2 in-memory (10 seed property listings)

What the app does

The application is a real-estate lead-management agent pipeline. A customer submits an enquiry (“I’m looking for a 3-bedroom house in London under £800,000”), and the system spins up an isolated Copilot Agent on a virtual thread to process it through a pipeline:

Application flow diagram showing the pipeline stages: Customer Enquiry flows to QUEUED, then VALIDATING, which branches to either SEARCHING (if genuine) or REJECTED (if spam/off-topic). SEARCHING leads to WRITING_REPORT (if matches found) or NO MATCHES. WRITING_REPORT completes at DONE.

The architecture uses Jakarta WebSocket to push real-time status updates from the server to the browser, so you can watch agents progress through phases as the model calls tools:

Application architecture diagram showing Browser with Pipeline Dashboard connecting to Open Liberty server containing AppState, CopilotClient in EMPTY mode, virtual thread agents, and WebSocket push for real-time UI updates.

Submit multiple inquiries simultaneously to see concurrent virtual-thread agents in action. Each one processes independently with its own Copilot session.

Screenshot of the sample application showing the pipeline dashboard with multiple enquiries being processed concurrently.
Screenshot of the sample application showing detailed agent event log and property search results.

SDK features in action

Let’s walk through the key SDK features as they appear in the sample code.

Defining tools with @CopilotTool

This is the headline API. If you’ve ever written a @GET endpoint in JAX-RS or an @MessageDriven bean, this will feel instantly familiar:

@CopilotTool(value = "Sets the current phase of the agent. Use this to report progress.",
             name = "set_current_phase")
public String setCurrentPhase(
        @CopilotToolParam("The phase to transition to (VALIDATING, SEARCHING, "
                + "WRITING_REPORT, REJECTED_GARBAGE, REJECTED_NO_MATCHES, or DONE)")
        String phaseName) {
    phase = Phase.valueOf(phaseName.trim().toUpperCase(Locale.ROOT));
    notifyUi();
    return "Phase set to " + phase.getLabel();
}

The @CopilotTool annotation declares the method as a tool the model can call. The @CopilotToolParam annotation describes each parameter so the model knows what to pass. The SDK handles all the JSON Schema generation, argument parsing, and dispatch. You just write a normal Java method.

Two build prerequisites for @CopilotTool. The annotation-based tool API is currently an experimental feature of the SDK, so you need to configure two things in your Maven build:

  1. Enable experimental APIs: pass -Acopilot.experimental.allowed=true to the compiler. Without this flag, the annotation processor will refuse to generate the tool metadata. For more details on the experimental APIs see Copilot SDK documentation.
  2. Register the annotation processor: add the SDK as an annotationProcessorPath so the compiler can find the @CopilotTool processor and generate the $$CopilotToolMeta classes at compile time.

Both are configured in the maven-compiler-plugin:

<plugin>
    <groupId>org.apache.maven.plugins</groupId>
    <artifactId>maven-compiler-plugin</artifactId>
    <version>3.15.0</version>
    <configuration>
        <compilerArgs>
            <arg>-Acopilot.experimental.allowed=true</arg>
        </compilerArgs>
        <annotationProcessorPaths>
            <path>
                <groupId>com.github</groupId>
                <artifactId>copilot-sdk-java</artifactId>
                <version>1.0.7-preview.1</version>
            </path>
        </annotationProcessorPaths>
    </configuration>
</plugin>

To register all annotated tools from an object:

List<ToolDefinition> annotatedTools = ToolDefinition.fromObject(this);

Inline lambda tools with ToolDefinition.from(...)

When you want a tool defined at the call site without a dedicated method, use the lambda style:

ToolDefinition reportIntentTool = ToolDefinition
        .from("report_intent",
              "Reports the current intent of the agent",
              Param.of(String.class, "intent", "Intent in max 4 words"),
              (String intent) -> {
                  currentIntent = intent;
                  addEvent(Instant.now(), "intent", "Intent updated", intent);
                  notifyUi();
                  return "ok";
              })
        .overridesBuiltInTool(true);

Notice .overridesBuiltInTool(true). This tells the SDK that our report_intent tool deliberately replaces a built-in tool of the same name. This is useful when you need custom behaviour for a tool the model already knows about.

Cross-class tool scanning

Tools don’t have to live in the same class as your agent logic. Here’s searchProperties defined in a separate CDI bean:

@ApplicationScoped
public class PropertyDatabase {

    @CopilotTool(value = "Searches the real estate listings database. "
                       + "Returns up to 10 matching properties.",
                 name = "search_properties")
    public List<Property> searchProperties(
            @CopilotToolParam("Property type substring (e.g. 'flat', 'house')") String type,
            @CopilotToolParam("City substring (e.g. 'London', 'Bristol')") String city,
            @CopilotToolParam("Minimum number of bedrooms (0 for no minimum)") int minBedrooms,
            @CopilotToolParam("Maximum price in GBP (0 for no maximum)") double maxPriceGbp) {
        // ... filter and return matching properties ...
    }
}

You would normally register these with ToolDefinition.fromObject(propertyDatabase). In the sample app, we use a lambda wrapper instead, because CDI client proxies can obscure the annotation metadata.

Customizing the system message

The SDK gives you fine-grained control over the system message. Use SystemMessageMode.CUSTOMIZE to replace specific sections while preserving the rest:

SystemMessageConfig systemMessage = new SystemMessageConfig()
        .setMode(SystemMessageMode.CUSTOMIZE)
        .setSections(Map.of(SystemMessageSections.IDENTITY,
            new SectionOverride()
                .setAction(SectionOverrideAction.REPLACE)
                .setContent("""
                    You are part of a real estate recommendation system.
                    You will receive enquiries from customers, and you must
                    carry out the following workflow...
                    """)));

The text block ("""...""") makes multi-line prompts readable without string concatenation. The IDENTITY section override replaces only the model’s self-description while leaving safety guardrails intact. If you prefer a simpler approach, SystemMessageMode.APPEND adds your content after the default system message without replacing anything.

The agentic loop: sendAndWait(...)

One line kicks off the full agentic loop:

session = client.createSession(sessionConfig).get();
// ...
AssistantMessageEvent result = session.sendAndWait(escapedEnquiry).get();

Behind .get(), the model reasons, calls your tools (potentially multiple times), and returns its final response. On a virtual thread, .get() is cheap. No platform thread is consumed while waiting. The SDK dispatches tool calls to your registered handlers automatically and feeds results back to the model until it’s done.

Real-time event handling with session.on(...)

Subscribe to session events to build responsive UIs:

sessionSubscription = session.on(event -> {
    captureSessionEvent(event);
    uiUpdateSocket.pushDetailUpdate(id);
});

Every tool call, every result, every assistant message fires an event. The sample app captures these events and pushes them to the browser via Jakarta WebSocket, so the pipeline dashboard updates in real time. You can use pattern matching to handle specific event types:

if (event instanceof AssistantMessageEvent msg) {
    finalReport = msg.getData().content();
} else if (event instanceof ToolExecutionStartEvent start) {
    // Tool is being invoked...
}

Headless client and permission handling

The client is configured for server-side operation:

copilotClient = new CopilotClient(
        new CopilotClientOptions()
                .setMode(CopilotClientMode.EMPTY)
                .setCopilotHome(copilotHome)
                .setExecutor(contextualVirtualThreadExecutor));

CopilotClientMode.EMPTY means no IDE integration — the client talks directly to the Copilot CLI. The custom Executor (discussed below) ensures tool callbacks run with container context.

For permission handling, the sample uses:

sessionConfig.setOnPermissionRequest(PermissionHandler.APPROVE_ALL);

APPROVE_ALL is appropriate for demos and development. In production, implement a real permission policy that validates which tools the model is allowed to invoke.

Jakarta EE integration patterns

The SDK is not a framework island. It composes naturally with Jakarta EE — and of course also with proprietary frameworks such as Spring.

The Executor parameter is the key integration point. Jakarta Concurrency (§5.2 in the 3.1 spec) requires that application-created threads be obtained from a ManagedThreadFactory so the container can:

  1. Track the thread for lifecycle shutdown (@PreDestroy / server stop)
  2. Apply concurrency constraints and policies
  3. Propagate context automatically (without needing manual contextualRunnable)

Open Liberty 26.x supports virtual-thread ManagedThreadFactory via the virtual attribute in server.xml.

<managedThreadFactory jndiName="concurrent/virtualThreadFactory" virtual="true" />

Then, in AppState.java we inject the factory:

@Resource(lookup = "concurrent/virtualThreadFactory")
private ManagedThreadFactory virtualThreadFactory;

And use it to create the Executor we pass to the Copilot SDK.

// The ManagedThreadFactory (virtual=true) creates container-managed virtual
// threads that automatically propagate CDI, JNDI, and transaction context.
Executor managedVirtualExecutor = runnable ->
    virtualThreadFactory.newThread(runnable).start()

String copilotHome = Path.of(System.getProperty("user.home"), ".copilot").toString();
CopilotClientOptions copilotClientOptions = new CopilotClientOptions()
        .setMode(CopilotClientMode.EMPTY)
        .setCopilotHome(copilotHome)
        .setExecutor(managedVirtualExecutor);
copilotClient = new CopilotClient(copilotClientOptions);

This creates virtual threads that carry the container’s context. When the SDK dispatches a tool call to searchProperties(), that method can @Inject a JPA repository and query the database, because the container context is present on the callback thread.

Other integration patterns in the sample:

  • CDI @ApplicationScoped for the singleton CopilotClient (one client per application lifecycle).
  • Jakarta Faces f:websocket push for real-time browser updates via PushContext.
  • Jakarta Data @Repository for type-safe database queries without raw JPA boilerplate.

Fine-grained tool access control with ToolSet. The SessionConfig lets you specify exactly which tools each session can access:

sessionConfig.setAvailableTools(new ToolSet()
        .addCustom("*")           // all registered custom tools
        .addBuiltIn("web_fetch")); // only the web_fetch built-in

This is an important production concern. Rather than exposing every built-in tool (file system access, shell execution, etc.), you explicitly opt in to only what the agent needs. In the sample app, we allow all custom tools plus web_fetch so the agent can look up real-time property information during the Search phase.

Summary

Here’s what we covered:

  • Java-native API: CompletableFuture, annotations, lambdas, and virtual threads make the SDK feel like idiomatic Java, not a ported-from-another-language afterthought.
  • Three tool-definition styles: annotations for enterprise patterns, lambdas for inline convenience, JSON Schema for full control.
  • System message customization: section-level overrides give you precise control over agent behaviour.
  • The agentic loop in one line: sendAndWait(...) handles the full tool-calling loop automatically.
  • Real-time event streaming: session.on(...) enables responsive UIs and observability.
  • Headless server-side operation: no IDE required; runs anywhere the Copilot CLI is available.
  • Natural composition with Jakarta EE: CDI, JPA, WebSocket, and virtual threads all work together through the Executor integration point.

What to try next

  • Explore the BYOK support. The GitHub Copilot SDK can be used directly against model providers, for example OpenAI, Azure, Anthropic, or OpenAI-compatible endpoints, by passing a provider/ProviderConfig with your own baseUrl + apiKey (or bearer token). No Copilot subscription required.
  • Clone the sample app and run it locally. Submit multiple enquiries simultaneously to see virtual threads in action.
  • Swap the model. Try session.setModel(...) to experiment with different Copilot models.
  • Add your own tool. Define a new @CopilotTool method (a mortgage calculator, a school-district lookup) and watch the agent discover and use it.
  • Deploy to Azure. Open Liberty runs great on Azure App Service, AKS, or Azure Container Apps. See the Jakarta EE on Azure guidance at https://aka.ms/java/ee.

The Copilot SDK for Java puts the full power of GitHub Copilot behind your Java code with no IDE required and no framework lock-in.

Clone the sample app and try it yourself >

The post Using the GitHub Copilot SDK for Java appeared first on The GitHub Blog.

Turn one giant AI-generated pull request to a reviewable stack

Post Syndicated from Julia Muiruri original https://github.blog/engineering/turn-one-giant-ai-generated-pull-request-to-a-reviewable-stack/


Think about the last big feature you shipped. Be honest. Did you cram it into one giant pull request, or did you split it into smaller scoped pull requests? For years, you have silently had to decide between watching a pull request grow so large that reviewing it becomes a nightmare or breaking it into a chain of smaller pull requests that you have to babysit, sync by hand, and untangle conflicts every time a change is introduced below.

Both options have trade-offs. One is hard to review, while the other is hard to maintain. Your decision that day leans towards the less painful option.

Now add coding agents. They are incredibly productive and are projected to drive a 50% productivity gain across every SDLC stage by 2028, according to Gartner. But, they can’t take away the choice of how you structure your pull requests. They amplify the need to make it.

In this post, follow along with an example of how you can use stacked pull requests to simplify reviews.

A closer look: Adding product search to a shopping assistant

Let’s say you issue a prompt to add product search to a shopping assistant, walk away and minutes later, literally, you come back to review, steer, and approve. But look closely at what tends to land in that single pull request:

  • A new data model and its seed data
  • An API route and its validation
  • The client wiring and the UI and the empty/fallback/error states

…all of this and more in one ginormous 1,000+ line diff.

Animated gif showing the pull request size grow from 0 lines to over 1,500 lines.

For agents largely trained on how code has traditionally been written over the years, this pattern is their default way of shipping. Let’s play this out.

You want to add product search on as existing web application and your starting state is:

  • A mock AI Assistant showing responses from a random-line generator
  • Inconsistent product data hardcoded and scattered across components
  • No catalog module, no API, no data layer—no nothing
Screenshot of the starting state of the website without a product search.

An issue is opened to implement the feature, and a typical flow would be to create a feature branch, assign it to a coding agent (or multiple custom agents), get a first draft of the whole implementation code and updated tests…

…you read the code (well, you maybe read the code). Then, you still need to manually verify feature behavior and make any necessary updates, push and open a pull request with its long-yet-shallow AI generated description, ensure CI checks are green, and self-review diff then request reviewers. You get started…

<reviewer's hat>

Reviewer: 1,721 lines changed!! This description isn’t very helpful. I’ll review this later.

</reviewer's hat>

And what follows is familiar:

  • The large pull request becomes hard to review—so it just…sits there.
  • Reviewers lose context and the feedback quality drops.
  • It becomes even slower to merge.

This kicks off a manual, messy, time-consuming process that’s prone to conflicts before the feature lands, and it eventually lands under-reviewed.

GitHub stacked pull requests

Stacked pull requests introduce a different and better structure of delivery. The principle is simple: decomposition. Instead of shooting for a single pull request that addresses the issue in its entirety, you break down the feature into logical layers and identify the dependency chain to arrive at your desired goal. This gives you, and your agents, a native way to decompose work that otherwise lands in a giant pull request into a chain of small, focused and independently reviewable layers.

That large pull request that’s hard to review becomes a stack of smaller, logically ordered pull requests, each scoped to a single concern, small enough to hold in a reviewer’s head and with just enough context naturally flowing from the previously reviewed pull request.

Let’s make it happen.

The stack structure

Let’s look at the steps involved when decomposing the problem and arranging the layered stack.

First, and importantly, set the stack base. This matters because CI checks and merge rules throughout the stack management lifecycle get evaluated against the stack base.

Then, identify the core foundational unit of work and put it closer to the base (lowest in the stack), and layer dependent work above it.

Stack Layer (L#)/Branch  What to ship  Depends on 
L1 (feat/catalog-data)  A typed catalog with seed data, validation, and a data access module  main (stack base) 
L2 (feat/search-api)  Validated /api/products/search endpoint  feat/catalog-data 
L3 (feat/chat-grounding)  Chat calls the API and answers from real product data  feat/search-api 
L4 (feat/grounded-ui)  Product citation cards + state  feat/chat-grounding 

Now the independent concerns are clear: data, API, wiring, UX, making it possible to allocate different reviewer audiences for each. Data is reviewed by a data owner, UX by a UI owner.

GitHub’s native support for stacked pull requests can be launched from the pull request UI and extends seamlessly to the terminal with the gh stack CLI.

Install the stacked pull requests CLI extension

Run the following:

gh extension install github/gh-stack

In ancient times, you’d be set to start working. Not today though. There are agents working alongside you. These agents need to learn how stacks work and how to create and manage them on your behalf. The gh-stack skills teaches them this.

gh skill install github/gh-stack

Or, if you prefer:

npx skills add github/gh-stack

For the specific feature from the above example, your development workflow has custom agents, each with defined work streams and that follow a strict scoping discipline to achieve the goal of small, single-scoped pull requests.

Layer/branch  Agent 
L1 (feat/catalog-data)  Data modeler agent 
L2 ( feat/search-api)  Backend agent 
L3 ( feat/chat-grounding)  Frontend agent 
L4 ( feat/grounded-ui)  Frontend agent 

The last piece of the setup is to confirm CI exists. As mentioned earlier, each pull request will be evaluated against the stack base, and these checks will run for every layer.

Now the work begins.

Layer one: Data catalog foundation

Most agent workflows today are automated and execute autonomously in loops, but for the sake of illustration, we’ll cover each step at a time.

At this point, all agents are familiar with how stacked pull requests work, so a typical workflow at this stage would be:

  1. Invoking the Data Modeler agent with an appropriate prompt
  2. The agent initializes a new stack and sets the first branch—feat/catalog-data with main as its base using gh init stack
  3. Checks out, works and runs validation
  4. (All checks == green) ? commit the layer : Iterate

Reviewer’s note for the future: Are the types correct? Is the data validated? Is the query helper safe? Period.

Layer two: Product search API

Follow a flow similar to:

  1. Invoking the Backend agent with an appropriate prompt
  2. The agent adds the next layer feat/search-api on top of layer one, its base: feat/catalog-data, to import the completed data access module with gh stack add
  3. Checks out, works and runs validation
  4. Developer tests the API manually
  5. (API works && All checks == green) ? commit the layer : Iterate

Reviewer’s note for the future: Is input validated? Is the response contract stable? Are error/empty states handled here or pushed downstream? Period.

Layer three: Wire chat to the API

In this next layer, you:

  1. Invoke the Frontend agent with an appropriate prompt
  2. The agent adds the next layer feat/chat-grounding on top of layer two. Its base: feat/search-api, which will branch off with both the data access module and validated API.
  3. Checks out, works and runs browser tests with Playwright
  4. (All checks == green) ? commit the layer : Iterate

Reviewer’s note for the future: Is every answer tracing back to a real API response? What happens when the API fails or returns nothing? Period.

Layer four: Grounded UI and citations

You’ll notice that layer three and layer four, despite having the same author, (Frontend agent), are layered distinctively. This is deliberate. The UI owner should not have to check the underlying data flow and vice versa, and this structure allows for that independence.

So, the frontend agent:

  1. Adds the next layer feat/grounded-ui on top of layer three, its base: feat/chat-grounding
  2. Checks out, works and runs browser tests with Playwright
  3. (All checks == green) ? commit the layer : Iterate

Reviewer’s note for the future: Does every citation link back to a real product? Are loading, empty and error states all covered? Period.

Submit the stack

The four local stacked branches are ready. Next is to push them to remote with gh stack push, then create pull requests linking them on GitHub with gh stack submit.

The stack map and CI on each layer

Switching over to GitHub, all four pull requests are open and at the top of each one, you see a stack map, which is a one-click navigation system between pull requests in the stack.

Reviewing and updating the stack

Time to switch hats and look at a reviewer’s journey through stacked pull requests.

<reviewer’s hat on>

The stack map is a reviewer’s compass – a navigation aid between the top of the stack and its bottom, heading towards a successful merge. The movement is directional: read top-down, review bottom-up.

  • Read top-down, for context. This gives you the end goal at the very beginning of the review process, so you can set a bearing. “Oh, so we want to display product cards on the chat interface.”
  • Review bottom-up to build on the predetermined checkpoints. The implementation on each layer only makes sense once the preceding layer is understood.

You are no longer looking at a single 1,720+ line-sized pull request to be reviewed in one sitting, as we saw in our example, but instead, the review can be distributed in small, self-contained targets in a stack.

As the assigned human in the loop reviewer, you come in and look at layer one, the pull request at the bottom of the stack, and see that the automatic Copilot Code Review (CCR) caught two issues which you agree should be fixed.

<developer's hat back on>

Changes are requested at the bottom of the stack, so you:

  • Hand the feedback to the layer one author, data modeler agent that owns the branch
  • Suggestions are applied, tested, committed and pushed
  • Once the fix lands on feat/catalog-data, the natural next question is: what does this mean for layers two, three, and four?

Since branch feat/catalog-data was pushed out of turn after the review, GitHub flags it plainly: “Some branches in this stack have diverged and must be rebased” paired with “Unable to merge as a stack” flag and that blocks the merge.

Back on the pull request UI on GitHub, a one-click Rebase stack button appears. Before using the button, there is something important worth noting. Triggering a web-based rebase using this button runs it on GitHub’s servers, which means it resets the committer to whoever clicked the button, the resulting commits aren’t signed, and if branch protection expects signed commits, that one click quietly breaks.

The safer, equivalent move from the terminal would be gh stack rebase to perform that same cascading rebase locally as you interactively resolve conflicts, but this time using your own Git configuration, then gh stack push.

Finally, you’ll propagate through the stack. The rest of the stack, both local and on GitHub, now needs to catch up, and it couldn’t be easier than a single sync command gh stack sync.

An all-in-one flow starts with fetching from origin, cascading a rebase of every branch above feat/catalog-data onto the new commit, pushes the rebased branches and syncs pull request state from GitHub. This way, the change ripples upward without anyone touching layers two, three, or four by hand.

Back on GitHub, all checks re-run, pass and the stack map settles back into a clean, mergeable line from main to feat/grounded-ui.

Get started with stacked pull requests >

The post Turn one giant AI-generated pull request to a reviewable stack appeared first on The GitHub Blog.

Introducing the Billable Usage API: programmatic cost visibility for Cloudflare

Post Syndicated from Ryan Noel original https://blog.cloudflare.com/billable-usage-api/

Agents Week is about the shift already underway: agents write code, deploy Workers, and provision infrastructure on your behalf. That shift changes what you need to see. If a program is spending money in your Cloudflare account, you need to know what it's spending; throughout the day, per product, in a shape another program can consume. The dashboard is the right answer for humans. It's not the right answer for automation.

So we're launching a new Billable Usage API for self-serve accounts: a single endpoint that returns your account's usage and cost, broken down by product and by service period. It covers every usage-based Cloudflare product on the account, including Workers, R2, D1, Workers AI, Vectorize, Images, and Stream, all with one call. And if you already work in a FinOps toolchain, the column names should look familiar.

You'll get back an HTTP 200 OK with Content-Type: application/json and the usage rows in the response body. Today, usage and cost data are updated daily while we work towards providing more real time data. 

What comes back

Each row in the response is one charge period for one product on your account.

  • ServiceName and ServiceFamilyName — which product ("Workers Standard" under the "Workers" family, "R2 Storage" under "R2", etc.).
  • ChargePeriodStart / ChargePeriodEnd — the window this row covers.
  • PricingQuantity and ConsumedUnit — how much you used, in the unit of measure we bill on (GB-months, GB-seconds, requests, etc.).
  • ContractedCost — what that period cost, in BillingCurrency.
  • CumulatedPricingQuantity and CumulatedContractedCost — running totals for the billing period.
  • ZoneId / ZoneName — when the usage is attributed to a specific zone.

Most of these map directly to columns in the FinOps Open Cost and Usage Specification (FOCUS), so if your team is already ingesting FOCUS data from another provider, the names and semantics should be familiar:

Responses use the standard Cloudflare API envelope — result is an array of rows, one per product per charge period, alongside success, errors, and messages.

Where we are on FOCUS

Matching FOCUS naming was a deliberate choice. AWS, Azure, Google Cloud, Oracle, and a growing list of SaaS providers already publish FOCUS formatted exports, and every serious cost-management tool speaks to it. That said, we're not yet claiming full conformance: a handful of columns the spec requires aren't in the payload today. Getting there is on our roadmap. Consider this the first step: familiar shape now, full conformance next.

Cloudflare spend, next to the rest of your cloud spend: our partnership with Vantage

We've partnered with Vantage on a native Cloudflare integration. Vantage is an infrastructure cost management platform that ingests cost and usage data from more than 30 providers, across AI, Cloud and SaaS providers, and brings it into a single view for reporting, allocation, and optimization. With this integration, your usage flows into the same Cost Reports, Budgets, and Cost Alerts you already use for the rest of your infrastructure.

Vantage connects to Cloudflare using a read-only API token with Billing Read access. Once connected, Vantage pulls your Billable Usage data daily and breaks it down by product (such as Workers and R2), zone, and account, so you can see which products drive your spend and attribute it to the teams and services behind it.

A few of the workflows this integration supports:

  • Cross-provider allocation. Group Cloudflare spend by product, zone, and account, then use Virtual Tags to allocate by team or product line alongside your AWS, Azure, and other provider costs, all in a single report.
  • Anomaly detection. Vantage Cost Alerts monitor every connected provider and notify you via Slack or E-Mail when spend deviates from its baseline, so a change in Workers or R2 spend surfaces the same way it does for any other provider.
  • FinOps agents and MCP. Ask the in-console Vantage FinOps agent a question such as "What was our biggest cost driver last week across every provider?", or query the same data from Claude or ChatGPT through Vantage's hosted MCP server. Cloudflare spend is included alongside your other connected providers.

Connect your Cloudflare account in the Vantage console, and your costs appear next to everything else you run. There are no manual exports, no invoice uploads, and no separate dashboard to maintain. 

This FOCUS standardized API also works with other Fintech tooling.

Why we built this

Agents do more than write code. They deploy Workers, provision R2 buckets, and manage D1 databases. When you grant programmatic access to your Cloudflare account, you need programmatic visibility into what it's costing you. Not at the end of the month, but throughout the day, by product, in a shape a program can actually consume.

The Billable Usage API is that shape. And customers have been asking us for programmatic usage for years. Finance teams want to pull spend into their own systems and attribute cost back to internal projects, teams, and even their end customers. Developers want a curl they can drop in a script. Every one of those workflows used to involve a screenshot or a manual export. Now it's an HTTP call, or a configuration in Vantage.

What's next

  • Finer-grained time windows. Today the API returns charge-period rows, which for most products is daily. We're looking at more real time breakdowns for the products where it makes sense.
  • Forecasting. CumulatedContractedCost tells you where your spend is in the current billing cycle. We want to help you predict where you're going to end up. And not just at the account level, but the product level.
  • Enterprise coverage. This first release is self-serve only. An equivalent experience for Enterprise contracts is in the works.

Try it

The endpoint is live today for all self-serve accounts. Grab an API token with the Billing Read permission, point your curl at it, and you'll get back your current billing period broken down by product. Full reference is available on the Cloudflare API docs. To see it alongside the rest of your cloud spend, connect your Cloudflare account in the Vantage console.

Cloudflare has spent years making it easy to run more of your stack on our network. It's time we made it just as easy to see what that's costing you — on Cloudflare, and everywhere else.

How AI is transforming analytics at Grab

Post Syndicated from Grab Tech original https://engineering.grab.com/how-ai-is-transforming-analytics

Introduction

At Grab, analytics sits close to almost every decision that matters. Our north star is the democratisation of intelligence, ensuring that anyone making a business call has immediate access to trustworthy answers.

Over the last two years, model capability has crossed a threshold enabling this shift. Agents now do in minutes what used to take a week: preparing the data, writing queries, running deep analysis and developing insights for business opportunities, designing experiments and interpreting the results, drafting the commentary that follows, and more. Our throughput is no longer rate-limited by how fast an individual can write code, build a deck, or run a deep-dive. It is rate-limited by how fast we can frame the right problem, judge the right answer, and influence the right decision.

As autonomy climbs, an analyst’s impact moves from producing the artefact to owning the question and the call behind it, and the role evolves to become part builder, part advisor, part strategist, owning the loop rather than running it. That unlocks two things at once: work we already do, faster and at lower marginal cost, and work we could never staff before, sitting beside every product manager, business owner, and operator at the moment they decide.

The ladder

We were heavily inspired by Dan Shapiro’s framing of five levels for AI coding. We use a similar ladder that defines how much of the loop an agent should own and where human judgement stays for every analytics loop.

One distinction runs across every level: who owns the loop, and where human judgement is required.

Level What Human role Agent role
L2 AI-Assisted Owns and executes every step; uses AI to draft, suggest, summarise Drafts SQL, suggests a visualisation
L3 Human plans, agent owns steps, human reviews Frames the question, picks the metric, the segment, and the comparison frame, reviews evidence, owns the recommendation Discovers data, writes and runs the query, sanity checks, drafts the write-up, flags caveats
L4 Agent plans, agent owns workflows, human reviews Sets intent and guardrails; reviews at gates (anomaly, novel scope, sensitive cut); owns the stakeholder relationship and sign-off Orchestrates discovery through query, analysis, validation, narrative and publish; runs validation, escalates exceptions
L5 End-to-end autonomous Sets objectives, quality bars, risk thresholds, escalation rules; reviews exceptions only Detects anomalies and opportunities, runs the loop, surfaces insight, evolves the metric layer, context and skills

Human judgement remains at every level, and autonomy never removes accountability. Humans own problem framing, canonical metric definitions, the causal story behind a move, business-case assumptions, the go/no-go, and the stakeholder relationship. A higher level means more of the mechanical loop sits with the agent and more human attention concentrates on the ambiguous, high-stakes work.

Making the climb

Five core capabilities move a workflow up the ladder. They also gate the climb in order: L3 needs execution and certified context, L4 needs gates and agentic review good enough that reviewing only at gates is honest, L5 needs a learning loop that closes.

  • Execution: A stack that runs the loop end to end rather than a notebook/workflow a human drives.
  • Knowledge: Metrics certified at the right grain, discoverable in our catalogue, grounded in context an agent can read. Ambiguous definitions cause most analytics slop.
  • Control: Repeatable expectations become mechanical checks, while human review handles what a rule cannot.
  • Review and governance: Agents check their own output against the gates and escalate on defined triggers. We govern definitions, targets, risk and exceptions.
  • Learning: When an agent fails the same way twice, we encode the fix into context documents, golden datasets, evals and gates.

What this looks like in practice

What follows is a set of explorations from the last two years. Some run in production today, while others are still teaching us where the limits are.

Loops that run end to end

Spartan is our end-to-end agentic analytics workflow, embedded across surface areas (like Slack), and most of its usage comes from people who are not analysts. On any given day, the Slack channel enables a range of analytics actions: from ads salespeople pulling spend breakdowns for a named merchant, to campaign managers sizing audiences for a target segment, and country teams asking why a number moved week on week. All of it in plain business language.

Figure 1. Index architecture across our knowledge base.

Two requests from July best demonstrate how it works. A commercial manager asked why revenue fell in the Philippines mid-market segment in the last two weeks of June. Separately, a product manager asked for a summary of a frequency-cap experiment on the ads surface. Both arrived as natural language questions in Slack and took entirely different routes through the system.

The router reads the first as a root-cause question and sends it down the diagnostic path. It identifies the best analysis framework for ads revenue, which is codified knowledge of how the metrics in that domain relate to each other, which dimensions are worth decomposing, and what counts as a meaningful move. Then it works through segment, market and campaign type against certified metrics to isolate what changed. The second question never touches the data lake. The router reads it as an experiment question, selects the experiment skill, pulls the pre-computed scorecard and the test’s own metadata from our experiment platform, and summarises the read rather than recomputing it. This is powered through 50+ skills and 120+ analysis frameworks that sit behind that routing decision. Underlying that is an index that tells the agent what to search, context that tells it how to query, and a framework that tells it how to think. Because the frameworks are shared rather than living in an analyst’s head, the interpretation compounds instead of being re-derived every time someone asks.

The second example of such a loop is Scarlet, which powers near-self-healing pipelines (L4). When a pipeline fails, an agent runs the root-cause analysis, triages, and then either fixes it or hands it to the team that owns the upstream problem. It escalates when the failure sits outside its documented runbooks or the pre-defined gates fire.

Figure 2. Scarlet in action on Slack.

Context that maintains itself

Context sets an agent’s ceiling. An agent that does not know a metric’s grain, its exclusions, and its caveats will guess and confidently produce wrong outputs at speed and at scale.

Realising the criticality of this, we have dedicated platform investment, as well as dedicated functional bandwidth to generate context docs.

Figure 3. ContextIQ.

Context goes out of date faster than anyone maintains it by hand, so we build the maintenance into our workflows. We built ContextIQ, and its Context Lifecycle Manager, to treat context as something with a lifecycle rather than a document somebody wrote once. A newer skill of ours reads an instrumentation spec alongside the existing context, proposes the SQL changes that follow from it, and updates the context document in the same pass. We work the problem from the other direction too. When we categorise an agent failure in production, we patch the context document behind it.

Two analysts recently used our internal agents to understand how the packaging fee is stored as a configuration. Having found the answer, the agent opened a merge request that committed both a certified-context table reference and a golden-dataset test case, so the next agent to ask the same question would find the answer already documented and the check already in place. One of the analysts spotted a false positive in it. The agent corrected itself and reopened the merge request. That is the learning capability working as designed, and it happened without anyone setting out to demonstrate it.

Loops that run unattended

The step from L3 to L4 is mostly the step from interactive to scheduled, and it is where we go down the path of autonomous execution, because no human is watching at the moment the work runs.

We have built root-cause analysis (RCA) as a platform capability, and it powers our automated metric and OKR commentaries, which are published through automated agents (configurable cadence). It judges whether a move is meaningful against standard deviation over six months and year on year, walks the metric tree to find which country, segment or funnel stage carried it, and correlates the operational metrics that moved alongside. Importantly, it also scans internal context for what teams changed on the ground, such as delivery fee and incentive moves, merchant visibility shifts, and experiments shipped in the same period. It also compares the movement against the same period in the previous year, which separates a seasonal effect from a real one and enables it to report a Songkran (Thai New Year) dip as amplified rather than merely expected. All of it is grounded in our own context documents, which keeps the narrative about the business rather than generic model output. The analytics owner is tagged on every report, and edits sync back so corrections land in the system.

Figure 4. OKR commentary shared through RCA agent.

Analysts as builders

The clearest evidence that our centre of gravity has moved is BriX, an internal portal we built and run ourselves.

Figure 5. Home page of BriX.

The premise is to configure once, host everywhere. We configure a system prompt, a set of context files, a model, the MCP connections and an interface once, and what comes out is a purpose-built analytics surface for a particular team or job. Each one inherits certified data, permissions and reusable agent skills rather than being wired up from scratch, and it runs wherever the work already happens: in Slack, invoked from inside an IDE, or on a schedule with nobody watching. We have grown usage more than 10x since September 2025, with strong retention, and every function at Grab now has users on it. Our aim is to put L3 workflows in the hands of people who are not advanced users.

We run it without a product manager, a technical programme manager or a designer. Our data engineers own the product, the platform, the support queue and the eval loop, with Claude Design doing the interface work and the builders triaging their own bugs. In the first half of this year, they shipped 31 production deployments, 283 merge requests and 60 features.

Three of our apps show the range:

  • Insights Lab is the general-purpose surface: a stakeholder asks for a metric, a breakdown or a root-cause in natural language, and the agent loads a specialist skill and answers off certified metrics rather than from memory.
  • We built Funnelytics to enable easy understanding of our consumer funnels. A funnel question used to mean an analyst writing the query and then assembling the view in Tableau or Power BI, and doing it again the next time someone wanted a slightly different path through the app. Now a stakeholder picks the events they care about and Funnelytics queries the raw event stream, builds the Sankey and funnel views, and writes the summary. If they cannot find the right instrumentation, which happens often on products still being redesigned, a live debugger lets them tap through the app on their own phone and watch the events fire.
  • Monte (like Monte Carlo) runs simulations to put a probability on a business outcome. You give each uncertain input a range rather than a single value, and it runs ten thousand scenarios to return the likelihood of hitting a target.
Figure 6. Interface of Insights Lab and Funnelytics.

Outside the portal, the same instinct shows up in smaller ways. Our analysts have been building more bespoke tools that enable better workflows for themselves and stakeholders.

The path forward

In February, 44% of the tickets our analysts closed were mechanical (data preparation, alerting, reporting); by June, that share had fallen to 30%. That capacity was redirected to other higher-leverage work, such as building new workflows to enable stakeholder self-serve, as well as more time spent on generating deeper insights for business opportunities.

Figure 7. Comparison of percentage of tickets closed in Q1 vs Q2 2026.

Importantly, our cycle times reduced by ~33%.

Figure 8. Comparison of time taken to resolve a ticket in Q1 vs Q2 2026.

The sharpest version of this sits in a Slack channel where self-serve agents are enabled. In March, an analyst had to step into half of them; by May, it was under a quarter. The share answered with no human involvement rose from 53% to 67% for metric questions, 63% to 90% for data pulls, and 50% to 81% for SQL requests. Just under three in four of the threads were started by someone outside the analytics team, and 85% of them got a first response inside a minute. Nearly every thread is logged as a ticket on the team’s board, and roughly two-thirds of the data exploration tickets on that board now arrive through the channel rather than through an analyst, and are solved by our data agents. For the ~230 tickets that arrived via the channel, if we apply a conservative assumption of 1–2 days per ticket, that is 230 to 470 business days of stakeholder asks that would have been in the backlog.

None of these arrived on a roadmap. They came from analysts who saw a loop worth automating and built it, which is why the climb is uneven. These have been strong proof points for us to believe our investments are working, and many of these workflows are starting to operate at scale. We will keep experimenting and iterating, and we expect to get a fair amount of it wrong. An analyst who owns a loop, sets its quality bar and reviews its exceptions is doing a different job from one who answers questions. Most of our team is somewhere in that transition today, and we truly believe it is changing what analytics is at Grab.

Join us

Grab is a leading superapp in Southeast Asia, operating across the deliveries, mobility, and digital financial services sectors. Serving over 900 cities in eight Southeast Asian countries: Cambodia, Indonesia, Malaysia, Myanmar, the Philippines, Singapore, Thailand, and Vietnam. Grab enables millions of people every day to order food or groceries, send packages, hail a ride or taxi, pay for online purchases or access services such as lending and insurance, all through a single app. We operate supermarkets in Malaysia under Jaya Grocer and Everrise, which enables us to bring the convenience of on-demand grocery delivery to more consumers in the country. As part of our financial services offerings, we also provide digital banking services through GXS Bank in Singapore and GXBank in Malaysia. Grab was founded in 2012 with the mission to drive Southeast Asia forward by creating economic empowerment for everyone. Grab strives to serve a triple bottom line. We aim to simultaneously deliver financial performance for our shareholders and have a positive social impact, which includes economic empowerment for millions of people in the region, while mitigating our environmental footprint.

Powered by technology and driven by heart, our mission is to drive Southeast Asia forward by creating economic empowerment for everyone. If this mission speaks to you, join our team today!

Don’t stop early: Case-folding source code at memory speed

Post Syndicated from Alexander Neubeck original https://github.blog/engineering/architecture-optimization/dont-stop-early-case-folding-source-code-at-memory-speed/


Suppose a user searches for café and your corpus contains CAFÉ, or they type straße and you’ve stored STRASSE. To make these count as matches, you need a canonical form that erases case distinctions, so that two strings which differ only in case compare equal. That form is case folding, and it shows up wherever text is matched rather than displayed: search engines, regex (?i) flags, case-insensitive usernames and hostnames.

It’s a basic operation, but at GitHub we run it a lot. Blackbird, GitHub’s code search engine, indexes over 180 million repositories—more than 480TB of source code. Every byte is case-folded before we extract ngrams and build the index, and for every potential query result, another (implicit or explicit) case folding operation is needed to locate matches. At that scale, the speed of even a basic operation starts to matter.

This post is about how we made it fast, and it starts somewhere counterintuitive: the biggest win in the ASCII fast path came from removing an optimization, not adding one. It turns out to be faster to sweep the whole buffer with no branches than to stop early at the first non-ASCII byte. We open-sourced the result as a Rust crate called casefold.

Folding is not lowercasing

It is tempting to reach for str::to_lowercase, but lowercasing and folding are different operations with different goals:

Lowercasing is for display, and it’s locale- and context-sensitive: Greek final sigma lowercases to ς at the end of a word and σ elsewhere, and Turkish I lowercases differently than English I. Case folding is for comparison, and it’s deliberately context-free and locale-independent. The point is a relation that stays stable and symmetric, so that if A folds to match B, B folds to match A in any locale. The Unicode Character Database ships an explicit CaseFolding.txt for exactly that.

The two operations diverge on real characters—ß, İ, final sigma—which is why lowercasing as a stand-in silently produces wrong matches. This crate implements only the simple (1-to-1) folds—statuses C and S in CaseFolding.txt—and not the multi-character “full” folds (ß → ss) or Turkic locale folds (the dotted İ). This isn’t an unusual choice: common tools and regex engines like ripgrep make the same restriction, and being consistent across tools is important.

The counterintuitive core: Don’t stop early

We deal mostly with source code, so the text we fold is overwhelmingly ASCII and making it run at memory speed is the single most important thing we can do. Everything else just has to keep the rare non-ASCII path from spoiling it.

The fold of an ASCII letter is trivial—A..=Z map to a..=z, everything else is unchanged—so the ASCII pass is really just “sweep the buffer, lowercase in place.” Ask any LLM for it and you might get something like this:

let bytes = s.as_bytes_mut(); 
for (i, b) in bytes.iter_mut().enumerate() { 
    if *b >= 0x80 { 
        break; // non-ASCII at index i: hand the rest to the Unicode path 
    } 
    if b.is_ascii_uppercase() { 
        *b += 32; // 'A'..='Z' → 'a'..='z' 
    } 
}

It looks ideal: do the cheap byte work, and the instant you hit a non-ASCII byte, break and let the “real” Unicode path take over: “only do the cheap work until you have to.” On an Apple M4 this runs at about 3 GiB/s. That sounds fine in isolation, but it is more than 15× short of “optimal” because of the if branches.

Let’s delete every branch, line by line:

  • if b >= 0x80 { break } → don’t stop at all. ORevery byte into an accumulator and test it once, after the loop: high_bit_acc |= *b. Same information (was there any non-ASCII byte?), zero branches in the body.
  • The A..=Z range test → make it arithmetic. b.wrapping_sub(b'A') < 26 is true exactly for A..=Z (any other byte wraps to ≥ 26), yielding a 0/1 mask with no branch.
  • The conditional write → fold the mask into the store.| (is_upper << 5)sets bit 5—turning an upper-case letter lower-case and being a no-op on everything else—the byte is always written, never branched on.

What’s left has no branch in its body and no early exit:

let mut high_bit_acc: u8 = 0; 
for b in &mut bytes { 
    high_bit_acc |= *b; // detect any non-ASCII byte 
    let is_upper = b.wrapping_sub(b'A') < 26; // branchless A..=Z test 
    *b |= u8::from(is_upper) << 5; // set bit 5 → lowercase, else no-op 
} 
if high_bit_acc & 0x80 == 0 { 
    return bytes; // pure ASCII: already folded in place, no second buffer 
}

A loop with no data-dependent control flow is trivially vectorizable: LLVM emits 16-byte-at-a-time NEON and the whole thing runs at > 45 GiB/s—essentially memory bandwidth. And we come out of the pass already knowing, from high_bit_acc, whether there’s any non-ASCII work left to do.

How much did each step matter? Measuring the cumulative ladder on pure ASCII (Apple M4, 5.7 KB buffer):

Version  Throughput  Vectorized? 
naive (break + branch test)  3.1 GiB/s  no (0 vector instrs) 
→ branchless test/write, keep break  2.6 GiB/s  no (0 vector instrs) 
→ drop the early-exit break  7.6 GiB/s  partially (25 vector instrs) 
→ branchless test + write (the loop)  >45 GiB/s  fully (41 vector instrs) 

The early-exit is what gates vectorization: keep the break but make the body perfectly branch-free and you still get zero vector instructions (~2.6 GiB/s); a data-dependent loop exit is enough on its own to keep the loop scalar. Only once the break is gone can the compiler vectorize. The final step—making the upper-case fold branchless—then turns a partially vectorized loop (which still compiles the conditional store to a compare-blend-masked-store, ~7.6 GiB/s) into the straight-line arithmetic that hits memory bandwidth.

Note: Branchless is a pessimization in scalar code. Look again at the table: making the body branchless while keeping the break (2.6 GiB/s) is actually slower than the naive branchy loop (3.1 GiB/s). The asm explains why. The branchy version only stores a byte when it actually changes one; its conditional strbis skipped for every lowercase letter, digit and space (the vast majority of real text), and the well-predicted branch that guards it is nearly free. The branchless version replaces that rarely taken store with an unconditional strbevery iteration, writing back all ~5,700 bytes instead of just the handful of upper-case ones. Extra write traffic for no benefit. Branchless-write only wins once the loop vectorizes, because then the store becomes a single 16-byte vector write regardless of content, and the per-byte cost disappears. The lesson: a branchless body is worth it only as the enabler for vectorization. On its own, in scalar code, it can cost you.

There’s also a middle ground, and it’s what standard libraries use. Instead of testing one byte at a time, [u8]::is_ascii scans a machine word at a time—on a 64-bit target it tests 16 bytes per iteration by OR-ing two u64 lanes and checking all their high bits with a single & 0x8080_8080_8080_8080 mask. You can build the ASCII fast path on top of that: chunk-scan to find the ASCII prefix, then run the branchless (vectorizable) convert over it. That keeps the early-exit ability—it still bails on the first non-ASCII block—while letting both halves go fast. The catch is that it reads the data twice (once to scan, once to convert), landing at about 23 GiB/s—roughly half of the single-pass branchless sweep, and ~7× the naive break loop. A solid, general-purpose default; just not the absolute ceiling when you control the whole loop and can fold detection and conversion into one branch-free pass.

Wouldn’t fusing the two passes be faster? It’s the obvious next thought: keep the chunked early-exit but convert each 16-byte block right after you’ve confirmed it’s ASCII, reading the data only once. Measured, it’s ~2.6× slower—8.7 GiB/s versus the two-pass 23. The inner block convert still vectorizes to a single 16-byte op, but now there’s a data-dependent early-exit branch every 16 bytes, and that branch pins the loop to one block at a time: the compiler doesn’t unroll or software-pipeline across blocks, and each iteration pays the full load→test→branch→convert→store latency with nothing to hide it behind. Split into two passes, each one is clean: the scan is a branch-light, store-free word scan that races through memory, and the convert is the fully-vectorized branch-free sweep at >45 GiB/s. Two fast, branch-free passes beat one branchy fused pass—even though the fused version touches the data half as many times. It’s the same lesson one more time: in the hot loop, the branch is the enemy.

Avoiding the heap

Forty-Five GiB/s also means doing zero unnecessary allocation. simple_fold takes the input String by value, owning the heap buffer it can mutate and return it. If the OR-accumulator’s high bit was clear, the input was pure ASCII already folded in place. We hand the same allocation straight back, no second buffer and no copy. Otherwise, we memchrto the first non-ASCII byte and scan the tail from there, leaving the output buffer unallocated (a null write cursor) until we hit a character that folds to different bytes. Text whose multibyte content never folds—CJK, Hangul, Kana, Arabic, Hebrew, symbols—also returns the original allocation untouched, never copying a byte.

Why a second buffer rather than rewriting in place like the ASCII pass? Because folding can make the string longer: almost every fold preserves the UTF-8 length or shrinks it, but two outliers grow—U+023A (Ⱥ) and U+023E (Ɀ) are 2 bytes each yet fold to 3-byte characters (ⱥ, ɀ). Once one appears, the output no longer fits in the input’s bytes, and we need somewhere new to write.

We allocate that buffer once, sized for the worst case, rather than growing it as more folds appear. Incremental reserve calls would mean re-checking capacity, occasionally reallocating, copying everything written so far, and juggling extra length/capacity bookkeeping; a single up-front allocation lets a raw write cursor run straight to the end with none of that. And since the cursor is nulluntil that first growing/changing fold, it doubles as the “have we allocated the extra buffer yet?” flag.

Sizing it needs a bound on growth, and those same two outliers give it: every 2 input bytes yield at most 3 output bytes, capping the output at 1.5× the input—exactly the capacity we reserve:

out = Vec::with_capacity(bytes.len() + bytes.len() / 2 + 4); 

After that the loop writes through a raw pointer with no capacity checks and calls set_len once at the end. Two more details keep it branch-light. The run of unchanged bytes between two folds is moved with a single copy_nonoverlapping rather than byte by byte. And each fold unconditionally writes all 4 bytes of a little-endian word before bumping the cursor by only the folded length (1–4)—dropping a branch on the output length from the hot path, with the + 4 in the reservation as the headroom that makes the final character’s over-store safe.

Making Unicode cheap too

When a character does fold, we still don’t want to fall off a cliff—decode UTF-8, hash lookup, re-encode. Unicode 16.0 has 1484 simple-fold mappings, but they’re a very sparse and very structured relation. Four observations shrink them to 1776 bytes and let the fold run without ever decoding a full character.

Even on the non-ASCII path, the overwhelming majority of characters do not fold. The hot operation isn’t really “fold this character,” it’s “does this character fold?” Almost always no. The table has to make that negative test as cheap as possible; the actual folding is the rare case on an already-rare path. That priority is what shapes the layout below—the page bitmap exists precisely so a non-folding character is rejected in a single bit test, straight from its leading UTF-8 bytes, without decoding or scanning anything.

This is exactly why a HashMap<u32, u32> is the wrong shape for the job, not just a bigger one. A hash map is optimized for the hit: it finds a present key in roughly one probe, and only spends extra work (more probes, full key comparison) when load factor or collisions bite. But our workload is dominated by misses—characters that aren’t in the table at all—and a miss is a hash map’s least favorite query: it still has to hash the key, jump to a bucket, and walk the probe sequence far enough to prove absence.

Foldable code points cluster into 64-code-point “pages”

Foldable code points bunch together. Slice the code space into 64-code-point “pages” and the ~1484 folds touch just 59 of ~1960 possible pages. A one-bit-per-page presence bitmap answers the negative test on its own: a clear bit is a definitive “no fold”—copy through, done—which is what makes fold-free scripts cheap. Only on a set bit do we consult a second structure, a cumulative-popcount side table that ranks the page (how many populated pages precede it) to find its slice of entries, storing nothing for the ~1900 empty pages.

let (word_idx, bit_idx, c_len) = if lead < 0xE0 { 
    (0usize, lead & 0x1F, 2usize) // 2-byte: word 0 
} else if lead < 0xF0 { 
    ((lead & 0x0F) as usize, bytes[read + 1] & 0x3F, 3) // 3-byte: word = nibble 
 
} else { 
    ( 
        (((lead & 0x07) as usize) << 6) | (bytes[read + 1] & 0x3F) as usize, 
        bytes[read + 2] & 0x3F, 
        4usize, 
    ) // 4-byte: merge 2 bytes 
}; 
// reject without decoding: clear bit ⇒ no fold 
if word_idx >= PAGE_BITMAP.len() || (PAGE_BITMAP[word_idx] >> bit_idx) & 1 == 0 { 
    read += c_len; 
    continue; 
} 

Because word_idxdepends only on the lead byte (and, for four-byte sequences, the first continuation byte), the bitmap load can be issued early.

Within a page, folds come in runs

A set page bit tells us something on this page folds, but not which code points or to what. The obvious encoding is one entry per foldable code point—but that is both bulky and slow to search: a page can hold dozens of folds, and we’d have to scan them all to find the one matching the current code point. The structure of the data rescues us again. Adjacent code points overwhelmingly share the same delta to their fold: A–Z all map +32, and Latin Extended is full of alternating runs like 0x0100, 0x0102, 0x0104, … where every second code point folds. Instead of per-code-point entries we store runs—start, end, stride, delta—and a 1-bit stride flag covers both the contiguous and the every-other case. This interval compression collapses the ~1484 individual folds into just 238 runs across the 59 pages (≈four per page), leaving the within-page search only a handful of entries to look at instead of dozens. This range-with-delta encoding (including the stride trick) is borrowed from Go’s unicode package, whose CaseRange records store a Lo/Hi range plus per-case deltas, with an UpperLower sentinel marking the alternating blocks. Runs are split at the page boundaries so a run never straddles two pages.

A run record is two clean bytes

With both endpoints inside one page they fit in 6 bits, split across two arrays: RUN_END_LOW[``i``] = end & 0x3F (the scan key) and RUN_START_STRIDE[``i``] = (start & 0x3F) | ((stride − 1) << 6) (read only on a hit). Because each key is one clean byte, the within-page search can go wide: rather than comparing cp & 0x3F against the runs one at a time, we load 8 end_low bytes into a single u64 and test all of them at once with one branchless SWAR step—(chunk | 0x80…80) − broadcast(low) & 0x80…80 sets the top bit of every lane whose key is ≥ cp & 0x3F. A single bit-scan of that mask (the keys are sorted, so the first set lane is the run we want) finds the slot. A page holds ~4 runs on average; that one 8-wide compare almost always resolves the entire search in a single step. One unlucky page does hold 30 runs, which puts the compare inside a short loop that strides eight keys at a time—but that loop trips at most a handful of times on exactly one page in all of Unicode, and never on the common ones. Either way: no per-run branch, and no code-point reconstruction anywhere.

/// Offset of the first run with `end_low >= low_v` in a page of `n` runs, 
/// or `n` if none. Scans 8 `end_low` bytes at a time via SWAR. 
#[inline] 
fn scan_end_low(lo: usize, n: usize, low_v: u8) -> usize { 
    const HIGH: u64 = 0x8080_8080_8080_8080; 
    const ONES: u64 = 0x0101_0101_0101_0101; 
    let bcast = (low_v as u64).wrapping_mul(ONES); 
    let mut base = 0; 
    while base < n { 
        // RUN_END_LOW is padded by 8 bytes so this read is always in bounds. 
        let chunk = u64::from_le_bytes( 
            RUN_END_LOW[lo + base..lo + base + 8] 
                .try_into() 
                .expect("8-byte slice"), 
        ); 
        // `(b | 0x80) - low_v` keeps its high bit iff `b >= low_v` (no 
        // cross-lane borrow). The first set lane is the first run `>= low_v`. 
        let ge = (chunk | HIGH).wrapping_sub(bcast) & HIGH; 
        if ge != 0 { 
            let j = base + (ge.trailing_zeros() / 8) as usize; 
            return if j < n { j } else { n }; 
        } 
        base += 8; 
    } 
    n 
} 

Folding is a little-endian byte addition

On a little-endian machine the folded character’s UTF-8 bytes, read as a u32, equal the source bytes (as a u32) plus a per-run constant. A parallel BYTE_DELTA[i] table then turns the whole fold into a masked load, one wrapping_add, and a 4-byte store:

let word = u32::from_le_bytes(next_four_bytes) & length_mask; // keep this char's bytes 
let folded = word.wrapping_add(BYTE_DELTA[i]); // the fold, as one byte add 
write_u32_le(dst, folded); // store all 4 bytes... 
dst += utf8_len(folded); // ...advance by the folded length

Both lengths in that snippet—the length_mask for the source character and the advance by the folded length for the destination—come from one more tiny trick. A UTF-8 sequence’s length is fixed by the top four bits of its lead byte, letting the 16 possible lengths pack one nibble each into a single 64-bit constant (0x4322_1111_1111_1111); the length is then a shift and a mask, (LEN_BITS >> (4 * (lead >> 4))) & 0xF—no if chain, no table memory, nothing for the predictor to get wrong. (A count leading ones(!lead).leading_zeros()—would also work, since a lead byte carries one leading 1-bit per byte of the sequence.)

/// Number of bytes in the UTF-8 sequence whose lead byte is `lead`. 
#[inline] 
pub fn utf8_len(lead: u8) -> usize { 
    const UTF8_LEN_BY_LEAD: u64 = 0x4322_1111_1111_1111; 
    ((UTF8_LEN_BY_LEAD >> (4 * (lead >> 4))) & 0xF) as usize 
}

Because we advance by the folded length, this even handles length-changing folds—U+212A KELVIN SIGN (3 bytes) → k (1 byte), or U+023A Ⱥ (2 bytes) → U+2C65 ⱥ (3 bytes)—by writing fewer or more bytes than were read. That’s the part we believe is genuinely new: every other folder we looked at—ICU, Go’s unicode, Rust’s regex, CPython, glibc—decodes UTF-8 to a code point, applies the fold there, and re-encodes (even SIMD folders decode first). Doing the arithmetic in byte space skips both the decode and the encode, which is exactly why this path can outrun a hash map that already has the answer tabulated—the hash map still has to decode its key and encode its result. The byte-space arithmetic assumes the input is well-formed, shortest-form UTF-8—every code point encoded with the minimal number of bytes. Reading the source bytes as a u32and adding a per-run delta only lands on the correct folded encoding when the source is in canonical form; an overlong encoding (a code point padded into more bytes than necessary, e.g. / as 0xC0 0xAF) has a different byte pattern and would break thelength_mask and the delta arithmetic. This is not a real restriction in Rust—&str/String are guaranteed to hold valid UTF-8, which by definition rejects overlong sequences—but a caller feeding raw bytes from elsewhere must validate (or otherwise normalize) them first.

The ASCII shortcut in the tail loop

One more shortcut rounds out the tail loop. Remember the first pass already lowercased every ASCII byte, so when the scan meets an ASCII byte in the tail it advances a single byte and moves on—no page probe, no table touch at all. And it doesn’t copy that byte either: unmodified bytes (ASCII and non-folding multibyte alike) aren’t moved one at a time. The scan just keeps walking until it reaches a character that actually folds, then flushes the whole unchanged run between the last fold and this one with a single copy_nonoverlapping. Mixed text—CJK with ASCII spaces and punctuation, or code with the occasional accented identifier—therefore races through the ASCII filler and only consults the bitmap for genuine multibyte characters, copying in bulk rather than byte by byte.

Putting it together: the whole table

Component  Bytes 
PAGE_BITMAP (1 bit per 64-cp page)  248 
POPCNT_SAMPLES (cumulative popcount)  32 
PAGE_OFFSET (per populated page)  60 
RUN_END_LOW (scan key, end & 0x3F, +8 pad)  246 
RUN_START_STRIDE (start & 0x3F | stride)  238 
BYTE_DELTA (little-endian fold delta per run)  952 
Total  1776 

That’s 9.6 bits per fold entry, over half of it the BYTE_DELTA side table we trade for the decode-free path; the index + run records alone are ~4.4 bits/entry.

Next to the obvious alternatives, that 1776 bytes is an order of magnitude or more smaller—and unlike most of them, it never decodes a character:

Representation  Size
Naïve [(u32, u32); 1484]  ~11.6 KB 
regex-syntax’s case_folding_simple table  ~70 KB 
Go’s unicode.SimpleFold (orbit + ASCII + ranges)  ~7.3 KB 
A runtime HashMap<u32, u32>  ~17 KB 
This crate (paged bitmap + packed runs)  1776 B 

Where it lands against the alternatives

On the common case, ASCII, folding runs at memory bandwidth (>45 GiB/s), more than an order of magnitude ahead of other real folders and more than 50% faster than the (non-equivalent) str::to_lowercase function. To get a rough “upper bound” for the non-ASCII case, we measured the optimized Utf8 decoding + encoding round trip without performing any actual case folding using the simdutf crate. This experiment achieves consistently about 2GB/sec and is only about twice as fast than our solution for the worst case all-folding input. A naive hash map trails everything on all workloads.

The three columns are real case folders that produce identical output: simple_fold (this crate), simd_normalizer (the simd-normalizer crate), and HashMap (naive CaseFolding.txt lookup). The workload rows are chosen to simulate different scenarios from typical to worst case:

Workload (input size)  simple_fold  simd_normalizer  HashMap (byte path) 
Pure ASCII (5.7 KB)  >45 GiB/s  1.21 GiB/s  213 MiB/s 
Chinese/Japanese/Korean, no folds (8.1 KB)  2.95 GiB/s  1.97 GiB/s  558 MiB/s 
Symbols / Myanmar, no folds (9.0 KB)  2.96 GiB/s  1.56 GiB/s  410 MiB/s 
Worst case: Latin/Greek/Cyrillic (Unicode U+0000–U+FFFF), all folding (8.8 KB)  869 MiB/s  922 MiB/s  334 MiB/s 
Length-changing folds (1.7 KB)  1.26 GiB/s  716 MiB/s  233 MiB/s 

Treat the absolute figures as illustrative, not portable: the whole design leans on auto-vectorization, SWAR, and little-endian byte arithmetic, so the numbers—and even the ratios between rows—can shift substantially on a different microarchitecture (a wider or narrower vector unit, different memory bandwidth, a big-endian target, x86 vs ARM).

More details can be found in the performance section of the README.

Take this with you

Case folding is about as basic as text operations get, which is exactly why it was worth the effort: we run it across every byte we index. The wins came from two ideas that both cut against instinct—sweep the whole buffer branch-free instead of stopping early, and do the fold as byte-space arithmetic instead of decoding to a code point. Together they let the common case run at memory bandwidth and the rare fold run without a decode, in a table small enough (1776 bytes) to stay resident. The decode-free byte-space fold is the piece we believe is genuinely new; it’s why this path can beat a hash map that already has the answer.

There’s surely more to find here, and we’d like to see it. The crate is casefold; the generated table and full design notes live alongside the source.

The post Don’t stop early: Case-folding source code at memory speed appeared first on The GitHub Blog.

Crowdsourced taxonomy verification: A feedback-driven framework for refining knowledge graph relationships via online search interactions

Post Syndicated from Grab Tech original https://engineering.grab.com/crowdsourced-taxonomy-verification

Introduction

The efficacy of semantic search relies on the accuracy of the underlying Knowledge Graph (KG). In high-velocity domains like on-demand food delivery or e-commerce, the catalog of entities like dishes, products, and merchants changes rapidly.

Current methods for KG construction and maintenance face three critical challenges:

  • Inaccuracy and hallucination from Large Language Models (LLMs): Automated models often infer relationships based on statistical text co-occurrence rather than semantic reality. For instance, an LLM might incorrectly classify “Pho” as a child of “Italian Noodle Soup” due to linguistic similarity, leading to irrelevant search results.

  • Scalability limits of manual verification: Traditional verification relies on human annotators or domain experts. This approach is slow, expensive, and unable to keep pace with dynamic catalogs containing millions of entities. For example, daily changes in restaurant menus or grocery stock keeping units (SKUs).
  • Error propagation in ranking: Inaccurate graph edges propagate errors downstream. If a parent-child relationship is wrong, query expansion algorithms will retrieve irrelevant items, directly degrading Click-Through Rate (CTR) and user trust.

We introduce a feedback-driven verification engine that operationalizes the search interface as a validation environment. Key contributions include:

  • User feedback-driven verification: The system treats unverified graph edges as hypotheses. Instead of accepting them as truth, it tests them against live traffic by injecting them into search suggestions and measuring user engagement.

  • Hierarchical relationship refinement: Unlike systems that only validate entities (nodes), this framework validates structural links (edges). It confirms whether entity A is truly a parent, child, or sibling of entity B, ensuring structural integrity.

  • Adaptive exploration: The system employs a greedy exploration policy. It intelligently balances exploitation by showing known good results with exploration through injecting unverified candidates to gather data without degrading the user experience.

Background

Automated KG construction using LLMs and unstructured content extraction can scale quickly across large, dynamic catalogs. However, relationships inferred from text co-occurrence or vector similarity do not always reflect semantic reality. Manual verification by domain experts remains accurate but does not scale to millions of entities that change daily.

When inaccurate edges enter the graph, ranking and query expansion systems propagate those errors to users. Incorrect parent-child or sibling links lead to irrelevant search results, reduced CTR, and lower user trust. An additional solution is required that can validate graph structure continuously, at scale, without relying solely on manual curation.

Solution

The overall workflow of this invention is shown in the following figure. The details of each step are explained in this section.

Figure 1. The system architecture.

The proposed framework functions as a closed-loop validation ecosystem. It is composed of four integrated modules designed to continuously cycle data from the KG to the user interface and back, using real-world interactions to separate semantic truth from artificial intelligence (AI) hallucinations.

The verification process follows a continuous, iterative loop that cycles data from the backend graph to the frontend user interface and back. This four-step procedure operationalizes the human-in-the-loop validation mechanism:

  1. Hypothesis generation
  2. Candidate injection
  3. Signal aggregation and scoring
  4. Graph update logic

Architecture details

KG core

The central repository acts as the source of truth, storing entities such as dishes, products, or merchants, and the connections between them. To manage the verification process, the system introduces a specialized metadata layer that classifies every connection (or edge) into one of two distinct states:

  • Verified edges: These are established relationships that have been validated either by high historical traffic or human confirmation. They represent the safe structure of the graph. For example, “Sushi” is definitely a child of “Japanese Cuisine”, and is used to power standard search results.
  • Candidate edges: These are probabilistic, unverified relationships generated by automated LLMs or content scrapers. They are treated as hypotheses waiting to be proven. For example, if an LLM ingests a blog post and predicts that “Pho” is related to “Italian Noodle Soup,” this link is stored as a candidate edge, invisible to the main search algorithm until validated.

Search and injection module

This module sits between the KG and the user, intercepting the query execution pipeline. Unlike standard ranking algorithms, which strictly optimize for relevance by showing only the best results, the injection engine employs a balanced strategy known as exploration vs. exploitation.

  • The injection mechanism: When a user performs a search, the system retrieves a list of high-confidence results (exploitation). Simultaneously, it deliberately retrieves a small subset of candidate edges related to the query. It injects these unverified candidates into specific, lower-risk slots within the user interface, such as the third or fourth position in a related searches chip carousel.
  • Risk management: To prevent user frustration, the system limits the number of candidates shown per session. This ensures that the user is primarily served helpful, verified content, while still providing enough data points to test new hypotheses.

Behavior tracking module

To accurately measure whether a candidate relationship is valid, the system tracks user micro-interactions with high granularity. It captures not just the final click, but the precise context in which the interaction occurred to determine semantic intent.

  • Contextual anchoring: The system logs the specific search term, also known as the anchor, used by the user. A click on “Pho” is only counted as a vote for the relationship if the user was searching for “Noodle Soup” at the time.
  • Signal classification: Signals are assessed in aggregate to estimate the relevance of a candidate relationship. Higher-intent engagement contributes stronger positive evidence, lighter exploratory behavior contributes weaker positive evidence, and lack of engagement or explicit negative actions contributes negative evidence.

Verification and refinement engine

This is an offline processing unit that acts as the final judge. It aggregates thousands of individual user signals to update the topology of the KG.

Relevance scoring: Instead of complex formulas, the engine calculates a simple confidence ratio. It looks at the total number of times a candidate was shown versus the number of positive interactions it received.

Graph topology updates:

  • Promotion (verify): If the confidence ratio exceeds a verification threshold. For example, if the candidate performs as well as known good items, the edge is upgraded from candidate to verified. It becomes a permanent part of the graph and is shown to all users.
  • Demotion (prune): If the candidate consistently fails to garner engagement or receives negative signals, it falls below a pruning threshold. The system automatically deletes this edge, effectively correcting the AI’s hallucination and cleaning the dataset.

Implementation

Hypothesis generation

The process begins by identifying a target subject, referred to as the anchor entity. For example, the specific dish “Pho”. The system queries the KG to retrieve a set of potential relationships. This retrieval includes both verified neighbors, where relationships are already confirmed by experts, and candidate neighbors, where the relationships are predicted by AI models but not yet proven.

Candidate injection

Once a hypothesis is selected, the system exposes it to real users to gather evidence. When a user actively searches for the anchor entity, the system dynamically injects the candidate neighbor into the search results.

  • User interface (UI) implementation: The candidate is presented alongside verified items, typically in a related categories carousel or a refine search chip list. This reflects standard relevance experimentation in search, with safeguards to ensure the experience remains controlled and measurable.
  • Exposure logging: The system logs an impression event specifically linking the anchor to the candidate. This record serves as the baseline, documenting that the user saw the relationship, which is essential for calculating future engagement rates.

Signal aggregation and scoring

Instead of using a raw count of clicks, the system calculates a sophisticated relationship confidence score by aggregating user interactions over time. This scoring model uses a weighted tier system to distinguish between casual interest and strong intent.

  • Weighted interaction logic: The system assigns a higher value to actions that require more effort or commitment. For example, a “Purchase” or “Add-to-Cart” action is weighted significantly heavier than a simple click, as it indicates a strong validation of the relationship. Conversely, scrolling past the item quickly or skipping is treated as a negative signal.
  • Normalization: To ensure fairness, the total weighted score is normalized against the total number of times the candidate was shown. This prevents niche items with low total traffic but high accuracy from being unfairly penalized.

Graph update logic

Periodically, the verification engine evaluates the confidence score against predefined benchmarks to update the KG’s topology. This is a binary decision process:

  • Validation (cementing the edge): If the accumulated confidence score exceeds a strict validation threshold, the system concludes that the relationship is genuine. The status of the edge is updated from candidate to verified. This permanently adds the relationship to the graph, ensuring it appears in future standard searches without the need for further testing.
  • Rejection (pruning the edge): Conversely, if the score falls below a rejection threshold, indicating that users consistently ignore or reject the suggestion, the system concludes the relationship is an AI hallucination. The edge is severed or removed from the graph. This pruning action cleans the dataset, preventing the system from making the same bad recommendation again.

Case study: hierarchical refinement in food delivery

To demonstrate the framework, consider a validation scenario in food delivery taxonomy. An LLM-based ingestion pipeline flags a candidate parent-child link
Noodle Soup → Dry Mee Pok and stores it as an unverified candidate edge in the KG, ready for live validation.

User-triggered validation:

When a user searches for “Noodle Soup,” the search module injects the candidate alongside verified results. For example, in a “Refine by Dish” filter carousel, and logs an impression linking the anchor query to the candidate.

Outcome collection:

User interactions like clicks, dwell time, scroll behavior, and conversions are captured and weighted over the validation window. The verification engine aggregates these signals and updates the graph: relationships that meet the validation threshold are promoted to verified status; those that fail are pruned or re-mapped to a more appropriate parent node.

Impact

By injecting unverified candidate edges into live search results and recommendation interfaces via a multi-armed bandit (MAB) exploration strategy, the system leverages implicit user feedback to validate semantic truth. This dynamic, human-in-the-loop mechanism effectively prunes erroneous connections and reinforces accurate taxonomies without the need for manual curation, significantly enhancing search relevance in dynamic domains such as food delivery and retail.

The case study demonstrates how the framework validates candidate relationships through live user traffic, collecting interaction signals and updating the graph without manual curation.

Learnings and conclusion

The feedback-driven verification engine operationalizes the search interface as a validation environment for KG relationships. By classifying edges as verified or candidate, injecting candidates through an exploration vs. exploitation strategy, and aggregating weighted user signals, the system promotes accurate relationships and prunes AI hallucinations at scale.

Unlike approaches that validate only entities, this framework validates structural links, confirming whether entity A is truly a parent, child, or sibling of entity B. The food delivery case study shows how a user-triggered search can initiate validation and outcome collection at scale, without manual intervention.

What’s next

Hierarchical confidence tiers

To safely graduate new connections into the production graph, we are introducing a dual-measurement trust system that requires both volume and variety before a new connection goes live: support mass (product hits, graph depth, recency) and corroboration (unique sessions, anonymous cohorts, and temporal spread). Connections must climb a strict state machine: proposed → shadow eligible → canary eligible → production, advancing only when both metrics meet progressively higher thresholds; if a snapshot causes metrics to fall below a tier’s floor, the connection is automatically demoted.

Adversarial and spam resistance

To prevent bad actors, bots, or highly repetitive users from manipulating the search graph, we are building a multi-layered defense system. We enforce per-merchant rate limits and anti‑abuse controls: hourly caps per session/device, exponential backoff for rapidly repeated actions, and a short (few‑hour) freeze of promotions from any user cohort after declines or “irrelevant” signals. For bot and Sybil attack defense, traffic flagged by abuse systems is excluded from trust calculations (but logged for analysis); votes must come from diverse network subnets or cohort buckets, and each bucket is subject to a daily contribution cap.

Join us

Grab is a leading superapp in Southeast Asia, operating across the deliveries, mobility, and digital financial services sectors. Serving over 900 cities in eight Southeast Asian countries: Cambodia, Indonesia, Malaysia, Myanmar, the Philippines, Singapore, Thailand, and Vietnam. Grab enables millions of people every day to order food or groceries, send packages, hail a ride or taxi, pay for online purchases or access services such as lending and insurance, all through a single app. We operate supermarkets in Malaysia under Jaya Grocer and Everrise, which enables us to bring the convenience of on-demand grocery delivery to more consumers in the country. As part of our financial services offerings, we also provide digital banking services through GXS Bank in Singapore and GXBank in Malaysia. Grab was founded in 2012 with the mission to drive Southeast Asia forward by creating economic empowerment for everyone. Grab strives to serve a triple bottom line. We aim to simultaneously deliver financial performance for our shareholders and have a positive social impact, which includes economic empowerment for millions of people in the region, while mitigating our environmental footprint.

Powered by technology and driven by heart, our mission is to drive Southeast Asia forward by creating economic empowerment for everyone. If this mission speaks to you, join our team today!

Tame Dependabot: Group your updates, slow the cadence, keep security fast

Post Syndicated from Bruno Borges original https://github.blog/security/supply-chain-security/tame-dependabot-group-your-updates-slow-the-cadence-keep-security-fast/


If you maintain an active repository, you know the feeling. You open your notifications on a Monday morning and there they are: five, 10, sometimes a dozen Dependabot pull requests, each bumping a single dependency by a single patch version. Individually, every one of them is helpful. Collectively, they’re noise. And noise is how important updates get ignored.

We looked at Microsoft’s GCToolkit, an open source Java library for analyzing garbage collection logs. As of July 2026, a git log of the repository showed that 92 of its 578 commits, roughly one in six, were Dependabot version bumps, with 61 in the previous 12 months alone, sometimes several in a single day. That’s a lot of review, merge, and CI cycles spent on routine maintenance.

The good news: Dependabot already ships with the features to fix this. In a recent pull request, the project changed its dependabot.yml in three small but meaningful ways, turning a daily drip of single-dependency pull requests into a predictable, grouped, monthly batch per ecosystem. Here’s what changed, why it works, and how to apply the same pattern to your own repositories, following the GCToolkit example.

The problem: Good defaults, wrong cadence

Here’s what GCToolkit’s configuration looked like before:

version: 2
updates:
- package-ecosystem: github-actions
  directory: "/"
  schedule:
    interval: daily
  open-pull-requests-limit: 10

This is a common starting point, but the daily interval here was a deliberate choice, not a default: schedule.interval is required, and GitHub’s suggested starter template uses weekly. Two things make this configuration noisy:

  • interval: daily tells Dependabot to check for updates every weekday (Monday through Friday). For a repository that references a handful of GitHub Actions, that can mean new pull requests landing on any weekday.
  • No grouping means every dependency gets its own pull request. Ten available updates equals 10 pull requests, 10 CI runs, and 10 review notifications.

The open-pull-requests-limit: 10 line is a symptom, not a cure: it caps the flood at 10 open pull requests, but it doesn’t stop the flood.

The fix: Three changes that compound

Here’s the configuration after the change:

version: 2
updates:
  - package-ecosystem: "github-actions"
    directory: "/"
    schedule:
      interval: "monthly"
    groups:
      monthly-batch:
        patterns:
          - "*"

  - package-ecosystem: "maven"
    directory: "/"
    schedule:
      interval: "monthly"
    groups:
      monthly-batch:
        patterns:
          - "*"

Three things are happening here, and they build on each other.

1. Group everything into a single pull request

The groups block is the heart of this change:

groups:
  monthly-batch:
    patterns:
      - "*"

A Dependabot group bundles multiple dependency updates into one pull request. The name (monthly-batch) is yours to choose. It shows up in the pull request title and branch name. The patterns list decides which dependencies belong to the group, and "*" is a wildcard that matches all of them.

So instead of 10 pull requests, you get one pull request titled something like “Bump the monthly-batch group with 10 updates.” One branch. One CI run. One review. If the whole batch is green, you merge once and you’re done. If something breaks, it’s contained in a single, reviewable place.

For larger projects, you don’t have to lump everything together. You can define multiple named groups with more specific patterns. For example, you could keep all your testing libraries in one group and your production dependencies in another, so related updates travel together and unrelated ones stay separate.

Grouping keeps getting more capable, too. In a February 2026 update, Dependabot gained the ability to group updates for the same dependency across multiple directories into a single pull request. That’s aimed squarely at monorepos: if one library is pinned in a dozen services, a single bump used to open a dozen near-identical pull requests, one per directory. Now you can point the directories key (note the plural) at a list of paths, or a glob like /apps/*, and let your group collapse all of them into one:

- package-ecosystem: "npm"
  directories:
    - "/apps/*"
  schedule:
    interval: "monthly"
  groups:
    monthly-batch:
      group-by: dependency-name
      patterns:Expand comment
        - "*"

That’s the same monthly-batch group as before, now spanning every service in the repository instead of a single directory. For the full set of options, see the Dependabot options reference.

2. Slow the cadence from daily to monthly

schedule:
  interval: "monthly"

Switching from daily to monthly changes the rhythm from “whenever anything changes” to “once, on a schedule you can plan around.” Combined with grouping, this is the real noise reduction: Dependabot now opens one batched pull request per ecosystem, per month, instead of a steady trickle all month long.

Monthly is the right call for a mature library where dependencies are stable and updates are rarely urgent. If you want something in between, weekly is also available, and you can pin the exact day and time with schedule.day and schedule.time.

3. Cover every ecosystem you actually use

The original config only requested version updates for github-actions. But GCToolkit is a Java project built with Maven, so its application dependencies weren’t receiving Dependabot version updates. The updated config adds a second updates entry:

- package-ecosystem: "maven"
  directory: "/"

This is an easy one to miss. Reducing noise is only half the win; the other half is making sure Dependabot is watching the dependencies that matter most. Each ecosystem gets its own schedule and its own group, so your Actions updates and your Maven updates arrive as two clean, separate batches.

But what about security updates?

This is the question every maintainer should ask before slowing anything down, and it’s where the design really shines: by default, the groups and schedule you set here shape your version updates, not your security fixes.

Dependabot security updates are raised as soon as a vulnerability with a fix is disclosed, independent of your schedule and separate from your version-update groups. So a monthly batch cadence for routine bumps doesn’t delay a critical patch. (You can batch security fixes on purpose with a group scoped to applies-to: security-updates, but even then they’re triggered by disclosures, not by your version-update schedule.)

One caveat: this safety net only exists if Dependabot security updates are actually turned on for the repository, which also requires the dependency graph and Dependabot alerts to be enabled. Confirm those are on before you rely on a slower version-update cadence. Do that, and you get the best of both worlds: quiet, predictable maintenance for the routine stuff, and immediate action when a real vulnerability lands.

That separation is what makes “slow down Dependabot” a safe recommendation rather than a risky one.

A new safety net: default package cooldown

There’s one more piece of noise reduction that landed recently, and it happens automatically. Dependabot now waits until a new release has been on its registry for at least three days before opening a version-update pull request. This cooldown is the default and requires no configuration.

Why wait? A brand-new release is one of the most common entry points for a supply chain attack. A compromised or simply broken version can reach your dependency updates before maintainers and the wider community have caught the problem. A short delay gives that signal time to surface, so you’re far less likely to merge a bad release the moment it ships.

Two things worth knowing:

  • It only applies to version updates. Security updates still open immediately, so critical fixes are never held back by the cooldown.
  • You stay in control. Use the cooldown option in your .github/dependabot.yml to widen or shorten the window, tune it per semantic-versioning level, or opt out entirely:
- package-ecosystem: "maven"
  directory: "/"
  schedule:
    interval: "monthly"
  cooldown:
    default-days: 7
  groups:
    monthly-batch:
      patterns:
        - "*"

Pair cooldown with grouping and a monthly cadence and the effect compounds: fewer pull requests, and the ones you do get have had a few days to prove they’re safe to merge.

How to apply this to your own repositories

You can adopt this pattern in a few minutes:

  1. Open (or create) .github/dependabot.yml in the default branch of your repository.
  2. For each package-ecosystem you depend on, set schedule.interval to weekly or monthly.
  3. Add a groups block with a single wildcard group (patterns: ["*"]) to batch updates into one pull request per ecosystem.
  4. Make sure every ecosystem you actually ship with is listed: not just github-actions, but maven, npm, pip, gomod, docker, and so on.
  5. Commit, and let the next scheduled run produce a single, grouped pull request.

A few tips as you tune it:

  • Start broad, then split. A single wildcard group is the simplest starting point. If you later find you want, say, patch-level and major-version updates handled differently, break the wildcard into more targeted named groups.
  • Don’t fold security fixes into this cadence. Dependabot security updates are triggered by vulnerability disclosures, not your version-update schedule, so a monthly cadence never delays them. You can even group them with applies-to: security-updates without slowing them down.
  • Lean on cooldown. The three-day default already shields you from brand-new bad releases; bump cooldown.default-days higher if you want an even wider safety margin on version updates.
  • Right-size the interval. Fast-moving apps may prefer weekly; stable libraries do fine on monthly.
  • Consolidate monorepo directories. If the same dependency lives in many directories, list them under directories and set group-by: dependency-name in the group so a single bump produces one pull request instead of one per directory.

The takeaway

Dependency updates are one of those chores that’s easy to automate and then easy to start ignoring, which defeats the purpose. The fix isn’t to turn Dependabot off or to merge pull requests without looking. It’s to shape its output so that the routine work is quiet and batched, and the urgent work still cuts through.

GCToolkit did it with about a dozen lines of YAML: group everything, slow the cadence to monthly, and make sure every ecosystem is covered. Add the new default cooldown on top, and even that monthly batch has had a few days to prove itself before it reaches you. The result is fewer pull requests, fewer CI runs, and, most importantly, a review queue where the updates that matter don’t get lost in the ones that don’t.

Further reading: once the routine pull request noise is under control, the harder question is which security alerts to fix first. Our earlier post, Cutting through the noise: How to prioritize Dependabot alerts, walks through using EPSS scores and repository properties to turn an overwhelming alert list into a clear, risk-ranked queue.

Configure your own Dependabot updates >

The post Tame Dependabot: Group your updates, slow the cadence, keep security fast appeared first on The GitHub Blog.

Agent platform (Part 1): How we help Grab build and run AI agents at scale

Post Syndicated from Grab Tech original https://engineering.grab.com/how-grab-builds-and-runs-ai-agents-at-scale

Part 1: From one support bot to a framework

At Grab, AI agents have evolved from interesting team prototypes into production services used every day by millions of merchants, drivers, and consumers. Today, more than 500 services run on our internal agent framework, over 50 Model Context Protocol (MCP) servers are registered on our remote MCP framework, and a single Large Language Model (LLM) gateway fronts every model call across the company, handling billions of tokens each month.

None of this was designed up front. It began as the plumbing behind one internal support bot, which then expanded because the same problems kept resurfacing for every team trying to ship an agent. This series tells the story of what the platform eventually became. This Part 1 of the blog focuses on the beginning: the architecture of our AI support bot, the specific pain points we hit while scaling and iterating on it, and how each of those failures became a core building block in the framework we now call LLM-Kit.

The bot that started it

Imagine you have a question for the Technical Infrastructure (Tech Infra) team – the engineers who run the cloud platforms, databases, developer tooling, and AI infrastructure behind Grab’s ecosystem. Instead of immediately paging an on-call engineer, a bot first triages the request, checks the team’s documentation, runbooks, and past Slack threads, and tries to answer directly in the thread. If it still cannot resolve the issue, it routes the ticket to the right human, with the relevant context already attached.

That is what we built with the Tech Infra Support Bot.

In the first half of 2023, Tech Infra handled thousands of support tickets, many of them repeated questions that had already been answered somewhere internally. Before LLMs, the bot’s role was mainly operational; performing tasks like helping track acknowledgments and response times for on-call engineers. With the arrival of GPT-4-32k, we evolved it into a GPT-powered Level-0 support layer that could answer documented questions before a human needed to be paged.

The first production version was a Go service organized around two planes:

  • A reasoning plane. At Level-0, it was a single-agent loop. It takes the user’s question, decides which tools to call, executes those calls, feeds the results back into the prompt, and returns an answer. The default model at the time was gpt-4.1; today, we have evolved to the latest reasoning models.

  • A tool plane. The tools provided the bot’s core working context. Retrieval flowed through Glean, which covered Confluence,
    TechDocs, internal drives, and Jira. Other tools handled log search through Kibana, GitLab runbook and file access, Slack conversation search, and a small set of Hypertext Transfer Protocol (HTTP) plugins. In the first version, tools and prompts were defined in per-channel JavaScript Object Notation (JSON) configs and resolved at request time. As models became more capable, we later standardized the tool set across channels.

A trimmed version of that tool config looked like this:

"agent_plugins": [
  {"name": "glean_search",        "type": "common", "metadata": {"wiki_space_collection": ["..."]}},
  {"name": "runbook_search",      "type": "common"},
  {"name": "gitlab_runbook_reader","type": "common"},
  {"name": "gitlab_read_file","type": "common"},
  {"name": "kibana_log_search",   "type": "common", "metadata": {"index": "k8s*"}},
  {"name": "slack_conversation_tool", "type": "common"}
]

It worked, but it taught us, the hard way, why a demo agent is not a production agent.

What it takes to scale and improve quickly

As we worked on improving the agent, we kept running into the same kinds of friction. Over time, those pain points formed clear patterns, and they were the same ones we saw other teams run into as well.

  • Vibe check is not an evaluation strategy. The bot had a base prompt, and each Slack channel could configure its own prompt, tools, and documentation filters. But the workflow was essentially: configure it, ship it, and hope it reduced toil. There were no real evaluations, just optimism that it would work.

  • Fast model and provider switching is essential. The AI landscape moves incredibly fast: a new state-of-the-art (SOTA) model appears on Tuesday, and a highly efficient open-source alternative shows up on Thursday. Switching providers should not feel like open-heart surgery. A unified Software Development Kit (SDK) and an LLM API gateway remove the need to refactor payload schemas, rewrite error handling, or integrate each provider from scratch. If moving from OpenAI to Anthropic, or routing to an open-source model endpoint, takes more than a few config changes, technical debt is already slowing you down.

  • Observability cannot be an afterthought. When an answer was wrong, figuring out “why” meant grepping logs across three separate systems: the agent workflow, the tool calls, and the model call. There was no shared trace tying them together. That level of friction is survivable for an internal tool; it is unacceptable for a customer-facing agent.

  • Everything around the agent took longer than the agent itself. Auth (OIDC), secrets management (Vault), per-environment config, vector database integration, LLM tracing, health probes, and metrics were not agent-specific problems. However, they all had to be solved before anything could be shipped. The reasoning loop took a whole afternoon. The production wrapper took two weeks.

The pattern was clear: the hard part of building an agent was not the agent itself, but everything around it that had to be in place before it could safely run in front of users. So we began pulling those shared components out of the bot and consolidating them into a unified framework.

Extracting the framework: LLM-Kit

LLM-Kit emerged when we stopped solving these problems service by service and started solving them once, centrally. It is intentionally not a new agent abstraction or a Domain-Specific Language (DSL). Instead, it is a curated set of integrations and scaffolding built around Grab’s existing infrastructure, pipelines, secret management, and observability. Just as importantly, we chose to build a framework rather than a heavy centralized platform. In a space evolving this quickly, a platform would have locked teams into rigid assumptions that would soon become outdated. A framework let us meet developers where they already were: standardizing the plumbing while preserving the freedom to iterate quickly. Looking back, that was the right first choice. Each part of LLM-Kit is a direct response to one of the failures described above.

We first wrote about LLM-Kit’s structure and code architecture in a 2024 blog post. Two years and a few hundred agents later, the overall shape is still recognizable, but almost every underlying layer has changed. Poetry was replaced by uv; we standardized on the OpenTelemetry stack; LangChain evolved into LangGraph and Deep Agents; and some tools moved onto our MCP framework.

It starts with a template. The entry point is a user interface (UI) form. An engineer fills in an application name and a few details, and gets back a GitLab repository with the production wrapper already assembled. Under the hood the template stamps out a full FastAPI service:

/
├── app/
│   ├── server.py              # FastAPI app factory: mounts routes + middleware, boots OTel + statsd
│   ├── agents/
│   │   ├── simple_react_agent.py   # a single-agent LangGraph ReAct loop (agent <-> tools)
│   │   ├── mcp_react_agent.py      # the same loop, but tools are pulled from remote MCP servers
│   │   └── simple_react_agent.png  # auto-exported graph diagram (generated in dev)
│   ├── routes/
│   │   ├── api.py             # router aggregator
│   │   ├── health_check.py    # liveness/readiness probe
│   │   ├── oidc.py            # OIDC login/callback (skipped in proxy-auth mode)
│   │   └── evalshub_eval.py   # runs ROUGE / BLEU / LLM-as-judge evals on the agent
│   ├── core/config.py         # AppConfig (pydantic-settings) + INI/secret parsing
│   ├── tools/word_length_tool.py   # an example tool to copy from
│   ├── utils/prompts.py       # prompt/message assembly helpers
│   └── storage/connection.py  # Postgres + pgvector engine and connection pooling
├── sdk/         # a generated, typed client SDK (protobuf) other services import
├── configs/
│   ├── dev.ini / stg.ini / prd.ini   # one config per environment
│   └── secret.ini.example     # secret template; real values resolve from Vault at deploy
├── databases/postgresql/      # SQL migrations (pgvector extension bootstrapped for you)
├── scripts/
│   ├── db.py / db.sh          # migration runner
│   └── gunicorn_conf.py       # production server/worker config
├── tests/
│   ├── unit_tests/            # starter unit tests (e.g. the health check)
│   └── evalshub_evaluation/   # golden test cases the eval route runs against
├── Dockerfile                 # multi-stage, distroless
├── Makefile                   # setup / run / test / lint targets
├── pyproject.toml             # uv build backend + pinned deps
└── .pre-commit-config.yaml

Three things are worth pulling out of that tree:

  • app/agents/ is the part you actually own. You get two working agents to fork from rather than a blank file: simple_react_agent.py is a single-agent LangGraph ReAct loop, and mcp_react_agent.py is the same loop wired to pull its tools from remote MCP servers. Both compile to a LangGraph StateGraph with a retry policy and a 30-second per-step timeout, and in dev the graph is auto-exported as a diagram. This is a real step up from the bare LangChain agent initialization we scaffolded in 2024.

  • app/routes/evalshub_eval.py ships evals on day one. The template comes with an endpoint that runs Recall-Oriented Understudy for Gisting Evaluation (ROUGE), Bilingual Evaluation Understudy (BLEU), and LLM-as-judge evaluators over a set of golden test cases in tests/evalshub_evaluation/. The thing we most wished the support bot had, is now in the box before a builder writes a line of their own logic.

  • Everything else is the production wrapper. core/config.py, storage/, configs/, databases/, scripts/, the distroless Dockerfile, and the pyproject.toml (now uv, not the Poetry we used in 2024) are the auth, secrets, persistence, packaging, and deploy plumbing that every service needs and that no team should have to write from scratch.

The day-one wiring that used to take two weeks or more now takes about an hour. The rest of this section is what “pre-wired” means, layer by layer.

Config and secrets are solved once. Apps declare environment configs as initialization (INI) files with secret interpolation, so secrets resolve from Vault at boot, and a single secret.ini.example is enough to run any LLM-Kit app locally:

[CONFIG]
GRABGPT_API_KEY=${SECRET:GRABGPT_API_KEY}
OTEL_EXPORTER_OTLP_ENDPOINT=<otel-collector-endpoint>
POSTGRES_POOL_RECYCLE=1800

Model access behind one resolver. Every model call goes through the GrabGPT Gateway, which is OpenAI-compatible. LLM-Kit’s job is just to resolve the right endpoint (per environment, and per data tier) and inject the key so application code never hard-codes a provider again:

from openai import OpenAI
from llm_kit.grabgpt import resolve_grabgpt_base_url, resolve_grabgpt_api_key

client = OpenAI(
    base_url=resolve_grabgpt_base_url("prd", "public"),  # provider chosen centrally
    api_key=resolve_grabgpt_api_key(),
)

That one indirection is what later lets a platform team change which provider serves a model, configure fallback routing, set budgets, and manage cost attribution, without a single application touching its code.

Tracing wired in, not bolted on. A single instrumentor auto-instruments FastAPI, outbound HTTP, LangChain, and MCP, and stamps every span with Kubernetes resource attributes (pod, namespace, image, service version). Structured logs auto-inject the trace and span IDs, so logs and traces correlate in Grafana/Kibana for free:

exporter = OTLPSpanExporter(endpoint=app_config.otel_exporter_otlp_endpoint)
OTELInstrumentor(exporter=exporter, excluded_urls=["health_check"]).instrument_app(app)

The three systems, no shared trace problem turns into one end-to-end trace across every LLM call, tool call, and retrieval step.

Tools can be exposed through MCP servers built on our MCP framework. Instead of hardwiring a large set of tool functions inside the agent process, the agent connects to MCP servers and discovers their tools at runtime. That means adding a new capability can be as simple as registering an MCP server, rather than redeploying the agent.

client = MultiServerMCPClient({
    "mcp-gitlab-remote": {
        "transport": "streamable_http",
        "url": "<remote-mcp-gitlab-endpoint>/mcp/",
        "headers": {"Authorization": "Bearer <token>"},
    }
})
tools = await client.get_tools()   # schema negotiated, no redeploy

An agent is just another service in the ecosystem, with gRPC on both sides. Most of Grab’s backend communicates over gRPC, and agents are rarely standalone; other services call them, and they in turn call other internal services. The template is designed to support both directions.

On the serving side, the scaffold includes a Protocol Buffers (protobuf) contract (sdk/.../.proto, with a sample Hello remote procedure call (RPC)) and a generated, typed client SDK package that other teams import to call your agent without hand-writing HTTP. make gen-proto regenerates the Python stubs from the .proto, and a gen-proto-check Continuous Integration (CI) step fails the build if the committed stubs drift from the contract. A gRPC server runs alongside FastAPI (default port 8087, multi-worker-safe via SO_REUSEPORT) and ships a standard gRPC health service out of the box:

$ grpcurl -plaintext localhost:8087 grpc.health.v1.Health/Check

On the calling side, LLM-Kit ships a channel provider so an agent never hardcodes an address. The auto provider tries Istio, then Consul, then a static fallback, health-checks the channel it selects, and runs a background monitor that re-selects after a few consecutive failures:

from llm_kit.grpc.channel_providers.auto import (
    AutoGrpcChannelProvider, AutoGrpcChannelProviderConfig,
)

provider = AutoGrpcChannelProvider(logger, AutoGrpcChannelProviderConfig(
    client_name="my-agent",
    service_key="some-internal-service",   # resolved via Istio / Consul
    enable_istio=True, enable_consul=True,
))
channel = provider.get_channel()           # first healthy channel, auto-reselected on failure
stub = SomeServiceStub(channel)

This is the less glamorous side of being production-ready. Before an agent can deliver value, it needs to both accept calls from and make calls to the rest of the company’s services using the same transport the broader system already relies on.

What’s next

LLM-Kit solved building and shipping one agent. At 500 agents, the problems were no longer framework problems. They were platform problems: who can change which model everyone calls, how one team safely reuses another team’s tools, and how you know an agent got better and not just different after a prompt change. We built three answers for that layer: the GrabGPT Gateway, a remote MCP framework, and an evals platform. Part 2 starts with the gateway — one endpoint, five providers, and what it takes to make “swap the model” a configuration change instead of an incident.

Join us

Grab is Southeast Asia’s leading superapp, serving over 900 cities across eight countries (Cambodia, Indonesia, Malaysia, Myanmar, the Philippines, Singapore, Thailand, and Vietnam). Through a single platform, millions of users access mobility, delivery, and digital financial services, including ride-hailing, food delivery, payments, lending, and digital banking via GXS Bank and GXBank. Founded in 2012, Grab’s mission is to drive Southeast Asia forward by creating economic empowerment for everyone while delivering sustainable financial performance and positive social impact.

Powered by technology and driven by heart, our mission is to drive Southeast Asia forward by creating economic empowerment for everyone. If this mission speaks to you, join our team today!

The cost of saying yes has changed

Post Syndicated from Dalia Abuadas original https://github.blog/engineering/the-cost-of-saying-yes-has-changed/


The most expensive part of a small feature request used to be writing the code. Now it’s usually the meeting about whether or not to write the code.

That’s a real shift, and it quietly breaks a lot of engineering instincts. Engineers learn early that most “small asks” aren’t small: they need tests, a rollout plan, someone to think through the edge cases and own the behavior after it ships. A two-hour change can become a two-week distraction if it touches the wrong part of the system. So we push back. Is this really needed? Does it belong in this release? Does it change a contract we already agreed to? I’m not giving that instinct up.

But it rests on an assumption that’s quietly breaking, which is that writing the first version of the code is the expensive step. For a specific class of change, it no longer is. If you can tell those changes apart from the rest, you can replace “is this in scope?” with a question you can answer in thirty minutes instead of a two-day debate.

The debate often costs more than the patch

Here’s a pattern I keep seeing. Someone asks for a small change such as surfacing a last_active_at timestamp that already exists in the backend on a settings page. The team spends forty minutes in a thread. One person says it sounds risky. Someone remembers a related migration from two years ago. Someone mentions the deadline. Eventually we land on “probably a day or two, could be more,” with low confidence, primarily because nobody has actually tried it.

That process made sense when trying was the expensive part. You had to stop what you were doing, load the context into your head, make the change by hand, write the tests, then discover the second- and third-order consequences. When the first attempt is cheap, defending the boundary can cost more than crossing it.

An agent can produce that first patch in the time the thread takes to warm up. It’s not free and definitely not automatically correct. But it is cheap enough that the smart move is often to stop guessing and look at a real diff.

The first patch is a price check, not the product

The mistake is to treat the generated patch as the deliverable. It isn’t. It’s a probe. It turns an abstract scope argument into a concrete artifact you can interrogate:

  • Does it touch the files you expected, or does it sprawl across five packages?
  • Are the tests obvious, or does the change resist being tested?
  • Does it preserve the existing abstractions?
  • Does it quietly require a new product decision?
  • Would you be comfortable owning this behavior six months from now?

Those are better questions than “does this feel like scope creep?” because now you’re arguing from evidence instead of vibes. If the last_active_at field comes back as a four-line diff with a passing test, ship it. The debate was the expensive part. However, if that same request comes back touching the auth middleware, you’ve learned the request was never small. Not only that, you learned this in thirty minutes instead of two days.

This is not letting the AI decide. It’s using the AI to make human judgment cheaper and better-informed.

Cheap to write is not the same as cheap to own

Here’s the trap, and it’s the most important distinction of the AI era. A change is not cheap just because the code was cheap to generate. It’s cheap only if a human can confidently review and own the result.

A thousand-line diff that technically passes but nobody wants to own is not a cheap change. It’s a deferred cost. So the dividing line in that case isn’t “can an agent write this?” It’s “can a person validate it?”

  • Adding a display field that already exists in the backend is usually cheap.
  • Changing authorization behavior is not cheap, no matter how clean the diff.
  • Refactoring a well-tested helper is usually cheap.
  • Changing data-retention semantics is not cheap.

Plenty of changes still deserve a hard no even when the code is trivial. This includes anything that moves the product contract, creates a support burden, or touches privacy, billing, or compliance. AI lowers the cost of producing a candidate. It does nothing to lower the cost of owning one.

Move scope discipline closer to the evidence

Traditionally, scope discipline happened before implementation, because implementation was the expensive thing to protect. Now some of that discipline can move to review. That doesn’t mean skipping planning. It means being precise about which planning actually pays off.

Before relitigating a small change, ask for a constrained attempt. The constraints are the whole point.

Produce the smallest possible patch. Keep it behind the existing feature flag. Don’t change the public contract. Add or update tests. List every file you touched and call out anything risky.

If the agent can’t produce a clean patch under those constraints, the request was bigger than you thought, and you know it carries a real ownership cost before anyone commits to it. If it can, that tells you something too. Either way you’ve replaced “is this in scope?” with “here’s what it costs. Do we want to pay it?”

The new skill is pricing uncertainty

The best engineers in an AI-assisted world won’t be the ones who say yes to everything, and they won’t be the ones who reflexively say no. They’ll be the ones who can price uncertainty fast. They’ll know when a request is a product decision wearing an implementation costume, when review will be harder than writing, and when a change is small enough that the fastest responsible answer is to just try it.

That last one is genuinely new. “Try it and see” used to mean pulling a developer off other work. Now, for the right kind of task, it means handing an agent a bounded assignment and using the result to make a better call. Less time guessing, more time supervising. Less time treating implementation as a black box, more time evaluating concrete artifacts.

Scope creep is still real. But “no, because any new code is too expensive” is a much weaker argument than it was two years ago. The cost of producing code has dropped. The cost of understanding, reviewing, and owning it didn’t. So the question worth asking shifted from “is this more work?” to “where’s the real cost?” And sometimes, for a small, bounded change, the real cost is just finding out.

The cost of saying yes has changed. The cost of saying no should change with it.

The post The cost of saying yes has changed appeared first on The GitHub Blog.

Better tools made Copilot code review worse. Here’s how we actually improved it.

Post Syndicated from Napalys Klicius original https://github.blog/ai-and-ml/github-copilot/better-tools-made-copilot-code-review-worse-heres-how-we-actually-improved-it/


Give an agent better tools and it should do better work. That’s the instinct, anyway.

When you open a pull request, Copilot code review reads the diff and explores the surrounding code to find the problems that matter before they ship. To do that, it used its own code exploration tools. So when we swapped in the better-maintained, shared tools that power the Copilot CLI, grep, glob, and view, we expected a clean upgrade.

Instead, in our benchmarks, we found that the cost of reviews was higher and fewer issues were being caught.

But the tools weren’t the problem. The instructions were. Once we rewrote them for the way a reviewer actually reads a pull request, the regression flipped into a win: roughly 20% lower average review cost, while maintaining the same review quality.

This is the story of how adjusting the workflows around the tools led us to a fix.

Same tools, wrong instincts

If you’ve built on top of an agent framework, you’ve probably inherited its tools too. They work, so you keep them, until the day your use case drifts far enough from what they were designed for that they quietly start working against you. That’s the situation we were in. Before trying to use the shared CLI tools, Copilot code review used its own code exploration tools. That tool layer was inspired by earlier agentic systems, including ideas from SWE-agent-style repository navigation and GitHub Copilot Autofix: list directories, search files, search directories, and read code. Those tools worked, but they were specific to Copilot code review, and they were designed for how models behaved at the time. Earlier agentic coding models made fewer tool calls and were worse at automatically pulling in necessary context. This meant it was more important to include all relevant information in the few tool calls that the model made.

Meanwhile, the Copilot CLI harness has a shared set of Unix-inspired code exploration tools: grep, glob, and view. That harness is also used by a growing number of Copilot agent products, including GitHub Copilot cloud agent, so harness improvements can benefit more than one product. We wanted to clean up and share infrastructure where possible, so we experimented with using the tools from the Copilot CLI harness in Copilot code review. The goal was to reduce duplicated tool implementations, create one shared place to improve code exploration tools, and make it easier to carry those improvements across Copilot products.

On paper, the migration looked simple:

Old Copilot code review GitHub Copilot CLI Purpose
list_dir  glob  Discover candidate files and directories before opening code. 
search_file and search_dir  grep  Search code for matching text, symbols, or call sites. 
read_code  view  Read the relevant file contents once a path or range is known. 

The existing review tools were not thin wrappers. When searching for a directory or reading a code range, they could return the matched or requested lines plus extra surrounding code context. That added token cost, but it also matched how earlier models often benefited from having nearby context included automatically.

Initially, we hoped this would be a simple migration: swap one set of tools for another. But when we tested the shared tools in offline benchmarks, the review agent became less efficient and less effective. Average cost increased, and the number of useful comments dropped.

The trace revealed a browsing loop

Our internal Copilot code review benchmarks were useful because they show more than a final score. They show the path the agent took, including which tools it called, how much output came back, where errors happened, and whether it was narrowing toward evidence or widening the search.

When we first tried the shared Copilot CLI tools in offline benchmarks, the agent often behaved as if it was browsing a repository instead of investigating a pull request. It would search broadly, guess likely paths, read broadly, find more things to search, and carry that extra context forward.

Diagram showing the flow before — a simplified illustration of the general-purpose behavior we observed: widening the search, guessing paths, and accumulating context.
Figure 1: Before — a simplified illustration of the general-purpose behavior we observed: widening the search, guessing paths, and accumulating context.

That pattern is understandable. Broad exploration can be useful when the task is “understand this repo.” But it’s not how a reviewer would usually review a pull request.

When I review a pull request, I start from the diff and ask targeted questions:

  • Where is this function called?
  • Is this config key used anywhere else?
  • Is there a test or helper with the same pattern?
  • What is the smallest nearby code range that explains this behavior?

I do not want to open a large part of the repository before I know what I am looking for. I want the minimal context needed to answer the question, without overloading the review with unrelated code.

That matters because every tool result becomes part of the agent’s working context. Extra file contents can be carried forward into later reasoning, increasing cost and sometimes making the review less focused. A tool result is not a disposable printout; for an agent, it’s extra tokens that stay in the context window.

The traces made that difference visible. The shared tools were not the problem. The instructions were giving the agent the wrong instincts to do an efficient and effective review.

The tools themselves worked, but their instructions were tuned for their use within the Copilot CLI and implied the wrong workflow: the agent used grep, glob, and view like a broad coding assistant instead of a reviewer. A coding assistant may map a whole area before making a change to ensure it doesn’t break some other corner of the code. On the other hand, a reviewer usually starts from the diff, asks whether the change introduced a problem, and then looks for the narrowest nearby evidence required to confirm or dismiss it.

General coding-assistant tool instructions, like the ones used by Copilot CLI or Copilot cloud agent, make sense for an interactive assistant. A developer may ask it to understand a repository, plan a change, edit files, and continue over multiple turns.

Copilot code review has a narrower job: start from a pull request diff, gather enough surrounding evidence to decide whether a change introduces a real issue, and avoid loading context that is not needed for that review question.

It was therefore clear that we couldn’t simply replace the previous Copilot code review tools with the tools from the Copilot CLI without additional prompting work. The problem became: how do we design tool instructions that use these shared tools effectively in a code review setting?

Rewriting the tool instructions for a reviewer’s workflow

The next iterations made the guidance specific to code review. The workflow we wanted Copilot code review to follow was:

  1. Start from the diff and form specific review questions.
  2. Use glob when the path is uncertain and grep to find candidate files, symbols, and call sites.
  3. Batch cheap discovery before reading files.
  4. Use view only when the agent knows which file or line range it needs.
  5. Batch focused reads instead of alternating between one search and one read.

In oversimplified form, this was the behavior we encoded:

Generic posture: Use the available tools to inspect repository context that may be relevant.

Review-shaped guidance: Start from the diff. Narrow first with grep and glob; read exact evidence with view. If grep fails to find relevant context, retry with a simpler escaped search. If a path is wrong, pivot to glob instead of guessing nearby paths.

For example, imagine the diff changes an authorization helper that decides whether an operation is allowed. A relevant review question is not “show me the full contents of every file that calls this helper.” It could instead be the narrower: “are any request-handling callers relying on the old behavior?”

The intended path is short:

start from the helper changed in the diff 
grep for callers of that helper 
glob for likely route, handler, or controller files 
view the most relevant caller ranges 
decide whether any caller changes the risk

The guidance also changed how the agent recovered from failed searches. If an input made grep fail, the better next step was one simpler, corrected search. If a path was wrong, the better next step was glob, not guessing neighboring paths and reading whatever happened to exist. That nudged the agent away from letting a small tool failure turn into a larger exploration loop.

Diagram showing the flow after: a simplified illustration of the review-shaped behavior the prompt guided toward: stay anchored to the diff, narrow with grep and glob, then read focused ranges with view.
Figure 2: After — a simplified illustration of the review-shaped behavior the prompt guided toward: stay anchored to the diff, narrow with grep and glob, then read focused ranges with view.

The change was small in wording and large in effect. It changed the rhythm of the agent from “browse, read, search again” to “ask, narrow, read, decide.”

Benchmarks let us debug behavior, not just scores

The shared harness gave us the tools. The internal Copilot code review benchmarks gave us the feedback loop.

We could run the same review examples, compare tool traces, update the instructions, and run again. That let us ask concrete questions:

  • Did the agent narrow first, or read broadly first?
  • Did it batch independent searches?
  • Did it call view only when it had a reason?
  • Did a tool-instruction change reduce tool errors, or just move them somewhere else?
  • Did the trace stay focused on evidence from the diff?
  • Did the review still preserve the quality metrics we cared about?

The most useful signal was not “the instructions are better.” It was more concrete. The agent was making a similar number of tool calls, but spending more of them on relevant evidence instead of repeatedly expanding the search.

That connected product-level outcomes to understandable engineering behavior. Instead of guessing why a score moved, we could inspect the workflow that produced it.

The result: roughly 20% lower average review cost

In production, the tuned behavior showed roughly 20% lower average review cost compared with the control. Importantly, it did not show a quality signal that could block shipping.

The reduction did not come from the tools by themselves, it came from the workflow around them. Shared code exploration tools, Copilot code review custom tool instructions, and internal benchmarks made the agent’s behavior visible enough to tune.

That framing matters when building with agents. It can be tempting to treat tools as implementation details by swapping one tool for another, then comparing the final answer. But for an agent, the tool surface is part of the product experience. It changes what the agent notices, how it searches, how much context it carries forward, and when it decides it has enough evidence.

Tool descriptions and system instructions are closer to API documentation. Unclear API docs can leave a developer confused and lead to inefficient or wrong decisions. Unclear tool prompting can do the same for an LLM; a small wording change can affect cost, quality, and the shape of the investigation because it changes how the agent spends its attention.

Same tools, different job

We also tried to apply the same kind of focused tool instructions in the CLI, where it did not produce the same kind of win. That is a useful counterexample, and an important guardrail for the lesson.

Copilot code review is anchored to a diff and a review question. Copilot CLI handles broader, interactive coding tasks where exploration can be part of the job. There may be no single diff anchor, the user may change direction over multiple turns, and the right context may not be obvious at the start. The same grep, glob, and view tools can support both products, but the workflow around those tools has to match the product.

The takeaway is that shared tools scale when the instructions and benchmarks match the job.

Try it out yourself using GitHub Copilot code review.

The post Better tools made Copilot code review worse. Here’s how we actually improved it. appeared first on The GitHub Blog.

Scaling Grab’s Data Lake: Our journey to Apache Iceberg adoption

Post Syndicated from Grab Tech original https://engineering.grab.com/our-journey-to-apache-iceberg-adoption

Introduction: The evolution of Grab’s Data Lake

At Grab’s scale, managing petabytes of data across billions of S3 objects demands more than a storage layer. It demands a robust architectural primitive that supports the high-concurrency needs of a modern “Lakehouse.” Our goal is full storage-compute separation, leveraging S3 as an elastic foundation for both near-real-time metrics and large-scale batch transformations.

For years, the vast majority of our tables were Hive Parquet, managed through the Hive Metastore with a directory-based layout. This model served us well, but as data volume grew, the directory-and-metastore approach became the limiting factor. We are now transitioning to a table-centric architecture built on modern table formats, treating data as a first-class primitive to ensure consistency and performance across our internal data transformation platforms: Slide, which powers batch transformations, and Hugo, which handles online-to-data-lake ingestion. Along the way, we also built the UnifiedSparkCatalog, a unified Spark catalog that hides table-format differences from users entirely, which we are open-sourcing alongside this post.

The catalyst for change: Challenges with Hive Parquet

For years, Hive Parquet was the backbone of our Data Lake, representing the vast majority of our tables. However, as data volume scaled, the architectural limitations of directory-based storage became apparent. We identified four primary bottlenecks:

  • Catalog latency: The Hive Metastore (HMS) became a centralized failure point. High concurrency during metadata access led to O(n) listing overhead, where query planning time scaled linearly with partition count, crippling throughput.
  • The small file problem: The directory layout left us with severe file fragmentation. Certain Machine Learning (ML) datasets had an average file size under 1 MB, with thousands of files in each partition. At this scale, the overhead of S3 object listing and metadata request latency drove up Application Programming Interface (API) costs and slowed scan operations.
  • Operational toil: Data engineers faced constant manual overhead for partition registration. Without native ACID support (no native UPSERT or DELETE), teams relied on complex workarounds to manage data changes carefully.
  • The broken information loop: A fundamental disconnect existed between the catalog and storage. Because the HMS, not the storage layer, was treated as the source of truth, direct S3 modifications frequently left the catalog stale and out of sync with the actual state on disk.

Why Iceberg? Strategic alignment and future-proofing

We evaluated several open table formats before selecting Apache Iceberg as our default. The deciding factors came down to community governance, engine compatibility, and long-term flexibility.

Recent industry momentum, including growing cloud-native support for Iceberg, further validates this direction. We are positioning Grab to be format-agnostic in the long term, but Iceberg provides the most mature foundation today.

Comparison of Legacy Hive Parquet and Apache Iceberg

Adopting Iceberg at scale

Migrating an established lake is not a flag flip. Our challenge was rolling out Iceberg across a lake that was overwhelmingly Hive Parquet, queried by many engines and teams, without breaking the downstream consumers that depended on those tables. Rather than converting everything at once, we moved the highest-value tables first. The efficiency gains across our production workloads have been substantial. Here are representative examples:

  • Query performance via Z-ordering: On a high-traffic navigation dataset, we achieved roughly a 10x improvement in query runtime. Z-ordering co-locates rows with similar values across specified dimensions, enabling Trino to leverage data skipping and min/max statistics to prune irrelevant files during query planning. This reduced query runtime from 70 seconds to 6 seconds.
  • S3 API cost reduction: For a heavily queried operations table, daily S3 API costs were reduced by up to 95% with no changes to the queries themselves. Larger file sizes and the elimination of expensive object listing during query planning drove most of the savings.
  • Compute savings: For a dataset used in funnel analysis, we reduced cluster resource usage by approximately half. A separate ML feature pipeline also improved feature freshness for downstream models.

The UnifiedSparkCatalog: Making mixed formats transparent

Migrating to Iceberg solved our storage and metadata problems, but it surfaced a new one at the developer-experience layer. Modern table formats like Delta, Iceberg, and Hudi each implement their own custom catalog that extends Spark’s SessionCatalog. In a standard Spark runtime, only one catalog implementation can be set as the default spark_catalog. Supporting additional formats requires explicit catalog declarations, meaning users must reference tables with format-specific prefixes like iceberg_catalog.schema.table or delta_catalog.schema.table.

With Iceberg, Delta, Hudi, and Hive tables now coexisting and tables actively migrating between formats, this created two problems: engineers had to know the underlying format of every table they queried, and any format migration silently broke every downstream query that hardcoded a prefix.

The UnifiedSparkCatalog is our answer. It is a unified Spark catalog that abstracts the complexity of working with mixed table formats so users never need to think about which format a table uses. We took inspiration from Trino’s Table Redirection, a feature that transparently points a query at the right connector when a table’s format differs from the catalog it was queried through. Our Spark equivalent works as follows:

How it works

  1. Table detection: The catalog loads metadata from the Hive Metastore.
  2. Format identification: A TableTypeDetector utility identifies the format based on metadata properties (e.g., the provider field) or path-based inference.
  3. Operation routing: The catalog delegates the operation to the correct format-specific catalog (Iceberg’s SparkCatalog, Delta’s DeltaCatalog, etc.) without requiring any prefix from the user.

Key design decisions

  • Lazy initialization: Catalogs for each format are initialized only when first needed, reducing startup overhead. If a format’s JAR is missing from the classpath, initialization continues gracefully. The catalog simply skips that format rather than failing the entire session.
  • Naming as spark_catalog: The catalog reports its name as spark_catalog because Spark treats this name specially for legacy Hive Data Manipulation Language (DML) operations. Many internal Spark code paths check for this exact name to determine whether to use Hive-compatible logic for inserts, updates, and deletes. Using any other name would break legacy Hive table operations.
  • Catalog reuse: Before creating a new catalog instance, the system checks whether one already exists in Spark’s catalog manager. This preserves compatibility with plugins like OpenLineage, which inspect catalog class types for lineage extraction.
  • Fallback behavior: If a table is not found in the expected format-specific catalog, the system falls back to the base session catalog, ensuring robust behavior for standard Hive tables.

We are open-sourcing UnifiedSparkCatalog alongside this blog post. The code and documentation are available here.

Lessons learned and overcoming hurdles

Scaling Iceberg across a large ecosystem revealed several technical nuances:

  • Hive lock contention: We encountered “zombie locks” in the HMS that blocked commits. We traced this to a low read timeout on the metastore side under high load. Adjusting retry intervals and increasing the timeout resolved the issue.
  • Timestamp handling: Spark 3.4 introduced TIMESTAMP_NTZ (no time zone), while Iceberg defaults to TIMESTAMP_LTZ (local time zone). This caused compatibility issues with legacy Hive views. We resolved it through a custom migration workflow and targeted patches to our Trino deployment to ensure consistent casting.
  • Storage tier costs: Generating Iceberg metadata involves reading historical data, which can trigger a one-time cost spike as files move between S3 storage tiers. To manage this, we prioritize migrations based on a table’s scan frequency and API operation costs rather than migrating the entire lake at once.

Conclusion: The road ahead

Apache Iceberg is now foundational to Grab’s data strategy. It is the default format for Slide and Hugo, and adoption is expanding across our compute platforms.

Looking forward, we are experimenting with Storage Partitioned Joins to eliminate shuffle stages in Spark and monitoring the Apache XTable project to maintain interoperability between formats. Our journey does not end with adoption. We will continue contributing back to the ecosystem, starting with the upcoming release of the UnifiedSparkCatalog.

Acknowledgments: This journey was made possible by the dedicated efforts of the Data Engineering, Infrastructure, and Search & Personalization teams at Grab.

Join us

Grab is Southeast Asia’s leading superapp, serving over 900 cities across eight countries (Cambodia, Indonesia, Malaysia, Myanmar, the Philippines, Singapore, Thailand, and Vietnam). Through a single platform, millions of users access mobility, delivery, and digital financial services, including ride-hailing, food delivery, payments, lending, and digital banking via GXS Bank and GXBank. Founded in 2012, Grab’s mission is to drive Southeast Asia forward by creating economic empowerment for everyone while delivering sustainable financial performance and positive social impact.

Powered by technology and driven by heart, our mission is to drive Southeast Asia forward by creating economic empowerment for everyone. If this mission speaks to you, join our team today!

Automating cross-repo documentation with GitHub Agentic Workflows

Post Syndicated from David Pine original https://github.blog/ai-and-ml/github-copilot/automating-cross-repo-documentation-with-github-agentic-workflows/


“Where are the docs?” It’s a question nobody on a product team enjoys answering. The honest reply is usually some variant of “behind.” A writer is staring at a closed pull request, trying to reverse-engineer what changed. The pull request’s author has already moved on. By the time the doc actually publishes, the feature has shipped, sometimes more than once.

That used to be us on the Aspire team (we’re a small team of 10 building dev tools for distributed apps). A few months back, we were trying to figure out how to safely bring AI into automations we already trusted. That’s when we discovered GitHub Agentic Workflows. I started bolting prototypes into microsoft/aspire.

Here’s what that bought us, in numbers pulled straight out of GitHub: for Aspire 13.3 and 13.4, 82 feature-docs pull requests merged at a median of 44.8 hours after the product pull request, every one of them reviewed by the engineer who shipped the feature. No new headcount. No process retraining. Just a different way of asking “who writes this?”

🔒 The constraint: cross-repo automation is the hard part

Our product lives in microsoft/aspire and our docs site lives in microsoft/aspire.dev—different repo, deploy target, and review chain. Most teams figure out same-repo automation pretty quickly; cross-repo automation is where things get sharp. Broad repo-scoped tokens belong in a museum, and any responsible security posture (ours included) restricts them accordingly. That’s a good thing. It’s also a real bottleneck if the place where you write the docs isn’t the place where you write the code.

The default workflow for years was:

  1. Engineer ships a feature in microsoft/aspire.
  2. Docs writer notices weeks later.
  3. Docs writer opens the pull request, reads the diff, and pings the engineer to clarify what changed.
  4. Engineer is on the next feature, vaguely remembers, replies with half the picture.
  5. Docs draft ships, sometimes against a release that’s already out.

This is the reverse-engineering tax. We needed automation that crossed repos without handing an agent a write-everywhere token. GitHub Agentic Workflows turned out to be the answer.

🤖 Why GitHub Agentic Workflows

GitHub Agentic Workflows is a project from the GitHub Next team that I keep describing to people as “GitHub Actions, but with a model as the work-item processor and guard rails that satisfy security review.” That’s reductive, but it’s close.

The shape of it:

  • You author a workflow as a single markdown file (.github/workflows/my-thing.md). YAML-style frontmatter on top, an English-language prompt underneath.
  • You run GitHub Agentic Workflows compile, and it generates a sibling .lock.yml (a normal GitHub Actions workflow) that you commit alongside.
  • At runtime, the workflow runs an agent against your prompt with a constrained toolset.
  • Critically, the agent doesn’t write to GitHub directly. It emits intent (a JSON blob describing the pull requests, issues, and comments it wants to create), and a separate, narrowly scoped job (the safe-outputs handler) materializes that intent against a per-workflow GitHub app.

That last bullet is the unlock. The agent gets read access and a prompt. Writes go through a tiny verifiable pipeline with explicit allow-lists. Security review nods. We ship.

💚 A small aside: kindred stacks

I love when the tools you’re using to build are built with the same tools you’re using to build with. The GitHub Agentic Workflows docs are built with Astro and Starlight. So is aspire.dev—Astro with Starlight, dressed up with the wider Starlight plugin ecosystem (astro-mermaid, starlight-llms-txt, starlight-sidebar-topics, starlight-image-zoom, the gorgeous @catppuccin/starlight theme, and more. Shout-out to Chris Swithinbank and the Starlight maintainers, the entire ecosystem feels designed by people who genuinely care).

There’s a real kinship there. The tool we use to automate docs and the docs site we automate into share the same foundation. Convenient, because the Mermaid sequence diagram in the next section renders the exact same way in both worlds.

The end-to-end pipeline

Here’s the flow we landed on. The protagonist is a workflow called pr-docs-check.md living in microsoft/aspire.

Sequence diagram showing an automated docs workflow: merging a feature pull request in microsoft/aspire triggers a GitHub Actions check that has an agent draft the documentation, open a draft pull request in microsoft/aspire.dev, and request SME review—so docs ship with the feature.

A run starts on pull_request: closed against main or release/*, gated by merged == true. From there, the workflow first runs a deterministic target branch resolver in plain bash before the agent ever wakes up:

  1. Pull request milestone title (e.g. 13.4 → release/13.4 on aspire.dev).
  2. Linked-issue milestone title (parse Fixes/Closes/Resolves #N from the body, fetch each issue, take the first non-empty milestone).
  3. Pull request base ref, if it matches release/X.Y[.Z].
  4. Fall back to main.

This is the linchpin. Milestones in the product repo map cleanly to release branches in the docs repo. When the agent finally runs, it knows exactly where the docs should land without any creative writing about target branches or guessing.

The agent reads the diff, scans linked issues, and decides: does this need docs? If yes, it drafts the actual content in a checked-out microsoft/aspire.dev workspace, following our existing doc-writer skill (voice, MDX conventions, Starlight components). It then emits a create_pull_request safe-output and hands off.

The safe-outputs handler takes over:

  • Title prefix: [docs]
  • Label: docs-from-code
  • draft: true (we never auto-merge)
  • Base branch: agent-supplied, restricted to main or release/*
  • Target repo: microsoft/aspire.dev
  • Reviewer: the SME identified from the source pull request’s reviews—i.e., whoever the product team trusted to approve the feature, now gets asked to approve the doc for that feature.

A companion job posts a marker comment back on the source pull request with the docs pull request link and minimizes any older pr-docs-check comments on re-run. The engineer who just hit Merge gets a notification within a few minutes: “Here’s the docs draft. Look it over?”

🔐 The safe-outputs contract

The whole security story comes down to a small, boring stretch of frontmatter:

tools: 
  github: 
    toolsets: [repos, issues, pull_requests] 
    min-integrity: approved          # only run pinned, integrity-checked actions 
    allowed-repos: 
      - microsoft/* 
    github-app: 
      app-id: ${{ secrets.ASPIRE_BOT_APP_ID }} 
      private-key: ${{ secrets.ASPIRE_BOT_PRIVATE_KEY }} 
      owner: "microsoft" 
      repositories: ["aspire.dev", "aspire"] 

safe-outputs: 
  create-pull-request: 
    title-prefix: "[docs] " 
    labels: [docs-from-code] 
    draft: true                      # human-in-the-loop, always 
    base-branch: main 
    allowed-base-branches: [main, release/*] 
    target-repo: "microsoft/aspire.dev" 
    protected-files: blocked         # AGENTS.md, manifests, security config: hands off 
    fallback-as-issue: true 

That’s the deal in plain text. The agent gets a GitHub App token whose installation is scoped to exactly two repositories—the product repo and the docs repo—and nothing else in the org is reachable. It can only land pull requests against main or release/*. AGENTS.md and dependency manifests are off-limits by policy. If the pull request creation fails (network blip, conflict, anything), the framework falls back to filing an issue, so nothing is silently dropped.

This is the part security review actually liked. The agent’s reasoning is fuzzy. The action surface is not.

📊 By the numbers

Here are the stats from a rolling 30-day window (May 3 – June 2, 2026) spanning the back end of the Aspire 13.3 release and the run-up to 13.4:

Metric  Value 
Product pull requests merged in microsoft/aspire  396 (338 main / 50 release/13.3 / 8 release/13.2) 
pr-docs-check workflow runs  396 
Draft docs pull requests created on microsoft/aspire.dev  82 
  – Merged  82 (100%) 
  – Closed without merge 
  – Still open 
Docs pull requests target branches  52 → release/13.3, 27 → release/13.4, 3 → main 
Median time-to-merge (docs)  44.8 hours 
Merged within 24 h / 7 days  38% / 96% 

Note: Numbers captured at the time of writing; the workflows keep running, so the totals only go up. 

A few of those numbers deserve a second look:

  • 396 runs → 82 pull requests is not a defect. The workflow runs on every merged pull request; most of them are internal refactors, test fixes, or dependency bumps with no user-facing surface. The agent saying “no docs needed” 300+ times is a feature.
  • 100% merge rate says the agent’s docs picks are right. The tighter prompt we shipped after the v1 false-positive phase is paying off.

✅ What worked, what didnt

What worked

  • Milestone → release-branch mapping. This was the single highest-leverage choice we made. Engineers already set milestones on pull requests and issues; we got accurate target-branch routing for free.
  • Draft-only, SME-as-reviewer. The agent never merges. The engineer who shipped the feature is the one who confirms the docs are right. We’ve stopped reverse-engineering features at the doc layer. The engineer just tells the docs draft what to say, in the place where they already are.
  • Scoped GitHub app per workflow. Each workflow gets its own app token with explicit repo and permission scopes. Security review approved. We approved too; the first time we needed to rotate keys.
  • protected-files: blocked. The agent cannot touch AGENTS.md, package manifests, or repo security config. Period.

What didn’t (at first)

  • ❌ The agent’s “is this docs-worthy?” gate was too generous in the first version. It drafted pull requests for changes that were genuinely internal, such as a CI tweak or a logging refactor. The result: 9 closures of 69 pull requests (≈13%), so we tightened the prompt’s user-facing-change definition and added explicit negative examples (CI, internal helpers, tests-only). Now, the rate is trending down.
  • ❌ Cross-repo pull request creation needed a mirrored checkout pattern that wasn’t obvious from the docs. The agent works in one repo; safe-outputs needs to find the target repo to push a branch. We solved it by checking out microsoft/aspire.dev twice—once as the current workspace, once under _repos/aspire.dev—so the safe-outputs handler can rediscover it deterministically.
  • ❌ Big diffs blow prompt budgets. We pre-extract pull request metadata (linked issues, milestone, base ref) in pre-agent-steps bash, so the agent gets a small, structured summary instead of a giant payload. This is GitHub Agentic Workflow’s designed-in pattern, and it works.

Wrapping up

The changes we made shifted our thinking. A feature wasn’t considered done until the docs were. Docs no longer trail along behind it like a tin can on a string. The engineer’s review is the gate; the bot does the typing.

Critically, this doesn’t replace docs writers; it un-burdens them. Our writers used to spend most of their time reverse-engineering features. Now they spend their time on the things only a human can do well: narrative pages, sample programs, conceptual walkthroughs, the parts of the docs that don’t fall out of a diff. The bot handles the mechanical “this new option was added; here’s the reference page update” work that was never enjoyable for anyone.

Huge thanks to the GitHub Next team for GitHub Agentic Workflows (and for making the safe-outputs primitive a first-class part of the design), and to Chris Swithinbank and the Starlight maintainers for the docs platform we automate into. A genuine thank-you, too, to the security folks whose guardrails forced us to design this the right way the first time. The boring secret of good automation is that strong security constraints make the system more trustworthy and more correct.

If you build a product in one repo and ship docs in another—and especially if you have to do it inside any nontrivial security boundary—GitHub Agentic Workflows is worth a serious look. Start with one workflow, such as pr-docs-check, and watch what happens to your median time-to-docs.

🔗 The other workflows

pr-docs-check is the one I wrote this post about, but it’s not running alone. If you’re curious about the rest, the source is public:

  • milestone-changelog.md: runs every two hours, picks up newly merged pull requests in the active milestone, and maintains a 13.x-Change-log wiki page (new features, improvements, notable bug fixes) with a companion editorial-feedback issue. 346 runs.
  • release-update-support-mdx.md: on a stable Aspire release, drafts a [support] pull request on aspire.dev that updates the support policy page (promotes the new version, demotes the previous one, refreshes the “Last updated” badge).
  • update-integration-data.md: lives in the docs repo; runs pnpm update:all daily, refreshes NuGet metadata + GitHub stats + sample data, and opens a chore: Update integration data PR with supersede-and-close logic for stale runs. 27 runs, eight merged pull requests.
  • repo-pulse.md: a rolling three-day repo dashboard pinned to a single issue and updated in place: recent merges, pull requests awaiting review, new issues, discussion activity. One issue, always fresh.

Happy automating, friends! 🤖🚀

The post Automating cross-repo documentation with GitHub Agentic Workflows appeared first on The GitHub Blog.

Migrating Counter Service storage: Design choices and learnings

Post Syndicated from Grab Tech original https://engineering.grab.com/counter-service-storage-migration

Introduction

Counter Service is used across Grab’s anti-fraud platform to answer time-windowed count questions, such as recent ride requests by a user or failed payment attempts on a card. The service handles tens of thousands of queries per second (QPS) with about a billion requests per day, while maintaining strict requirements around latency and reliability to support real-time fraud rule evaluation.

For most of its life, Counter Service was backed by a wide-column database that served the workload reliably as the service scaled. As part of a broader infrastructure review mandated at an organizational level, our database team evaluated alternatives to this storage that many services relied on, including Counter Service. Based on their assessment, Aerospike emerged as a good fit for our use-case. We also used the migration as an opportunity to decouple storage concerns from business logic, a necessary first step for this migration, and one that would reduce the effort required for future storage changes. As part of the same effort, we revisited the data model and access patterns in detail, which helped us identify and apply several straightforward optimizations.

This post walks through how we did it. What we built on the reader-side to make the migration safe, how we redesigned the writer-side data model around the new backend, and what we ran into during the gradual rollout.

Setting the stage

Counter data is stored in three time granularities: 15-minute, hourly, and daily buckets. A typical read would be along the lines of, “give me the count for key X over the last 90 minutes”, which the service decomposes into the smallest possible set of buckets, one hourly in the middle, a few 15-minute buckets at the edges, fetches them, and sums.

In the original setup, each granularity was stored in a separate table with a composite primary key:

TABLE daily_count (
    key      TEXT,         -- partition key
    day_ts   TIMESTAMP,    -- clustering key
    count    BIGINT,
    PRIMARY KEY (key, day_ts)
);

The clustering column gave us convenient range queries, that is needed for the Counter Service. On the write path, each incoming counter event triggered a read-modify-write, three parallel SELECT across the three tables, an in-memory increment, then a batch write. This produced four network round-trips per event.

As this service is a core part of Grab’s fraud detection ecosystem and handles high query volume, migrating its underlying storage required a careful rollout plan. We had three requirements:

  • Ramp traffic to the new backend gradually and roll back at any point with a config change.
  • Monitor both the original and new storage paths to verify data integrity before switching over.
  • Complete the migration without downtime.

We also wanted the migration machinery to be reusable for future storage changes. The migration is divided into three workstreams, which we’ll walk through below:

  • Preparing the reader service.
  • Identifying the best integration mechanism for the new storage.
  • Updating the writer pipeline.

Reader: Separating the data access layer

The reader is a Rust service. Before any migration work began, the reader’s business logic had tight coupling with the storage layer. Session creation, query building, fan-out orchestration, and the data types those queries returned were all intertwined in a single flat file. The main application state struct (AppState) held a raw database session handle and prepared query references. Every handler, gRPC Remote Procedure Calls (gRPC) or HyperText Transfer Protocol (HTTP), received the bare session as a parameter. Variable names baked the storage technology into the business layer.

This made the storage migration difficult to attempt directly. We couldn’t add a second storage backend without forking the orchestration logic, and we had no way to test the read path in isolation from a real database session. So we did the migration prep in three stages.

Stage 1: Extracting the storage code

The first stage shipped no behavioural change. We deleted the monolithic storage file and split its contents in two:

  • storage/legacy.rs: wrapped session creation, prepared statements, and query execution behind a LegacyStorage struct.
  • batch_read_ops.rs: kept only the orchestration logic: time-range splitting, channel-based fan-out, and aggregation.

AppState started holding an Arc<LegacyStorage> instead of a raw session handle. The PreparedQueries struct lost its statements (those moved inside LegacyStorage). We renamed every storage-specific identifier in business code to generic storage_* names.

The result was a hard fence. After Stage 1, the database driver crate was reachable only from inside the storage module. Nothing in the business logic or handlers imported it any more.

Stage 2: The storage facade

With the seam in place, we introduced the actual abstraction. A new storage/ module with mod.rs, legacy.rs, aerospike.rs, and mock_storage.rs as siblings became the only place driver crates were reachable from.

The idiomatic Rust approach would have been a trait with associated types, but our backend selection is runtime (a config string parsed at startup), and associated types propagate upwards through every consumer. The alternative, trait objects with boxed futures adds a heap allocation per query, which we wanted to avoid at our QPS.

We chose a concrete facade with enum dispatch:

struct Storage {
    legacy:    LegacyStorage,
    aerospike: AerospikeStorage,
    mock:      MockStorage,
    settings:  StorageSettings,
}

execute_queries(backend: BackendType, ...) {
    match backend {
        Legacy    => self.legacy.execute(...),
        Aerospike => self.aerospike.execute(...),
        Mock      => self.mock.execute(...),
    }
}

A match statement at the request boundary, which made it easier to reason about and debug. The facade then routes everything to the original backend without the rest of the code knowing or caring.

Each backend’s execute_queries honours the same contract: take a Vec<QueryCandidate> and a HashMap<BatchIndex, Sender<...>>, and emit (index, value, timestamp, granularity) tuples into those channels. The orchestration layer above doesn’t need to know whether a candidate became a paginated row stream or a single batch read with client-side map filtering, both write into the same channels in the same shape.

On top of the facade we layered three config-driven operating modes that map to the migration phases:

  • Single: one backend serves the request.
  • WithShadow: the primary serves the response; the secondary runs asynchronously in the background for parity comparison.
  • WithSplit: a deterministic percentage of traffic is served by each backend. Used for the live cutover.

The mode and traffic percentages are read from a service config, allowing the reader to move from legacy-only to Aerospike-only without code changes. The transition starts in Single(legacy), then shadow reads are enabled with WithShadow(primary=legacy, secondary=aerospike, pct=X). The shadow percentage is gradually ramped from 5% to 20%, 50%, and finally 100%, while parity is verified through metrics. Optionally, the system can then move into WithSplit(primary=legacy, secondary=aerospike, split=X), where live traffic is gradually shifted from the original backend to Aerospike, for example from 5% to 30%, 70%, and then 100%. Once Aerospike is fully validated and serving all traffic, the reader moves to Single(aerospike).

Stage 3: Shadow comparison and metrics

Each storage call carries metadata like backend, role (primary/secondary/shadow), and mode, attached as tags to every metric. When Aerospike was added, existing dashboards showed per-backend breakdowns without changes.

We placed the mode dispatch at the handler level rather than inside the storage layer to validate the full request path, not only the rows returned by storage. This also lets the response return as soon as the primary completes, while the shadow runs as a fire-and-forget background task.

Writer: redesigning the data model

Since the two systems use different storage engines, it wasn’t clear that a one-to-one port of our original schema would work. We tried three approaches.

Approaches 1 and 2: Row-per-bucket

We first tried mirroring our original row-per-bucket model. Approach 1 used Aerospike’s Secondary Index (SI) to recover range queries; approach 2 skipped SI and computed the exact set of primary keys client-side via BatchGet.

Both hit the same wall: Aerospike’s primary index is 64 bytes per record, kept in memory. At billions of records, index memory becomes the constraint. SI added overhead and operational complexity we didn’t need.

Approach 3: Map-based schema

The third approach was structurally different from the first two and was the most compact of the options. Rather than storing one record per bucket, which kept us in the same cardinality regime, we collapsed all bucket counts for a single counter into one record. The values were stored as a sorted map keyed by bucket timestamp:

Set:           helium_hourly
Primary key:   "{counterKey}"
Bins:
   counts: KEY_ORDERED_MAP({
        1773369000000: 1,
        1773372600000: 3,
        1773376200000: 7,
        ...
   })

The map keys are bucket timestamps in milliseconds. The map values are running counts. One record holds the entire time series for one counter at one granularity.

Reads become straightforward: fetch the record, iterate the map, sum the entries within the requested window. Each Get returns a bounded number of map entries (determined by Time To Live (TTL) and bucket size), and client-side filtering of that many entries is negligible.

Writes use MapIncrementOp, an atomic server-side increment of a value at a given map key, creating the entry on first access. Combined with MapRemoveByKeyRangeOp for pruning stale entries, every write is one atomic operation:

ops = [
    MapIncrementOp(counts, bucketTsMs, delta),
    MapRemoveByKeyRangeOp(counts, 0, cutoffMs),
    PutOp(key_bin, counterKey),
]
client.Operate(policy, key, ops)

For TTL management, we couldn’t use Aerospike’s record-level expiry directly. A single record holds many timestamps, so record-level TTL would either keep everything or drop everything. Instead, we prune stale map entries explicitly on every write using MapRemoveByKeyRangeOp. The record-level TTL stays as a safety net for counters that stop receiving writes.

The two backends produce very different network shapes for the same logical query. The original backend returns many small paginated row streams, one per (key, granularity). The server filters by time range using the clustering column. Aerospike returns one batch response with the entire counts map per key, and the client filters the map to the requested range. The reader’s storage layer hides this difference: both paths emit (index, value, timestamp, granularity) tuples into the same per-index channels, and the orchestrator above sums them the same way.

The third approach performed best in testing. By collapsing many bucket records into a single record per counter, we reduced the total record count by more than an order of magnitude, which also reduced primary index memory. It also produced a smaller on-disk footprint, since the long counter key is stored once per record instead of being repeated across every bucket. The schema was chosen to fit the access pattern, with the index and disk savings following naturally.

The pipeline continues writing to the original backend as the primary, while Aerospike is added as a separate asynchronous shadow write behind a deterministic rollout logic. This lets us ramp Aerospike gradually and eventually cut over to it fully.

Reader: How each backend actually serves a query

The two storage backends sit behind the same execute_queries contract on the reader service, but what they do internally for a single batch read looks very different.

Figure 1. How a single read request flows through each backend.

The reader takes a batch of counter queries and decomposes each into one or more sub-queries per granularity (a 90-minute window for instance, becomes one hourly sub-query and two 15-minute sub-queries). In the original backend, each sub-query becomes its own prepared statement bound with (start_ms, end_ms, key), and the storage layer fires all of them concurrently as a stream of futures with buffer_unordered capping in-flight queries to a tuned bound. Each query returns a paginated row iterator, the server uses the clustering column to filter by time range and rows stream through to per-index channels as they arrive. So a single user request can produce many small queries, each a separate network round-trip to the partition master holding key, with results dribbled back over a paginated stream.

On Aerospike, the storage layer first groups all sub-queries by granularity, then issues one BatchOperate per granularity. Each sub-query becomes a single primary-key read against the appropriate set; the server returns the entire counts map for that key in one record. The client iterates the map and emits only the entries whose timestamps fall inside the requested range. This keeps the code simple, and at our map sizes the overhead is negligible. There’s no streaming, a batch read either succeeds or fails as a unit and there are at most three network round-trips per user request, one per granularity, regardless of how many sub-queries there are.

This reflects the different design philosophies of the two systems. Wide-column stores typically expect client-side fan-out for reads, while Aerospike’s batch API is designed for exactly this multi-key pattern.

A few issues with the Aerospike Rust client also surfaced during rollout, as it was less mature than its Go counterpart. For example, when we started, the officially available Rust client was synchronous, so every batch read had to be bridged through tokio::task::spawn_blocking with some amount of custom plumbing. Once the official async client was released, we removed that layer and saw measurable improvements in both p50 and p99 latency. The other issue was Domain Name System (DNS). The client resolved seed hostnames only during initialization and did not re-resolve them when the cluster topology refreshed. As a result, a full staging cluster replacement, with new IPs behind the same hostnames, left the client stuck on the old IPs until restart. We filed the bug upstream, and a fix shipped in a subsequent release. We also reproduced the scenario locally with a Docker-based end-to-end test and ran additional staging drills to confirm recovery before continuing the rollout.

Experiment with indexing

We run Aerospike in its default storage configuration, Hybrid Memory Architecture (HMA), where the primary index sits in Random-Access Memory (RAM) and the data sits on Solid-State Drive (SSD). The other relevant mode keeps both index and data in Dynamic Random-Access Memory (DRAM), which is more expensive and not something that fits our use-case. Even in HMA, the primary index grows linearly with record count. At our scale, that growth was a foreseeable issue.

To raise the memory ceiling, we tried moving the primary index itself from RAM to local Non-Volatile Memory Express (NVMe) while keeping data on SSD. We expected the extra index latency to be invisible within our overall request budget. In practice, we started seeing p99 spikes that did not track overall QPS. Instead, they followed I/O activity on hot keys. We observed that when many concurrent lookups land on the same record, the in-memory index handles them more prudently compared to a disk backed index. Adding more and better nodes improved things slightly but did not mitigate the issue. Consequently, we reverted back to in-memory index with a memory-optimized instance type.

Overall impact

The migration delivered gains across infrastructure, performance, and data footprint. Most of these improvements trace back to the schema redesign like collapsing rows into maps, rather than the database change itself.

The primary index currently uses about 50 GB of the roughly 100 GB usable memory per node. The same dataset is around 1 TB on disk, compared with around 3 TB on the original setup. This is primarily attributed to our adoption of the map-based schema discussed earlier.

In production, p99 read latency was consistently better than the original setup, with roughly 50% improvement across our read paths. The write path now uses a single atomic increment operation, replacing the read-modify-write pattern we had built previously.

The new setup costs roughly 45–50% less per node compared to our original setup. We also reduced the replication factor from 3 to 2, saving roughly a third of both storage and primary index memory. RF=2 can be awkward in databases that depend on write quorum, but Aerospike’s master-replica model still keeps an authoritative copy available after a single-node loss. That gives us meaningful fault tolerance even at RF=2. The remaining risk, a simultaneous multi-AZ failure, was acceptable for this workload because the writer continues producing increments from the source event stream. Any lost counter data can self-heal as new events arrive.

Conclusion

This migration ultimately came down to aligning the storage design with the workload. These results would not have been achieved by simply swapping one storage system for another. As the service evolved over time, our initial design choices became less optimal, and the migration surfaced opportunities to rethink them. The gains came from focusing on optimization opportunities, redesigning the data model, and cleanly separating storage concerns. Through shadow reads and writes, followed by a gradual rollout, we completed the migration with zero downtime and no data-integrity issues. The result is a system that fits its workload well and a foundation that makes future storage changes safer and easier to attempt.

Join us

Grab is Southeast Asia’s leading superapp, serving over 900 cities across eight countries (Cambodia, Indonesia, Malaysia, Myanmar, the Philippines, Singapore, Thailand, and Vietnam). Through a single platform, millions of users access mobility, delivery, and digital financial services, including ride-hailing, food delivery, payments, lending, and digital banking via GXS Bank and GXBank. Founded in 2012, Grab’s mission is to drive Southeast Asia forward by creating economic empowerment for everyone while delivering sustainable financial performance and positive social impact.

Powered by technology and driven by heart, our mission is to drive Southeast Asia forward by creating economic empowerment for everyone. If this mission speaks to you, join our team today!

Palana (Part 2): Architecting isolation, identity, and auditability for AI agents

Post Syndicated from Grab Tech original https://engineering.grab.com/part-2-palana-architecture

Introduction

In Part 1, we introduced Palana, Grab’s Kubernetes-native secure execution platform for autonomous AI agents. We discussed the underlying need for isolated environments and covered its core design principles: treating isolation as the unit of trust, keeping credentials out of agent hands, and mediating all network access. In this second part, we’ll dive under the hood into Palana’s architecture, look at the agent lifecycle, and share the key lessons we learned from putting this system into production.

Architecture overview

The core request path looks like this:

Figure 1. Palana architecture overview.

The agent pod runs in a namespace owned by one user and one agent. It gets default-deny style network policy, domain name system (DNS), access to required platform services, and a persistent /data volume. Browser traffic enters through Traefik. LLM traffic goes to the LiteLLM wrapper in the gateway namespace. General Hypertext Transfer Protocol (HTTP) and Hypertext Transfer Protocol Secure (HTTPS) egress goes through the proxy namespace. Secrets are read from Vault only by the component authorized to use them.

The operator is responsible for turning a user request into the concrete Kubernetes shape:

  1. The user creates an agent through pcli (Palana command-line interface) or the portal.
  2. Palana writes a UserAgent or Agent custom resource with the raw user identity.
  3. The operator creates the user and agent namespaces, service accounts, role bindings, storage, network policies, and ingress.
  4. The user runs a template or container image.
  5. Admission webhooks inject proxy environment variables and enforce pod-level restrictions.
  6. Logs, policy decisions, and activity signals are emitted to observability systems.

Agent lifecycle

From a user’s perspective, the basic workflow is intentionally small:

./pcli login
./pcli create demo
./pcli secrets add demo GRABGPT_API_KEY token=<token>
./pcli run demo --template claudecodeui

Behind those commands, Palana provisions an isolated execution environment:

  • Namespace: agent-{sanitized-user}-{agent}
  • Service account: bound only to that namespace
  • Storage: an Amazon Elastic File System (EFS)-backed persistent volume claim (PVC) mounted at /data
  • Ingress: an agent-specific hostname protected by Concedo-backed browser auth
  • Egress: forced through platform proxies, except for approved internal platform services
  • Secrets: split between agent-readable and proxy-only Vault paths
  • Policies: proxy egress, network egress, and optional inter-agent peering rules

The same lifecycle is exposed in the portal for users who prefer a browser user interface (UI).

How Palana handles identity

Human authentication uses Concedo OpenID Connect (OIDC). pcli login performs a browser-based authorization code flow with Proof Key for Code Exchange (PKCE) and stores the resulting identity in an isolated kubeconfig. Browser access to agent UIs is protected by OAuth2-Proxy through Traefik forward auth.

The important detail is that Palana keeps the raw user identity, such as an email address, as the authoritative owner on the custom resource. That raw identity is used for Kubernetes role-based access control (RBAC) subject matching. Sanitized forms are used only where Kubernetes object names, labels, namespaces, or Vault paths require safer strings.

This split prevents a common class of identity bugs: the display-safe or path-safe version of a user ID should not accidentally become the authorization subject.

In the future, we will integrate Palana via SPIFFE (Secure Production Identity Framework for Everyone) and SPIRE (SPIFFE Runtime Environment) with the rest of our service mesh, to provide an agentic identity — a combination of user and agent instance id — that can then be controlled as a subset of a user’s capabilities. This gives us a first step into “agents on behalf of users” with cut-down permissions while the wider industry firms up the approaches via Open Authorization (OAuth) and other controls.

How Palana handles secrets

Palana’s Vault layout is designed around least privilege:

kv/agents/{user}/{agent}/{secret}
kv/proxy-secrets/{user}/{agent}/{secret}

The first path is for secrets the agent is allowed to read through its per-agent Vault role. The second path is for credentials the agent can use only through the proxy. For each proxy-only secret, Palana can create an agent-visible placeholder value. The placeholder is inert unless the request goes through the approved proxy path.

This gives teams a practical migration path. Existing clients can often be configured with a token-looking value, while Palana keeps the real token out of the runtime.

How Palana handles LLM access

LLM calls go through litellm-proxy-wrapper, which sits in front of LiteLLM and GrabGPT. The wrapper derives agent identity from Kubernetes context rather than trusting client-provided headers. It then looks up the per-agent GrabGPT credential in Vault and forwards the request to the correct upstream route.

The agent config uses internal base URLs such as:

http://litellm-proxy.gateway:4000/aws/v1
http://litellm-proxy.gateway:4000/unified/v1

That design gives us three useful properties:

  • Agents do not need raw upstream LLM credentials.
  • LLM traffic is attributable to a specific agent.
  • Provider routing and credential handling can evolve centrally.

How Palana handles network access

Network control is split into two layers.

At Layer 3 and Layer 4, Kubernetes NetworkPolicy and Cilium enforce which pods can talk to which namespaces, services, and classless inter-domain routing (CIDR) blocks. Agent namespaces are locked down to the platform paths they need: DNS, Vault, the egress proxy, the LLM gateway, and the Kubernetes application programming interface (API) patterns the platform explicitly supports.

At Layer 7, the proxy policy controls HTTP and HTTPS destinations by host, method, and agent identity. Open Policy Agent (OPA) evaluates per-agent policy. The proxy logs allow and deny decisions in structured form.

This split is deliberate. NetworkPolicy is good at containment. The proxy is good at application-aware decisions and audit. This allows us to be very expressive in the restrictions we place on our agents — by default, they get nothing; if they should have access to an internal service they get only that service, and cannot be used as an entry point to the wider internal environment.

Observability and operations

Palana treats observability as part of the safety model, not a nice-to-have. The platform emits structured logs for proxy decisions, Git activity, LLM requests, agent lifecycle, and idle-shutdown decisions. Operators can query activity by namespace, user, host, decision, or component.

One example is idle shutdown. Long-running agents are useful, but idle workloads consume cluster resources and expand the surface area that platform teams must monitor. Palana’s reaper records the most recent observable activity for each UserAgent. It combines signals from gateway/proxy logs, Git activity, Slack-routed agent messages, and Prometheus network activity. After a configurable idle threshold, it can warn the user and stop the workload while preserving /data, RBAC, namespace, and Vault state.

This is a good example of the platform philosophy: stop the compute, keep the state, and make resumption easy.

In addition, as we move into agentic operations, we use the many signals generated by Palana itself to aid our agents. For example, we have an agent that can monitor user workloads and provide advice and assistance if it spots issues — say, an agent is consistently out of memory (OOM), the ops agent can see that and message the user with instructions on how to increase the allocated memory. We don’t need to special-case every possible issue; instead we have agents that understand Palana logs and are able to communicate with the users themselves.

What we learned

Agent platforms need security controls at the platform layer

Prompt-level guardrails and model policies are useful, but they are not enough. Agents call tools, tools call services, and services use credentials. Palana puts controls where the action crosses a trust boundary: identity, egress, secrets, ingress, Git, and Kubernetes API access.

The user experience matters as much as the control

If the secure path requires every team to learn Terraform, Vault policy syntax, Kubernetes RBAC, and proxy configuration before they can try an agent, teams will work around it. Palana uses pcli, templates, and the portal to make the safe path the easy path.

Separating “can read a credential” from “can cause a credentialed request” is powerful

Proxy-only secrets are one of the highest-leverage design choices. They let agents perform authenticated work without turning the agent filesystem, logs, process environment, or prompt context into a credential store.

A namespace boundary is simple, but it compounds

Per-agent namespaces give us a consistent place to apply RBAC, storage, network policy, logging labels, resource quotas, and lifecycle controls. The pattern is easy to reason about during incidents: identify the namespace, identify the owner, inspect the policy, and isolate if needed.

Long-running agents need lifecycle management

Once agents persist for days or weeks, “run a container” becomes an incomplete product. Users need resume semantics. Operators need idle cleanup. Security teams need audit history. Platform teams need a way to rotate credentials, update images, and stop workloads externally.

What’s next

Palana is increasingly becoming a substrate for larger autonomous systems rather than only a place to run individual agents. Emerging patterns include:

  • Supervisor systems that route work to a pool of scoped agents.
  • Slack-native agents that wake up, handle a task, and scale back down.
  • Remote development environments backed by persistent cloud state.
  • Agent swarms where each worker has a separate namespace and credential scope.
  • Operational agents that investigate platform health and propose or apply small fixes under policy.
  • Security experiments around supply chain monitoring, token rotation, transport layer security (TLS) inspection, and automated isolation.

The north star is not “let every agent do anything”. It is to make useful autonomy boring to operate: attributable, inspectable, revocable, and recoverable.

Conclusion

AI agents are most valuable when they can act in real environments. That is also when they become risky. Palana gives Grab a way to keep both sides of that tradeoff in view: teams can move quickly with self-service agent environments, while the platform keeps isolation, identity, secrets, network access, and auditability as defaults.

We expect the underlying tools and models to keep changing. The platform primitives are more durable. Agents will vary, but they will still need a place to run, a way to authenticate, a boundary around their actions, and a record of what happened.

That is the role Palana is designed to play.

Join us

Grab is Southeast Asia’s leading superapp, serving over 900 cities across eight countries (Cambodia, Indonesia, Malaysia, Myanmar, the Philippines, Singapore, Thailand, and Vietnam). Through a single platform, millions of users access mobility, delivery, and digital financial services, including ride-hailing, food delivery, payments, lending, and digital banking via GXS Bank and GXBank. Founded in 2012, Grab’s mission is to drive Southeast Asia forward by creating economic empowerment for everyone while delivering sustainable financial performance and positive social impact.

Powered by technology and driven by heart, our mission is to drive Southeast Asia forward by creating economic empowerment for everyone. If this mission speaks to you, join our team today!