Tag Archives: artificial intelligence

From Policy to Practice: Why Cyber Resilience Needs a Reboot

Post Syndicated from Rapid7 original https://www.rapid7.com/blog/post/it-policy-to-practice-cyber-resilience-needs-reboot-experts

In cybersecurity today, regulation is everywhere, but resilience isn’t keeping pace.

In this episode of Experts on Experts: Commanding Perspectives, Craig Adams chats with Sabeen Malik, VP of Public Policy & Government Affairs at Rapid7, about what’s broken (and what’s promising) in today’s regulatory landscape.

Sabeen pulls from her experience across diplomacy, operations, and government relations to highlight where policy too often fails to account for how risk actually works. From insider threats to government shutdowns, it’s a sharp, timely look at how security leaders should approach strategy, structure, and compliance going into 2026.

Key themes:

  • The growing trust gap between public, private, and institutional actors

  • Why insider threats are a cultural problem, not just a controls one

  • Where UK and US guidance is falling short on resilience

  • What small and midsized businesses are still missing

  • Why AI, exposure, and threat governance need to be connected

Whether you’re thinking about AI use cases or modern regulation fatigue, this episode offers a much-needed reset.

Watch the full video.

Amazon Bedrock adds reinforcement fine-tuning simplifying how developers build smarter, more accurate AI models

Post Syndicated from Donnie Prakoso original https://aws.amazon.com/blogs/aws/improve-model-accuracy-with-reinforcement-fine-tuning-in-amazon-bedrock/

Organizations face a challenging trade-off when adapting AI models to their specific business needs: settle for generic models that produce average results, or tackle the complexity and expense of advanced model customization. Traditional approaches force a choice between poor performance with smaller models or the high costs of deploying larger model variants and managing complex infrastructure. Reinforcement fine-tuning is an advanced technique that trains models using feedback instead of massive labeled datasets, but implementing it typically requires specialized ML expertise, complicated infrastructure, and significant investment—with no guarantee of achieving the accuracy needed for specific use cases.

Today, we’re announcing reinforcement fine-tuning in Amazon Bedrock, a new model customization capability that creates smarter, more cost-effective models that learn from feedback and deliver higher-quality outputs for specific business needs. Reinforcement fine-tuning uses a feedback-driven approach where models improve iteratively based on reward signals, delivering 66% accuracy gains on average over base models.

Amazon Bedrock automates the reinforcement fine-tuning workflow, making this advanced model customization technique accessible to everyday developers without requiring deep machine learning (ML) expertise or large labeled datasets.

How reinforcement fine-tuning works
Reinforcement fine-tuning is built on top of reinforcement learning principles to address a common challenge: getting models to consistently produce outputs that align with business requirements and user preferences.

While traditional fine-tuning requires large, labeled datasets and expensive human annotation, reinforcement fine-tuning takes a different approach. Instead of learning from fixed examples, it uses reward functions to evaluate and judge which responses are considered good for particular business use cases. This teaches models to understand what makes a quality response without requiring massive amounts of pre-labeled training data, making advanced model customization in Amazon Bedrock more accessible and cost-effective.

Here are the benefits of using reinforcement fine-tuning in Amazon Bedrock:

  • Ease of use – Amazon Bedrock automates much of the complexity, making reinforcement fine-tuning more accessible to developers building AI applications. Models can be trained using existing API logs in Amazon Bedrock or by uploading datasets as training data, eliminating the need for labeled datasets or infrastructure setup.
  • Better model performance – Reinforcement fine-tuning improves model accuracy by 66% on average over base models, enabling optimization for price and performance by training smaller, faster, and more efficient model variants. This works with Amazon Nova 2 Lite model, improving quality and price performance for specific business needs, with support for additional models coming soon.
  • Security – Data remains within the secure AWS environment throughout the entire customization process, mitigating security and compliance concerns.

The capability supports two complementary approaches to provide flexibility for optimizing models:

  • Reinforcement Learning with Verifiable Rewards (RLVR) uses rule-based graders for objective tasks like code generation or math reasoning.
  • Reinforcement Learning from AI Feedback (RLAIF) employs AI-based judges for subjective tasks like instruction following or content moderation.

Getting started with reinforcement fine-tuning in Amazon Bedrock
Let’s walk through creating a reinforcement fine-tuning job.

First, I access the Amazon Bedrock console. Then, I navigate to the Custom models page. I choose Create and then choose Reinforcement fine-tuning job.

I start by entering the name of this customization job and then select my base model. At launch, reinforcement fine-tuning supports Amazon Nova 2 Lite, with support for additional models coming soon.

Next, I need to provide training data. I can use my stored invocation logs directly, eliminating the need to upload separate datasets. I can also upload new JSONL files or select existing datasets from Amazon Simple Storage Service (Amazon S3). Reinforcement fine-tuning automatically validates my training dataset and supports the OpenAI Chat Completions data format. If I provide invocation logs in the Amazon Bedrock invoke or converse format, Amazon Bedrock automatically converts them to the Chat Completions format.

The reward function setup is where I define what constitutes a good response. I have two options here. For objective tasks, I can select Custom code and write custom Python code that gets executed through AWS Lambda functions. For more subjective evaluations, I can select Model as judge to use foundation models (FMs) as judges by providing evaluation instructions.

Here, I select Custom code, and I create a new Lambda function or use an existing one as a reward function. I can start with one of the provided templates and customize it for my specific needs.

I can optionally modify default hyperparameters like learning rate, batch size, and epochs.

For enhanced security, I can configure virtual private cloud (VPC) settings and AWS Key Management Service (AWS KMS) encryption to meet my organization’s compliance requirements. Then, I choose Create to start the model customization job.

During the training process, I can monitor real-time metrics to understand how the model is learning. The training metrics dashboard shows key performance indicators including reward scores, loss curves, and accuracy improvements over time. These metrics help me understand whether the model is converging properly and if the reward function is effectively guiding the learning process.

When the reinforcement fine-tuning job is completed, I can see the final job status on the Model details page.

Once the job is completed, I can deploy the model with a single click. I select Set up inference, then choose Deploy for on-demand.

Here, I provide a few details for my model.

After deployment, I can quickly evaluate the model’s performance using the Amazon Bedrock playground. This helps me to test the fine-tuned model with sample prompts and compare its responses against the base model to validate the improvements. I select Test in playground.

The playground provides an intuitive interface for rapid testing and iteration, helping me confirm that the model meets my quality requirements before integrating it into production applications.

Interactive demo
Learn more by navigating an interactive demo of Amazon Bedrock reinforcement fine-tuning in action.

Additional things to know
Here are key points to note:

  • Templates — There are seven ready-to-use reward function templates covering common use cases for both objective and subjective tasks.
  • Pricing — To learn more about pricing, refer to the Amazon Bedrock pricing page.
  • Security — Training data and custom models remain private and aren’t used to improve FMs for public use. It supports VPC and AWS KMS encryption for enhanced security.

Get started with reinforcement fine-tuning by visiting the reinforcement fine-tuning documentation and by accessing the Amazon Bedrock console.

Happy building!
Donnie

New serverless customization in Amazon SageMaker AI accelerates model fine-tuning

Post Syndicated from Channy Yun (윤석찬) original https://aws.amazon.com/blogs/aws/new-serverless-customization-in-amazon-sagemaker-ai-accelerates-model-fine-tuning/

Today, I’m happy to announce new serverless customization in Amazon SageMaker AI for popular AI models, such as Amazon Nova, DeepSeek, GPT-OSS, Llama, and Qwen. The new customization capability provides an easy-to-use interface for the latest fine-tuning techniques like reinforcement learning, so you can accelerate the AI model customization process from months to days.

With a few clicks, you can seamlessly select a model and customization technique, and handle model evaluation and deployment—all entirely serverless so you can focus on model tuning rather than managing infrastructure. When you choose serverless customization, SageMaker AI automatically selects and provisions the appropriate compute resources based on the model and data size.

Getting started with serverless model customization
You can get started customizing models in Amazon SageMaker Studio. Choose Models in the left navigation pane and check out your favorite AI models to be customized.

Customize with UI
You can customize AI models in a only few clicks. In the Customize model dropdown list for a specific model such as Meta Llama 3.1 8B Instruct, choose Customize with UI.

You can select a customization technique used to adapt the base model to your use case. SageMaker AI supports Supervised Fine-Tuning and the latest model customization techniques including Direct Preference Optimization, Reinforcement Learning from Verifiable Rewards (RLVR), and Reinforcement Learning from AI Feedback (RLAIF). Each technique optimizes models in different ways, with selection influenced by factors such as dataset size and quality, available computational resources, task at hand, desired accuracy levels, and deployment constraints.

Upload or select a training dataset to match the format required by the customization technique selected. Use the values of batch size, learning rate, and number of epochs recommended by the technique selected. You can configure advanced settings such as hyperparameters, a newly introduced serverless MLflow application for experiment tracking, and network and storage volume encryption. Choose Submit to get started on your model training job.

After your training job is complete, you can see the models you created in the My Models tab. Choose View details in one of your models.

By choosing Continue customization, you can continue to customize your model by adjusting hyperparameters or training with different techniques. By choosing Evaluate, you can evaluate your customized model to see how it performs compared to the base model.

When you complete both jobs, you can choose either the SageMaker or Bedrock in the Deploy dropdown list to deploy your model.

You can choose Amazon Bedrock for serverless inference. Choose Bedrock and the model name to deploy the model into Amazon Bedrock. To find your deployed models, choose Imported models in the Bedrock console.

You can also deploy your model to a SageMaker AI inference endpoint if you want to control your deployment resources such as an instance type and instance count. After the SageMaker AI deployment is In service, you can use this endpoint to perform inference. In the Playground tab, you can test your customized model with a single prompt or chat mode.

With the serverless MLflow capability, you can automatically log all critical experiment metrics without modifying code and access rich visualizations for further analysis.

Customize with code
When you choose customizing with code, you can see a sample notebook to fine-tune or deploy AI models. If you want to edit the sample notebook, open it in JupyterLab. Alternatively, you can deploy the model immediately by choosing Deploy.

You can choose the Amazon Bedrock or SageMaker AI endpoint by selecting the deployment resources either from Amazon SageMaker Inference or Amazon SageMaker Hyperpod.

When you choose Deploy on the bottom right of the page, it will be redirected back to the model detail page. After the SageMaker AI deployment is in service, you can use this endpoint to perform inference.

Okay, you’ve seen how to streamline the model customization in the SageMaker AI. You can now choose your favorite way. To learn more, visit the Amazon SageMaker AI Developer Guide.

Now available
New serverless AI model customization in Amazon SageMaker AI is now available in US East (N. Virginia), US West (Oregon), Asia Pacific (Tokyo), and Europe (Ireland) Regions. You only pay for the tokens processed during training and inference. To learn more details, visit Amazon SageMaker AI pricing page.

Give it a try in Amazon SageMaker Studio and send feedback to AWS re:Post for SageMaker or through your usual AWS Support contacts.

Channy

Introducing checkpointless and elastic training on Amazon SageMaker HyperPod

Post Syndicated from Channy Yun (윤석찬) original https://aws.amazon.com/blogs/aws/introducing-checkpointless-and-elastic-training-on-amazon-sagemaker-hyperpod/

Today, we’re announcing two new AI model training features within Amazon SageMaker HyperPod: checkpointless training, an approach that mitigates the need for traditional checkpoint-based recovery by enabling peer-to-peer state recovery, and elastic training, enabling AI workloads to automatically scale based on resource availability.

  • Checkpointless training – Checkpointless training eliminates disruptive checkpoint-restart cycles, maintaining forward training momentum despite failures, reducing recovery time from hours to minutes. Accelerate your AI model development, reclaim days from development timelines, and confidently scale training workflows to thousands of AI accelerators.
  • Elastic training  – Elastic training maximizes cluster utilization as training workloads automatically expand to use idle capacity as it becomes available, and contract to yield resources as higher-priority workloads like inference volumes peak. Save hours of engineering time per week spent reconfiguring training jobs based on compute availability.

Rather than spending time managing training infrastructure, these new training techniques mean that your team can concentrate entirely on enhancing model performance, ultimately getting your AI models to market faster. By eliminating the traditional checkpoint dependencies and fully utilizing available capacity, you can significantly reduce model training completion times.

Checkpointless training: How it works
Traditional checkpoint-based recovery has these sequential job stages: 1) job termination and restart, 2) process discovery and network setup, 3) checkpoint retrieval, 4) data loader initialization, and 5) training loop resumption. When failures occur, each stage can become a bottleneck and training recovery can take up to an hour on self-managed training clusters. The entire cluster must wait for every single stage to complete before training can resume. This can lead to the entire training cluster sitting idle during recovery operations, which increases costs and extends the time to market.

Checkpointless training removes this bottleneck entirely by maintaining continuous model state preservation across the training cluster. When failures occur, the system instantly recovers by using healthy peers, avoiding the need for a checkpoint-based recovery that requires restarting the entire job. As a result, checkpointless training enables fault recovery in minutes.

Checkpointless training is designed for incremental adoption and built on four core components that work together: 1) collective communications initialization optimizations, 2) memory-mapped data loading that enables caching, 3) in-process recovery, and 4) checkpointless peer-to-peer state replication. These components are orchestrated through the HyperPod training operator that is used to launch the job. Each component optimizes a specific step in the recovery process, and together they enable automatic detection and recovery of infrastructure faults in minutes with zero manual intervention, even with thousands of AI accelerators. You can progressively enable each of these features as your training scales.

The latest Amazon Nova models were trained using this technology on tens of thousands of accelerators. Additionally, based on internal studies on cluster sizes ranging between 16 GPUs to over 2,000 GPUs, checkpointless training showcased significant improvements in recovery times, reducing downtime by over 80% compared to traditional checkpoint-based recovery.

To learn more, visit HyperPod Checkpointless Training in the Amazon SageMaker AI Developer Guide.

Elastic training: How it works
On clusters that run different types of modern AI workloads, accelerator availability can change continuously throughout the day as short-duration training runs complete, inference spikes occur and subside, or resources free up from completed experiments. Despite this dynamic availability of AI accelerators, traditional training workloads remain locked into their initial compute allocation, unable to take advantage of idle accelerators without manual intervention. This rigidity leaves valuable GPU capacity unused and prevents organizations from maximizing their infrastructure investment.

Elastic training transforms how training workloads interact with cluster resources. Training jobs can automatically scale up to utilize available accelerators and gracefully contract when resources are needed elsewhere, all while maintaining training quality.

Workload elasticity is enabled through the HyperPod training operator that orchestrates scaling decisions through integration with the Kubernetes control plane and resource scheduler. It continuously monitors cluster state through three primary channels: pod lifecycle events, node availability changes, and resource scheduler priority signals. This comprehensive monitoring enables near-instantaneous detection of scaling opportunities, whether from newly available resources or requests from higher-priority workloads.

The scaling mechanism relies on adding and removing data parallel replicas. When additional compute resources become available, new data parallel replicas join the training job, accelerating throughput. Conversely, during scale-down events (for example, when a higher-priority workload requests resources), the system scales down by removing replicas rather than terminating the entire job, allowing training to continue at reduced capacity.

Across different scales, the system preserves the global batch size and adapts learning rates, preventing model convergence from being adversely impacted. This enables workloads to dynamically scale up or down to utilize available AI accelerators without any manual intervention.

You can start elastic training through the HyperPod recipes for publicly available foundation models (FMs) including Llama and GPT-OSS. Additionally, you can modify your PyTorch training scripts to add elastic event handlers, which enable the job to dynamically scale.

To learn more, visit the HyperPod Elastic Training in the Amazon SageMaker AI Developer Guide. To get started, find the HyperPod recipes available in the AWS GitHub repository.

Now available
Both features are available in all the Regions in which Amazon SageMaker HyperPod is available. You can use these training techniques without additional cost. To learn more, visit the SageMaker HyperPod product page and SageMaker AI pricing page.

Give it a try and send feedback to AWS re:Post for SageMaker or through your usual AWS Support contacts.

Channy

Amazon Bedrock AgentCore adds quality evaluations and policy controls for deploying trusted AI agents

Post Syndicated from Danilo Poccia original https://aws.amazon.com/blogs/aws/amazon-bedrock-agentcore-adds-quality-evaluations-and-policy-controls-for-deploying-trusted-ai-agents/

Today, we’re announcing new capabilities in Amazon Bedrock AgentCore to further remove barriers holding AI agents back from production. Organizations across industries are already building on AgentCore, the most advanced agentic platform to build, deploy, and operate highly capable agents securely at any scale. In just 5 months since preview, the AgentCore SDK has been downloaded over 2 million times. For example:

  • PGA TOUR, a pioneer and innovation leader in sports has built a multi-agent content generation system to create articles for their digital platforms. The new solution, built on AgentCore, enables the PGA TOUR to provide comprehensive coverage for every player in the field, by increasing content writing speed by 1,000 percent while achieving a 95 percent reduction in costs.
  • Independent software vendors (ISVs) like Workday are building the software of the future on AgentCore. AgentCore Code Interpreter provides Workday Planning Agent with secure data protection and essential features for financial data exploration. Users can analyze financial and operational data through natural language queries, making financial planning intuitive and self-driven. This capability reduces time spent on routine planning analysis by 30 percent, saving approximately 100 hours per month.
  • Grupo Elfa, a Brazilian distributor and retailer, relies on AgentCore Observability for complete audit traceability and real-time metrics of their agents, transforming their reactive processes into proactive operations. Using this unified platform, their sales team can handle thousands of daily price quotes while the organization maintains full visibility of agent decisions, helping achieve 100 percent traceability of agent decisions and interactions, and reduced problem resolution time by 50 percent.

As organizations scale their agent deployments, they face challenges around implementing the right boundaries and quality checks to confidently deploy agents. The autonomy that makes agents powerful also makes them hard to confidently deploy at scale, as they might access sensitive data inappropriately, make unauthorized decisions, or take unexpected actions. Development teams must balance enabling agent autonomy while ensuring they operate within acceptable boundaries and with the quality you require to put them in front of customers and employees.

The new capabilities available today take the guesswork out of this process and help you build and deploy trusted AI agents with confidence:

  • Policy in AgentCore (Preview) – Defines clear boundaries for agent actions by intercepting AgentCore Gateway tool calls before they run using policies with fine-grained permissions.
  • AgentCore Evaluations (Preview) – Monitors the quality of your agents based on real-world behavior using built-in evaluators for dimensions such as correctness and helpfulness, plus custom evaluators for business-specific requirements.

We’re also introducing features that expand what agents can do:

  • Episodic functionality in AgentCore Memory – A new long-term strategy that helps agents learn from experiences and adapt solutions across similar situations for improved consistency and performance in similar future tasks.
  • Bidirectional streaming in AgentCore Runtime – Deploys voice agents where both users and agents can speak simultaneously following a natural conversation flow.

Policy in AgentCore for precise agent control
Policy gives you control over the actions agents can take and are applied outside of the agent’s reasoning loop, treating agents as autonomous actors whose decisions require verification before reaching tools, systems, or data. It integrates with AgentCore Gateway to intercept tool calls as they happen, processing requests while maintaining operational speed, so workflows remain fast and responsive.

You can create policies using natural language or directly use Cedar—an open source policy language for fine-grained permissions—simplifying the process to set up, understand, and audit rules without writing custom code. This approach makes policy creation accessible to development, security, and compliance teams who can create, understand, and audit rules without specialized coding knowledge.

The policies operate independently of how the agent was built or which model it uses. You can define which tools and data agents can access—whether they are APIs, AWS Lambda functions, Model Context Protocol (MCP) servers, or third-party services—what actions they can perform, and under what conditions.

Teams can define clear policies once and apply them consistently across their organization. With policies in place, developers gain the freedom to create innovative agentic experiences, and organizations can deploy their agents to act autonomously while knowing they’ll stay within defined boundaries and compliance requirements.

Using Policy in AgentCore
You can start by creating a policy engine in the new Policy section of the AgentCore console and associate it with one or more AgentCore gateways.

A policy engine is a collection of policies that are evaluated at the gateway endpoint. When associating a gateway with a policy engine, you can choose whether to enforce the result of the policy—effectively permitting or denying access to a tool call—or to only emit logs. Using logs helps you test and validate a policy before enabling it in production.

Then, you can define the policies to apply to have granular control over access to the tools offered by the associated AgentCore gateways.

Amazon Bedrock AgentCore Policy console

To create a policy, you can start with a natural language description (that should include information of the authentication claims to use) or directly edit Cedar code.

Amazon Bedrock AgentCore Policy add

Natural language-based policy authoring provides a more accessible way for you to create fine-grained policies. Instead of writing formal policy code, you can describe rules in plain English. The system interprets your intent, generates candidate policies, validates them against the tool schema, and uses automated reasoning to check safety conditions—identifying prompts that are overly permissive, overly restrictive, or contain conditions that can never be satisfied.

Unlike generic large language model (LLM) translations, this feature understands the structure of your tools and generates policies that are both syntactically correct and semantically aligned with your intent, while flagging rules that cannot be enforced. It is also available as a Model Context Protocol (MCP) server, so you can author and validate policies directly in your preferred AI-assisted coding environment as part of your normal development workflow. This approach reduces onboarding time and helps you write high-quality authorization rules without needing Cedar expertise.

The following sample policy uses information from the OAuth claims in the JWT token used to authenticate to an AgentCore gateway (for the role) and the arguments passed to the tool call (context.input) to validate access to the tool processing a refund. Only an authenticated user with the refund-agent role can access the tool but for amounts (context.input.amount) lower than $200 USD.

permit(
  principal is AgentCore::OAuthUser,
  action == AgentCore::Action::"RefundTool__process_refund",
  resource == AgentCore::Gateway::"<GATEWAY_ARN>"
)
when {
  principal.hasTag("role") &&
  principal.getTag("role") == "refund-agent" &&
  context.input.amount < 200
};

AgentCore Evaluations for continuous, real-time quality intelligence
AgentCore Evaluations is a fully managed service that helps you continuously monitor and analyze agent performance based on real-world behavior. With AgentCore Evaluations, you can use built-in evaluators for common quality dimensions such as correctness, helpfulness, tool selection accuracy, safety, goal success rate, and context relevance. You can also create custom model-based scoring systems configured with your choice of prompt and model for business-tailored scoring while the service samples live agent interactions and scores them continuously.

All results from AgentCore Evaluations are visualized in Amazon CloudWatch alongside AgentCore Observability insights, providing one place for unified monitoring. You can also set up alerts and alarms on the evaluation scores to proactively monitor agent quality and respond when metrics fall outside acceptable thresholds.

You can use AgentCore Evaluations during the testing phase where you can check an agent against the baseline before deployment to stop faulty versions from reaching users, and in production for continuous improvement of your agents. When quality metrics drop below defined thresholds—such as a customer service agent satisfaction declining or politeness scores dropping by more than 10 percent over an 8-hour period—the system triggers immediate alerts, helping to detect and address quality issues faster.

Using AgentCore Evaluations
You can create an online evaluation in the new Evaluations section of the AgentCore console. You can use as data source an AgentCore agent endpoint or a CloudWatch log group used by an external agent. For example, I use here the same sample customer support agent I shared when we introduced AgentCore in preview.

Amazon Bedrock AgentCore Evaluations source

Then, you can select the evaluators to use, including custom evaluators that you can define starting from the existing templates or build from scratch.

Amazon Bedrock AgentCore Evaluations source

For example, for a customer support agent, you can select metrics such as:

  • Correctness – Evaluates whether the information in the agent’s response is factually accurate
  • Faithfulness – Evaluates whether information in the response is supported by provided context/sources
  • Helpfulness – Evaluates from user’s perspective how useful and valuable the agent’s response is
  • Harmfulness – Evaluates whether the response contains harmful content
  • Stereotyping – Detects content that makes generalizations about individuals or groups

The evaluators for tool selection and tool parameter accuracy can help you understand if an agent is choosing the right tool for a task and extracting the correct parameters from the user queries.

To complete the creation of the evaluation, you can choose the sampling rate and optional filters. For permissions, you can create a new AWS Identity and Access Management (IAM) service role or pass an existing one.

Amazon Bedrock AgentCore Evaluations create

The results are published, as they are evaluated, on Amazon CloudWatch in the AgentCore Observability dashboard. You can choose any of the bar chart sections to see the corresponding traces and gain deeper insight into the requests and responses behind that specific evaluation.

Amazon AgentCore Evaluations results

Because the results are in CloudWatch, you can use all of its feature to create, for example, alarms and automations.

Creating custom evaluators in AgentCore Evaluations
Custom evaluators allow you to define business-specific quality metrics tailored to your agent’s unique requirements. To create a custom evaluator, you provide the model to use as a judge, including inference parameters such as temperature and max output tokens, and a tailored prompt with the judging instructions. You can start from the prompt used by one of the built-in evaluators or enter a new one.

AgentCore Evaluations create custom evaluator

Then, you define the scale to produce in output. It can be either numeric values or custom text labels that you define. Finally, you configure whether the evaluation is computed by the model on single traces, full sessions, or for each tool call.

AgentCore Evaluations custom evaluator scale

AgentCore Memory episodic functionality for experience-based learning
AgentCore Memory, a fully managed service that gives AI agents the ability to remember past interactions, now includes a new long-term memory strategy that gives agents the ability to learn from past experiences and apply those lessons to provide more helpful assistance in future interactions.

Consider booking travel with an agent: over time, the agent learns from your booking patterns—such as the fact that you often need to move flights to later times when traveling for work due to client meetings. When you start your next booking involving client meetings, the agent proactively suggests flexible return options based on these learned patterns. Just like an experienced assistant who learns your specific travel habits, agents with episodic memory can now recognize and adapt to your individual needs.

When you enable the new episodic functionality, AgentCore Memory captures structured episodes that record the context, reasoning process, actions taken, and outcomes of agent interactions, while a reflection agent analyzes these episodes to extract broader insights and patterns. When facing similar tasks, agents can retrieve these learnings to improve decision-making consistency and reduce processing time. This reduces the need for custom instructions by including in the agent context only the specific learnings an agent needs to complete a task instead of a long list of all possible suggestions.

AgentCore Runtime bidirectional streaming for more natural conversations
With AgentCore Runtime, you can deploy agentic applications with few lines of code. To simplify deploying conversational experiences that feel natural and responsive, AgentCore Runtime now supports bidirectional streaming. This capability enables voice agents to listen and adapt while users speak, so that people can interrupt agents mid-response and have the agent immediately adjust to the new context—without waiting for the agent to finish its current output. Rather than traditional turn-based interaction where users must wait for complete responses, bidirectional streaming creates flowing, natural conversations where agents dynamically change their response based on what the user is saying.

Building these conversational experiences from the ground up requires significant engineering effort to handle the complex flow of simultaneous communication. Bidirectional streaming simplifies this by managing the infrastructure needed for agents to process input while generating output, handling interruptions gracefully, and maintaining context throughout dynamic conversation shifts. You can now deploy agents that naturally adapt to the fluid nature of human conversation—supporting mid-thought interruptions, context switches, and clarifications without losing the thread of the interaction.

Things to know
Amazon Bedrock AgentCore, including the preview of Policy, is available in the US East (Ohio, N. Virginia), US West (Oregon), Asia Pacific (Mumbai, Singapore, Sydney, Tokyo), and Europe (Frankfurt, Ireland) AWS Regions . The preview of AgentCore Evaluations is available in the US East (Ohio, N. Virginia), US West (Oregon), Asia Pacific (Sydney), and Europe (Frankfurt) Regions. For Regional availability and future roadmap, visit AWS Capabilities by Region.

With AgentCore, you pay for what you use with no upfront commitments. For detailed pricing information, visit the Amazon Bedrock pricing page. AgentCore is also a part of the AWS Free Tier that new AWS customers can use to get started at no cost and explore key AWS services.

These new features work with any open source framework such as CrewAI, LangGraph, LlamaIndex, and Strands Agents, and with any foundation model. AgentCore services can be used together or independently, and you can get started using your favorite AI-assisted development environment with the AgentCore open source MCP server.

To learn more and get started quickly, visit the AgentCore Developer Guide.

Danilo

Amazon S3 Vectors now generally available with increased scale and performance

Post Syndicated from Sébastien Stormacq original https://aws.amazon.com/blogs/aws/amazon-s3-vectors-now-generally-available-with-increased-scale-and-performance/

Today, I’m excited to announce that Amazon S3 Vectors is now generally available with significantly increased scale and production-grade performance capabilities. S3 Vectors is the first cloud object storage with native support to store and query vector data. You can use it to help you reduce the total cost of storing and querying vectors by up to 90% when compared to specialized vector database solutions.

Since we announced the preview of S3 Vectors in July, I’ve been impressed by how quickly you adopted this new capability to store and query vector data. In just over four months, you created over 250,000 vector indexes and ingested more than 40 billion vectors, performing over 1 billion queries (as of November 28th).

You can now store and search across up to 2 billion vectors in a single index, that’s up to 20 trillion vectors in a vector bucket and a 40x increase from 50 million per index during preview. This means that you can consolidate your entire vector dataset into one index, removing the need to shard across multiple smaller indexes or implement complex query federation logic.

Query performance has been optimized. Infrequent queries continue to return results in under one second, with more frequent queries now resulting in latencies around 100ms or less, making it well-suited for interactive applications such as conversational AI and multi-agent workflows. You can also retrieve up to 100 search results per query, up from 30 previously, providing more comprehensive context for retrieval augmented generation (RAG) applications.

The write performance has also improved substantially, with support for up to 1,000 PUT transactions per second when streaming single-vector updates into your indexes, delivering significantly higher write throughput for small batch sizes. This higher throughput supports workloads where new data must be immediately searchable, helping you ingest small data corpora quickly or handle many concurrent sources writing simultaneously to the same index.

The fully serverless architecture removes infrastructure overhead—there’s no infrastructure to set up or resources to provision. You pay for what you use as you store and query vectors. This AI-ready storage provides you with quick access to any amount of vector data to support your complete AI development lifecycle, from initial experimentation and prototyping through to large-scale production deployments. S3 Vectors now provides the scale and performance needed for production workloads across AI agents, inference, semantic search, and RAG applications.

Two key integrations that were launched in preview are now generally available. You can use S3 Vectors as a vector storage engine for Amazon Bedrock Knowledge Base. In particular, you can use it to build RAG applications with production-grade scale and performance. Moreover, S3 Vectors integration with Amazon OpenSearch is now generally available, so that you can use S3 Vectors as your vector storage layer while using OpenSearch for search and analytics capabilities.

You can now use S3 Vectors in 14 AWS Regions, expanding from five AWS Regions during the preview.

Let’s see how it works
In this post, I demonstrate how to use S3 Vectors through the AWS Console and CLI.

First, I create an S3 Vector bucket and an index.

echo "Creating S3 Vector bucket..."
aws s3vectors create-vector-bucket \
    --vector-bucket-name "$BUCKET_NAME"

echo "Creating vector index..."
aws s3vectors create-index \
    --vector-bucket-name "$BUCKET_NAME" \
    --index-name "$INDEX_NAME" \
    --data-type "float32" \
    --dimension "$DIMENSIONS" \
    --distance-metric "$DISTANCE_METRIC" \
    --metadata-configuration "nonFilterableMetadataKeys=AMAZON_BEDROCK_TEXT,AMAZON_BEDROCK_METADATA"

The dimension metric must match the dimension of the model used to compute the vectors. The distance metric indicates to the algorithm to compute the distance between vectors. S3 Vectors supports cosine and euclidian distances.

I can also use the console to create the bucket. We’ve added the capability to configure encryption parameters at creation time. By default, indexes use the bucket-level encryption, but I can override bucket-level encryption at the index level with a custom AWS Key Management Service (AWS KMS) key.

I also can add tags for the vector bucket and vector index. Tags at the vector index help with access control and cost allocation.

S3 Vector console - create

And I can now manage Properties and Permissions directly in the console.

S3 Vector console - properties

S3 Vector console - create

Similarly, I define Non-filterable metadata and I configure Encryption parameters for the vector index.

S3 Vector console - create index

Next, I create and store the embeddings (vectors). For this demo, I ingest my constant companion: the AWS Style Guide. This is an 800-page document that describes how to write posts, technical documentation, and articles at AWS.

I use Amazon Bedrock Knowledge Bases to ingest the PDF document stored on a general purpose S3 bucket. Amazon Bedrock Knowledge Bases reads the document and splits it in pieces called chunks. Then, it computes the embeddings for each chunk with the Amazon Titan Text Embeddings model and it stores the vectors and their metadata on my newly created vector bucket. The detailed steps for that process are out of the scope of this post, but you can read the instructions in the documentation.

When querying vectors, you can store up to 50 metadata keys per vector, with up to 10 marked as non-filterable. You can use the filterable metadata keys to filter query results based on specific attributes. Therefore, you can combine vector similarity search with metadata conditions to narrow down results. You can also store more non-filterable metadata for larger contextual information. Amazon Bedrock Knowledge Bases computes and stores the vectors. It also adds large metadata (the chunk of the original text). I exclude this metadata from the searchable index.

There are other methods to ingest your vectors. You can try the S3 Vectors Embed CLI, a command line tool that helps you generate embeddings using Amazon Bedrock and store them in S3 Vectors through direct commands. You can also use S3 Vectors as a vector storage engine for OpenSearch.

Now I’m ready to query my vector index. Let’s imagine I wonder how to write “open source”. Is it “open-source”, with a hyphen, or “open source” without a hyphen? Should I use uppercase or not? I want to search the relevant sections of the AWS Style Guide relative to “open source.”

# 1. Create embedding request
echo '{"inputText":"Should I write open source or open-source"}' | base64 | tr -d '\n' > body_encoded.txt

# 2. Compute the embeddings with Amazon Titan Embed model
aws bedrock-runtime invoke-model \
  --model-id amazon.titan-embed-text-v2:0 \
  --body "$(cat body_encoded.txt)" \
  embedding.json

# Search the S3 Vectors index for similar chunks
vector_array=$(cat embedding.json | jq '.embedding') && \
aws s3vectors query-vectors \
  --index-arn "$S3_VECTOR_INDEX_ARN" \
  --query-vector "{\"float32\": $vector_array}" \
  --top-k 3 \
  --return-metadata \
  --return-distance | jq -r '.vectors[] | "Distance: \(.distance) | Source: \(.metadata."x-amz-bedrock-kb-source-uri" | split("/")[-1]) | Text: \(.metadata.AMAZON_BEDROCK_TEXT[0:100])..."'

The first result shows this JSON:

        {
            "key": "348e0113-4521-4982-aecd-0ee786fa4d1d",
            "metadata": {
                "x-amz-bedrock-kb-data-source-id": "0SZY6GYPVS",
                "x-amz-bedrock-kb-source-uri": "s3://sst-aws-docs/awsstyleguide.pdf",
                "AMAZON_BEDROCK_METADATA": "{\"createDate\":\"2025-10-21T07:49:38Z\",\"modifiedDate\":\"2025-10-23T17:41:58Z\",\"source\":{\"sourceLocation\":\"s3://sst-aws-docs/awsstyleguide.pdf\"",
                "AMAZON_BEDROCK_TEXT": "[redacted] open source (adj., n.) Two words. Use open source as an adjective (for example, open source software), or as a noun (for example, the code throughout this tutorial is open source). Don't use open-source, opensource, or OpenSource. [redacted]",
                "x-amz-bedrock-kb-document-page-number": 98.0
            },
            "distance": 0.63120436668396
        }

It finds the relevant section in the AWS Style Guide. I must write “open source” without a hyphen. It even retrieved the page number in the original document to help me cross-check the suggestion with the relevant paragraph in the source document.

One more thing
S3 Vectors has also expanded its integration capabilities. You can now use AWS CloudFormation to deploy and manage your vector resources, AWS PrivateLink for private network connectivity, and resource tagging for cost allocation and access control.

Pricing and availability
S3 Vectors is now available in 14 AWS Regions, adding Asia Pacific (Mumbai, Seoul, Singapore, Tokyo), Canada (Central), and Europe (Ireland, London, Paris, Stockholm) to the existing five Regions from preview (US East (Ohio, N. Virginia), US West (Oregon), Asia Pacific (Sydney), and Europe (Frankfurt))

Amazon S3 Vectors pricing is based on three dimensions. PUT pricing is calculated based on the logical GB of vectors you upload, where each vector includes its logical vector data, metadata, and key. Storage costs are determined by the total logical storage across your indexes. Query charges include a per-API charge plus a $/TB charge based on your index size (excluding non-filterable metadata). As your index scales beyond 100,000 vectors, you benefit from lower $/TB pricing. As usual, the Amazon S3 pricing page has the details.

To get started with S3 Vectors, visit the Amazon S3 console. You can create vector indexes, start storing your embeddings, and begin building scalable AI applications. For more information, check out the Amazon S3 User Guide or the AWS CLI Command Reference.

I look forward to seeing what you build with these new capabilities. Please share your feedback through AWS re:Post or your usual AWS Support contacts.

— seb

Amazon Bedrock adds 18 fully managed open weight models, including the new Mistral Large 3 and Ministral 3 models

Post Syndicated from Channy Yun (윤석찬) original https://aws.amazon.com/blogs/aws/amazon-bedrock-adds-fully-managed-open-weight-models/

Today, we’re announcing the general availability of an additional 18 fully managed open weight models in Amazon Bedrock from Google, Moonshot AI, MiniMax AI, Mistral AI, NVIDIA, OpenAI, and Qwen, including the new Mistral Large 3 and Ministral 3 3B, 8B, and 14B models.

With this launch, Amazon Bedrock now provides nearly 100 serverless models, offering a broad and deep range of models from leading AI companies, so customers can choose the precise capabilities that best serve their unique needs. By closely monitoring both customer needs and technological advancements, we regularly expand our curated selection of models based on customer needs and technological advancements to include promising new models alongside established industry favorites.

This ongoing expansion of high-performing and differentiated model offerings helps customers stay at the forefront of AI innovation. You can access these models on Amazon Bedrock through the unified API, evaluate, switch, and adopt new models without rewriting applications or changing infrastructure.

New Mistral AI models
These four Mistral AI models are now available first on Amazon Bedrock, each optimized for different performance and cost requirements:

  • Mistral Large 3 – This open weight model is optimized for long-context, multimodal, and instruction reliability. It excels in long document understanding, agentic and tool use workflows, enterprise knowledge work, coding assistance, advanced workloads such as math and coding tasks, multilingual analysis and processing, and multimodal reasoning with vision.
  • Ministral 3 3B – The smallest in the Ministral 3 family is edge-optimized for single GPU deployment with strong language and vision capabilities. It shows robust performance in image captioning, text classification, real-time translation, data extraction, short content generation, and lightweight real-time applications on edge or low-resource devices.
  • Ministral 3 8B – The best-in-class Ministral 3 model for text and vision is edge-optimized for single GPU deployment with high performance and minimal footprint. This model is ideal for chat interfaces in constrained environments, image and document description and understanding, specialized agentic use cases, and balanced performance for local or embedded systems.
  • Ministral 3 14B – The most capable Ministral 3 model delivers state-of the-art text and vision performance optimized for single GPU deployment. You can use advanced local agentic use cases and private AI deployments where advanced capabilities meet practical hardware constraints.

More open weight model options
You can use these open weight models for a wide range of use cases across industries:

Model provider Model name Description Use cases
Google Gemma 3 4B Efficient text and image model that runs locally on laptops. Multilingual support for on-device AI applications. On-device AI for mobile and edge applications, privacy-sensitive local inference, multilingual chat assistants, image captioning and description, and lightweight content generation.
Gemma 3 12B Balanced text and image model for workstations. Multi-language understanding with local deployment for privacy-sensitive applications. Workstation-based AI applications; local deployment for enterprises; multilingual document processing, image analysis and Q&A; and privacy-compliant AI assistants.
Gemma 3 27B Powerful text and image model for enterprise applications. Multi-language support with local deployment for privacy and control. Enterprise local deployment, high-performance multimodal applications, advanced image understanding, multilingual customer service, and data-sensitive AI workflows.
Moonshot AI Kimi K2 Thinking Deep reasoning model that thinks while using tools. Handles research, coding and complex workflows requiring hundreds of sequential actions. Complex coding projects requiring planning, multistep workflows, data analysis and computation, and long-form content creation with research.
MiniMax AI MiniMax M2 Built for coding agents and automation. Excels at multi-file edits, terminal operations and executing long tool-calling chains efficiently. Coding agents and integrated development environment (IDE) integration, multi-file code editing, terminal automation and DevOps, long-chain tool orchestration, and agentic software development.
Mistral AI Magistral Small 1.2 Excels at math, coding, multilingual tasks, and multimodal reasoning with vision capabilities for efficient local deployment. Math and coding tasks, multilingual analysis and processing, and multimodal reasoning with vision.
Voxtral Mini 1.0 Advanced audio understanding model with transcription, multilingual support, Q&A, summarization, and function-calling. Voice-controlled applications, fast speech-to-text conversion, and offline voice assistants.
Voxtral Small 1.0 Features state-of-the-art audio input with best-in-class text performance; excels at speech transcription, translation, and understanding. Enterprise speech transcription, multilingual customer service, and audio content summarization.
NVIDIA NVIDIA Nemotron Nano 2 9B High efficiency LLM with hybrid transformer Mamba design, excelling in reasoning and agentic tasks. Reasoning, tool calling, math, coding, and instruction following.
NVIDIA Nemotron Nano 2 VL 12B Advanced multimodal reasoning model for video understanding and document intelligence, powering Retrieval-Augmented Generation (RAG) and multimodal agentic applications. Multi-image and video understanding, visual Q&A, and summarization.
OpenAI gpt-oss-safeguard-20b Content safety model that applies your custom policies. Classifies harmful content with explanations for trust and safety workflows. Content moderation and safety classification, custom policy enforcement, user-generated content filtering, trust and safety workflows, and automated content triage.
gpt-oss-safeguard-120b Larger content safety model for complex moderation. Applies custom policies with detailed reasoning for enterprise trust and safety teams. Enterprise content moderation at scale, complex policy interpretation, multilayered safety classification, regulatory compliance checking, high-stakes content review.
Qwen Qwen3-Next-80B-A3B Fast inference with hybrid attention for ultra-long documents. Optimized for RAG pipelines, tool use & agentic workflows with quick responses. RAG pipelines with long documents, agentic workflows with tool calling, code generation and software development, multi-turn conversations with extended context, multilingual content generation.
Qwen3-VL-235B-A22B Understands images and video. Extracts text from documents, converts screenshots to working code, and automates clicking through interfaces. Extracting text from images and PDFs, converting UI designs or screenshots to working code, automating clicks and navigation in applications, video analysis and understanding, reading charts and diagrams.

When implementing publicly available models, give careful consideration to data privacy requirements in your production environments, check for bias in output, and monitor your results for data security, responsible AI, and model evaluation.

You can access the enterprise-grade security features of Amazon Bedrock and implement safeguards customized to your application requirements and responsible AI policies with Amazon Bedrock Guardrails. You can also evaluate and compare models to identify the optimal models for your use cases by using Amazon Bedrock model evaluation tools.

To get started, you can quickly test these models with a few prompts in the playground of the Amazon Bedrock console or use any AWS SDKs to include access to the Bedrock InvokeModel and Converse APIs. You can also use these models with any agentic framework that supports Amazon Bedrock and deploy the agents using Amazon Bedrock AgentCore and Strands Agents. To learn more, visit Code examples for Amazon Bedrock using AWS SDKs in the Amazon Bedrock User Guide.

Now available
Check the full Region list for availability and future updates of new models or search your model name in the AWS CloudFormation resources tab of AWS Capabilities by Region. To learn more, check out the Amazon Bedrock product page and the Amazon Bedrock pricing page.

Give these models a try in the Amazon Bedrock console today and send feedback to AWS re:Post for Amazon Bedrock or through your usual AWS Support contacts.

Channy

Amazon FSx for NetApp ONTAP now integrates with Amazon S3 for seamless data access

Post Syndicated from Veliswa Boya original https://aws.amazon.com/blogs/aws/amazon-fsx-for-netapp-ontap-now-integrates-with-amazon-s3-for-seamless-data-access/

Today, we’re announcing the ability to access your data in Amazon FSx for NetApp ONTAP file systems using Amazon Simple Storage Service (Amazon S3). With this capability, you can use your enterprise file data to augment generative AI applications with Amazon Bedrock Knowledge Bases for Retrieval Augmented Generation (RAG), train machine learning (ML) models with Amazon SageMaker, generate insights with Amazon S3 integrated third-party services, use comprehensive research capabilities in AI-powered business intelligence (BI) tools such as Amazon Quick Suite, and run analyses using Amazon S3 based cloud-native applications, all while your file data continues to reside in your FSx for NetApp ONTAP file system.

Amazon FSx for NetApp ONTAP is the first and fully AWS managed NetApp ONTAP file system in the cloud to migrate on-premises applications that rely on NetApp ONTAP or other network-attached storage (NAS) appliances to AWS without having to change how you manage your data. FSx for NetApp ONTAP provides the popular capabilities, high performance, and data management APIs of ONTAP file systems with the added benefits of the AWS Cloud, such as simplified management, on-demand scaling, and seamless integration with other AWS services.

Over the years, AWS has developed a broad range of industry-leading AI, ML, and analytics services and applications that work with data in Amazon S3 that organizations use to innovate faster, discover new insights, and make even better data-driven decisions. However, some organizations want to use these services with their enterprise file data stored in NetApp ONTAP or other NAS appliances.

How to get started
You can create and attach an S3 Access Point to your FSx for ONTAP file system using the Amazon FSx console, the AWS Command Line Interface (AWS CLI), or the AWS SDK.

I have an existing FSx for ONTAP file system demo-create-s3access which I created by following the steps in the Creating file systems in the FSx for ONTAP documentation. Using the Amazon FSx console I now choose the file system ID fs-0c45b011a7f071d70 to access the full details of the file system.

I’ll attach the access point to the volume of the file system. I choose the volume vol1 and then select Create S3 Access Point from the Actions dropdown menu.


I enter details such as the access point name, the type of file system user identity and the network configuration, then choose Create s3 Access Point to finalize the process.


After it’s created, the access point my-s3-accesspoint is ready to allow access to the file data stored in my file system demo-create-s3access from Amazon S3. Amazon Access Points are S3 endpoints that can be attached to Amazon FSx volumes and used to perform Amazon S3 object operations.


I can now bring proprietary data stored in the file system demo-create-s3access to Amazon S3 for use in applications that work with Amazon S3 while my file data continues to reside in the FSx for NetApp ONTAP file system using the access point my-s3-accesspoint (this data remains accessible through the file protocols).

For the walkthrough in this post, I’ll integrate with Quick Suite.

Integrating decades of enterprise file data with the latest AI powered BI tools on AWS
In the Quick Suite Console, in the left navigation pane, I choose Connections, then select Integrations. Before you begin, make sure that you have the correct permissions to the Amazon S3 AWS resource. You can control the AWS resources that Quick Suite can access by following the Amazon Quick Suite user guide.


After I’ve selected the Amazon S3 integration I enter my Amazon S3 Access Point alias as the S3 bucket URL, leave the rest of the information as default, then choose Create and continue.


I finalize the process by providing the Name of the knowledge base, the Description, then choose Create.


After the knowledge base has been created it’s automatically synchronized, it’s now available for interaction.


I want to learn more about the AWS European Sovereign Cloud so I’ve updated the file system (accessed through the S3 Access Point my-s3-accesspoin-iyytkgz83djdjj7abn3u711supfgkuse1b-ext-s3alias) with the AWS whitepaper on this topic. In the chat in Amazon Quick Suite. I start asking the first question “do we have any documentation on the europe sovereignty cloud?“. To answer my question, the chat agent accesses and analyzes various types of data sources I have permission to use, including uploaded files in my current conversation, spaces I have access to, knowledge bases from my integrations, and more.

When I verify the source, I see that the document I uploaded to my file system is listed as one of the sources.

Other use cases of Amazon S3 Access Points for Amazon FSx for NetApp ONTAP
Earlier, we looked at use cases such as connecting an organization’s proprietary file data to Amazon Quick Suite for advanced business intelligence. Additionally, Amazon S3 Access Points for Amazon FSx for NetApp ONTAP can be used to seamlessly integrate enterprise file data with comprehensive analytics services, such as Amazon Athena for serverless SQL queries or AWS Glue for ETL processing, to name a few.

Amazon S3 Access Points for Amazon FSx for NetApp ONTAP are also suitable for data access from serverless compute workloads that are cloud-native with containerized microservices that require flexible access to shared enterprise datasets, such as configuration files, reference data, content libraries, model artifacts, and application assets.

Now available
You can get started today using the Amazon FSx console, AWS CLI, or AWS SDK to attach Amazon S3 Access Points to your Amazon FSx for NetApp ONTAP file systems. The feature is available in the following AWS Regions: Africa (Cape Town), Asia Pacific (Hong Kong, Hyderabad, Jakarta, Melbourne, Mumbai, Osaka, Seoul, Singapore, Sydney, Tokyo), Canada (Central, Calgary), Europe (Frankfurt, Ireland, London, Milan, Paris, Spain, Stockholm, Zurich), Israel (Tel Aviv), Middle East (Bahrain, UAE), South America (Sao Paulo), US East (N. Virginia, Ohio), and US West (N. California Oregon). You’re billed by Amazon S3 for the requests and data transfer costs through your S3 Access Point, in addition to your standard Amazon FSx charges. Learn more on the Amazon FSx for NetApp ONTAP pricing page.

PS: Writing a blog post at AWS is always a team effort, even when you see only one name under the post title. In this case, I want to thank Luke Miller, for his expertise and generous help with technical guidance, which made this overview possible and comprehensive.

Veliswa Boya.

Introducing Amazon Nova 2 Lite, a fast, cost-effective reasoning model

Post Syndicated from Danilo Poccia original https://aws.amazon.com/blogs/aws/introducing-amazon-nova-2-lite-a-fast-cost-effective-reasoning-model/

Today, we’re releasing Amazon Nova 2 Lite, a fast, cost-effective reasoning model for everyday workloads. Available in Amazon Bedrock, the model offers industry-leading price performance and helps enterprises and developers build capable, reliable, and efficient agentic-AI applications. For organizations who need AI that truly understands their domain, Nova 2 Lite is the best model to use with Nova Forge to build their own frontier intelligence.

Nova 2 Lite supports extended thinking, including step-by-step reasoning and task decomposition, before providing a response or taking action. Extended thinking is off by default to deliver fast, cost-optimized responses, but when deeper analysis is needed, you can turn it on and choose from three thinking budget levels: low, medium, or high, giving you control over the speed, intelligence, and cost tradeoff.

Nova 2 Lite supports text, image, video, document as input and offers a one million-token context window, enabling expanded reasoning and richer in-context learning. In addition, Nova 2 Lite can be customized for your specific business needs. The model also includes access to two built-in tools: web grounding and a code interpreter. Web grounding retrieves publicly available information with citations, while the code interpreter allows the model to run and evaluate code within the same workflow.

Amazon Nova 2 Lite demonstrates strong performance across diverse evaluation benchmarks. The model excels in core intelligence across multiple domains including instruction following, math, and video understanding with temporal reasoning. For agentic workflows, Nova 2 Lite shows reliable function calling for task automation and precise UI interaction capabilities. The model also demonstrates strong code generation and practical software engineering problem-solving abilities.

Amazon Nova 2 Lite benchmarks

Nova 2 Lite is built to meet your company’s needs
Nova 2 Lite can be used for a broad range of your everyday AI tasks. It offers the best combination of price, performance, and speed. Early customers are using Nova 2 Lite for customer service chatbots, document processing, and business process automation.

Nova 2 Lite can help support workloads across many different use cases:

  • Business applications – Automate business process workflow, intelligent document processing (IDP), customer support, and web search to improve productivity and outcomes
  • Software engineering – Generate code, debugging, refactoring, and migrating systems to accelerate development and increase efficiency
  • Business intelligence and research – Use long-horizon reasoning and web grounding to analyze internal and external sources to uncover insights, and make informed decisions

For specific requirements, Nova 2 Lite is also available for customization on both Amazon Bedrock and Amazon SageMaker AI.

Using Amazon Nova 2 Lite
In the Amazon Bedrock console, you can use the Chat/Text playground to quickly test the new model with your prompts. To integrate the model into your applications, you can use any AWS SDKs with the Amazon Bedrock InvokeModel and Converse API. Here’s a sample invocation using the AWS SDK for Python (Boto3).

import boto3

AWS_REGION="us-east-1"
MODEL_ID="global.amazon.nova-2-lite-v1:0"
MAX_REASONING_EFFORT="low" # low, medium, high

bedrock_runtime = boto3.client("bedrock-runtime", region_name=AWS_REGION)

# Enable extended thinking for complex problem-solving
response = bedrock_runtime.converse(
    modelId=MODEL_ID,
    messages=[{
        "role": "user",
        "content": [{"text": "I need to optimize a logistics network with 5 warehouses, 12 distribution centers, and 200 retail locations. The goal is to minimize total transportation costs while ensuring no location is more than 50 miles from a distribution center. What approach should I take?"}]
    }],
    additionalModelRequestFields={
        "reasoningConfig": {
            "type": "enabled", # enabled, disabled (default)
            "maxReasoningEffort": MAX_REASONING_EFFORT
        }
    }
)

# The response will contain reasoning blocks followed by the final answer
for block in response["output"]["message"]["content"]:
    if "reasoningContent" in block:
        reasoning_text = block["reasoningContent"]["reasoningText"]["text"]
        print(f"Nova's thinking process:\n{reasoning_text}\n")
    elif "text" in block:
        print(f"Final recommendation:\n{block['text']}")

You can also use the new model with agentic frameworks that supports Amazon Bedrock and deploy the agents using Amazon Bedrock AgentCore. In this way, you can build agents for a broad range of tasks. Here’s the sample code for an interactive multi-agent system using the Strands Agents SDK. The agents have access to multiple tools, including read and write file access and the possibility to run shell commands.

from strands import Agent
from strands.models import BedrockModel
from strands_tools import calculator, editor, file_read, file_write, shell, http_request, graph, swarm, use_agent, think

AWS_REGION="us-east-1"
MODEL_ID="global.amazon.nova-2-lite-v1:0"
MAX_REASONING_EFFORT="low" # low, medium, high

SYSTEM_PROMPT = (
    "You are a helpful assistant. "
    "Follow the instructions from the user. "
    "To help you with your tasks, you can dynamically create specialized agents and orchestrate complex workflows."
)

bedrock_model = BedrockModel(
    region_name=AWS_REGION,
    model_id=MODEL_ID,
    additional_request_fields={
        "reasoningConfig": {
            "type": "enabled", # enabled, disabled (default)
            "maxReasoningEffort": MAX_REASONING_EFFORT
        }
    }
)

agent = Agent(
    model=bedrock_model,
    system_prompt=SYSTEM_PROMPT,
    tools=[calculator, editor, file_read, file_write, shell, http_request, graph, swarm, use_agent, think]
)

while True:
    try:
        prompt = input("\nEnter your question (or 'quit' to exit): ").strip()
        if prompt.lower() in ['quit', 'exit', 'q']:
            break
        if len(prompt) > 0:
            agent(prompt)
    except KeyboardInterrupt:
        break
    except EOFError:
        break

print("\nGoodbye!")

Things to know
Amazon Nova 2 Lite is now available in Amazon Bedrock via global cross-Region inference in multiple locations. For Regional availability and future roadmap, visit AWS Capabilities by Region.

Nova 2 Lite includes built-in safety controls to promote responsible AI use, with content moderation capabilities that help maintain appropriate outputs across a wide range of applications.

To understand the costs, see Amazon Bedrock pricing. To learn more, visit the Amazon Nova User Guide.

Start building with Nova 2 Lite today. To experiment with the new model, visit the Amazon Nova interactive website. Try the model in the Amazon Bedrock console, and share your feedback on AWS re:Post.

Danilo

Introducing Amazon Nova Forge: Build your own frontier models using Nova

Post Syndicated from Danilo Poccia original https://aws.amazon.com/blogs/aws/introducing-amazon-nova-forge-build-your-own-frontier-models-using-nova/

Organizations are rapidly expanding their use of generative AI across all parts of the business. Applications requiring deep domain expertise or specific business context need models that truly understand their proprietary knowledge, workflows, and unique requirements.

While techniques like prompt engineering and Retrieval Augmented Generation (RAG) work well for many use cases, they have fundamental limitations when it comes to embedding specialized knowledge into a model’s core understanding. Supervised fine-tuning and reinforcement learning help in customizing the model, but they operate too late in the development lifecycle, layering modifications on top of models that are a fully trained, and therefore difficult to steer to specific domains of interest.

When organizations attempt deeper customization through Continued Pre-Training (CPT) using only their proprietary data, they often encounter catastrophic forgetting, where models lose their foundational capabilities as they learn new content. At the same time, the data, compute, and cost needed for training a model from scratch are still a prohibitive barrier for most organizations.

Today, we’re introducing Amazon Nova Forge, a new service to build your own frontier models using Nova. Nova Forge customers can start their development from early model checkpoints, blend their datasets with Amazon Nova-curated training data, and host their custom models securely on AWS. Nova Forge is the easiest and most cost-effective way to build your own frontier model.

Use cases and applications
Nova Forge is designed for organizations with access to proprietary or industry-specific data who want to build AI that truly understands their domain. This includes:

  • Manufacturing and automation – Building models that understand specialized processes, equipment data, and industry-specific workflows
  • Research and development – Creating models trained on proprietary research data and domain-specific knowledge
  • Content and media – Developing models that understand brand voice, content standards, and specific moderation requirements
  • Specialized industries – Training models on industry-specific terminology, regulations, and best practices

Depending on the specific use cases, Nova Forge can be used to add differentiated capabilities, enhance task-specific accuracy, reduce costs, and lower latency.

How Nova Forge works
Nova Forge addresses the limitations of current customization approaches by allowing you to start model development from early checkpoints across pre-training, mid-training, and post-training phases. You can blend your proprietary data with Amazon Nova-curated data throughout all training phases, running training using proven recipes on Amazon SageMaker AI fully managed infrastructure. This data mixing approach significantly reduces catastrophic forgetting compared to training with raw data alone, helping preserve foundational skills—including core intelligence, general instruction following capabilities, and safety benefits—while incorporating your specialized knowledge.

Nova Forge provides the ability to use reward functions in your own environment for reinforcement learning (RL). This allows the model to learn from feedback generated in environments that are representative of your use cases. Beyond single-step evaluations, you can also use your own orchestrator to manage multi-turn rollouts, enabling RL training for complex agent workflows and sequential decision-making tasks. Whether you’re using chemistry tools to score molecular designs, or robotics simulations that reward efficient task completion and penalize collisions, you can connect your proprietary environments directly.

You can also take advantage of the built-in responsible AI toolkit available in Nova Forge to configure the safety and content moderation settings of your model. You can adjust settings to meet your specific business needs in areas like safety, security, and handling of sensitive content.

Getting started with Nova Forge
Nova Forge integrates seamlessly with your existing AWS workflows. You can use the familiar tools and infrastructure in Amazon SageMaker AI to run your training, then import your custom Nova models as private models on Amazon Bedrock. This gives you the same security, consistent APIs, and broader AWS integrations as any model in Amazon Bedrock.

In Amazon SageMaker Studio, you can now build your frontier model with Amazon Nova.

Amazon Nova Forge in the SageMaker AI console

To start building the model, choose which checkpoint to use: pre-trained, mid-trained, or post-trained. You can also upload your dataset here or use existing datasets.

Amazon Nova Forge checkpoints

You can blend your training data by mixing in curated datasets provided by Nova. These datasets, categorized by domain, can help your model to preserve general performance and prevent overfitting or catastrophic forgetting.

Amazon Nova Forge data mixing

Optionally, you can choose to use Reinforcement Fine-Tuning (RFT) to improve factual accuracy and reduce hallucinations in specific domains.

When training completes, import the model into Amazon Bedrock and start using it in your applications.

Things to know
Amazon Nova Forge is available in the US East (N. Virginia) AWS Region. The program includes access to multiple Nova model checkpoints, training recipes to mix proprietary data with Amazon Nova-curated training data, proven training recipes, and integration with Amazon SageMaker AI and Amazon Bedrock.

Learn more in the Amazon Nova User Guide and explore Nova Forge from the Amazon SageMaker AI console.

Organizations interested in expert assistance can also reach out to our Generative AI Innovation Center for additional support with their model development initiatives.

Danilo

AWS Transform for mainframe introduces Reimagine capabilities and automated testing functionality

Post Syndicated from Channy Yun (윤석찬) original https://aws.amazon.com/blogs/aws/aws-transform-for-mainframe-introduces-reimagine-capabilities-and-automated-testing-functionality/

In May, 2025, we launched AWS Transform for mainframe, the first agentic AI service for modernizing mainframe workloads at scale. The AI-powered mainframe agent accelerates mainframe modernization by automating complex, resource-intensive tasks across every phase of modernization—from initial assessment to final deployment. You can streamline the migration of legacy mainframe applications, including COBOL, CICS, DB2, and VSAM to modern cloud environments—cutting modernization timelines from years to months.

Today, we’re announcing enhanced capabilities in AWS Transform for mainframe that include AI-powered analysis features, support for the Reimagine modernization pattern, and testing automation. These enhancements solve two critical challenges in mainframe modernization: the need to completely transform applications rather than merely move them to the cloud, and the extensive time and expertise required for testing.

  • Reimagining mainframe modernization – This is a new AI-driven approach that completely reimagines the customer’s application architecture using modern patterns or moving from batch process to real-time functions. By combining the enhanced business logic extraction with new data lineage analysis and automated data dictionary generation from the legacy source code through AWS Transform, customers transform monolithic mainframe applications written in languages like COBOL into more modern architectural styles, like microservices.
  • Automated testing – Customers can use new automated test plan generation, test data collection scripts, and test case automation scripts. AWS Transform for mainframe also provides functional testing tools for data migration, results validation, and terminal connectivity. These AI-powered capabilities work together to accelerate testing timelines and improve accuracy through automation.

Let’s learn more about reimagining mainframe modernization and automated testing capabilities.

How to reimagine mainframe modernization
We recognize that mainframe modernization is not a one-size-fits-all proposition. Whereas tactical approaches focus on augmentation and maintaining existing systems, strategic modernization offers distinct paths: Replatform, Refactor, Replace, or the new Reimagine.

In the Reimagine pattern, AWS Transform AI-powered analysis combines mainframe system analysis with organizational knowledge to create detailed business and technical documentation and architecture recommendations. This helps preserve critical business logic while enabling modern cloud-native capabilities.

AWS Transform provides new advanced data analysis capabilities that are essential for successful mainframe modernization, including data lineage analysis and automated data dictionary generation. These features work together to define the structure and meaning to accompany the usage and relationships of mainframe data. Customers gain complete visibility into their data landscape, enabling informed decision-making for modernization. Their technical teams can confidently redesign data architectures while preserving critical business logic and relationships.

The Reimagining strategy follows the principle of human in the loop validation, which means that AI-generated application specifications and code such as AWS Transform and Kiro are continuously validated by domain experts. This collaborative approach between AI capabilities and human judgment significantly reduces transformation risk while maintaining the speed advantages of AI-powered modernization.

The pathway has a three-phase methodology to transform legacy mainframe applications into cloud-native microservices:

  • Reverse engineering to extract business logic and rules from existing COBOL or job control language (JCL) code using AWS Transform for mainframe.
  • Forward engineering to generate microservice specification, modernized source code, infrastructure as code (IaC), and modernized database.
  • Deploy and test to deploy the generated microservices to Amazon Web Services (AWS) using IaC and to test the functionality of the modernized application.

Although microservices architecture offers significant benefits for mainframe modernization, it’s crucial to understand that it’s not the best solution for every scenario. The choice of architectural patterns should be driven by the specific requirements and constraints of the system. The key is to select an architecture that aligns with both current needs and future aspirations, recognizing that architectural decisions can evolve over time as organizations mature their cloud-native capabilities.

The flexible approach supports both do-it-yourself and partner-led development, so you can use your preferred tools while maintaining the integrity of your business processes. You get the benefits of modern cloud architecture while preserving decades of business logic and reducing project risk.

Automated testing in action
The new automated testing feature supports IBM z/OS mainframe batch application stack at launch, which helps organizations address a wider range of modernization scenarios while maintaining consistent processes and tooling.

Here are the new mainframe capabilities:

  • Plan test cases – Create test plans from mainframe code, business logic, and scheduler plans.
  • Generate test data collection scripts – Create JCL scripts for data collection from your mainframe to your test plan.
  • Generate test automation scripts – Generate execution scripts to automate testing of modernized applications running in the target AWS environment.

To get started with automated testing, you should set up a workspace, assign a specific role to each user, and invite them to onboard your workspace. To learn more, visit Getting started with AWS Transform in the AWS Transform User Guide.

Choose Create job in your workspace. You can see all types of supported transformation jobs. For this example, I select the Mainframe Modernization job to modernize mainframe applications.

After a new job is created, you can kick off modernization for tests generation. This workflow is sequential and it is a place for you to answer the AI agent’s questions, providing the necessary input. You can add your collaborators and specify resource location where the codebase or documentation is located in your Amazon Simple Storage Service (Amazon S3) bucket.

I use a sample application for a credit card management system as the mainframe banking case with the presentation (BMS screens), business logic (COBOL) and data (VSAM/DB2), including online transaction processing and batch jobs.

After finishing the steps of analyzing code, extracting business logic, decomposing code, planning migration wave, you can experience new automated testing capabilities such as planning test cases, generating test data collection scripts, and test automation scripts.

The new testing workflow creates a test plan for your modernization project and generates test data collection scripts. You will have three planning steps:

  • Configure test plan inputs – You can link your test plan to your other job files. The test plan is generated based on analyzing the mainframe application code and can provide more details optionally using the extracted business logic, the technical documentation, the decomposition, and using a scheduler plan.
  • Define test plan scope – You can define the entry point, the specific program where the application’s execution flow begins. For example, the JCL for a batch job. In the test plan, each functional test case is designed to start the execution from a specific entry point.
  • Refine test plan – A test plan is made up of sequential test cases. You can reorder them, add new ones, merge multiple cases, or split one into two on the test case detail page. Batch test cases are composed of a sequence of JCLs following the scheduler plan.

Generating test data collection scripts collects test data from mainframe applications for functional equivalence testing. This step actively generates JCL scripts that will help you gather test data from the sample application’s various data sources (such as VSAM files or DB2 databases) for use in testing the modernized application. The step is designed to create automated scripts that can extract test data from VSAM datasets, query DB2 tables for sample data, collect sequential data sets, and generate data collection workflows. After this step is completed, you’ll have comprehensive test data collection scripts ready to use.

To learn more about automated testing, visit Modernization of mainframe applications in the AWS Transform User Guide.

Now available
The new capabilities in AWS Transform for mainframe are available today in all AWS Regions where AWS Transform for mainframe is offered. For Regional availability and future roadmap, visit the AWS Capabilities by Region. Currently, we offer our core features—including assessment and transformation—at no cost to AWS customers. To learn more, visit AWS Transform Pricing page.

Give it a try in the AWS Transform console. To learn more, visit the AWS Transform for mainframe product page and send feedback to AWS re:Post for AWS Transform for mainframe or through your usual AWS Support contacts.

Channy

Building with AI-DLC using Amazon Q Developer

Post Syndicated from Will Matos original https://aws.amazon.com/blogs/devops/building-with-ai-dlc-using-amazon-q-developer/

The AI-Driven Development Life Cycle (AI-DLC) methodology marks a significant change in software development by strategically assigning routine tasks to AI while maintaining human oversight for critical decisions. Amazon Q Developer, a generative AI coding assistant, supports the entire software development lifecycle and offers the Project Rules feature, allowing users to tailor their development practices within the platform.

Recently, AWS made its AI-DLC workflow open-source, enabling developers to create software using this methodology. This workflow is implemented in Amazon Q Developer through its Project Rules customization feature. In this post, we will demonstrate how the AI-DLC workflow operates in Amazon Q Developer using an example use case.

AI-DLC Workflow Overview

The AI-DLC workflow is the practical implementation of the AI-DLC methodology for executing software development tasks. As outlined in the AI-DLC Method Definition Paper, the workflow has three phases. These phases are Inception, Construction, and Operations. Inception involves planning and architecture. Construction focuses on design and implementation. Operations cover deployment and monitoring. Each phase includes distinct stages. These stages address specific software development life cycle functions. The workflow adapts to project requirements. It analyzes requests, codebases, and complexity. This analysis determines the necessary stages. Simple bug fixes skip planning. They go directly to code generation. Complex features need requirements analysis. They also require architectural design and detailed testing.

The workflow maintains quality and control through structured milestones and transparent decision-making. At each phase, AI-DLC asks clarifying questions, creates execution plans, and waits for approval. Every decision, input, and response is logged in an audit trail for traceability. Whether building a new microservice, refactoring legacy code, or fixing a production bug, AI-DLC scales its rigor to match needs—comprehensive when complex, efficient when simple, and always in control. Figure 1 shows the phases and stages within the adaptive AI-DLC workflow. The stages shown in green boxes are mandatory, while those in yellow boxes are conditional.

AI-DLC workflow diagram showing three phases: Inception Phase (blue) with mandatory steps for Workspace Detection, Requirements Analysis, and Workflow Planning, plus conditional steps for Reverse Engineering, User Stories, Application Design, and Units Generation; Construction Phase (green) with conditional steps for Functional Design, NFR Requirements, NFR Design, and Infrastructure Design, followed by mandatory Code Generation and Build and Test steps that loop for each unit; and Operations Phase (orange) with an Operations step. The workflow flows from User Request at the top to Complete at the bottom.

Figure 1. SDLC phases and stages in AI-DLC workflow

Prerequisites

Before we begin the walk-through, we must have an AWS account or AWS Builder Id for authenticating Amazon Q Developer. If you don’t have one, sign up for AWS account or create an AWS builder id. You can use any of the Integrated Development Environments (IDEs) supported by Amazon Q Developer and install the extension as per the AWS documentation. In this post, we’ll be using the Amazon Q Developer extension in VS Code IDE. Once the plug-in is installed, you’ll need to authenticate Q Developer with the AWS cloud backend. Refer to the AWS documentation for Q Developer authentication instructions.

The AI-DLC workflow generates various Mermaid diagrams in markdown files. To view these diagrams within your IDE, you can install a Mermaid viewer plugin.

Let’s Begin Building!

Let’s construct a simple River Crossing Puzzle as a web UI app using AI-DLC. By choosing a straightforward app, we can concentrate more on learning the AI-DLC workflow and less on the project’s technical intricacies.

The sections below outline the individual steps in the AI-DLC development process using Amazon Q Developer. We’ll showcase screenshots of our IDE with the Amazon Q Developer plug-in and demonstrate how to interact with the workflow.

Although we’ve used the Amazon Q Developer IDE plug-in in this blog post, you can also use Kiro Command Line Interface (CLI) to build with AI-DLC without any additional setup. The workflow remains the same, except that you’ll interact through the command line instead of the graphical interface in the IDE.

As we progress through the workflow, your AI-DLC experience will be tailored to your specific problem statement. You’ll also notice the probabilistic nature of large language models (LLMs), as the questions and artifacts generated by them will vary from one run to another for the same problem statement. For example, if you attempt to replicate the same problem statement we used in this blog post, your experience will likely differ. This is expected and desirable. Despite these minor variations, we’ll eventually find a solution to the problem we initially set out to address.

Step 1: Clone GitHub repo containing the AI-DLC Q Developer Rules

Clone the GitHub repo containing the AI-DLC Q Developer Rules:

git clone https://github.com/awslabs/aidlc-workflows.git

Step 2: Load Q Developer Rules in your project workspace

Follow the README.md instructions in the GitHub repo to copy the rules files over to your project folder.

Step 3: Install and authenticate Amazon Q Developer Extension in IDE

Open the project folder you created in Step 2 in VS Code. Open the Amazon Q Chat Panel in the IDE and ensure that the AI-DLC workflow rules are loaded in Q Developer, as shown in Figure 2. If you don’t see what’s shown in Figure 2, please double-check the steps you performed in Step 2.

Screenshot showing four steps to access AI-DLC rules in Amazon Q: Step 1 shows opening Amazon Q Chat Panel from the left sidebar; Step 2 shows opening a chat session in Amazon Q at the top; Step 3 shows clicking on the Rules button in the chat interface; Step 4 shows ensuring AI-DLC rules are loaded in the rules panel on the right side of the screen.

Figure 2: AI-DLC rules enabling in Amazon Q Developer

Step 4: Start the AI-DLC workflow by entering a high-level problem statement

Our development environment is now set up, and we’re ready to begin application development using AI-DLC. In our Q Developer chat session, we enter the following problem statement:

Using AI-DLC let's build a web application to solve the river crossing puzzle.

Notice that we’ve prefixed our problem statement with “Using AI-DLC …” to ensure that Q Developer engages the AI-DLC workflow. Figure 3 shows what happens next. The AI-DLC workflow is triggered within Q Developer. It greets us with a welcome message and provides a brief overview of the AI-DLC methodology.

Figure 3 shows an expanded view of the AI-DLC workflow rules folder structure on the left. You’ll notice that a single aws-aidlc-rules/core-workflow.md is placed in the designated .amazonq/rules folder, while the rest of the rules files are placed in an ordinary aws-aidlc-rule-details folder. This arrangement is designed to optimize model efficiency. By placing the aws-aidlc-rules/core-workflow.md file in the .amazonq/rules folder, , it serves as additional context, ensuring that the core workflow structure is always accessible without incurring additional token consumption. Conversely, the detailed phase and stage-level behavior rules are stored in the aws-aidlc-rule-details folder and are dynamically loaded as required. This approach conserves Amazon Q’s context window and token usage by retaining only the necessary information within the context at any given time, thereby enhancing model efficiency.

The rules files under the aws-aidlc-rule-details folder are organized into three sub-folders, each representing a phase of AI-DLC. Within each phase, there are stage-specific files. A common folder houses cross-cutting rules applicable to all AI-DLC phases and stages such as the “human-in-the-loop”.

The AI-DLC workflow is self-guided and provides us with a clear understanding of what to expect next. It informs us that it will enter the AI-DLC Inception phase next, starting with the Workspace Detection stage within it.

Screenshot of Amazon Q interface showing AI-DLC workflow initialization. The left sidebar displays a file tree with various workflow stages and configuration files. The main chat area shows a problem statement input box at the top with placeholder text 'Using AI-DLC let's build a web application to solve the most pressing problem.' Below is a welcome message explaining AI-DLC (AI-Driven Development Life Cycle) and its capabilities. Three callout annotations highlight: 1) The core workflow dynamically utilizes detailed instructions for different phases and stages, loading and unloading them as required; 2) AI-DLC workflow kicks off with a welcome message and precise overview; 3) The workflow is structured to load a single Q Developer Rule file, one workflow.md, which then dynamically loads and unloads the stage definitions housed in the 'aws-aidlc-rule-details' folder as needed.

Figure 3: User enters high level problem statement in Amazon Q. AI-DLC workflow is triggered.

Step 5: Workspace Detection

We enter the Workspace Detection stage within the Inception phase. In this stage, AI-DLC analyzes the current workspace and determines whether it’s a greenfield (new) or brownfield (existing) application. Since AI-DLC is an adaptive workflow, it decides whether the next stage will be Reverse Engineering (for brownfield projects) or Requirements Analysis (for greenfield projects).

Since we’re building a greenfield application and there’s no existing code in the workspace to reverse engineer, the workflow will guide us to Requirements Analysis next. If we were working on a brownfield application, the workflow would have performed Reverse Engineering first and then moved on to Requirements Analysis. This demonstrates the adaptive nature of the workflow.

Figure 4 illustrates the process in our IDE when we enter this stage. The workflow requests our permission to create an aidlc-docs folder under the project root. This folder will serve as the repository for all the artifacts generated by AI-DLC during the workflow execution. Subsequently, the workflow generates two files within this folder: aidlc-state.md and audit.md. The purpose of these files is explained in Figure 4.

Screenshot of AI-DLC workspace detection phase showing the Amazon Q chat interface. The left sidebar displays the file tree with an 'aidlc-doc' folder highlighted. The main chat area shows the Inception Phase - Workspace Detection stage with explanatory text about analyzing the workspace. Five callout annotations explain: 1) Workflow creates aidlc-doc directory for storing AI-DLC generated artifacts; 2) The workflow tracks its progress in aidlc-metadata.json for error recovery and session continuity; 3) The audit.md file stores user's prompts; 4) Workflow highlights the AI-DLC phase and stage name with a clear heading for easy tracking; 5) Workflow loads detailed stage-level behavior files dynamically such that they don't consume the context window statically. At the bottom, a user approval prompt shows 'mkdir -p /Users/[...]/NewConsumerPortal/aidlc-docs' with the user asked to approve the 'mkdir' command.

Figure 4: Workspace Detection

The Workspace Detection will quickly finish as this is a greenfield project. The workflow will guide us into Requirements Analysis stage within the Inception phase next.

Step 6: Requirements Analysis

The workflow has progressed to the Requirements Analysis stage, where we will define the application requirements. The AI-DLC workflow presented our high-level problem statement to the Q Developer, which then responded with several requirements clarifications questions, as illustrated in Figure 4.

Several AI-DLC rules came into play at this stage. One rule instructed Amazon Q to avoid making assumptions on the user’s behalf and instead ask clarifying questions. Since LLMs tend to make assumptions and rush towards outcomes, they must be explicitly instructed to align with the engineering rigor of the AI-DLC methodology. To achieve this, the Q Developer presented several requirements clarification questions in requirement-verification-questions.md file and asked us to answer them inline in the file.

Another AI-DLC rule instructed the Q Developer to present questions in multiple-choice format and always include an open-ended option (“Other”) to enhance user convenience and provide flexibility in answering.

As shown in Figure 5, Amazon Q has asked us about the desired puzzle variant, such as the Classic Farmer, Fox, Chicken, and Grain puzzle or other popular variations. Additionally, it has asked us questions about user interaction methods, score persistence across multiple players, and the creation of a leaderboard.

These questions are essential for achieving our desired application outcome. Our responses to these questions will determine the final product. While we didn’t explicitly specify this level of detail in our high-level problem statement, AI-DLC has delegated detailed requirements elaboration to Amazon Q, but we still retain control over what gets built.

Screenshot of AI-DLC Requirements Analysis phase showing a split view. The left side displays a requirements clarification questions markdown file with multiple-choice questions about the Kuer Crossing Portal, including sections about user crossing portal variants, primary user interaction methods, and data storage preferences. The right side shows the Amazon Q chat interface with the Inception Phase - Requirements Analysis heading. Two callout annotations highlight: 1) AI-DLC asks questions in multiple choice format, with an 'Other' option that leaves an open-ended fill-in-the-blank when the answer doesn't match the predefined options; 2) AI-DLC generates config.requirements-clarification-questions.md file containing requirements clarification questions, with questions placed in an MD file where the user can respond inline in the file, using 'Answered' to indicate completion. The chat shows instructions for answering questions to clarify requirements.

Figure 5: Requirements Analysis

We answer all the questions in requirement-verification-questions.md file and enter “Done” in the chat window.

Amazon Q processes our responses. The AI-DLC workflow is designed to identify human errors. It checks if we’ve answered all the questions and identifies any contradictions or ambiguities in our answers. Any confusions, contradictions, or ambiguities will be flagged for follow-up questions. AI-DLC adheres to high standards and ensures that we don’t proceed to the next step until we’re fully in agreement on the requirements between us and Amazon Q.

Since we answered all the questions and there were no contradictions in our answers, the workflow continues and generates a comprehensive requirements.md document, as shown in figure 6.

Screenshot showing AI-DLC requirements review phase with split view. The left side displays a Requirements Document for the River Crossing Puzzle Web Application, including Intent Analysis Summary, User Request details, Request Type, and Functional Requirements with Core Puzzle Functionality items (FR-001 through FR -006) describing game features like classic farmer puzzle, timer display, move tracking, puzzle state validation, and victory messages. The right side shows the Amazon Q chat interface with 'Requirements Analysis Complete' heading, displaying project details including Puzzle Type (Classic Farmer, Fox, Chicken, and Grain river crossing puzzle), Technology (React-based modern web application), and Target Devices (web browsers only). Three callout annotations highlight: 1) Requirements Analysis phase complete; 2) Requirements document generated; 3) User may Request Changes, Add User Stories for Approval, or Approve & Continue, with a REVIEW SAFETY note warning users to review requirements and approve to continue, with options to request changes or add modifications if required.

Figure 6: Requirements Review

The workflow prompts us to review the requirements.md document and decide on the next step. If we’re not aligned on the requirements, we can prompt Amazon Q to help us achieve alignment. We can then iterate on the requirements until we’re fully aligned. Once we’re fully aligned, we prompt AI-DLC to progress to the next stage.

Given the adaptive nature of the AI-DLC workflow, Amazon Q has recommended that this application is simple enough, and we can skip the User Stories stage. If we felt otherwise, we would have overridden the model’s recommendation. In this case, we agree with Q’s recommendation and will therefore enter “Continue” in the chat window.

The workflow will enter Workflow Planning stage next.

Step 7: Workflow Planning

With our requirements established, we proceed to the Workflow Planning stage. In this phase, we leverage the requirements context and the workflow’s intelligence to plan the execution of specific stages of AI-DLC within the workflow to build our application as per the requirements specification.

Figure 7 illustrates the workflow planning stage in Q Developer. The workflow has generated an execution-plan.md file that outlines the recommended stages for execution and those that should be skipped.

The workflow planning process is highly contextual to the requirements. During requirements analysis, we decided to develop a simple river crossing puzzle application, consisting of a single HTML file, without a backend, leaderboard, or persistence. Consequently, Amazon Q recommends that we skip all the conditional stages, such as User Stories, Application Design, Units of Work Planning, and so on, and proceed directly to the Code Generation Planning stage in the Construction phase.

Figure 7 visually represents the recommended workflow graphically, indicating the stages that will be executed and those that will be skipped.

Screenshot of AI-DLC Workflow Planning phase showing an Execution Plan document on the left with Detailed Analysis Summary including user-facing changes, brownfield changes, API changes, and NFR changes, plus Risk Assessment. Below is a Workflow Visualization flowchart diagram showing the workflow stages from Inception through Construction to Operations phases. The right side shows the Amazon Q chat with 'Workflow Planning Complete' heading. Three callout annotations highlight: 1) AI -DLC workflow has analyzed requirements and based on the problem complexity has proposed a set of stages to execute in the workflow; 2) Problem is simple enough that AI-DLC is proposing to skip the detailed optional stages; 3) User may Request Changes, Add back skipped stages or Approve & Continue.

Figure 7: Workflow Planning

Since we’ve opted for a straightforward web UI app in this blog post for brevity, the workflow execution plan suggested by AI-DLC aligns seamlessly with our objectives. Should we not be aligned with the AI-DLC recommended workflow execution plan, we would request Q Developer to modify the plan to suit our preferences.

Since we’ve agreed on the workflow plan, we’ll enter “Continue” in Q’s chat session. If we weren’t aligned with the recommended workflow execution plan, we’d have prompted Q with our concerns and iterated over the revised execution plan until it aligned with our preferences. Following the recommended execution plan, the workflow will transition into the Construction phase and directly into the Code Generation Plan stage in the phase.

Step 8: Code Generation Planning

AI-DLC prioritizes planning over rushing to outcomes. This approach aligns with the concept of human-in-the-loop behavior, allowing us to detect issues early on, provide feedback on the plan, and prevent wrong assumptions from propagating further. Before we proceed with actual Code Generation, we undergo Code Generation Planning.

During Code Generation Planning, AI-DLC creates a detailed, numbered plan. It analyzes the requirements and design artifacts, breaking down the process into explicit steps for generating business logic, the API layer, the data layer, tests, documentation, and deployment files.

The plan is documented in a {unit-name}-code-generation-plan.md file, complete with check boxes. This ensures transparency, allowing users to see what will be built. It also provides control, enabling users to modify the plan. Additionally, it maintains quality by ensuring comprehensive coverage of code, tests, and documentation.

Figure 8 illustrates the AI-DLC’s code generation plan. The proposed workflow comprises eight steps, starting with creating an HTML structure and progressing to adding styling, game logic, and concluding with testing and documentation.

Screenshot of AI-DLC Code Generation Planning showing a Code Generation Plan document for River Crossing Puzzle on the left, with Unit Context listing HTML Structure, CSS Styling, and JavaScript files, followed by Unit Generation Steps including Step 1: HTML Structure Generation, Step 2: CSS Styling Generation, and Step 3 : Core Game Logic Generation with detailed checkboxes for each step. The right side shows Amazon Q chat with code generation plan details. Three callout annotations highlight: 1) The plan doc contains to-do items for AI-DLC to execute. These checkboxes get completed when the task is done; 2) This is how AI-DLC workflow persists and tracks progress state; 3) AI-DLC has proposed an 8-step code generation plan with checkboxes and review prompts, and User may Request Changes or Approve & Continue.

Figure 8: Code Generation Planning

The code generation plan appears reasonable to us. We will proceed to the Code Generation stage by entering “Continue” in Q’s chat session.

Step 9: Code Generation

The Code Generation stage executes the Code Generation Plan we approved in the previous step. It generates actual code artifacts step-by-step, including business logic, APIs, data layers, tests, and documentation. Completed steps are marked with check boxes, progress is tracked, and story traceability is ensured before presenting the generated code for user approval.

Figure 9 illustrates that the Code Generation stage has been completed. We are now reviewing a single index.html file generated with embedded styling and JavaScript consistent with our preference specified in requirements.md.

The workflow provides a summary of the activities performed during the Code Generation phase.

Screenshot of AI-DLC Code Generation phase showing generated HTML code on the left with embedded styling and JavaScript for the River Crossing Puzzle application. The right side shows Amazon Q chat with 'Code Generation Complete - river-crossing-puzzle' heading and a list of generated artifacts including HTML file, CSS interface, drag-and-drop interface, game logic, and testing services. Two callout annotations highlight: 1) The generated code is an HTML file with embedded styling and JavaScript; 2) We have specified during requirements analysis phase that we want a single-file index.html file implementation; 3) Code generation has been completed, and a summary of the generated artifacts is provided.

Figure 9: Code Generation

We’re about to test our newly created application soon. While it may be straightforward to test this simple puzzle app right now, for complex applications, we generate build and test instructions using AI-DLC.

We’ll enter “Continue” in the workflow and enter the final Build and Test stage in the Construction phase.

Step 10: Build and Test

These questions are essential for achieving our desired application.
We’ve reached the final stage of the AI-DLC Construction Phase, known as the Build and Test stage. During this stage, we create comprehensive instruction files that guide the build and packaging of the project, and document the necessary testing layers. These layers include unit tests (validating generated code), integration tests (checking unit interactions), performance tests (load/stress testing), and additional tests as required (security, contract, e2e).

The generated build instructions include dependencies and commands, test execution steps with expected results, and a summary document that provides an overview of the overall build/test status and the project’s readiness for deployment.

Figure 10 illustrates the documentation generated during this stage.

Screenshot of AI-DLC Build and Test phase showing a Build and Test Summary document on the left with Build Status (Build Tool, Build Status, Build Artifacts, Build Warnings) and Test Execution Summary including Unit Tests, Integration Tests, and Performance Tests sections with checkmarks and failure indicators. The right side shows Amazon Q chat with build and test completion status and project summary. Two callout annotations highlight: 1) Build and Test Complete! Build and Test instructions have been documented; 2) The AI-DLC workflow has concluded with a comprehensive summary of all completed stages and generated artifacts.

Figure 10: Build and Test

The AI-DLC workflow has now concluded.

Let’s Solve the Puzzle!

We open index.html in a web browser to access our newly created River Crossing Puzzle application. As shown in figure 11, we see our graphical web UI.

During requirements assessment, we chose a straightforward user interface using HTML, CSS, and JavaScript (without any frameworks), as evident in the display shown in Figure 11. Your display may vary due to the probabilistic nature of LLMs and the choices you made for requirements.

We attempt to solve the puzzle and find that it works as expected.

Side-by-side screenshots of the River Crossing Puzzle web application showing two game states. The left screenshot shows the initial state with a farmer on the left bank, and fox, chicken, and grain items listed below, with a blue river in the center and right bank on the right. The right screenshot shows a game state after moves with the farmer on the right bank and a success message 'Congratulations! You won in 7 moves!' displayed at the bottom. Both screens have a yellow 'Start Over' button and show move counts.

Figure 11: River Crossing Puzzle Web App

Conclusion

This post shows how AWS’s open-source AI-DLC workflow, guided by Amazon Q Developer’s Project Rules feature, helps developers build applications with structured oversight and transparency.

Using a River Crossing Puzzle web application as an example, the walk-through illustrates how AI-DLC methodology adapts its rigor based on project complexity, skipping unnecessary stages for simple applications while maintaining comprehensive processes for complex projects. Throughout each stage, AI-DLC enforces “human-in-the-loop” behavior, requiring user approval at critical checkpoints, asking clarifying questions, and maintaining complete audit trails for traceability.

The exercise successfully demonstrates how AI-DLC balances AI automation with human oversight, enhancing productivity without sacrificing quality or control. By following this structured, repeatable methodology, development teams can leverage generative AI’s capabilities while ensuring humans remain in charge of architectural decisions and implementation approaches. This framework provides the necessary guardrails for responsible and effective AI-assisted software development across projects of varying complexity.

Cleanup

We did not create any AWS resources in this walk-through, so no AWS cleanup is needed. You may cleanup your project workspace at your discretion.

Ready to get started? Visit our GitHub repository to download the AI-DLC workflow and join the AI-Native Builders Community to contribute to the future of software development.

About the authors:

Raja SP

Raja is a Principal Solutions Architect at AWS, where he leads Developer Transformation Programs. He has worked with more than 100 large customers, helping them design and deliver mission critical systems built on modern architectures, platform engineering practices, and Amazon inspired operating models. As generative AI reshapes the software development landscape, Raja and his team created the AI Driven Development Lifecycle (AI-DLC) — an end to end, AI native methodology that re-imagines how large teams collaboratively build production-grade software in the AI era.

Raj Jain

Raj is a Senior Solutions Architect, Developer Specialist at AWS. Prior to this role, Raj worked as a Senior Software Development Engineer at Amazon, where he helped build the security infrastructure underlying the Amazon platform. Raj is a published author in the Bell Labs Technical Journal, and has also authored IETF standards, AWS Security blogs, and holds twelve patents

Siddhesh Jog

Siddhesh is a Senior Solutions Architect at AWS. He has worked in multiple industries in a wide variety of roles and is passionate about all things technology. At AWS Siddhesh is most excited to help customers transition to the AI Driven Development Lifecycle and enable them to build applications rapidly in a secure, complaint and cost efficient cloud environment.

Will Matos

Will Matos is a Principal Specialist Solutions Architect with AWS’s Next Generation Developer Experience (NGDE) team, revolutionizing developer productivity through Generative AI, AI-powered chat interfaces, and code generation. With 27 years of technology, AI, and software development experience, he collaborates with product teams and customers to create intelligent solutions that streamline workflows and accelerate software development cycles. A thought leader engaging early adopters, Will bridges innovation and real-world needs .

Open-Sourcing Adaptive Workflows for AI-Driven Development Life Cycle (AI-DLC)

Post Syndicated from Will Matos original https://aws.amazon.com/blogs/devops/open-sourcing-adaptive-workflows-for-ai-driven-development-life-cycle-ai-dlc/

AI-Driven Development Life Cycle (AI-DLC) holds the promise of unlocking the full potential of AI in software development. By emphasizing AI-led workflows and human-centric decision-making, AI-DLC can deliver velocity and quality. However, realizing these gains hinges on how organizations effectively integrate AI into their engineering workflows.

Through our work with engineering teams across industries, we have identified three recurring challenges. These challenges consistently limit the effectiveness of AI in accelerating modern software development. The first challenge is one-size-fits-all workflows. These workflows force every project through the same rigid sequence of steps. The second challenge is the lack of flexible depth in workflow stages. This leads to over-engineering or insufficient rigor. The third challenge is tools that over-automate. These tools unintentionally divert humans away from critical validation and oversight responsibilities.

Achieving true, sustainable productivity requires the process and AI coding agents to become adaptive to context, flexible in depth, and collaborative by design. In this blog, we’ll show you how AI-DLC’s core principles address these three challenges, transforming them from productivity blockers into opportunities for adaptive, human-centered development. We’ll describe how AI-DLC enables workflows that adapt to the problem at hand by intelligently selecting stages, modulating depth, and embedding human oversight at every critical decision point.

We will also introduce our open-source Amazon Q Developer/Kiro Rules implementation, which brings AI-DLC principles to life through adaptive workflow scaffolds. This allows you to start applying these principles in your own projects and experience AI-native development that accelerates delivery without compromising engineering discipline or human judgment.

How does AI-DLC address these challenges?

Let’s explore how AI-DLC addresses these challenges.

1. The “One-Size-Fits-All” Workflow Problem

Software development has never been a linear process. In practice, different projects follow distinct pathways with their own checkpoints and deliverables. Consider these examples:

  • A simple defect fix doesn’t require elaborate requirements analysis and planning
  • A pure infrastructure porting project doesn’t warrant application design with domain modeling
  • A new feature or service addition demands different steps than applying a security patch

Yet, many modern Agentic coding tools provide hard-wired, opinionated workflows that ignore this diversity. Regardless of intent or scope, every project is forced through the same rigid sequence of steps—even when some add little or no value. This rigidity introduces friction, wastes time, and reduces productivity. The result: artificial ceremonies, unnecessary artifacts, redundant approvals, and process overhead that impede velocity.

How AI-DLC addresses this challenge:
AI-DLC addresses this challenge through the Principle 10 (No Hard-Wired, Opinionated SDLC Workflows) as defined in the AI-DLC Method Definition Paper.

AI-DLC avoids prescribing opinionated workflows for different development pathways (such as new system development, refactoring, defect fixes, or microservice scaling). Instead, it adopts a truly AI-First approach where AI recommends the Level 1 Plan based on the given pathway intention.

2. Lack of Flexible Depth Within Each Stage

True adaptivity must go beyond the breadth of a workflow and extend into its depth and intensity. This is how human experts intuitively plan software projects today.

Even when workflows are flexible, many tools fail to modulate the depth of engagement at each stage. For example, building a lightweight utility function doesn’t require full-scale Domain-Driven Design or detailed architectural modeling. When an AI coding agent compels teams to follow these steps regardless of need, the consequence is wasted effort and an over-engineered product. Developers spend cycles reviewing artifacts as the tools dictate rather than delivering business value.

How AI-DLC addresses this challenge:
Through the same principle 10, AI-DLC adapts both the breadth (choice of stages) and the depth of each stage to match the complexity of the intent and context. For example, the complexity of the requirements determines whether a conceptual design is sufficient or whether a full architectural deep dive is required in the Design stage.

Humans validate and adjust this AI-proposed breadth and depth, ensuring that each stage’s rigor matches the scope of the challenge. This elasticity—balancing breadth and depth—is essential for sustaining true velocity without sacrificing engineering discipline.

3. Tools that Reduce the Emphasis on Human Oversight

As AI tools automate more of the Software Development Life Cycle (SDLC), a new risk has emerged: process atrophy. Developers, excited by automation, often drift into passive execution—allowing AI to “decide everything.” The result is a loss of reflection, weakened oversight, and erosion of shared understanding. AI tools must not only automate work but also amplify the significance of human judgment. They should remind practitioners that “human in the loop” is not a checkbox—it is the cornerstone of trust, accountability, and correctness in AI-native development. Equally critical are the rituals and rhythms that sustain collaborative engineering.

How AI-DLC addresses this challenge:
AI-DLC addresses this challenge by requiring a collaborative human-in-the-loop cycle at every stage of the workflow. In this loop, AI generates a plan to execute a task, and relevant stakeholders assemble, review, and validate it.

These rituals, defined as Mob Elaboration and Mob Construction in AI-DLC, ensure that AI’s suggestions are not blindly accepted. Approved plans are executed, and stakeholders again review and validate the final artifacts. The AI-DLC workflow records every human action and approval, embedding reflection to ensure that humans remain the compass, guiding AI’s acceleration.

Circular workflow diagram showing AI-DLC collaboration cycle. Starting at top: Humans Provide Task (orange person icon) , arrow to AI Creates Plan and Seeks Clarification (blue brain icon), arrow to Humans Provide Clarification (orange person icon), arrow to AI Refines Plan (blue brain icon), arrow to Humans Approve Plan (orange person icon), arrow to AI Executes Plan (blue brain icon), arrow to Humans Verify Outcome (orange person icon), completing the cycle back to the start. The diagram illustrates iterative human-AI collaboration with humans making decisions and AI performing execution tasks.

Figure 1: AI-DLC workflow: Humans decide and validate, AI plans and executes.

Effective tooling must therefore emphasize:

  • Promoting for stakeholder collaboration: The system should explicitly call for collaborative rituals involving stakeholders
  • Auditability: Every AI-generated plan and artifact should surface rationale and invite review, recording every human oversight and interaction
  • Flow awareness: Tools should detect when automation races ahead of human validation and deliberately slow down to emphasize critical checkpoints

The goal is not to suppress automation but to embed critical human ownership.

From Principles to Practice

The ideas we outlined — adaptive workflows, flexible depth, and embedded human oversight — are compelling in theory and validated by all engineering teams we’ve engaged. The critical question is: How do we operationalize these ideas into practice without reintroducing the rigidity we seek to eliminate?

One approach is manual prompt engineering: crafting structured prompts that guide AI assistants through the AI-DLC workflow step by step. Each prompt encodes the role AI should assume, the task at hand, the governance requirements, and the audit trail expectations. This structured approach transforms a simple AI interaction into a disciplined workflow that embodies AI-DLC principles.

This approach, while promising, faces its own limitations. Crafting intricate prompts demands discipline and expertise, posing barriers to widespread adoption. Moreover, humans become responsible for maintaining workflow adaptability, selecting the appropriate prompt at the right moment, and ensuring collaborative checkpoints are honored. This places the burden of orchestration back on practitioners, diverging from our core principle of truly AI-native development, where AI itself drives adaptive decision-making.

The question arises: How can we embed AI-DLC principles directly into the execution layer, making adaptivity and collaboration inherent properties of the system rather than manual responsibilities?

Steering for Productivity

The answer lies in workflow scaffolds. These are Rules or Steering customizations for AI Coding Agents. They operationalize AI-DLC principles within the tools. This is done while maintaining transparency, audibility, and modifiability. Our implementation uses Rules/Steering Files. These serve as the foundation of this execution layer. It transforms AI from a passive assistant into an adaptive decision engine.

Rather than requiring developers to craft elaborate prompts, AI-Driven development begins with a simple statement of intent. From there, the workflow scaffolds evaluate context, assess complexity, and dynamically construct an appropriate development pathway. The core workflow definition, including a library of stages and decision heuristics for when and how to apply them, empowers AI to continuously tailor the development process to the nature of the work at hand.

Each AI-DLC phase (Inception, Construction, Operations) evaluates the depth at which it should execute, resulting in a process that adapts to the problem rather than forcing the problem to adapt to the process. This approach yields several critical outcomes:

  1. Adaptive decisioning: The workflow conforms to the problem’s shape, intelligently skipping or deepening stages based on contextual assessment rather than predetermined rules.
  2. Transparent checkpoints: Human approvals are embedded at every decision gate, preserving oversight while maintaining velocity. The system doesn’t just automate; it orchestrates collaboration.
  3. End-to-end traceability: Every artifact, decision, and conversation is logged, creating a continuous, inspectable trail of reasoning that supports both accountability and continuous improvement.

The result is a process that is context-aware, scalable, and self-correcting – capable of supporting everything from a single-line defect fix to a comprehensive system modernization, all while maintaining the rigor and human judgment that define engineering excellence.

Build, Test, and Evolve with Us

We’re open-sourcing the AI-DLC workflow, implemented as Amazon Q Rules and Kiro Steering Files, so organizations everywhere can experience AI-DLC in practice and build production-grade systems. We invite developers, architects, and engineering leaders to:

  1. Apply the steering rules in real-world projects, whether brownfield or greenfield. Refer to our companion AI-DLC workflow walkthrough blog for step-by-step instructions on how to build using AI-DLC in Amazon Q Developer.
  2. Observe how the process adapts to your project’s size, scope, and intent.
  3. Share your experience through our GitHub repository, where you can open issues, propose improvements, and contribute ideas.

Your feedback will help evolve this into a foundation for AI-native software development – one that accelerates delivery without sacrificing rigor or human judgment. Together, we can redefine what software engineering looks like in the age of AI: not scripted but steered.

Conclusion

AI-DLC addresses multiple challenges limiting AI’s effectiveness in software development such as rigid workflows, inflexible workflow depth, and tools that reduce human oversight. AI-DLC enables adaptive workflows that intelligently select stages, modulate depth, and embed human oversight at critical decision points. This approach, implemented through open-source tools like Amazon Q Developer Rules and Kiro Steering, accelerates delivery while maintaining engineering discipline and human judgment.

AI-DLC emphasizes human oversight and collaboration in AI-driven software development. Workflow scaffolds, embed AI-DLC principles into the execution layer, enabling adaptive decision-making, transparent checkpoints, and end-to-end traceability. Open-sourcing the AI-DLC workflow allows organizations to experience AI-DLC in practice and contribute to its evolution.

Ready to get started? Visit our GitHub repository to download the AI-DLC workflow and join the AI-Native Builders Community to contribute to the future of software development.


About the authors:

Raja SP

Raja is a Principal Solutions Architect at AWS, where he leads Developer Transformation Programs. He has worked with more than 100 large customers, helping them design and deliver mission critical systems built on modern architectures, platform engineering practices, and Amazon inspired operating models. As generative AI reshapes the software development landscape, Raja and his team created the AI Driven Development Lifecycle (AI-DLC) — an end to end, AI native methodology that re-imagines how large teams collaboratively build production-grade software in the AI era.

Raj Jain

Raj is a Senior Solutions Architect, Developer Specialist at AWS. Prior to this role, Raj worked as a Senior Software Development Engineer at Amazon, where he helped build the security infrastructure underlying the Amazon platform. Raj is a published author in the Bell Labs Technical Journal, and has also authored IETF standards, AWS Security blogs, and holds twelve patents

Siddhesh Jog

Siddhesh is a Senior Solutions Architect at AWS. He has worked in multiple industries in a wide variety of roles and is passionate about all things technology. At AWS Siddhesh is most excited to help customers transition to the AI Driven Development Lifecycle and enable them to build applications rapidly in a secure, complaint and cost efficient cloud environment.

Will Matos

Will Matos is a Principal Specialist Solutions Architect with AWS’s Next Generation Developer Experience (NGDE) team, revolutionizing developer productivity through Generative AI, AI-powered chat interfaces, and code generation. With 27 years of technology, AI, and software development experience, he collaborates with product teams and customers to create intelligent solutions that streamline workflows and accelerate software development cycles. A thought leader engaging early adopters, Will bridges innovation and real-world needs.

Accelerate investigations with AWS Security Incident Response AI-powered capabilities

Post Syndicated from Daniel Begimher original https://aws.amazon.com/blogs/security/accelerate-investigations-with-aws-security-incident-response-ai-powered-capabilities/

If you’ve ever spent hours manually digging through AWS CloudTrail logs, checking AWS Identity and Access Management (IAM) permissions, and piecing together the timeline of a security event, you understand the time investment required for incident investigation. Today, we’re excited to announce the addition of AI-powered investigation capabilities to AWS Security Incident Response that automate this evidence gathering and analysis work.

AWS Security Incident Response helps you prepare for, respond to, and recover from security events faster and more effectively. The service combines automated security finding monitoring and triage, containment, and now AI-powered investigation capabilities with 24/7 direct access to the AWS Customer Incident Response Team (CIRT).

While investigating a suspicious API call or unusual network activity, scoping and validation require querying multiple data sources, correlating timestamps, identifying related events, and building a complete picture of what happened. Security operations center (SOC) analysts devote a significant amount of time to each investigation, with roughly half of that effort spent manually gathering and piecing together evidence from various tools and complex logs. This manual effort can delay your analysis and response.

AWS is introducing an investigative agent to Security Incident Response, changing this paradigm and adding layers of efficiency. The investigative agent helps you reduce the time required to validate and respond to potential security events. When a case for a security concern is created, either by you or proactively by Security Incident Response, the investigative agent asks clarifying questions to make sure it understands the full context of the potential security event. It then automatically gathers evidence from CloudTrail events, IAM configurations, and Amazon Elastic Compute Cloud (Amazon EC2) instance details and even analyzes cost usage patterns. Within minutes, it correlates the evidence, identifies patterns, and presents you with a clear summary.

How it works in practice

Before diving into an example, let’s paint a clear picture of where the investigative agent lives, how it’s accessed, and its purpose and function. The investigative agent is built directly into Security Incident Response and is automatically available when you create a case. Its purpose is to act as your first responder—gathering evidence, correlating data across AWS services, and building a comprehensive timeline of events so you can quickly move from detection to recovery.

For example: you discover that AWS credentials for an IAM user in your account were exposed in a public GitHub repository. You need to understand what actions were taken with those credentials and properly scope the potential security event, including lateral movement and reconnaissance operations. You need to identify persistence mechanisms that might have been created and determine the appropriate containment steps. To get started, you create a case in the Security Incident Response console and describe the situation.

Here’s where the agent’s approach differs from traditional automation: it asks clarifying questions first. When were the credentials first exposed? What’s the IAM user name? Have you already rotated the credentials? Which AWS account is affected?

This interactive step gathers the appropriate details and metadata before it starts gathering evidence. Specifically, you’re not stuck with generic results—the investigation is tailored to your specific concern.

After the agent has what it needs, it investigates. It looks up CloudTrail events to see what API calls were made using the compromised credentials, pulls IAM user and role details to check what permissions were granted, identifies new IAM users or roles that were created, checks EC2 instance information if compute resources were launched, and analyzes cost and usage patterns for unusual resource consumption. Instead of you querying each AWS service, the agent orchestrates this automatically.

Within minutes, you get a summary, as shown in the following figure. The investigation summary includes a high-level summary and critical findings, which include the credential exposure pattern, observed activity and the timeframe, affected resources, and limiting factors.

This response was generated using AWS Generative AI capabilities. You are responsible for evaluating any recommendations in your specific context and implementing appropriate oversight and safeguards. Learn more about AWS Responsible AI requirements.

Note: The preceding example is representative output. Exact formatting will vary depending on findings.

The investigation summary includes various tabs for detailed information, such as technical findings with an events timeline, as shown in the following figure:

Figure 2 – Security event timeline

Figure 2 – Security event timeline

When seconds count, this transparency is paramount to a quick, high-fidelity, and accurate response—especially if you need to escalate to the AWS CIRT, a dedicated group of AWS security experts, or explain your findings to leadership, creating a single lens for stakeholders to view the incident.

When the investigation is complete, you have a high-resolution picture of what happened and can make informed decisions about containment, eradication, and recovery. For the preceding exposed credentials scenario, you might need to:

  • Delete the compromised access keys
  • Remove the newly created IAM role
  • Terminate the unauthorized EC2 instances
  • Review and revert associated IAM policy changes
  • Check for additional access keys created for other users.

When you engage with the CIRT, they can provide additional guidance on containment strategies based on the evidence the agent gathered.

What this means for your security operations

The leaked credentials scenario shows what the agent can do for a single incident. But the bigger impact is on how you operate day-to-day:

  • You spend less time on evidence collection. The investigative agent automates the most time-consuming part of investigations—gathering and correlating evidence from multiple sources. Instead of spending an hour on manual log analysis, you can spend most of that time on making containment decisions and preventing recurrence.
  • You can investigate in plain language. The investigative agent uses natural language processing (NLP), which you can use to describe what you’re investigating in plain language, such as unusual API calls from IP address X or data access from terminated employee’s credentials, and the agent translates that into the technical queries needed. You don’t need to be an expert in AWS log formats or know the exact syntax for querying CloudTrail.
  • You get a foundation for high-fidelity and accurate investigations. The investigative agent handles the initial investigation—gathering evidence, identifying patterns, and providing a comprehensive summary. If your case requires deeper analysis or you need guidance on complex scenarios, you can engage with the AWS CIRT, who can immediately build on the work the agent has already done, speeding up their response time. They see the same evidence and timeline, so they can focus on advanced threat analysis and containment strategies rather than starting from scratch.

Getting started

If you already have Security Incident Response enabled, the AI-powered investigation capabilities are available now—no additional configuration needed. Create your next security case and the agent will start working automatically.

If you’re new to Security Incident Response, here’s how to set it up:

  1. Enable Security Incident Response through your AWS Organizations management account. This takes a few minutes through the AWS Management Console and provides coverage across your accounts.
  2. Create a case. Describe what you’re investigating; you can do this through the Security Incident Response console or an API, or set up automatic case creation from Amazon GuardDuty or AWS Security Hub alerts.
  3. Review the analysis. The agent presents its findings through the Security Incident Response console, or you can access them through your existing ticketing systems such as Jira or ServiceNow.

The investigative agent uses the AWS Support service-linked role to gather information from your AWS resources. This role is automatically created when you set up your AWS account and provides the necessary access for Support tools to query CloudTrail events, IAM configurations, EC2 details, and cost data. Actions taken by the agent are logged in CloudTrail for full auditability.

The investigative agent is included at no additional cost with Security Incident Response, which now offers metered pricing with a free tier covering your first 10,000 findings ingested per month. Beyond that, findings are billed at rates that decrease with volume. With this consumption-based approach, you can scale your security incident response capabilities as your needs grow.

How it fits with existing tools

Security Incident Response cases can be created by customers or proactively by the service. The investigative agent is automatically triggered when a new case is created, and cases can be managed through the console, API, or Amazon EventBridge integrations.

You can use EventBridge to build automated workflows that route security events from GuardDuty, Security Hub, and Security Incident Response itself to create cases and initiate response plans, enabling end-to-end detection-to-investigation pipelines. Before the investigative agent begins its work, the service’s auto-triage system monitors and filters security findings from GuardDuty and third-party security tools through Security Hub. It uses customer-specific information, such as known IP addresses and IAM entities, to filter findings based on expected behavior, reducing alert volume while escalating alerts that require immediate attention. This means the investigative agent focuses on alerts that actually need investigation.

Conclusion

In this post, I showed you how the new investigative agent in AWS Security Incident Response automates evidence gathering and analysis, reducing the time required to investigate security events from hours to minutes. The agent asks clarifying questions to understand your specific concern, automatically queries multiple AWS data sources, correlates evidence, and presents you with a comprehensive timeline and summary while maintaining full transparency and auditability.

With the addition of the investigative agent, Security Incident Response customers now get the speed and efficiency of AI-powered automation, backed by the expertise and oversight of AWS security experts when needed.

The AI-powered investigation capabilities are available today in all commercial AWS Regions where Security Incident Response operates. To learn more about pricing and features, or to get started, visit the AWS Security Incident Response product page.

If you have feedback about this post, submit comments in the Comments section below.

Daniel Begimher

Daniel Begimher

Daniel is a Senior Security Engineer in Global Services Security, specializing in cloud security, application security, and incident response. He co-leads the Application Security focus area within the AWS Security and Compliance Technical Field Community, holds all AWS certifications, and authored Automated Security Helper (ASH), an open source code scanning tool.

The Agentic AI Security Scoping Matrix: A framework for securing autonomous AI systems

Post Syndicated from Aaron Brown original https://aws.amazon.com/blogs/security/the-agentic-ai-security-scoping-matrix-a-framework-for-securing-autonomous-ai-systems/

As generative AI became mainstream, Amazon Web Services (AWS) launched the Generative AI Security Scoping Matrix to help organizations understand and address the unique security challenges of foundation model (FM)-based applications. This framework has been adopted not only by AWS customers across the globe, but also widely referenced by organizations such as OWASP, CoSAI, and other industry standards bodies, partners, systems integrators (SIs), analysts, auditors, and more. Now, as long-running, function-calling agentic AI systems emerge with capabilities for autonomous decision-making, we’re creating an additional framework to address an entirely new set of security challenges.

Agentic AI systems can autonomously execute multi-step tasks, make decisions, and interact with infrastructure and data. This is a paradigm shift, and organizations must adapt to it. Unlike traditional FMs that operate in stateless request-response patterns, agentic AI systems introduce autonomous capabilities, persistent memory, tool orchestration, identity and agency challenges, and external system integration, expanding the risks that organizations must address.

Working with customers deploying these systems, we’ve observed that traditional AI security frameworks don’t always extend into the agentic space. The autonomous nature of agentic systems requires fundamentally different security approaches. To address this gap, we’ve developed the Agentic AI Security Scoping Matrix, a mental model and framework that categorizes four distinct agentic architectures based on connectivity and autonomy levels, mapping critical security controls across each.

Understanding the agentic paradigm shift

FM-powered applications operate in a now well-understood, predictable pattern even though the responses that an FM produces are non-deterministic and stateless. These applications, in their most basic form receive a prompt or instruction, generate a response, then terminate the session. Security and safety controls focus on basic measures such as input validation, output filtering, and content moderation guardrails, while governance focuses on the overall risk profiles and the resilience of models. This model works because security failures have limited scope: a compromised interaction affects only that specific request and response, without persisting or propagating to other systems or users.

Agentic AI systems fundamentally change this security model through several key capabilities:

Autonomous execution and agency: Agents initiate actions based on goals and environmental triggers that might, or might not, require human prompts or approval. This creates risks of unauthorized actions, runaway processes, and decisions that exceed intended boundaries when agents misinterpret objectives or operate on compromised instructions.

When AI agents are given instructions or permissions to act based on the data, parameters, instructions, and responses given to them, the boundaries of independence or autonomy they are permitted to act within are important to define. In discussing agentic AI systems, it’s important to clarify the distinction between agency and autonomy, because these related but different concepts inform our security approach.

Agency refers to the scope of actions an AI system is permitted and enabled to take within the operating environment, and how much a human bounds an agent’s actions or capabilities. This includes what systems it can interact with, what operations it can perform, and what resources it can modify. Agency is fundamentally about capabilities and permissions—what the system is allowed to do within its operational environment. For example, an AI agent with no agency would be guided by human-defined workflow, process, tools, or orchestration compared to an AI agent with full agency that can self-determine how to accomplish a human-defined goal.

Autonomy, in contrast, refers to the degree of independent decision-making and action the system can take without human intervention. This includes when it operates, how it chooses between available actions, and whether it requires human approval for execution. Autonomy is about independence in decision-making and execution—how freely the system can act within its granted agency. For example, an AI agent might have high agency (able to perform many actions) but low autonomy (requiring human approval for each action), or vice versa.

Understanding this distinction is crucial for implementing appropriate security controls. Agency requires boundaries and permission systems, while autonomy requires oversight mechanisms and behavioral controls. Both dimensions must be carefully managed to create secure agentic AI systems.

It’s important to determine how much agency and autonomy you want to permit and grant your AI agents to act within. After you have determined the appropriate level that any given agent should operate within, you can then evaluate the appropriate security controls to put in place to restrict the agency to a permissible risk tolerance for your agentic-based application and your organization.

Persistent memory: Agents often benefit from maintaining context and learned behaviors across sessions, building knowledge bases that inform future decisions in the form of short- and long-term memory. This data persistence introduces additional data protection requirements and can add new risk vectors such as memory poisoning attacks where adversaries inject false information that corrupts decision-making across multiple interactions and users.

Tool orchestration: Agents directly integrate via functions with connections to databases, APIs, services, and potentially other agents or orchestration components to execute complex tasks autonomously depending on the tool abstraction level. This expanded attack surface creates risks of cascading compromises where a single agent breach can propagate through connected systems, multi-agent workflows, and downstream services and data stores.

External connectivity: Agents operate across network boundaries, accessing internet resources, third-party APIs, and enterprise systems. Like traditional non-agentic systems, expanded connectivity can help unlock new business value, but this access should be designed with security controls that limit risks such as data exfiltration, lateral movement, and external manipulation. Threat modeling your agentic AI applications should be a high priority and can help directly align security controls that assist your implementation of zero-trust principles into your strategy.

Self-directed behavior: Advanced agents can initiate activities based on environmental monitoring, scheduling, or learned patterns without human instantiation or review, depending on configuration. This self-direction introduces risks of uncontrolled operations, explainability, and auditability, and makes it difficult to maintain predictable security boundaries.

These capabilities transform security from a boundary problem to a continuous monitoring and control challenge. A compromised agent doesn’t just leak information—it could autonomously execute unauthorized transactions, modify critical infrastructure, or operate maliciously for extended periods without detection.

The Agentic AI Security Scoping Matrix

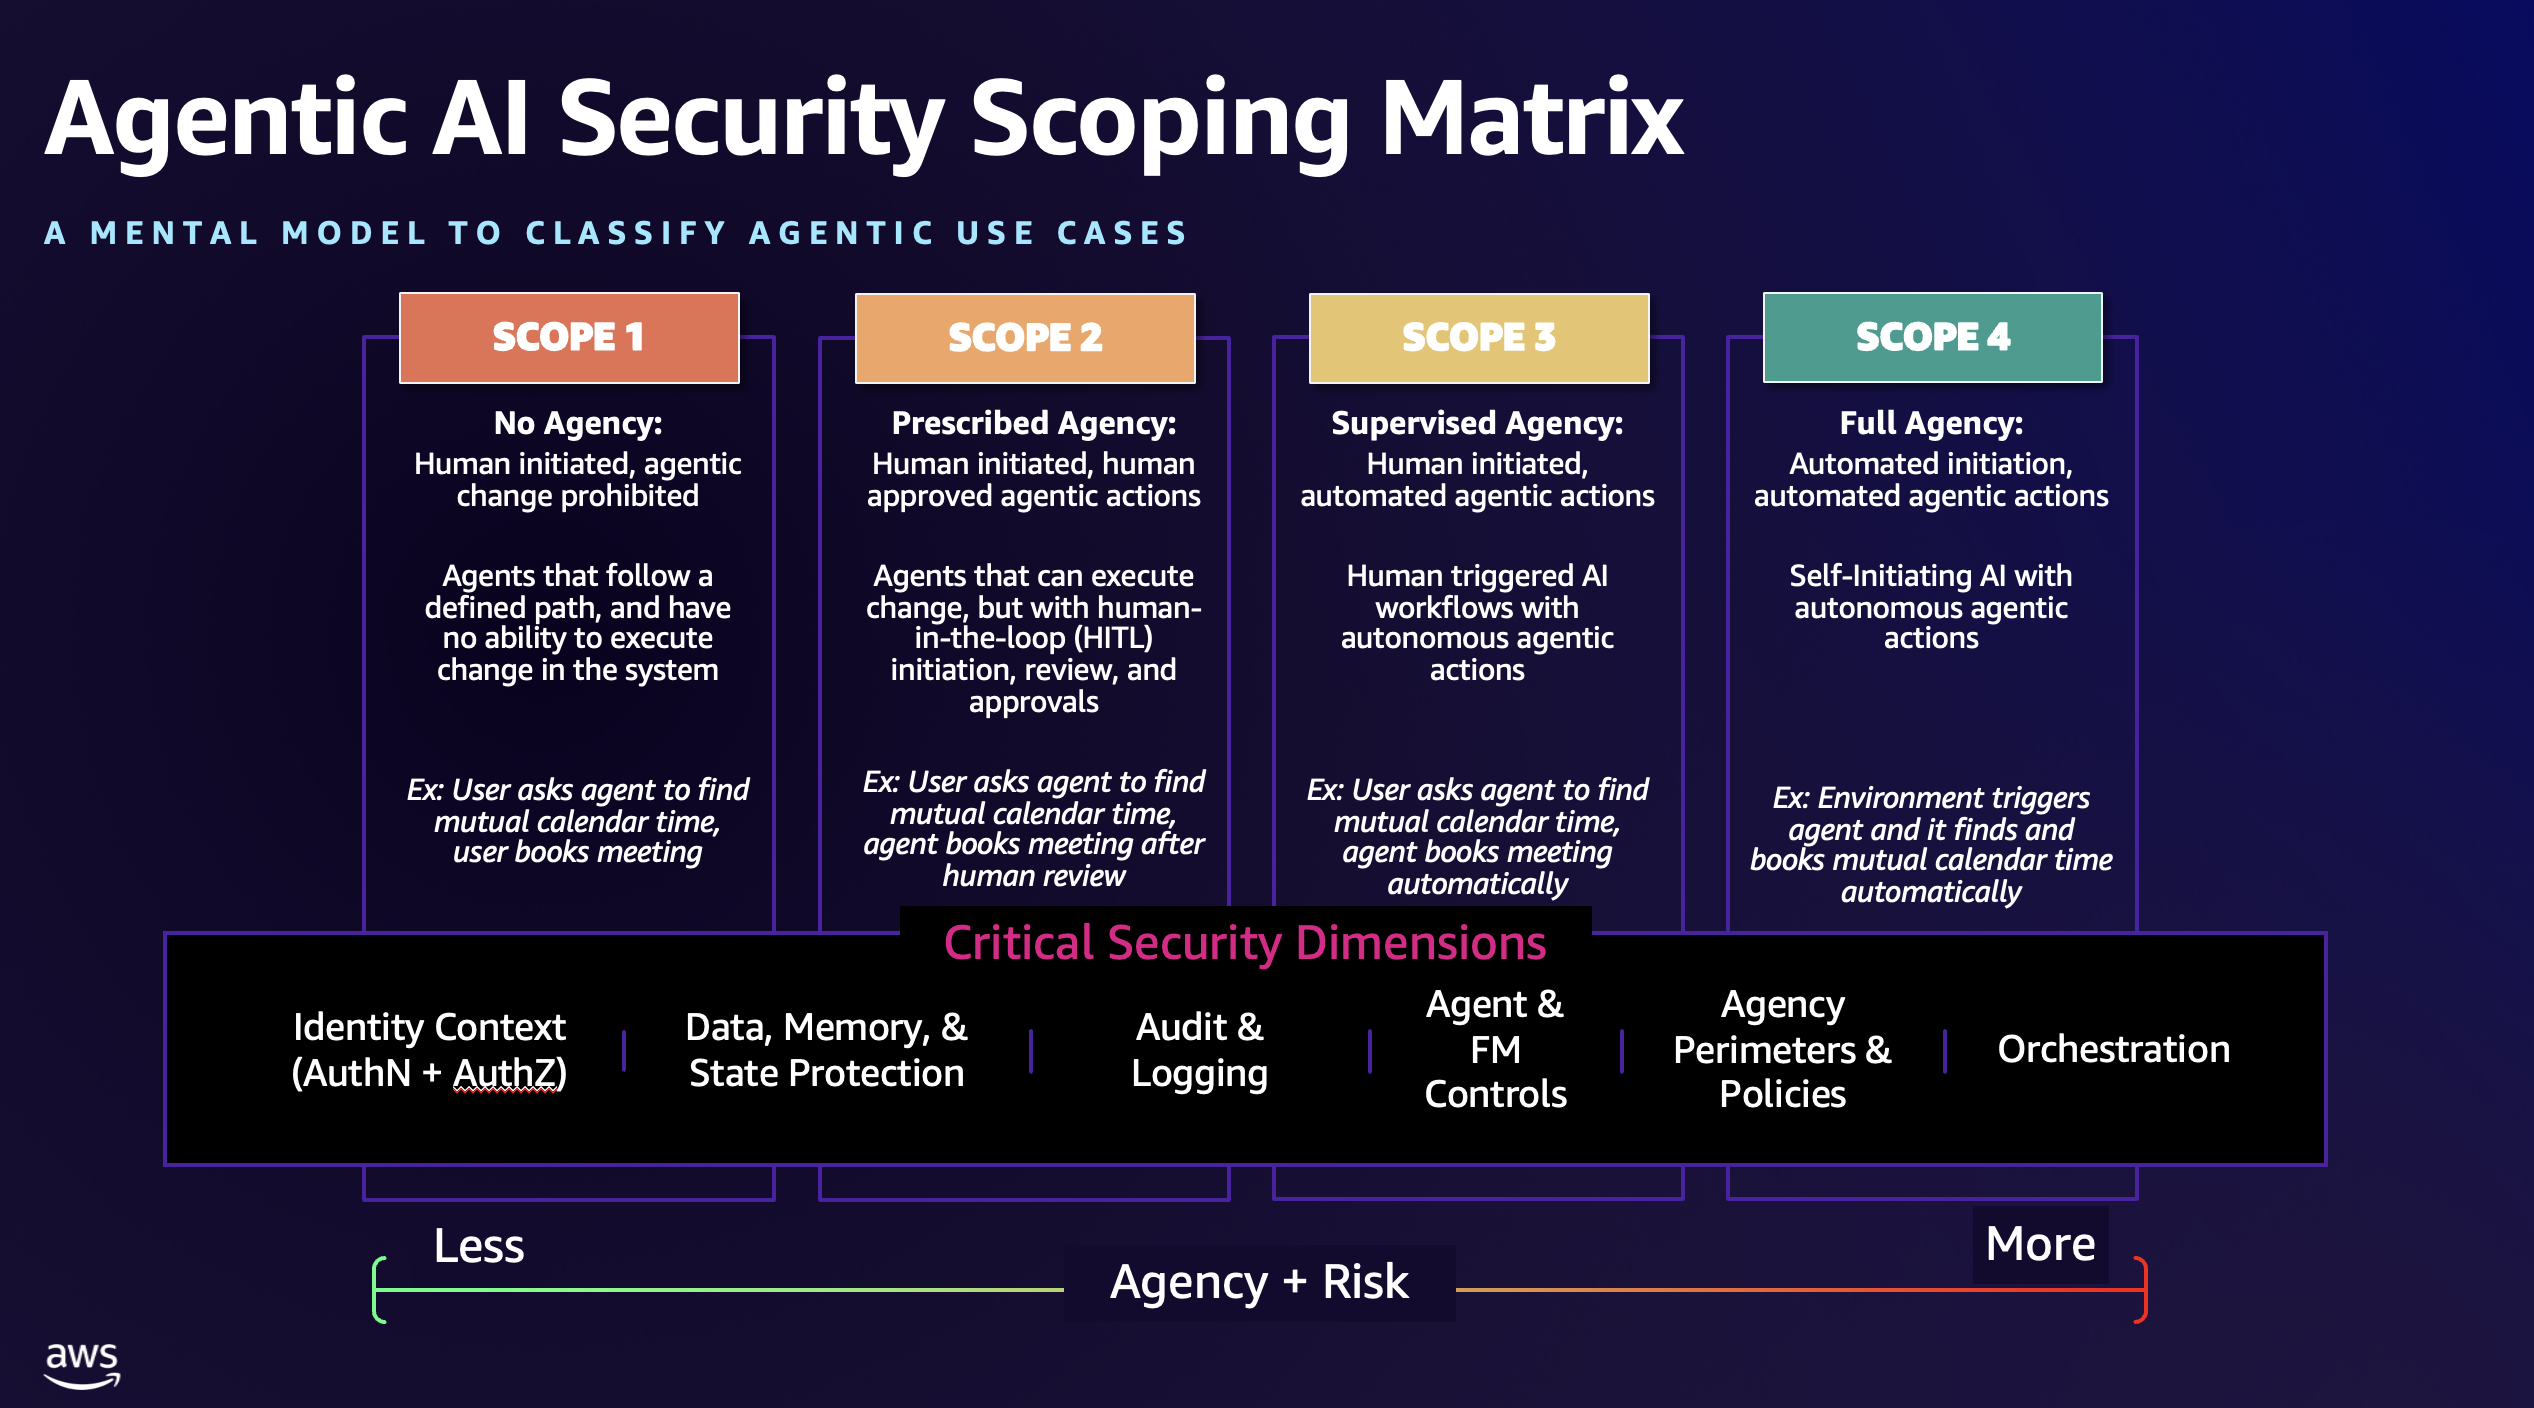
Working with customers and the community, we’ve identified four architectural scopes that represent the evolution of agentic AI systems based on two critical dimensions: level of human oversight compared with autonomy and the level of agency the AI system is permitted to act within. Each scope introduces new capabilities—and corresponding security requirements—that organizations must prioritize when addressing agentic AI risk. Figure 1 shows the Agentic AI Security Scoping Matrix.

Figure 1 - The Agentic AI Security Scoping Matrix

Figure 1 – The Agentic AI Security Scoping Matrix

Scope 1: No agency

In this most basic scope, systems operate with human-initiated processes and no autonomous or even human-approved change capabilities through the agent itself. The agents are, essentially, read-only. These systems follow predefined execution paths and operate under strict human-triggered workflows, which are usually predefined and follow discrete steps, but could be augmented with non-deterministic outputs from an FM. Security focuses primarily on process integrity and boundary enforcement, helping operations remain within predetermined limits and agents are highly controlled and prohibited from change execution and unbounded actions.

Key characteristics:

  • Agents can’t directly execute change in the environment
  • Fixed step-by-step execution following predetermined paths
  • Generative AI components process data within individual workflow nodes
  • Conditional branching only where explicitly designed into the workflow
  • No dynamic planning or autonomous goal-seeking behavior
  • State persistence limited to workflow execution context
  • Tool access restricted to specific predefined workflow steps

Security focus: Protecting data integrity within the environment and restricting agents to not exceed their boundaries, especially limits around environment and data modification. Primary concerns include securing state transitions between steps, validating data passed between workflow nodes, and preventing AI components from modifying the orchestration logic or escaping their designated boundaries within the workflow.

Example: We will use a very simplistic example, across all four scopes, of a use case for an agent that is designed to help you create calendar invites. Let’s say you need to book a meeting with another colleague. In Scope 1, you might have an agent that you instantiate through a workflow or prompt to look at your calendar and your colleague’s calendar for available meeting times. In this case, you initiate the request, and the agent executes a contextual search using a Model Context Protocol (MCP) server connected to your enterprise calendaring application. The agent is only allowed to look at available times, analyze the best times to meet, and provide a response back, which a human can then use to manually set up a meeting. In this example, the human defines specific workflows and orchestrations (no agency) and reviews and approves the actions taken (no autonomous change).

Scope 2: Prescribed agency

Moving up in agency and risk, Scope 2 systems also are instantiated by a human, but now have the potential to perform actions—limited agency—that could change the environment. However, all actions taken by an agent require explicit human approval for all actions of consequence—commonly referred to as human in the loop or HITL. These systems can gather information, analyze data, and prepare recommendations, but cannot execute actions that modify external systems or access sensitive resources without human authorization. Agents can also request human input to clarify ambiguities, provide missing context, or optimize their approach before presenting recommendations.

Key characteristics:

  • Agents can execute change in the environment with human review and approval
  • Real-time human oversight with approval workflows
  • Bidirectional human interaction—agents can query humans for context
  • Limited autonomous actions restricted to read-only operations (such as, querying data, running analysis jobs, and so on)
  • Agent-initiated requests for clarification or additional information
  • Audit trails of all human approval decisions and context exchanges

Security focus: Implementing robust approval workflows and preventing agents from bypassing human authorization controls. Key concerns include preventing privilege escalation, enforcing appropriate identity contexts, securing the approval process itself, validating human-provided context to prevent injection attacks, and maintaining visibility into all agent recommendations and their rationale.

Example: In our calendaring example, a Scope 2 agentic system is instantiated by a human. The agent then looks up the stakeholders’ calendar availability, does its analysis, returns a recommendation for a meeting time to the user, and asks the user if they want the agent to send the invitation out on their behalf. The user looks at the response and recommendation of the agent, validates that it meets their requirements, and then acknowledges and approves the agent’s request to modify the calendars and send the invitation. In this example, the human orchestrates a structured workflow, but the agent now can instantiate human reviewed change through bounded actions (limited agency and limited autonomy).

Scope 3: Supervised agency

In Scope 3, we expand the agency to allow for a greater sense of agentic autonomy—high agency—in execution. These are AI systems that execute complex autonomous tasks that are initiated by humans (or at least from an upstream human-managed workflow), with the ability to make decisions and take actions to connected systems without further approval or HITL mechanisms. Humans define the objectives and trigger execution, but agents operate independently to achieve goals through dynamic planning and tool usage. During execution, agents can request human guidance to optimize trajectory or handle edge cases, though they can continue operating without it.

Key characteristics:

  • Agents can execute change in the environment, with no (or optional) human interaction or review
  • Human-triggered execution with autonomous task completion
  • Dynamic planning and decision-making during execution
  • Optional human intervention points for trajectory optimization
  • Human ability to adjust parameters or provide context mid-execution
  • Direct access to external APIs and systems for task completion
  • Persistent memory across extended execution sessions
  • Autonomous tool selection and orchestration within defined boundaries

Security focus: Implementing comprehensive monitoring of agent actions during autonomous execution phases and establishing clear agency boundaries for agent operations—the bounds you’re willing to let the agents operate within, and actions that would be out of bounds and must be prevented. Critical concerns include securing the human intervention channel to prevent unauthorized modifications, preventing scope creep during task execution, implementing trusted identity propagation constructs, monitoring for behavioral anomalies, and validating that agents remain aligned with original human intent throughout extended operations even when trajectory adjustments are made.

Example: In our calendaring example, a Scope 3 agentic system can still be instantiated by a human. The agent then looks up the stakeholders’ calendar availability, does its analysis, and returns a recommendation for a meeting time to the user; however, it’s within the agent’s bounds to act upon its own recommendation on behalf of the user to automatically book the best available slot. The user is not prompted or expected to give the agent permission to do so prior to its actions. The result is that all stakeholders have a calendar entry added to their calendar in the context of the calling human user. In this example, the human defines an outcome but with more freedom for the agent to determine how to achieve that goal, and the agent now can take autonomous action without human review (high agency and high autonomy).

Scope 4: Full agency

Scope 4 includes fully autonomous AI systems that can initiate their own activities based on environmental monitoring, learned patterns, or predefined conditions, and execute complex tasks without human intervention. These systems represent the highest level of AI agency, operating continuously and making independent decisions about when and how to act. It’s key to note that AI systems within Scope 4 could have full agency when executing within their designed bounds; therefore, it’s critical that humans maintain supervisory oversight with the ability to provide strategic guidance, course corrections, or interventions when needed. Continuous compliance, auditing, and full-lifecycle management mechanisms, both human and automated reviews, which could also be aided by AI, are critical to successfully securing and governing Scope 4 agentic AI systems while limiting risk.

Key characteristics:

  • Self-directed activity initiation based on environmental triggers
  • Continuous operation with minimal human oversight or HITL processes during execution
  • Human ability to inject strategic guidance without disrupting operations
  • High to full degrees of autonomy in goal setting, planning, and execution
  • Dynamic interaction with multiple external systems and agents
  • Capability for recursive self-improvement and capability expansion

Security focus: Implementing advanced guardrails for behavioral monitoring, anomaly detection, scope-based tool access controls, and fail-safe mechanisms to prevent runaway operations. Primary concerns include maintaining alignment with organizational objectives, securing human intervention channels against adversarial manipulation, preventing unauthorized capability expansion, preventing human oversight mechanisms from being disabled by the agent, and enabling graceful degradation when agents encounter unexpected situations.

Example: Let’s look at how we might deploy our AI calendaring example in Scope 4. Let’s say you have implemented a generative AI meeting summarizer. This agent is automatically enabled when you host a web conference. At the conclusion of the meeting, the calendaring agent sees a new meeting occurred from the meeting summarizer agent. It looks at the action items that were summarized and determines that six people agreed to a whiteboard session on Friday. The calendaring agent might either have a statically defined API configuration or leverage dynamic discovery on MCP servers to help with calendaring. It then finds availability for the six identified resources and books the best available slot. It then uses the appropriate identity context of the user who is asking for the meeting to book the meeting autonomously. At no point does a user directly instantiate the request for calendaring; it is fully automated and driven off environment changes that the agent is instructed to look for (full agency and full autonomy).

Scope comparison across the scopes

In the context of the security scoping matrix, let’s compare how autonomy and agency characteristics shift depending on the scope:

Table 1 – Scope impacts on agency and autonomy levels

Critical security dimensions

Scope

Agency level

Agency characteristics

Autonomy level

Autonomy characteristics

Scope 1: No agency

None

  • Read-only operations
  • Fixed workflow paths

None

  • Human-initiated only
  • Predefined execution steps

Scope 2: Prescribed agency

Limited

  • Can modify systems
  • Access to multiple tools

Limited

  • Requires human approval for actions
  • HITL for all changes

Scope 3: Supervised agency

High

  • Can modify multiple systems
  • Dynamic tool selection

High

  • Autonomous execution after human initiation
  • Optional human guidance

Scope 4: Full agency

Full

  • Comprehensive system access
  • Multi-system orchestration
  • Self-adaptive

Full

  • Self-initiated actions
  • Continuous autonomous operation
  • Strategic human oversight

Each architectural scope requires specific security controls and considerations across six critical dimensions. Table 2 illustrates how security requirements escalate with increasing agency and autonomy:

Security dimension

Scope 1: No agency

Scope 2: Prescribed agency

Scope 3: Supervised agency

Scope 4: Full agency

Identity context (authN and authZ)

  • User authentication
  • Service authentication
  • Limited system permissions (read-only)
  • Limited system access (only necessary, known systems needed for the workflow)
  • User authentication
  • Service authentication
  • Human identity verification for approvals
  • User authentication
  • Service authentication
  • Agent authentication
  • Identity delegation for autonomous actions
  • Dynamic identity lifecycle
  • Federated authentication
  • Continuous identity verification
  • Agent identity attestation

Data, memory, and state protection

  • Local resource permissions
  • File system access controls
  • Role-based access control
  • Human approval workflows
  • Read-mostly permissions for agents
  • Context-aware authorization
  • Just-in-time privilege elevation
  • Dynamic permission boundaries
  • Behavioral authorization
  • Adaptive access controls
  • Continuous authorization validation

Audit and logging

  • Local activity logs
  • Change tracking
  • Integrity monitoring
  • Policy enforcement
  • Human decision audit trails
  • Agent recommendation logging
  • Approval process tracking
  • Comprehensive action logging
  • Reasoning chain capture
  • Extended session tracking
  • Continuous behavioral logging
  • Pattern analysis
  • Predictive monitoring
  • Automated incident correlation

Agent and FM controls

  • Process isolation
  • Input/output validations
  • Guardrails
  • Approval gateway enforcement
  • Extended session monitoring
  • Container isolation
  • Long-running process management
  • Tool invocation sandboxing
  • Behavioral analysis
  • Anomaly detection
  • Automated containment
  • Self-healing security

Agency perimeters and policies

  • Fixed execution boundaries
  • Predefined action limits
  • Static resource quotas
  • Hard-coded constraints
  • Approval-based boundary modification
  • Human-validated constraint changes
  • Time-bound elevated access
  • Multi-step validation
  • Dynamic boundary adjustment
  • Runtime constraint evaluation
  • Resource scaling limits
  • Automated safety checks
  • Self-adjusting boundaries
  • Context-aware constraints
  • Cross-system resource management
  • Autonomous limit adaptation

Orchestration

  • Simple workflow orchestration
  • Fixed execution paths
  • Single or limited system integration points
  • Multi-step workflow orchestration
  • Approval-gated tool access
  • Human-validated tool chains
  • Dynamic tool orchestration
  • Parallel execution paths
  • Cross-system integration
  • Autonomous multi-agent orchestration
  • Cross-session learning
  • Dynamic service discovery

Table 2 — Critical security dimensions per scope

Security implementation by scope

Now that we’ve outlined each of the scopes and the associated levels of agency and autonomy, let’s discuss some primary security challenges per scope and key considerations that should be taken to address the associated risks.

Scope 1: No agency
Primary security challenges: Protecting workflow integrity, preventing prompt injection from breaking predetermined flows, and maintaining isolation between workflow executions.

Implementation considerations:

  • Comprehensive monitoring with anomaly detection
  • Strict data validation and integrity checking
  • Input validation at each workflow step boundary
  • Immutable workflow definitions with version control
  • State encryption and validation between workflow nodes
  • Monitoring for attempts to escape workflow boundaries
  • Segregation between different workflow executions
  • Fixed timeout and resource limits per workflow step
  • Audit trails showing actual compared to expected execution paths

Scope 2: Prescribed agency
Primary security challenges: Securing approval workflows, preventing human authorization bypass, and maintaining oversight effectiveness.

Implementation considerations:

  • Multi-factor authentication for all human approvers
  • Cryptographically signed approval decisions
  • Securing bidirectional human-agent communication channels
  • Time-bounded approval tokens with automatic expiration
  • Comprehensive logging of all approval interactions
  • Regular training for human approvers on agent capabilities and risks

Scope 3: Supervised agency
Primary security challenges: Maintaining control during autonomous execution, scope management, explainability and auditability, and behavioral monitoring.

Implementation considerations:

  • Clear execution boundaries defined at initiation
  • Real-time monitoring of agent actions during execution
  • Automated kill switches for runaway processes
  • Non-blocking intervention mechanisms
  • Behavioral baselines for normal agent operations
  • Regular validation of agent alignment with original objectives

Scope 4: Full agency
Primary security challenges: Continuous behavioral validation, enforcing agency boundaries, preventing capability drift, and maintaining organizational alignment.

Implementation considerations:

  • Advanced AI safety techniques including reward modeling
  • Continuous monitoring with machine learning-based anomaly detection
  • Automated response systems for behavioral deviations
  • Regular alignment validation through systematic testing
  • Tamper-proof human override mechanisms
  • Failsafe mechanisms that can halt operations when confidence drops

Key architectural patterns

Successful agentic deployments share common patterns that balance autonomy with control.

Progressive autonomy deployment: Start with Scope 1 or 2 implementations and gradually advance through the scopes as organizational confidence and security capabilities mature. This approach minimizes risk while building operational experience. Be cautious and selective when analyzing use cases and bounding controls for Scope 4 implementations and review your ability to address risks at the lower scopes and how risks increase as you move further up the levels.

Layered security architecture: Implement defense-in-depth with security controls at multiple levels—network, application, agent, and data layers—to safeguard that compromise at one level doesn’t lead to complete system failure. Although the combination of these controls is what enables a high security bar, be sure to spend considerable efforts on making sure that identity and authorization concerns are addressed—for both machines and humans. This helps prevent issues such as the confused deputy problem—when a human or service with lesser permissions is able to elevate permissions through agents that might themselves have more entitlements and privileges.

Continuous validation loops: Establish automated systems that continuously verify agent behavior against expected patterns, and that have escalation procedures for when deviations are detected. Auditability and explainability are key requirements to confirm that agents are performing within the bounds intended and to help you determine control effectiveness, adjust parameters, and validate your orchestration workflows.

Human oversight integration: Even in highly autonomous systems, maintain meaningful human oversight through strategic checkpoints, behavioral reporting, and manual override capabilities. It might be reasonable to assume that human oversight reduces when moving from Scope 1 to Scope 4 agency, but the truth is that it simply shifts focus. For example, the human requirement to instantiate, review, and approve certain agentic actions is higher in Scopes 1 and 2 and lower in Scopes 3 and 4; however, the human requirement to audit, assess, validate, and implement more complex security and operational controls is much higher in Scopes 4 and 3 than they are in Scopes 2 and 1.

Graceful degradation: Design systems to automatically reduce autonomy levels when security events are detected, allowing operations to continue safely while human operators investigate. If your agents start to act in ways that go beyond the intended bounds of their design, anomalous behavior is detected, or they begin to perform actions deemed particularly risky or sensitive to your business, then consider having detective controls that will automatically inject tighter restrictions such as requiring more HITL or reducing the actions an agent can take. You might do this as incremental degradation or, you might choose to disable the agent if it’s acting in ways that negatively impact the environment. These agentic safety mechanisms that can implement additional restrictions or even disable an agent should be considered when building or deploying agents.

Conclusion

The Agentic AI Security Scoping Matrix provides a structured mental model and framework for understanding and addressing the security challenges of autonomous agentic AI systems across four distinct scopes. By accurately assessing your current scope and implementing appropriate controls across all six security dimensions, organizations can confidently deploy agentic AI while managing the landscape of associated risks.

The progression from basic and highly constrained agents to fully autonomous and even self-directing agents represents a fundamental shift in how we approach AI security. Each scope requires specific security capabilities, and organizations must build these capabilities systematically to support their agentic ambitions safely.

Next steps

To implement the Agentic AI Security Scoping Matrix in your organization:

  1. Assess your current agentic use cases and maturity against the four scopes to understand your security requirements and associated risks. Integrate it into your procurement and SDLC processes.
  2. Identify capability gaps across the six security dimensions for your target scope.
  3. Develop a progressive deployment strategy that builds security capabilities as you advance through scopes.
  4. Implement continuous monitoring and behavioral analysis appropriate for your scope level.
  5. Establish governance processes for scope progression and security validation.
  6. Train your teams on the unique security challenges of each scope.

You can find additional information on the Agentic AI Security Scoping matrix here, along with additional information on AI security topics. For additional resources on securing AI workloads, see the AI for security and security for AI: Navigating Opportunities and Challenges whitepaper and explore purpose-built platforms designed for the unique challenges of agentic AI.
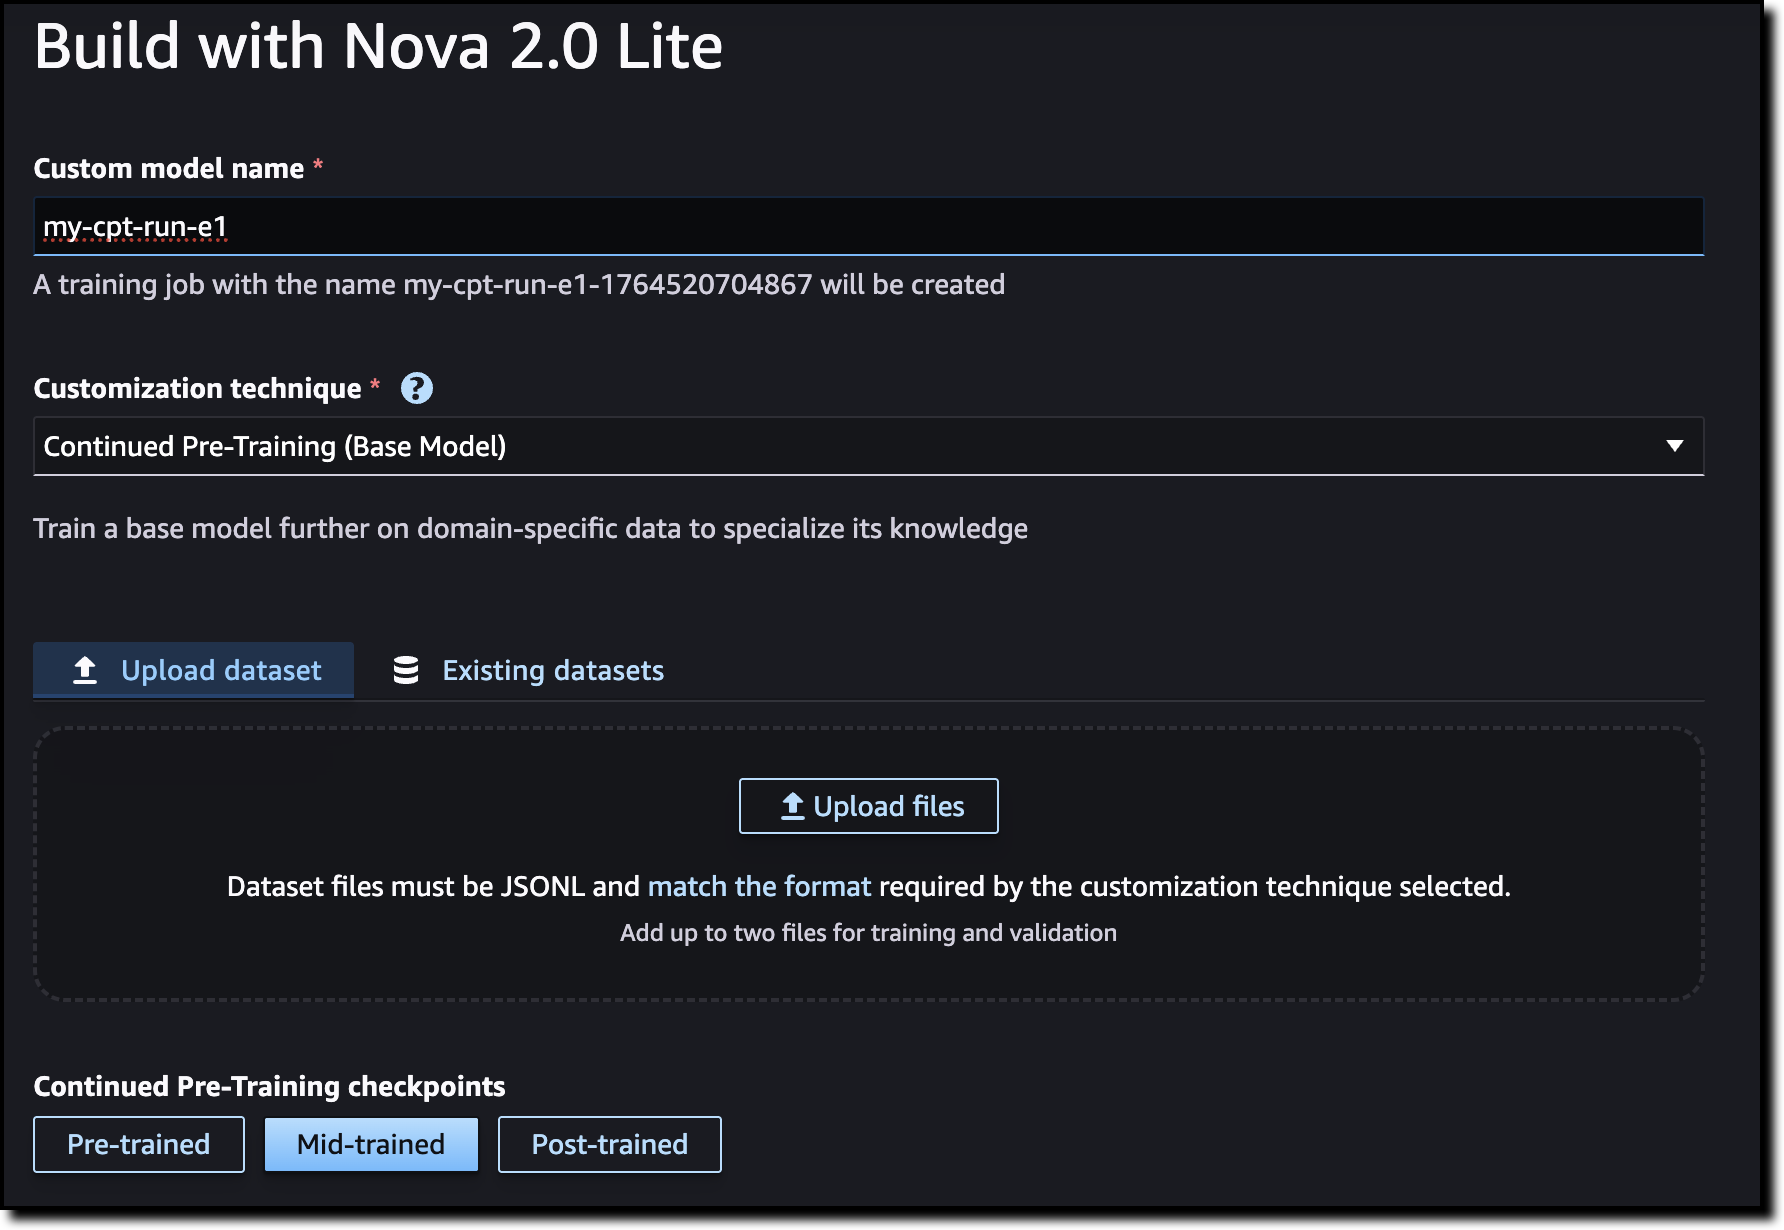
If you have feedback about this post, submit comments in the Comments section below.

Aaron Brown

Aaron Brown

Aaron Brown is a Senior AI Security Architect at AWS with over 8+ years of experience designing, building and shipping AI solutions in the offensive and defensive security domains.

Matt Saner

Matt Saner

Matt Saner is a global security leader helping customers unblock and accelerate complex security challenges. He plays a key role in the development of security standards for AI, including serving on the project governing board and executive steering committee for the Coalition for Secure AI (CoSAI) and as a distinguished review board member for OWASP’s GenAI and Agentic AI security projects.

Amazon introduces two benchmark datasets for evaluating AI agents’ ability on code migration

Post Syndicated from Linbo Liu original https://aws.amazon.com/blogs/devops/amazon-introduces-two-benchmark-datasets-for-evaluating-ai-agents-ability-on-code-migration/

Introduction: Repository-Level Code Migration

Code migration is a repository-level transformation process that modernizes entire software projects to run on new platforms, frameworks, or runtime environments while preserving their original functionality and structure. Rather than focusing on isolated files or APIs, it operates across the full repository, spanning source code, dependencies, build systems, and configuration files to ensure consistency and correctness at scale. Typical examples include upgrading Java repositories from legacy versions such as Java 8 to modern Long-Term Support releases like Java 17 or 21, migrating .NET Framework repositories to .NET Core, and upgrading AWS Lambda projects in Python or Node.js to the latest runtime versions.

Code migration is a challenging software engineering (SWE) task that involves runtime upgrade, deprecated API replacement, test framework optimization, and syntax modernization. As we build agentic solutions for code migration, the community needs a standardized benchmark dataset and an evaluation framework to measure how well these systems actually perform. To close this gap, we introduce two benchmark datasets: MigrationBench on Java and Poly-MigrationBench as an extension to other programming languages. These datasets are designed not only to benchmark the effectiveness of Large Language Models (LLMs) in repository-level migration, but also to provide the community with a standardized evaluation framework for reproducible experiments.

Solution Overview

MigrationBench: Repository-Level Java Migration

MigrationBench is a comprehensive repository-level benchmark focused on Java upgrades. Specifically, it evaluates the ability of LLMs and other tools to migrate code from Java 8 to newer Long-Term Support (LTS) versions such as Java 17 and Java 21.

The full dataset includes 5,102 open-source Java 8 Maven repositories collected from GitHub, alongside a representative subset of 300 repositories curated for research requiring fewer compute resources. MigrationBench also provides an evaluation framework for validating Java Maven repository upgrades.

Our data collection process follows a carefully designed pipeline with multiple filtering stages to ensure the quality and relevance of the repositories we include. We begin by collecting Java Maven projects, focusing on repositories written in Java that use Maven as their build tool. Next, we apply a license filter, retaining only repositories under MIT or Apache 2.0 licenses to ensure open and permissible usage. We then apply a quality filter, keeping only repositories with at least three GitHub stars to exclude toy or inactive projects. For each repository, we search for the latest buildable commit that is compatible with Java 8, ensuring a valid starting point for migration. We also remove redundant repositories based on their snapshot hashes. Finally, we further exclude repositories without any unit tests or integration tests, which are essential components to validate migration correctness in a robust way. For more details, checkout our paper MigrationBench: Repository-Level Code Migration Benchmark from Java 8 and the GitHub repository.

Poly-MigrationBench: Extending Beyond Java

While MigrationBench focuses exclusively on Java, the real-world code migration problem spans multiple ecosystems. To address this broader scope, we develop Poly-MigrationBench, an extension that introduces additional languages and platforms. We applied a similar data curation process as MigrationBench to additionally collect

  • 100 .NET Framework repositories. They are to be migrated to .NET core.
  • 74 Node.js repositories with version less than Node.js 22. They are to be migrated to Node.js 22.
  • 83 Python repositories with Python version less than 3.13. They are to be migrated to Python 3.13.

The above datasets are publicly available on GitHub: https://github.com/amazon-science/Poly-MigrationBench

Together, these datasets enable researchers to explore cross-language and cross-platform migration challenges at scale.

Use Case 1: Cross-Platform .NET Migration

One pressing migration challenge lies in moving .NET applications from Windows environments running on the legacy .NET Framework to Linux environments powered by .NET Core. This migration is critical for organizations seeking cross-platform compatibility, improved performance, and modern deployment practices such as containerization.

To support research in this area, we curated a benchmark of 100 open-source .NET Framework repositories from GitHub. These projects were carefully selected for diversity and quality, offering a real world foundation for evaluating migration tools and automated systems. The migration goal is clear: transition .NET Framework repositories to .NET Core on Linux while preserving functional equivalence.

Use Case 2: Node.js Upgrade for AWS Lambda Applications

Another timely migration need involves Lambda functions written in Node.js. Node.js 20, currently supported by Lambda, is scheduled for end-of-support in April 2026 (reference). After this deadline, projects running on Node.js 20 will no longer receive critical security patches or bug fixes.

For increased security and to avoid accumulating technical debt, developers building Lambda applications are proactively upgrading to Node.js 22. To evaluate LLMs’ effectiveness in automating this migration, Poly-MigrationBench provides a dataset of 74 open-source Node.js repositories using Node.js versions no later than 20. The task is to upgrade them to Node.js 22 while ensuring functional correctness is preserved.

Use-case 3: AWS Lambda Python Migrations

We also release benchmarks on Lambda Python repositories to the community to facilitate research and evaluation of automated Lambda function migrations in Python code. According to AWS documentation, Python 3.10 and 3.11 are scheduled to reach end of support for Lambda in June 2026. This approaching deadline highlights the urgency of migrating existing Lambda functions to newer runtimes and underscores the critical need for scalable, reliable, and LLM-driven migration solutions. To facilitate evaluation on this task, we collect 83 Python AWS Lambda repositories with Python version no later than 3.12. The objective is to migrate these repositories to Python 3.13.

Get Started

We’ve open-sourced both the datasets and the evaluation framework on Hugging Face and GitHub to make it easy for the community to explore, reproduce, and extend our work. Alongside them, we also released a baseline solution, SD-Feedback, for MigrationBench, while leaving the development of more sophisticated agentic migration systems as a open challenge for the research community.

MigrationBench

To download the MigrationBench dataset, visit our Hugging Face collection. For evaluation, simply clone our GitHub repository and follow the steps in the README.md.

Poly-MigrationBench

To access the Poly-MigrationBench dataset and evaluation commands, clone our GitHub repository.

For a deeper dive into how the benchmarks were curated and how the evaluation framework was designed, check out our paper:

MigrationBench: Repository-Level Code Migration Benchmark from Java 8

Conclusion

Code migration is an essential but complex task for maintaining long-term software reliability and security. With MigrationBench and Poly-MigrationBench, we aim to provide the community with systematic, large-scale benchmarks that enable reproducible research and practical evaluation of automated migration approaches.

Authors

Linbo Liu

Linbo Liu is an Applied Scientist at Amazon Web Services. He works on coding agents optimization and post-training.

Yiyi Guo

Yiyi Guo is a Senior Product Manager at Amazon Web Services. She works on agentic AI, software migration and modernization in AWS Transform.

Luke Huan

Luke Huan is a Senior Principal Scientist at Amazon Web Services. He works on agentic AI, generative AI, AI4code and supports AWS Transform.

Architecting for AI excellence: AWS launches three Well-Architected Lenses at re:Invent 2025

Post Syndicated from Anitha Selvan original https://aws.amazon.com/blogs/architecture/architecting-for-ai-excellence-aws-launches-three-well-architected-lenses-at-reinvent-2025/

At re:Invent 2025, we introduce one new lens and two significant updates to the AWS Well-Architected Lenses specifically focused on AI workloads: the Responsible AI Lens, the Machine Learning (ML) Lens, and the Generative AI Lens. Together, these lenses provide comprehensive guidance for organizations at different stages of their AI journey, whether you’re just starting to experiment with machine learning or already deploying complex AI applications at scale.

The AWS Well-Architected Framework provides the best architectural practices for designing and operating reliable, secure, performance efficient, cost-optimized, and sustainable workloads in the cloud.

The Responsible AI Lens: Embedding trust in AI systems

The Responsible AI Lens offers a structured approach for developers to assess and track their AI workloads against established best practices, identify potential gaps in their AI implementation and receive actionable guidance to improve their AI systems’ quality and alignment with responsible AI principles. By using the Responsible AI Lens you can make informed decisions that balance business and technical requirements, accelerating your path from AI experimentation to production-ready solutions.

Key takeaways from the Responsible AI Lens:

  • Every AI system has a Responsible AI consideration: Whether intentionally designed or not, AI systems inherently carry Responsible AI implications that need to be actively managed rather than left to chance.
  • AI systems can be used beyond original intent and may have unintended impacts: Applications often get utilized in ways developers didn’t anticipate, and due to their probabilistic nature, AI systems can produce unexpected outcomes even within intended use cases, making robust Responsible AI decisions essential from the start.
  • Responsible AI is an enabler to innovation and trust: Rather than being a constraint, Responsible AI practices can accelerate innovation by proactively building stakeholder and customer trust and reducing downstream risks.

The Responsible AI Lens serves as the foundational guidance for AI development activities, providing critical guidelines that inform both the Machine Learning Lens and the Generative AI Lens implementations.

The Machine Learning Lens: Foundation for ML workloads

The Machine Learning Lens provides you with a set of established cloud-agnostic best practices in the form of Well-Architected Framework pillars for each machine learning (ML) lifecycle phase. The updated Machine Learning Lens provides a consistent approach for designing, building, and operating machine learning workloads on AWS. It addresses the full spectrum of ML workloads, from traditional supervised and unsupervised learning to modern AI applications.

The updated Machine Learning Lens incorporates the latest AWS ML capabilities (evolved since their introduction in 2023). What’s new in the updated ML Lens:

  • Enhanced data and AI collaborative workflows through Amazon SageMaker Unified Studio.
  • AI-assisted development for code generation and productivity enhancement.
  • Distributed training infrastructure for foundation model development and fine-tuning with Amazon SageMaker HyperPod.
  • Model customization capabilities such as knowledge distillation and fine-tuning domain-specific applications using Amazon Bedrock with Kiro and Amazon Q Developer.
  • No-code ML development using Amazon SageMaker Canvas with Amazon Q integration.
  • Improved bias detection with enhanced fairness metrics and Responsible AI capabilities in Amazon SageMaker Clarify.
  • Automated dashboard creation for business insights through Amazon Quick Sight.
  • Modular inference architecture for flexible model deployment with Inference Components.
  • Advanced observability with improved debugging and monitoring capabilities across the ML lifecycle.
  • Enhanced cost optimization for resource management through Amazon SageMaker Training Plans, Savings Plans, and Spot Instance support.

You can use the ML Lens wherever you are on your cloud journey. You can choose to apply this guidance either during the design of your ML workloads or after your workloads have entered production as part of the continuous improvement process. These improvements are powered by key AWS services including Amazon SageMaker Unified Studio, Amazon Q, Amazon SageMaker HyperPod, and Amazon Bedrock.

The Generative AI Lens: Specialized guidance for foundation models

The Generative AI Lens provides a consistent approach for customers to evaluate architectures that use large language models (LLMs) to achieve their business goals. This lens addresses common considerations relevant to model selection, prompt engineering, model customization, workload integration, and continuous improvement. We identify best practices that help you architect your cloud-based applications and workloads according to AWS Well-Architected design principles gathered from supporting thousands of customer implementations. While the Machine Learning (ML) Lens covers the broad spectrum of ML workloads, the Generative AI Lens focuses specifically on foundation models and generative AI applications. The Generative AI Lens provides the best architectural practices for designing and operating generative AI workloads on AWS.

The updated Generative AI Lens includes several new additions:

  • Amazon SageMaker HyperPod guidance for orchestrating complex, long-running generative AI workflows that includes additional service capabilities.
  • Enhanced Responsible AI preamble with detailed discussion on the eight core dimensions of Responsible AI as described by AWS.
  • Updated data architecture preamble with strategic considerations needed to architect a data system for generative AI workloads.
  • New agentic AI preamble introducing architecture paradigms for agentic systems.
  • Eight architecture scenarios covering common generative AI-powered business applications such as autonomous call centers, knowledge worker co-pilots, and multi-tenant generative AI service systems.

The Generative AI Lens builds upon the foundation established by the ML Lens, providing specialized guidance for the unique challenges and opportunities presented by foundation models and generative AI applications.

Implementation strategy for Well-Architected AI/ML guidance: A unified approach

The new lenses – Responsible AI Lens, Machine Learning Lens, and Generative AI Lens – work together to provide comprehensive guidance for AI development. The Responsible AI Lens guides safe, fair, and secure AI development. It helps balance business needs with technical requirements, streamlining the transition from experimentation to production. The Machine Learning Lens guides organizations in evaluating workloads across both modern AI and traditional machine learning approaches. Recent updates focus on key areas including enhanced data and AI collaborative workflows, AI-assisted development capabilities, large-scale infrastructure provisioning, and customizable model deployment. The Generative AI Lens helps customers evaluate large language model (LLM) based architectures and its updates include guidance for Amazon SageMaker HyperPod users, new insights on agentic AI, and updated architectural scenarios.

What are the next steps?

The launch of these new lenses at re:Invent 2025 helps organizations build AI systems that are responsible, trustworthy, powerful, and effective. By providing comprehensive guidance across the full spectrum of AI workloads, AWS supports organizations to accelerate their AI initiatives while maintaining the highest standards of responsible AI and technical excellence.

Learn more about the AWS Well-Architected Framework and implement the best practice guidance provided using the GitHub repository. These lenses are practical tools designed to help you build AI systems that deliver real business value while maintaining the highest standards of ethics, security, and operational excellence.

For additional reading, refer to the AWS Well-Architected Framework and pillar whitepapers, or contact your AWS Solutions Architect or Account Representative for support on implementing these lenses in your organization.


About the authors

The State of Security Today: Setting the Stage for 2026

Post Syndicated from Rapid7 original https://www.rapid7.com/blog/post/it-security-today-setting-stage-for-2026-predictions-webinar

As we close out 2025, one thing is clear: the security landscape is evolving faster than most organizations can keep up. From surging ransomware campaigns and AI-enhanced phishing to data extortion, geopolitical fallout, and gaps in cyber readiness, the challenges facing security teams today are as varied as they are relentless. But with complexity comes clarity and insight.

This year’s most significant breaches, breakthroughs, and behavioral shifts provide a critical lens through which we can view what’s next. That’s exactly what we’ll explore in our upcoming Security Predictions for 2026 webinar, where Rapid7’s experts will break down where we are now, what to expect next, and how organizations can proactively adapt.

Before we look ahead, let’s take stock of what defined 2025 and what it tells us about the state of cybersecurity today.

Ransomware: Same playbook, more precision

Ransomware remains one of the most consistent and costly threats facing organisations today, but the approach has shifted. According to Rapid7’s Q3 2025 Threat Landscape Report, data extortion continues to dominate, with groups increasingly focused on exfiltration and disruption rather than encryption alone. Over 80% of ransomware cases handled in Q3 involved data theft, often staged and timed to maximise leverage.

Threat actors like RansomHub, BlackSuit, NoEscape, and Scattered Spider continue to refine their operations. Many campaigns are multi-stage and collaborative, with Initial Access Brokers providing footholds that are later sold to ransomware operators. One common thread is a focus on identity and infrastructure abuse – attackers are compromising vSphere environments, exploiting misconfigurations in third-party platforms, and abusing legitimate remote access tools to move laterally before launching extortion phases.

These incidents increasingly target complex organizations with sprawling digital footprints. The result? Weeks of operational downtime, lost revenue, regulatory scrutiny, and enduring brand damage. In this landscape, ransomware is no longer just a malware problem – it’s a business continuity issue, a supply chain risk, and a board-level concern.

The offense is automated: AI goes to work

This year, we saw AI break through hype and land firmly in attackers’ toolkits. Tools like WormGPT, FraudGPT, and DarkBERT gave cybercriminals an entry point to generate convincing phishing emails, polymorphic malware, and credential-harvesting scripts, all without needing advanced coding skills.

In our AI Offense blog, we detailed how these tools lower the barrier to entry and amplify the volume and sophistication of social engineering campaigns. Pair that with deepfakes, cloned voices, and LLM-powered targeting, and security teams now face threats that are faster, cheaper, and harder to detect than ever before.

The takeaway? AI is not a future threat. It is here. And defenders must embrace its potential just as aggressively as attackers have.

The human factor: Still the weakest link

Despite improved tooling, attacker playbooks still rely heavily on people. Our recent exploration of evolving social engineering trends highlighted the rise of Microsoft Teams-based impersonation, remote access tool abuse such as Quick Assist, and multi-stage credential compromise.

The fallout has been widespread. From attacks on major UK retailers to multiple airline disruptions and critical public sector breaches, social engineering is no longer just email phishing. It is phone calls, voice cloning, fake calendars, and chat-based manipulation.

Training helps. But attackers are innovating faster than awareness campaigns can keep up. Security teams need to simulate these threats internally and invest in visibility across identity platforms, because credentials remain the crown jewels.

From awareness to action: Resilience as a mandate

A growing number of incidents in 2025 underscored the readiness gap in many organizations. Our recent blog on preparedness broke down the UK’s National Cyber Security Centre guidance urging companies to revisit their offline contingency planning, including printed IR protocols and analog communications in case digital systems are taken offline.

This call followed a sharp rise in high-impact events, with over 200 nationally significant cyber incidents recorded in the UK alone this year.

The lesson? Cyber resilience is not a nice to have. It is foundational. Detection, backup, and patching are essential, but so is building response plans that assume failure, simulate outages, and bring the entire business to the table.

Join us: Predicting what’s next in 2026

We’ll explore these trends and where they’re heading in much greater depth in our Security Predictions for 2026 webinar, taking place on December 10.

Rapid7’s experts will unpack:

  • Which attacker tactics are here to stay and which are on the rise

  • Where AI, regulation, and infrastructure gaps are creating new exposures

  • How defenders can better prioritise risk and operate in resource-constrained environments

  • What CISOs, SOC leaders, and engineers need to align on in 2026 to stay ahead

This is our biggest global webinar of the year, and it is designed to help security professionals at every level get proactive and stay ahead of what’s next.

Register now and join thousands of security professionals from around the world as we set the stage for 2026. Because when the threat landscape keeps shifting, your best defense is a head start.

Supercharging the ML and AI Development Experience at Netflix

Post Syndicated from Netflix Technology Blog original https://netflixtechblog.com/supercharging-the-ml-and-ai-development-experience-at-netflix-b2d5b95c63eb

Supercharging the ML and AI Development Experience at Netflix with Metaflow

Shashank Srikanth, Romain Cledat

Metaflow — a framework we started and open-sourced in 2019 — now powers a wide range of ML and AI systems across Netflix and at many other companies. It is well loved by users for helping them take their ML/AI workflows from prototype to production, allowing them to focus on building cutting-edge systems that bring joy and entertainment to audiences worldwide.

Metaflow allows users to:

  1. Iterate and ship quickly by minimizing friction
  2. Operate systems reliably in production with minimal overhead, at Netflix scale.

Metaflow works with many battle-hardened tooling to address the second point — among them Maestro, our newly open-sourced workflow orchestrator that powers nearly every ML and AI system at Netflix and serves as a backbone for Metaflow itself.

In this post, we focus on the first point and introduce a new Metaflow functionality, Spin, that helps users accelerate their iterative development process. By the end, you’ll have a solid understanding of Spin’s capabilities and learn how to try it out yourself with Metaflow 2.19.

Iterative development in ML and AI workflows

Developing a Metaflow flow with cards in VSCode

To understand our approach to improving the ML and AI development experience, it helps to consider how these workflows differ from traditional software engineering.

ML and AI development revolves not just around code but also around data and models, which are large, mutable, and computationally expensive to process. Iteration cycles can involve long-running data transformations, model training, and stochastic processes that yield slightly different results from run to run. These characteristics make fast, stateful iteration a critical part of productive development.

This is where notebooks — such as Jupyter, Observable, or Marimo — shine. Their ability to preserve state in memory allows developers to load a dataset once and iteratively explore, transform, and visualize it without reloading or recomputing from scratch. This persistent, interactive environment turns what would otherwise be a slow, rigid loop into a fluid, exploratory workflow — perfectly suited to the needs of ML and AI practitioners.

Because ML and AI development is computationally intensive, stochastic, and data- and model-centric, tools that optimize iteration speed must treat state management as a first-class design concern. Any system aiming to improve the development experience in this domain must therefore enable quick, incremental experimentation without losing continuity between iterations.

New: rapid, iterative development with spin

At first glance, Metaflow code looks like a workflow — similar to Airflow — but there’s another way to look at it: each Metaflow @step serves as a checkpoint boundary. At the end of every step, Metaflow automatically persists all instance variables as artifacts, allowing the execution to resume seamlessly from that point onward. The below animation shows this behavior in action:

An animated GIF showing how resume can be used in Metaflow. The GIF shows how using `flow.py resume join` makes Metaflow clone previously executed steps and resumes the computation from the `join` step and continues executing till the end of the flow.
Using resume in Metaflow

In a sense, we can consider a @step similar to a notebook cell: it is the smallest unit of execution that updates state upon completion. It does have a few differences that address the issues with notebook cells:

  • The execution order is explicit and deterministic: no surprises due to out-of-order cell execution;
  • The state is not hidden: state is explicitly stored as self. variables as shared state, which can be discovered and inspected;
  • The state is versioned and persisted making results more reproducible.

While Metaflow’s resume feature can approximate the incremental and iterative development approach of notebooks, it restarts execution from the selected step onward, introducing more latency between iterations. In contrast, a notebook allows near-instant feedback by letting users tweak and rerun individual cells while seamlessly reusing data from earlier cells held in memory.

The new spin command in Metaflow 2.19 addresses this gap. Similar to executing a single notebook cell, it quickly executes a single Metaflow @step — with all the state carried over from the parent step. As a result, users can develop and debug Metaflow steps as easily as a cell in a notebook.

The effect becomes clear when considering the three complementary execution modes — run, resume, and spin — side by side, mapping them to the corresponding notebook behavior:

Diagram showing the various modes of execution in Metaflow: Run, Resume and Spin
Run, Resume and Spin “modes”

Another major difference isn’t just what gets executed, but what gets recorded. Both run and resume create a full, versioned run with complete metadata and artifacts, while spin skips tracking altogether. It’s built for fast, throw-away iterations during development.

The one-minute clip below illustrates a typical iterative development workflow that alternates between run and spin. In this example, we are building a flow that reads a dataset from a Parquet file and trains a separate model for each product category, focusing on computer-related categories.

As shown in the video, we start by creating a flow from scratch and running a minimal version of it to persist test artifacts — in this case, a Parquet dataset. From there, we can use spin to iterate on one step at a time, incrementally building out the flow, for example, by adding the parallel training steps demonstrated in the clip.

Once the flow has been iterated on locally, it can be seamlessly deployed to production orchestrators like Maestro or Argo, and scaled up on compute platforms such as AWS Batch, Titus, Kubernetes and more. Thus, the experience is as smooth as developing in a notebook, but the outcome is a production-ready, scalable workflow, implemented as an idiomatic Python project!

Spin up smooth development in VSCode/Cursor

Instead of typing run and spin manually in the terminal, we can bind them to keyboard shortcuts. For example, the simple metaflow-dev VS Code extension (works with Cursor as well) maps Ctrl+Opt+R to run and Ctrl+Opt+S to spin. Just hack away, hit Ctrl+Opt+S, and the extension will save your file and spin the step you are currently editing.

One area where spin truly shines is in creating mini-dashboards and reports with Metaflow Cards. Visualization is another strong point of notebooks but the combination of spin and cards makes Metaflow a very compelling alternative for developing real-time and post-execution visualizations. Developing cards is inherently iterative and visual (much like building web pages) where you want to tweak code and see the results instantly. This workflow is readily available with the combination of VSCode/Cursor, which includes a built-in web-view, the local card viewer, and spin.

To see the trio of tools — along with the VS Code extension — in action, in this short clip we add observability to the train step that we built in the earlier example:

A major benefit of Metaflow Cards is that we don’t need to deploy any extra services, data streams, and databases for observability. Just develop visual outputs as above, deploy the flow, and wehave a complete system in production with reporting and visualizations included.

Spin to the next level: injecting inputs, inspecting outputs

Spin does more than just run code — it also lets us take full control of a spun @step’s inputs and outputs, enabling a range of advanced patterns.

In contrast to notebooks, we can spin any arbitrary @step in a flow using state from any past run, making it easy to test functions with different inputs. For example, if we have multiple models produced by separate runs, we could spin an inference step, supplying a different model run each time.

We can also override artifact values or inject arbitrary Python objects — similar to a notebook cell — for spin. Simply specify a Python module with an ARTIFACTS dictionary:

ARTIFACTS = {
"model": "kmeans",
"k": 15
}

and point spin at the module:

spin train --artifacts-module artifacts.py

By default spin doesn’t persist artifacts, but we can easily change this by adding –persist. Even in this case, artifacts are not persisted in the usual Metaflow datastore but to a directory-specific location which you can easily clean up after testing. We can access the results with the Client API as usual — just specify the directory you want to inspect with inspect_spin:

from metaflow import inspect_spin

inspect_spin(".")
Flow("TrainingFlow").latest_run["train"].task["model"].data

Being able to inspect and modify a step’s inputs and outputs on the fly unlocks a powerful use case: unit testing individual steps. We can use spin programmatically through the Runner API and assert the results:

from metaflow import Runner

with Runner("flow.py").spin("train", persist=True) as spin:
assert spin.task["model"].data == "kmeans"

Making AI agents spin

In addition to speeding up development for humans, spin turns out to be surprisingly handy for coding agents too. There are two major advantages to teaching AI how to spin:

  1. It accelerates the development loop. Agents don’t naturally understand what’s slow, or why speed matters, so they need to be nudged to favor faster tools over slower ones.
  2. It helps surface errors faster and contextualizes them to a specific piece of code, increasing the chance that the agent is able to fix errors by itself.

Metaflow users are already using Claude Code; spin makes this even easier. In the example below, we added the following section in a CLAUDE.md file:

## Developing Metaflow code
Follow this incremental development workflow that ensures quick iterations
and correct results. You must create a flow incrementally, step by step
following this process:
1. Create a flow skeleton with empty `@step`s.
2. Add a data loading step.
3. `run` the flow.
4. Populate the next step and use `spin` to test it with the correct inputs.
5. `run` the flow to record outputs from the new step.
5. Iterate on (4–5) until all steps have been implemented and work correctly.
6. `run` the whole flow to ensure final correctness.

To test a flow, run the flow as follows
```
python flow.py - environment=pypi run
```

Do this once before running `spin`.
As you are building the flow, you `spin` to test steps quickly.
For instance
```
python flow.py - environment=pypi spin train
```

Just based on these quick instructions, the agent is able to use spin effectively. Take a look at the following inspirational example that one-shots Claude to create a flow, along the lines of our earlier examples, which trains a classifier to predict product categories:

In the video, we can see Claude using spin around the 45-second mark to test a preprocess step. The step initially fails due to a classic data science pitfall: during testing, Claude samples only a small subset of data, causing some classes to be underrepresented. The first spin surfaces the issue, which Claude then fixes by switching to stratified sampling — and finally does another spin to confirm the fix, before proceeding to complete the task.

The inner loop of end-to-end ML/AI

To circle back to where we started, our motivation for adding spin — and for creating Metaflow in the first place — is to accelerate development cycles so we can deliver more joy to our subscribers, faster. Ultimately, we believe there’s no single magic feature that makes this possible. It takes all parts of an ML/AI platform working together coherently — spin included.

From this perspective, it’s useful to place spin in the context of other Metaflow features. It’s designed for the innermost loop of model and business-logic development, with the added benefit of supporting unit testing during deployment, as shown in the overall blueprint of the Metaflow toolchain below.

Metaflow tool-chain.
Metaflow tool-chain

In this diagram, the solid blue boxes represent different Metaflow commands, while the blue text denotes decorators and other features. In particular, note the Shared Functionality box — another key focus area for us over the past year — which includes configuration management and custom decorators. These capabilities let domain-specific teams and platform providers tailor Metaflow to their own use cases. Following our ethos of composability, all of these features integrate seamlessly with spin as well.

Another key design philosophy of Metaflow is to let projects start small and simple, adding complexity only when it becomes necessary. So don’t be overwhelmed by the diagram above. To get started, install Metaflow easily with

pip install metaflow

and take your first baby @steps for a spin! Check out the docs and for questions, support, and feedback, join the friendly Metaflow Community Slack.

Acknowledgments

We would like to thank our partners at Outerbounds, and particularly Ville Tuulos, Savin Goyal, and Madhur Tandon, for their collaboration on this feature, from initial ideation to review, testing and documentation. We would also like to acknowledge the rest of the Model Development and Management team (Maria Alder, David J. Berg, Shaojing Li, Rui Lin, Nissan Pow, Chaoying Wang, Regina Wang, Seth Yang, Darin Yu) for their input and comments.


Supercharging the ML and AI Development Experience at Netflix was originally published in Netflix TechBlog on Medium, where people are continuing the conversation by highlighting and responding to this story.

Amazon Nova Multimodal Embeddings: State-of-the-art embedding model for agentic RAG and semantic search

Post Syndicated from Danilo Poccia original https://aws.amazon.com/blogs/aws/amazon-nova-multimodal-embeddings-now-available-in-amazon-bedrock/

Today, we’re introducing Amazon Nova Multimodal Embeddings, a state-of-the-art multimodal embedding model for agentic retrieval-augmented generation (RAG) and semantic search applications, available in Amazon Bedrock. It is the first unified embedding model that supports text, documents, images, video, and audio through a single model to enable crossmodal retrieval with leading accuracy.

Embedding models convert textual, visual, and audio inputs into numerical representations called embeddings. These embeddings capture the meaning of the input in a way that AI systems can compare, search, and analyze, powering use cases such as semantic search and RAG.

Organizations are increasingly seeking solutions to unlock insights from the growing volume of unstructured data that is spread across text, image, document, video, and audio content. For example, an organization might have product images, brochures that contain infographics and text, and user-uploaded video clips. Embedding models are able to unlock value from unstructured data, however traditional models are typically specialized to handle one content type. This limitation drives customers to either build complex crossmodal embedding solutions or restrict themselves to use cases focused on a single content type. The problem also applies to mixed-modality content types such as documents with interleaved text and images or video with visual, audio, and textual elements where existing models struggle to capture crossmodal relationships effectively.

Nova Multimodal Embeddings supports a unified semantic space for text, documents, images, video, and audio for use cases such as crossmodal search across mixed-modality content, searching with a reference image, and retrieving visual documents.

Evaluating Amazon Nova Multimodal Embeddings performance
We evaluated the model on a broad range of benchmarks, and it delivers leading accuracy out-of-the-box as described in the following table.

Amazon Nova Embeddings benchmarks

Nova Multimodal Embeddings supports a context length of up to 8K tokens, text in up to 200 languages, and accepts inputs via synchronous and asynchronous APIs. Additionally, it supports segmentation (also known as “chunking”) to partition long-form text, video, or audio content into manageable segments, generating embeddings for each portion. Lastly, the model offers four output embedding dimensions, trained using Matryoshka Representation Learning (MRL) that enables low-latency end-to-end retrieval with minimal accuracy changes.

Let’s see how the new model can be used in practice.

Using Amazon Nova Multimodal Embeddings
Getting started with Nova Multimodal Embeddings follows the same pattern as other models in Amazon Bedrock. The model accepts text, documents, images, video, or audio as input and returns numerical embeddings that you can use for semantic search, similarity comparison, or RAG.

Here’s a practical example using the AWS SDK for Python (Boto3) that shows how to create embeddings from different content types and store them for later retrieval. For simplicity, I’ll use Amazon S3 Vectors, a cost-optimized storage with native support for storing and querying vectors at any scale, to store and search the embeddings.

Let’s start with the fundamentals: converting text into embeddings. This example shows how to transform a simple text description into a numerical representation that captures its semantic meaning. These embeddings can later be compared with embeddings from documents, images, videos, or audio to find related content.

To make the code easy to follow, I’ll show a section of the script at a time. The full script is included at the end of this walkthrough.

import json
import base64
import time
import boto3

MODEL_ID = "amazon.nova-2-multimodal-embeddings-v1:0"
EMBEDDING_DIMENSION = 3072

# Initialize Amazon Bedrock Runtime client
bedrock_runtime = boto3.client("bedrock-runtime", region_name="us-east-1")

print(f"Generating text embedding with {MODEL_ID} ...")

# Text to embed
text = "Amazon Nova is a multimodal foundation model"

# Create embedding
request_body = {
    "taskType": "SINGLE_EMBEDDING",
    "singleEmbeddingParams": {
        "embeddingPurpose": "GENERIC_INDEX",
        "embeddingDimension": EMBEDDING_DIMENSION,
        "text": {"truncationMode": "END", "value": text},
    },
}

response = bedrock_runtime.invoke_model(
    body=json.dumps(request_body),
    modelId=MODEL_ID,
    contentType="application/json",
)

# Extract embedding
response_body = json.loads(response["body"].read())
embedding = response_body["embeddings"][0]["embedding"]

print(f"Generated embedding with {len(embedding)} dimensions")

Now we’ll process visual content using the same embedding space using a photo.jpg file in the same folder as the script. This demonstrates the power of multimodality: Nova Multimodal Embeddings is able to capture both textual and visual context into a single embedding that provides enhanced understanding of the document.

Nova Multimodal Embeddings can generate embeddings that are optimized for how they are being used. When indexing for a search or retrieval use case, embeddingPurpose can be set to GENERIC_INDEX. For the query step, embeddingPurpose can be set depending on the type of item to be retrieved. For example, when retrieving documents, embeddingPurpose can be set to DOCUMENT_RETRIEVAL.

# Read and encode image
print(f"Generating image embedding with {MODEL_ID} ...")

with open("photo.jpg", "rb") as f:
    image_bytes = base64.b64encode(f.read()).decode("utf-8")

# Create embedding
request_body = {
    "taskType": "SINGLE_EMBEDDING",
    "singleEmbeddingParams": {
        "embeddingPurpose": "GENERIC_INDEX",
        "embeddingDimension": EMBEDDING_DIMENSION,
        "image": {
            "format": "jpeg",
            "source": {"bytes": image_bytes}
        },
    },
}

response = bedrock_runtime.invoke_model(
    body=json.dumps(request_body),
    modelId=MODEL_ID,
    contentType="application/json",
)

# Extract embedding
response_body = json.loads(response["body"].read())
embedding = response_body["embeddings"][0]["embedding"]

print(f"Generated embedding with {len(embedding)} dimensions")

To process video content, I use the asynchronous API. That’s a requirement for videos that are larger than 25MB when encoded as Base64. First, I upload a local video to an S3 bucket in the same AWS Region.

aws s3 cp presentation.mp4 s3://my-video-bucket/videos/

This example shows how to extract embeddings from both visual and audio components of a video file. The segmentation feature breaks longer videos into manageable chunks, making it practical to search through hours of content efficiently.

# Initialize Amazon S3 client
s3 = boto3.client("s3", region_name="us-east-1")

print(f"Generating video embedding with {MODEL_ID} ...")

# Amazon S3 URIs
S3_VIDEO_URI = "s3://my-video-bucket/videos/presentation.mp4"
S3_EMBEDDING_DESTINATION_URI = "s3://my-embedding-destination-bucket/embeddings-output/"

# Create async embedding job for video with audio
model_input = {
    "taskType": "SEGMENTED_EMBEDDING",
    "segmentedEmbeddingParams": {
        "embeddingPurpose": "GENERIC_INDEX",
        "embeddingDimension": EMBEDDING_DIMENSION,
        "video": {
            "format": "mp4",
            "embeddingMode": "AUDIO_VIDEO_COMBINED",
            "source": {
                "s3Location": {"uri": S3_VIDEO_URI}
            },
            "segmentationConfig": {
                "durationSeconds": 15  # Segment into 15-second chunks
            },
        },
    },
}

response = bedrock_runtime.start_async_invoke(
    modelId=MODEL_ID,
    modelInput=model_input,
    outputDataConfig={
        "s3OutputDataConfig": {
            "s3Uri": S3_EMBEDDING_DESTINATION_URI
        }
    },
)

invocation_arn = response["invocationArn"]
print(f"Async job started: {invocation_arn}")

# Poll until job completes
print("\nPolling for job completion...")
while True:
    job = bedrock_runtime.get_async_invoke(invocationArn=invocation_arn)
    status = job["status"]
    print(f"Status: {status}")

    if status != "InProgress":
        break
    time.sleep(15)

# Check if job completed successfully
if status == "Completed":
    output_s3_uri = job["outputDataConfig"]["s3OutputDataConfig"]["s3Uri"]
    print(f"\nSuccess! Embeddings at: {output_s3_uri}")

    # Parse S3 URI to get bucket and prefix
    s3_uri_parts = output_s3_uri[5:].split("/", 1)  # Remove "s3://" prefix
    bucket = s3_uri_parts[0]
    prefix = s3_uri_parts[1] if len(s3_uri_parts) > 1 else ""

    # AUDIO_VIDEO_COMBINED mode outputs to embedding-audio-video.jsonl
    # The output_s3_uri already includes the job ID, so just append the filename
    embeddings_key = f"{prefix}/embedding-audio-video.jsonl".lstrip("/")

    print(f"Reading embeddings from: s3://{bucket}/{embeddings_key}")

    # Read and parse JSONL file
    response = s3.get_object(Bucket=bucket, Key=embeddings_key)
    content = response['Body'].read().decode('utf-8')

    embeddings = []
    for line in content.strip().split('\n'):
        if line:
            embeddings.append(json.loads(line))

    print(f"\nFound {len(embeddings)} video segments:")
    for i, segment in enumerate(embeddings):
        print(f"  Segment {i}: {segment.get('startTime', 0):.1f}s - {segment.get('endTime', 0):.1f}s")
        print(f"    Embedding dimension: {len(segment.get('embedding', []))}")
else:
    print(f"\nJob failed: {job.get('failureMessage', 'Unknown error')}")

With our embeddings generated, we need a place to store and search them efficiently. This example demonstrates setting up a vector store using Amazon S3 Vectors, which provides the infrastructure needed for similarity search at scale. Think of this as creating a searchable index where semantically similar content naturally clusters together. When adding an embedding to the index, I use the metadata to specify the original format and the content being indexed.

# Initialize Amazon S3 Vectors client
s3vectors = boto3.client("s3vectors", region_name="us-east-1")

# Configuration
VECTOR_BUCKET = "my-vector-store"
INDEX_NAME = "embeddings"

# Create vector bucket and index (if they don't exist)
try:
    s3vectors.get_vector_bucket(vectorBucketName=VECTOR_BUCKET)
    print(f"Vector bucket {VECTOR_BUCKET} already exists")
except s3vectors.exceptions.NotFoundException:
    s3vectors.create_vector_bucket(vectorBucketName=VECTOR_BUCKET)
    print(f"Created vector bucket: {VECTOR_BUCKET}")

try:
    s3vectors.get_index(vectorBucketName=VECTOR_BUCKET, indexName=INDEX_NAME)
    print(f"Vector index {INDEX_NAME} already exists")
except s3vectors.exceptions.NotFoundException:
    s3vectors.create_index(
        vectorBucketName=VECTOR_BUCKET,
        indexName=INDEX_NAME,
        dimension=EMBEDDING_DIMENSION,
        dataType="float32",
        distanceMetric="cosine"
    )
    print(f"Created index: {INDEX_NAME}")

texts = [
    "Machine learning on AWS",
    "Amazon Bedrock provides foundation models",
    "S3 Vectors enables semantic search"
]

print(f"\nGenerating embeddings for {len(texts)} texts...")

# Generate embeddings using Amazon Nova for each text
vectors = []
for text in texts:
    response = bedrock_runtime.invoke_model(
        body=json.dumps({
            "taskType": "SINGLE_EMBEDDING",
            "singleEmbeddingParams": {
                "embeddingDimension": EMBEDDING_DIMENSION,
                "text": {"truncationMode": "END", "value": text}
            }
        }),
        modelId=MODEL_ID,
        accept="application/json",
        contentType="application/json"
    )

    response_body = json.loads(response["body"].read())
    embedding = response_body["embeddings"][0]["embedding"]

    vectors.append({
        "key": f"text:{text[:50]}",  # Unique identifier
        "data": {"float32": embedding},
        "metadata": {"type": "text", "content": text}
    })
    print(f"  ✓ Generated embedding for: {text}")

# Add all vectors to store in a single call
s3vectors.put_vectors(
    vectorBucketName=VECTOR_BUCKET,
    indexName=INDEX_NAME,
    vectors=vectors
)

print(f"\nSuccessfully added {len(vectors)} vectors to the store in one put_vectors call!")

This final example demonstrates the capability of searching across different content types with a single query, finding the most similar content regardless of whether it originated from text, images, videos, or audio. The distance scores help you understand how closely related the results are to your original query.

# Text to query
query_text = "foundation models"  

print(f"\nGenerating embeddings for query '{query_text}' ...")

# Generate embeddings
response = bedrock_runtime.invoke_model(
    body=json.dumps({
        "taskType": "SINGLE_EMBEDDING",
        "singleEmbeddingParams": {
            "embeddingPurpose": "GENERIC_RETRIEVAL",
            "embeddingDimension": EMBEDDING_DIMENSION,
            "text": {"truncationMode": "END", "value": query_text}
        }
    }),
    modelId=MODEL_ID,
    accept="application/json",
    contentType="application/json"
)

response_body = json.loads(response["body"].read())
query_embedding = response_body["embeddings"][0]["embedding"]

print(f"Searching for similar embeddings...\n")

# Search for top 5 most similar vectors
response = s3vectors.query_vectors(
    vectorBucketName=VECTOR_BUCKET,
    indexName=INDEX_NAME,
    queryVector={"float32": query_embedding},
    topK=5,
    returnDistance=True,
    returnMetadata=True
)

# Display results
print(f"Found {len(response['vectors'])} results:\n")
for i, result in enumerate(response["vectors"], 1):
    print(f"{i}. {result['key']}")
    print(f"   Distance: {result['distance']:.4f}")
    if result.get("metadata"):
        print(f"   Metadata: {result['metadata']}")
    print()

Crossmodal search is one of the key advantages of multimodal embeddings. With crossmodal search, you can query with text and find relevant images. You can also search for videos using text descriptions, find audio clips that match certain topics, or discover documents based on their visual and textual content. For your reference, the full script with all previous examples merged together is here:

import json
import base64
import time
import boto3

MODEL_ID = "amazon.nova-2-multimodal-embeddings-v1:0"
EMBEDDING_DIMENSION = 3072

# Initialize Amazon Bedrock Runtime client
bedrock_runtime = boto3.client("bedrock-runtime", region_name="us-east-1")

print(f"Generating text embedding with {MODEL_ID} ...")

# Text to embed
text = "Amazon Nova is a multimodal foundation model"

# Create embedding
request_body = {
    "taskType": "SINGLE_EMBEDDING",
    "singleEmbeddingParams": {
        "embeddingPurpose": "GENERIC_INDEX",
        "embeddingDimension": EMBEDDING_DIMENSION,
        "text": {"truncationMode": "END", "value": text},
    },
}

response = bedrock_runtime.invoke_model(
    body=json.dumps(request_body),
    modelId=MODEL_ID,
    contentType="application/json",
)

# Extract embedding
response_body = json.loads(response["body"].read())
embedding = response_body["embeddings"][0]["embedding"]

print(f"Generated embedding with {len(embedding)} dimensions")
# Read and encode image
print(f"Generating image embedding with {MODEL_ID} ...")

with open("photo.jpg", "rb") as f:
    image_bytes = base64.b64encode(f.read()).decode("utf-8")

# Create embedding
request_body = {
    "taskType": "SINGLE_EMBEDDING",
    "singleEmbeddingParams": {
        "embeddingPurpose": "GENERIC_INDEX",
        "embeddingDimension": EMBEDDING_DIMENSION,
        "image": {
            "format": "jpeg",
            "source": {"bytes": image_bytes}
        },
    },
}

response = bedrock_runtime.invoke_model(
    body=json.dumps(request_body),
    modelId=MODEL_ID,
    contentType="application/json",
)

# Extract embedding
response_body = json.loads(response["body"].read())
embedding = response_body["embeddings"][0]["embedding"]

print(f"Generated embedding with {len(embedding)} dimensions")
# Initialize Amazon S3 client
s3 = boto3.client("s3", region_name="us-east-1")

print(f"Generating video embedding with {MODEL_ID} ...")

# Amazon S3 URIs
S3_VIDEO_URI = "s3://my-video-bucket/videos/presentation.mp4"

# Amazon S3 output bucket and location
S3_EMBEDDING_DESTINATION_URI = "s3://my-video-bucket/embeddings-output/"

# Create async embedding job for video with audio
model_input = {
    "taskType": "SEGMENTED_EMBEDDING",
    "segmentedEmbeddingParams": {
        "embeddingPurpose": "GENERIC_INDEX",
        "embeddingDimension": EMBEDDING_DIMENSION,
        "video": {
            "format": "mp4",
            "embeddingMode": "AUDIO_VIDEO_COMBINED",
            "source": {
                "s3Location": {"uri": S3_VIDEO_URI}
            },
            "segmentationConfig": {
                "durationSeconds": 15  # Segment into 15-second chunks
            },
        },
    },
}

response = bedrock_runtime.start_async_invoke(
    modelId=MODEL_ID,
    modelInput=model_input,
    outputDataConfig={
        "s3OutputDataConfig": {
            "s3Uri": S3_EMBEDDING_DESTINATION_URI
        }
    },
)

invocation_arn = response["invocationArn"]
print(f"Async job started: {invocation_arn}")

# Poll until job completes
print("\nPolling for job completion...")
while True:
    job = bedrock_runtime.get_async_invoke(invocationArn=invocation_arn)
    status = job["status"]
    print(f"Status: {status}")

    if status != "InProgress":
        break
    time.sleep(15)

# Check if job completed successfully
if status == "Completed":
    output_s3_uri = job["outputDataConfig"]["s3OutputDataConfig"]["s3Uri"]
    print(f"\nSuccess! Embeddings at: {output_s3_uri}")

    # Parse S3 URI to get bucket and prefix
    s3_uri_parts = output_s3_uri[5:].split("/", 1)  # Remove "s3://" prefix
    bucket = s3_uri_parts[0]
    prefix = s3_uri_parts[1] if len(s3_uri_parts) > 1 else ""

    # AUDIO_VIDEO_COMBINED mode outputs to embedding-audio-video.jsonl
    # The output_s3_uri already includes the job ID, so just append the filename
    embeddings_key = f"{prefix}/embedding-audio-video.jsonl".lstrip("/")

    print(f"Reading embeddings from: s3://{bucket}/{embeddings_key}")

    # Read and parse JSONL file
    response = s3.get_object(Bucket=bucket, Key=embeddings_key)
    content = response['Body'].read().decode('utf-8')

    embeddings = []
    for line in content.strip().split('\n'):
        if line:
            embeddings.append(json.loads(line))

    print(f"\nFound {len(embeddings)} video segments:")
    for i, segment in enumerate(embeddings):
        print(f"  Segment {i}: {segment.get('startTime', 0):.1f}s - {segment.get('endTime', 0):.1f}s")
        print(f"    Embedding dimension: {len(segment.get('embedding', []))}")
else:
    print(f"\nJob failed: {job.get('failureMessage', 'Unknown error')}")
# Initialize Amazon S3 Vectors client
s3vectors = boto3.client("s3vectors", region_name="us-east-1")

# Configuration
VECTOR_BUCKET = "my-vector-store"
INDEX_NAME = "embeddings"

# Create vector bucket and index (if they don't exist)
try:
    s3vectors.get_vector_bucket(vectorBucketName=VECTOR_BUCKET)
    print(f"Vector bucket {VECTOR_BUCKET} already exists")
except s3vectors.exceptions.NotFoundException:
    s3vectors.create_vector_bucket(vectorBucketName=VECTOR_BUCKET)
    print(f"Created vector bucket: {VECTOR_BUCKET}")

try:
    s3vectors.get_index(vectorBucketName=VECTOR_BUCKET, indexName=INDEX_NAME)
    print(f"Vector index {INDEX_NAME} already exists")
except s3vectors.exceptions.NotFoundException:
    s3vectors.create_index(
        vectorBucketName=VECTOR_BUCKET,
        indexName=INDEX_NAME,
        dimension=EMBEDDING_DIMENSION,
        dataType="float32",
        distanceMetric="cosine"
    )
    print(f"Created index: {INDEX_NAME}")

texts = [
    "Machine learning on AWS",
    "Amazon Bedrock provides foundation models",
    "S3 Vectors enables semantic search"
]

print(f"\nGenerating embeddings for {len(texts)} texts...")

# Generate embeddings using Amazon Nova for each text
vectors = []
for text in texts:
    response = bedrock_runtime.invoke_model(
        body=json.dumps({
            "taskType": "SINGLE_EMBEDDING",
            "singleEmbeddingParams": {
                "embeddingPurpose": "GENERIC_INDEX",
                "embeddingDimension": EMBEDDING_DIMENSION,
                "text": {"truncationMode": "END", "value": text}
            }
        }),
        modelId=MODEL_ID,
        accept="application/json",
        contentType="application/json"
    )

    response_body = json.loads(response["body"].read())
    embedding = response_body["embeddings"][0]["embedding"]

    vectors.append({
        "key": f"text:{text[:50]}",  # Unique identifier
        "data": {"float32": embedding},
        "metadata": {"type": "text", "content": text}
    })
    print(f"  ✓ Generated embedding for: {text}")

# Add all vectors to store in a single call
s3vectors.put_vectors(
    vectorBucketName=VECTOR_BUCKET,
    indexName=INDEX_NAME,
    vectors=vectors
)

print(f"\nSuccessfully added {len(vectors)} vectors to the store in one put_vectors call!")
# Text to query
query_text = "foundation models"  

print(f"\nGenerating embeddings for query '{query_text}' ...")

# Generate embeddings
response = bedrock_runtime.invoke_model(
    body=json.dumps({
        "taskType": "SINGLE_EMBEDDING",
        "singleEmbeddingParams": {
            "embeddingPurpose": "GENERIC_RETRIEVAL",
            "embeddingDimension": EMBEDDING_DIMENSION,
            "text": {"truncationMode": "END", "value": query_text}
        }
    }),
    modelId=MODEL_ID,
    accept="application/json",
    contentType="application/json"
)

response_body = json.loads(response["body"].read())
query_embedding = response_body["embeddings"][0]["embedding"]

print(f"Searching for similar embeddings...\n")

# Search for top 5 most similar vectors
response = s3vectors.query_vectors(
    vectorBucketName=VECTOR_BUCKET,
    indexName=INDEX_NAME,
    queryVector={"float32": query_embedding},
    topK=5,
    returnDistance=True,
    returnMetadata=True
)

# Display results
print(f"Found {len(response['vectors'])} results:\n")
for i, result in enumerate(response["vectors"], 1):
    print(f"{i}. {result['key']}")
    print(f"   Distance: {result['distance']:.4f}")
    if result.get("metadata"):
        print(f"   Metadata: {result['metadata']}")
    print()

For production applications, embeddings can be stored in any vector database. Amazon OpenSearch Service offers native integration with Nova Multimodal Embeddings at launch, making it straightforward to build scalable search applications. As shown in the examples before, Amazon S3 Vectors provides a simple way to store and query embeddings with your application data.

Things to know
Nova Multimodal Embeddings offers four output dimension options: 3,072, 1,024, 384, and 256. Larger dimensions provide more detailed representations but require more storage and computation. Smaller dimensions offer a practical balance between retrieval performance and resource efficiency. This flexibility helps you optimize for your specific application and cost requirements.

The model handles substantial context lengths. For text inputs, it can process up to 8,192 tokens at once. Video and audio inputs support segments of up to 30 seconds, and the model can segment longer files. This segmentation capability is particularly useful when working with large media files—the model splits them into manageable pieces and creates embeddings for each segment.

The model includes responsible AI features built into Amazon Bedrock. Content submitted for embedding goes through Amazon Bedrock content safety filters, and the model includes fairness measures to reduce bias.

As described in the code examples, the model can be invoked through both synchronous and asynchronous APIs. The synchronous API works well for real-time applications where you need immediate responses, such as processing user queries in a search interface. The asynchronous API handles latency insensitive workloads more efficiently, making it suitable for processing large content such as videos.

Availability and pricing
Amazon Nova Multimodal Embeddings is available today in Amazon Bedrock in the US East (N. Virginia) AWS Region. For detailed pricing information, visit the Amazon Bedrock pricing page.

To learn more, see the Amazon Nova User Guide for comprehensive documentation and the Amazon Nova model cookbook on GitHub for practical code examples.

If you’re using an AI–powered assistant for software development such as Amazon Q Developer or Kiro, you can set up the AWS API MCP Server to help the AI assistants interact with AWS services and resources and the AWS Knowledge MCP Server to provide up-to-date documentation, code samples, knowledge about the regional availability of AWS APIs and CloudFormation resources.

Start building multimodal AI-powered applications with Nova Multimodal Embeddings today, and share your feedback through AWS re:Post for Amazon Bedrock or your usual AWS Support contacts.

Danilo