Post Syndicated from Bruce Schneier original https://www.schneier.com/blog/archives/2025/12/like-social-media-ai-requires-difficult-choices.html
In his 2020 book, “Future Politics,” British barrister Jamie Susskind wrote that the dominant question of the 20th century was “How much of our collective life should be determined by the state, and what should be left to the market and civil society?” But in the early decades of this century, Susskind suggested that we face a different question: “To what extent should our lives be directed and controlled by powerful digital systems—and on what terms?”
Artificial intelligence (AI) forces us to confront this question. It is a technology that in theory amplifies the power of its users: A manager, marketer, political campaigner, or opinionated internet user can utter a single instruction, and see their message—whatever it is—instantly written, personalized, and propagated via email, text, social, or other channels to thousands of people within their organization, or millions around the world. It also allows us to individualize solicitations for political donations, elaborate a grievance into a well-articulated policy position, or tailor a persuasive argument to an identity group, or even a single person.
But even as it offers endless potential, AI is a technology that—like the state—gives others new powers to control our lives and experiences.
We’ve seen this out play before. Social media companies made the same sorts of promises 20 years ago: instant communication enabling individual connection at massive scale. Fast-forward to today, and the technology that was supposed to give individuals power and influence ended up controlling us. Today social media dominates our time and attention, assaults our mental health, and—together with its Big Tech parent companies—captures an unfathomable fraction of our economy, even as it poses risks to our democracy.
The novelty and potential of social media was as present then as it is for AI now, which should make us wary of its potential harmful consequences for society and democracy. We legitimately fear artificial voices and manufactured reality drowning out real people on the internet: on social media, in chat rooms, everywhere we might try to connect with others.
It doesn’t have to be that way. Alongside these evident risks, AI has legitimate potential to transform both everyday life and democratic governance in positive ways. In our new book, “Rewiring Democracy,” we chronicle examples from around the globe of democracies using AI to make regulatory enforcement more efficient, catch tax cheats, speed up judicial processes, synthesize input from constituents to legislatures, and much more. Because democracies distribute power across institutions and individuals, making the right choices about how to shape AI and its uses requires both clarity and alignment across society.
To that end, we spotlight four pivotal choices facing private and public actors. These choices are similar to those we faced during the advent of social media, and in retrospect we can see that we made the wrong decisions back then. Our collective choices in 2025—choices made by tech CEOs, politicians, and citizens alike—may dictate whether AI is applied to positive and pro-democratic, or harmful and civically destructive, ends.
A Choice for the Executive and the Judiciary: Playing by the Rules
The Federal Election Commission (FEC) calls it fraud when a candidate hires an actor to impersonate their opponent. More recently, they had to decide whether doing the same thing with an AI deepfake makes it okay. (They concluded it does not.) Although in this case the FEC made the right decision, this is just one example of how AIs could skirt laws that govern people.
Likewise, courts are having to decide if and when it is okay for an AI to reuse creative materials without compensation or attribution, which might constitute plagiarism or copyright infringement if carried out by a human. (The court outcomes so far are mixed.) Courts are also adjudicating whether corporations are responsible for upholding promises made by AI customer service representatives. (In the case of Air Canada, the answer was yes, and insurers have started covering the liability.)
Social media companies faced many of the same hazards decades ago and have largely been shielded by the combination of Section 230 of the Communications Act of 1994 and the safe harbor offered by the Digital Millennium Copyright Act of 1998. Even in the absence of congressional action to strengthen or add rigor to this law, the Federal Communications Commission (FCC) and the Supreme Court could take action to enhance its effects and to clarify which humans are responsible when technology is used, in effect, to bypass existing law.
A Choice for Congress: Privacy
As AI-enabled products increasingly ask Americans to share yet more of their personal information—their “context“—to use digital services like personal assistants, safeguarding the interests of the American consumer should be a bipartisan cause in Congress.
It has been nearly 10 years since Europe adopted comprehensive data privacy regulation. Today, American companies exert massive efforts to limit data collection, acquire consent for use of data, and hold it confidential under significant financial penalties—but only for their customers and users in the EU.
Regardless, a decade later the U.S. has still failed to make progress on any serious attempts at comprehensive federal privacy legislation written for the 21st century, and there are precious few data privacy protections that apply to narrow slices of the economy and population. This inaction comes in spite of scandal after scandal regarding Big Tech corporations’ irresponsible and harmful use of our personal data: Oracle’s data profiling, Facebook and Cambridge Analytica, Google ignoring data privacy opt-out requests, and many more.
Privacy is just one side of the obligations AI companies should have with respect to our data; the other side is portability—that is, the ability for individuals to choose to migrate and share their data between consumer tools and technology systems. To the extent that knowing our personal context really does enable better and more personalized AI services, it’s critical that consumers have the ability to extract and migrate their personal context between AI solutions. Consumers should own their own data, and with that ownership should come explicit control over who and what platforms it is shared with, as well as withheld from. Regulators could mandate this interoperability. Otherwise, users are locked in and lack freedom of choice between competing AI solutions—much like the time invested to build a following on a social network has locked many users to those platforms.
A Choice for States: Taxing AI Companies
It has become increasingly clear that social media is not a town square in the utopian sense of an open and protected public forum where political ideas are distributed and debated in good faith. If anything, social media has coarsened and degraded our public discourse. Meanwhile, the sole act of Congress designed to substantially reign in the social and political effects of social media platforms—the TikTok ban, which aimed to protect the American public from Chinese influence and data collection, citing it as a national security threat—is one it seems to no longer even acknowledge.
While Congress has waffled, regulation in the U.S. is happening at the state level. Several states have limited children’s and teens’ access to social media. With Congress having rejected—for now—a threatened federal moratorium on state-level regulation of AI, California passed a new slate of AI regulations after mollifying a lobbying onslaught from industry opponents. Perhaps most interesting, Maryland has recently become the first in the nation to levy taxes on digital advertising platform companies.
States now face a choice of whether to apply a similar reparative tax to AI companies to recapture a fraction of the costs they externalize on the public to fund affected public services. State legislators concerned with the potential loss of jobs, cheating in schools, and harm to those with mental health concerns caused by AI have options to combat it. They could extract the funding needed to mitigate these harms to support public services—strengthening job training programs and public employment, public schools, public health services, even public media and technology.
A Choice for All of Us: What Products Do We Use, and How?
A pivotal moment in the social media timeline occurred in 2006, when Facebook opened its service to the public after years of catering to students of select universities. Millions quickly signed up for a free service where the only source of monetization was the extraction of their attention and personal data.
Today, about half of Americans are daily users of AI, mostly via free products from Facebook’s parent company Meta and a handful of other familiar Big Tech giants and venture-backed tech firms such as Google, Microsoft, OpenAI, and Anthropic—with every incentive to follow the same path as the social platforms.
But now, as then, there are alternatives. Some nonprofit initiatives are building open-source AI tools that have transparent foundations and can be run locally and under users’ control, like AllenAI and EleutherAI. Some governments, like Singapore, Indonesia, and Switzerland, are building public alternatives to corporate AI that don’t suffer from the perverse incentives introduced by the profit motive of private entities.
Just as social media users have faced platform choices with a range of value propositions and ideological valences—as diverse as X, Bluesky, and Mastodon—the same will increasingly be true of AI. Those of us who use AI products in our everyday lives as people, workers, and citizens may not have the same power as judges, lawmakers, and state officials. But we can play a small role in influencing the broader AI ecosystem by demonstrating interest in and usage of these alternatives to Big AI. If you’re a regular user of commercial AI apps, consider trying the free-to-use service for Switzerland’s public Apertus model.
None of these choices are really new. They were all present almost 20 years ago, as social media moved from niche to mainstream. They were all policy debates we did not have, choosing instead to view these technologies through rose-colored glasses. Today, though, we can choose a different path and realize a different future. It is critical that we intentionally navigate a path to a positive future for societal use of AI—before the consolidation of power renders it too late to do so.
This post was written with Nathan E. Sanders, and originally appeared in Lawfare.


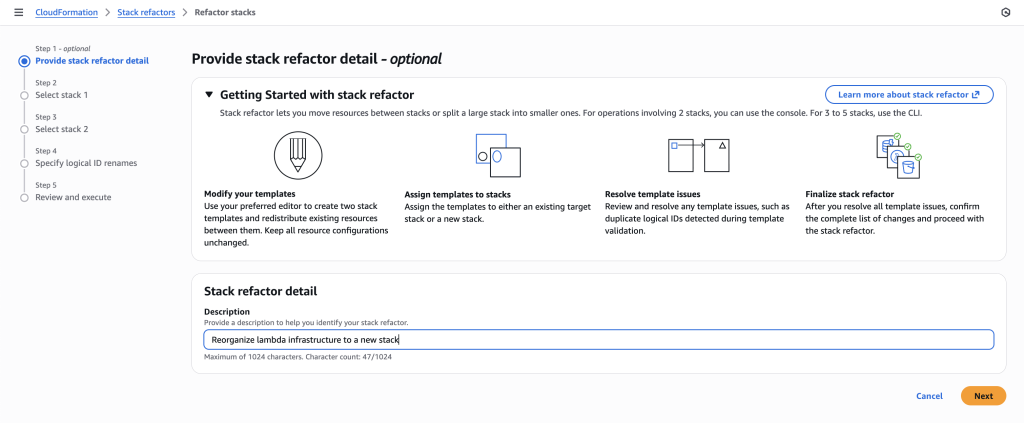
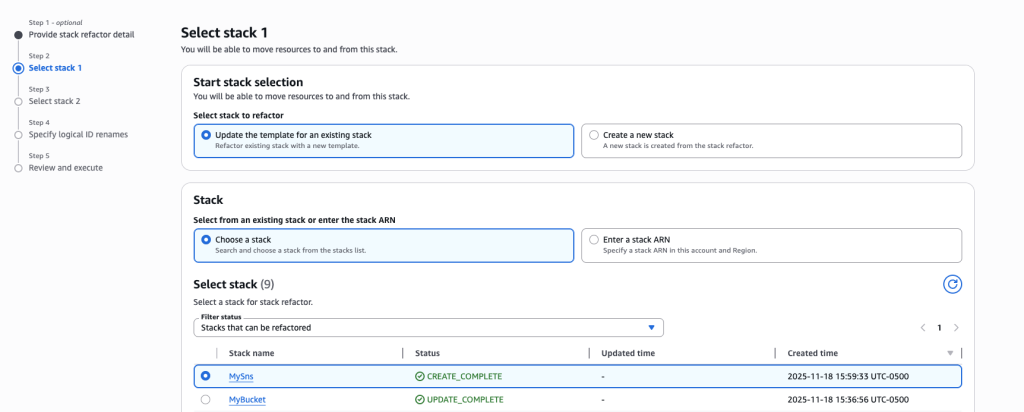
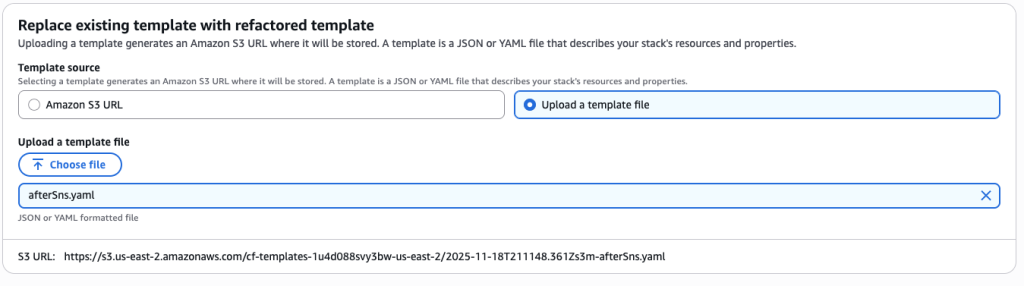
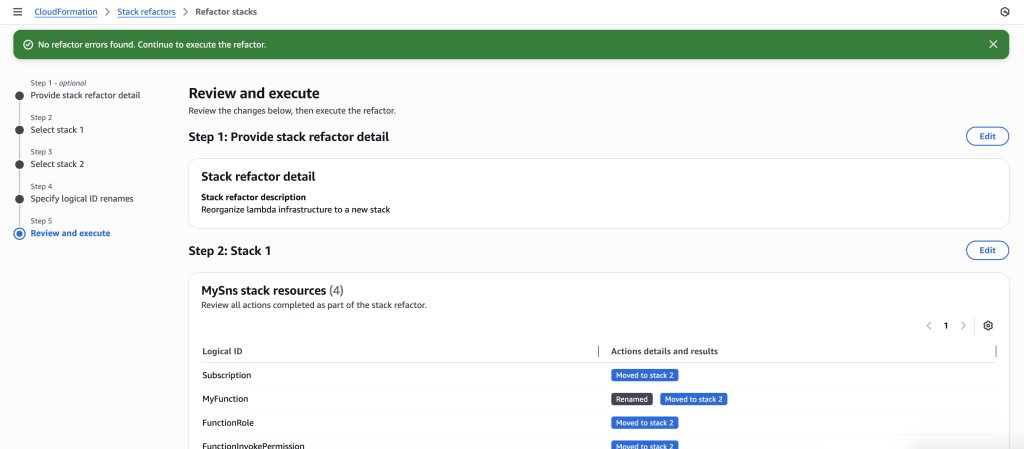
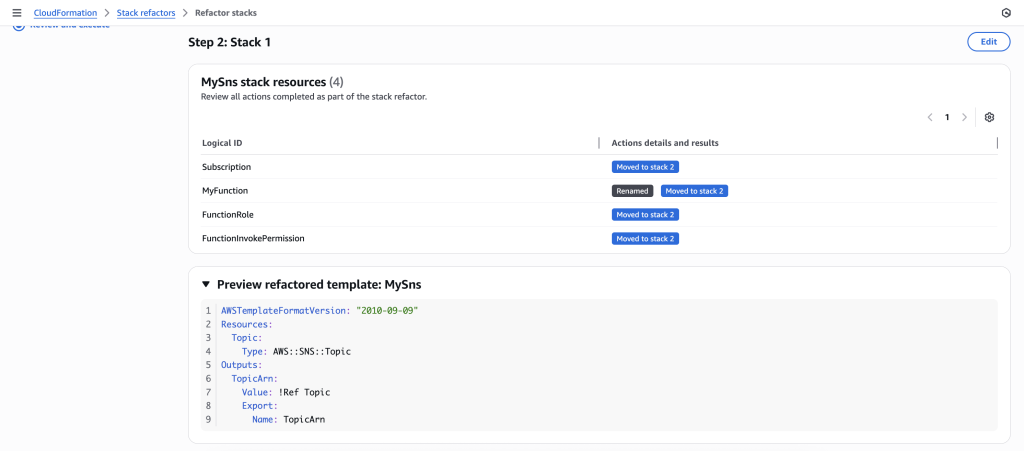
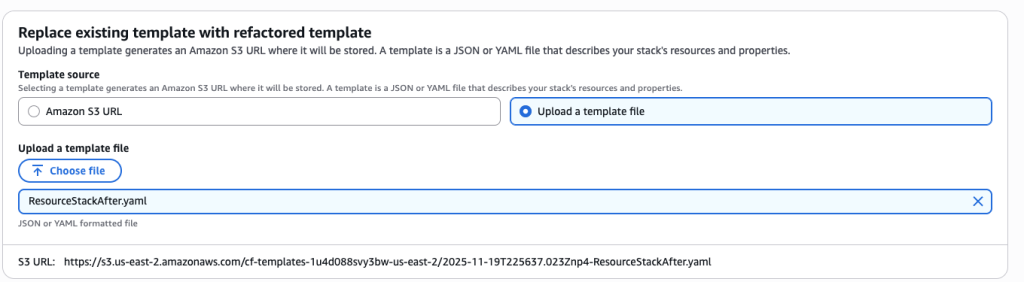
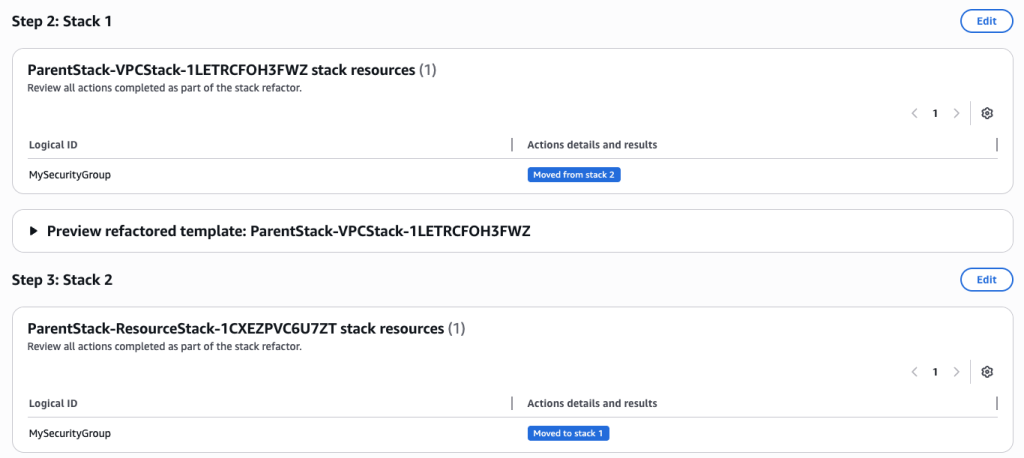
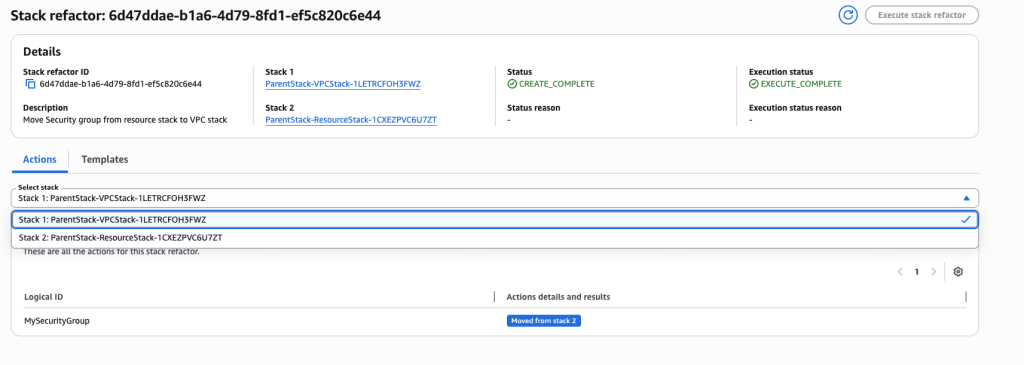
 In some scenarios, CloudFormation console can automatically detect logical resource ID renames and pre-fill the mapping for you. The resource mapping is required when there are logical resource ID changes between the original stack and refactored template. Ensure that the mappings are correct before proceeding to the next step.
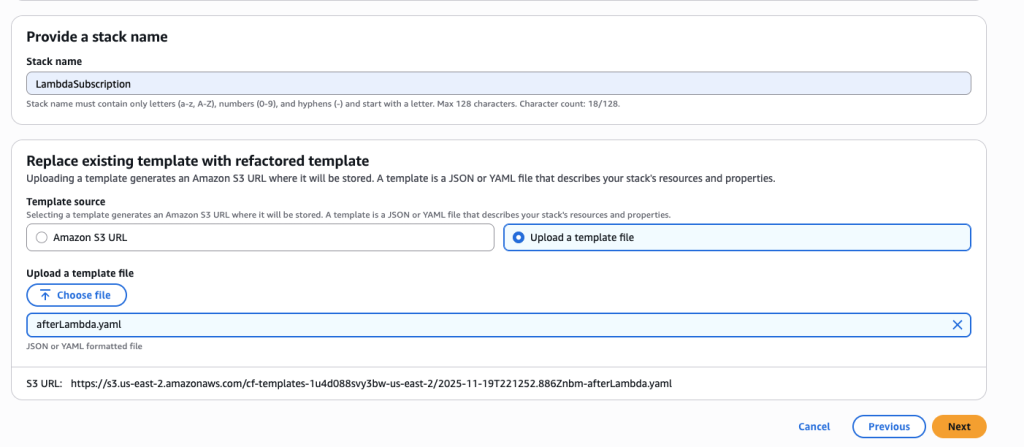