Post Syndicated from Venu Geddam original https://aws.amazon.com/blogs/compute/maximize-amazon-ec2-capacity-reservations-with-capacity-manager-data-exports/
In our previous post, we introduced Amazon EC2 Capacity Manager and its data export capability. Amazon EC2 Capacity Manager provides centralized visibility into your Amazon Elastic Compute Cloud (Amazon EC2) capacity usage across all accounts and Regions in your organization. It tracks capacity usage for three types of EC2 capacity: On-Demand instances, Spot instances, and On-Demand Capacity Reservations (ODCR). On the AWS Management Console, it provides 90 days of historical capacity data. With data exports to Amazon Simple Storage Service (Amazon S3), you can retain and analyze capacity trends beyond this period using your preferred analytics tools.
In this post, we demonstrate how to configure EC2 Capacity Manager data exports to Amazon S3 and query historical capacity data using Amazon Athena. This approach helps you identify long-term usage patterns, plan capacity needs, and optimize resource allocation across your organization.
Solution overview
The following diagram illustrates the solution architecture. EC2 Capacity Manager exports capacity data to Amazon S3, where Amazon Athena queries it using SQL with automatic partition discovery.

The solution involves the following steps:
- Set up an S3 bucket for capacity data export.
- Configure EC2 Capacity Manager data export.
- Set up Amazon Athena to query the exported data.
- Run queries to analyze capacity patterns.
Prerequisites:
- An AWS account with permissions to create S3 buckets and configure EC2 Capacity Manager.
- AWS Command Line Interface (AWS CLI) installed and configured (optional, for CLI-based setup).
- Familiarity with SQL for querying data in Athena.
Setting up data export to Amazon S3
EC2 Capacity Manager can export capacity data in compressed CSV (Gzip) or compressed Parquet (Snappy) format. Use Parquet format for query performance in Athena (Parquet’s columnar format is designed to optimize analytical queries).
Configure the data export
You can configure data export through the EC2 Capacity Manager console or AWS CLI.
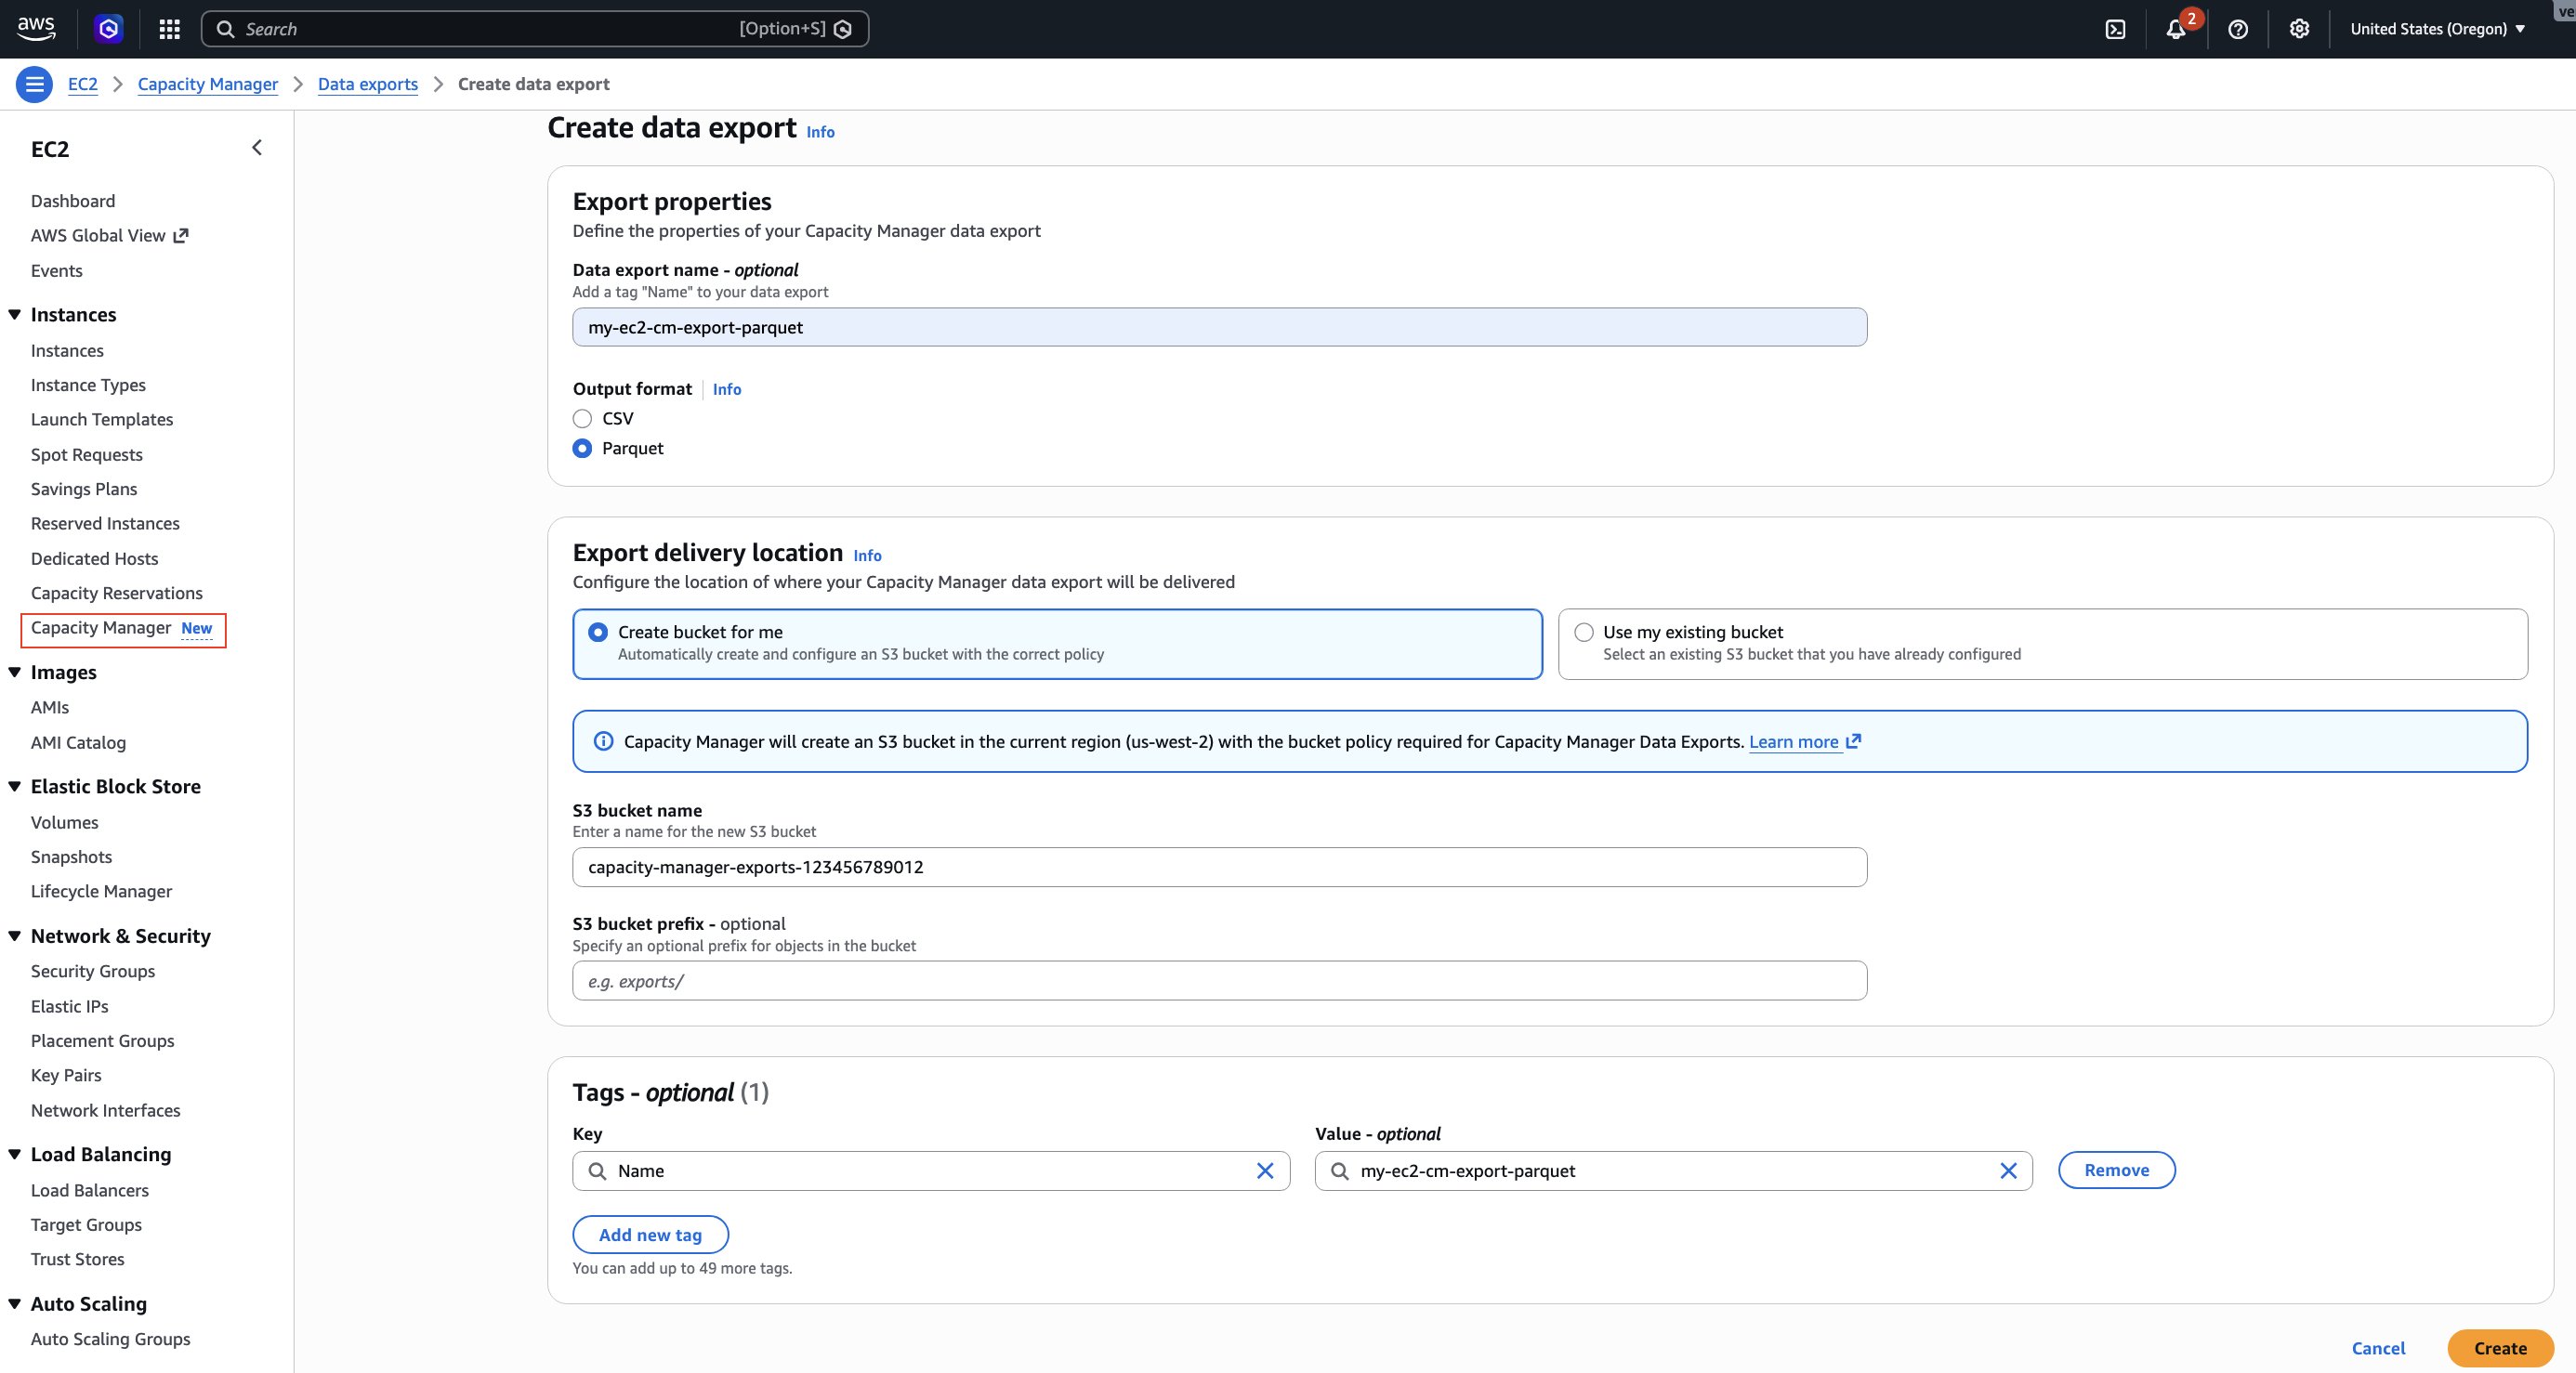
To configure data export using the console:
- Open the Amazon EC2 console at https://console.aws.amazon.com/ec2/.
- In the navigation pane, choose Capacity Manager.
- Choose the Data exports tab.
- Choose Create data export.
- For Output format, select Parquet.
- For S3 bucket, choose Create bucket for me to create a new bucket with the required permissions, or select an existing bucket from the list.
- If you selected an existing bucket, add the bucket policy shown in the following section to grant EC2 Capacity Manager write access.
- (Optional) For S3 prefix, enter a prefix to organize your exported files (for example,
capacity-data/). - For Schedule, select Hourly.
- Choose Create.
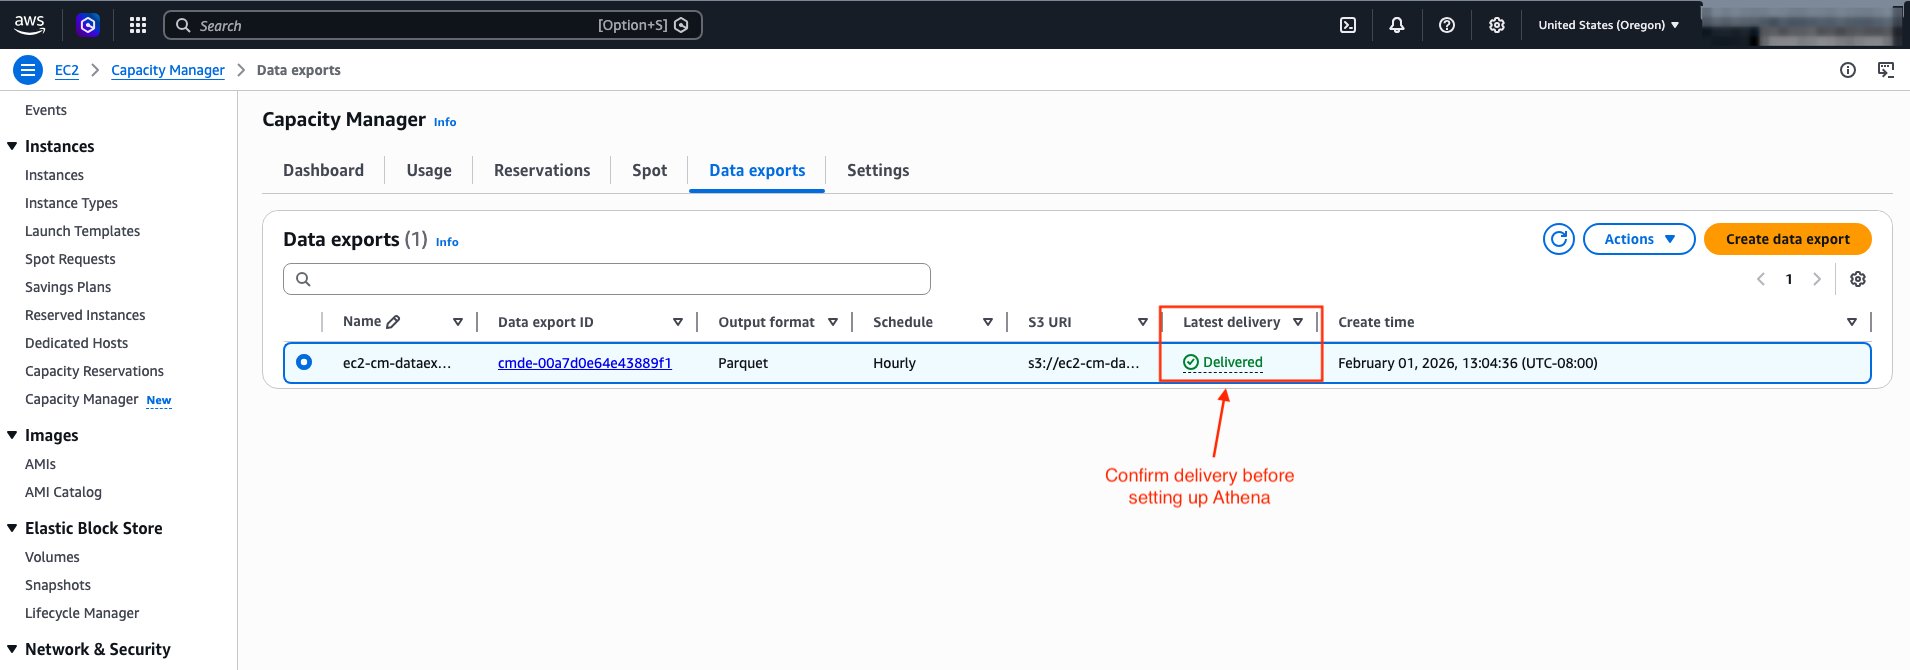
After you create the data export, EC2 Capacity Manager displays the export details.
Update the S3 bucket policy (existing buckets only)
If you use an existing S3 bucket, you must add the bucket policy shown in the following example to grant EC2 Capacity Manager write access.
Replace <AWS_ACCOUNT_NUMBER> with your AWS account number, <AWS_REGION> with your AWS Region (for example, us-west-2), and <BUCKET_NAME> with your bucket name.
To configure data export using the AWS CLI :
After creating the data export, wait for the first export to complete before proceeding to set up Athena. You can check the export status using the following command:
The command returns details about your data export configuration, including the delivery status:
Wait until LatestDeliveryStatus shows "delivered" before proceeding to the next section. The first export typically appears in your S3 bucket in a couple of hours. Subsequent exports follow your configured schedule.
Setting up Amazon Athena to query capacity data
After EC2 Capacity Manager exports data to your S3 bucket, you can use Amazon Athena to query the data using standard SQL. Athena uses AWS Glue as its metadata store. Specifically, it relies on the AWS Glue Data Catalog, which contains table definitions that tell Athena where you have stored your data in S3 and how you have structured it. When you create tables in Athena, you’re actually creating metadata entries in the Data Catalog that Athena references when running queries.
Create an Athena database and table
You can create the table using AWS Glue crawler or manually with SQL. AWS Glue crawler automatically discovers the complete schema from your exported Parquet files, including optional fields like resource tags if enabled. It helps minimize manual schema definition efforts. If the export format changes in the future, you can re-run the crawler to update the table definition. For detailed instructions on creating a Glue Crawler, see Use a crawler to add a table in the Amazon Athena User Guide.
In this post, we create the table manually using a SQL statement. We also use partition projection for automatic partition discovery. We do this because EC2 Capacity Manager continuously adds new partitions to the S3 bucket according to your configured schedule. As new partitions arrive in S3, Athena doesn’t know about them until you run MSCK REPAIR TABLE or ALTER TABLE ADD PARTITION to update the AWS Glue Data Catalog. This becomes an overhead when data arrives frequently.
With partition projection, you define the partition scheme and specify its range/rules in the table properties. Athena then computes the partitions at query time instead of looking them up in the Glue Data Catalog. So partition projection automatically makes new partitions visible as soon as EC2 Capacity Manager exports the data to S3, eliminating the need for you to update metadata. The CREATE TABLE statement that follows defines the schema for EC2 Capacity Manager exports. If your capacity reservations are already tagged, add the corresponding tag columns (for example, tag_environment string or tag_costcenter string). Alternatively, use an AWS Glue crawler to automatically discover your complete schema, including tag columns.
- Open the Athena console at https://console.aws.amazon.com/athena/
- If prompted, configure a query result location in S3. This is where Athena writes query output. It is separate from the S3 bucket that stores your capacity data.
- Run the following query to create a database:
- Create a table for Parquet format data:
Replace <BUCKET_NAME> in the LOCATION clause and storage.location.template property with your bucket name, and capacity-data/ with table name of your choice.
Now that your table is set up, you can explore how to query the exported data.
Example queries for common use cases
The following queries demonstrate how to analyze your EC2 capacity data for cost optimization and capacity planning. The queries use date values (year=‘2026’, month=‘04’) and table name capacity_data. Adjust the partition values to match your actual data’s time period and table name to match your value. When querying EC2 Capacity Manager export data:
- Metric group filtering: EC2 Capacity Manager exports contain two types of data that the
metricgroupnamecolumn identifies:Reservation Usagefor analyzing ODCR utilization and optimization opportunities, andInstance Usagefor analyzing overall capacity consumption across reserved, unreserved, and Spot instances. Always filter by the appropriate metric group for your analysis needs. - Partition filtering: Always include partition filters (
y,m,d,h) to improve query performance. - Numeric operations: Use
CASTto convert string columns to numeric types for proper comparison and sorting (for example,CAST(reservationavgutilizationinst AS double)). - NULL handling: Use
COALESCEto handle NULL values in calculations (for example,COALESCE(CAST(column AS double), 0)) to prevent NULL results in totals. WithoutCOALESCE, when you add a column value NULL to a non-NULL value, the result is NULL.
Use case 1: Identify underutilized ODCRs
Discover On-Demand Capacity Reservations with low utilization that are generating cost waste. Identify specific reservations to downsize, cancel, or share with other teams to reduce unnecessary spending.
Sample output:
| reservationid | instancetype | region | az-id | reservationstate | utilization_pct | total_capacity_hrs | unused_capacity_hrs | wasted_cost_usd |
| cr-041aedfba865106c1 | m5.8xlarge | us-west-2 | usw2-az2 | active | 0 | 1 | 1 | 1.536 |
| cr-089f17dc178e993a8 | m5.8xlarge | us-west-2 | usw2-az1 | active | 0 | 1 | 1 | 1.536 |
| cr-089f17dc178e993a8 | m5.8xlarge | us-west-2 | usw2-az1 | active | 0 | 1 | 1 | 1.536 |
Use case 2: ODCR utilization summary by instance type
Get a comprehensive view of ODCR utilization across instance types to identify which instance families have the worst utilization rates. This helps prioritize optimization efforts on the reservations with the highest cost impact.
Sample output:
| instancetype | account_count | reservation_count | total_odcr_capacity | total_unused_capacity | avg_utilization_pct | total_unused_cost_usd |
| m5.8xlarge | 1 | 2 | 311.99 | 311.99 | 0.0 | 479.22 |
| c5.9xlarge | 1 | 1 | 211.0 | 211.0 | 0.0 | 322.83 |
| t3.micro | 1 | 1 | 1055.0 | 1055.0 | 0.0 | 10.97 |
Use case 3: Identify peak usage patterns
Analyze average hourly usage patterns across reserved, unreserved, and Spot capacity to identify when your workloads typically hit peak demand. This breakdown helps you understand your capacity mix, plan for peak periods, and optimize your purchasing strategy.
Sample output:
| hour | avg_reserved_usage_hours | avg_unreserved_usage_hours | avg_spot_usage_hours | avg_total_usage_hours |
| 09 | 0.75 | 0.5 | 0 | 1.25 |
| 10 | 0.75 | 0.5 | 0 | 1.25 |
| 15 | 0.75 | 0.5 | 0 | 1.25 |
Use case 4: Regional capacity distribution
Understand how your ODCR capacity is distributed across AWS Regions and instance types. This geographic view helps you identify Regions with excess capacity that could be redistributed or consolidated to improve utilization and reduce costs.
Sample output:
| region | instancetype | total_reserved_capacity | unused_reserved_capacity | avg_utilization_pct |
| us-west-2 | t2.nano | 1484.0 | 1060.0 | 33.34 |
| us-west-2 | t3.micro | 1060.0 | 1060.0 | 0.0 |
| us-west-2 | t2.micro | 848.0 | 636.0 | 25.0 |
Use case 5: Unused capacity reservations by Region and Availability Zone
Pinpoint exactly where you have unused ODCR capacity at the Availability Zone level. This granular view enables you to share unused capacity with other teams in the same AZ or modify reservations to better match actual usage patterns.
Sample output:
| region | az-id | instancetype | unused_capacity_instances | avg_utilization_pct | unused_cost_usd |
| us-west-2 | usw2-az1 | c5.9xlarge | 212.0 | 0.0 | 324.36 |
| us-west-2 | usw2-az2 | m5.8xlarge | 157.0 | 0.0 | 241.15 |
| us-west-2 | usw2-az1 | m5.8xlarge | 157.0 | 0.0 | 241.15 |
Clean up
To avoid incurring future charges, delete the resources you created:
Warning: This permanently deletes the table definition. Verify that you no longer need to query this data before proceeding.
- Delete the Athena table by running the following query:
DROP TABLE IF EXISTS capacity_manager_db.capacity_data; - Delete the database by running the following query:
DROP DATABASE IF EXISTS capacity_manager_db; - Navigate to the Athena console settings.
- Note the query result location S3 bucket.
- If you created this bucket specifically for this tutorial:
- Empty the S3 bucket by running:
aws s3 rm s3://<QUERY_RESULT_BUCKET_NAME> --recursive - Delete the S3 bucket by running:
aws s3 rb s3://<QUERY_RESULT_BUCKET_NAME>
- Empty the S3 bucket by running:
- Delete the data export configuration by using AWS Management Console or AWS CLI.
- If using AWS Console, select the “Delete data export” option in the Actions menu.
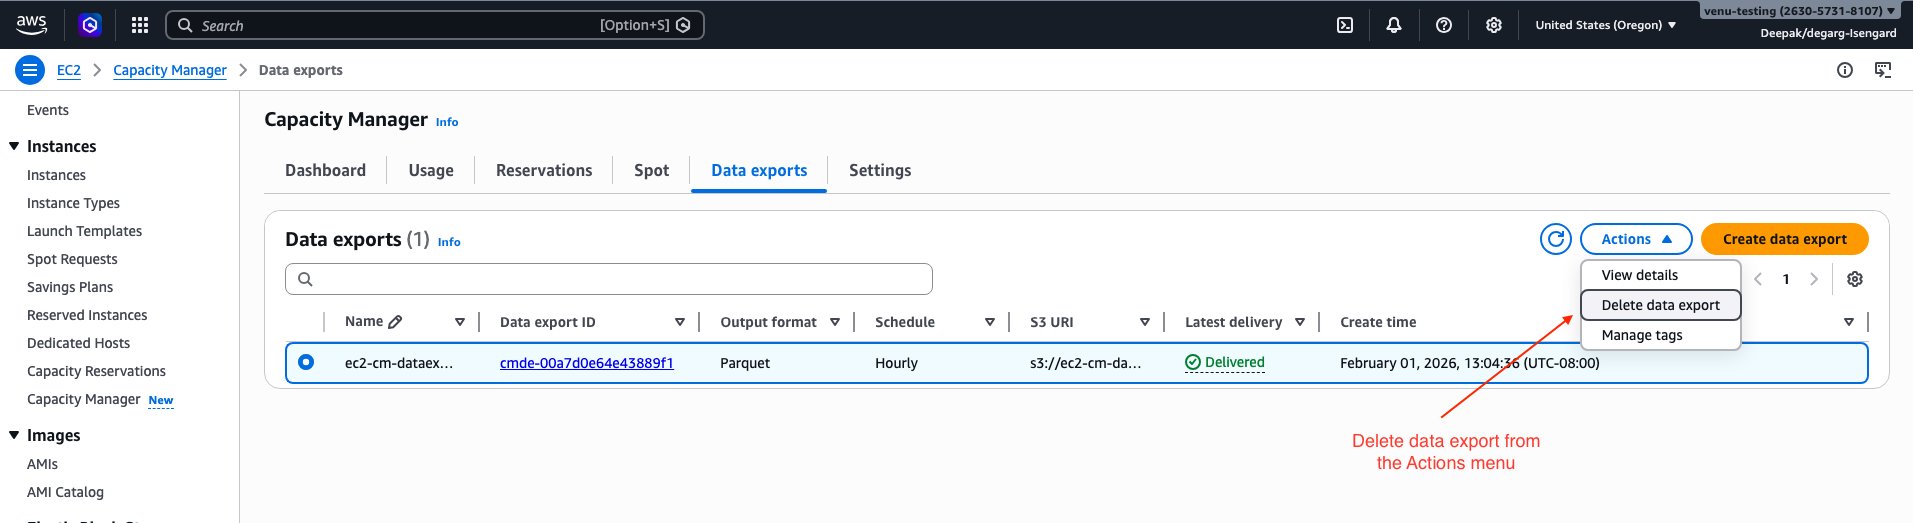
- To delete the configuration using AWS CLI:
Replace
<EXPORT_ID>with your data export ID and<AWS_REGION>with your AWS Region.Warning: Deleting the S3 bucket permanently removes all exported capacity data. Verify that you have backed up any data you need before proceeding.
- (Optional) Delete the S3 bucket and data: If you no longer need the exported data, complete the following steps:
- Empty the S3 bucket by running:
aws s3 rm s3://<BUCKET_NAME> --recursive - Delete the S3 bucket by running:
aws s3 rb s3://<BUCKET_NAME>
- Empty the S3 bucket by running:
Conclusion
In this post, we demonstrated how to configure EC2 Capacity Manager data exports to Amazon S3 and query historical capacity data using Amazon Athena. This approach enables you to retain capacity data beyond the 90-day console limit.
As you scale your capacity management practices, consider integrating these exports with your existing analytics and monitoring workflows. By combining EC2 Capacity Manager data with your broader infrastructure metrics, you can make data-driven decisions about capacity allocation and optimization across your organization.
To deepen your understanding, explore the EC2 Capacity Manager documentation for additional features, learn more about Amazon Athena for advanced query capabilities, and review EC2 capacity optimization best practices. Share your feedback and tell us how you’re using EC2 Capacity Manager data exports to optimize your capacity planning in the comments.