For many years Amazon Web Services (AWS) has been guiding users in the deployment of powerful NVIDIA GPU backed workstations for graphics intensive workloads. With the recent expansion of our G-series Amazon Elastic Compute Cloud (Amazon EC2) graphics-based instances, we’re excited to introduce new instance families that deliver enhanced performance and capabilities. We’re also refreshing our comprehensive guidance on choosing and configuring these powerful virtual workstations.
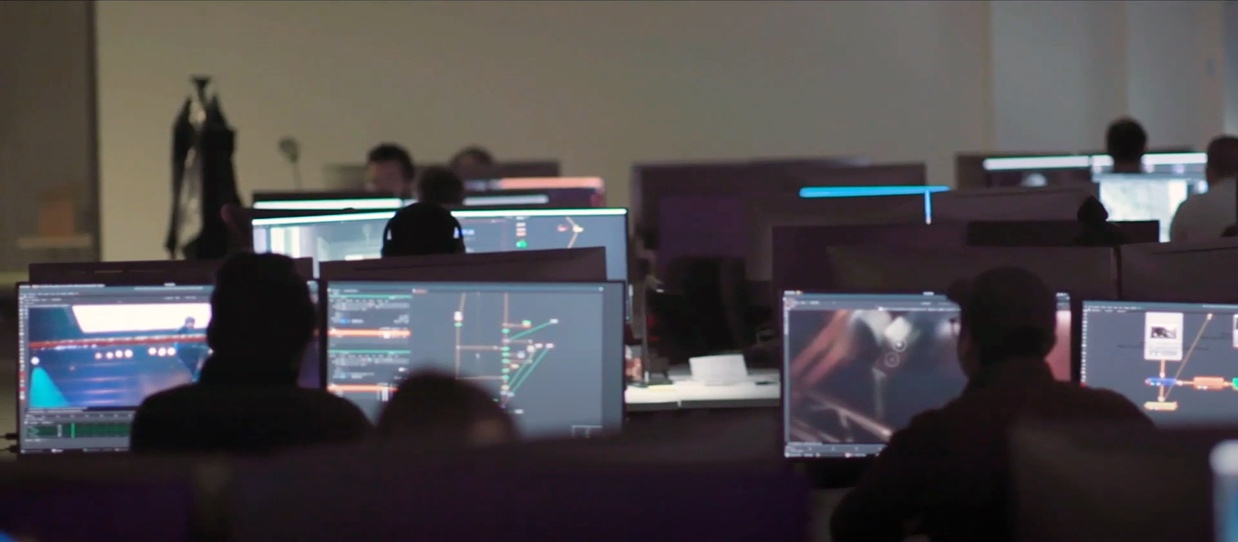
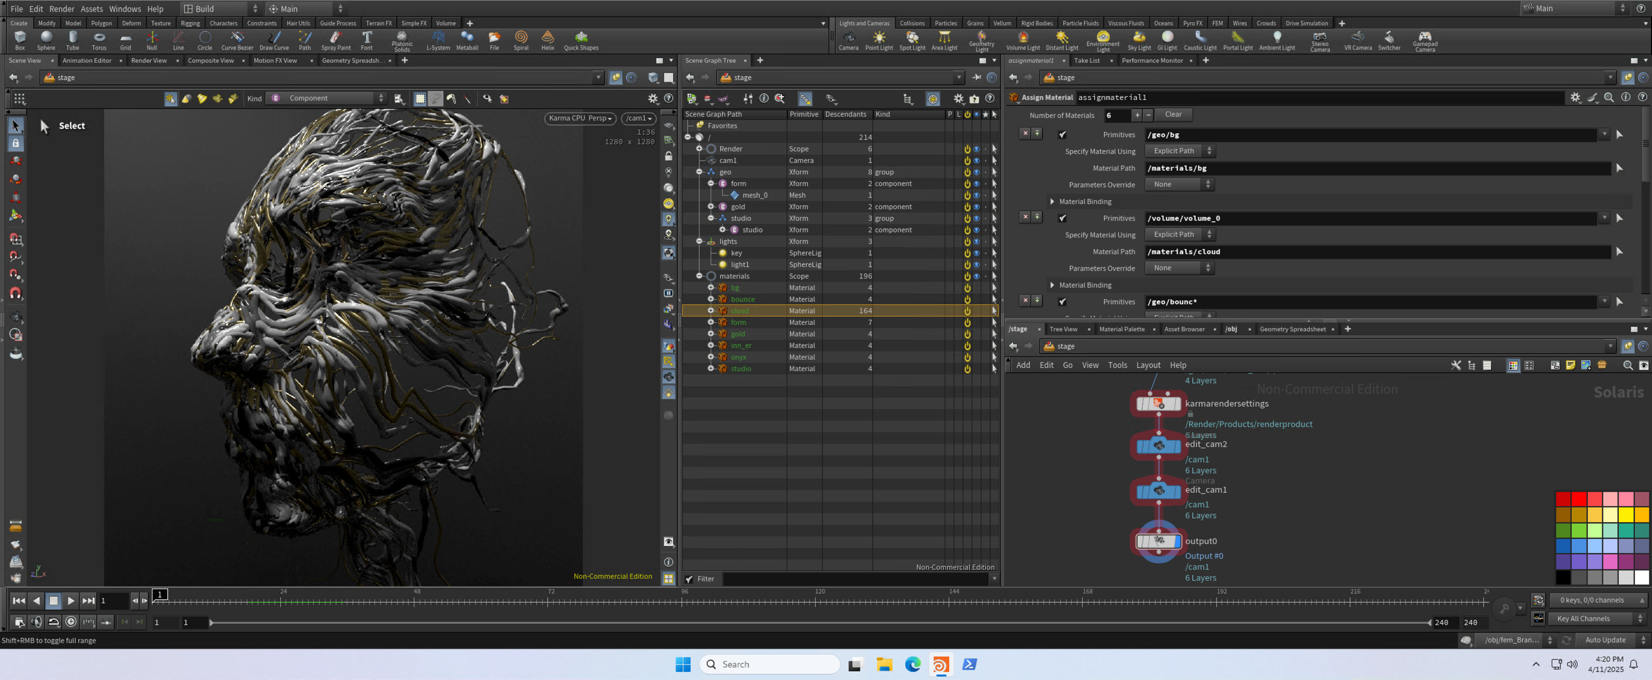
This is the fifth post in a five-part series, exploring security practices related to the deployment of visual effects (VFX) workstations: how to secure these workstations by controlling who can reach the desktop, protecting the session in transit, and safeguarding the credentials, images, and storage behind it. The following screen capture shows these GPU-powered workstations in use, in a real production environment.
Figure 1: Amazon EC2 GPU-powered workstations, used in a Studio-in-the-Cloud courtesy of Outpost VFX
Before you begin
This post builds upon topics covered earlier in the series, regarding Linux and Windows EC2 instances, configured for the purposes of creating GPU workstations.
When deploying EC2 instance workloads on Amazon EC2, security hardening isn’t only a best practice but also essential for protecting your infrastructure, data, and applications from evolving threats. AWS provides secure cloud infrastructure, but the responsibility for securing the operating system and applications running on your EC2 instances falls squarely on you as part of the AWS Shared Responsibility Model. While AWS secures the underlying infrastructure (the physical servers, networking equipment, and hypervisor layer), you’re responsible for everything from the guest operating system upward. This includes patching, configuration management, access controls, and monitoring. A misconfigured EC2 instance can become an entry point for unauthorized users, potentially impacting more than that single instance in your AWS environment through lateral movement.
Throughout this post series, we’ve implemented security best practices aligned with the AWS documentation on Best practices for Amazon EC2. As we conclude, let’s revisit the key security principles we’ve applied and explore additional considerations for production environments.
Amazon DCV connection security
Amazon DCV provides immediate out-of-the-box encryption of pixels and end-user inputs, and to do so it creates a self-signed certificate. As previously mentioned, the browser issues a security warning when you connect by default. This is expected because the browser can’t verify the certificate’s authenticity in terms of domain or validity by a Certificate Authority (CA). Amazon DCV doesn’t immediately know your domain requirements for servers or clients. You elect to accept the risk based on your knowledge of the IP in question that you are connecting to.
Amazon DCV itself has further configurations that can mitigate potential security risks. For example, the DCV server can perform administrator-defined regex filtering on origin and host names to protect against WebSocket hijacking, and Host Header attacks. On Linux, add the following to dcv.conf, typically found at /etc/dcv/dcv.conf:
# Under [security] add the following line:
allowed-ws-origin-regex = ^https://(www\.)?example\.com(:443)?$
allowed-http-host-regex = ^(www\.)?example\.com$
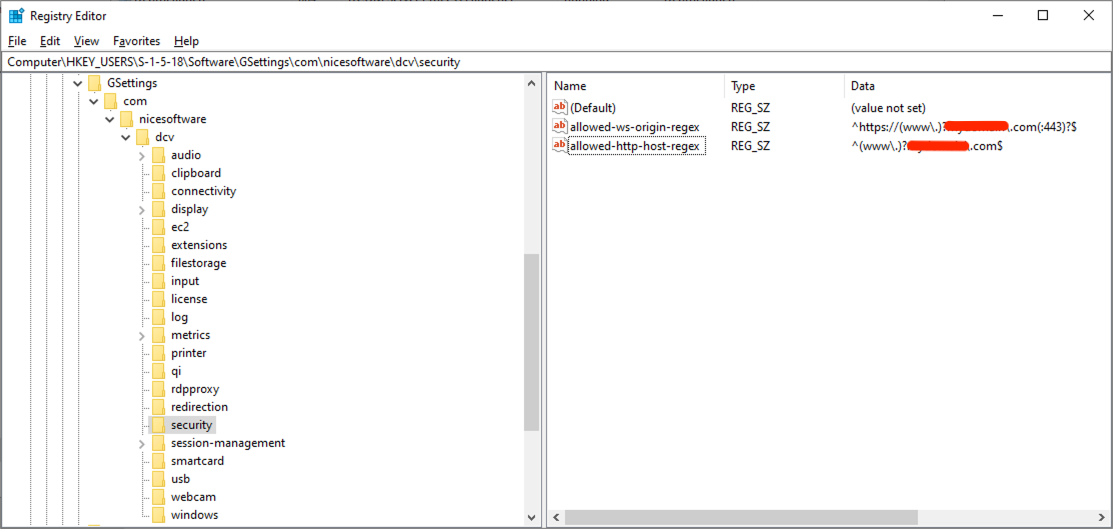
On Windows, you add the respective string values for each parameter subkey within the Computer\HKEY_USERS\S-1-5-18\Software\GSettings\com\nicesoftware\dcv\security registry key. The following screen capture shows this registry key open in Registry Editor, with the connectivity-restriction values in place. In this example, two values are defined under the security key (allowed-ws-origin-regex and allowed-http-host-regex) each set to a regular expression that limits connections to a specific domain.
Figure 2: The Amazon DCV registry security key, with subkeys limiting host and origin connectivity
For more information about security parameters with Amazon DCV, see security parameter reference of the Amazon DCV Administrator Guide.
Amazon DCV clients requesting connections to the Amazon DCV server can be restricted through fundamental network-level controls that allow requests from specific IP addresses and ports:
AWS Security Groups (as already mentioned and used in this post) apply another layer of restrictions on incoming IP addresses and ports to the server instance.
Firewall rules can further restrict incoming IP addresses and ports.
To extend both the functionality and security of Amazon DCV, an Amazon DCV Connection Gateway can also be used as part of a more extensive infrastructure, to act as an intermediary between clients and servers. From a security point of view, it adds a single point of entry, hiding the servers behind the gateway, mitigating load, but also implementing a token-based authentication system to resolve server sessions for clients.
Whilst these steps prevent unauthorized access attempts from unexpected sources, it doesn’t solve the certificate trust warning. To improve both the user experience (to resolve the warning, and the general question of is this secure?) as well as strengthen your security defenses, consider using your own certificate from a trusted CA. This is beyond the scope of this post, but services such as AWS Private Certificate Authority provide the ability to create certificates that encapsulate your domain and can be trusted by the browser as a legitimate CA. Not only does this simplify the user experience but it also provides cryptographic verification of server identity and protection against man-in-the-middle attacks.
Network security
We have repeatedly applied the principle of least privilege, using Security Group rules to restrict access to known IP addresses only. As detailed in Part 1 of this series, the choice of connectivity method significantly impacts your security architecture, and while this post uses internet connectivity for simplicity, production environments should evaluate additional security layers based on their requirements. Network Access Control Lists (NACLs) can also be used for subnet-level traffic filtering as an additional defense layer to security groups, and AWS Network Firewall offers advanced threat protection and intrusion detection.
For enhanced security postures AWS Site-to-Site VPN adds network-layer IPsec encryption on top of the application-layer security of Amazon DCV, protecting against man-in-the-middle attacks, traffic analysis, and DNS hijacking while allowing workstations to reside in private subnets. AWS Direct Connect further strengthens security by bypassing the public internet entirely through dedicated fiber connections, reducing exposure to internet-based DDoS attacks, ISP-level surveillance, and routing attacks.
If you have strict compliance requirements, also consider deploying Amazon DCV servers in private subnets with AWS PrivateLink endpoints for fully private connectivity. For comprehensive guidance on these connectivity options and additional firewall and protection services that enhance protection against exploits such as ransomware and DDoS, see Security, Identity and Compliance on AWS (refer back to Part 1’s detailed comparison of connectivity architectures).
AWS Identity and Access Management (IAM)
IAM securely controls access to AWS. With IAM, you can manage authentication and authorization and grant your identities only the least-privilege permissions required for their tasks, reducing the risk of mistakes or unauthorized behavior. Throughout this post series, we’ve applied this principle of least privilege to IAM roles and policies. For example, we attached IAM roles to EC2 instances rather than using long-lived static credentials, eliminating the risk of exposed access keys.
For example, for the purposes of this post, we used read-only policies for S3. For production environments, we recommend taking this further by prescribing:
Access to specific S3 buckets using resource-level permissions.
For example, arn:aws:s3:::amzn-s3-demo-bucket/*.
Limiting actions to only what’s required.
For example, s3:GetObject instead of s3:*.
Credential security
As a best practice, we recommend changing default passwords immediately and aligning them with your organization’s password quality requirements, such as 16 or more characters with mixed case, numbers, and symbols. Any SSH key pairs should be rotated regularly in line with your organizational requirements.
Monitoring and logging
You can use a number of tools and services to monitor activity within an AWS account. For example, use AWS CloudTrail to audit IAM actions and API calls for compliance and security, and implement Amazon CloudWatch alarms to warn about specific security events. AWS Identity and Access Management Access Analyzer can be used to identify resources shared with external entities and validate that your IAM policies grant only intended access, whilst VPC Flow Logs monitor and allow you to audit network traffic patterns within your network. For vulnerability detection, Amazon Inspector can scan EC2 instances for software and network exposure, whilst Amazon GuardDuty can continuously monitor for threat detection across your infrastructure, looking for suspicious or malicious behavior.
Encryption
Encrypting your data at rest, and in transit helps protect against unauthorized access even if storage media is compromised or network traffic is intercepted. In these posts we made sure that Amazon Elastic Block Store (Amazon EBS) volumes for our instances were all encrypted using AWS Key Management Service (KMS) for encryption key management, providing cryptographic verification and centralized key rotation capabilities. We explored Transport Layer Security (TLS) encryption for Amazon DCV, which helps protect your desktop pixels and user inputs during transmission using TLS v1.2 or greater with strong cipher suites.
Patch management
Consider build-time hardening services such as EC2 Image Builder to automate the creation of Amazon Machine Images (AMIs) that apply the latest security patches, remove unnecessary components, and install anti-malware protection.
For lifecycle management, AWS Systems Manager Patch Manager can automate patching across your fleets. It uses patching policies that scan for and install approved updates on a schedule you define (weekly is recommended). Patch Manager is particularly valuable for fleet-wide VFX workstations because it centralises patching control across multiple accounts and AWS Regions. It supports custom patch baselines, so you can define what counts as compliant for your organisation. It also integrates with AWS Security Hub CSPM (Cloud Security Posture Management) and AWS Config for greater visibility, and it maintains audit trails through AWS CloudTrail.
Backup and recovery
Amazon EBS snapshots represent a cost-effective, encrypted, point-in-time backup of your instance data (such as the operating system and applications) residing on EBS volumes. They’re stored in Amazon Simple Storage Service (Amazon S3). Incremental versions only store the deltas in data from previously stored volumes (deletions of snapshots only remove unique data associated with that volume). With snapshots, you can retrieve a prior state (snapshot) of an instance and resume work or even turn a snapshot into an AMI for more permanent use. Whilst many companies using VFX workstations on AWS tend to regularly launch new daily instances for their artists (avoiding ‘stopped’ state charges overnight and ensuring artists are using up-to-date AMIs), long-term use of Amazon EC2 instances can use EBS snapshots to instigate disaster recovery preparation against accidents, corruption, or ransomware. It’s vital when using disaster recovery processes such as EBS snapshots, that testing is done to confirm that recovery procedures work when needed.
Conclusion
This post has covered essential security practices including network controls, IAM policies, encryption, monitoring, and threat detection, which are all foundational elements of a comprehensive security strategy. For production deployments, we strongly recommend consulting the AWS Security Best Practices documentation and the AWS Well-Architected Framework Security Pillar to explore additional security services, compliance frameworks, and industry-specific guidance tailored to your organization’s requirements.
For many years, Amazon Web Services (AWS) has been guiding customers in deploying powerful workstations backed by NVIDIA graphics processing units (GPUs) for graphics-intensive workloads. With the recent expansion of our G-series Amazon Elastic Compute Cloud (Amazon EC2) graphics-based instances, we’re excited to introduce new instance families that deliver enhanced performance and capabilities. We’re also refreshing our comprehensive guidance on choosing and configuring these powerful virtual workstations.
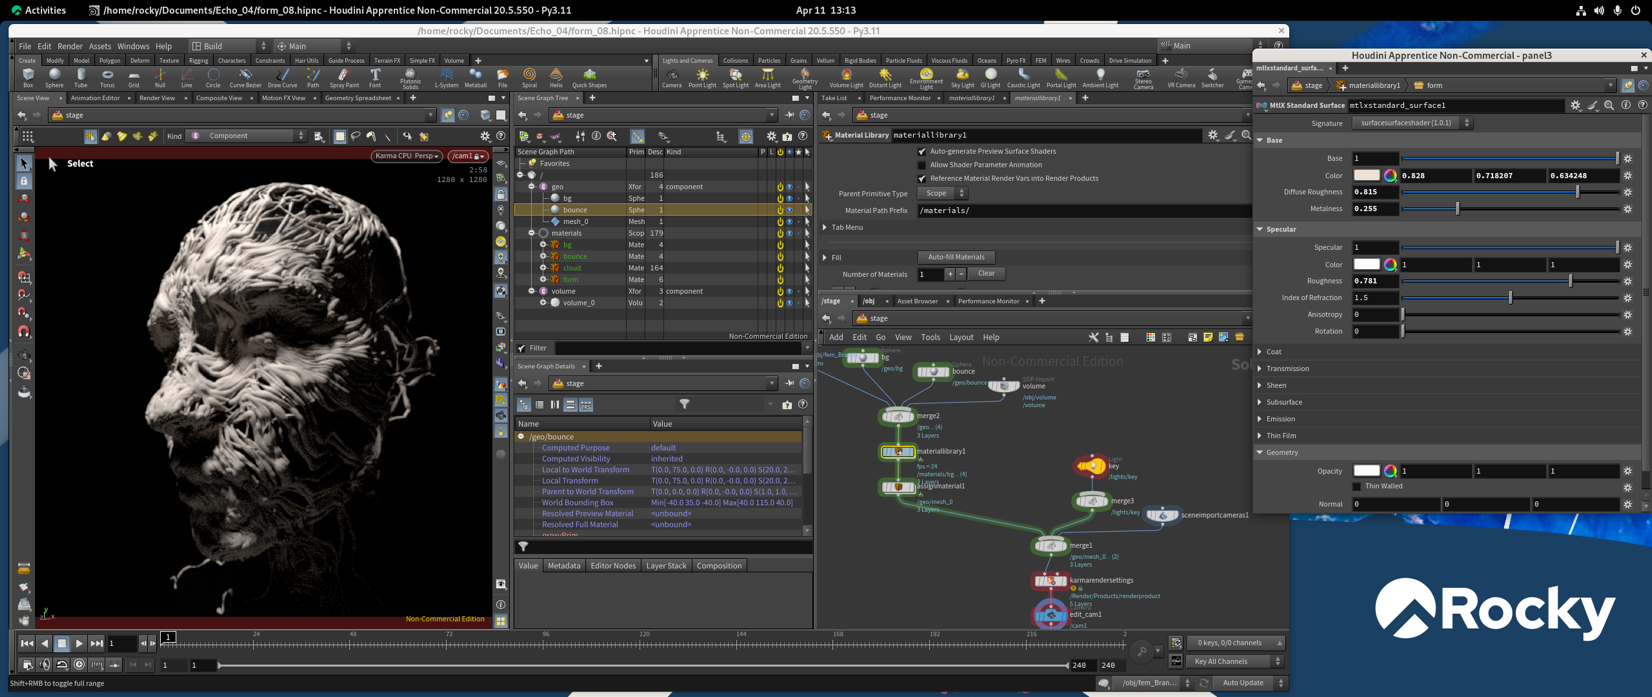
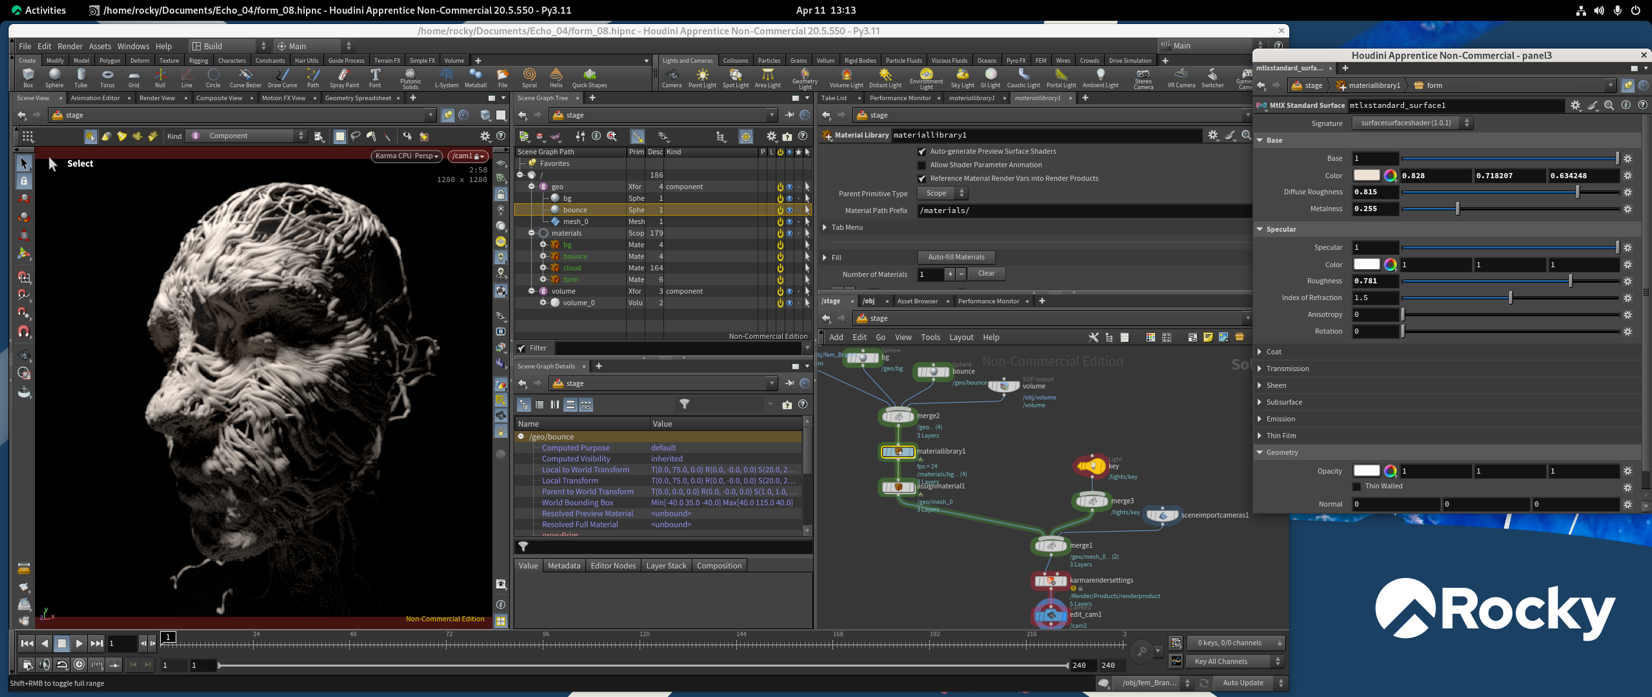
This is the fourth post in a five-part series, exploring optimizations to support the ready deployment of visual effects (VFX) workstations, using Amazon DCV as a performant desktop display protocol. The screen capture that follows shows one such workstation running a live visual-effects workload.
“First there were rocks… Humanity made wheels. Those wheels ground flour and we made progress to sliced bread. Amazon DCV is the best thing since sliced bread.”
— Chris Coupe, CG Supervisor, Outpost VFX
Figure 1: A screen capture of a Rocky Linux-based workstation
This post focuses on several key aspects:
The consolidation and standardization of VFX workstation instance configurations, to allow simpler launching mechanisms, also facilitating deployments at larger scale (for example, a team of people).
Optimizations to improve performance beyond out-of-the-box setups, with emphasis on GPU acceleration.
Analysis and discussion of security considerations when implementing a VFX workstation on AWS.
Prerequisites
This post assumes that you have deployed a Linux or Windows EC2 instance, for the purposes of creating a GPU workstation.
You have used existing base Amazon Machine Images (AMIs) as a source for your OS and software, customizing them to your needs. The next step is to produce your own AMIs from these customizations so that you can quickly launch one or more instances from this state in the future. Furthermore, you want to avoid replicating the work that you have just done, while also maintaining a standard environment across the teams that use these instances.
Moreover, when you initiated the workstation instances, you also stipulated the networking, security, permissions, and instance type that define the complete instance alongside the AMI. You can wrap all of this information into an Amazon EC2 launch template to standardize the whole instance, so you can launch it without issues.
Note the current size of the Amazon Elastic Block Store (Amazon EBS) volume that you are using for your OS and applications on your workstation. When you create an AMI you stipulate the size of the volume to associate with it. Keeping the storage size of the AMI efficient makes sure that your (relatively small) storage costs are optimized and any movement and startup using that AMI are as quick as possible.
On Windows, review the size of the C: drive in Windows Explorer by looking at the drive properties, and in a shell in Linux you can use df -h to review filesystem disk space usage.
Preparing a Linux AMI
To prepare Linux, first stop the instance, if it is running:
In the Amazon EC2 console, choose Amazon EC2 Dashboard in the top left.
Choose Instances (running).
Choose the my_linux_workstation instance in the top pane.
Open the context menu for the instance, and choose Stop instance.
Wait for the Instance state to move from Running to Stopped.
Preparing a Windows AMI
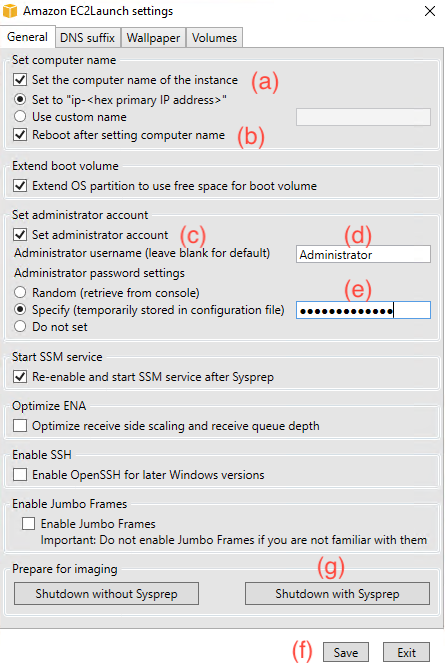
Windows Server 2025 uses the agent EC2Launchv2 on bootup to perform system tasks. You must configure the agent before shutting down the instance, prior to making an AMI, through the Amazon EC2LaunchSettings application. The following screen capture shows the EC2Launch Settings application, where you set the boot-time behavior of the agent. In this example, the General tab is open. This tab controls launch-time options for the instance, such as setting the instance name and configuring the administrator username and password.
Figure 2: A screen capture of the Amazon EC2Launch Settings application, used to configure the EC2Launch agent on bootup
On your Windows instance, open the Amazon EC2Launch settings application.
This application controls which tasks the agent performs on boot. Pertinent options to enable are as follows:
Host name:
Turn on “Set the compute name of the instance”, and set it to ip-<hex primary IP address>.
Turn on “Reboot after setting Computer Name”.
This makes sure that the compute host name is unique upon booting for future considerations toward Active Directory, render farms, and so on.
Password
Turn on Set the administrator account.
Set the Administrator username (for example, Administrator).
Specify the Administrator password.
This can be the same as what you previously set before, or you can change it.
Wallpaper (on the third tab)
You can specify the custom Windows wallpaper and stat burn-in of various instance parameters.
When you have made your changes, choose Save at the bottom of the screen to save your configuration changes.
You have two choices to shut down based on Sysprep.
Shut down without Sysprep
This option is useful if you have embedded information on the image that you want to retain (for example, local users for processes) that would otherwise be removed by Sysprep.
Shut down with Sysprep
For removing PC-specific information for future AMI consideration:
Shut down with Sysprep on this occasion. The machine automatically shuts down.
Wait for the Instance state to move from Running to Stopped.
When your instances are in the Stopped state, you can proceed with making your AMI.
In the Amazon EC2 console, choose Instances in the top left.
Choose your workstation instance by selecting the checkbox next to its name.
Choose Actions from the top right of the pane, and choose Image and templates, Create image.
In the Create image page, specify the options for your AMI:
Give your AMI an Image name. You might want to consider versions in the AMI name.
For example, VFX_Workstation_Linux_v001.
Give your AMI a relevant Image description.
For example, base build, with GPU, WACOM, CLI.
The Size of your storage can be specified. As mentioned previously, consider reducing this down to something that is more aligned with your actual usage, such as usage + 20 percent.
Consider adding a new tag to give your AMI a discernible name.
For example, add a Name tag key, and paste the Image name as the value.
Choose Create image to make the AMI. This can take several minutes to complete.
Amazon EC2 AMIs can be shared across accounts and Regions, which lets teams standardize workstation configurations and deploy them quickly. Because a VFX workstation AMI often bakes in licensed digital content creation (DCC) tools, render plugins, studio tooling, and credentials, treat it as a controlled asset rather than something to share broadly.
Share each AMI only with the specific accounts that need it and prefer sharing with named AWS account IDs over making an AMI public. Before you share, confirm the image contains no embedded secrets such as application API keys, license tokens, or SSH keys baked in during the build. Audit your sharing configuration periodically so access does not outlive its purpose and revoke it when a team or project no longer needs the image.
Creating a launch template
When you launched the EC2 instance, as well as the AMI to use, you also stipulated other options that were important to define how the machine launched, such as the network, security groups, and roles. Rather than do this each time that you want to start an instance, you can combine all this information, and more, into an Amazon EC2 launch template. You can then quickly launch machines in the future, or combine them with other brokering and scaling mechanisms to control larger usage of the machines. This is useful for studios with multiple artists, or render farms with multiple machines, all using standardized environments.
You can build a launch template through the Amazon EC2 console:
In the Amazon EC2 console, choose Launch Templates under the Instances section on the left.
Choose Create launch template on the right side of the pane.
Provide a Launch template name and description in the relevant boxes.
Launch templates are versioned, so there is no need to add a version number to its name.
For the AMI, choose My AMIs and choose the relevant AMI that you made in the previous steps.
Under Instance type choose g6.4xlarge. This is the default size for your template (but this and all values can be overridden at launch time if you wish).
Provide your ec2_test_keypair in the Key pair (login).
Edit the Network settings to adjust security and network placement:
Leave the Subnet to Don’t include in launch template.
Under the Firewall (security groups) section of the Network Settings, choose Select existing security group, and choose the “ec2_test_sg” that you made earlier to set up the firewall for the machine.
In Resource tags, add a Name key tag, with a value of my_workstation or another suitable name.
Under Advanced details, specify the basic_workstation_role that you made previously through the IAM instance profile list, to allow your workstation to access more services.
There are many other options that you can explore in launch templates. A useful feature is found at the bottom of the Advanced details: the User data. With user data, you can enter Windows PowerShell or Linux shell commands to run on boot, adding configurations or modifications on top of the AMI. This circumvents the need to publish new AMIs for certain kinds of change. An example of this can be found in the following GPU performance optimization section, but for now you can finish making the launch template.
Choose Create launch template.
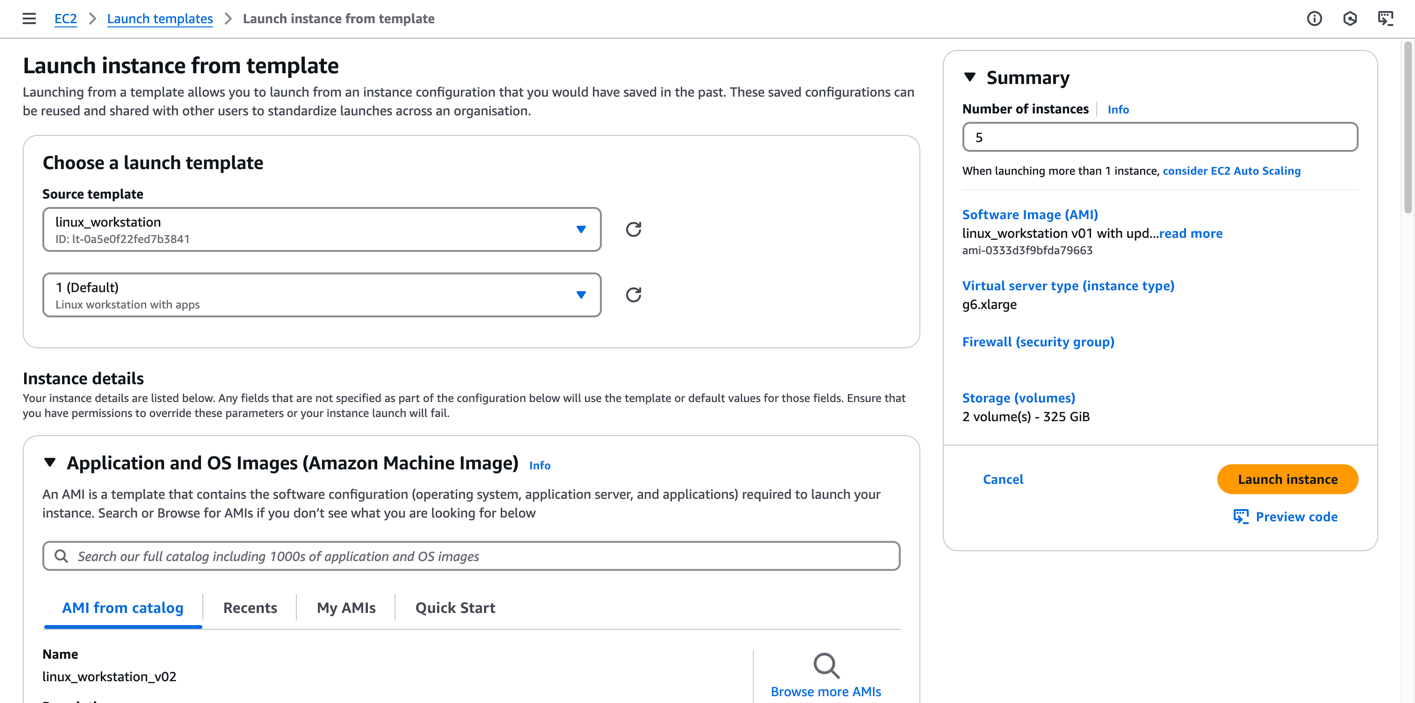
When you return to the Launch templates dashboard, your newly created template appears in the list. Select the template, then choose Launch instance from template from the Actions menu to open a dialog for launching a new instance from it. The dialog shows the template’s values and lets you adjust any setting before launch. You can also modify a template to create new versions and set a default version. This way, you can keep multiple versions for comparison while clearly marking which one to use by default. The following screen capture shows the dialog, where you confirm the source template and version and optionally override its settings before launching.
Figure 3: The Amazon EC2 launch template UI can be used to quickly start an instance, with options to override existing parameters
Launch templates can be used in other services to streamline and control instance starting mechanisms at scale, such as Amazon EC2 Auto Scaling groups, as well as third-party services listed in the Further reading section.
This post demonstrates how to build an AMI in manual steps. There are alternate services to create an AMI that can cater to larger scaling mechanisms to support productions. For example, Amazon EC2 Image Builder allows you to define recipes and schedules for automating the creation of AMIs.
GPU performance optimization
There’s dedicated AWS documentation in the Amazon EC2 User Guide regarding GPU optimizations. This includes initializing the persistent driver kernel on Linux, to keep GPU states initialized regardless of client connections:
sudo nvidia-persistenced
It also includes documenting how to turn off GPU autoboost, for slightly more efficient GPU usage. This option should be considered and evaluated on a per-application basis to ascertain positive or negative impact on performance. Go to the preceding documentation for more information.
Outside of the official documentation on AWS, for VFX-specific workloads a further optimization can be made regarding NVIDIA Error Correction Code (ECC). Amazon EC2 G instance family types use NVIDIA data center cards, designed for high performance computing. These differ from the consumer-style cards typically found in individual workstations in offices. On data center cards, ECC is provisioned and enabled as a method to introspectively look for potential pixel errors because of bit flipping through phenomena such as cosmic ray interaction, and fix any errors found.
You should consider deactivating this feature to reduce the overhead of memory checking on the GPU, to gain performance. ECC isn’t typically available on consumer GPU cards, so many customers’ workloads haven’t relied on this error-correction feature in the first place. If debugging requires it, the feature can be quickly re-enabled.
ECC is activated on every fresh start of an EC2 instance, and disabling necessitates a reboot. You can automate turning it off with a traditional startup script, or with the previously mentioned User data script as part of the launch template.
For a Windows instance, you can add the User data script by inserting it between leading and trailing powershell elements to define a PowerShell script, with the persist element added so the script runs again on each reboot cycle, and not only on the first boot.
For a Linux instance, you can enter a shell script:
#!/bin/sh
if ( /usr/bin/nvidia-smi -q -d ECC | grep -q 'Enabled')
then
    echo "ECC Enabled: Turning off ECC"
    sudo nvidia-smi -e 0
    sudo reboot
else
    echo "ECC Disabled: Nothing to do."
fi
User data is a mechanism to make changes to EC2 instances, without reverting to changing the underlying AMI. However, you should avoid hardcoding and storing sensitive data in it, that might pose a visible compliance or security risk. AWS Secrets Manager can be used to obfuscate sensitive data, as it stores and manages the lifecycle of secrets, and provides robust mechanisms to pass that data programmatically into process within a user data context.
Cleaning up
Remember to turn off your instances when not in use. You can turn them off either through the AWS Management Console, or through other programmatic methods such as the AWS Command Line Interface (AWS CLI). You incur costs associated with a running machine, so deactivating machines when not in use reduces your expenditure.
There are two different options for deactivating an EC2 instance: stopping and terminating.
Stopping
When you stop an instance, its Amazon EBS volumes remain attached and their data is retained, so your work on the EBS volume persists while the instance is deactivated. Data held in memory (RAM) is not preserved, and neither is any data on the instance store (NVMe) volumes (that data is lost when the instance stops).
You perform this operation by choosing the instance from the Amazon EC2 console, and under the Instance state options you can elect to Stop instance. The instance remains in your console, with a “Stopped” state, but the persistent volumes enable you to restart the instance and resume your session when you want, retaining any changes that you made to the main volume. You can restart an instance by using the Start instance operation under the Instance state options.
When an instance is “Stopped”, you don’t pay for the instance itself but incur a smaller charge for the storage of the volume.
Terminating
This operation deactivates the instance and does not retain any information locally stored. You can’t restart a terminated instance.
To terminate an instance, choose Terminate instance from the Instance state options on the Amazon EC2 console. The instance shuts down and reports a “Terminated” state on the console, and automatically disappears after a short time.
For more information about Amazon EC2 lifecycles, options, and billing, go to the Amazon EC2 User Guide.
Conclusion
This post has demonstrated how existing base AMIs can be used as a source for creating a custom VFX workstation, with further GPU optimizations applied to increase performance. These customizations can be published as new AMIs themselves for quick redeployment of that machine setup. Then, you integrated this AMI into a launch template to specify the complete array of startup requirements needed for a workstation, for quick and standardized deployment of machines.
We recommend that you continue to the final Part 5 of our series, Building a GPU workstation for visual effects with Amazon EC2: Part 5 – Security, to explore security practices related to the deployment of visual effects (VFX) workstations. This post examines how to secure these workstations by controlling who can reach the desktop, protecting the session in transit, and safeguarding the credentials, images, and storage behind it.
If you want to augment a VFX workstation environment with a dedicated render farm, then consider the managed service AWS Deadline Cloud.
EC2 instance metrics, such as CPU and memory usage, are readily sent to Amazon CloudWatch logs, allowing you to access this data through the console and AWS CLI. This information can be pertinent to discern if an EC2 instance is being over-provisioned or under-provisioned for the work at hand. For example, it has excessive CPU, memory, and networking resources for the current tasks and could be optimized for price, or the alternative where it has not been allocated enough resources to cope. For more information, visit the Amazon EC2 User Guide.
Windows instances can be lengthy to boot. Amazon EC2 Fast Launch for Windows is an AWS facility for quicker launching of Windows machines through smart snapshots of the AMI.
The following post shows how to programmatically configure a Windows EC2 instance as part of a domain. This is particularly useful when the instances are used ephemerally, for example as part of a fleet of instances that spool up and down for the purposes of rendering, and you need methods to bind and remove instances quickly.
Commercial options also exist to perform artist/instance brokering, using Amazon DCV and Amazon EC2 launch templates. An example of this offering is Leostream.
For many years Amazon Web Services (AWS) has been guiding customers in the deployment of powerful NVIDIA GPU-backed workstations for graphics-intensive workloads. With the recent expansion of our G-series Amazon Elastic Compute Cloud (Amazon EC2) graphics-based instances, we are excited to introduce new instance families that deliver enhanced performance and capabilities. We are also refreshing our comprehensive guidance on choosing and configuring these powerful virtual workstations.
This is the third post in a five-part series, focusing on the deployment of a Windows Server 2025 visual effects (VFX) workstation, using Amazon DCV as a performant desktop display protocol.
“Amazon DCV has unlocked previously unrealised playback performance, that has massively increased my productivity. Amazon DCV is performant on a range of systems and where other solutions have failed, I have been able to continue working and most importantly, continue delivering”
— Chris Coupe, CG Supervisor, Outpost VFX
Prerequisites
This post assumes that you have configured the following:
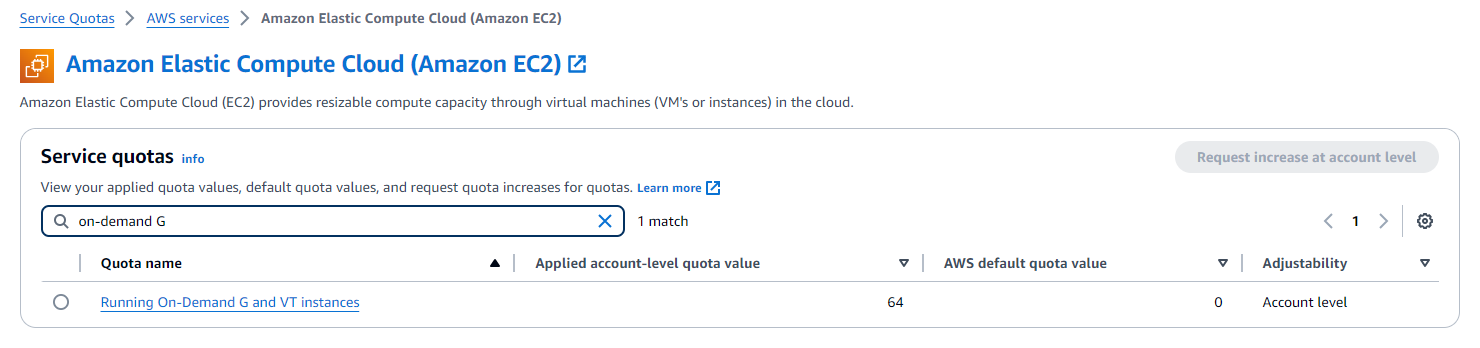
An active AWS account with increased GPU Amazon EC2 service quota limits.
We use the latest AWS provided Windows Server 2025 Amazon Machine Image (AMI) for our deployment, and install the NVIDIA, Amazon DCV, and Wacom components to create a fully functioning VFX Windows desktop environment.
Follow these steps to launch a g6.4xlarge instance in your chosen AWS Region. If you want to use multiple GPU cards (for example, by using the 12xlarge, 24xlarge, or 48xlarge instance types), then Windows requires you to have that number of GPU cards present when setting up the GPU driver. In this case, we recommend starting the relevant multiple GPU instance size when making your AMI.
Log in to the AWS Management Console and choose EC2 Dashboard in the top left.
Choose Launch instances to start the prompt to launch a new instance.
Give the instance a name, for example my_windows_workstation.
Choose Windows under the Quick Start AMI and use the default Microsoft Windows Server Base Image 2025.
Under Instance type, choose g6.4xlarge.
Under Key pair name, choose the menu and choose your key pair. In the previous post we called it ec2_test_keypair to specify the password security credentials.
Edit the Network settings to adjust security and network placement:
Leave the Subnet to No preference.
Make sure that Auto-assign public IP is set to Enable, so that you can access the instance through the internet.
Under the Firewall (security groups) section of the Network Settings, choose Select existing security group, and specify your security group. In the previous post we named it ec2_test_sg to set up the firewall for the machine.
In Configuration storage, expand the default root volume from 10 GiB to 50 GiB of gp3 storage.Important: Turn on encryption in the Advanced options by selecting the Encrypted option and selecting the default AWS managed key (aws/ebs) or a customer-managed KMS key for enhanced control. Amazon Elastic Block Store (Amazon EBS) encryption protects your VFX project files, renders, and application data at rest. Encryption uses industry-standard AES-256 encryption and is transparent to applications with minimal performance impact.
Under Advanced details, specify the role that you created for workstation usage. In the previous post we called it basic_workstation_role through the IAM instance profile menu, so your workstation can access more services.
Choose Launch instance on the right-hand side, as shown in the following figure.
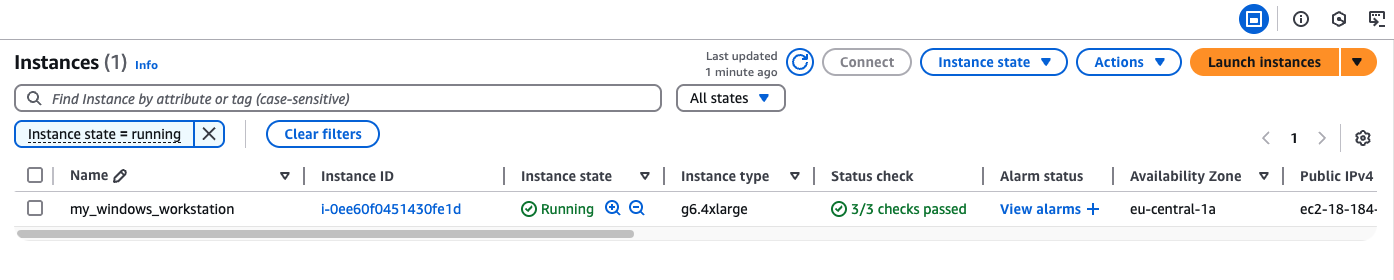
Choose the link to the EC2 instance that has been launched, or view it through the Instances pane in the Amazon EC2 Service page. The following screen capture shows the newly launched workstation in the EC2 Instances list, where you can confirm it is ready to use. Wait until the my_windows_workstation instance shows an Instance state of Running and a Status check of 3/3 checks passed. Once both conditions are met, you can continue.
Figure 1: A screen capture of the EC2 Instances page, showing the my_windows_workstation in a ready state
Configuring the Windows workstation
In the last part of our series, Building a GPU workstation for visual effects with Amazon EC2: Part 4 – Optimizations, we show how to add scripting capabilities to the boot sequence of EC2 instances. This runs processes such as the NVIDIA GPU driver and Wacom tablet driver automatically during the startup of a machine. For the purposes of this post, we take a more manual approach, showing how you can remote into the machine to perform setup tasks.
You initially connect to the instance through the Windows Remote Desktop Protocol (RDP). In the Amazon EC2 Service page browser tab with the list of EC2 instances running, again choose the my_windows_workstation and choose Connect.
Choose the RDP client tab to connect to the machine through RDP with the following steps:
Choose the Get password option to retrieve the Administrator password for the machine through your key pair credential.
Upload the private ec2_test_keypair .pem key file that you downloaded previously and choose Decrypt password.
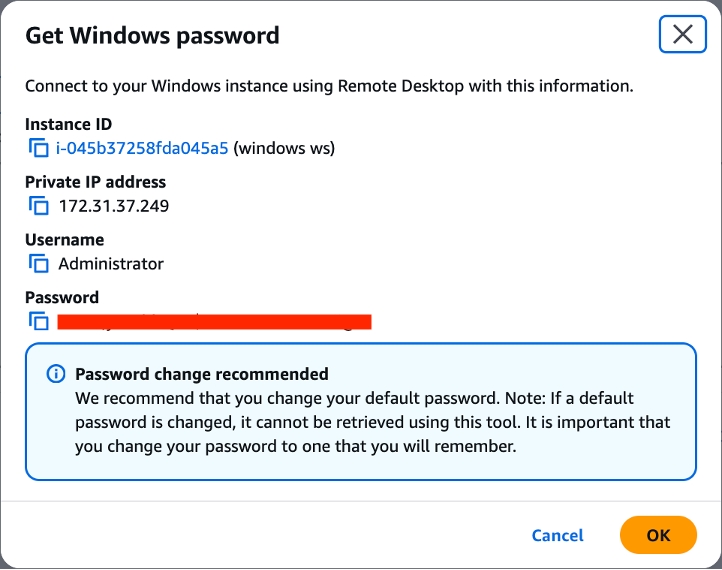
The password is now displayed. Copy the password into the clipboard memory by choosing the copy icon, and choose OK, as shown in the following figure.
Figure 2: A screen capture of the Get Windows Password retrieval options available to EC2 instances
Choose Download remote desktop file to download the .rdp file to your local machine.
Run the .rdp file with your Remote Desktop Application of choice.
When prompted, paste the previously copied Administrator password and choose OK.
Choose Yes to trust the machine, and the session is authenticated and opened.
Security
We recommend setting a new, private password when you first start the fresh instance.
Open a Windows PowerShell to configure and make changes to the workstation. In the shell, configure that change and store your new password in a safe place.
You must use AWS approved NVIDIA GPU drivers, issued through Amazon S3, not only for optimal compatibility and performance, but also to make sure that the necessary professional GRID drivers are automatically provisioned. You can always find the latest instructions in the Amazon EC2 Windows User Guide. At the time of writing, you can download the latest version to your desktop by running the following in a new Windows PowerShell:
When it is downloaded, navigate to your Desktop, open the NVIDIA folder, then the latest folder inside, and run the NVIDIA installer executable, following the instructions.
Wacom support and Wacom Bridge
To add Wacom stylus support on the workstation, open Microsoft Edge (or install your browser of choice) and download and install the latest drivers from the Wacom drivers page.
Wacom Bridge is now generally available on Windows and Mac, and offers new advantages for Wacom users on AWS:
Applications running locally and remotely on AWS transfer their Wacom-specific settings automatically.
Artists can switch from local to remote use of the pen by choosing the necessary application window.
Wacom Inkline draws an instant temporary line on your screen, to bridge any gap between the local pen tip and the remote drawn line.
Amazon DCV provides enhanced security through data transport encrypted through HTTPS/TLS connections.
To use Amazon DCV, you need to download the server application for the Amazon EC2 workstation from https://www.amazondcv.com/.
On the Amazon EC2 workstation, open the preceding link in your browser of choice, expand the latest Amazon DCV Server entry (2026.0 at the time of this post), choose the Windows (x86_64) link, download the installer, and run it. The default options automatically configure firewall entries for the Amazon DCV server ports, and start the Amazon DCV server.
Instance store setup
Finally, consider setting up the instance store on the instance:
In the search bar at the bottom of the screen, enter Computer Management and press Enter.
Choose Disk Management in the left pane.
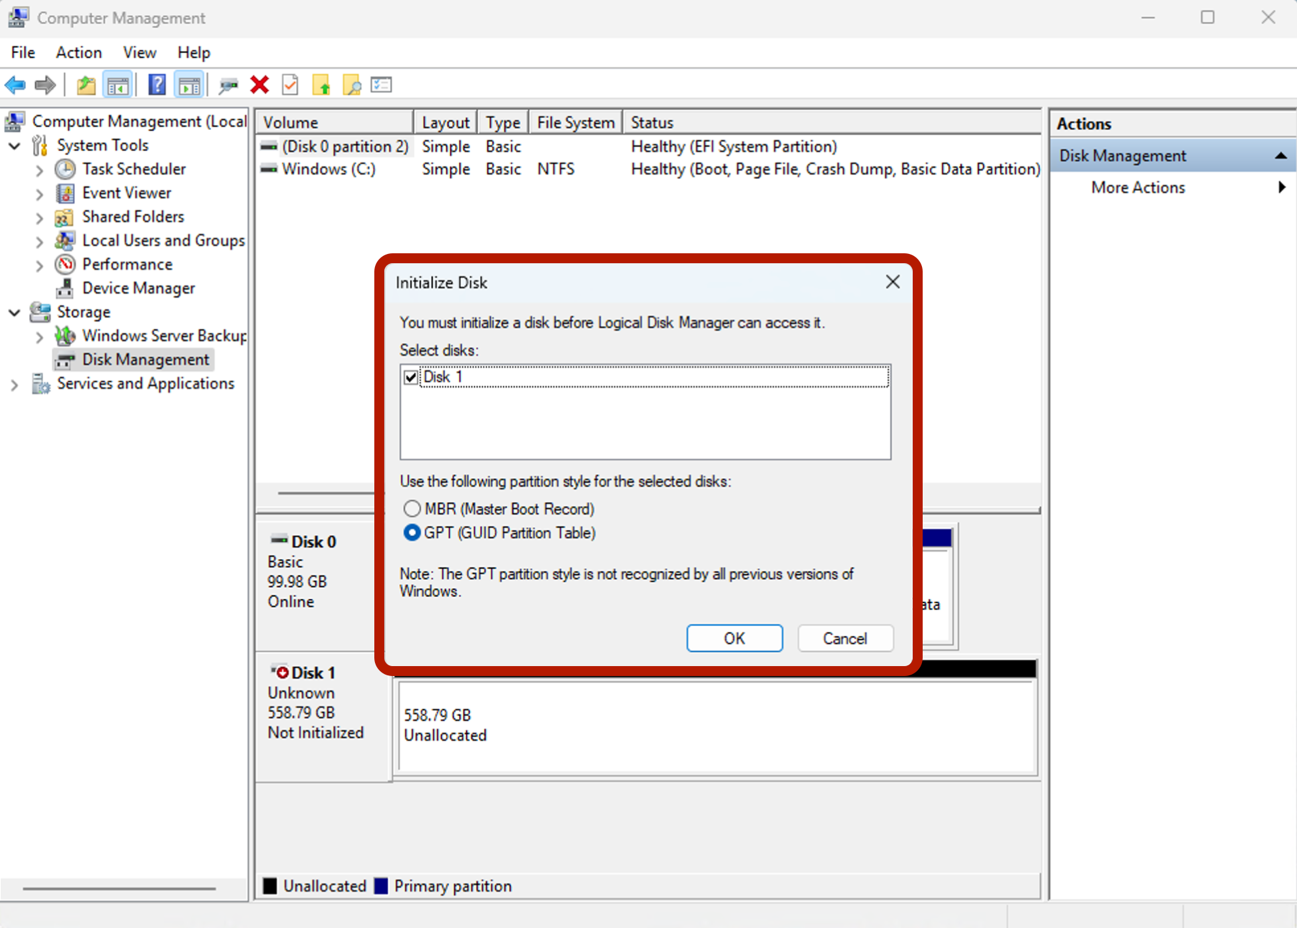
If prompted, then choose OK to accept the requested formatting of the instance store. The following figure shows such a prompt.
Open the context menu for the Unallocated drive and choose New Simple Volume.
Accept the requests, making any wanted changes to the drive name, or assigning to a folder instead.
Choose Finish and the new volume is available to use as a temporary drive.
Figure 3: The Disk Management tool prompting the automatic formatting of the instance store
Proceed to the next section to log in to your workstation to use Amazon DCV.
Logging into your workstation through Amazon DCV
To log in to your machine using Amazon DCV, you must first set up the client software on your local machine:
Expand the Amazon DCV Client entry that matches the Server version that you installed on your workstation.
Choose the relevant OS for your machine or laptop, for example Windows (x86_64).
Download the installer.
Run the installer.
When it is installed, you must determine the public IP address of the workstation to connect to:
In the Amazon EC2 Console, choose Amazon EC2 Dashboard in the top left.
Choose Instances (running).
Choose the my_windows_workstation EC2 instance, in the top pane of the screen.
Choose the copy icon next to the Public IPv4 address in the lower pane to copy the IP address.
Finally, use the Amazon DCV client to view the workstation:
Open the Amazon DCV client on your local machine.
Paste the previous IP address and press Enter, then trust the connection.
You will see a security warning about an untrusted certificate. This is expected behavior because Amazon DCV uses a self-signed certificate by default. For this initial setup, it is safe to accept the certificate and proceed with the connection. For a detailed explanation of why this warning appears and how to implement proper certificate security for production environments, see Amazon DCV Connection Security in Building a GPU workstation for visual effects with Amazon EC2: Part 5 – Security.
In the next Username / Password entry field, choose Administrator, and the appropriate password to which you set that user.
After the connection is established, Amazon DCV opens and displays the remote workstation desktop. The following screen capture shows the running workstation, confirming that your remote session is active and the environment is ready to use. In this example, the Windows Server 2025 desktop is shown with SideFX Houdini open, displaying a rendered scene in the viewport above the Windows taskbar.
Figure 4: A screen capture of a Windows Server 2025 based workstation
With Windows, you automatically get brush sensitivity with Wacom and Amazon DCV connectivity. You don’t need to configure additional steps for your brushes to dynamically use the tablet’s controls.
Note: If you have need for a managed, non-persistent Windows desktop where several users share one GPU instance, consider Amazon WorkSpaces Applications multi-session fleets. They’re best for lighter graphics users such as reviewers, CAD viewers and editors, rather than artists working heavily in the viewport.
Cleaning up
Finally, you must remember to turn off your instances when not in use, either through the AWS Management Console, or through other programmatic methods such as AWS CLI. You incur costs associated with a running machine, and so deactivating machines when not in use reduces your expenditure.
This can be done by choosing Terminate instance from the Instance state options of the workstation in the Amazon EC2 console. The instance shuts down and reports a Terminated state on the console, but it automatically disappears after a short time.
This post has shown how Amazon EC2 instances running Windows Server 2025 can create a GPU-backed VFX workstation. Your artists can use the latest technologies to unlock efficiencies, unhampered by the lengthy hardware renewal cycles typically found in on-premises environments.
We recommend that you continue to Part 4 of our series, Building a GPU workstation for visual effects with Amazon EC2: Part 4 – Optimizations, to learn how to implement GPU optimizations and infrastructure to streamline the provisioning of workstations. Part 4 also covers essential information on security practices for Windows EC2 instances, including build-time hardening and automated patch management to protect your workstation infrastructure from evolving threats.
If you want to augment a VFX workstation environment with a dedicated render farm, then consider the managed service AWS Deadline Cloud.
EC2 instance metrics, such as CPU and memory usage, are sent to Amazon CloudWatch logs, so you can access this data through the console and AWS CLI. This information helps you discern whether an EC2 instance is over- or under-provisioned for the work at hand. For example, an instance might have excessive CPU, memory, and networking resources for the current tasks and could be optimized for price. Alternatively, it might not have enough resources to cope. For more information, visit the Amazon EC2 User Guide.
Windows instances can be lengthy to boot. Amazon EC2 Fast Launch for Windows is an AWS feature for faster launching of Windows machines through smart snapshots of the AMI.
Another post shows how to programmatically configure a Windows EC2 instance as part of a domain. This is particularly useful when the instances are used ephemerally, for example as part of a fleet of instances that spool up and down for rendering, and you need methods to bind and remove instances quickly.
More advanced examples of using Amazon DCV can be found in the aws-samples dcv-samples GitHub repo. This includes methods to broker multiple users and instances. Amazon DCV Connection Gateway provides a single entry point for users to connect to multiple Amazon DCV sessions across different instances, streamlining access management and improving security through centralized authentication.
Commercial options also exist to perform artist/instance brokering, using Amazon DCV and Amazon EC2 launch templates. An example of such an offering is Leostream.
For many years Amazon Web Services (AWS) has been guiding customers in the deployment of powerful NVIDIA GPU-backed workstations for graphics-intensive workloads. With the recent expansion of our G-series Amazon Elastic Compute Cloud (Amazon EC2) graphics-based instances, we are excited to introduce new instance families that deliver enhanced performance and capabilities. We are also refreshing our comprehensive guidance on choosing and configuring these powerful virtual workstations.
This is the second post in a five-part series, focusing on the deployment of a Rocky Linux 9.5 visual effects (VFX) workstation, using Amazon DCV as a high-performance desktop display protocol.
“Amazon DCV gives me the ability to prioritise image quality or smooth performance and playback, depending on the tasks I am performing. It adapts quickly to any monitor used and when in full screen, I forget I am operating a remote workstation.”
— Giorgio Pitino, Head of Creative Operations, Outpost VFX
Prerequisites
This post assumes that you have already configured the following:
An active AWS account with increased GPU Amazon EC2 service quota limits.
A valid Amazon EC2 key pair in your AWS Region of choice.
A configured virtual firewall Security Group, with open TCP/UDP ports 22, 443, 8443, and 3389 limited to only your own IP address.
Search for “rocky linux 9 official” in the Search field.
Choose Rocky Linux 9 (Official) – x86_64 to view the marketplace offering.
Choose Continue to Subscribe to subscribe to this product.
This product has no actual fee: other products, such as variations of Rocky Linux with support from third parties, might charge.
To continue, choose Accept Terms (if you agree).
The subscription process starts, with Effective date showing pending. But when the subscription is complete (which can take a few minutes) this changes to the current date.
When the subscription process has completed, you can launch an EC2 instance from that AMI:
Navigate back to the AWS Marketplace service console page and choose Manage subscriptions.
Choose Launch new instance underneath the entry for Rocky Linux 9 (Official) – x86_64.
Choose Launch instances.
When prompted, specify your AWS Region, and choose Continue to launch through EC2.
This now opens the Amazon EC2 launch interface.
Give the instance a name, for example “my_linux_workstation”.
Note that the AMI has been pre-filled for you.
Under Instance type, choose g6.4xlarge.
Under Key pair name, open the list and choose your key pair. In the previous post we called it “ec2_test_keypair” to specify the password security credentials.
Edit the Network settings to adjust security and network placement:
Leave the Subnet to No preference.
Make sure that Auto-assign public IP is set to Enable, so that you can access the instance through the internet.
Under the Firewall (security groups) section of the Network Settings, choose Select existing security group, and specify your security group. In the previous post we named it “ec2_test_sg” to set up the firewall for the machine.
In Configuration storage, expand the default root volume from 10 GiB to 50 GiB of gp3 storage.Important: Enable encryption in the Advanced options by checking the Encrypted option and select the default AWS managed key (aws/ebs) or a customer managed AWS KMS key for enhanced control. Amazon Elastic Block Store (Amazon EBS) encryption protects your VFX project files, renders, and application data at rest. Encryption uses industry-standard AES-256 encryption and is transparent to applications with minimal performance impact.
Under Advanced details, specify the role that you created for workstation usage. In the previous post we called it “basic_workstation_role”, through the IAM instance profile list, so your workstation can access additional services.
Choose Launch instance.
You can now choose the link to the EC2 instance that has been launched or view it through the Instances pane in the Amazon EC2 Service page. The following screen capture shows the newly launched workstation in the EC2 Instances list, where you can confirm it is ready to use. When the “my_linux_workstation” instance is in the Running state, and the Status check is 3/3 checks passed, you can continue.
Figure 1: A screen capture of the EC2 Instances page, showing my_linux_workstation in a ready state
Configuring the Linux workstation
Now you proceed to configure the instance with the necessary libraries and software needed to make it a capable workstation for making 2D and 3D content. From a Mac terminal, Linux terminal, or Windows PowerShell, you can now SSH into the rocky user over the public IP address. To find the Public IPv4 address, choose the EC2 instance in the Instances pane (as shown in the preceding figure), and you should find the address located in the top/middle part of the Details section.
When you are logged in to the machine, you can start with password updates and general necessary packages:
# Set a password for your rocky user.
sudo passwd rocky

# Install some useful packages for later use.
sudo yum install wget nano unzip -y

# Install AWS CLI.
# https://docs.aws.amazon.com/cli/latest/userguide/getting-started-install.html
cd ~
curl "https://awscli.amazonaws.com/awscli-exe-linux-x86_64.zip" -o "awscliv2.zip"
unzip awscliv2.zip
sudo ./aws/install

# Install pip.
curl -O https://bootstrap.pypa.io/get-pip.py
python get-pip.py --user

# Make sure all packages are up-to-date.
sudo yum update -y

# Install GNOME.
sudo yum groupinstall "Server with GUI" -y

# Install kernel-devel and reboot.
sudo yum install kernel-devel -y
sudo reboot
Reconnect to the instance to disable nouveau drivers, in preparation for installing the GPU drivers:
# We need to disable the nouveau driver which conflicts with NVIDIA graphics cards.
# Make a module configuration to disable it.
sudo nano /etc/modprobe.d/nvidia_nouveau_off.conf

# Add the following lines
blacklist nouveau
options nouveau modeset=0

# CTRL-X and "y" to exit and save changes

# Ensure this file is also in usr/lib.
sudo cp /etc/modprobe.d/nvidia_nouveau_off.conf /usr/lib/modprobe.d/

# Rebuild the initramfs / boot process.
sudo dracut --force

# Set a new boot config based on the running system, and reboot.
sudo grub2-mkconfig -o /boot/grub2/grub.cfg
sudo reboot
Reconnect to the instance to begin installing the GPU drivers:
# Firstly, you can now double check that nouveau is not present on the system.
# You should see no output from the below:
lsmod | grep nouveau
You must use AWS approved NVIDIA GPU drivers, issued through Amazon S3, not only for optimal compatibility and performance, but also to make sure that the necessary professional GRID drivers are automatically provisioned:
At the time of writing, these are the current steps to install the correct NVIDIA GPU drivers.
# Install supporting libraries for NVIDIA GRID driver.
sudo dnf install -y make gcc elfutils-libelf-devel libglvnd-devel kernel-devel-$(uname -r)

mkdir ~/nvidia
cd ~/nvidia

# Copy the latest GRID driver from the public AWS S3 bucket.
aws s3 cp --recursive s3://ec2-linux-nvidia-drivers/latest/ .
chmod +x NVIDIA-Linux-x86_64*.run
sudo /bin/sh ./NVIDIA-Linux-x86_64*.run

# Follow the prompts to install:
# - you do not need to install 32 bit drivers
# - you should rebuild initramfs if requested.

# Check the driver is installed.
nvidia-smi -q | head
You should get an output as follows:
==============NVSMI LOG==============

Timestamp : Wed Jan 8 13:56:10 2025
Driver Version : 550.127.05
CUDA Version : 12.4
Attached GPUs : 1
GPU 00000000:31:00.0
Product Name : NVIDIA L4
Now set up the Amazon DCV server to stream the desktop to your local machine/client.
# Installing Amazon DCV.
# You can follow more detailed / up-to-date instructions at this link:
# https://docs.aws.amazon.com/dcv/latest/adminguide/setting-up-installing-linux-server.html

# First, disable the Wayland protocol.
sudo nano /etc/gdm/custom.conf
# Uncomment the "WaylandEnable=false" line.
# CTRL-X and "y" to exit and save changes

# Configure X Server -- check that the system is configured for graphical sessions:
sudo systemctl get-default
# If "multi.target" is returned then perform the following:
sudo systemctl set-default graphical.target

# start the X server
sudo systemctl isolate graphical.target

# Update xorg.conf with multi monitor connectivity.
sudo nvidia-xconfig --preserve-busid --enable-all-gpus --connected-monitor=DFP-0,DFP-1,DFP-2,DFP-3

# Restart X-Server.
sudo systemctl isolate multi-user.target
sudo systemctl isolate graphical.target

# Download and install the Amazon DCV server
mkdir ~/amazondcv
cd ~/amazondcv

# Install the key
sudo rpm --import https://d1uj6qtbmh3dt5.cloudfront.net/NICE-GPG-KEY

# Get the latest Rocky 9 Amazon DCV server.
# Note: The Amazon DCV team provide permanent links to the latest DCV software:
# https://www.amazondcv.com/latest.html
wget https://d1uj6qtbmh3dt5.cloudfront.net/nice-dcv-el9-x86_64.tgz
tar -xvzf ./nice-dcv-el9-x86_64.tgz

# 'cd' into the extracted folder -- note this will be version named, hence the generic line below.
cd $(ls -d */|head -n 1)

# install the server rpm -- note this will be version named, hence the generic line below.
sudo yum install $(ls nice-dcv-server*.rpm|head -n 1)

# Restart the X Server.
sudo systemctl isolate multi-user.target
sudo systemctl isolate graphical.target
The Amazon DCV server uses parameters to specify configuration options. On Linux this manifests as a file on disk.
# Adjust the Amazon DCV config files to enable
# the automatic creation of a session by the "rocky" user...
sudo nano /etc/dcv/dcv.conf

# Under [session-management] add the following line:
create-session = true

# Under [session-management/automatic-console-session] add the following line:
owner = "rocky"

# CTRL-X and "y" to exit and save changes.

# Start DCV and enable it to automatically restart on boot
sudo systemctl restart dcvserver
sudo systemctl enable dcvserver

# Finally, open up the firewall to allow Amazon DCV access.
sudo firewall-cmd --add-port=8443/tcp --permanent
sudo firewall-cmd --add-port=8443/udp --permanent
sudo firewall-cmd --reload
Note: Looking to the future of Linux based workstations, DCV now supports Wayland display drivers on RHEL 10, Rocky Linux 10, CentOS 10 and Ubuntu 26.04.
Now install the Wacom drivers:
mkdir ~/wacom
cd ~/wacom

# Download the drivers from (again replacing the link below with the latest version):
# https://github.com/linuxwacom/input-wacom/releases
wget https://github.com/linuxwacom/input-wacom/releases/download/v1.3.0/input-wacom-1.3.0.tar.bz2
tar jxf input-wacom-1.3.0.tar.bz2
cd input-wacom-1.3.0
sudo su
./configure
make && make install
modprobe wacom
dracut --force

# Setup Wacom Pressure Sensitivity
nano /etc/X11/xorg.conf.d/99-wacom-pressure2k.conf

# Add the following lines:
Section "InputClass"
    Identifier "Wacom pressure compatibility"
    MatchDriver "wacom"
    Option "Pressure2K" "true"
EndSection

# CTRL-X and "y" to exit and save changes.

# Setup Wacom with Amazon DCV and Pressure Sensitivity
# Described here: https://docs.aws.amazon.com/dcv/latest/adminguide/enable-stylus.html
sudo nano /etc/X11/xorg.conf

# Add these 2 sections to the end of the file
Section "InputDevice"
    Identifier "DCV Stylus Pen"
    Driver "dcvinput"
    Option "Pressure2K" "true"
EndSection

Section "InputDevice"
    Identifier "DCV Stylus Eraser"
    Driver "dcvinput"
    Option "Pressure2K" "true"
EndSection

# Add the following inside the ServerLayout section
InputDevice "DCV Stylus Pen"
InputDevice "DCV Stylus Eraser"

# CTRL-X and "y" to exit and save changes.

# Restart X display
sudo systemctl isolate multi-user.target
sudo systemctl isolate graphical.target
The local instance store NVMe devices need mounting. For more information, visit the Amazon EC2 User Guide.
# View the volumes -- note that only our nvme0n1 drive is available.
# Our secondary instance store is not listed.
df -h

Filesystem      Size  Used Avail Use% Mounted on
devtmpfs        4.0M     0  4.0M   0% /dev
tmpfs           7.4G     0  7.4G   0% /dev/shm
tmpfs           3.0G  1.3M  3.0G   1% /run
efivarfs        128K  3.8K  120K   4% /sys/firmware/efi/efivars
/dev/nvme0n1p4   49G   45G  3.9G  93% /
/dev/nvme0n1p3  936M  716M  221M  77% /boot
/dev/nvme0n1p2  100M  7.0M   93M   8% /boot/efi
tmpfs           1.5G   52K  1.5G   1% /run/user/42
tmpfs           1.5G   36K  1.5G   1% /run/user/1000

# View volumes mapped but not formatted or mounted.
# Note nvme1n1 -- our instance store - is listed but not mounted.
lsblk

NAME        MAJ:MIN RM   SIZE RO TYPE MOUNTPOINTS
nvme0n1     259:0    0    50G  0 disk
├─nvme0n1p1 259:2    0     2M  0 part
├─nvme0n1p2 259:3    0   100M  0 part /boot/efi
├─nvme0n1p3 259:4    0  1000M  0 part /boot
└─nvme0n1p4 259:5    0  48.9G  0 part /
nvme1n1     259:1    0 558.8G  0 disk

# Create a file system on that device
sudo mkfs -t xfs /dev/nvme1n1

# Create a directory to mount the new device.
sudo mkdir /data

# Mount the device to your new directory.
sudo mount /dev/nvme1n1 /data

# Confirm our instance store - nvme1n1 - is now mounted.
df -h

Filesystem      Size  Used Avail Use% Mounted on
devtmpfs        4.0M     0  4.0M   0% /dev
tmpfs            31G     0   31G   0% /dev/shm
tmpfs            13G  1.2M   13G   1% /run
efivarfs        128K  3.8K  120K   4% /sys/firmware/efi/efivars
/dev/nvme0n1p4   49G   44G  5.1G  90% /
/dev/nvme0n1p3  936M  716M  221M  77% /boot
/dev/nvme0n1p2  100M  7.0M   93M   8% /boot/efi
tmpfs           6.1G   36K  6.1G   1% /run/user/1000
/dev/nvme1n1    559G  4.0G  555G   1% /data
Finally, we show some examples of application-specific library setup. Each application potentially has its own list of necessary libraries to install, which can be referenced online. The following are some examples:
Expand the Amazon DCV Client entry that matches the Server version that you installed on your workstation.
Choose the relevant OS for your machine/laptop, for example Windows (x86_64).
Download the installer.
Run the installer.
When it is installed, we need to determine the Public IP address of the workstation to connect to:
In the Amazon EC2 Console, choose Amazon EC2 Dashboard.
Choose Instances (running).
Choose the “my_linux_workstation” EC2 instance, in the top pane of the screen.
Choose the copy icon next to the Public IPv4 address in the lower pane to copy the IP address.
Finally, use the Amazon DCV client to view the workstation:
Open the Amazon DCV client on your local machine.
Paste the preceding IP address and press Enter, then trust the connection.
You will see a security warning about an untrusted certificate. This is expected behavior because DCV uses a self-signed certificate by default. For this initial setup, it’s safe to accept the certificate and proceed with the connection. For a detailed explanation of why this warning appears and how to implement proper certificate security for production environments, see Amazon DCV Connection Security in Building a GPU workstation for visual effects with Amazon EC2: Part 5 – Security.
In the next Username / Password entry field, choose rocky, and the appropriate password to which you set that user.
After the connection is established, Amazon DCV opens and displays the remote workstation desktop. The following screen capture shows the running workstation, confirming that your remote session is active and the environment is ready to use. In this example, the Rocky Linux desktop is shown with SideFX Houdini open, displaying a rendered scene in the viewport against the Rocky Linux desktop background.
Figure 2: A screen capture of a Rocky Linux-based workstation
Cleaning up
Finally, you must turn off your instances when not in use, either through the AWS Management Console, or through other programmatic methods such as the AWS Command Line Interface (AWS CLI). You incur costs associated with a running machine, and so deactivating machines when not in use reduces your expenditure.
Deactivating instances can be done by choosing Terminate instance from the Instance state options of the workstation on the Amazon EC2 console. The instance shuts down and reports a “Terminated” state on the console, but it automatically disappears after a short time.
However, if you want to learn more about the various methods to deactivate an EC2 instance, and creating a persistent machine image of your Linux instance, then refer to Part 4 of the series: Building a GPU workstation for visual effects with Amazon EC2: Part 4 – Optimizations. Additionally, Part 4 will cover essential information on security practices for Linux EC2 instances, including build-time hardening and automated patch management to protect your workstation infrastructure from evolving threats.
Conclusion
In this post you have subscribed to and deployed an AWS Marketplace AMI of Rocky Linux to serve as your base image. Then, you modified it with GPU drivers, Wacom drivers, and other modules to make it a capable Linux-backed VFX workstation, using Amazon EC2 GPU accelerated G instance types.
If you want to augment a VFX workstation environment with a dedicated render farm, then consider the managed service AWS Deadline Cloud.
EC2 instance metrics, such as CPU and memory usage, are readily sent to Amazon CloudWatch logs, so you can access this data through the console and AWS CLI. This information can be pertinent to discern if an EC2 instance is being over-provisioned or under-provisioned for the work at hand. An over-provisioned instance has excessive CPU, memory, and networking resources for the current tasks and could be optimized for price. Alternatively, an under-provisioned instance does not have enough resources to cope. For more information visit the Amazon EC2 User Guide.
More advanced examples of using Amazon DCV can be found in the aws-samples GitHub repo. This includes methods to broker multiple users and instances. Furthermore, DCV Connection Gateway provides a single entry point so you can connect to multiple DCV sessions across different instances, streamlining access management and improving security through centralized authentication.
Commercial options also exist to perform artist/instance brokering, using Amazon DCV and Amazon EC2 Launch templates. An example of such an offering is Leostream.
For reference, examples of setting up Amazon DCV capable instances, using AWS CloudFormation templates as a method of deployment, can be found in this GitHub repo.
A greater depth of analysis of bit rates and latency surrounding Amazon DCV connections can be found in this AWS HPC post.
For many years Amazon Web Services (AWS) has been guiding users in the deployment of powerful NVIDIA GPU-backed workstations for graphics-intensive workloads. With the recent expansion of our G-series Amazon Elastic Compute Cloud (Amazon EC2) graphics-based instances, we’re excited to introduce new instance families that deliver enhanced performance and capabilities. We’re also refreshing our comprehensive guidance on choosing and configuring these powerful virtual workstations.
This is the first in a five-part series providing detailed guidance on instance types, and deployment instructions for building Windows and Linux based NVIDIA GPU powered workstation on GPU accelerated EC2 instances. In this initial post, we explore the instance types, and outline essential AWS configurations for account preparation, security, policies, and other prerequisites. Subsequent posts cover Linux deployment (Part 2), Windows deployment (Part 3), optimizations and infrastructure for standardizing workstations deployment at scale (Part 4), and security considerations (Part 5).
G instance families
The Amazon EC2 G-series instances come in multiple families, with various types and fractionalization of GPUs, memory-to-CPU ratios, and sizes of vCPU and RAM. The g6 and gr6 instances, equipped with NVIDIA L4 GPUs, deliver up to 200 percent performance improvement in graphics-intensive workloads compared to the widely-adopted g4dn family, while offering enhanced performance and cost efficiency over their g5 predecessors. The g6f and gr6f options introduce more GPU partitioning capabilities with the NVIDIA L4, so you can provision fractional GPU allocations. This supports more cost-effective scaling for workloads that do not need a full GPU, with options for half, quarter, and one-eighth GPU. Fractional instances are ideal for remote workstation applications for staff that need only partial GPU usage, as well as other tasks such as lightweight machine learning (ML) research.
The g6e instances, featuring the NVIDIA L40S GPU, go further with double the GPU memory, 2.9x faster GPU memory bandwidth, and up to 2.5 times overall performance improvement compared to g5 instances. All three families offer flexible configurations with 1, 4, or 8 GPUs, providing specialized cores optimized for GPU processing, ray tracing, and machine learning workloads, as shown in the following figure.
The latest 7th generation instances, the g7 and g7e offer greater performance in GPU speed and memory with the latest NVIDIA RTX PRO 4500 and 6000 respectively. These instances are well suited for high-end 3D and 2D workloads and artificial intelligence (AI) workloads, delivering 4.6 times the AI inference performance of previous g6 instances. With up to 700 Gbps EFA-enabled network bandwidth, g7 instances help you run graphics and data workloads more efficiently.
NVIDIA L4
NVIDIA L40S
NVIDIA RTX PRO 4500
NVIDIA RTX PRO 6000
Architecture
Ada Lovelace
Ada Lovelace
Blackwell
Blackwell
Memory
24 GB GDDR6
48 GB GDDR6
32 GB GDDR7
96 GB GDDR7
Memory Bandwith
300 GB/s
864 GB/s
896 GB/s
1790 GB/s
Cuda Cores
7680
18176
10496
24064
Tensor Cores
240
568
328
752
Ray Tracing Cores
60
140
82
188
Figure 1: The list of GPU architecture statistics for the L4, L40S, RTX PRO 4500, and RTX PRO 6000 NVIDIA GPUs
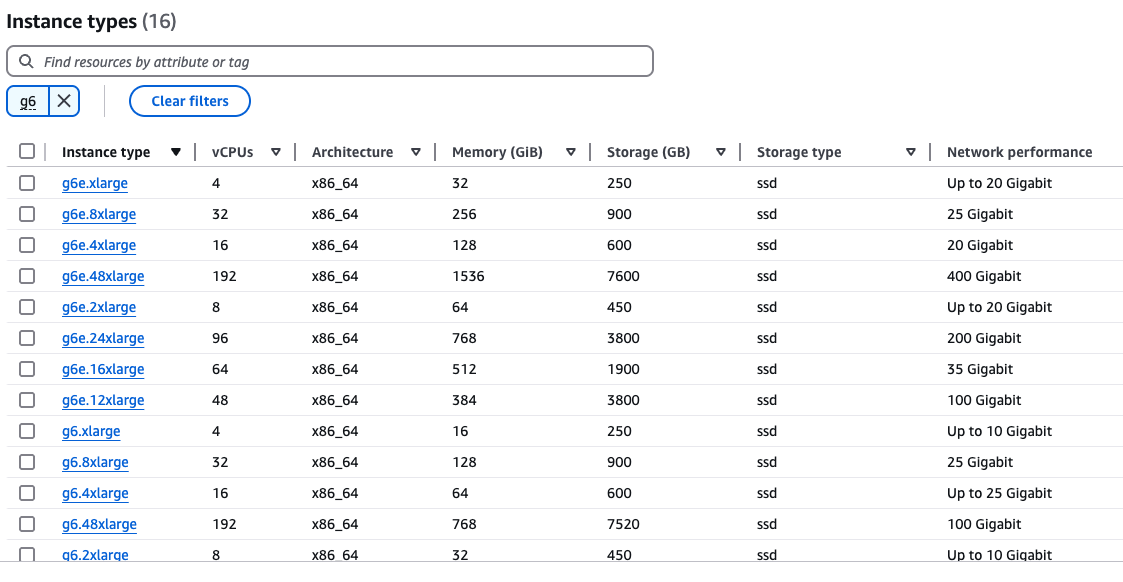
The 6th and 7th generation of G instances are available in multiple configurations to accommodate diverse GPU, CPU, memory, and networking requirements. The g6, g6f, and g7 instances maintain the traditional 1:4 ratio of vCPUs to memory (GiB) established by previous generations such as g4dn and g5. The gr6 and gr6f families introduce an enhanced 1:8 ratio option, while the g6e and g7e instances natively possess the expanded 1:8 ratio. These higher allocations suit memory-intensive 2D and 3D workloads that frequently encounter memory constraints, providing support for demanding visual computing applications.
For the non-fractional g6 and gr6 instances, the configurations of sizes are as follows:
Instance type
NVIDIA L4 GPU count
vCPUs
Memory (GiB)
EBS Bandwidth (Gbps)
Network Bandwidth (Gbps)
Single GPU
g6.xlarge
1
4
16
Up to 5
Up to 10
g6.2xlarge
1
8
32
Up to 5
Up to 10
g6.4xlarge
1
16
64
8
Up to 25
g6.8xlarge
1
32
128
16
25
g6.16xlarge
1
64
256
20
25
Single GPU / Memory Biased
gr6.4xlarge
1
16
128
8
Up to 25
gr6.8xlarge
1
32
256
16
25
Multi GPU
g6.12xlarge
4
48
192
20
40
g6.24xlarge
4
96
384
30
50
g6.48xlarge
8
192
768
60
100
Figure 2: The list of g6 and gr6 instance types with corresponding GPU amounts, vCPUs, network, and bandwidth data
The fractional g6f and gr6f configurations are:
Memory (GiB) to vCPU ratio
Instance type
NVIDIA L4 GPU count
NVIDIA L4 GPU RAM (GiB)
vCPUs
Memory (GiB)
EBS Bandwidth (Gbps)
Network Bandwidth (Gbps)
4-to-1
g6f.large
1/8
3
2
8
Up to 5
Up to 10
g6f.xlarge
1/8
3
4
16
Up to 5
Up to 10
g6f.2xlarge
1/4
6
8
32
Up to 5
Up to 10
g6f.4xlarge
1/2
12
16
64
6
Up to 25
8-to-1
gr6f.4xlarge
1/2
12
16
128
8
Up to 25
Figure 3: The list of g6f and gr6f instance types with corresponding fractional GPU amounts, vCPUs, network, and bandwidth data
For the g7 instances, the configurations of sizes are as follows:
Figure 4: The list of g7 instance types with corresponding GPU amounts, vCPUs, network, and bandwidth data
For the enhanced g6e the following instance size configurations are:
Instance type
NVIDIA L40S GPU count
vCPUs
Memory (GiB)
EBS Bandwidth (Gbps)
Network Bandwidth (Gbps)
Single GPU
g6e.xlarge
1
4
32
Up to 5
Up to 20
g6e.2xlarge
1
8
64
Up to 5
Up to 20
g6e.4xlarge
1
16
128
8
20
g6e.8xlarge
1
32
256
16
25
g6e.16xlarge
1
64
512
20
35
Multi GPU
g6e.12xlarge
4
48
384
20
100
g6e.24xlarge
4
96
768
30
200
g6e.48xlarge
8
192
1536
60
400
Figure 5: The list of g6e instance types with corresponding GPU amounts, vCPUs, network, and bandwidth data
Moreover, the g7e has the following instance size configurations:
Instance type
NVIDIA L40S GPU count
vCPUs
Memory (GiB)
EBS Bandwidth (Gbps)
Network Bandwidth (Gbps)
Single GPU
g7e.2xlarge
1
8
64
Up to 5
50
g7e.4xlarge
1
16
128
8
50
g7e.8xlarge
1
32
256
16
100
Multi GPU
g7e.12xlarge
2
48
512
25
400
g7e.24xlarge
4
96
1024
50
800
g7e.48xlarge
8
192
2048
100
1600
Figure 6: The list of g7e instance types with corresponding GPU amounts, vCPUs, network, and bandwidth data
EC2 instances mount one (or more) Amazon Elastic Block Store (Amazon EBS) volumes for durable, block-level storage. These can be detached from the instance and retained independently from the lifecycle of that instance, allowing modifications of the instance itself (such as changing the size and type) without the loss of storage.
Ephemeral NVMe storage on each instance is also provided by Instance Stores, aligned for temporary scratch data that benefits from performant local I/O access, which can be used by 2D/3D applications (for example Foundry Nuke’s cache directory). In the follow-up posts we discuss setting up and configuring these instance stores to maximize efficiency. The 6th and 7th generation EC2 instances automatically have instance stores allocated, dependent on their sizes, as shown in the following figure:
Figure 7: The configuration of instance stores on the 6th and 7th generation EC2 instances
The 6th and 7th generation G instances represent our latest offering in GPU-powered workstations capable servers, but we still offer previous generations, notably the g5 and g4dn, giving many choices in machine types to match performance and cost needs.
You can find specifications of all our instances types, on our Amazon EC2 webpage (G instances are classed as Accelerated Computing types).
Desktop streaming with Amazon DCV
Typically, cost-effective Mini PCs or laptops are used to connect to the Amazon EC2 workstation through a desktop streaming protocol. AWS offers a high-end desktop experience through Amazon DCV. This is a performant remote display protocol capable of streaming 4k UHD resolution images over multiple monitors (up to 4), 60 frames per second, QUIC UDP support for high performance image streaming, 4:4:4 8-bit chroma sub-sampling, and stylus/touch device support for M&E workloads. Our posts show how to set up both the server and client for Amazon DCV on Windows and Linux.
The recent addition of Wacom Bridge with Amazon DCV has optimized stylus operations further (on Windows at the time of writing, Linux in beta currently). This is both in terms of real-time user feedback on the local device, mitigating the effect of any potential latency delay, but also dedicated channel support for hardware communications to provide even lower latency performance, as well as the synchronization of settings.
Workstation connectivity
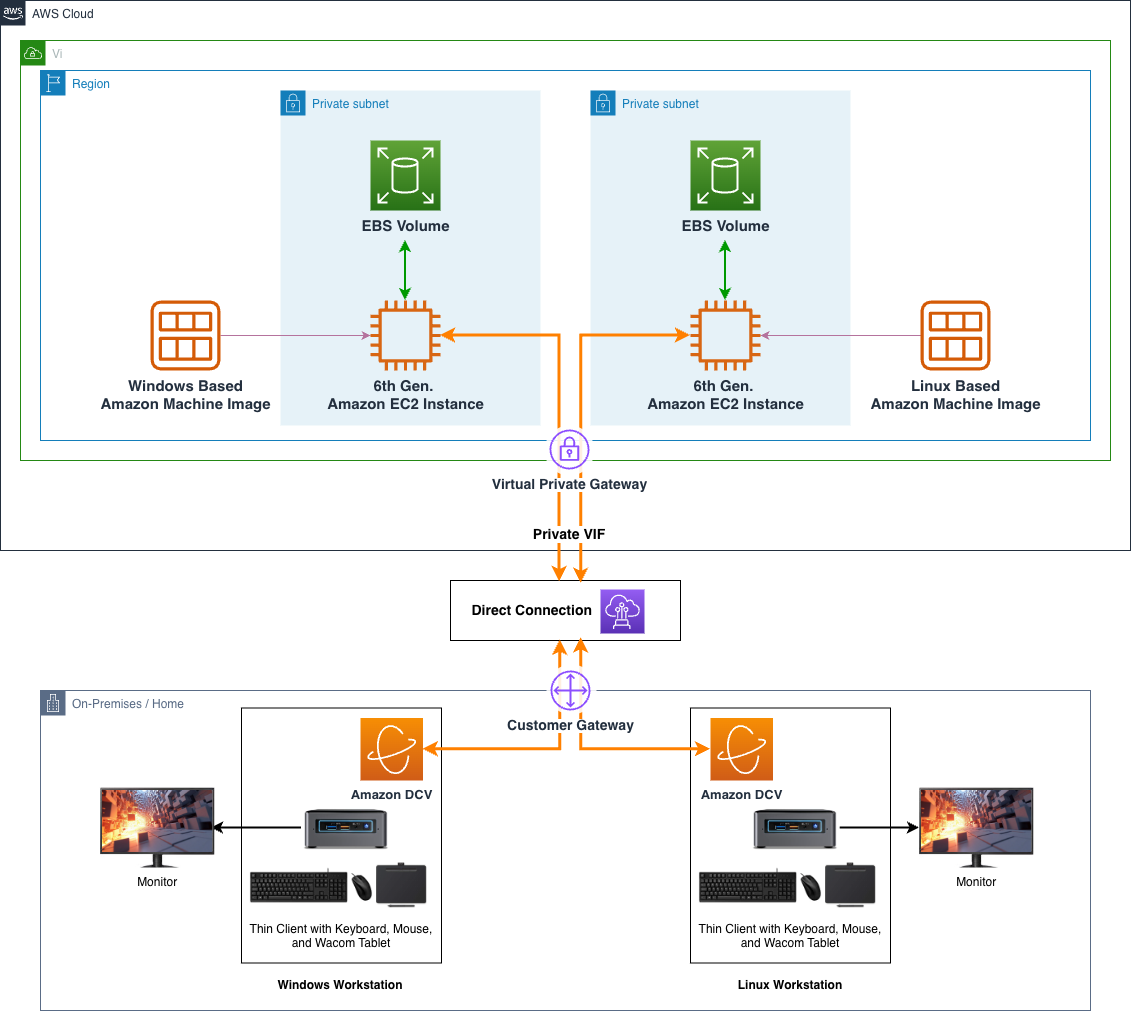
When establishing connectivity between your on-premises workstation and your EC2 instance, you have three primary options, each offering different levels of security, performance, and complexity.
Internet connectivity (used in this post)
For this post, we use the most basic connection method: direct internet connectivity. This approach connects your local workstation to your Amazon EC2 instance over the public internet, with security groups (virtual firewalls) configured to restrict access to your specific IP address and only the necessary ports.
This method uses application-layer security to provide built-in encryption for all Amazon DCV streaming sessions, which helps keep your visual data protected during transmission. Security groups operate at the network and transport layers to control which IP addresses and ports can reach your instances. Together, these layers provide complementary security properties:
Confidentiality in transit: DCV session traffic is encrypted, which helps prevent an intermediary who intercepts the traffic from reading its contents.
Access control at the instance boundary: Security groups accept connections only from IP addresses on your approved list, reducing the instance’s exposure to unsolicited inbound connection attempts.
Reduced attack surface: Only the specific ports required for DCV are exposed, which limits how much of the instance is reachable from the network.
This method provides a straightforward setup suitable for individual users or small teams, combining quick configuration with secure encrypted streaming. We discuss the security group configuration in detail later in this post.
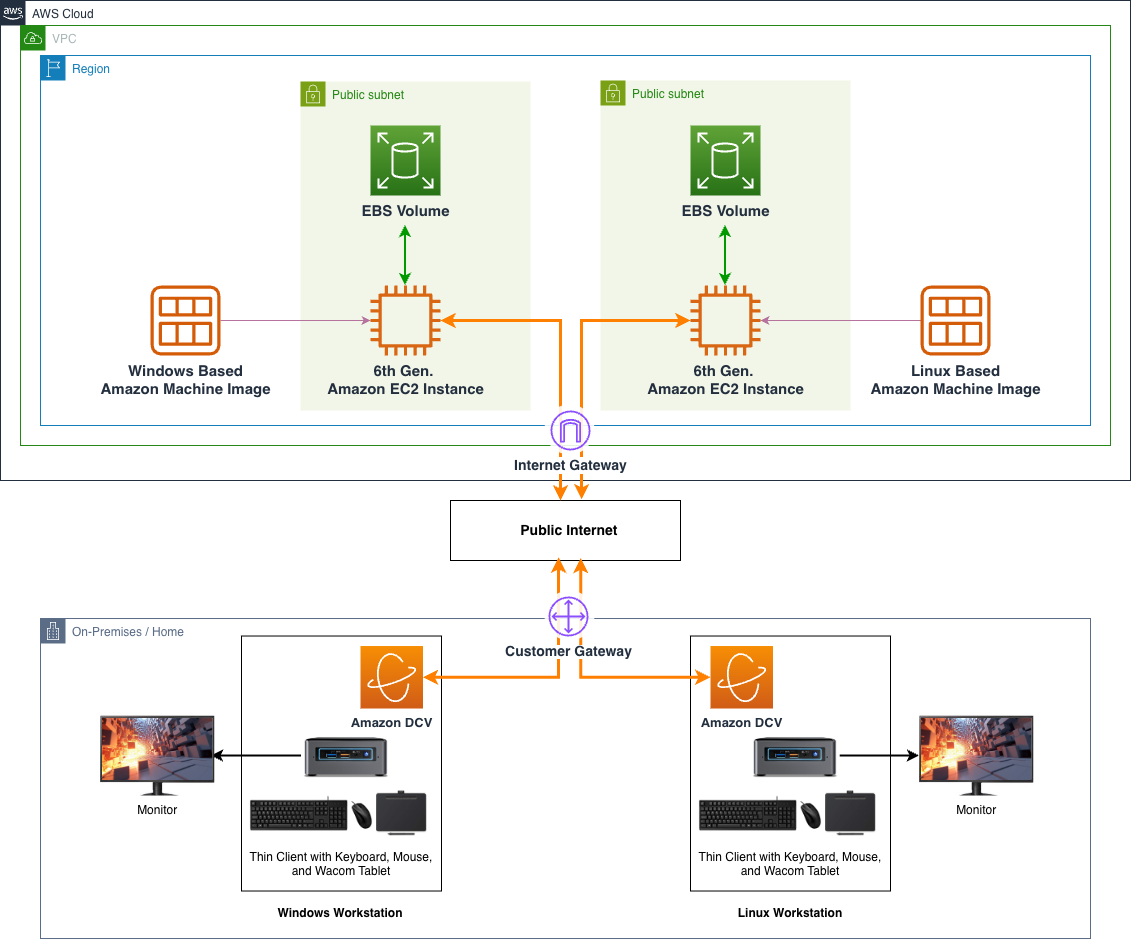
The following diagram illustrates this internet-based connectivity architecture. It shows how an artist’s local workstation connects across the public internet to a GPU-backed EC2 instance in AWS, with Amazon DCV carrying the session between them.
Figure 8: A streamlined architectural diagram showing on-premises and home workstations integrating with Amazon EC2 instances, using Amazon Machine Images and EBS storage, connecting through the internet
VPN connectivity
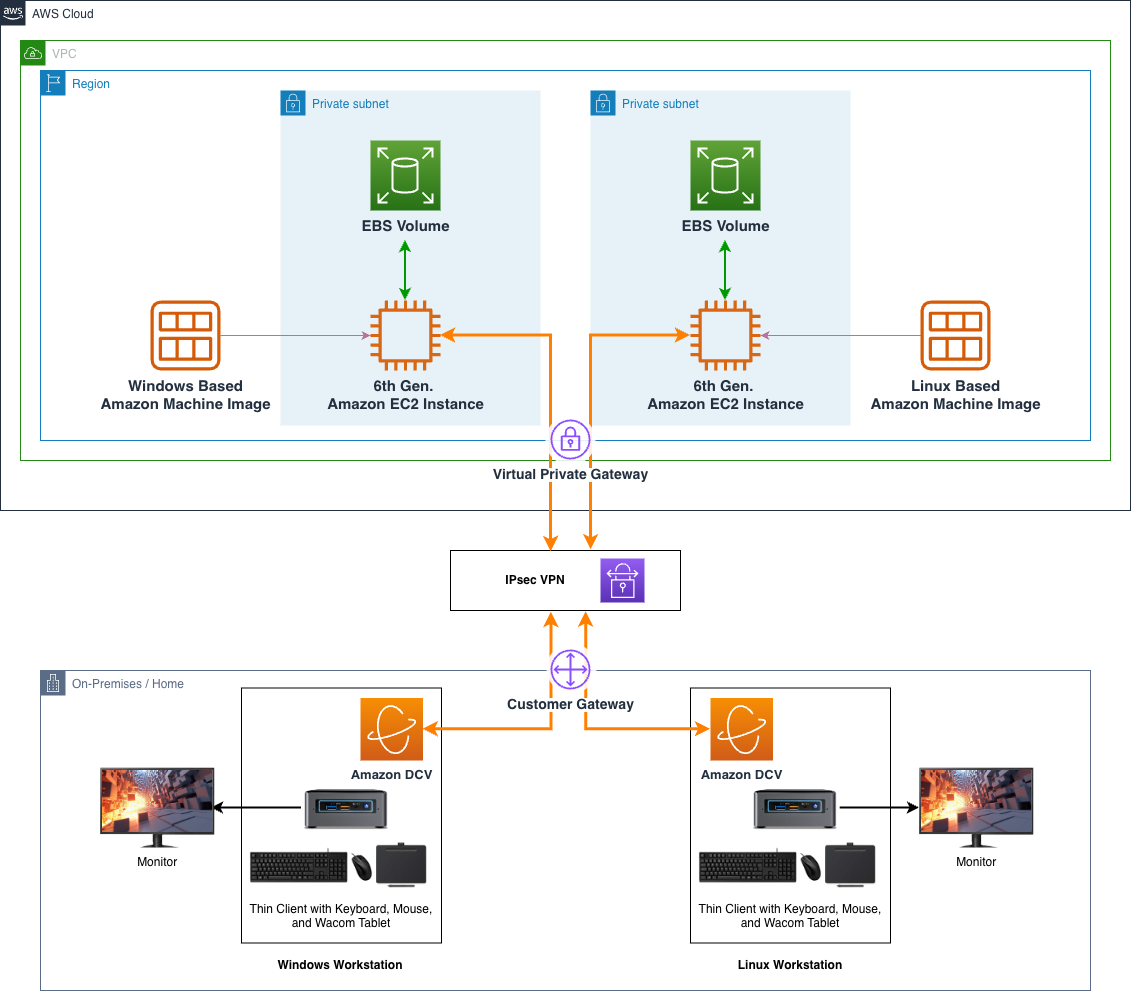
For organizations requiring additional security beyond basic internet connectivity, AWS Site-to-Site VPN provides encrypted tunnels that use the internet securely. This method creates a secure connection between your on-premises location and your AWS resources, allowing you to access EC2 workstations through encrypted channels while maintaining the high-performance capabilities needed for graphics-intensive work.
AWS Site-to-Site VPN adds network-layer encryption on top of the application-layer protection provided by Amazon DCV. The VPN establishes encrypted IPsec tunnels between your on-premises network and AWS, so traffic is protected at the network layer before it reaches the application. In practice this means your DCV session traffic travels inside an additional encrypted tunnel alongside the rest of your network connection.
Choosing Site-to-Site VPN over direct internet connectivity comes down to a few practical factors:
Security posture: VPN extends your existing corporate network controls and policies into AWS, so the same governance you apply on-premises continues to apply to traffic reaching your instances. This is useful if your organization requires network-layer encryption or treats AWS as an extension of the internal network.
Operational complexity: VPN requires configuring and maintaining the tunnel, a customer gateway, and routing on both sides. This is more involved than direct connectivity, which needs only a security group.
VPN connectivity is a good fit when you need to extend your corporate network into AWS and maintain consistent security policies across both environments, and when the added setup and cost are justified by that requirement.
The following diagram shows the VPN-based connectivity architecture. The key difference from the direct-internet setup is that the EC2 instances now sit in a private subnet with no public internet access. The Site-to-Site VPN carries all traffic between your on-premises network and AWS instead.
Figure 9: A streamlined architectural diagram showing on-premises and home workstations integrating with Amazon EC2 instances, using Amazon Machine Images and EBS storage, connecting through a Site-to-Site VPN
AWS Direct Connect
For workloads that need consistent network performance and a connection that doesn’t traverse the public internet, AWS Direct Connect establishes a dedicated physical connection between your on-premises location and AWS. Through your chosen network provider, it creates a private link from your premises to the AWS Region containing your Amazon EC2 G instances, which can offer more predictable latency and bandwidth than an internet-based connection.
AWS Direct Connect provides additional isolation at the physical and data link layers by using a dedicated connection that doesn’t traverse the public internet. Your traffic travels over private network infrastructure between your location and AWS, which keeps it off shared internet paths and gives you more consistent, predictable network behavior than an internet-based connection. Because the connection is private and dedicated, it isn’t exposed to the general internet in the way a public connection is.
AWS Direct Connect is ideal for organizations requiring consistent network performance, enhanced security, and reduced data transfer costs when working with graphics workstations in the cloud. Combined with the application-layer encryption of Amazon DCV, this provides defense-in-depth across the entire network stack, from the physical cables through to the application data itself. This approach provides the most predictable latency and bandwidth for demanding creative workflows.
The following diagram depicts the Direct Connect connectivity architecture. As with the VPN option, the EC2 instances sit in private subnets with no need for public internet access, but here the connection runs over a dedicated Direct Connect link between your on-premises location and AWS.
Figure 10: A streamlined architectural diagram showing on-premises and home workstations integrating with Amazon EC2 instances, using Amazon Machine Images and EBS storage, connecting through a Direct Connect link
Consult the documentation for further details and options around VPN offerings, as well as Direct Connect, to inform your security decisions. For further information, and additional firewall and protection services that can enhance protection against exploits such as ransomware and DDoS, please see Security, Identity and Compliance on AWS.
Latency
A superior virtual workstation experience relies on low-latency and high-bandwidth connectivity from your local client to your EC2 instance. Bandwidth requirements vary based on several factors such as the number of monitors, screen resolution, frame rate, and visual quality settings. For creative professionals using Wacom tablets or similar input devices, we recommend a latency round trip of 50 ms or less when using Amazon DCV. To evaluate your connection’s suitability, there are a number of third-party websites that you can use to test latency between your location and the nearest Region, such as https://aws-latency-test.com/ or https://www.cloudping.info/.
“Our collaboration with the AWS Visual Computing team and the use of EC2 instances as virtual workstations, has exceeded our expectations, delivering exceptional result.”
— John Coyne, Senior Technical Manager, Sky TV
Workstation build overview
For the purposes of this post, we focus on deploying a g6 family instance.
The following overview outlines the complete build across the whole series. Part 1 covers the prerequisites and base image selection. The remaining phases such as the instance configuration, creating Amazon Machine Images, and setting up launch templates are covered in later parts.
Setting up EC2 Launch Templates to encapsulate all boot requirements.
Standardizing deployment parameters.
Streamlining future workstation launches.
GPU optimization tips and resources.
Cost consideration
In these posts we use different AWS services, with each service having a cost associated with its usage. EC2 instances are charged by the second, so you must make sure that you shut down or terminate the instances when you are finished to avoid unwanted costs.
Accessing AWS services through the AWS Command Line Interface
AWS has many API/SDK entry points for creating and manipulating services. In this post we use the AWS Command Line Interface (AWS CLI), a convenient utility that you can use to query and set AWS service properties through the command line. In both the Windows and Linux deployment posts we set up the CLI for later convenience.
For more information about how to configure the credentials for usage with the CLI, as well as the range of functionality that you can use with it, go to the AWS CLI User Guide.
Workstation prerequisites Part 1: account setup and service quotas
The following steps are used to set up a secure Amazon Virtual Private Cloud (Amazon VPC) network platform for your instances, providing security and permissions for accessing and configuring your instance:
At the time of writing, AWS has 39 geographic Regions, each composed of multiple AWS Availability Zones (AZs) to make sure of service availability and durability, and over 35 AWS Local Zones (which are infrastructure deployments that place compute, storage, and other select AWS services closer to large population and industry centers). For more information, see the AWS Documentation on Global Infrastructure. As we previously mentioned, latency can be critical for optimal virtual workstation experiences. Therefore, we recommend building your workstations in a Region that offers the best latency experience. This is configured on the console itself:
Choose your AWS Region that best suits your needs (a drop down of AWS Regions is available at the top right of the Console).
AWS services can vary across AWS Regions, so before proceeding you must confirm that g6 instances are available in your AWS Region of choice. This can be done through the Amazon EC2 service page, as shown in the following figure:
Open the Amazon EC2 service page, the central service page for deploying EC2 instances.
Search for “EC2” in the Service search bar (top left), or choose Services -> Compute -> EC2.
Choose Instance Types in the left pane.
Enter “g6” into the Instance Types search bar and confirm that the various g6 instance types are listed as available in that AWS Region. The following image shows a filtered response from the Instance Types pane.
Figure 11: A screen capture of the Instance Types page, reporting g6 Amazon EC2 availability in a Region
Service limits
Limits exist around many AWS services. They act as guard rails for new users and prevent misuse of AWS services. New AWS accounts start with low limits to prevent unintentional spend, so you need to check the account limits to make sure that there is enough GPU vCPU quota to launch your workstation. You can check and request limit changes through the Service Quotas service page:
Navigate to the Service Quotas page by searching for its name in the Services search bar (top left of the Console window). Or alternatively choose Services -> Management and Governance -> Service Quotas.
You can choose the star icon next to each service to bookmark it for access later at the top of the Console.
Under Manage quotas (top right), enter EC2 in the search field, choose Amazon Elastic Compute Cloud (Amazon EC2), and choose View quotas.
In the Service quotas search field that appears, enter On-Demand G and the list of quotas should reduce to just Running On-Demand G and VT instances, the quota controlling your access to G instance machines, as shown in the following figure.
Figure 12: A screen capture of the Service Quotas page, requesting an increase to the GPU limit
You can see the current Applied account-level quota value, which is your limit on how many vCPUs you can use at any given time in this Region. This is not the number of instances (a common misconception)! We recommend making sure that you have at least a quota of 32, because this is enough to run two g6.4xlarge instances, a common size that suits basic 2D and 3D workflows. If the value in the applied account-level quota is below this, then you must submit a request to increase it:
Choose Request Increase at account level.
Enter “32” in the Increase quota value field.
Choose Request.
When you receive an email confirmation of the increase, check the quota limit again for a value of 32 and you are safe to proceed with the rest of the post.
Workstation prerequisites Part 2: networking and security
When you have received your Service Quota increase, you can continue back in the AWS Management Console to start setting up some auxiliary components needed for workstations, for example security keys, firewall groups, and so on.
Open the Amazon EC2 service page, the central service page for deploying EC2 instances.
Search for “EC2” in the Service search bar (top left) or choose Services -> Compute -> EC2.
Amazon EC2 key pair security
Amazon EC2 key pairs are security credentials that validate your identity when accessing EC2 instances.
To set up an Amazon EC2 key pair:
Under Network and Security on the left side of the panel, choose Key Pairs.
Choose Create key pair in the top right.
Give your new key pair a name, for example ec2_test_keypair.
Leave the key pair as an RSA type, with a .pem extension, and choose Create key pair.
Store the automatically downloaded .pem file in a safe place, because you need it later.
You should restrict the permissions on the .pem file so that only you can read it.
On a Mac or Linux machine you can change the permission in a terminal:
chmod 400 <<YOUR_EC2_TEST_KEYPAIR_PEM_FILE>>
On Windows, open the context menu for the file, choose Properties, then the Security tab, choose Advanced, choose Disable inheritance, and remove access to all users except the current user. For more information surrounding the best use of key pairs, go to the relevant section in the Amazon EC2 User Guide.
Virtual firewalls
Security groups act as virtual firewalls, restricting incoming and outgoing traffic to your G instances. You should set up a security group working on the principle of least privilege, which means you must be very specific about which ports and which IP addresses can access it:
Under Network and Security on the left pane, choose Security groups.
Choose Create Security Group in the top left.
Give your security group a name, for example ec2_test_sg.
Give your security group a meaningful description, for example SG for basic EC2 interaction.
Leave the VPC as-is. This automatically presents the ‘default’ VPC in your account and AWS Region.
The following Inbound rules ports must be added to the security group to allow access to that machine from a specific client’s source IP address: in this case your local machine. Under Inbound rules, use the Add rule feature multiple times to add the definitions defined in the following figure, using the My IP drop-down under Source to automatically determine and use your current IP address, appending the /32 CIDR to limit the connectivity to that single address.The following table contains a list of TCP and UDP ports to add to your security group.
Type
Protocol
Port Range
Source
Description
SSH
TCP
22
<YOUR “CUSTOM” CLIENT SOURCE IP>
SSH for Linux platform.
Custom TCP Rule
TCP
443
<YOUR “CUSTOM” CLIENT SOURCE IP>
HTTPS for both platforms.
Custom TCP Rule
TCP
8443
<YOUR “CUSTOM” CLIENT SOURCE IP>
Amazon DCV for both platforms.
Custom UDP Rule
UDP
8443
<YOUR “CUSTOM” CLIENT SOURCE IP>
Amazon DCV for both platforms.
RDP
TCP
3389
<YOUR “CUSTOM” CLIENT SOURCE IP>
RDP for Windows platform.
Figure 13: The list of inbound ports that need to be opened to allow user access to the EC2 instance for the purpose of this post
For the purposes of this post, we’re making a single security group that encompasses both Linux and Windows. If you’re only focusing on a specific operating system, then a security consideration would be to remove the unneeded ports.
For Outbound rules, the default allows all outbound traffic. This is enough for the instance to download packages and reach AWS service endpoints during setup, and because inbound access is already restricted to your IP, it doesn’t open an inbound path. Open outbound traffic is, however, the route that data exfiltration or a compromised host’s callbacks would use. Once your instance is running and you know which destinations it genuinely needs (for example, HTTPS 443 to AWS and your package repositories), restrict outbound rules to those destinations rather than leaving them fully open.
Choose Create security group to finish making the security group.
Identity and Access Management
AWS advocates a policy of least permissions, establishing a strong base security standpoint, which necessitates that you add the permissions needed for access to services. To allow your Amazon EC2 workstation instance to access services such as Amazon Simple Storage Service (Amazon S3) (for graphics drivers), you must create a role to encompass these permissions for your instance. You should set up an AWS Identity and Access Management (IAM) profile to allow the instance access to the necessary services.
Navigate to the IAM service page by entering “IAM” into the Service search field (top left), or choose Security, Identity & Compliance > IAM.
Choose Roles (in the left side pane).
Choose Create role, in the top right.
Leave the Trusted entity type as AWS service.
You must use AWS approved NVIDIA GPU drivers, issued through Amazon S3, not only for optimal compatibility and performance, but also to make sure that the necessary professional GRID drivers are automatically provisioned. Therefore, you need a role that can read from Amazon S3. You should use a very generic Amazon S3 read-only policy to allow read access to public S3 buckets (such as the bucket on which AWS shares GPU drivers).
Under Use case, enter “S3” and then choose Next (bottom right).
Search for AmazonS3ReadOnlyAccess and choose the box to the left of the policy to add it to the role. Then, choose Next.
Give your new role a name, for example basic_workstation_role.
Choose Create role.
If later on you want to add more service features to your workstation role (for example to enable write permissions from the workstation to one of your own storage buckets), then you can use the same process to add pre-defined permissions or create your own in JSON.
You now have an account, and the resources needed to launch EC2 instances, which are covered in our next posts.
Conclusion
In this post we have discussed the different generation Amazon EC2 instance families: their memory, network, storage, and GPU options. We have outlined the steps needed not only to prepare an AWS account for running GPU workstations but also to build key infrastructure that is needed to deploy them.
If you want to augment a VFX workstation environment with a dedicated render farm, then consider the managed service AWS Deadline Cloud.
EC2 instance metrics, such as CPU and memory usage, are sent to Amazon CloudWatch, where you can access this data through the AWS Management Console and AWS CLI. This information can be pertinent to discern if an EC2 instance is being over or under provisioned for the work at hand. In other words, it has excessive CPU, memory, and networking resources for the current tasks, and it could be optimized for price, or the alternative where it has not been allocated enough resources to cope. For more information, go to the Amazon EC2 User Guide.
More advanced examples of using Amazon DCV can be found in this “aws-samples” GitHub repo. This includes methods to broker multiple users and instances. Furthermore, DCV Connection Gateway provides a single-entry point for users to connect to multiple DCV sessions across different instances, streamlining access management and improving security through centralized authentication.
Commercial options also exist to perform artist/instance brokering, using Amazon DCV and Amazon EC2 Launch templates. An example of such an offering is Leostream.
For reference, examples of setting up Amazon DCV capable instances, and using AWS CloudFormation templates as a method of deployment, can be found in this GitHub repo.
A greater depth of analysis of bit rates, and latency, surrounding Amazon DCV connections can be found in this AWS HPC post.
About the authors
The collective thoughts of the interwebz
Manage Consent
To provide the best experiences, we use technologies like cookies to store and/or access device information. Consenting to these technologies will allow us to process data such as browsing behavior or unique IDs on this site. Not consenting or withdrawing consent, may adversely affect certain features and functions.
Functional
Always active
The technical storage or access is strictly necessary for the legitimate purpose of enabling the use of a specific service explicitly requested by the subscriber or user, or for the sole purpose of carrying out the transmission of a communication over an electronic communications network.
Preferences
The technical storage or access is necessary for the legitimate purpose of storing preferences that are not requested by the subscriber or user.
Statistics
The technical storage or access that is used exclusively for statistical purposes.The technical storage or access that is used exclusively for anonymous statistical purposes. Without a subpoena, voluntary compliance on the part of your Internet Service Provider, or additional records from a third party, information stored or retrieved for this purpose alone cannot usually be used to identify you.
Marketing
The technical storage or access is required to create user profiles to send advertising, or to track the user on a website or across several websites for similar marketing purposes.