Post Syndicated from Jigar Bhatt original https://aws.amazon.com/blogs/security/penetration-testing-every-deployment-with-aws-continuum/
Most security tooling that fits into a CI/CD pipeline—static analysis (SAST), software composition analysis (SCA), and dynamic scanners (DAST)—flags potential issues from patterns and signatures. A flagged pattern shows you where to look; penetration testing is what confirms whether something is actually exploitable. That confirmation has traditionally come from a periodic, out-of-band engagement that runs on a schedule rather than on a deploy, so deploys between engagements reach production with that confirmation still pending.
AWS Continuum for penetration testing (formerly AWS Security Agent) is a service that uses AI agents to find and confirm exploitable vulnerabilities in your running applications. In this post, we walk you through making it a post-deployment gate in your pipeline. The gate runs a penetration test that is automatically scoped to the change you just deployed, and it can block promotion to production when a finding is at or above a severity threshold you choose. Because each run tests only the change since the last passing gate rather than the whole application, it is fast and economical enough to run on every deploy. We give a high-level overview of the pattern, which can be applied on four major CI/CD platforms: GitHub Actions, GitLab CI/CD, Bitbucket Pipelines, and Azure DevOps Pipelines. We then provide a specific worked example for GitHub Actions.
By the end, you will have a pipeline that deploys a change to a staging environment, runs a scoped penetration test against the deployed change, and promotes the change to production only when the gate passes.
The following diagram shows the end-to-end flow. Your CI/CD pipeline deploys to staging, then the pentest gate step authenticates to your AWS account through OpenID Connect (OIDC) and calls Continuum for penetration testing, which runs the scoped test against the staging environment. The gate waits for the result, reports the outcome back to your pipeline, and conditionally blocks promotion to production. All testing runs server-side in your AWS account, so no penetration testing logic runs on your CI/CD runner.
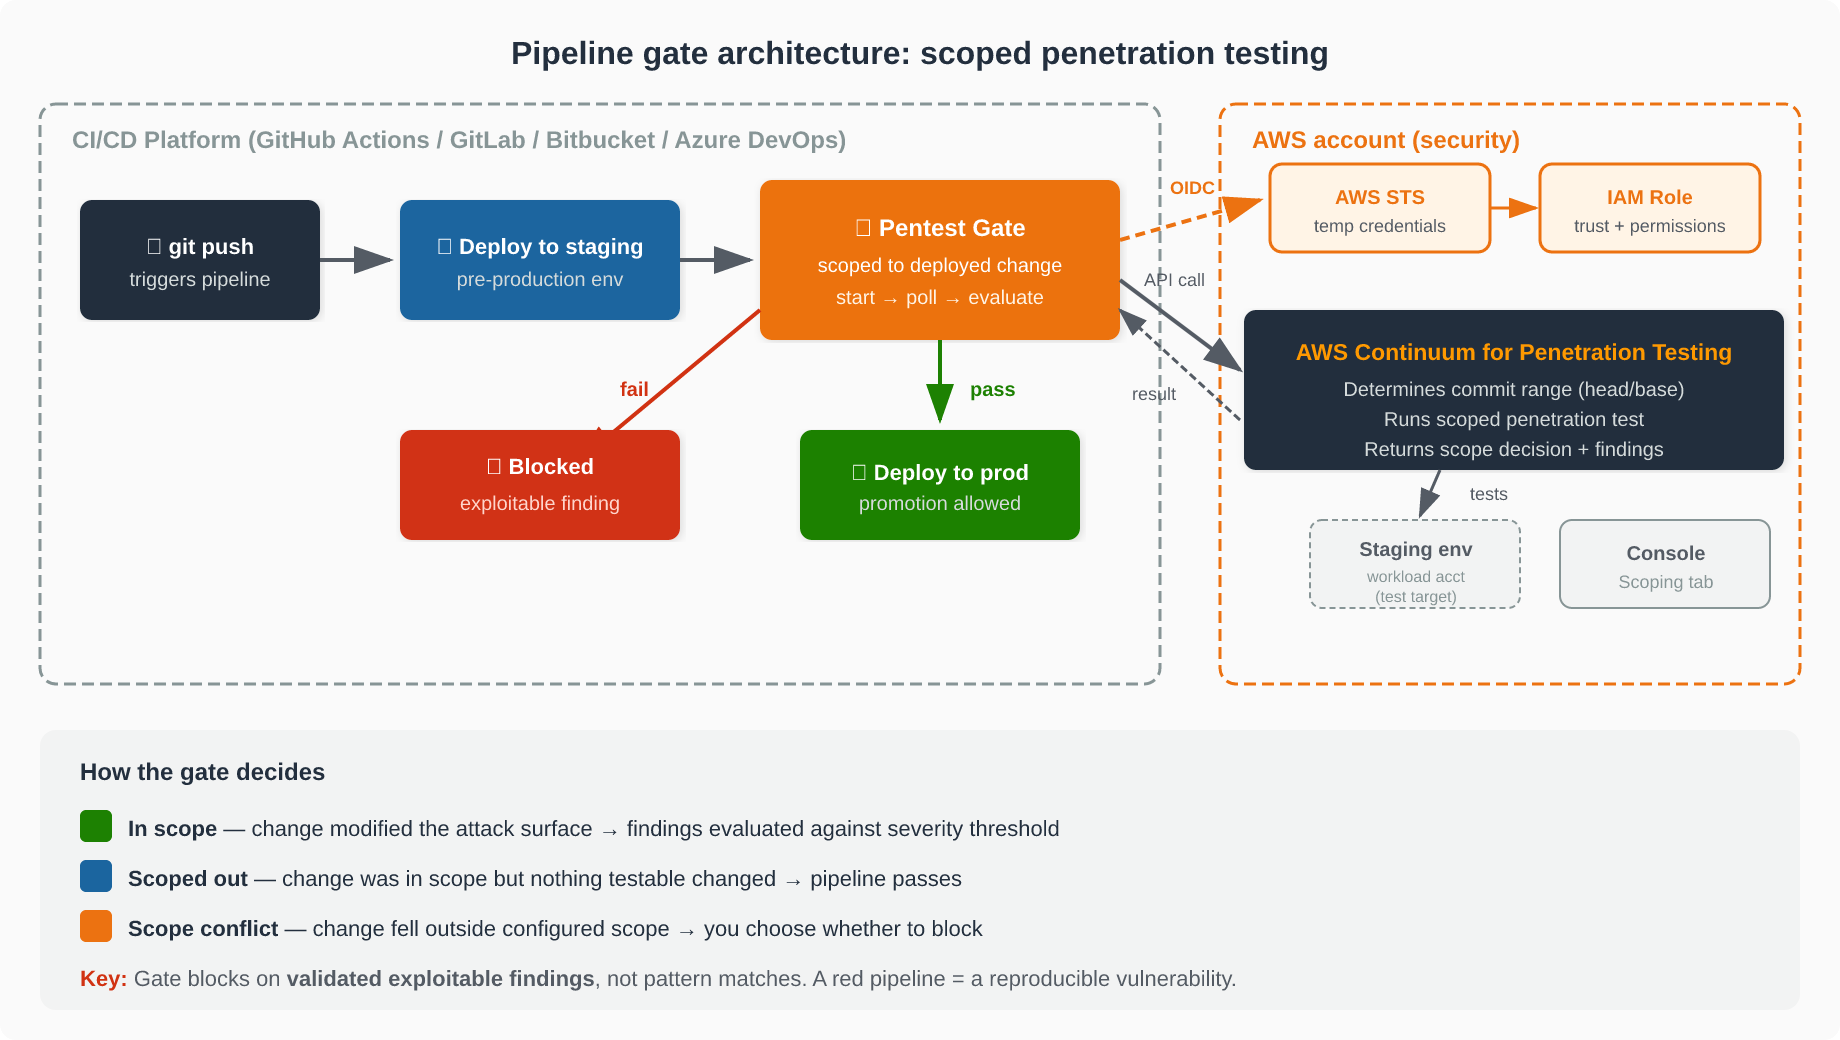
Figure 1: Pipeline gate architecture: Your CI/CD pipeline deploys to staging, the pentest gate authenticates via OIDC and calls Continuum for penetration testing, which returns a scope decision that gates promotion to production.
Why scoping to the change matters
What makes the gate practical to run on every deploy is that it scopes each test to the change you just deployed. Continuum for penetration testing determines the commit range—the head is the commit being gated, and the base is the previous commit the gate already cleared—and tests only what changed. Testing the change instead of the whole application is what keeps a per-deploy penetration test fast and cheap enough to belong in a pipeline rather than on a quarterly calendar.
Each run returns one of three scope decisions: in scope (the change modified the attack surface—findings are evaluated against your threshold), scoped out (the change was within scope but nothing security-relevant changed—the pipeline passes), or scope conflict (the change fell outside the configured scope and was not tested—you choose whether that blocks). The Continuum for penetration testing console records the decision and the commit range on the Scoping tab of each run. When a gate blocks, you can see exactly why. For the full mechanics of how the commit range is computed and validated, see How the pipeline integration scopes the test.
Because the gate blocks on findings that Continuum for penetration testing validated as exploitable rather than on pattern matches, a red pipeline carries a clear meaning: a reproducible vulnerability in the change, waiting to be fixed before promotion.
Setting up the gate
The gate takes three steps to set up: configure a penetration test, create an AWS Identity and Access Management (IAM) role that your pipeline can assume, and add the gate step to your pipeline.
Before you start, you need an AWS account with permission to create both an IAM OIDC identity provider and an IAM role, and a staging environment the penetration test can reach.
Step 1: Configure the penetration test
Complete the one-time setup described in Before you start: verify your target domain, create a penetration test in your Agent Space, enable CI/CD mode, and connect your repository. Note the Agent Space ID (as-…) and penetration test ID (pt-…), because you pass both to the gate step in Step 3. The pipeline tests whatever this penetration test is configured to test, so its target and scope set what the gate covers.
Step 2: Create the IAM role
Authentication uses OIDC federation rather than stored keys. Your CI/CD provider issues a short-lived token identifying the pipeline, and AWS Security Token Service (AWS STS) exchanges it for temporary credentials when the pipeline assumes an IAM role you create. There are no long-lived AWS access keys to store as CI/CD variables, which removes the credential most often leaked from a pipeline.
The security of the gate rests on two policies: the IAM role’s trust policy (which pipelines can assume the role) and its permissions policy (what the pipeline can do once the role is assumed). For the exact policy JSON, the provider-specific OIDC URLs and audience values, and the sub claim format for each CI/CD platform, follow the reference in Scope the trust policy to your pipeline and Grant least-privilege permissions.
The following judgment calls help you decide how to scope these policies.
How tightly to scope the trust policy is the first decision. Pinning the sub claim to a single branch (for example, main) is the right default when a branch is the only one that deploys through this pipeline. If several branches or environments legitimately run the gate, scope to the environment instead of the branch where your provider’s claim supports it—and remember that not every provider carries a branch in the claim at all. On Bitbucket, the repository (and optionally a deployment environment) is as tight as it gets. Start as narrow as your deployment reality allows and widen only when a real branch or environment needs it. Note that GitHub repositories created or renamed on or after July 15, 2026 emit an immutable sub claim with numeric IDs—confirm the exact sub your pipeline emits before you write the policy.
Step 3: Add the gate step to your pipeline
The step is the same idea on every provider—the syntax differs. Pin the integration to an immutable version (a release tag, commit SHA, or pinned component version) so an upstream change can’t alter what runs in your pipeline. For the full settings reference and defaults table, see Defaults the integration ships with.
Before relying on the gate, run it once in dry-run mode. A dry run checks authentication, the Region, and that your repository resolves—without starting a scoped penetration test job. If validation fails, the step fails regardless of your error-handling settings, so a misconfiguration surfaces immediately.
A worked example: GitHub Actions
The following workflow shows the three-job topology that makes the gate work: deploy deploys to staging, security-pentest runs the gate, and deploy-prod promotes to production. Because deploy-prod declares needs: [security-pentest], GitHub skips production whenever the gate fails.
Note: The tutorials use an application with a deliberate SQL injection so the gate has a real finding to block on. Deploy it only to an isolated, non-production environment and remove it when you finish.
Replace the account ID, role name, Region, and the as-/pt- identifiers with your own values.
Two things in this example deserve attention. First, the contents: write permission lets the gate advance the baseline marker it keeps as a ref in your repository—without write access, every run would test a wider range than intended. Second, the role-duration-seconds: 7200 on the credential step must outlast the penetration test; AWS STS rejects a request for more than the role allows rather than reducing it, so set the role’s maximum session duration to at least (timeout + 10) x 60 seconds. A credential that expires partway through makes an otherwise-healthy run fail as though the service were at fault and leaves the cleanup unable to stop the abandoned, still-running job.
The full step-by-step tutorials for all four providers are linked at the end of this post.
Rolling out the gate: from report-only to blocking
The single most important detail before you roll this out.
Three independent settings decide whether the step fails, and each covers a different outcome: severity-threshold (what happens to findings), on-scope-conflict (what happens when the change wasn’t tested), and fail-on-infrastructure-error (what happens when the job couldn’t run). They are independent—relaxing one does not affect the others.
Most teams introduce the gate in report-only mode first—set threshold to NONE so the test runs and publishes findings without blocking anyone’s pipeline. Watch what it finds for a release or two, then tighten the threshold to HIGH. This staged rollout is sound, with one critical caveat:
A run that passes—including a report-only run—advances the baseline. The commits in that run’s range are then recorded as cleared and will not be re-tested when you later tighten the threshold. If you run report-only for a month and then switch to HIGH, the gate only assesses commits after the last report-only run—it does not go back and recheck what it already reported on.
This is by design: relaxing a setting is you accepting the outcome it allows. But if you want a stricter setting to reassess a range an earlier run cleared, override the head and base commit SHAs by setting base-commit-sha and head-commit-sha. Where the marker lives differs by provider; see What advances the baseline, and why that matters for the full matrix.
One default also deserves attention: fail-on-infrastructure-error ships as false (fail-open). For pipelines where promotion requires security sign-off, set it to true from the start.
GitLab: your committed settings are defaults, not a contract
On GitLab CI/CD, a pipeline variable overrides the value a job sets in its own variables: block. That means anyone who can run a pipeline could supply a variable that lowers the threshold, turns on dry-run, or relaxes error handling—and the gate does what the variable says, not what your .gitlab-ci.yml says. Restrict who may override variables in your project’s CI/CD settings before you rely on the gate to hold a release.
Protecting credentials on the runner
The temporary credentials and OIDC token are sensitive for the duration of the step. Three practices matter:
- Keep debug and verbose tracing off for steps that handle credentials—shell-trace modes (for example, GitLab CI’s
CI_DEBUG_TRACE) echo command arguments to the job log in plaintext. - Don’t persist source control credentials in the workspace—set
persist-credentials: falseon the checkout step so a token isn’t written to the runner’s .git configuration where a later step could read it. - Don’t expose the token to untrusted steps—grant OIDC-token permission only to the jobs that need it, and don’t run untrusted code (such as a fork build) in a job that can read the token.
Taking this to production and multiple accounts
The example uses one account for clarity. In practice, your staging and production environments are often separate AWS accounts. The pattern extends cleanly:
- Create the pentest-gate IAM role in the account where the penetration test and Agent Space live—the security account. Your pipeline assumes that role via OIDC regardless of which workload account it deploys to, so you keep one well-scoped gate role rather than a copy or a set of long-lived keys in every account.
- Run the gate against each pre-production environment you promote through, and gate promotion to the next stage on its result. Because the baseline advances only on a passing gate, coverage stays continuous across deploys.
- Set
fail-on-infrastructure-errortotrueand restrict who can override pipeline variables once the gate is holding real releases. - Pin the integration version so upstream changes are reviewed before they run.
For broader guidance of AWS Security Agent—testing against non-production environments, validating AI-generated findings, and IAM—see Security best practices for AWS Continuum.
Cleanup
If you followed one of the provider tutorials to try the gate, complete its Clean up section to remove everything it had you create: the sample application’s staging environment, the IAM role and OIDC identity provider, and—if you created one specifically for the walkthrough—the penetration test (and dedicated Agent Spaces) in the Continuum for penetration testing console. Removing them avoids ongoing charges and takes the intentionally vulnerable sample application offline.
Conclusion
Scoping penetration tests to the deployed change is what makes them practical as a per-deploy gate rather than a quarterly exercise. The key decisions you now have are:
- How strict: Start report-only (
NONE), but know the baseline advances—delete the marker when you tighten. - How to fail: Set
fail-on-infrastructure-errortotruefor anything that requires security sign-off. - How to scope trust: Pin the
subclaim as narrowly as your deployment reality allows. - Where to put the role: One role in a security account, assumed from workloads pipeline via OIDC.
To build the gate end to end on your platform, follow the worked tutorial for your provider:
- Tutorial: Gate a GitHub Actions deployment with a scoped penetration test
- Tutorial: Gate a GitLab CI/CD deployment with a scoped penetration test
- Tutorial: Gate a Bitbucket Pipelines deployment with a scoped penetration test
- Tutorial: Gate an Azure DevOps deployment with a scoped penetration test
For the concepts and full reference, see Run penetration tests from your CI/CD pipeline.
If you have feedback about this post, submit comments in the Comments section below.