Post Syndicated from Mike Brouwers original https://aws.amazon.com/blogs/big-data/automate-etl-pipeline-creation-with-amazon-bedrock-agentcore-and-aws-glue/
If you run data pipelines, you know how much work they can take to set up, sometimes only to break without you realizing. That doesn’t even include data from sources too small to justify a project of their own, such as instrument exports, partner CSV files, and database tables. Each one can take an engineer days to map, code, test, and provision, and the work needs to be repeated when the schema changes.
Agentic Data Ingestion, the solution referenced in this post, automates that work with agentic AI. You point it at a file or a database table, and foundation models (FMs) propose the field mapping and write the transformation code. The agent tests that code on Apache Spark before it deploys the code as an AWS Glue job, and you approve or reject the result at the mapping or code testing step. In our test deployment, a run at sample scale costs about USD $0.10–0.25, and the idle deployment about USD $15–20 a month. For more information, see Cost to run the solution.
To see it in action before you deploy, try the interactive demo.
In this solution, the FMs run on Amazon Bedrock, which is a fully managed service that provides foundation models, and the agents, built with the open-source Strands Agents SDK, run on Amazon Bedrock AgentCore, which hosts and operates AI agents. AWS Step Functions, which provides serverless workflow orchestration, manages each run, and AWS Glue, which provides serverless data integration capabilities, runs the generated jobs. You deploy the whole solution with the AWS Cloud Development Kit (AWS CDK). Before you begin, review the Prerequisites.
Solution overview
The following diagram shows the architecture.
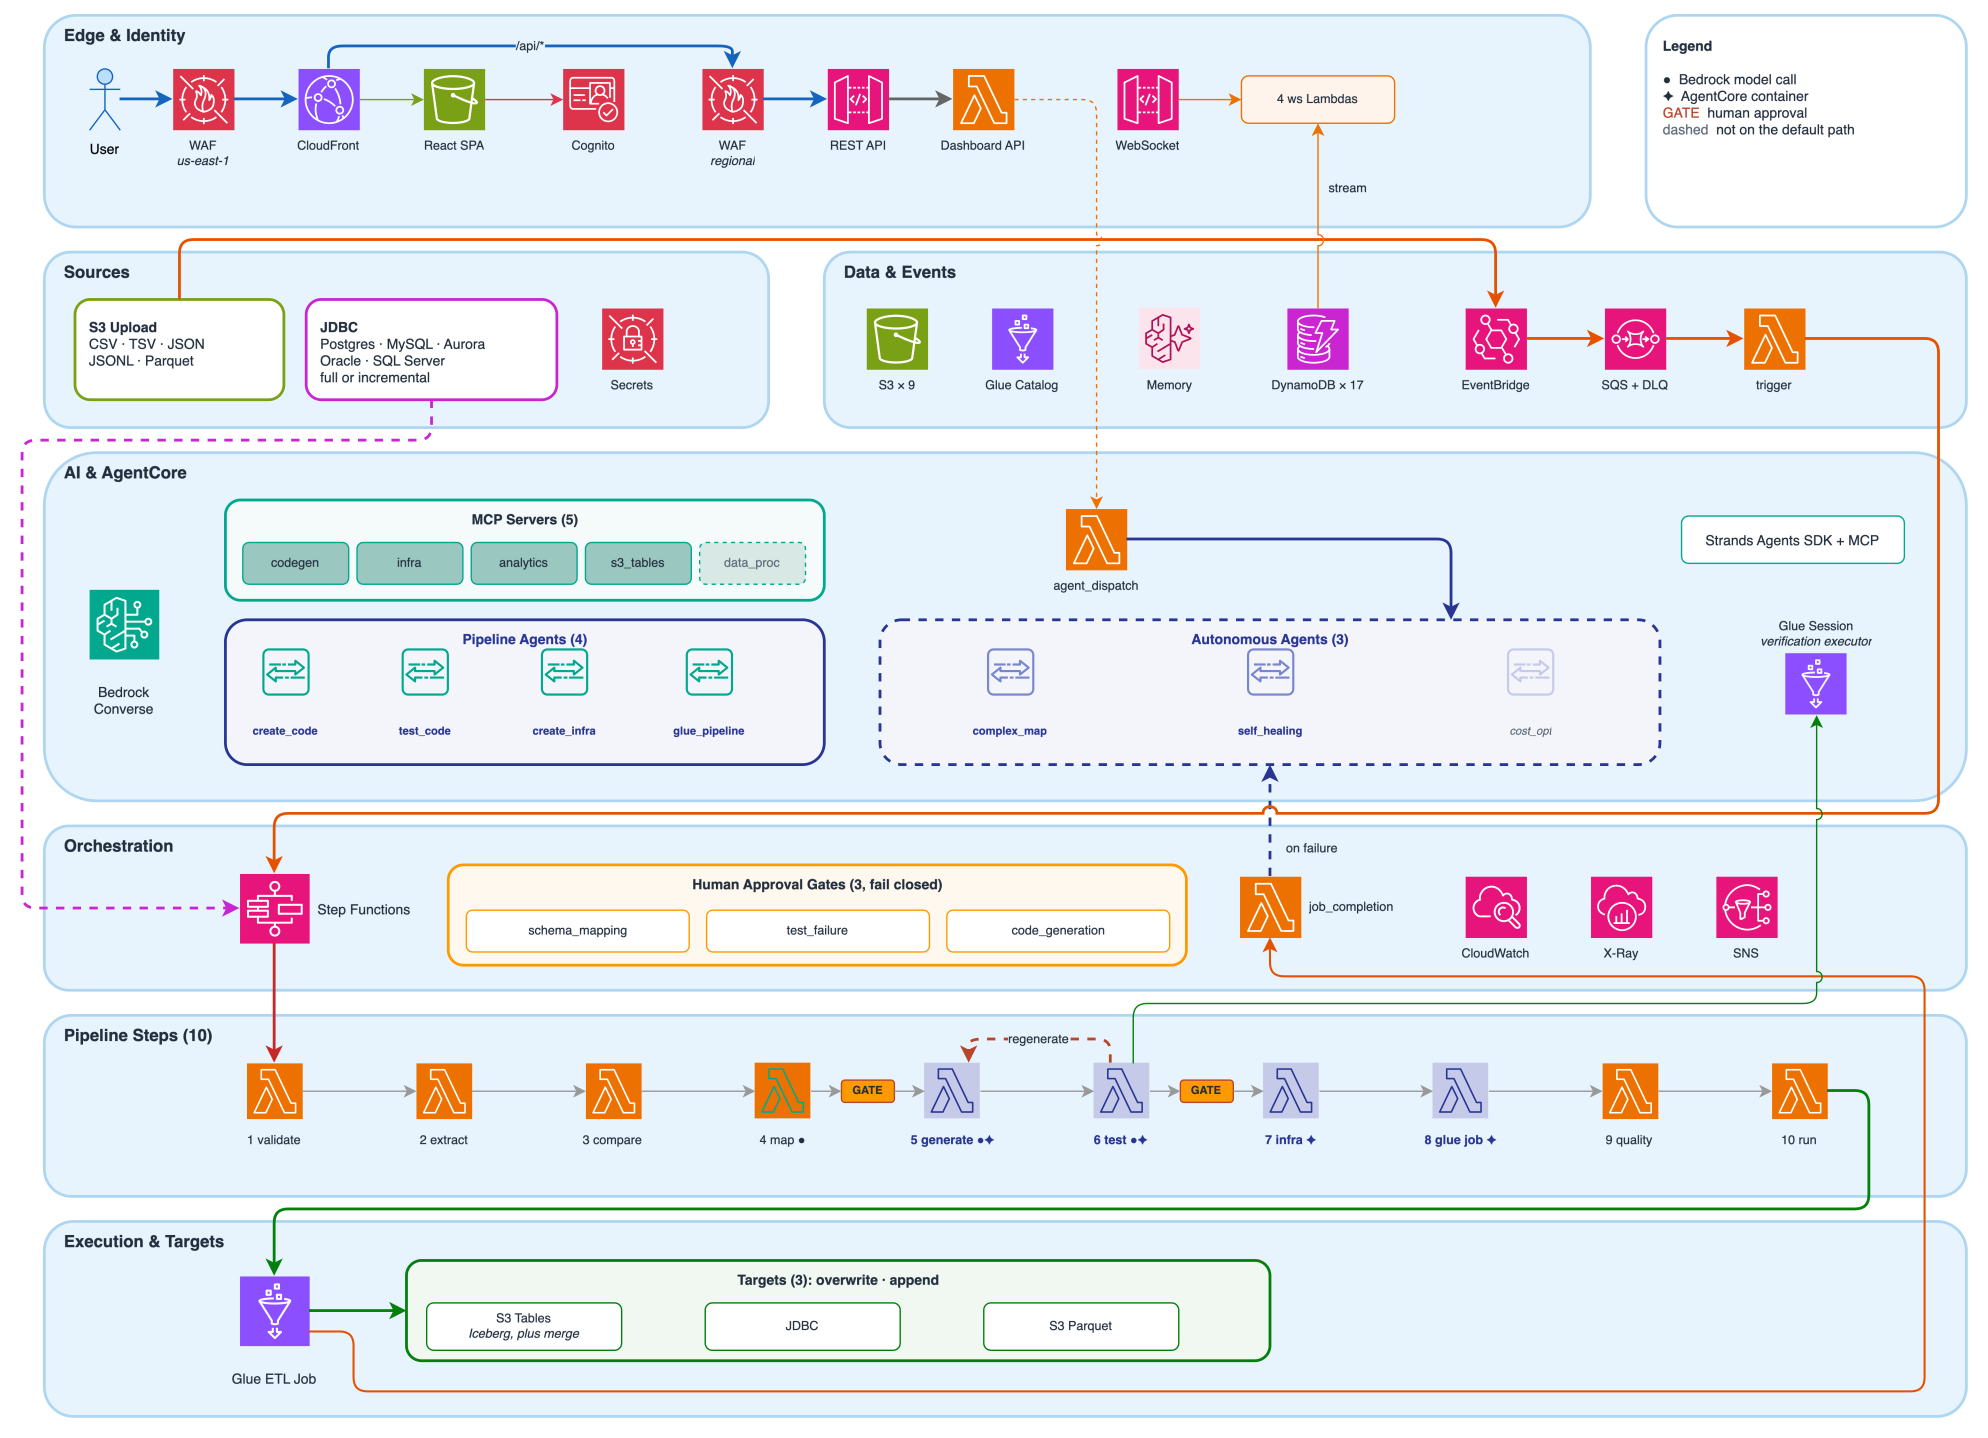
Figure 1: Solution architecture, from sign-in and the data sources through the agents and Step Functions orchestration to the AWS Glue job and its targets
The solution includes a React dashboard that shows each run’s progress and the approval gates. An upload to the source Amazon Simple Storage Service (Amazon S3) bucket travels through Amazon EventBridge and Amazon Simple Queue Service (Amazon SQS), an event bus and a message queue, to a trigger function on AWS Lambda, which provides serverless compute capabilities, starts a 10-step Step Functions workflow:
- File validation – Check format and size from object metadata.
- Schema extraction – Infer field names and types.
- Schema comparison – Detect drift against the target schema.
- Schema mapping – An FM maps source to target fields with confidence scores. (Approval gate).
- Code generation – Generate the PySpark transform and data quality rules.
- Code testing – Run the transform on Spark and check its output. (Approval gate, plus a forced review if tests keep failing).
- Infrastructure provisioning – Create the target if it doesn’t exist.
- AWS Glue job creation – Create the job with a validated configuration.
- Quality checks – Record which data quality rules the job will enforce.
- Run pipeline – Run the AWS Glue job.
The data quality rules, for AWS Glue Data Quality, a capability of AWS Glue, come from the approved mappings and run inside the job, which quarantines failing rows before it writes. They’re on by default for file uploads into Amazon S3 Tables, a capability of Amazon S3, which stores Apache Iceberg tables, and optional for the other targets.
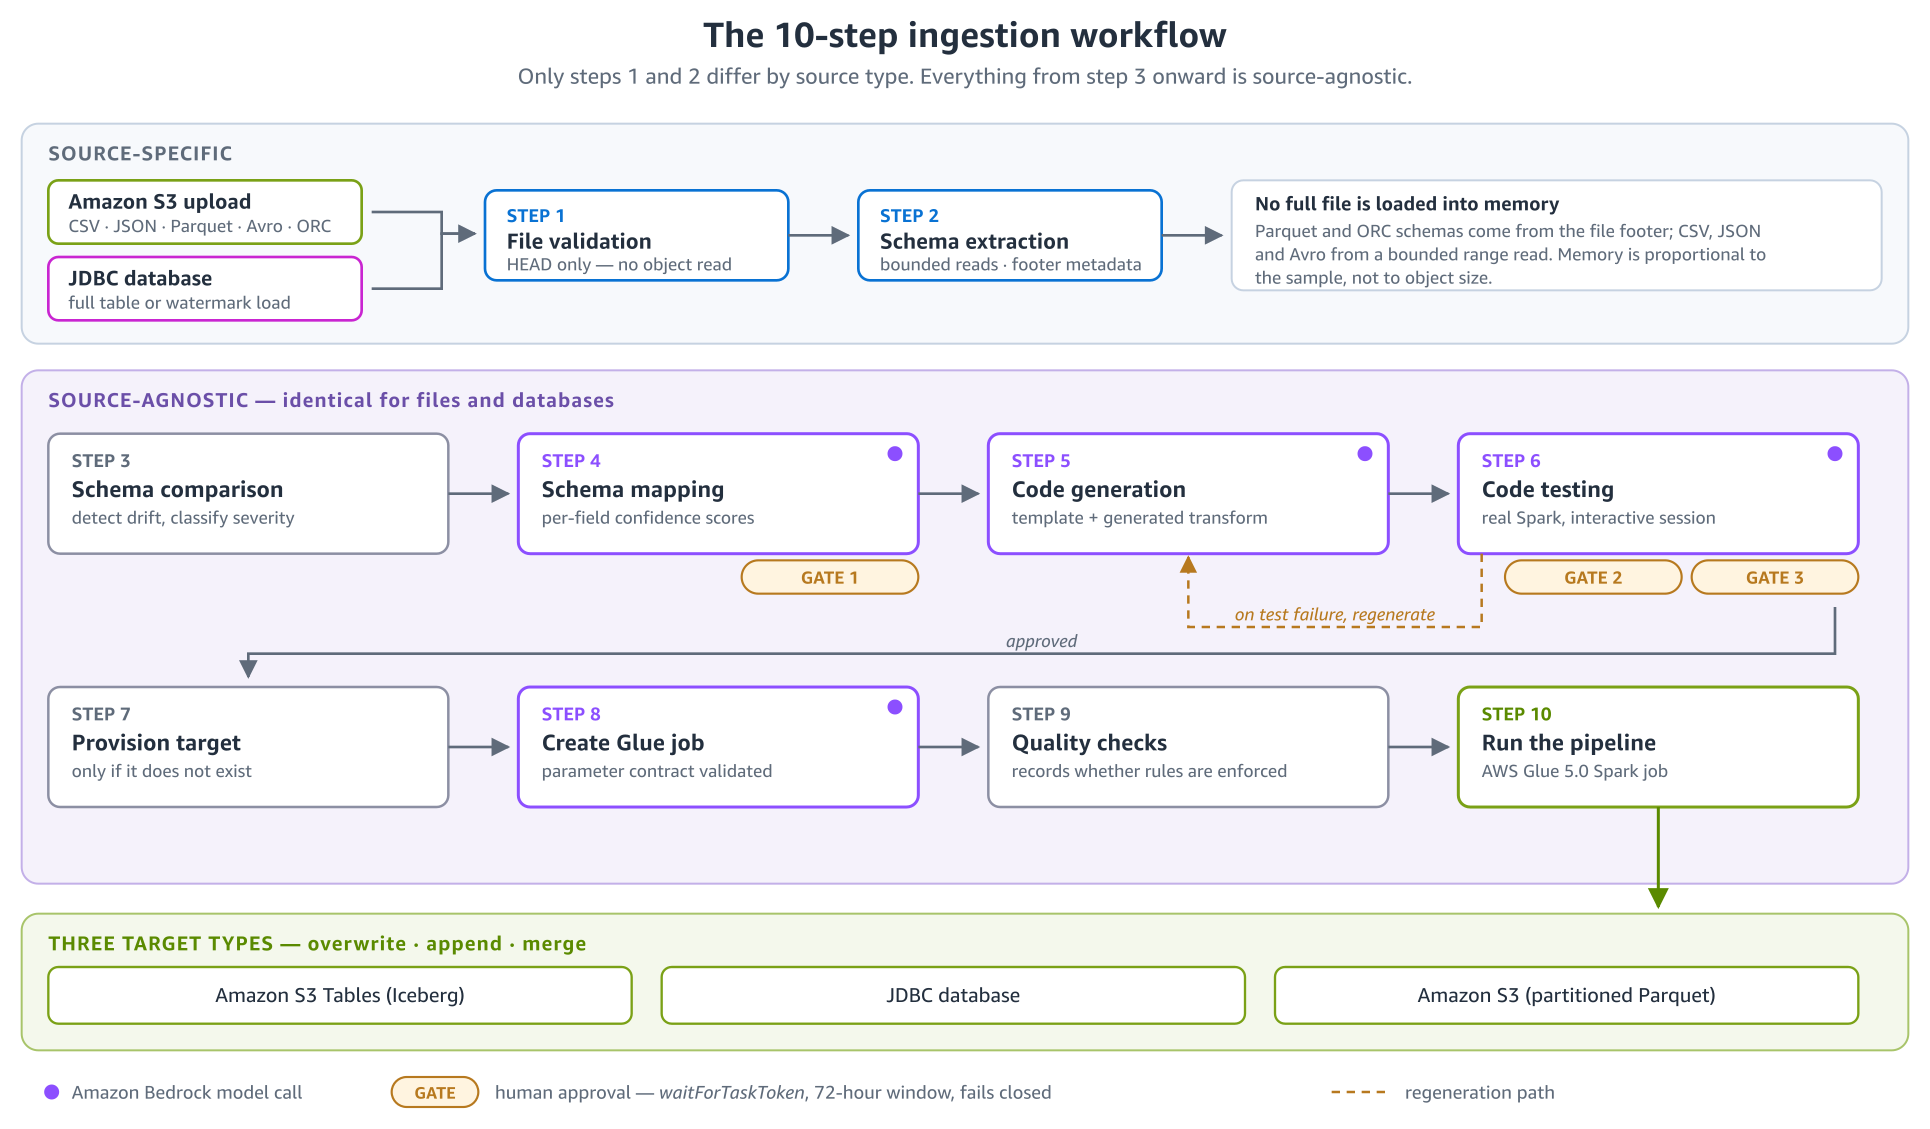
Figure 2: The 10-step workflow. Steps 1 and 2 depend on the source type, approval gates follow steps 4 and 6, a failing test returns to step 5, and the job writes to one of three target types
Supported sources and targets
| Source | Details |
| Amazon S3 upload | CSV (including TSV and pipe-delimited), JSON, Parquet, Avro, ORC, and Excel (.xlsx, one worksheet per run). Each file starts its own run. |
| JDBC database | PostgreSQL, Amazon Aurora, MySQL, MariaDB, Oracle, or SQL Server through the AWS Glue Java Database Connectivity (JDBC) connector, on demand or on a schedule. Incremental loads read only rows newer than the last run, keyed on a timestamp or numeric watermark column. |
| Target | Details |
| Amazon S3 Tables | Apache Iceberg tables (append, overwrite, or merge), queryable from Amazon Athena, Amazon EMR, and Amazon Redshift after you enable the analytics integration. |
| JDBC database | Relational databases, including Amazon Relational Database Service (Amazon RDS). Credentials come from AWS Secrets Manager at run time. |
| Amazon S3 (Parquet) | Partitioned Parquet in a bucket you own. |
How we made generated code reviewable and repeatable
In our very first attempt, we asked the model to create the whole AWS Glue script, more than 500 lines on each run. Reviewing that each time wasn’t sustainable. It failed for random reasons, and because the model is non-deterministic, the next run could fail somewhere new no matter how much we optimized the prompt. To solve this, we made the job as deterministic as we could. A human-written/reviewed Jinja2 template for each target type now supplies the scaffold, and the FM writes only the transformation block, typically 5–15 lines for these samples, which is checked against an allowlist of permitted constructs before the job is created.
In our next iteration, these jobs failed inconsistently with GlueArgumentError because different parts of the code used different names for the same job arguments. We made the code itself consistent, but not how the arguments were named. The solution parses the parameters that the rendered code reads with getResolvedOptions, resolves a value for each, and refuses to create the job if one is missing.
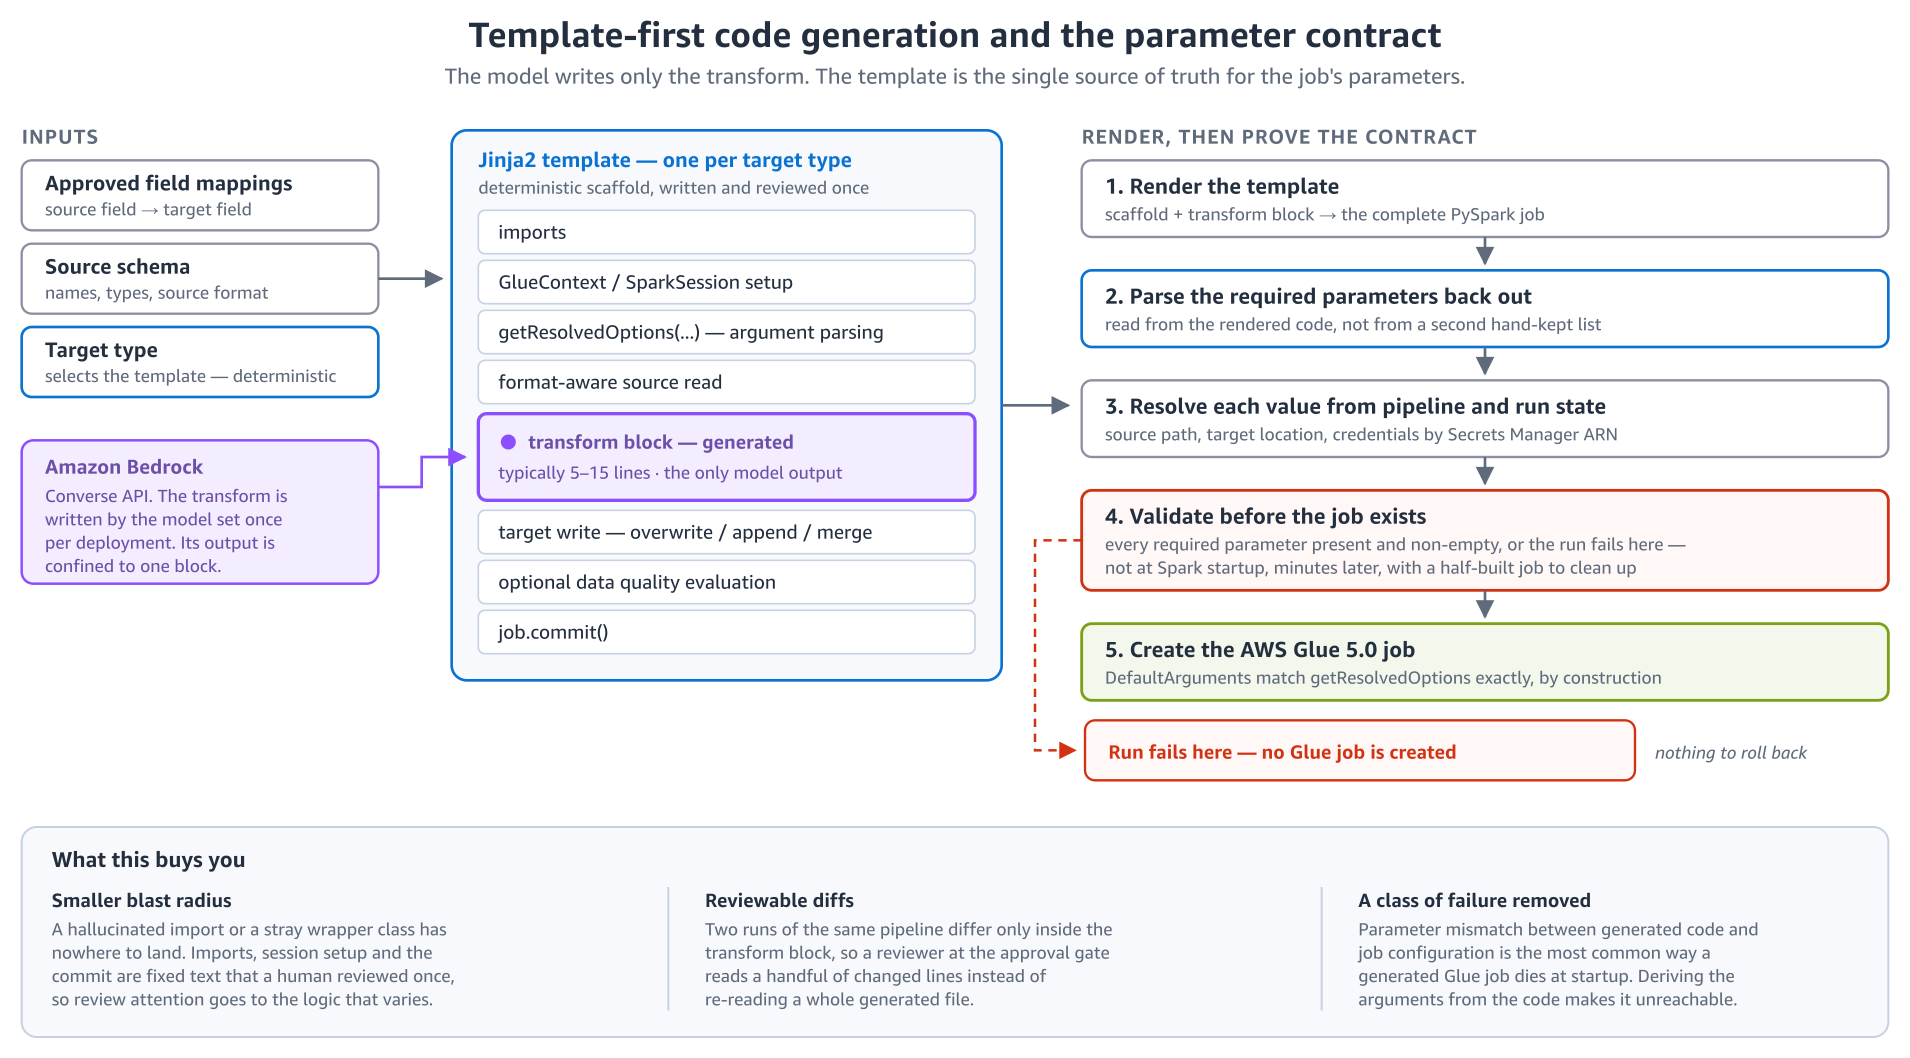
Figure 3: Template-first code generation. The model writes only the transform block, and the job’s parameters are validated before the job is created
When we first started testing, we translated the PySpark into pandas, which we thought would simplify testing. But this approach couldn’t express everything PySpark can. It failed inconsistently and could never guarantee the script would work, which defeats the purpose of testing. So now the transform runs in an AWS Glue interactive session on the same Spark version as the job, against a 100-row sample of the source file. Its output is checked for record counts, nulls, and schema compliance. Database sources are tested on rows generated from the schema instead, because the test session in the workflow has no access to your databases.
Human approval gates
To review the results before continuing while you build trust in the pipeline, two gates pause a normal run and wait for approval, one after schema mapping and one after the code passes its tests. A mapping skips review only when each field pair is high-confidence and corroborated by a name match, and a reused mapping goes to review by default.
The gates fail closed, so if the workflow can’t tell whether a step needs review, it waits for a person. A run left waiting at a gate for 72 hours fails, and approvals and rejections are recorded with the reviewer’s identity. Two agents can help along the way. When mapping confidence is low, a complex-mapping agent adds sample values and specific questions to the mapping review. When an AWS Glue job fails, a self-healing agent starts one new run, which regenerates the code after a schema or type error or uses a larger worker after an out-of-memory error. It skips the retry when a second run could duplicate data the failed job already wrote, or when a retry can’t fix the error, such as a permissions problem. The run then stays failed, with the agent’s diagnosis on its detail page. For the full rules, see Approval Gates and the agents guide.
Customer perspective: Montai Therapeutics
Montai Therapeutics applies the same pattern to scientific data. Rather than hand-writing a parser for each new assay format, the team embedded an agent that generates the parser into the ingestion application they already had.
“We have implemented agentic parser generation to ingest semi-structured or variably formatted scientific data into our schema-controlled system of record. Embedding the parser function generation agent into our existing ingestion app has brought lead time to onboard and deploy new assays and protocols to near zero (5 to 10 minutes for parser generation and output checking on an agent runtime), where before there could be days to weeks of developer time spent scripting bespoke parsing functions that may only be used a few times.
The biggest business impact has been the proportion of experimental data that now lands in our data lake rather than in people’s inboxes, which will funnel into improving our drug specificity and efficacy predictive models. Time spent by scientists troubleshooting data formatting issues is now relegated to solving the scientific problems at the core of our business strategy.”
— Kevin Klicki, Senior Engineer – Bioinformatics, Montai Therapeutics
Security considerations
Generated code runs in an isolated test session under a read-only role before an AWS Glue job exists. The solution creates dedicated AWS Identity and Access Management (IAM) roles for pipeline jobs, scoped to that pipeline and bounded by a permissions boundary, with separate roles for agent runtimes. Data is encrypted at rest and in transit, and JDBC credentials are referenced only by their Secrets Manager Amazon Resource Name (ARN), so they don’t appear in job arguments.
You sign in through Amazon Cognito, with multi-factor authentication (MFA) required by default. The dashboard is served through Amazon CloudFront behind an AWS WAF web access control list (web ACL) with managed rules and a rate limit. A second web ACL admits only API requests that come through CloudFront. By default, signed-in users have full dashboard access. The solution doesn’t include identity federation or role-based access, which the README’s Hardening for real data section lists as next steps for production.
Cost to run the solution
We measured these figures on our test deployment in the US West (Oregon) AWS Region (us-west-2) with the repository’s sample files, which have seven or eight columns, and priced the usage at public list prices.
Idle, the solution costs about USD $15–20 per month. About USD $14 is the two AWS WAF web ACLs and their rules, up to USD $5 is Amazon CloudWatch monitoring, depending on your free tier, and storage and one secret add about USD 1. Everything else bills per use.
A run at sample scale costs about USD $0.10–0.25:
| Component | Grows with | Per run, measured | Basis |
| Amazon Bedrock, Claude Sonnet 4.6 | Number of fields and model calls | USD $0.05–0.14 | About 10,500 tokens over three model calls on a clean run, up to 32,000 with regeneration, at USD $3.30 and USD $16.50 per million input and output tokens (us. inference profile) |
| AWS Glue interactive session (testing) | Test attempts | USD $0.01–0.02 per attempt | Two G.1X workers at USD 0.44 per data processing unit (DPU) hour |
| AWS Glue job | Data volume | About USD $0.02 | About 0.04 DPU hours |
| Amazon Bedrock AgentCore runtime, Step Functions, Amazon DynamoDB, Amazon S3, CloudWatch | Number of runs | Under USD $0.05 | Amazon Bedrock AgentCore runtime at USD $0.0895 per vCPU hour and USD $0.00945 per GB hour |
The AI cost depends on the number of fields rather than rows, because prompts carry schemas and at most 100 sample rows. A scheduled pipeline repeats most AI steps on each run and skips only the mapping call when the schema is unchanged. We haven’t yet measured a wider source or a lower-cost model such as Amazon Nova Pro. For current prices, see Amazon Bedrock, AWS Glue, Amazon Bedrock AgentCore, and AWS WAF pricing.
Prerequisites
You don’t need prior experience with Amazon Bedrock AgentCore or Strands Agents. You need the following:
- An AWS account, with credentials that can create IAM roles and the solution’s resources in your Region and in US East (N. Virginia) (
us-east-1). The AWS WAF stack deploys tous-east-1because CloudFront requires its web ACL there, so service control policies (SCPs) that restrict Regions must allow it. - Access to Anthropic Claude Sonnet 4.6 in Amazon Bedrock. See Enable the Claude model.
Node.js20 or later, Python 3.12 or later, the AWS Command Line Interface (AWS CLI), and Docker. The deployment script installs the AWS CDK CLI for you.- A host that can build
linux/arm64images, because Amazon Bedrock AgentCore runtime supports only ARM64 containers, with about 100 GB of free disk, mostly for the Docker images. Apple silicon or an AWS Graviton instance such as at4g.largewith a 100 GBgp3volume builds them natively (see the EC2 build host guide). An x86 host needs QEMU emulation, which./deploy.sh --checkdetects. The browser-based AWS CloudShell can’t build the project, because it has no Docker daemon. - An authenticator app for MFA.
- Note: This solution uses the
us.anthropic.claude-sonnet-4-6cross-Region inference profile, which is available only from US AWS Regions. If you deploy outside the US, update the model ID in the configuration before deploying.
We tested the solution in us-west-2. Other Regions need the same Amazon Bedrock models and inference profiles, AgentCore, AWS Glue 5.0, and, for S3 Tables targets, Amazon S3 Tables.
Deploy the solution
The deployment script checks the prerequisites, builds the container images, bootstraps both Regions, and deploys eight AWS CloudFormation stacks.
Note: Stack names end in -dev. If you deploy with ./deploy.sh --environment <name>, use -<name> in the commands that follow.
To deploy the solution:
- Clone the repository:
- Set your AWS profile and Region:
- (Optional) Check the prerequisites without changing anything. The script prints
All prerequisite checks passed.or lists each problem with its fix. - Deploy the solution. A first deployment can take up to roughly 20 minutes on a
t4g.large, mostly to build container images. - Confirm that the script exits without an error and its last line reads
All 8 stacks present and healthy.If a stack isMISSINGor failed, check its Events tab in the AWS CloudFormation console, fix the error, and run./deploy.shagain.
Run the remaining commands in a shell where AWS_PROFILE and AWS_REGION are still set. Self-sign-up is disabled, so you create the first user yourself.
To create your first user and sign in:
- Create a user with a random temporary password, replacing
<your-email-address>with your email address. The temporary password expires after 24 hours. - Get the dashboard URL:
- Open the dashboard URL and sign in with your email address and the temporary password. Set your own password, then enroll your authenticator app.
Enable the Claude model
The AI steps call the default model, Claude Sonnet 4.6, which needs a one-time setup per account. The first call to the model enables it, and that call needs AWS Marketplace permissions that the solution’s roles deliberately don’t have, so you make it with your own credentials.
To enable the Claude model:
- Submit Anthropic’s one-time use case details, either by choosing an Anthropic model in the model catalog of the Amazon Bedrock console or with the
PutUseCaseForModelAccessAPI. For details, see Request access to models. - Call the model once:
- Confirm that you get a text reply. If you get
AccessDeniedExceptionright after submitting the use case details, wait a few minutes and try again.
Without this setup, the deployment still works, but the AI steps fail with AccessDeniedException.
Run a pipeline
Next, you create a pipeline that loads a sample customer file into a new Amazon S3 Tables table, then review the run. With the sample file, a run takes roughly 5–15 minutes plus the time you spend at the gates. The following interactive demo shows the same steps, and Human approval gates describes what each gate checks.
Interactive demo: Agentic Data Ingestion dashboard walkthrough.
To create a pipeline:
- On the dashboard, choose Create Pipeline. On Name & Description, enter a Pipeline Name, and choose Next.
- On Source, for Source Type, choose S3 Upload, and choose Next.
- On Target Destination, for Target Type, choose S3 Table Bucket, and then choose Create new.
- Enter a Bucket name, Namespace, and Table name. The bucket name must be unique in your account and Region (see the naming rules). For Write Mode, keep the default, Append, and choose Next.
- On Target Schema, for Schema Source, choose Upload, then use Choose file to select
tests/test-data/target_schema.jsonfrom your local clone of the repository. Choose Next. - On AI Model & Options, for AI Model, choose Claude Sonnet 4.6. Keep the approval and data quality settings at their defaults, and choose Next.
- On Review & Create, check the settings, and choose Create Pipeline.
To run and review the pipeline:
- On the pipeline’s overview page, choose Upload File.
- Select
tests/test-data/customer_data_4.csvfrom your local clone, and choose Upload. The upload starts a run. The file’s column names differ from the target schema (for example,email_addressinstead ofemail), which gives the mapping step something to decide. - When the run pauses at a gate, choose Approvals in the navigation bar.
- Choose Review next to the pending approval, check the mapping or the code, optionally add a comment, and choose Approve or Reject. Repeat steps 3 and 4 for each gate the run reaches.
- When the run completes, open it from Recent Runs on the pipeline’s overview page, and review the Step Flow, Code, and Data Quality tabs.
Note: The mapping review lists each field pair with its Confidence, and the code review shows the transform with its Test Report.
To read from a database instead, choose JDBC Database as the Source Type. You need a Secrets Manager secret with username and password keys, an Amazon S3 gateway endpoint in the database’s subnet, and a security group that allows traffic from itself on the database port. The JDBC source guide covers the details.
Clean up
Delete your pipelines first, while the dashboard is still deployed.
To clean up the deployed resources:
- For each pipeline, choose Archive Pipeline on its overview page. Then choose Archived in the navigation bar, choose Delete next to the pipeline, and confirm with Continue and Permanently Delete. This removes the pipeline’s AWS Glue job, rules, and uploaded files, and for a database source the AWS Glue connections and crawler it created.
- From the repository root, list what the teardown script would delete. Without
--force, it deletes nothing. - Delete the stacks. If you deployed with
--environment, pass the same option. The script also deletes the DynamoDB tables the Data stack retains and the project’s IAM roles and policies across the account, because IAM is global. - Delete what your pipelines created at run time: the S3 Tables resources, which hold the ingested data and bill for storage, and any AWS Glue databases or secrets left with the project’s name prefix. Find the table bucket ARN with
aws s3tables list-table-buckets, and the leftover names with the two list commands.
The CDK bootstrap stack, CDKToolkit, stays in both Regions. Delete it only if nothing else in the account deploys with CDK.
Conclusion
The approval gates are where this gets interesting in practice. The mapping review in particular surfaces assumptions about your data that are worth catching before a job runs in production. We’ve seen how the model sometimes picks a reasonable mapping that’s technically wrong for the business context, which is exactly why the human review step exists. We’ve only measured our own files and sources so far. If you run it on a wide source, say, 100 columns from a production instrument export, we’d genuinely like to know whether the mapping and costs held up.
It’s a reference solution, so the next step is adding your own sources, targets, data quality rules, approval policies, and production identity setup.
The Amazon Bedrock AgentCore Developer Guide, AWS Glue Developer Guide, Strands Agents documentation, and the solution repository have the details for extending the solution beyond what we’ve covered here.
Try out the solution in your account with one of your sources and let us know what you built in the comments.