Post Syndicated from Rajendra Kulkarni original https://aws.amazon.com/blogs/architecture/block-dns-threats-with-infoblox-rules-in-amazon-route-53-resolver-dns-firewall/
Blocking DNS threats at the lookup stage helps you interrupt malware delivery, command-and-control channels, and data exfiltration. Attackers use domain names to reach your network and to move data out of it. With Amazon Route 53 Resolver DNS Firewall (DNS Firewall), you can already filter outbound DNS queries from your Amazon Virtual Private Cloud (Amazon VPC) resources, but keeping domain lists current takes ongoing effort.
Infoblox Threat Defense is now available in preview in DNS Firewall, providing partner-managed DNS threat intelligence directly in your rule groups. You subscribe in AWS Marketplace from the DNS Firewall rule workflow, and Infoblox maintains the threat data for you.
In this post, we show you how to add an Infoblox managed rule to a DNS Firewall rule group, test it in alert mode, and then move to blocking. We also cover how to monitor matches and how to clean up resources if you are evaluating the solution.
Solution overview
Figure 1 shows the architecture of the solution. Workloads, such as Amazon Elastic Compute Cloud (Amazon EC2) instances, in your VPC send DNS queries to Amazon Route 53 Resolver. Route 53 Resolver passes each outbound query to DNS Firewall for inspection. DNS Firewall evaluates the query against your rule group, which includes the Infoblox managed rule. DNS Firewall matches are recorded in the Resolver query logs, which you deliver to Amazon CloudWatch Logs. Outside your VPC, Infoblox supplies threat intelligence to the managed rule, and AWS Marketplace supplies the managed rules to the rule group.
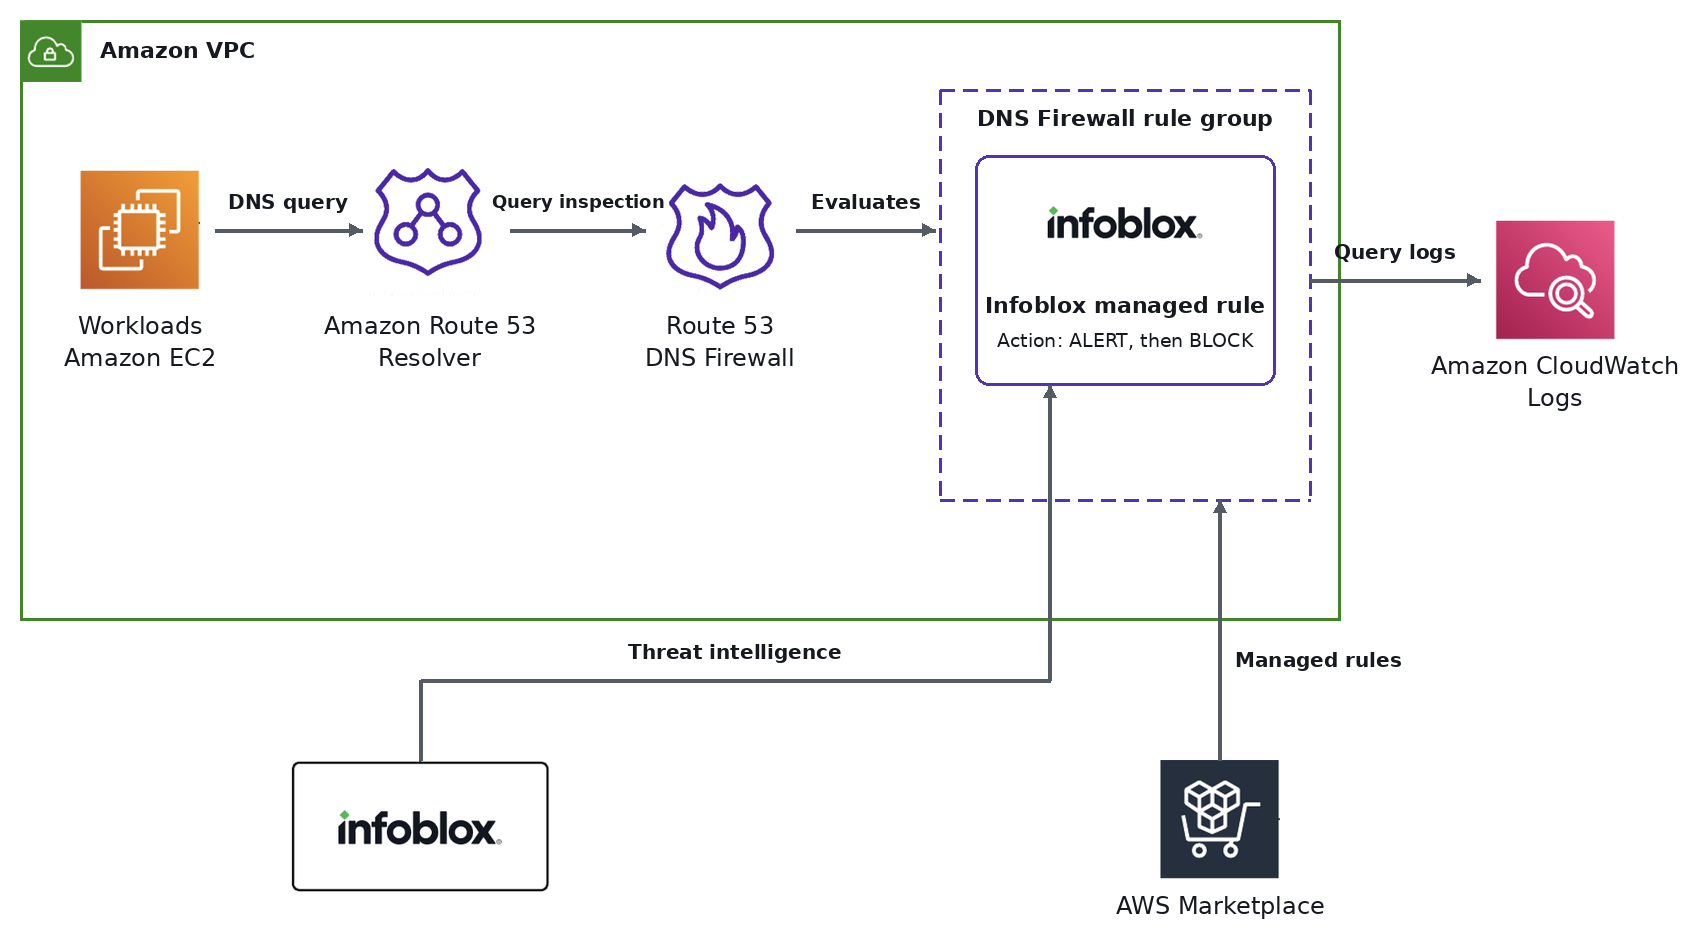
Figure 1: Architecture of the solution
The solution has six components:
- Workloads in your Amazon VPC send DNS queries to Route 53 Resolver.
- Route 53 Resolver passes each outbound query to DNS Firewall.
- A DNS Firewall rule group that you associate with your VPC holds your rules, including the Infoblox managed rule.
- Infoblox threat intelligence supplies the domain categories that the managed rule matches against. Infoblox updates this data automatically, so you do not maintain feeds or domain lists.
- AWS Marketplace handles your subscription. DNS Firewall generates metering records for the rule groups you subscribe to, and the charges appear on your AWS bill.
- CloudWatch Logs stores the Route 53 Resolver query logs that you use to review matches.
Subscription and billing through AWS Marketplace
You discover, subscribe to, and manage the Infoblox protections in the same DNS Firewall workflow you already use. You can manage rule groups with the AWS Management Console, the AWS Command Line Interface (AWS CLI), or the AWS SDKs. Because metering is built in, you do not need a separate billing system with Infoblox. Usage appears alongside your other AWS costs, so cloud, security, procurement, and finance teams can work from one purchasing and reporting model.
Solution walkthrough
Prerequisites
For this walkthrough, you need the following:
- An AWS account with AWS Identity and Access Management (IAM) permissions for the actions listed in the next section.
- An Amazon VPC with workloads that use Route 53 Resolver.
- A DNS Firewall rule group, or permission to create one.
The Infoblox managed rule requires the DNS Firewall Advanced pricing option and a subscription through AWS Marketplace. For details, see Cost considerations later in this post.
Required IAM permissions
Your IAM role or user needs the following actions. Use least-privilege permissions in production and scope resources where the service supports it. For the full list of actions, see Actions, resources, and condition keys for Amazon Route 53 Resolver in the Service Authorization Reference.
- DNS Firewall rule groups and rules:
route53resolver:CreateFirewallRuleGroup,route53resolver:GetFirewallRuleGroup,route53resolver:ListFirewallRuleGroups,route53resolver:DeleteFirewallRuleGroup,route53resolver:CreateFirewallRule,route53resolver:UpdateFirewallRule,route53resolver:ListFirewallRules,route53resolver:DeleteFirewallRule. - Domain lists for the allow list:
route53resolver:CreateFirewallDomainList,route53resolver:UpdateFirewallDomains,route53resolver:ListFirewallDomains,route53resolver:GetFirewallDomainList,route53resolver:ListFirewallDomainLists,route53resolver:DeleteFirewallDomainList. - VPC association and fail-open setting:
route53resolver:AssociateFirewallRuleGroup,route53resolver:DisassociateFirewallRuleGroup,route53resolver:GetFirewallRuleGroupAssociation,route53resolver:ListFirewallRuleGroupAssociations,route53resolver:GetFirewallConfig,route53resolver:ListFirewallConfigs,route53resolver:UpdateFirewallConfig,ec2:DescribeVpcs. - Query logging configuration:
route53resolver:CreateResolverQueryLogConfig,route53resolver:GetResolverQueryLogConfig,route53resolver:ListResolverQueryLogConfigs,route53resolver:AssociateResolverQueryLogConfig,route53resolver:GetResolverQueryLogConfigAssociation,route53resolver:ListResolverQueryLogConfigAssociations,route53resolver:DisassociateResolverQueryLogConfig,route53resolver:DeleteResolverQueryLogConfig. - CloudWatch Logs log delivery (if you choose a log group as the destination):
logs:CreateLogGroup,logs:DescribeLogGroups,logs:CreateLogDelivery,logs:GetLogDelivery,logs:UpdateLogDelivery,logs:DeleteLogDelivery,logs:ListLogDeliveries,logs:PutResourcePolicy,logs:DescribeResourcePolicies. - AWS Marketplace subscription:
aws-marketplace:ViewSubscriptions,aws-marketplace:Subscribe,aws-marketplace:Unsubscribe.
If you send query logs to an Amazon Simple Storage Service (Amazon S3) bucket or an Amazon Data Firehose delivery stream instead, you need the corresponding permissions for that destination.
Cost considerations
This solution has three cost components. For current rates, see Amazon Route 53 pricing.
- DNS Firewall Advanced: You pay an hourly charge for each rule group that contains Advanced rules, for each VPC that the rule group is associated with. If you also add a custom domain list for exceptions, DNS Firewall charges for the queries it inspects against that list and for each domain it stores.
- AWS Marketplace fee: The Infoblox subscription in AWS Marketplace is available at no cost during preview. The offer on the Infoblox listing in AWS Marketplace shows the pricing and terms, and the charge appears on your AWS bill.
- Query logging: Route 53 does not charge for Resolver query logs. You pay for the destination that you choose, which is Amazon CloudWatch Logs, Amazon S3, or Amazon Data Firehose.
Add the Infoblox managed rule
To add the managed rule, complete the following steps:
- Open the Amazon VPC console. In the navigation pane, under DNS Firewall, choose Rule groups.
- Choose your rule group, then choose Add rule.
- Under Rule details, enter a Name and select the Advanced pricing option.
- Under Rule configurations, for Rule type, choose Partner managed DNS threat protection. For Vendor, choose Infoblox.
- If you are not yet subscribed, choose View subscription options, review the pricing and terms, and choose Subscribe. When you subscribe, you authorize AWS to share DNS query metadata with Infoblox, as described after these steps. The form updates when the subscription is active.
- For DNS security categories, choose the threat feeds for this rule. Infoblox organizes protections into risk-based domain lists (Critical, High, Medium, Low, and Informational). You can start in detect-only mode and later move to blocking, beginning with the Critical and High risk categories.
- For the action, choose ALERT so you can review matches before you block anything.
- Choose Add rule.
Figure 2 shows the Add rule page with the Advanced tier and the Partner managed DNS rule type selected. Infoblox is selected as the vendor, and a banner confirms that the subscription succeeded. The DNS security categories list shows five Infoblox categories: Informational, Low Risk, Medium Risk, High Risk, and Critical Risk.
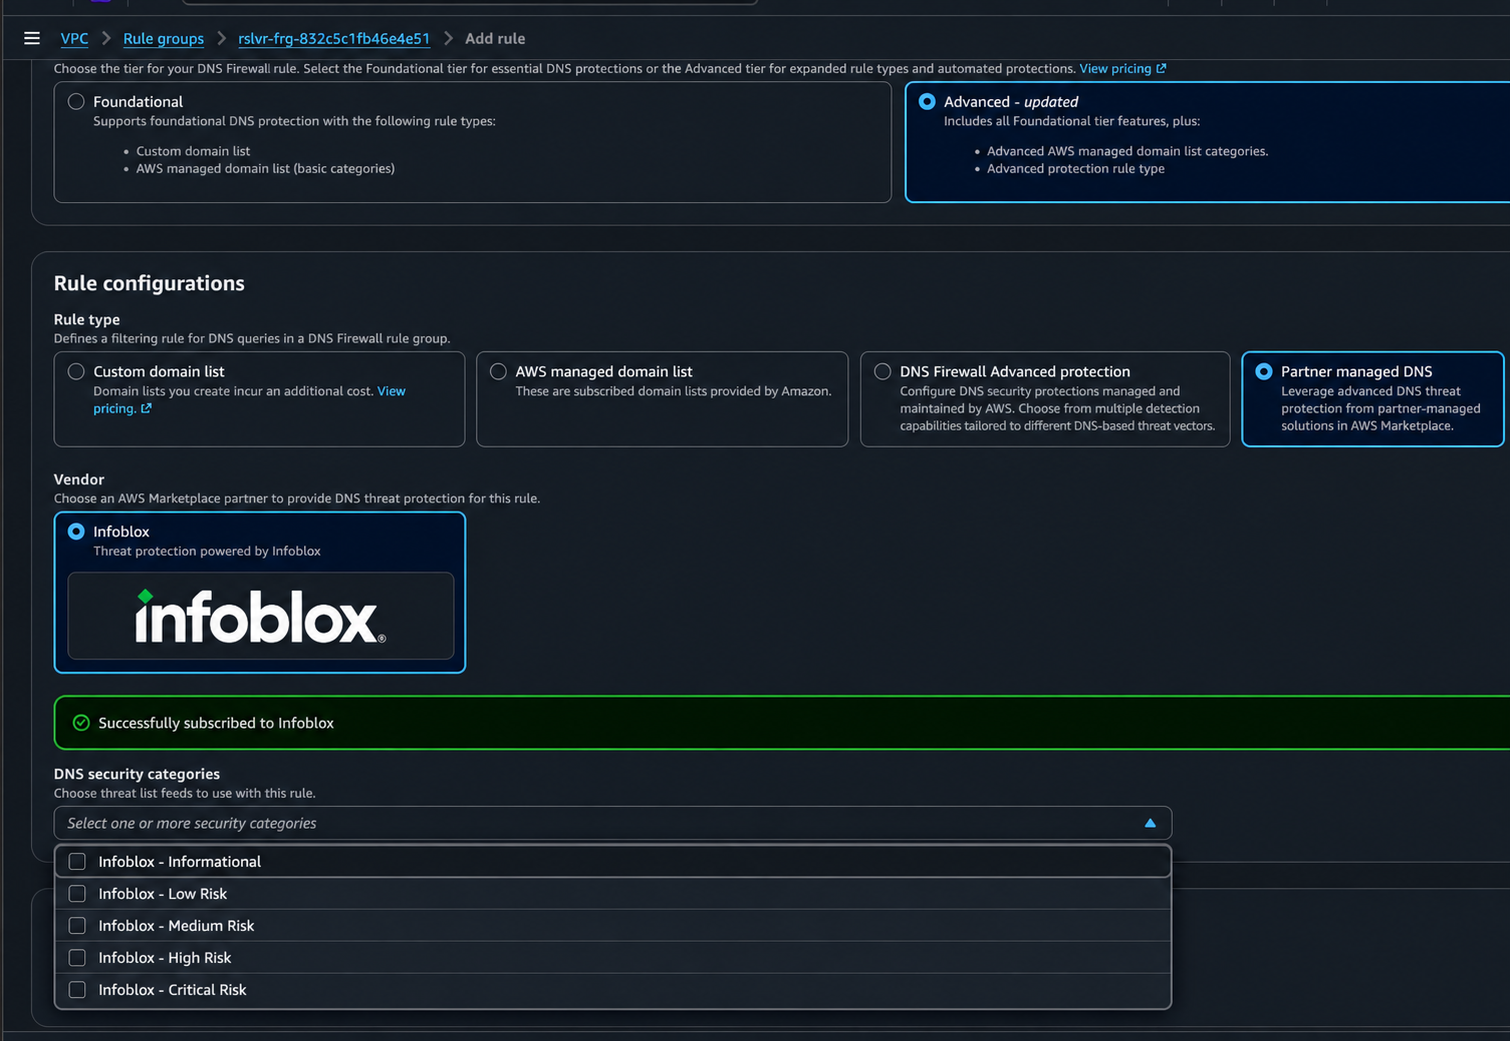
Figure 2: The Add rule page with the Infoblox rule type and DNS security categories
Data shared with Infoblox. When you subscribe, you authorize AWS to share DNS query metadata with Infoblox. This metadata is the domain names that an Infoblox rule checks, and it is anonymized, as it is with the Palo Alto Networks partner managed rule. For the terms that apply, see the Infoblox listing in AWS Marketplace and review them before you subscribe.
Associate the rule group with VPCs
A rule group only takes effect on VPCs you associate with it. To associate the rule group, complete the following steps:
- On the Rule groups page, choose your rule group, then choose View details.
- On the Associated VPCs tab, choose Associate VPC.
- Select one or more VPCs, then choose Associate.
- Wait for the association Status to change from Updating to Complete.
You can expand protection later by associating additional VPCs with the same rule group.
Fail-open and fail-closed behavior. By default, the firewall configuration for a VPC fails closed. If DNS Firewall does not respond, Route 53 Resolver blocks the query and returns a SERVFAIL response, so a DNS Firewall issue can interrupt name resolution for your workloads. To favor availability over security, enable FirewallFailOpen for the VPC by editing its DNS Firewall configuration in the Route 53 Resolver console or by calling UpdateFirewallConfig. For more information, see DNS Firewall VPC configuration in the Amazon Route 53 Developer Guide.
Turn on query logging
Monitoring depends on Route 53 Resolver query logs, so turn on query logging for your VPC before you test in alert mode. To configure query logging, complete the following steps:
- Open the Route 53 console. In the navigation pane, under Resolver, choose Query logging.
- Choose the AWS Region of your VPC, then choose Configure query logging.
- Enter a Query logging configuration name. For Query logs destination, choose a CloudWatch Logs log group, an Amazon S3 bucket, or an Amazon Data Firehose delivery stream. Create a new destination or choose an existing one in the same Region.
- Under VPCs to log queries for, select the VPCs that you associated with the rule group.
- Choose Configure query logging.
Query logs usually start to appear within a few minutes. Route 53 Resolver logs only unique queries, so queries that it answers from its cache do not create new entries. The firewall fields in each log entry, such as firewall_rule_action and firewall_rule_group_id, are populated only when a query matches a rule whose action is ALERT or BLOCK. For the full list of fields, see Values that appear in VPC Resolver query logs. For more information about configuring logging, see Managing Resolver query logging configurations.
Monitor matches and start blocking
Route 53 Resolver sends query logs to the destination that you chose: a CloudWatch Logs log group, an Amazon S3 bucket, or an Amazon Data Firehose delivery stream. From there, you can route the logs to your security information and event management (SIEM) or security orchestration, automation, and response (SOAR) tools.
Review the alerts for a period that matches your workload patterns. Investigate each match. For domains that you approve, add an exception by following the steps in this section.
DNS Firewall does not support the ALLOW action on Advanced rules. Instead, create a custom domain list that contains the approved domains, and add a rule with the ALLOW action at a lower priority number than the Infoblox rule. DNS Firewall evaluates rules from the lowest priority number to the highest and stops at the first match, so the ALLOW rule takes effect before the Infoblox rule. For more information, see Rule actions in DNS Firewall.
To add an exception for an approved domain, complete the following steps:
- In the Amazon VPC console, under DNS Firewall, choose Domain lists, then choose Add domain list.
- Enter a name, add the domains that you approve, and choose Add domain list.
- Under Rule groups, choose the rule group that contains the Infoblox rule, then choose Add rule.
- Enter a Name and select the Foundational pricing option. The ALLOW action is not available with the Advanced option.
- For Rule type, choose Custom domain list, and then choose the domain list that you created.
- For the action, choose ALLOW.
- Set the rule priority to a number lower than the priority of the Infoblox rule. For example, if the Infoblox rule has priority 100, use 10.
- Choose Add rule.
When the results look right, edit the Infoblox rule and change the action to BLOCK.
Clean up resources
If you are running an evaluation, remove the resources when you finish testing to avoid incurring future costs:
- Disassociate the VPCs from the rule group.
- Delete the Infoblox rule, and delete the rule group if you created it for this test.
- Delete the ALLOW rule and the custom domain list if you created them for this test.
- Delete the query logging configuration and the log destination if you created them for this test.
- Cancel your subscription in AWS Marketplace.
Conclusion
With Infoblox managed rules in DNS Firewall, you add curated DNS threat intelligence to the controls you already run, and you manage it with the same tools, access controls, and AWS bill. In this post, we showed you how to subscribe, add the managed rule, test in alert mode, and move to blocking.
To get started, open the Amazon VPC console and add a partner managed rule to a DNS Firewall rule group. To learn more, see the Amazon Route 53 Resolver DNS Firewall detail page and How Resolver DNS Firewall works in the Amazon Route 53 Developer Guide. For details about the Infoblox offer, see the Infoblox listing in AWS Marketplace. For Infoblox-specific configuration details, see Infoblox managed DNS threat protection in DNS Firewall.
If you want help applying a similar approach in your environment, contact an AWS representative.