All posts by Allan Holmes

Reduce alert fatigue by customizing threat detection features in Amazon GuardDuty

Post Syndicated from Allan Holmes original https://aws.amazon.com/blogs/security/reduce-alert-fatigue-by-customizing-threat-detection-features-in-amazon-guardduty/

The teams responsible for security today don’t have a problem with the number of alerts they receive; they have a problem turning those alerts into something truly actionable. When an analyst concludes an investigation with “this was caused by our vulnerability scanner” or “this account is configured to share Amazon Machine Images (AMIs) publicly on purpose,” the detection worked as designed, it just wasn’t applicable to the environment. When this happens continuously at scale, alert fatigue sets in. As teams sort through these events, incident response slows down or, worse, teams stop paying attention to the alerts at all.

Amazon GuardDuty is a threat detection service that continuously monitors, analyzes, and processes Amazon Web Services (AWS) data sources and logs in your AWS environment for suspicious or potentially malicious activity. GuardDuty then delivers detailed security findings to you for visibility and remediation. GuardDuty accomplishes this by analyzing independent streams of available sources. This includes logging of management events in AWS CloudTrail, information about IP traffic through Amazon Virtual Private Cloud (Amazon VPC) Flow Logs, and Amazon Route 53 DNS query logs to name a few. These sources don’t need to be enabled or configured within your accounts for GuardDuty to use them. When GuardDuty observes activity that looks suspicious or anomalous, it produces a finding that’s a detailed security alert naming the behavior, the resources involved, and any supporting evidence. A finding is a signal to investigate, not a final verdict.

While the managed detections in GuardDuty work consistently across every AWS customer, personalizing detections for your specific architectures and environments is equally important. Over the past year, AWS has released a set of capabilities within GuardDuty that you can use to supply that missing context, most recently with the launch of Custom Detection Rules.

In this post, we walk through those capabilities in three distinct stages. These stages explore how to customize what GuardDuty detects, triage the findings that remain, and accelerate investigations. Throughout this blog post you’ll learn how to:

  • Efficiently detect anomalous behavior that shouldn’t occur in a specific account, without building detection logic yourself
  • Measure if a detection will be noisy before it generates a single finding, flooding security teams
  • Feed your own custom threat intelligence, including file hashes, into GuardDuty
  • Scope a suppression rule narrowly enough to archive expected activity while surfacing the same behavior elsewhere
  • Get an automated analysis of a finding, with a risk level and recommended actions, before the finding is opened manually

Prerequisites

For the walkthrough in this post, you must have the following prerequisites in place.

  • GuardDuty must be enabled in at least one AWS account and AWS Region. Note that these customization features aren’t currently available in all Regions, for more information, see Region-specific feature availability.
  • Your user or role must have AWS Identity and Access Management (IAM) permissions to configure these features in GuardDuty. The AmazonGuardDutyFullAccess_v2 managed policy covers the required actions.
  • If you manage multiple accounts through AWS Organizations, AWS recommends administering GuardDuty using the delegated administrator account. By using this method, you can manage lists, suppression rules, and conduct investigations from a centralized location.
  • GuardDuty Runtime Monitoring must be enabled to conduct file hash matching and to use Custom Detection Rules for Runtime Monitoring. This protection plan isn’t enabled automatically in GuardDuty.
  • An Amazon Simple Storage Service (Amazon S3) bucket that you control for storage of custom threat entity lists.
  • The AWS Command Line Interface (AWS CLI) installed.

Stage 1: How to customize what GuardDuty detects

An AMI is a pre-configured template that contains the software configurations needed to launch an Amazon Elastic Compute Cloud (Amazon EC2) instance on AWS. Sharing an AMI publicly can be a routine operation in an account whose purpose is distributing images, and a potential security event in any other account. The same might be said for disabling VPC Flow Logs, or signing in without multi-factor authentication for a legacy service account. Until the release of Custom Detection Rules, there was no way to account for these differences in GuardDuty.

Custom Detection Rules

Custom Detection Rules is a library of prebuilt, opt-in rules that AWS builds and maintains. At launch, it holds 90 rules across AWS CloudTrail management events and GuardDuty Runtime Monitoring events, producing 38 finding types mapped to 13 MITRE ATT&CK® tactics, described using vocabulary from ATT&CK and the Threat Technique Catalog for AWS. The catalog is maintained by the AWS Customer Incident Response Team (CIRT) and is based on the MITRE ATT&CK Cloud Matrix, documenting threat actor tactics, techniques, and procedures specific to AWS as observed by the AWS CIRT during customer engagements. Each entry includes detection guidance and mitigations specific to AWS environments, so a technique ID on a finding points to a public entry that your team can read.

Previously, detecting environment-specific behavior meant ingesting your own CloudTrail logs or host telemetry, normalizing them, building the logic, and maintaining that logic as APIs changed. Custom Detection Rules remove that work. You select the rules for GuardDuty to evaluate against the CloudTrail management events it already analyzes and, where Runtime Monitoring is enabled, the runtime events from the GuardDuty security agent, without the undifferentiated heavy lifting of log ingestion, normalization, and storage. Coverage is extended without adding unnecessary alerts that don’t add value to your teams.

Each rule runs in one of two modes. In dry run mode, GuardDuty evaluates the rule and publishes Amazon CloudWatch metrics showing how often an event matched the rule, but generates no findings. Dry run mode expires automatically after 14 days. In live mode, events that match generate findings, and live mode has no expiration.

Custom Detection Rules are currently available in all AWS commercial Regions and the AWS GovCloud (US) Regions. Custom Detection Rules for Runtime Monitoring are available in every region where GuardDuty Runtime Monitoring is available.

Walkthrough: Measure a rule, then turn it on

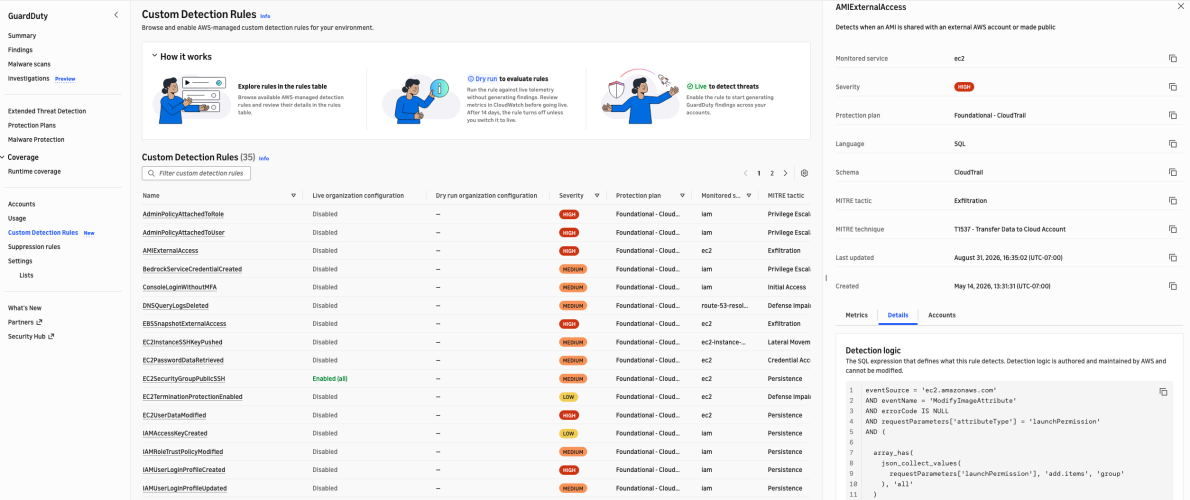
Start in dry run so you can measure the noise level before receiving a finding. This walkthrough uses the AMIExternalAccess rule, which detects when an AMI is shared with an external AWS account or made public, and applies it from the GuardDuty delegated administrator account. In an organization, the delegated administrator manages Custom Detection Rules for all member accounts through an organization configuration, and accounts that join the organization later inherit it.

Using the GuardDuty console

  1. Open the AWS Management Console for GuardDuty and choose Custom Detection Rules.

    Figure 1 – The Custom Detection Rules catalog with the detection logic for the AMIExternalAccess rule

    Figure 1. The Custom Detection Rules catalog with the detection logic for the AMIExternalAccess rule

  2. Select a rule name to see its detection logic on the Details tab. Rules are SQL conditions over CloudTrail fields, so you can review exactly what a rule matches before enabling it.
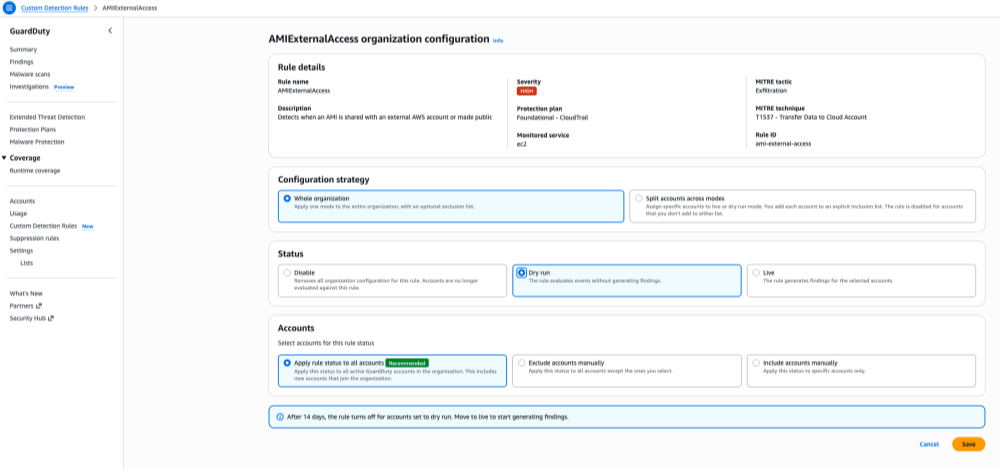
  3. Choose the rule’s Accounts tab, then under Organization configuration, choose Configure.

    Figure 2. Configuring the AMIExternalAccess rule in dry run mode

    Figure 2. Configuring the AMIExternalAccess rule in dry run mode

  4. Under Configuration strategy, select Whole organization. Under Status, select Dry run. Under Accounts, select Apply rule status to all accounts, then choose Save.
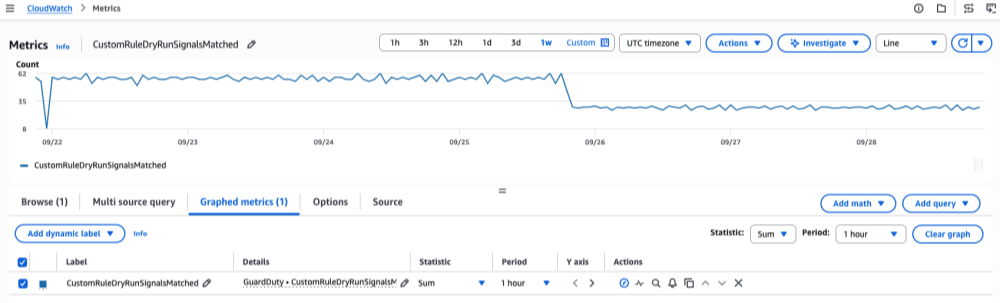
  5. Watch the CustomRuleDryRunSignalsMatched metric in CloudWatch. GuardDuty publishes the metric only when the rule matches an event, so a rule with no matching activity shows no data. Because dry run mode expires automatically after 14 days, a full dry-run period is the longest continuous sample GuardDuty collects without you re-enabling the rule. The metric data persists in CloudWatch under its standard retention after the dry run ends, so you can review it shortly before or after expiry and still base your decision on the most complete data available. Volume alone doesn’t tell you whether the activity is benign, so account for what you see before deciding. If a rule matches constantly and someone can point to the process that causes it, that account is a poor candidate for live mode. If nobody can explain the matches, investigate them as they stand, because a dry run measuring real attacker activity looks the same as one measuring routine operations.

    Figure 3. Dry-run match volume for a rule over one week, shown as hourly totals

    Figure 3. Dry-run match volume for a rule over one week, shown as hourly totals

  6. When you’re satisfied the rule is worth acting on, return to the rule’s organization configuration and change Status to Live to start generating findings. To keep the rule off in accounts where the activity is expected, such as an image-build account, choose Exclude accounts manually under Accounts and select those accounts.
Using the AWS CLI

  1. From the delegated administrator account, apply the rule in dry run to the whole organization. Omitting account lists targets every member account, including accounts that join later.
    aws guardduty create-custom-detection-rule-org-configuration \
    --rule-id ami-external-access \
    --mode DRY_RUN

  2. Review the CustomRuleDryRunSignalsMatched metric over the dry-run period, applying the same judgment described in the preceding console procedure.
  3. Move the rule to live mode by updating the existing configuration. Creating a second whole-organization configuration for the same rule fails with a conflict error. To exclude accounts where the activity is expected, add --exclude-account-ids.
    aws guardduty update-custom-detection-rule-org-configuration \
    --rule-id ami-external-access \
    --mode LIVE \
    --exclude-account-ids <image-build-account-id>

Note: In a standalone account that isn’t part of an organization, you enable a rule for that account alone. With the AWS CLI, use create-custom-detection-rule-association with the same --rule-id and --mode parameters. To change the mode later, use update-custom-detection-rule-association with the association ID. Member accounts in an organization can’t enable or change a rule themselves; the delegated administrator manages rules on their behalf. For details, see Managing Custom Detection Rules in multiple-account environments.

Threat entity lists

If your threat intelligence team already tracks known-bad infrastructure and files, you can pass those indicators to GuardDuty and generate findings when they appear in your AWS account.

GuardDuty has two list formats. An IP address list holds IP addresses only. An entity list, the newer format, can hold IP addresses, CIDR ranges, and domain names together in a single file. The difference that matters is coverage: entity list entries apply to CloudTrail, VPC Flow Logs, and Amazon Route 53 Resolver DNS query log findings, while IP address lists cover CloudTrail and VPC Flow Log findings only. If you still use IP address lists, the additional DNS coverage is a reason to move.

In addition, entity lists now also accept SHA-256 file hashes. Hashes sit alongside network indicators in the same file, and GuardDuty checks them against Runtime Monitoring. When the runtime agent sees an executable whose hash matches an active list, it generates a high severity Execution:Runtime/MaliciousFileExecuted.Custom finding and names the matching list, so your responder knows which intelligence source was used.

Note: If the entity list is changed, the list must be reactivated to include the updates. Uploading a new version of the file isn’t sufficient on its own. If this step is automated, build that reactivation step into the same process that refreshes the file.

Entity lists are currently available in all AWS commercial Regions, but not in the AWS GovCloud (US) Regions.

Stage 2: How to triage the findings that remain

Customizing detection reduces findings at the source, but the work is rarely finished there. New workloads appear, teams change how they operate, and some findings still describe activity that’s expected in your environment. You also need a precise way to route those events away from the queue your analysts work from.

A filter selects findings. A suppression rule is a filter that automatically archives a GuardDuty finding it matches. Archiving isn’t deletion: the finding is retained for 90 days and stays viewable, but the finding isn’t forwarded to AWS Security Hub, Amazon S3, Amazon Detective, or Amazon EventBridge, so it stays out of your security information and event management (SIEM) system and ticket queue.

Two changes have made that routing more customizable.

Wildcards

Filter criteria now support the Matches and NotMatches operators, where * matches any number of characters and ? matches one. Criteria used to be exact-match only, so suppressing findings from every AWS Lambda function in a service meant listing each name and updating it on every deployment. One pattern now covers the naming convention, including functions that don’t exist yet, so the rule stops going stale.

Additional property filter fields

You can now use over 1,000 supported fields from a finding as suppression criteria, including runtime process details, Kubernetes workload metadata, network connection information, and attack sequence signals. Take a vulnerability scanner in one Kubernetes namespace generating expected findings. With no namespace criterion available, you previously either suppressed the finding type more broadly than you wanted or wrote downstream logic to strip them. Now you scope the rule to that specific namespace and leave detection intact everywhere else in the cluster. This expanded field set is available in the aws partition; other partitions continue to use the console-supported fields only. See Filtering findings in GuardDuty for the full list of supported fields.

The recommended method is to assemble your criteria on the Findings page first, confirm the filtered list contains only findings you’re willing to archive, then choose Create suppression rule. The console and CLI procedures are detailed in the user guide.

Figure 4. Findings filtered by finding type and Kubernetes namespace, before creating a suppression rule

Figure 4. Findings filtered by finding type and Kubernetes namespace, before creating a suppression rule

Before you write wildcard criteria, know that they can’t be validated with ListFindings or GetFindingsStatistics, the testing workflow AWS recommends for ordinary filters. Instead, start from a filter that takes no action and watch the suppression rule metrics to see how much it would match before you rely on it. Nothing is lost if the pattern is too broad, matched findings are archived rather than deleted, so you can lift the suppression rule and return them to your queue.

Stage 3: How to accelerate investigations

What remains consumes analyst hours. To decide whether a finding is a real event, an analyst pivots into CloudTrail for the operations that identity performed, lines up timestamps, checks IPs and domains against intelligence, and looks for a change ticket that explains the work. That can take hours, and most such investigations end in expected. When one doesn’t, all that time was spent before any actual containment could begin.

GuardDuty Investigation, also called AI-powered investigations performs that correlation automatically. GuardDuty Investigation analyzes the finding alongside related activity from the past 90 days, affected resources, threat intelligence, and threat indicators, and returns a structured summary in minutes: a risk level, a confidence rating, a written summary, supporting detail, MITRE ATT&CK classification, and recommended actions including the CLI commands to carry them out.

Note: Read the confidence rating as carefully as the risk level. High risk with low confidence is a very different indicator to an analyst than high risk with high confidence.

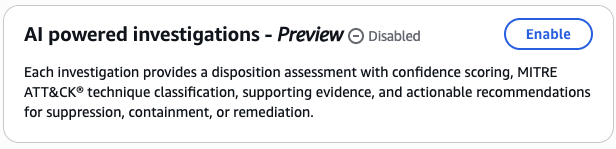
You can investigate a single finding, an account, or a whole organization, from the console, the AWS CLI, the API, or an AWS MCP Server. To turn on AI-powered investigations, go to Settings, find AI powered investigations – Preview, and choose Enable.
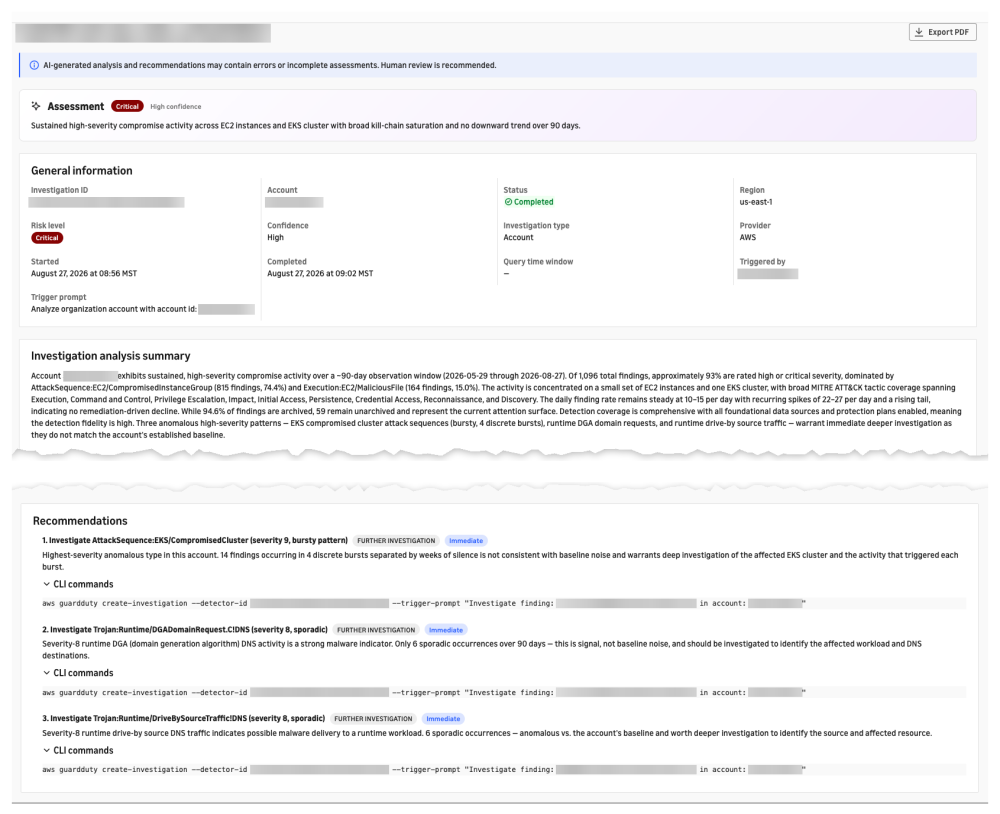
Figure 5. A completed account investigation with risk level, confidence, analysis summary, and recommended actions

Figure 5. A completed account investigation with risk level, confidence, analysis summary, and recommended actions

The preview runs in 10 AWS Regions: US East (N. Virginia), US East (Ohio), US West (Oregon), Canada (Central), Europe (Frankfurt), Europe (Ireland), Europe (London), Europe (Paris), Europe (Stockholm), and Asia Pacific (Tokyo). It allows 10 investigations per account per day and 100 per account in total, and can only be started from an administrator account, member accounts can’t create investigations from their own accounts. The feature uses Amazon Bedrock models with Cross-Region Inference (CRIS), which automatically selects a Region within your geography to process the analysis and generate the report. Your data remains stored only in the Region where the investigation request originates, but investigation data and summary results might be processed outside that Region. Review that routing if you have data residency commitments. For GuardDuty Region-specific differences more broadly, see Region-specific feature availability in the user guide.

Putting it all together

Consider a team running containerized workloads on Amazon Elastic Kubernetes Service (Amazon EKS) across a handful of accounts in one organization.

The threat intelligence team uploads SHA-256 hashes from a recent brief as a threat entity list. Security engineering enables Custom Detection Rules in dry run mode and finds after 2 weeks that AMI sharing fires constantly in the image-build account and nowhere else, so they promote the rule to live across the organization and exclude the build account.

The team’s vulnerability scanner runs in a dedicated Kubernetes namespace, so they suppress that namespace and finding type while leaving the same behavior detected elsewhere. A second rule uses a wildcard on their Lambda naming convention, replacing a hand-maintained list.

Suppressed findings are archived instead of being sent to Security Hub, Amazon S3, EventBridge, or the SIEM, so they never reach the analyst queue. When a finding does warrant attention, an analyst starts an investigation and gets a disposition before manual work begins.

Each stage reduces the work of the next. Customizing detection means less to triage, effective triage means less to investigate, and automated investigation means the findings that reach a human get a decision faster.

Next steps

If you haven’t enabled GuardDuty, start with the 30-day free trial. Most protection plans enable automatically and are included, so you can evaluate them. Turn on Runtime Monitoring separately if you want to test hash matching or Custom Detection Rules for Runtime Monitoring..

If you’re already using GuardDuty:

  • Enable two or three Custom Detection Rules in dry run mode. Choose behavior that shouldn’t occur in specific accounts, measure across the dry-run period, then promote selectively.
  • Revisit existing suppression rules. Any rule written before the April 2026 field expansion might be broader than you intended, because the field you wanted wasn’t available then; narrow it to that field now.
  • Audit filters for wildcard opportunities. Any filter with a growing list of exact-match names is maintenance a single pattern can replace.
  • Migrate IP address lists to entity lists for the DNS query log coverage.

Conclusion

GuardDuty’s managed detections keep expanding, driven by AWS threat intelligence, security research, and customer feedback. These capabilities enable you to decide which activity is worth alerting on in which accounts, and which findings never need to be delivered to a human at all.

Learn more


Allan Holmes

Allan Holmes

Allan brings over 20 years of experience spanning security & compliance, networking, and DevOps to his current role as a Security Specialist. Giving him a uniquely holistic view of cloud security challenges. Allan holds multiple technical certifications from AWS, ISC2, CompTIA, and an MBA, enabling him to bridge deep technical expertise with business strategy. Outside of work, Allan is an avid gardener and electronics enthusiast who enjoys exploring innovative technologies hands-on.

Austin Buettner

Austin Buettner

Austin is a Senior Technical Account Manager (TAM) at AWS, where he helps enterprise companies build and operate secure, resilient workloads at scale. A former architect with over 15 years of experience in IT, he focuses on security, networking, and cloud operations, turning AWS capabilities into practical guidance customers can put to work. Outside of work, Austin enjoys golfing, hitting the gym, and spending time with his family.

Zhuo Zhang

Zhuo Zhang

Zhuo is a Technical Lead at AWS GuardDuty, where he builds the software and systems behind the service’s threat detection mission. Since 2016, he has been part of GuardDuty from concept through many expansions. Zhuo uses his background in software engineering and cybersecurity to develop the capabilities of GuardDuty. Outside of work, Zhuo enjoys trying new technologies and spending time with his family.

Introducing the Amazon GuardDuty investigation agent: on-demand AI-powered threat assessment

Post Syndicated from Allan Holmes original https://aws.amazon.com/blogs/security/introducing-the-amazon-guardduty-investigation-agent-on-demand-ai-powered-threat-assessment/

The new Amazon GuardDuty investigation agent (now in public preview) investigates security findings across your Amazon Web Services (AWS) environment, reducing investigation time from hours to minutes.

GuardDuty is our managed threat detection service that continuously monitors your AWS accounts and workloads for suspicious, potentially malicious activity, and unauthorized behavior, delivering detailed security findings for visibility and remediation.

Whether you’re investigating a single suspicious finding or assessing security posture across your entire organization, the investigation agent provides structured assessments providing risk levels, confidence scores, and actionable recommendations.

Security teams can spend hours investigating security findings and correlating data across multiple tools. The GuardDuty investigation agent automates this correlation, providing actionable intelligence, built directly into GuardDuty and accessible on demand through the AWS Management Console, AWS Command Line Interface (AWS CLI), AWS APIs, or AWS SDKs.

This post shows you how to:

  • Enable the investigation agent in your GuardDuty console.
  • Create your first investigation through the console or AWS CLI.
  • Use the investigation agent with the AWS MCP server for AI-assisted security operations

Key features of the GuardDuty investigation agent

The GuardDuty investigation agent provides APIs using the same patterns you already know from GuardDuty. Each completed investigation returns a risk level, confidence assessment, MITRE ATT&CK® technique mapping, resource mapping, and prioritized recommendations.

You can scope investigations from the console for a specific finding, an account, or all accounts across your organization. Alternatively, the AWS CLI and API accept a free-form trigger prompt of up to 2,048 characters, so you can describe what to investigate in natural language and guide the analysis of the agent by specifying areas of concern, suspected root causes, or priorities for the investigation.

The investigation agent APIs are also available through the official AWS MCP server, part of the Agent Toolkit for AWS, enabling integration into your existing security toolchains and AI-powered workflows. You don’t need to manage or interact with the agent directly. Call API endpoints, and the agent investigates findings, correlates evidence, and delivers an assessment without the overhead of managing complex configurations.

How the investigation agent analyzes findings

When you create an investigation, the agent uses cross-Region inference to process your findings based on scope and produces a structured output.

Cross-Region inference – GuardDuty investigation uses the Cross-Region Inference Service (CRIS), which selects the optimal AWS Region within your geography to process the investigation assessment. Your data remains stored only in the Region where the investigation request originates. However, investigation data and summary results might be processed outside that Region. Data is transmitted encrypted across the secure network provided by Amazon.

For more information about which inference Regions your request might be routed to see the Cross-Region inference routing table located in the investigation section of the Amazon GuardDuty User Guide.

Investigation output – Each completed investigation produces the following insights: Risk level (Info, Low, Medium, High, or Critical), Confidence (Unknown, Low, Medium, or High), Summary (description of findings and key observations), Investigation Details (additional context), and Recommended Actions (detailed actions including AWS CLI commands).

Account scoping – Account specification is required only when investigating a specific member account. For broader scopes such as your entire organization, no account ID is needed. The agent will only investigate findings within accounts you’re authorized to access per the authorization model that follows.

Prerequisites

Before you get started, make sure you have the following prerequisites in place:

  • Amazon GuardDuty enabled in your account
  • AWS account in a supported Region (see Availability section)

Required IAM permissions

You will need three new permissions: guardduty:CreateInvestigation to start new investigations, guardduty:GetInvestigation to retrieve results, and guardduty:ListInvestigations to view investigations for a given detector.

Example IAM policy:

{
  "Version": "2012-10-17",
  "Statement": [
    {
      "Effect": "Allow",
      "Action": [
        "guardduty:CreateInvestigation",
        "guardduty:GetInvestigation",
        "guardduty:ListInvestigations"
      ],
      "Resource": "*"
    }
  ]
}

Authorization model

Administrator accounts can create investigations, retrieve results, and view investigation lists for themselves and their member accounts. Member accounts can only retrieve results and view investigation lists for their own account. Member accounts can’t create investigations and can’t access investigations belonging to other accounts or the administrator account. Account specification is required only when investigating a specific member account. For your own account or accounts across your organization, no account ID is needed.

To enable and create your first investigation

Before you begin, verify you have the required IAM permissions as described in the prerequisites .

  1. Open the AWS Management Console in the desired supported Region and navigate to Amazon GuardDuty.
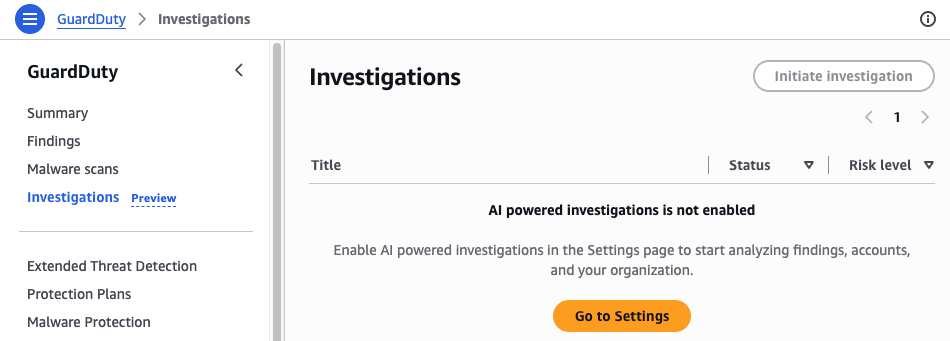
  2. In the navigation pane, choose Investigations.
Figure 1: GuardDuty investigation dashboard

Figure 1: GuardDuty investigation dashboard

  1. If investigations aren’t enabled choose Go to Settings and then enable investigations by choosing Enable.
Figure 2: GuardDuty investigations enablement screen

Figure 2: GuardDuty investigations enablement screen

  1. After investigations are enabled, navigate back to the investigations page.
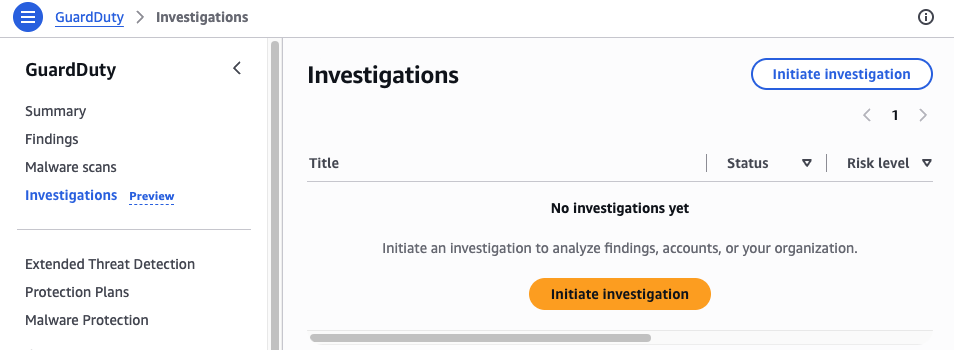
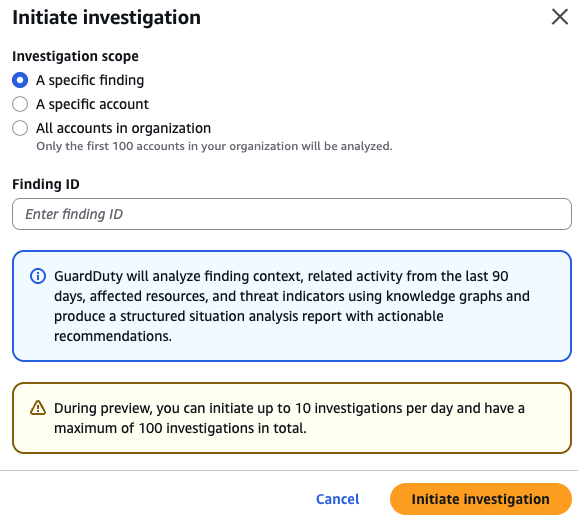
  2. In the navigation pane, choose Initiate Investigation.
Figure 3: GuardDuty initiate investigation

Figure 3: GuardDuty initiate investigation

  1. Select a scope for your investigation:
    • Enter a GuardDuty Finding ID: Use when you want to investigate a specific GuardDuty finding in depth
    • Enter an AWS Account ID: Use when you want to assess the overall security posture of a specific AWS account
    • All accounts: Use for organization-wide security assessment or when investigating potential lateral movement
    • Choose Initiate investigation.
Figure 4: GuardDuty investigation setup

Figure 4: GuardDuty investigation setup

  1. Wait for the investigation to complete (typically 2–5 minutes for account level and 10–12 minutes for specific finding investigations during preview). The status updates automatically.
  2. When the investigation completes, select the investigation title to view the full assessment.
Figure 5: GuardDuty investigation completed menu

Figure 5: GuardDuty investigation completed menu

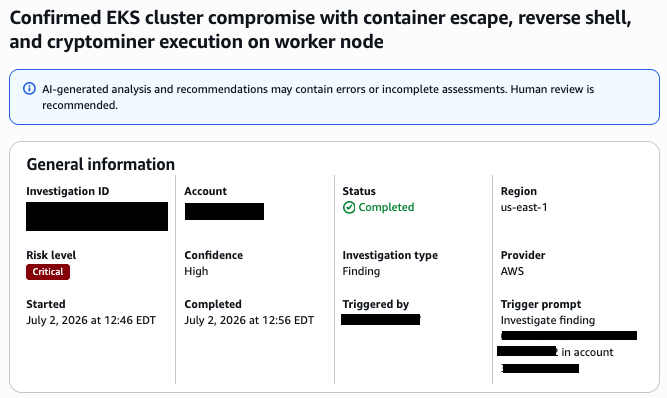
The investigation assessment contains detailed information about the investigation including general information, a summary of the investigation, mapping, assessment of the threat, and recommended actions.

The General Information section displays the investigation ID, status, triggered-by account, and creation timestamp.

Figure 6: General information section of the assessment

Figure 6: General information section of the assessment

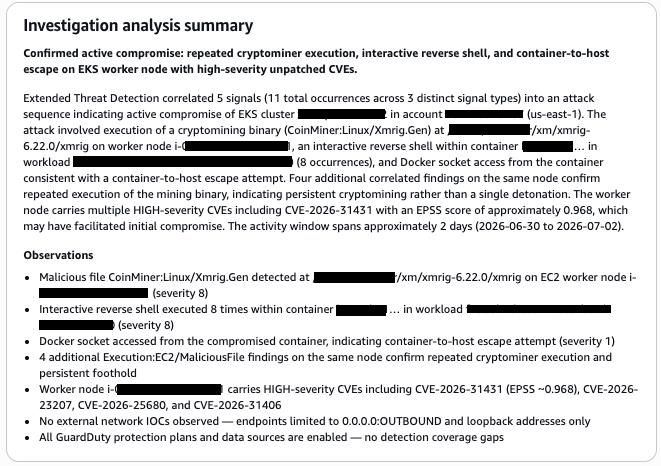
The summary section provides a narrative of key observations and findings.

Figure 7: Summary section of the assessment

Figure 7: Summary section of the assessment

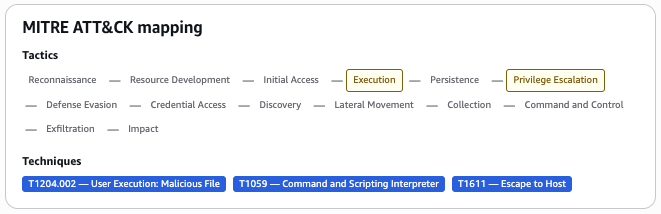
The mapping section shows attack techniques and affected AWS resources.

Figure 8: MITRE ATT&CK mapping section of the assessment

Figure 8: MITRE ATT&CK mapping section of the assessment

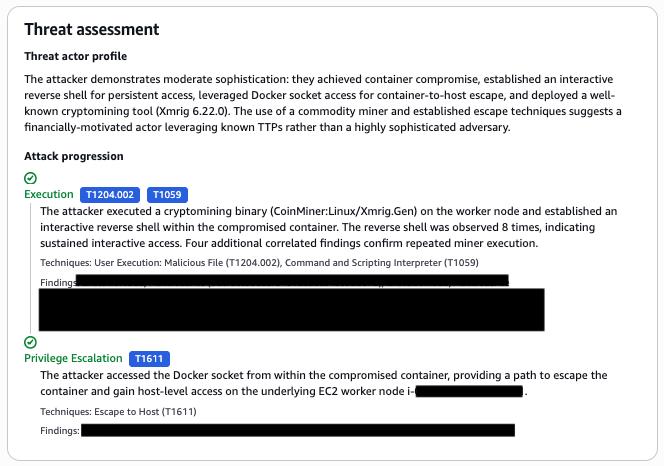
The Threat Assessment section displays the risk level, confidence score, and detailed threat analysis.

Figure 9: Threat assessment section

Figure 9: Threat assessment section

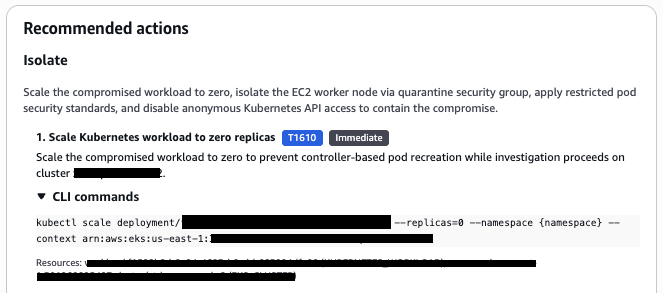
The Recommended Actions section lists prioritized remediation steps.

Figure 10: Recommended actions section of the assessment

Figure 10: Recommended actions section of the assessment

Investigations can also be conducted with the AWS CLI or SDK using the following API endpoints:

  • CreateInvestigation – Initiates a GuardDuty investigation that automatically analyzes security findings, correlates related activity, performs account-level analysis, and produces a structured investigation summary with recommended next steps.
  • GetInvestigation – Retrieve the status and results of a specific investigation, including the assessment from the agent, correlated evidence, and recommended actions when completed.
  • ListInvestigations – View investigations across your environment with filtering and pagination.

To run investigations using the AWS CLI

Investigations are asynchronous because the agent queries multiple data sources, correlates findings across services, and performs AI-based analysis. After creating an investigation, you’ll need to check its status periodically until it completes.

Step 1: Find your detector ID

Each GuardDuty deployment has a unique detector ID per-account and per-Region that identifies your specific GuardDuty configuration. You will need this for all AWS CLI operations, especially if you have GuardDuty enabled in multiple Regions. You can find your detector ID in the GuardDuty console under Settings, or by running the following command and specifying the Region. For example, if the GuardDuty detector of interest were in the us-east-1 (N. Virginia) Region

aws guardduty list-detectors –-region=us-east-1

Expected response:

{
  "DetectorIds": [
    "12abc34d567e8fa901bc2d34eexample"
  ]
}

Note: the DetectorIDvalue from the response, you will use it in all subsequent commands.

Or if working only in the same Region, the session can be set as an environment variable to avoid repetition, for example on Linux:

export AWS_DEFAULT_REGION=us-east-1

See the AWS CLI documentation for guidance on configuring this for additional operating systems.

Step 2: Create an investigation

The following is an example of code to investigate a specific finding:

aws guardduty create-investigation us-east-1 \
--detector-id 12abc34d567e8fa901bc2d34eexample \
--trigger-prompt "Investigate this finding ID 1ab2c3d4e5f6a7b8c9d0e1f2a3b4c5d6"

The --trigger-prompt parameter is useful when you have context that isn’t captured in GuardDuty metadata or consumable through the API.

Expected response:

{
  "InvestigationId":"a1b2c3d4-5678-90ab-cdef-ef1234567890"
}

To investigate findings across an entire AWS account, use the following example:

aws guardduty create-investigation –-region=us-east-1 \
--detector-id 12abc34d567e8fa901bc2d34eexample \
--trigger-prompt “Investigate findings in Account 123456789012”

To investigate findings across an entire organization:

aws guardduty create-investigation –-region=us-east-1 \
--detector-id 12abc34d567e8fa901bc2d34eexample \
--trigger-prompt “Investigate findings across my AWS Organization”

Step 3: Check investigation status

Check the status of the investigation shown here using the AWS CLI query command to filter and list only the Status section of the output for simplicity:

aws guardduty get-investigation –-region=us-east-1 \
--detector-id 12abc34d567e8fa901bc2d34eexample \
--investigation-id a1b2c3d4-5678-90ab-cdef-ef1234567890 --query 'Investigation.Status'

Repeat this command until the Status field shows COMPLETED.

Example completed response output:

{
  "Investigation": {
    "InvestigationId": "a1b2c3d4-5678-90ab-cdef-ef1234567890",
    "Status": "COMPLETED",
    "TriggerPrompt": "Investigate finding 1ab2c3d4e5f6a7b8c9d0e1f2a3b4c5d6 in account 123456789012",
    "TriggeredBy": "123456789012",
    "RiskLevel": "Critical",
    "Risk": "Active multi-stage runtime compromise on EKS worker node with root-privileged reverse shell, Docker socket access, malicious file execution, and 500 multi-tactic runtime signals — behavioral evidence is consistent with a genuine intrusion.",
    "Confidence": "High",
    "Summary": "{\"keyObservations\":{\"title\":\"...\",\"narrative\":\"...\",\"observations\":[...]},\"countermeasures\":[...],\"threatAssessment\":{...}}",
    "Cloud": {
      "Provider": "AWS",
      "Region": "us-east-1",
      "Account": "123456789012"
    },
    "Metadata": {
      "Product": {
        "Name": "AmazonGuardDuty AI Analyst",
        "Feature": "Investigation"
      },
      "Version": "1.0.0"
    },
    "StartTime": 1705319400.0,
    "EndTime": 1705319700.0
  }
}

  • Status values – RUNNING, COMPLETED, FAILED
  • Timing – Investigation times can very. Checking status every 30 seconds should be sufficient to yield results.
  • If status shows FAILED – Review the error message in the response and verify your permissions match the authorization model requirements.

To list all investigations for a given detector run the following, the max-results command is optional but useful to filter the number of returned results.

aws guardduty list-investigations –-region=us-east-1 \
--detector-id 12abc34d567e8fa901bc2d34eexample \
--max-results=10

Beyond running investigations manually, the API-first design addresses a common customer pattern: sending GuardDuty findings to third-party tools. You can now add automated investigation to those existing pipelines, so your team receives enriched, prioritized intelligence rather than raw alerts.

Consider a customer that routes GuardDuty findings through Amazon EventBridge to their Security Information and Event Management (SIEM) platform, where analysts manually investigate each alert. With the investigation agent, an AWS Lambda function can be placed into the pipeline that calls CreateInvestigation with the finding ID, waits for completion, and forwards the enriched results (risk level, confidence score, MITRE ATT&CK mapping, and recommended actions) to their SIEM alongside the original finding. Critical findings route directly to the customer incident response queue for further analysis or automation. Low-risk findings with high confidence get auto-closed or batched for weekly review. The analyst’s time shifts from repetitive log correlation to validating assessments and acting on confirmed threats.

This pattern works with SIEMs, ticketing systems, or automation platforms that can be customized to use the API or EventBridge messaging. The investigation agent fits into the pipeline as a processing step, not a destination.

The agent is fine-tuned on investigating GuardDuty findings. It’s distinct from other AWS frontier agents such as the AWS Security Agent and AWS DevOps Agent. The scope of the investigation agent is focused to deliver specialized analysis of GuardDuty findings.

Integration with the AWS MCP server

The Model Context Protocol (MCP) is an open standard that allows AI assistants to securely connect to external data sources and tools. Because the AWS MCP server implements this standard for AWS services, you can use it to add GuardDuty investigations into AI-powered workflows using tools like Kiro, Anthropic’s Claude, or other MCP-compatible clients.

To configure the AWS MCP server

  1. Configure your MCP client to connect to the AWS MCP server.
  2. Use natural language to invoke investigations (for example,“Investigate the recent Unauthorized Access finding for account 123456789012″).
  3. Review the investigation results returned through your MCP client. These results can vary depending on the model or agent being used, configuration, and the non-deterministic nature of AI.

Integrate the results into your existing agent automation or take manual action based on the findings.

Additional usage examples

  • “Investigate the latest high-severity finding in my production account”
  • “Create an investigation for finding ID abc123 in account 987654321098 and summarize what happened”
  • “List investigations from the last 24 hours and flag those that need human review”

How the investigation agent relates to AWS Security Incident Response

At re:Invent 2024, AWS launched AWS Security Incident Response (AWS SIR), a managed service that you can use to quickly prepare for, respond to, and recover from security incidents. AWS SIR and the GuardDuty investigation agent address different stages of your security workflow. The GuardDuty investigation agent provides an on-demand assessment capability. When your team needs deeper context on a specific finding, an account security posture, or the overall security posture of your organization. You create an investigation and receive a structured assessment with risk levels, confidence scores, MITRE ATT&CK® technique mappings, and actionable recommendations. Security analysts can use this to quickly understand the scope and severity of what GuardDuty has detected.

When you create an AWS-supported case through AWS SIR, a SIR investigation agent activates, working in parallel with AWS Security Incident Response engineers to gather evidence and deliver an investigation summary within minutes. AWS SIR is purpose-built for active security events where you need both AI-powered automation and human expertise to coordinate containment and recovery.

Security teams can use these capabilities to assess and prioritize findings on demand using the GuardDuty investigation agent, escalate confirmed issues to stakeholders with supporting evidence, and create or update an AWS-supported case to accelerate involvement from the AWS SIR team when additional support is needed.

Availability and pricing

Public preview of the GuardDuty investigation agent is available in 10 AWS Regions including US East (N. Virginia), US East (Ohio), US West (Oregon), Canada (Central), Europe (Frankfurt), Europe (Ireland), Europe (London), Europe (Paris), Europe (Stockholm), and Asia Pacific (Tokyo).

During public preview, the investigation agent is available at no charge. Usage is limited to 10 investigations per account per day, with a cumulative limit of 100 investigations per account during the preview period. Failed investigations do not count toward these quotas.

Start investigating findings today

The Amazon GuardDuty investigation agent reduces investigation time from hours to minutes, letting your security team focus on confirmed security events rather than manual correlation.

Get started by:

  1. Enabling the investigation agent in your GuardDuty console
  2. Creating your first investigation using a recent GuardDuty finding
  3. Reviewing the structured assessment, including risk level and recommended next steps

For organizations using the AWS MCP server, you can also invoke investigations through natural language in your AI assistant of choice.

Learn more

If you have feedback about this post, submit comments in the Comments section below.


Allan Holmes

Allan Holmes

Allan brings over 20 years of experience spanning security & compliance, networking, and DevOps to his current role as a Security Specialist. Giving him a uniquely holistic view of cloud security challenges. Allan holds multiple technical certifications from AWS, ISC2, CompTIA, and an MBA, enabling him to bridge deep technical expertise with business strategy. Outside of work, Allan is an avid gardener and electronics enthusiast who enjoys exploring innovative technologies hands-on.