All posts by Debasis Rath

Build high-performance apps with AWS Lambda Managed Instances

Post Syndicated from Debasis Rath original https://aws.amazon.com/blogs/compute/build-high-performance-apps-with-aws-lambda-managed-instances/

High-performance applications such as CPU-intensive processing, memory-heavy analytics, and steady-state data pipelines often require more predictable compute resources than standard AWS Lambda configurations provide. AWS Lambda Managed Instances (LMI) addresses this by letting you run Lambda functions on selected Amazon EC2 instance types while preserving the Lambda programming model. You can choose over 400 Amazon Elastic Compute Cloud (Amazon EC2) instance types from general purpose, compute optimized, or memory optimized instance families to match workload requirements. AWS Lambda continues to manage infrastructure operations such as instance lifecycle management, operating system patching, runtime updates, request routing, and automatic scaling. This approach gives your teams greater control over compute characteristics, EC2 pricing model and reduces operational overhead of managing servers or clusters.

In this post, you will learn how to configure AWS Lambda Managed Instances by creating a Capacity Provider that defines your compute infrastructure, associating your Lambda function with that provider, and publishing a function version to provision the execution environments. We will conclude with production best practices including scaling strategies, thread safety, and observability for reliable performance.
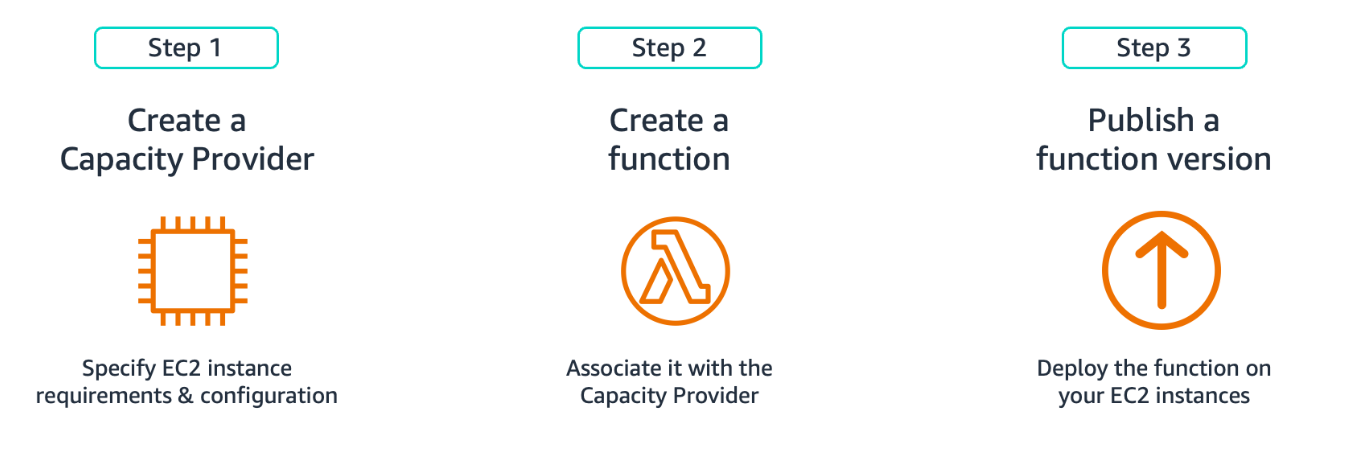
Figure 1. Creating Function on LMI

Figure 1. Creating Function on LMI

Creating Capacity Providers

A Capacity Provider defines the infrastructure blueprint for running LMI functions on Amazon EC2. It specifies instance types, network placement, and scaling behavior. To create a Capacity Provider, you need two parameters: an IAM role (Capacity Provider Operator Role) granting Lambda permissions to launch and manage instances and your VPC configuration with subnets and security groups. Create this role in your account with the AWSLambdaManagedEC2ResourceOperator managed policy following the Principle of Least Privilege (granting only the minimum permissions necessary).

This command creates a Capacity Provider with instance types and scaling configuration:

aws lambda create-capacity-provider \
  --capacity-provider-name my-lmi-capacity \
  --vpc-config SubnetIds=subnet-abc123,subnet-def456,SecurityGroupIds=sg-xyz789 \
  --permissions-config CapacityProviderOperatorRoleArn=arn:aws:iam::123456789012:role/LMIOperatorRole \
  --instance-requirements Architectures=x86_64,AllowedInstanceTypes=c5.2xlarge,r5.4xlarge \
  --capacity-provider-scaling-config MaxVCpuCount=50,ScalingMode=Auto \
  --region us-east-1

This command returns a Capacity Provider ARN that you’ll use to create your LMI function. Your functions behavior depends on four main configurations in the capacity provider:

Instance selection

Lambda currently supports three Amazon EC2 instance families (.large and up): C (compute optimized) for CPU-heavy work, M (general purpose) for balanced workloads, and R (memory optimized) for large datasets. Choose x86 (Intel/AMD) or ARM (Graviton) architectures. If you don’t specify instance types, Lambda defaults to appropriate instances based on your function’s memory and CPU configuration. This is the recommended starting point unless you have specific performance requirements. When you need more control, use AllowedInstanceTypes to specify only the instance types that Lambda can use or use ExcludedInstanceTypes to exclude specific types while allowing all other instance types. You can’t use both parameters together.

VPC and networking

Configure multiple subnets across Availability Zones. Lambda creates a minimum Amazon EC2 fleet of three instances distributed across your configured Availability Zones to maintain availability and resiliency. Egress traffic from functions, including Amazon CloudWatch Logs, transits through the Amazon EC2 instance’s network interface in your Amazon Virtual Private Cloud (Amazon VPC). As functions send logs and metrics to CloudWatch, you will need internet access through a NAT Gateway or VPC endpoints with AWS PrivateLink for Amazon CloudWatch. This only affects egress traffic; function invoke requests don’t flow through your VPC. Security groups attached to your instances should allow only the traffic your function code needs. With LMI, configure VPC once at the Capacity Provider level instead of per function, simplifying management for multiple LMI functions. Standard Lambda functions continue to use their own VPC configurations. This Capacity Provider VPC configuration applies only to LMI functions.
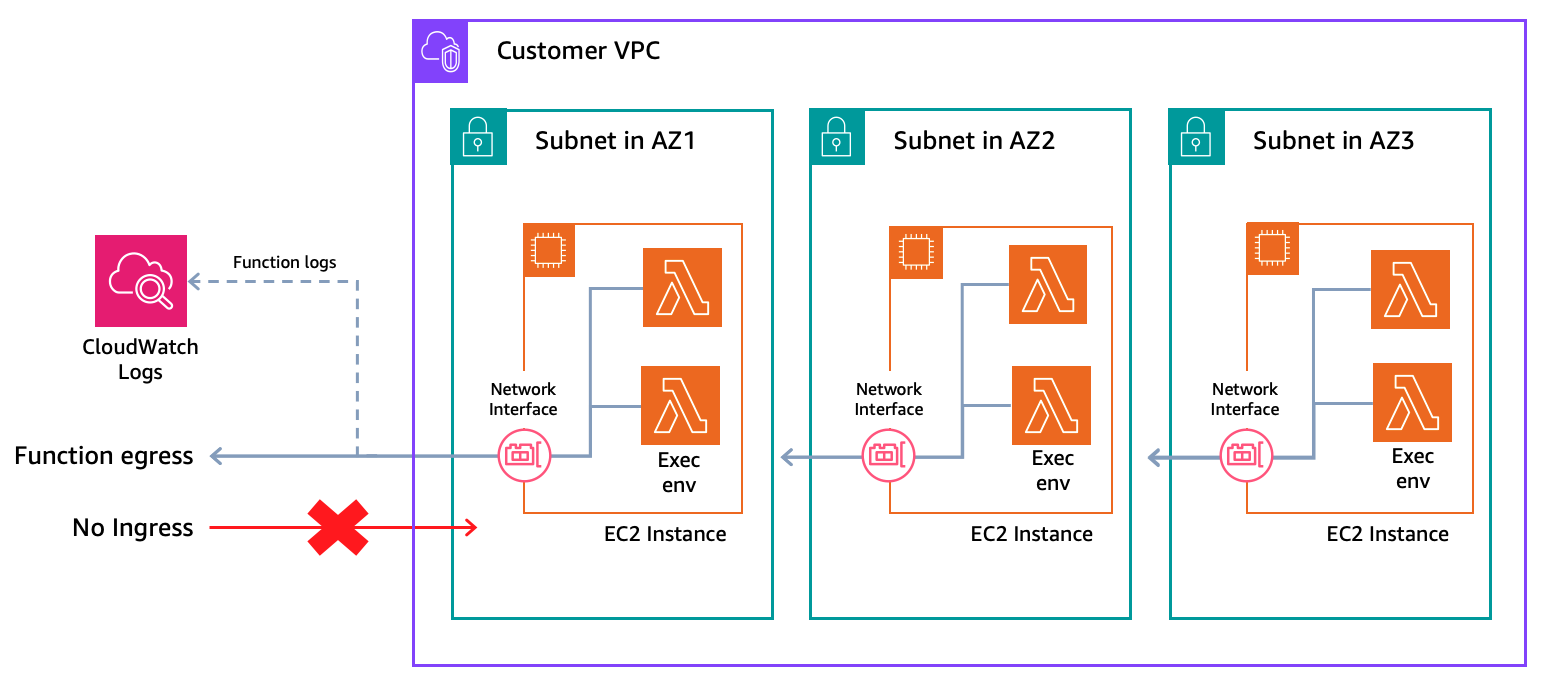
Figure 2. LMI Networking

Figure 2. LMI Networking

Scaling configuration

Set MaxVCpuCount to cap compute capacity and control costs. New invocations throttle when you reach this limit until capacity frees up. Lambda monitors CPU utilization and scales instances automatically. Choose automatic scaling mode where Lambda tunes thresholds based on load patterns, or manual mode where you set a target CPU utilization percentage. Multiple functions can share the same Capacity Provider to reduce costs through better resource utilization, though you might want separate providers for functions with different performance or isolation requirements.

Security

Lambda encrypts Amazon Elastic Block Store (Amazon EBS) volumes attached to EC2 instances with a service-managed key by default. You can provide your own AWS Key Management Service (AWS KMS) key for encryption. Place instances in private subnets with restrictive security groups for enhanced security.

Creating Lambda Managed Instance Functions

You create an LMI function similarly to creating a standard Lambda function. You package your code, set your runtime, assign an execution role, and configure memory. The difference is specifying a CapacityProviderConfig to tell Lambda which Capacity Provider to use and how to size each execution environment. Specify CapacityProviderConfig during function creation with the Capacity Provider ARN and configure two execution environment settings. ExecutionEnvironmentMemoryGiBPerVCpu sets the memory-to-vCPU ratio (2:1, 4:1, or 8:1) based on your workload type and PerExecutionEnvironmentMaxConcurrency defines how many concurrent requests share each execution environment. This table shows how memory and vCPU allocation maps across supported execution environment ratio.

2:1 Ratio(Compute optimized) 4:1 Ratio(General purpose) 8:1 Ratio(Memory optimized)
Memory (GB) vCPU(s) Memory (GB) vCPU(s) Memory (GB) vCPU(s)
2 1 4 1 8 1
4 2 8 2 16 2
6 3 12 3 24 3
8 4 16 4 32 4
10 5 20 5
12 6 24 6
14 7 28 7
16 8 32 8
32 16

Function Memory-to-CPU configuration

Set the function’s memory size (up to 32 GB for LMI) and ExecutionEnvironmentMemoryGiBPerVCpu ratio. The default ratio is 2:1. A 2:1 ratio map to compute optimized instances for CPU-intensive tasks like video encoding, 4:1 map to a general purpose for balanced workloads, and 8:1 maps to a memory optimized instances for large in-memory datasets or caching. You must set memory in multiples of the ratio. LMI requires a 2 GB minimum as execution environments need sufficient memory to handle multiple concurrent requests. LMI supports up to 32 GB memory per execution environment.

Multi-Concurrency settings

LMI supports multiple concurrent invocations sharing the same execution environment, reducing cost per invocation by maximizing vCPU utilization. This is particularly effective for I/O-bound workloads, where invocations waiting on database queries or API calls yield vCPU usage to other invocations during idle periods. Lambda defaults to max concurrency per execution environment based on your runtime: Node.js (64 per vCPU), Java, and .NET (32 per vCPU), Python (16 per vCPU). Use PerExecutionEnvironmentMaxConcurrency to set a lower limit based on your workload’s resource needs. Decrease it if you’re experiencing memory pressure or CPU contention. When environments reach their configured max concurrency, new invocations throttle until capacity frees up at the execution environment level. This table captures the maximum concurrency per vCPU for each supported programming language.

Language Default Max Concurrency
Node.js 64 per vCPU
Java 32 per vCPU
.NET 32 per vCPU
Python 16 per vCPU

This command creates a Lambda function and associates it with your Capacity Provider:

aws lambda create-function \
  --function-name my-lmi-function \
  --runtime python3.13 \
  --role arn:aws:iam::123456789012:role/LambdaExecutionRole \
  --handler app.lambda_handler \
  --zip-file fileb://function.zip \
  --memory-size 4096 \
  --capacity-provider-config '{
    "LambdaManagedInstancesCapacityProviderConfig": {
      "CapacityProviderArn": "arn:aws:lambda:us-east-1:123456789012:capacity-provider:my-lmi-capacity",
      "ExecutionEnvironmentMemoryGiBPerVCpu": 4.0,
      "PerExecutionEnvironmentMaxConcurrency": 10
    }
  }' \
  --region us-east-1

Publishing Lambda Managed Instance Functions

Important: publish a function version before invoking an LMI function. Publishing triggers Lambda to provision Amazon EC2 instances and initialize execution environments, so that the configured baseline capacity is ready before you start invoking. Expect a brief delay before your code goes live as Lambda provisions and launches Amazon EC2 instances. With LMI, execution environments pre-warm after publishing and remain invoke-ready, without cold starts for published versions. Standard Lambda environments initialize on first invoke (cold starts).

This command publishes a Lambda function version and provisions capacity:

aws lambda publish-version --function-name my-lmi-function \
--region us-east-1

After publishing, the function works with standard invocation methods including direct invokes, event source mappings, and service integrations with Amazon API Gateway, Amazon Simple Storage Service (Amazon S3), Amazon DynamoDB Streams, and Amazon EventBridge.
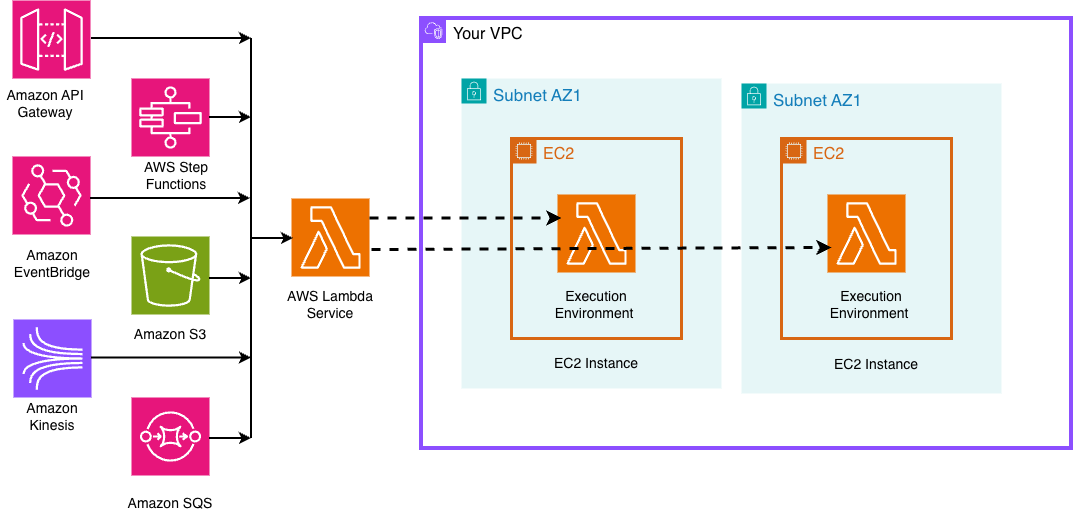
Figure 3. LMI Invocation from event sources

Figure 3. LMI Invocation from event sources

Scaling LMI Functions

Lambda monitors CPU utilization at Capacity Provider level. When CPU utilization reaches the target threshold, Lambda automatically provisions additional EC2 instances, and creates more execution environments on those instances, up to the MaxVCpuCount limit you configured for your capacity provider. As demand decreases, Lambda consolidates workloads onto fewer EC2 instances. You can choose automatic scaling mode (Lambda adjusts thresholds based on your patterns) or manual mode (you set a target CPU percentage). Automatic mode works for variable traffic patterns or when getting started. Manual mode fits when you have predictable patterns and want precise control over scaling thresholds for cost optimization.

Min and max execution environments

Control scaling at the function level with min and max execution environments. The default minimum is 3 execution environments to maintain high availability across Availability Zones. Your total function concurrency equals the number of execution environments multiplied by PerExecutionEnvironmentMaxConcurrency. For example, with min set to 3 and PerExecutionEnvironmentMaxConcurrency of 10, you have provided capacity for 30 concurrent invocations. With max set to 20, you can scale up to 200 concurrent invocations with incoming traffic, based on CPU utilization or concurrency saturation per execution environment. Set max to cap total concurrency and prevent noisy neighbor issues when multiple functions share a Capacity Provider. LMI maintains a minimum number of execution environments with a minimum Amazon EC2 fleet, while standard Lambda scales to zero when idle. Set both min and max to 0 to deactivate a function without deleting it.
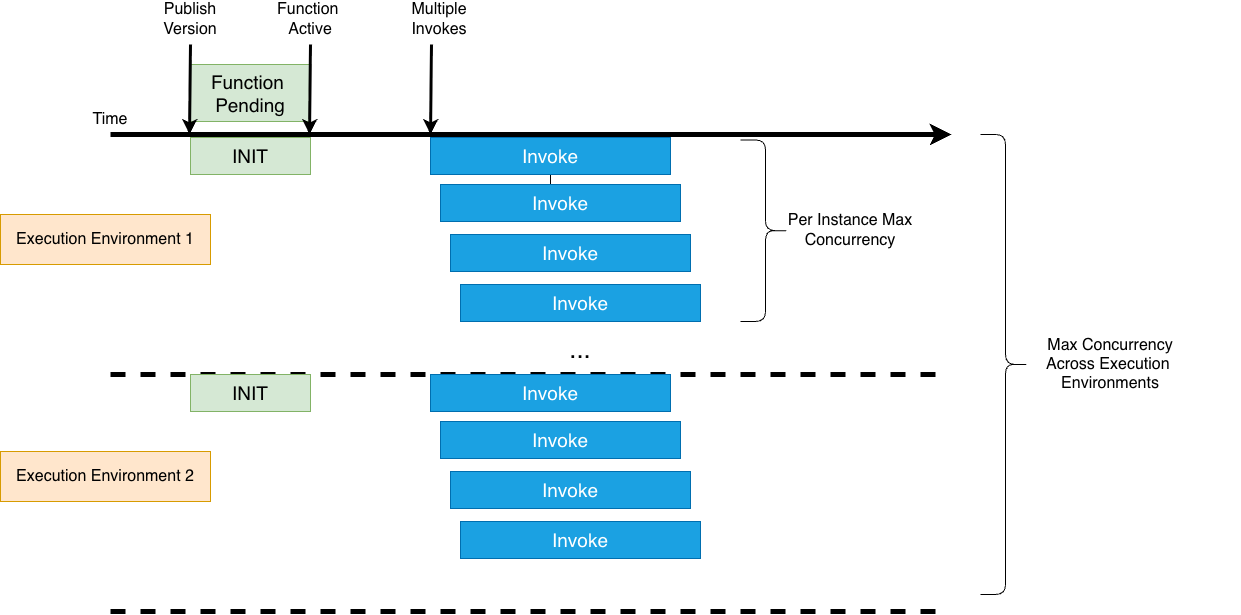
Figure 4. LMI Scaling

Figure 4. LMI Scaling

This command updates the minimum and maximum execution environments for your function:

aws lambda put-function-scaling-config \
  --function-name my-lmi-function \
  --qualifier $LATEST \
  --function-scaling-config MinExecutionEnvironments=5,MaxExecutionEnvironments=20 \
  --region us-east-1

We’ll cover scaling patterns and throughput optimization strategies in depth in a separate blog post.

Best Practices and Production Considerations

Thread Safety

Since LMI supports multiple invocations sharing execution environments, your code must be thread-safe. Code that isn’t thread-safe causes data corruption, security issues, or unpredictable behavior under concurrent load.

Thread safety essentials

Avoid mutating shared objects or global variables. Use thread-local storage for request-specific data. Initialize shared clients (AWS SDK, database connections) outside the function handler and verify that configurations remain immutable during invocations. Write to /tmp using request-specific file names to prevent concurrent writes.

Runtime-specific guidance

Java applications should use immutable objects, thread-safe collections, and proper synchronization. Node.js applications should use async context for request isolation. Python applications run separate processes per execution environment. So, focus on interprocess coordination and file locking for /tmp access.

Workload Optimization

I/O-bound workloads perform better with higher concurrency per environment. Use asynchronous patterns and non-blocking I/O to maximize efficiency. CPU-bound workloads get no benefit from concurrency greater than one per vCPU. Instead, configure more vCPUs per function for true parallelism for compute-heavy tasks like data transformation or image processing.

Testing

Validate your code under concurrent execution. Test with multiple simultaneous invocations to detect race conditions and shared state issues before production deployment. You can use LocalStack for local emulation of LMI. Learn more about LocalStack’s LMI support in their announcement blog.

Compatibility

Tools like Powertools for AWS work with LMI without code changes. However, if you’re reusing existing Lambda function code, layers, or packaged dependencies on LMI, test for thread safety and compatibility with the multi-concurrent execution model before production deployment.

Observability

LMI automatically publishes CloudWatch metrics at two levels: capacity provider (CPU, memory, network, and disk utilization across your Amazon EC2 fleet) and execution environment (concurrency, CPU, and memory per function). Monitor CPUUtilization to understand scaling headroom and right-size your MaxVCpuCount. Track ExecutionEnvironmentConcurrency against ExecutionEnvironmentConcurrencyLimit to catch throttling before it impacts users. Lambda publishes metrics at 5-minute intervals. Use CloudWatch alarms to stay ahead of capacity limits in production.

Conclusion

AWS Lambda Managed Instances combines serverless simplicity with compute flexibility, helping you run high-performance workloads with reduced operational complexity. You maintain the familiar programming model of Lambda while accessing the diverse instance types of Amazon EC2 and predictable pricing, making it well-suited for data processing pipelines, compute intensive operations and cost-sensitive steady-state applications.

Ready to get started with LMI? Deploy our Monte Carlo risk simulation example from GitHub to see LMI in action with a real compute-intensive workload. The sample includes complete infrastructure code and walks you through capacity provider configuration, function setup, and performance optimization.

We want to hear from you. Share your feedback, questions, and use cases on re:Post.
Best practices for Lambda durable functions using a fraud detection example

Post Syndicated from Debasis Rath original https://aws.amazon.com/blogs/compute/best-practices-for-lambda-durable-functions-using-a-fraud-detection-example/

AWS Lambda durable functions extend the Lambda programming model to build fault-tolerant multi-step applications and AI workflows using familiar programming languages. They preserve progress despite interruptions and execution can suspend for up to one year, for human approvals, scheduled delays, or other external events, without incurring compute charges for on-demand functions.

This post walks through a fraud detection system built with durable functions. It also highlights the best practices that you can apply to your own production workflows, from approval processes to data pipelines to AI agent orchestration. You will learn how to handle concurrent notifications, wait for customer responses, and recover from failures without losing progress. If you are new to durable functions, check out the Introduction to Durable Functions blog post first.

Fraud detection with human-in-the-loop

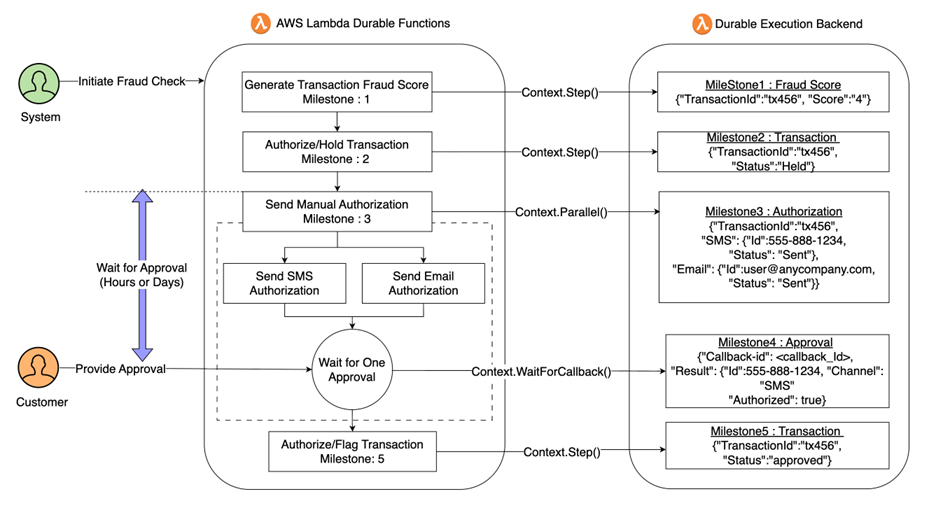
Consider a credit card fraud detection system, which uses an AI agent to analyze incoming transactions and assign risk scores. For ambiguous cases (medium-risk scores), the system needs human approval before authorizing a transaction. The workflow branches based on risk:

  • Low risk (score < 3): Authorize immediately
  • High risk (score ≥ 5): Send to the fraud department immediately
  • Medium risk (score 3–4): Suspend transaction, send SMS and email to cardholder, wait up to 24 hours for confirmation (wait time is customizable)
Figure 1. Agentic Fraud Detection with durable Lambda functions

Figure 1. Agentic Fraud Detection with durable Lambda functions

With human-in-the-loop workflows, response times can vary from minutes to hours. These delays introduce the need to durably preserve the state without consuming compute resources while waiting. With financial systems, we must also implement idempotency to guard against duplicate messages (invocations) and recover from failures without reprocessing completed work. To address these requirements, developers implement polling patterns with external state stores like Amazon DynamoDB or Amazon Simple Storage Service (Amazon S3) to manage idempotency, pay for idle compute while waiting for callbacks, introduce external orchestration components, or build asynchronous message-driven systems to handle long-processing tasks.

Lambda durable functions provide a new alternative to address these challenges through durable execution, a pattern that uses checkpoints (saved state snapshots) to preserve progress and replays from saved state to recover from failures or resume after waiting. With checkpointing capabilities, you no longer need to pay Lambda compute charges while waiting, whether for callbacks, scheduled delays, or external events. Learn how to implement durable functions using the complete fraud detection implementation at this GitHub repository. You can deploy it to your AWS account and experiment with the code as you read. The repository includes deployment instructions, sample data, and helper functions for testing.

As we walk through the code, we’ll focus on best practices for designing workflows with durable execution and how to apply these patterns correctly in production workflows.

Design steps to be idempotent

Durable execution is designed to preserve progress through checkpoints and replay, but that reliability model means step logic can execute more than once. When steps retry, how do you prevent duplicate actions like charges to the credit card or repeated customer SMS or email notifications?

Durable functions use at-least-once execution by default, executing each step at least one time, potentially more if failures occur. When a step fails, it retries. There are two strategies to design idempotent steps that prevent duplicate side effects: using external API idempotency keys and using the at-most-once step semantics built into durable functions.

Strategy A: External API Idempotency Keys

// Strategy A: Use external API idempotency keys
await context.step(`authorize-${tx.id}`, async () => {
  return payment.charges.create({
    amount: tx.amount,
    currency: 'usd',
    idempotency_key: `tx-${tx.id}`, // Prevents duplicate charges
    description: `Transaction ${tx.id}`
  });
});

Notice the configuration:

  • idempotency_key in API call: If the step retries, the payment processor recognizes it’s a duplicate request and returns the original result
  • Defense in depth: Two layers of protection: Lambda checkpointing and external API idempotency

Each layer provides independent protection. If Lambda’s checkpoint fails, the external API prevents duplicate charges. For legacy systems without idempotency support, where it’s critical that an operation is not executed more than once, use at-most-once semantics:

Strategy B: Use At-Most-Once Semantics

For legacy systems without idempotency support, use at-most-once execution, a delivery feature that executes each step zero or one time, never more:

// Strategy B: At-most-once step semantics
await context.step("charge-legacy-system", async () => {
  return await legacyPaymentSystem.charge(tx.amount);
}, {
  semantics: StepSemantics.AtMostOncePerRetry,
  retryStrategy: createRetryStrategy({ maxAttempts: 0 })
});

This checkpoints before step execution, preventing the step from re-execution on retries. The tradeoff? If the step fails, you must decide whether to retry (risking duplicates) or fail the entire workflow.

Use idempotency for critical side effects like payment processing, database writes, external API calls, state transitions, and resource provisioning. Read more about idempotency here.

Prevent duplicate executions with DurableExecutionName

Idempotent steps prevent duplicate side effects within a single execution, but what about duplicate workflow executions running concurrently? For example, duplicate messages in the queue, users clicking “Submit” multiple times in the UI, or the same event arriving via multiple channels like webhook and API. Without protection, each invocation creates a separate durable execution, potentially running the fraud check multiple times, sending duplicate notifications, and creating confusion about which execution is authoritative. Durable functions provide DurableExecutionName to help ensure only one concurrent execution per unique name.

// Invoke fraud detection function with execution name
await lambda.invoke({
  FunctionName: 'fraud-detection',
  InvocationType: 'Event',
  DurableExecutionName: `tx-${transactionId}`,
  Payload: JSON.stringify({
    id: transactionId,
    amount: 6500,
    location: 'New York, NY',
    vendor: 'Amazon.com'
  })
});

Notice the configuration:

  • DurableExecutionName: tx-${transactionId}: Uses the transaction ID as a unique execution identifier
  • InvocationType: ‘Event’: Asynchronous invocation supports long-running workflows beyond 15 minutes
  • One execution per transaction: If three invocations arrive with the same transaction ID, only the first creates an execution. Subsequent requests with the same execution name and payload receive an idempotent response returning the existing execution’s ARN, rather than creating a new execution.

Lambda durable functions work with Lambda event sources, including event source mappings (ESM) such as Amazon Simple Queue Service (Amazon SQS)Amazon Kinesis, and DynamoDB Streams. ESMs invoke durable functions synchronously and inherit Lambda’s 15-minute invocation limit. Therefore, like direct Request/Response invocations, durable functions executions using event source mappings cannot exceed 15 minutes.

For workflows exceeding 15 minutes, use an intermediary Lambda function between the event source mapping and durable function:

// Intermediary function for SQS -> Durable function
export const handler = async (event) => {
  for (const record of event.Records) {
    const transaction = JSON.parse(record.body);
    await lambda.invoke({
      FunctionName: process.env.FRAUD_DETECTION_FUNCTION,
      InvocationType: 'Event',
      DurableExecutionName: `tx-${transaction.id}`,
      Payload: JSON.stringify(transaction)
    });
  }
};

This removes the 15-minute limit, allows executions up to one year, and enables custom execution name parameters for idempotency. Use Powertools for AWS Lambda to prevent duplicate invocations of the durable function when the event source mapping retries the intermediary function. Additionally, configure failure handling for your event source to capture failed invocations for future redrive or replay. For example, dead letter queues for SQS, or on-failure destinations for other event sources.

Match timeouts to invocation type

One important configuration detail ties these patterns together: matching your timeout settings to your invocation type. Lambda synchronous invocations (RequestResponse) have a hard 15-minute timeout limit. If you configure a durable execution to run for 24 hours but invoke it synchronously, the synchronous invocation fails immediately with an exception. Durable functions support workflows up to one year when invoked asynchronously.

// Lambda function configuration
{
  FunctionName: 'fraud-detection',
  Timeout: 300,
  MemorySize: 512,
  DurableConfig: {
    ExecutionTimeout: 90000
  }
}

And invoke asynchronously:

// Async invocation for long-running workflow
await lambda.invoke({
  FunctionName: 'fraud-detection',
  InvocationType: 'Event',
  DurableExecutionName: `tx-${transactionId}`,
  Payload: JSON.stringify(transaction)
});

Notice the configuration:

  • Timeout: 300: Lambda function timeout (5 minutes in this example, up to a maximum of 15 minutes). This defines the maximum duration for each active execution phase, including the initial invocation and any subsequent replays. Set this to cover the longest expected active processing time in your workflow.
  • ExecutionTimeout: { hours: 25 }: Durable execution timeout covers the workflow’s expected total duration including suspension periods. Set this slightly above the longest wait timeout to avoid edge cases.
  • InvocationType: ‘Event’: Asynchronous invocation removes the 15-minute limit and enables executions up to one year.

The Lambda function timeout applies to active execution phases (AI calls, notification sending). During suspension (waiting for callbacks), the function isn’t running, so this timeout doesn’t apply. Setting the durable execution timeout to a meaningful boundary prevents workflows from running longer than expected. Without an explicit timeout, executions can run up to the maximum lifetime of one year.

Synchronous (RequestResponse) Asynchronous (Event)
Total duration Under 15 minutes Up to 1 year
Caller needs result Yes No
Idempotency support Yes Yes
Waits with suspension Yes Yes

Execute Concurrent Operations with context.parallel()

In the fraud detection workflow, the system notifies the cardholder through multiple channels such as SMS and email. Preserving business logic when executing parallel workflows introduces code complexities such as managing execution state across branches, handling synchronization, and coordinating branch completion. Durable functions simplify parallel workflow implementation using context.parallel(), which executes branches concurrently while maintaining durable checkpoints for each branch and provides configurable options to handle partial completions. By checkpointing and managing the state internally, durable functions help make sure that the state is preserved even if there are retries or failures. Note that context.parallel() manages the internal execution state for each branch. If your branches interact with a shared external state (such as a database), you’re responsible for managing concurrent access to that external state.

// Human-in-the-loop: verify via email AND SMS (first response wins)
let verified = await context.parallel("human-verification", [
  (ctx) => ctx.waitForCallback("SendVerificationEmail",
    async (callbackId) => sendCustomerNotification(callbackId, 'email', tx)
  ),
  (ctx) => ctx.waitForCallback("SendVerificationSMS",
    async (callbackId) => sendCustomerNotification(callbackId, 'sms', tx)
  )
], {
  maxConcurrency: 2,
  completionConfig: {
    minSuccessful: 1 // Continue after 1 success
  }
});

Notice the configuration:

  • maxConcurrency: 2: Both notifications sent at the same time
  • minSuccessful: 1: We only need one channel to succeed, whichever responds first wins

Each parallel branch waits for its callback independently, and the durable execution checkpoints each branch as part of the execution state. Using the minSuccessful parameter, you control the minimum number of successful branch executions required for the parallel operation to complete. In this example, only one of the two branches needs to succeed. Verifications through SMS or email are both valid, and the workflow resumes as soon as either channel completes successfully. We call this the first-response-wins pattern. This pattern works well when you only need a single successful result from any parallel branch and want the remaining branches to stop blocking progress.

But what happens if neither channel responds? Without timeouts, this workflow could remain suspended for up to the configured execution lifetime.

Always configure callback timeouts

Let’s add timeout protection to the parallel verification from the previous section. context.waitForCallback() accepts a timeout option that bounds how long each branch waits before throwing an exception. By wrapping the parallel call in a try/catch, you can implement fallback logic when users don’t respond in time.

// Enhanced: parallel verification with timeout and error handling
let verified;
try {
  verified = await context.parallel("human-verification", [
    (ctx) => ctx.waitForCallback("SendVerificationEmail",
      async (callbackId) => sendCustomerNotification(callbackId, 'email', tx),
      { timeout: { days: 1 } }  // Wait up to 1 day for email response
    ),
    (ctx) => ctx.waitForCallback("SendVerificationSMS",
      async (callbackId) => sendCustomerNotification(callbackId, 'sms', tx),
      { timeout: { days: 1 } }  // Wait up to 1 day for SMS response
    )
  ], {
    maxConcurrency: 2,
    completionConfig: {
      minSuccessful: 1
    }
  });
} catch (error) {
  const isTimeout = error.message?.includes("timeout");
  if (isTimeout) {
    context.logger.warn("Customer verification timeout", { error, txId: tx.id });
    // Fallback: escalate to fraud department
    return await context.step("sendToFraudDepartment", async () =>
      sendToFraudDepartment(tx, true)
    );
  }
  throw error; // Re-throw non-timeout errors
}

Notice what changed from the previous section:

  • timeout: { days: 1 }: Each callback branch now has a maximum wait time of 1 day. If neither the email nor SMS callback arrives within that window, a timeout exception is thrown.
  • try/catch with timeout detection: The catch block distinguishes between timeout errors and other exceptions. When a timeout occurs, the workflow implements fallback logic by escalating the transaction to the fraud department, while non-timeout errors are re-thrown to be handled by the durable execution retry mechanism.

Without this error handling, the entire execution fails unhandled. The timeout also works with the minSuccessful configuration: if one branch times out but the other succeeds, the parallel operation still completes successfully since only one successful result is required.

For advanced use cases where the callback handler performs long-running work, you can also configure a heartbeatTimeout to detect stalled callbacks before the main timeout expires. See the Lambda Developer Guide for details.

Use callback timeouts for human approvals, external API callbacks, asynchronous processing, and third-party integrations.

Putting it all together: complete fraud detection implementation

Now let’s see how all the best practices work together in the complete fraud detection workflow:

import { withDurableExecution } from "@aws/durable-execution-sdk-js";
import { BedrockAgentCoreClient, InvokeAgentRuntimeCommand } from "@aws-sdk/client-bedrock-agentcore";

const agentRuntimeArn = process.env.AGENT_RUNTIME_ARN;
const agentRegion = process.env.AGENT_REGION || 'us-east-1';
const client = new BedrockAgentCoreClient({ region: agentRegion });

export const handler = withDurableExecution(async (event, context) => {
  const tx = {
    id: event.id,
    amount: event.amount,
    location: event.location,
    vendor: event.vendor
  };

  // AI fraud assessment with error handling
  tx.score = await context.step("fraudCheck", async () => {
    try {
      const payloadJson = JSON.stringify({ input: { amount: tx.amount } });
      const command = new InvokeAgentRuntimeCommand({
        agentRuntimeArn: agentRuntimeArn,
        qualifier: 'DEFAULT',
        payload: Buffer.from(payloadJson, 'utf-8'),
        contentType: 'application/json',
        accept: 'application/json'
      });
      const response = await client.send(command);
      const responseText = await response.response.transformToString();
      const result = JSON.parse(responseText);
      return result?.output?.risk_score ?? 5;  // Default to high-risk if score unavailable
    } catch (error) {
      context.logger.error("Fraud check failed", { error, txId: tx.id });
      return 5;
    }
  });

  // Route based on AI decision
  if (tx.score < 3) {
    // Best Practice: Idempotent authorization
    return await context.step(`authorize-${tx.id}`, async () =>
    authorizeTransaction(tx, { idempotency_key: `tx-${tx.id}` })
    );
  }

  if (tx.score >= 5) {
    return await context.step(`sendToFraudDepartment-${tx.id}`, async () =>
      sendToFraudDepartment(tx)
    );
  }

  // Medium risk: need human verification
  await context.step(`suspend-${tx.id}`, async () => suspendTransaction(tx));

  // Best Practice: Concurrent operations with timeout configuration
  let verified;
  try {
    verified = await context.parallel("human-verification", [
      (ctx) => ctx.waitForCallback("SendVerificationEmail",
        async (callbackId) => sendCustomerNotification(callbackId, 'email', tx),
        { timeout: { days: 1 } }
      ),
      (ctx) => ctx.waitForCallback("SendVerificationSMS",
        async (callbackId) => sendCustomerNotification(callbackId, 'sms', tx),
        { timeout: { days: 1 } }
      )
    ], {
      maxConcurrency: 2,
      completionConfig: {
        minSuccessful: 1
      }
    });
  } catch (error) {
    const isTimeout = error.message?.includes("timeout");
    context.logger.warn(
      isTimeout ? "Customer verification timeout" : "Customer verification failed",
      { error, txId: tx.id }
    );
    return await context.step(`timeout-escalate-${tx.id}`, async () =>
      sendToFraudDepartment(tx, true)
    );
  }

  // Idempotent final step with idempotency key
  return await context.step(`finalize-${tx.id}`, async () => {
    const action = !verified.hasFailure && verified.successCount > 0
      ? "authorize"
      : "escalate";
    if (action === "authorize") {
      return authorizeTransaction(tx, true, { idempotency_key: `finalize-${tx.id}` });
    }
    return sendToFraudDepartment(tx, true);
  });
});

Notice how the best practices work together: context.parallel() sends SMS and email concurrently, resuming when either channel responds. Both callbacks configure 1-day timeouts with try/catch handling that escalates on timeout. The DurableExecutionName: tx-${transactionId} parameter (specified at invocation time, shown in the following CLI example) provides execution-level deduplication, while idempotency keys in the authorization steps prevent duplicate charges at the application layer. Asynchronous invocation (InvocationType: 'Event') enables the 24-hour wait period.

Once deployed, invoke the function asynchronously with a sample transaction to see it in action:

transactionId="123456789"
aws lambda invoke \
  --function-name "fraud-detection:$LATEST" \
  --invocation-type Event \
  --durable-execution-name "tx-${transactionId}" \
  --cli-binary-format raw-in-base64-out \
  --payload "{\"id\": \"${transactionId} \", \"amount\": 6500, \"location\": \"New York, NY\", \"vendor\": \"Amazon.com\"}" \
  --region us-east-2 \
  response.json

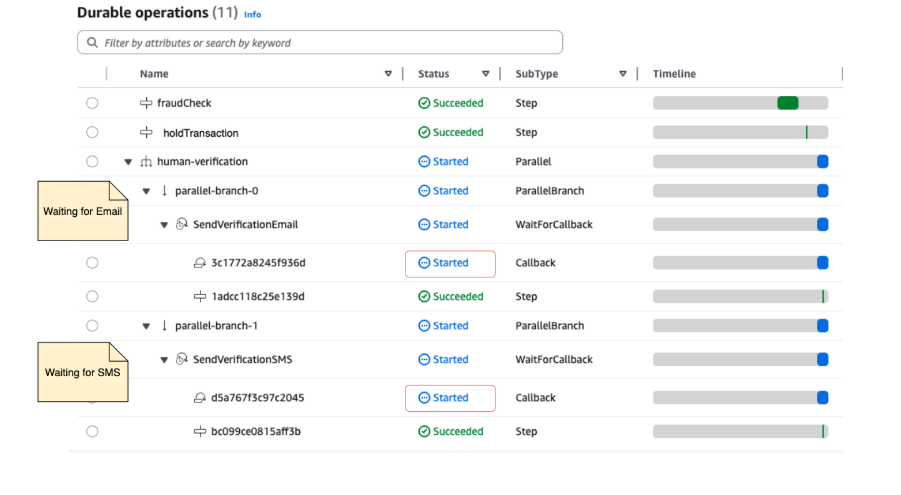
Upon successful invocation, you can view the execution state in the Lambda console’s durable operations view. The execution shows a suspended state, waiting for customer response:

Figure 2: Suspended execution state

Figure 2: Suspended execution state

Notice the fraudCheck and suspendTransaction steps show as succeeded with checkpointed results. The human-verification parallel operation shows that both SMS and email branches started. The timeline shows the function in a suspended state. Simulate a customer response by sending a callback success through the console, AWS Command Line Interface (AWS CLI) or Lambda API:

aws durable-lambda send-durable-execution-callback-success \
  --callback-id <CALLBACK_ID_FROM_EMAIL_OR_SMS> \
  --result '{"status":"approved","channel":"email"}' \
  --cli-binary-format raw-in-base64-out
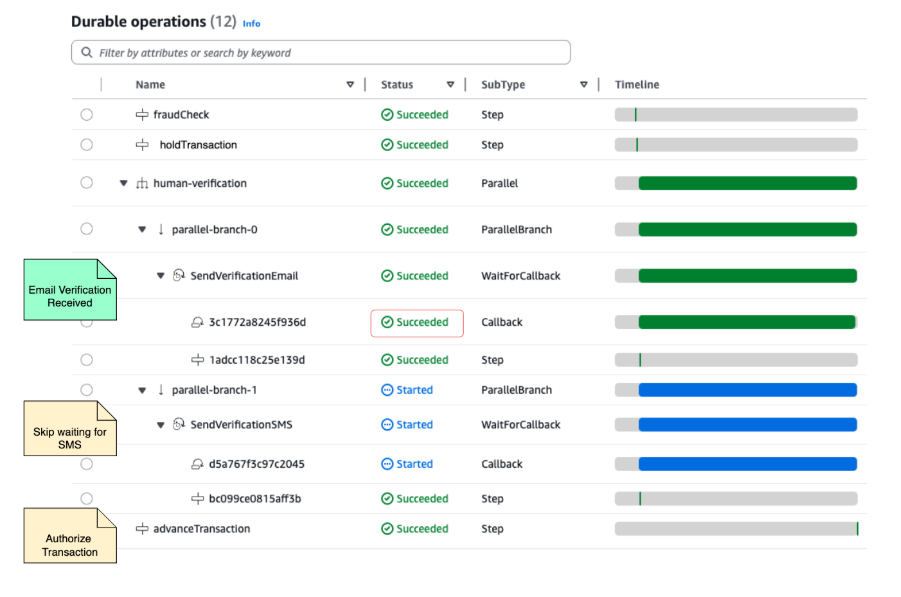
Figure 3: Completed execution with customer approval

Figure 3: Completed execution with customer approval

After receiving the customer’s approval, the durable execution resumes from its checkpoint, authorizes the transaction, and completes. The execution spanned hours but consumed only seconds of compute time.

Conclusion

With durable functions, Lambda extends beyond single-event processing to power core business processes and long-running workflows, while retaining the operational simplicity, reliability, and scale that define Lambda. You can build applications that run for days or months, survive failures, and resume where they left off, all within the familiar event-driven programming model.

Deploy the fraud detection workflow from our GitHub repository and experiment with human-in-the-loop patterns in your own account. For core concepts, see Introduction to AWS Lambda Durable Functions. For comprehensive documentation, see the Lambda Developer Guide. Browse Serverless Land for reference architectures and discover where durable execution fits in your designs.

Share your feedback, questions, and use cases in the SDK repositories or on re:Post.

Infrastructure as code translation for serverless using AI code assistants

Post Syndicated from Debasis Rath original https://aws.amazon.com/blogs/compute/infrastructure-as-code-translation-for-serverless-using-ai-code-assistants/

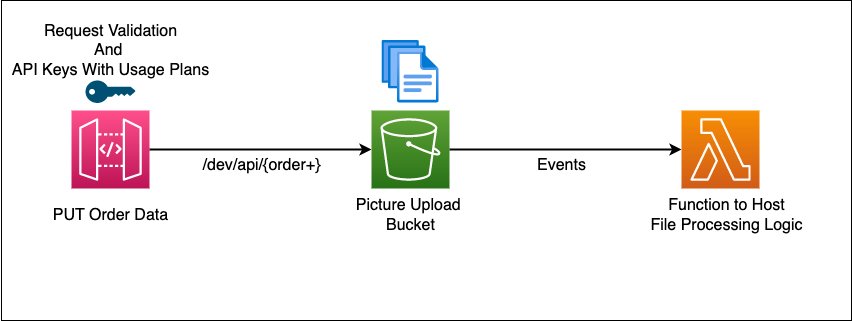
Serverless applications commonly use infrastructure as code (IaC) frameworks to define and manage their cloud resources. Teams choose different IaC tools based on their skills, existing tooling, or compliance needs. As applications grow, the need to shift between IaC formats may arise to adopt new features or align with evolving standards. Developers are rapidly adopting AI-powered coding assistants to help with these evolving demands. In this post, we focus on Amazon Q Developer as an example, but the guidance applies broadly to any coding assistant. Amazon Q Developer is an AI-powered assistant that helps developers with code generation, problem-solving, and development tasks within the Amazon Web Services (AWS) ecosystem. Amazon Q Developer command line interface (CLI) allows developers to convert infrastructure definitions between popular IaC frameworks. This post demonstrates how to use Amazon Q CLI to translate a serverless project from a source IaC such as Serverless Framework version 3 to an IaC framework of choice such as the AWS Serverless Application Model (AWS SAM). To make demonstration more accessible, we have chosen a low-complexity project. However, Amazon Q CLI supports bidirectional translation across multiple IaC formats. We walk through how to migrate a reference architecture to show how the process works, as shown in the following figure.

Figure 1. Architecture diagram of example AWS solution to translate

Figure 1. Architecture diagram of example AWS solution to translate

This sample project orchestrates the deployment of a REST API using Amazon API Gateway, acting as an Amazon Simple Storage Service (Amazon S3) proxy for write operations. It includes API-Key setup, basic request validator, AWS Lambda invocation on Amazon S3 events, and enables Amazon CloudWatch Logs and AWS X-Ray tracing for API Gateway and Lambda using the Powertools for Lambda developer toolkit.

Solution overview

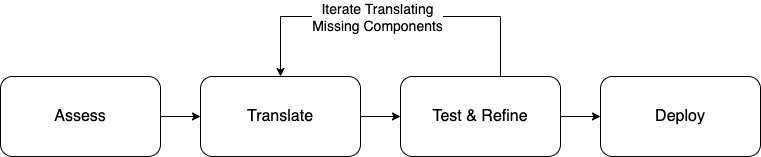
Amazon Q Developer is trained on AWS best practices and provides an AI-powered experience through its CLI. It automates IaC translation by reducing manual effort, minimizing errors, and preserving the original intent across frameworks. The translation process follows four steps: assess, translate, test and refine, and deploy. The following figure shows this workflow.

Figure 2. Logical flow for assessment, translation, testing, and deployment

Figure 2. Logical flow for assessment, translation, testing, and deployment

  1. Assess: Analyze existing Serverless Framework projects for compatibility and readiness.
  2. Translate: Convert Serverless Framework configuration into AWS SAM templates using Amazon Q Developer CLI.
  3. Test and refine: Validate and improve translated templates to make sure of functional accuracy and best practices.
  4. Deploy: Package and deploy the finalized AWS SAM templates to AWS environments.

Prerequisites and considerations

The following prerequisites and considerations are necessary to complete this solution.

Define custom rules to guide automation with Amazon Q Developer

Amazon Q Developer uses a rule-based model to automate tasks that is guided by user-defined rules. These rules encode your team’s standards to make sure that the automation is consistent and repeatable. You can create a library of custom rules to enforce best practices when using Amazon Q in your integrated development environment (IDE) or through the CLI. To help you get started, we’ve included a sample rules file that provides a baseline configuration. This file defines the structure of the output, sequence of the automation steps, and best practices to follow during each phase of the project. You can customize these rules to align with your organization’s architectural guidelines, security policies, or compliance needs.

Understand and categorize project complexity

Serverless projects differ in scale and structure, which directly impacts how you assess them. Smaller projects with minimal configuration and a few functions typically present fewer challenges. Larger, more complex projects can include dozens of Lambda functions, shared layers, and integrations across services such as Amazon Simple Queue Service (Amazon SQS), Amazon DynamoDB, or Amazon EventBridge. Start by categorizing the project as low, medium, or high complexity based on factors such as the number of functions, the diversity of event sources, and the presence of shared configurations. Use this categorization to prioritize and scope your assessment efforts. For complex workloads, assess individual components separately to reduce the surface area for troubleshooting and remediation.

Handle framework-specific tooling and plugins

Plugins or dependencies in different IaC frameworks extend core functionality or introduce custom behaviors. AWS SAM supports similar capabilities but in a different way. For example, you may be able to use AWS SAM, but for capabilities not found in AWS SAM, you can use AWS CloudFormation macros or Lambda-backed custom resources. During assessment, identify all active plugins and document their purpose and integration points. Evaluate whether each plugin’s functionality can be replicated using native AWS services or custom resources in AWS SAM. For common patterns—such as packaging optimizations, function warmers, or custom deploy hooks—consider using the CloudFormation macros and custom resources. When plugin functionality cannot be translated directly, annotate it in your assessment report for manual intervention. Clearly mapping each plugin’s role helps maintain parity and reduces surprises during deployment in the new environment.

With all of this you are ready to start the conversion.

Assess with Amazon Q Developer

The animated diagrams included in this post offer step-by-step visuals to explain the Amazon Q behavior throughout the workflow. Remember that you have already set rules for Amazon Q for each phase. Now your prompt to Amazon Q is clear. At this point Amazon Q has enough context to get you crisper and deterministic result. Use the following prompt to start the assessment:

Prompt

Evaluate the readiness of the Serverless Framework v3 project for 
translation to AWS SAM using the provided assessment rules.
Figure 3. Assessment step using Amazon Q Developer

Figure 3. Assessment step using Amazon Q Developer

After the assessment, Amazon Q Developer generates translation recommendations based on AWS best practices. It produces an evaluation_summary.md file with detailed insights, mapping guidance, and technical considerations for converting components to AWS SAM resources. The report serves as the foundation for the next step: automated translation into AWS SAM resources.

Translate using Amazon Q Developer

After completing the assessment, begin the translation using the baseline rules defined in .amazonq/rules/translation_rules.md. These rules guide the conversion and make sure of consistency with the assessment outputs. Amazon Q Developer CLI uses these rules to parse the serverless.yml file, scaffold a new project structure, and generate a complete AWS SAM template. During translation, Amazon Q Developer performs the following actions:

  • Converts each Lambda function into an AWS::Serverless::Function, preserving runtime, handler, memory, timeout, and environment settings.
  • Translates event sources such as HTTP APIs and Amazon SQS into SAM event definitions.
  • Maps AWS Identity and Access Management (IAM) policies and permissions into CloudFormation-compatible resources.
  • Removes development-only settings such as the serverless-offline plugin.

Serverless Framework v3 often uses CloudFormation orchestration and custom resources to deliver certain capabilities. For example, it may use custom resources to provision S3 bucket notifications. Amazon Q detects these patterns during assessment and translates them into explicit, well-structured AWS SAM resources. This makes sure of functional parity in the target IaC.Use the following prompt to begin the translation:

Prompt

Apply the translation rules to migrate this Serverless Framework 
v3 project into an AWS SAM project while maintaining all 
original infrastructure behavior.
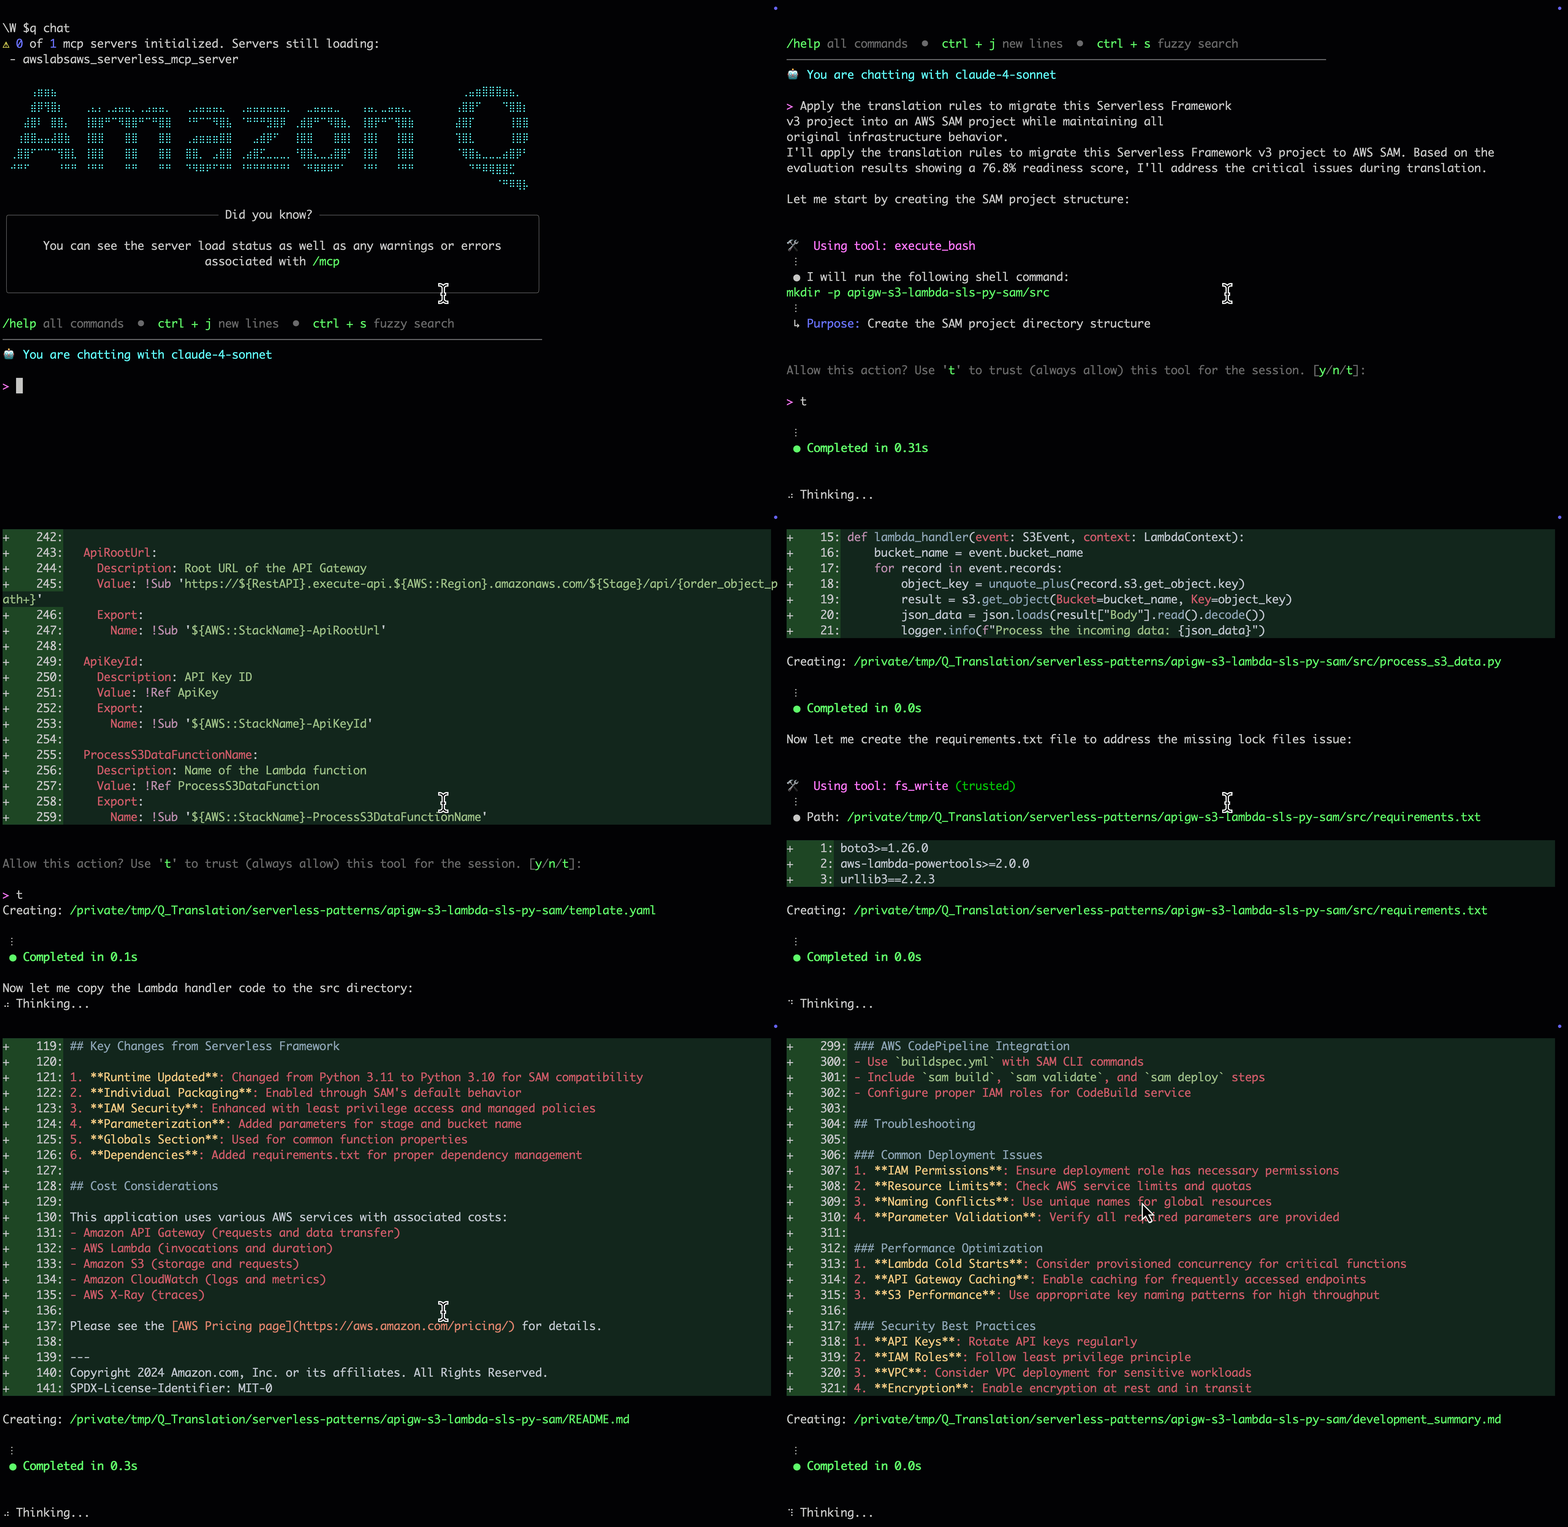
Figure 4. Translation using Amazon Q Developer

Figure 4. Translation using Amazon Q Developer

After translation, Amazon Q Developer produces a complete AWS SAM project with test scripts and documentation. The project supports local testing, automated deployment, consistent resource management, and native integration with AWS tools. You also receive a development_summary.md file with a structured project overview and step-by-step testing instructions.

Amazon Q Developer replaces resources created implicitly by Serverless Framework plugins (such as Serverless Lift or custom resources for handling circular dependencies) with explicit CloudFormation definitions. To support custom or unsupported plugins, define the translation logic in .amazonq/rules/development_rules.md. Specify mappings or flag resources for manual review. This maximizes automation while highlighting exceptions early in the workflow.

Test and refine using Amazon Q Developer

Validate the translated AWS SAM application using the local testing rules defined in .amazonq/rules/local_testing_rules.md. These rules guide high-fidelity simulation and verification.

Amazon Q Developer generates test commands that use the AWS SAM CLI to replicate real-world behavior. It uses sam local invoke to test Lambda functions and sam local start-api to simulate HTTP API calls. This makes sure of the translated application behaves as expected when compared to the original Serverless Framework project.

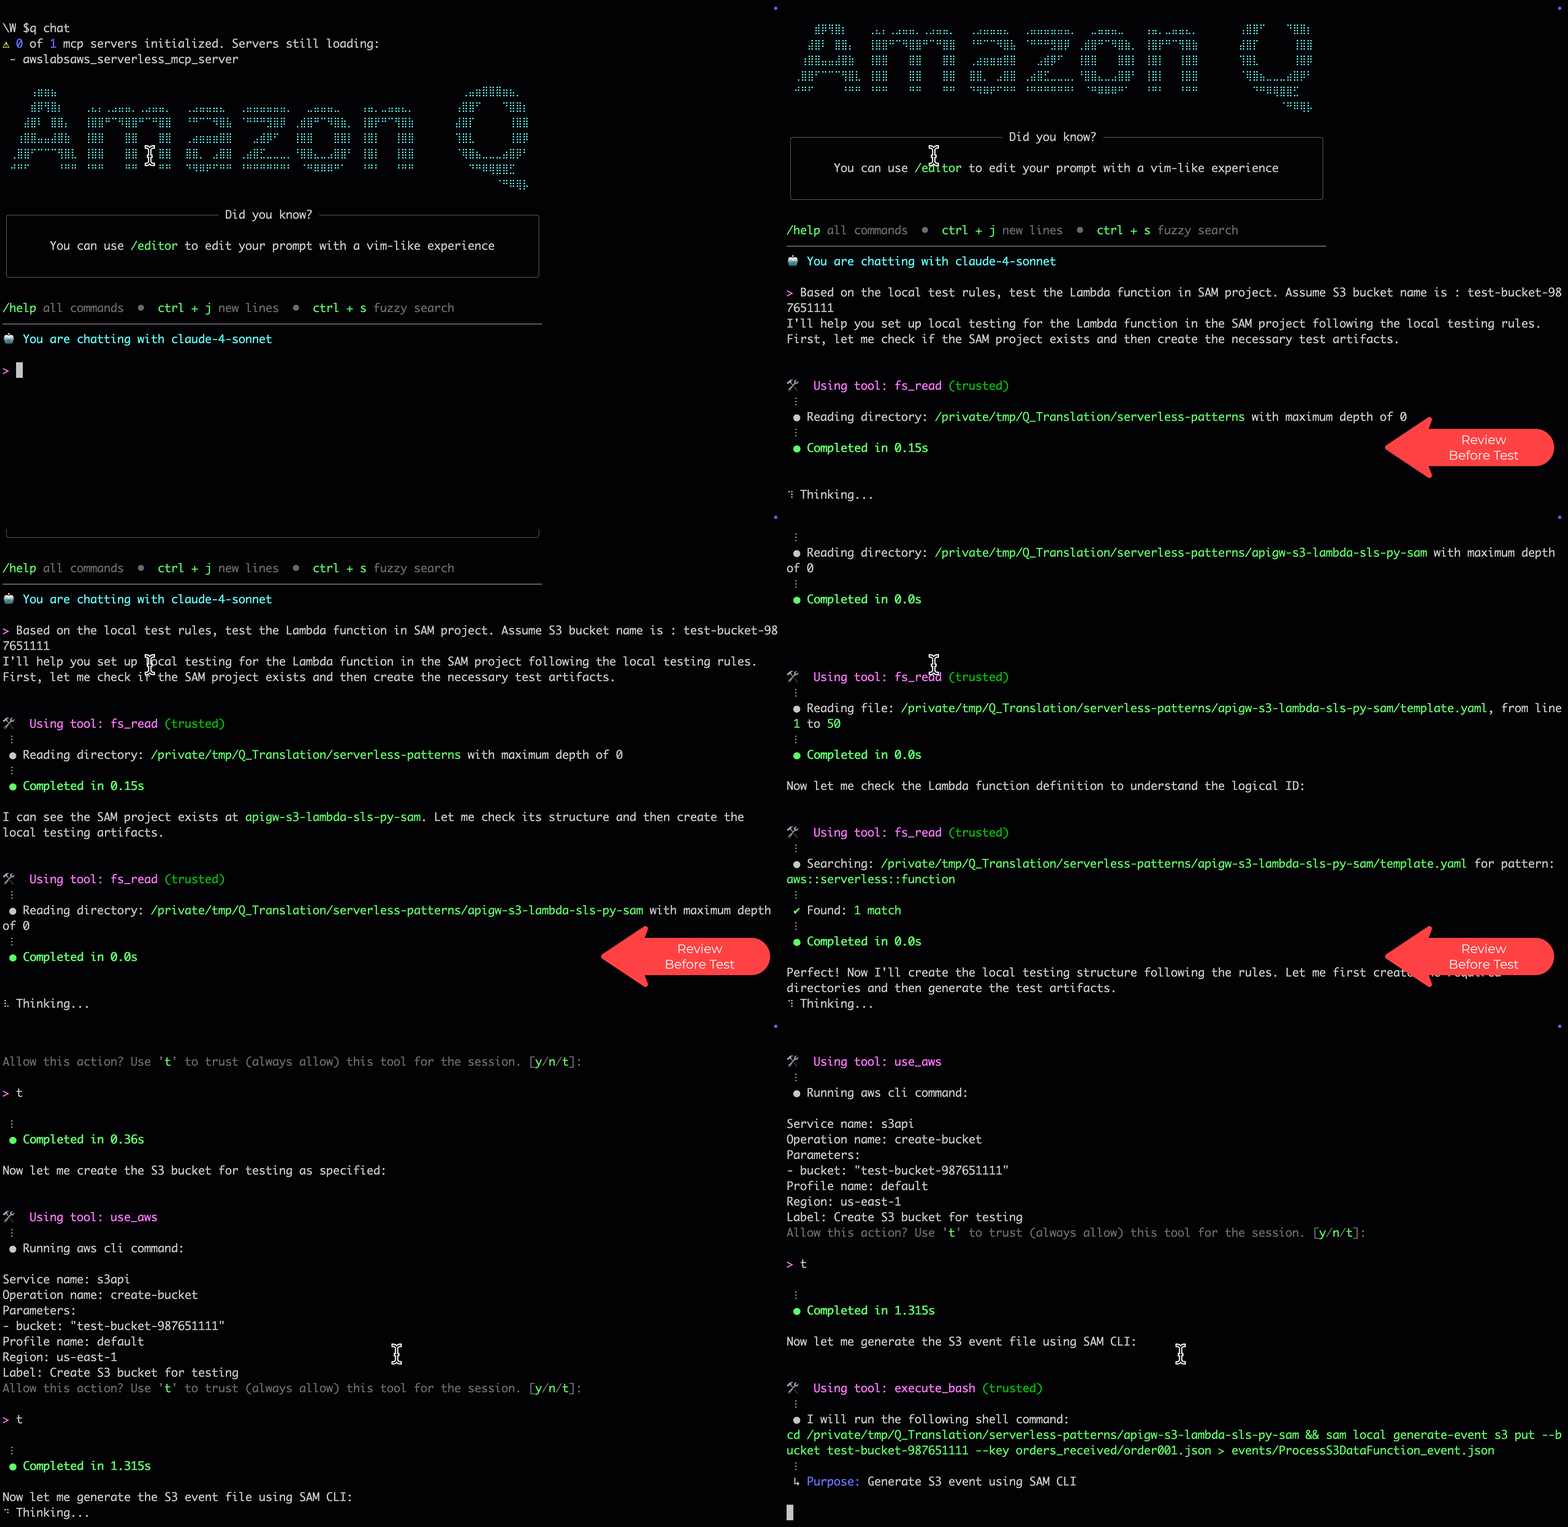
To simulate Amazon S3 events, provision temporary S3 buckets, and instruct Amazon Q Developer to reference them during testing, it enables full end-to-end validation by combining real Amazon S3 interactions with a local function execution.Use the following prompt to begin testing:

Based on the local test rules, test the Lambda function in 
SAM project. Assume S3 bucket name is : <BUCKET_NAME>
Figure 5. Testing and refinement step using Amazon Q Developer

Figure 5. Testing and refinement step using Amazon Q Developer

Use AWS SAM Accelerate with sam sync to run cloud-based integration tests in a lower environment after completing local validation. This complements early testing and helps catch runtime issues before deployment. Combining Amazon Q Developer automation with AWS SAM CLI allows you to speed up feedback cycles and make sure of functional accuracy in the cloud environment.

Deploy

The translated and tested AWS SAM application is ready, thus the final step is deployment. Using AWS SAM CLI, package and deploy the application to an AWS environment where it becomes fully operational. Begin by running the following:sam build

This command prepares the application for deployment by packaging the Lambda function code, resolving dependencies, and creating build artifacts in the .aws-sam directory.Next, deploy the application using the following:

sam deploy --guided

The --guided flag walks you through the initial configuration, such as stack name, AWS Region, and necessary capabilities such as IAM role creation. When it’s complete, CloudFormation provisions all resources defined in the template.yaml, such as Lambda functions, API Gateway endpoints, SQS queues, and IAM policies. Here is how the output looks from the deployment:

Key                 ApiGKeyId
Description         API Gateway Key ID
Value               j5u41XXXXXX

Key                 S3BucketName
Description         Name of the S3 bucket
Value               bb245-sfp-XXXXXXXXXX

Key                 ApiRootUrl
Description         Root URL of the API Gateway
Value               https://XXXXXXXX.execute-api.us-east-1.amazonaws.com/dev/api/{order_object_path+}

Key                 ProcessS3DataFunction
Description         ProcessS3Data Lambda Function ARN
Value               arn:aws:lambda:us-east-1:0123456789012:function:q-generated-stack-ProcessS3DataFunction-
jvXXXXXXXMAT

AWS SAM emphasizes explicit definitions such as resource names and parameters. Therefore, using the AWS SAM guided deployment here helps by presenting change set reviews to verify these changes.Now that you’ve translated and tested your AWS SAM application, verify its parity with the original Serverless Framework stack. Compare CloudFormation outputs—API Gateway endpoints, S3 bucket names, Lambda Amazon Resource Names (ARNs), and queue URLs—and automate integration or A/B tests to confirm functional equivalence. Then, deploy the AWS SAM version using a canary release, monitor performance and user metrics, and shift traffic gradually to minimize risk.

Cleaning up

If you no longer need the AWS resources that you created by running this example, then you can remove them by deleting the CloudFormation stack that you deployed.

To delete the CloudFormation stack, use the sam delete command:

sam delete --stack-name apigw-s3-lambda-sam-stack

Conclusion

In this post you’ve learned how Amazon Q Developer CLI can streamline the translation of IaC by using an example of migrating Serverless Framework to AWS SAM. Using AI-powered conversational interfaces and deep integration with AWS knowledge means that Amazon Q Developer substantially reduces the manual effort and potential errors involved in these translations. Comprehensive assessment, translation, testing, and deployment can be difficult to accelerate, but this can be streamlined with new generative AI tools from AWS.

For more information on Amazon Q, you can check out Amazon Q Developer. For more serverless learning resources, visit Serverless Land. To find more patterns, go directly to the Serverless Patterns Collection.