All posts by Sanket Hase

Getting started with Apache Iceberg write support in Amazon Redshift – Part 2

Post Syndicated from Sanket Hase original https://aws.amazon.com/blogs/big-data/getting-started-with-apache-iceberg-write-support-in-amazon-redshift-part-2/

In Getting started with Apache Iceberg write support in Amazon Redshift – part 1, you learned how to create Apache Iceberg tables and write data directly from Amazon Redshift to your data lake. You set up external schemas, created tables in both Amazon Simple Storage Service (Amazon S3) and S3 Tables, and performed INSERT operations while maintaining ACID (Atomicity, Consistency, Isolation, Durability) compliance.

Amazon Redshift now supports DELETE, UPDATE, and MERGE operations for Apache Iceberg tables stored in Amazon S3 and Amazon S3 table buckets. With these operations, you can modify data at the row level, implement upsert patterns, and manage the data lifecycle while maintaining transactional consistency using familiar SQL syntax. You can run complex transformations in Amazon Redshift and write results to Apache Iceberg tables that other analytics engines like Amazon EMR or Amazon Athena can immediately query.

In this post, you work with customer and orders datasets that were created and used in the previously mentioned post to demonstrate these capabilities in a data synchronization scenario.

Solution overview

This solution demonstrates DELETE, UPDATE, and MERGE operations for Apache Iceberg tables in Amazon Redshift using a common data synchronization pattern: maintaining customer records and orders data across staging and production tables. The workflow includes three key operations:

  • DELETE – Remove customer records based on opt-out requests
  • UPDATE – Modify existing customer information
  • MERGE – Synchronize order data between staging and production tables using upsert patterns
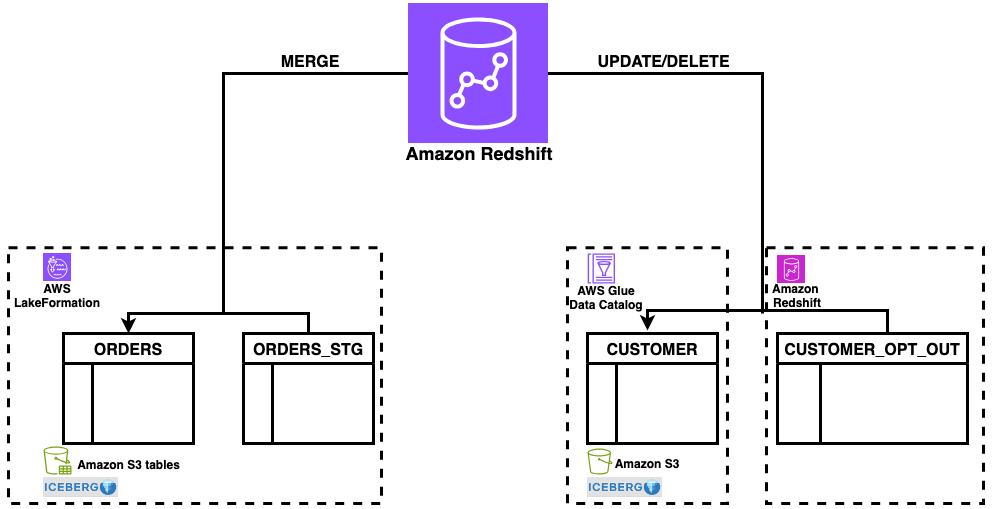
Figure : solution overview

Figure 1: solution overview

The solution uses a staging table (orders_stg) stored in an S3 table bucket for incoming data and reference tables (customer_opt_out) in Amazon Redshift for managing data lifecycle operations. With this architecture, you can process changes efficiently while maintaining ACID compliance across both storage types.

Prerequisites

For this walkthrough, you should have completed the setup steps from Getting started with Apache Iceberg write support in Amazon Redshift – part 1, including:

  • Create an Amazon Redshift data warehouse (provisioned or Serverless)
  • Set up the required IAM role (RedshifticebergRole) with appropriate permissions
  • Create an Amazon S3 bucket and S3 Table bucket
  • Configure AWS Glue Data Catalog database and setting up access
  • Set up AWS Lake Formation permissions
  • Create the customer Apache Iceberg table in Amazon S3 standard buckets with sample customer data
  • Create the orders Apache Iceberg table in Amazon S3 Table buckets with sample order data
  • Amazon Redshift data warehouse on p200 version or higher

Data preparation

In this section, you set up the sample data needed to demonstrate MERGE, UPDATE, and DELETE operations. To prepare your data, complete the following steps:

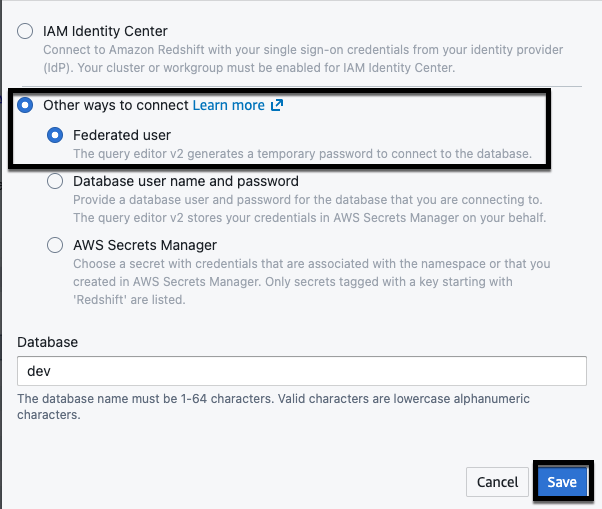
  1. Log in to Amazon Redshift using Query Editor V2 with the Federated user option.
  2. Create the orders_stg and customer_opt_out tables with sample data:
CREATE TABLE "iceberg-write-blog@s3tablescatalog".iceberg_write_namespace.orders_stg
(
customer_id BIGINT,
order_id BIGINT,
Total_order_amt DECIMAL(10,2),
Total_order_tax_amt REAL,
tax_pct DOUBLE PRECISION,
order_date DATE,
order_created_at_tz TIMESTAMPTZ,
is_active_ind BOOLEAN
)
USING ICEBERG;
INSERT INTO "iceberg-write-blog@s3tablescatalog".iceberg_write_namespace.orders_stg
(order_date, order_id, customer_id, total_order_amt, total_order_tax_amt, tax_pct, order_created_at_tz, is_active_ind)
VALUES
('2024-11-11', 1016, 10, 167.45, 13.40, 0.08, '2024-11-11 06:55:00-06:00', true),
('2024-11-12', 1017, 15, 34.99, 2.80, 0.08, '2024-11-12 23:30:30-06:00', true),
('2024-11-09', 1014, 9, 500.60, 56.80, 0.09, '2024-11-09 16:20:55-06:00', true),
('2024-11-10', 1015, 5, 329.85, 33.51, 0.08, '2024-11-10 11:45:30-06:00', true);
select * from "iceberg-write-blog@s3tablescatalog".iceberg_write_namespace.orders_stg;
Figure 2: orders_stg result set

Figure 2: orders_stg result set

CREATE TABLE dev.public.customer_opt_out
(
customer_id bigint,
customer_name varchar,
opt_out_ind char(1),
cust_rec_upd_ind char(1)
);
INSERT INTO dev.public.customer_opt_out VALUES
(9, 'Customer9 Martinez', 'Y', 'N'),
(12, 'Customer12 Thomas', 'Y', 'N'),
(13, 'Customer13 Albon', 'N', 'Y'),
(14, 'Customer14 Oscar', 'N', 'Y');
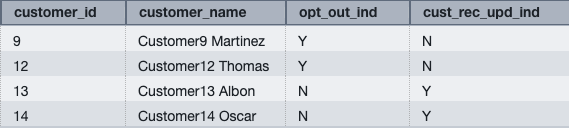
select * from dev.public.customer_opt_out;
Figure 3: customer_opt_out result set

Figure 3: customer_opt_out result set

You can now use the orders_stg and customer_opt_out tables to demonstrate data manipulation operations on the orders and customer tables created in the prerequisite section.

MERGE

MERGE conditionally inserts, updates, or deletes rows in a target table based on the results of a join with a source table. You can use MERGE to synchronize two tables by inserting, updating, or deleting rows in one table based on differences found in the other table.

To perform a MERGE operation:

  1. Verify that the current data in the orders table for order IDs 1014, 1015, 1016, and 1017.You loaded this sample data in Part 1:

select * from "iceberg-write-blog@s3tablescatalog".iceberg_write_namespace.orders
where order_id in (1014,1015,1016,1017);
Figure 4: orders data for existing orders for orders in orders_stg

Figure 4: orders data for existing orders for orders in orders_stg

The orders table contains existing rows for order IDs 1014 and 1015.

  1. Run the following MERGE operation using order_id as the key column to match rows between the orders and orders_stg tables:
MERGE INTO "iceberg-write-blog@s3tablescatalog".iceberg_write_namespace.orders
USING "iceberg-write-blog@s3tablescatalog".iceberg_write_namespace.orders_stg
ON orders.order_id = orders_stg.order_id
WHEN MATCHED THEN UPDATE 
SET
customer_id         = orders_stg.customer_id,
total_order_amt     = orders_stg.total_order_amt,
total_order_tax_amt = orders_stg.total_order_tax_amt,
tax_pct             = orders_stg.tax_pct,
order_date          = orders_stg.order_date,
order_created_at_tz = orders_stg.order_created_at_tz,
is_active_ind       = orders_stg.is_active_ind
WHEN NOT MATCHED THEN INSERT
VALUES 
(orders_stg.customer_id,orders_stg.order_id,orders_stg.total_order_amt,orders_stg.total_order_tax_amt,orders_stg.tax_pct,orders_stg.order_date,orders_stg.order_created_at_tz,orders_stg.is_active_ind);

The operation updates existing rows (1014 and 1015) and inserts new rows for order IDs that don’t exist in the orders table (1016 and 1017).

  1. Verify the updated data in the orders table:

select * from "iceberg-write-blog@s3tablescatalog".iceberg_write_namespace.orderswhere order_id in (1014,1015,1016,1017);
Figure 5: merged data on orders from orders_stg

Figure 5: merged data on orders from orders_stg

The MERGE operation performs the following changes:

  • Updates existing rows – Order IDs 1014 and 1015 have updated total_order_amt and total_order_tax_amt values from the orders_stg table
  • Inserts new rows – Order IDs 1016 and 1017 are inserted because they don’t exist in the orders table

This demonstrates the upsert pattern, where MERGE conditionally updates or inserts rows based on the matching key column.

UPDATE

UPDATE modifies existing rows in a table based on specified conditions or values from another table.

Update the customer Apache Iceberg table using data from the customer_opt_out Amazon Redshift native table. The UPDATE operation uses the cust_rec_upd_ind column as a filter, updating only rows where the value is ‘Y’.

To perform an UPDATE operation:

  1. Verify the current customer_name values for customer IDs 13 and 14 in customer_opt_out and customer (loaded this sample data in Part 1) tables:

select * from dev.public.customer_opt_out
where cust_rec_upd_ind = 'Y';
Figure 6: verify existing customer data for customers from customer_opt_out
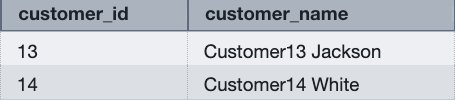
Figure 6: verify existing customer data for customers from customer_opt_out

select customer_id,customer_name from dev.demo_iceberg.customer
where customer_id in(13,14);
Figure 7: verify existing customer name for customers from customer_opt_out

Figure 7: verify existing customer name for customers from customer_opt_out

  1. Run the following UPDATE operation to modify customer names based on the cust_rec_upd_ind from customer_opt_out:
UPDATE dev.demo_iceberg.customerSET customer_name = customer_opt_out.customer_name
FROM dev.public.customer_opt_out
WHERE customer_opt_out.cust_rec_upd_ind = 'Y'and customer.customer_id = customer_opt_out.customer_id;
  1. Verify the changes for customer IDs 13 and 14:

select customer_id,customer_name from dev.demo_iceberg.customer where customer_id in(13,14) order by 1;
Figure 8: updated customer names in customer table

Figure 8: updated customer names in customer table

The UPDATE operation modifies the customer_name values based on the join condition with the customer_opt_out table. Customer IDs 13 and 14 now have updated names (Customer13 Albon and Customer14 Oscar).

DELETE

DELETE removes rows from a table based on specified conditions. Without a WHERE clause, DELETE removes all the rows from table.

Delete rows from the customer Apache Iceberg table using data from the customer_opt_out Amazon Redshift native table. The DELETE operation uses the opt_out_ind column as a filter, removing only rows where the value is ‘Y’.

To perform a DELETE operation:

  1. Verify the opt-out indicator data in the customer_opt_out table:
select * from dev.public.customer_opt_out
where opt_out_ind = 'Y';
Figure 9: verify customer records for opt out

Figure 9: verify customer records for opt out

  1. Verify the current customer data for customer IDs 9 and 12:

select * from dev.demo_iceberg.customerwhere customer_id in(9,12);
Figure 0: verify existing customers data in customer table for opt out

Figure 10: verify existing customers data in customer table for opt out

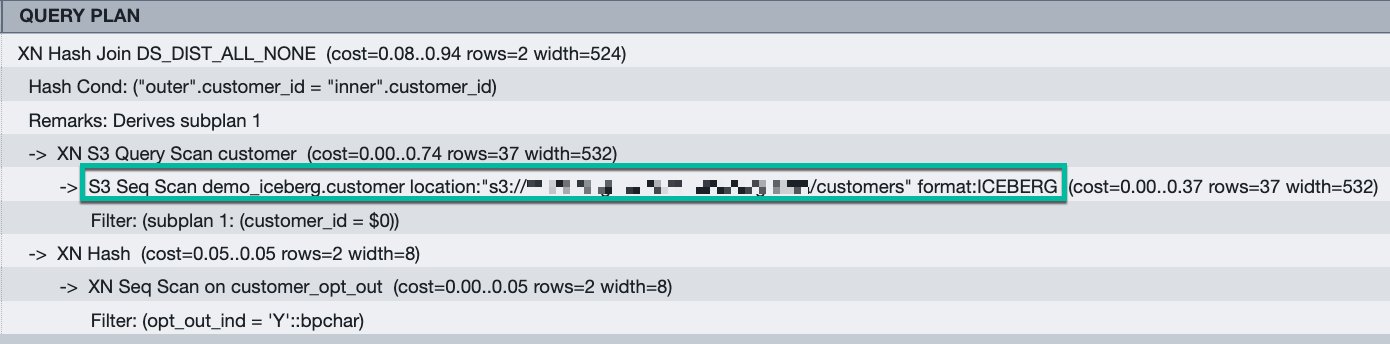
  1. Review the query execution plan:
EXPLAINDELETE FROM demo_iceberg.customerUSING public.customer_opt_out
WHERE customer.customer_id = customer_opt_out.customer_id
AND customer_opt_out.opt_out_ind = 'Y';
Figure 1: query plan for the DELETE queryThe execution plan shows Amazon S3 scans for Apache Iceberg format tables, indicating that Amazon Redshift removes rows directly from the Amazon S3 bucket.

Figure 11: query plan for the DELETE query. The execution plan shows Amazon S3 scans for Apache Iceberg format tables, indicating that Amazon Redshift removes rows directly from the Amazon S3 bucket.

  1. Run the following DELETE operation:
DELETE FROM demo_iceberg.customer
USING public.customer_opt_out
WHERE customer.customer_id = customer_opt_out.customer_id
AND customer_opt_out.opt_out_ind = 'Y';
  1. Verify that the rows were removed:
select * from dev.demo_iceberg.customer where customer_id in(9,12);
Figure 2: result set from customer table for opt out customer after delete

Figure 12: result set from customer table for opt out customer after delete

The query returns no rows, confirming that customer IDs 9 and 12 were successfully deleted from the customer table.

Best practices

After performing multiple UPDATE or DELETE operations, consider running table maintenance to optimize read performance:

  • For AWS Glue tables – Use AWS Glue table optimizers. For more information, see Table optimizers in the AWS Glue Developer Guide.
  • For S3 Tables – Use S3 Tables maintenance operations. For more information, see S3 Tables maintenance in the Amazon S3 User Guide.

Table maintenance merges and compacts deletion files generated by Merge-on-Read operations, improving query performance for subsequent reads.

Conclusion

You can use Amazon Redshift support for DELETE, UPDATE, and MERGE operations on Apache Iceberg tables to build data architectures that combine warehouse performance with data lake scalability. You can modify data at the row level while maintaining ACID compliance, giving you the same flexibility with Apache Iceberg tables as you have with native Amazon Redshift tables.

Get started:


About the authors

Sanket Hase

Sanket Hase

Sanket is an Engineering Manager with the Amazon Redshift team, leading query execution teams in the areas of data lake analytics, hardware-software co-design, and vectorized query execution.

Raghu Kuppala

Raghu Kuppala

Raghu is an Analytics Specialist Solutions Architect experienced working in the databases, data warehousing, and analytics space. Outside of work, he enjoys trying different cuisines and spending time with his family and friends.

Ritesh Sinha

Ritesh is an Analytics Specialist Solutions Architect based out of San Francisco. He has helped customers build scalable data warehousing and big data solutions for over 16 years. He loves to design and build efficient end-to-end solutions on AWS. In his spare time, he loves reading, walking, and doing yoga.

Sundeep Kumar

Sundeep Kumar

Sundeep is a Sr. Specialist Solutions Architect at Amazon Web Services (AWS), helping customers build data lake and analytics platforms and solutions. When not building and designing data lakes, Sundeep enjoys listening to music and playing guitar.

Getting started with Apache Iceberg write support in Amazon Redshift

Post Syndicated from Sanket Hase original https://aws.amazon.com/blogs/big-data/getting-started-with-apache-iceberg-write-support-in-amazon-redshift/

Many companies store structured data in warehouses for analytics while keeping diverse datasets in data lakes for flexible processing. Until now, maintaining consistency between these systems required complex ETL processes and introduced potential data synchronization challenges.

The new Amazon Redshift Apache Iceberg write support removes these complexities through direct writes to Apache Iceberg tables stored in Amazon S3 and S3 Tables. With this native integration you can write data directly from Redshift queries to your data lake without intermediate ETL steps, facilitate data consistency with ACID-compliant transactions that help optimize query performance with flexible partitioning strategies, and use the familiar Redshift SQL interface when writing to Apache Iceberg tables. For example, you can now run a complex transformation in Redshift and write the results directly to an Apache Iceberg table that other analytics engines like Amazon EMR or Amazon Athena can immediately query. By using this approach you can query the same datasets from both Redshift and other analytics tools without copying data.

In this post, we show how you can use Amazon Redshift to write data directly to Apache Iceberg tables stored in Amazon S3 and S3 Tables for seamless integration between your data warehouse and data lake while maintaining ACID compliance.

“Verisk processes billions of catastrophe risk modeling records using Amazon Redshift and Apache Iceberg, achieving 30% faster query aggregations and significant storage cost reductions”

— Karthick Shanmugam, Associate Vice President, Verisk

Solution overview 

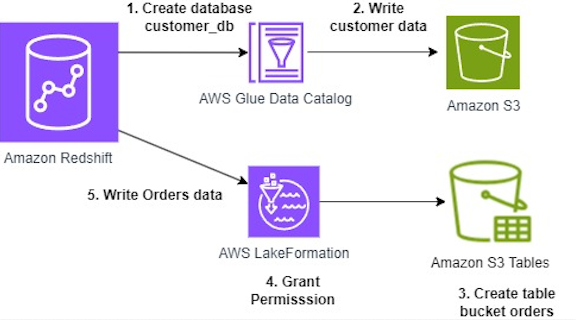
You can now create and write directly to Apache Iceberg tables stored in Amazon S3 and S3 Tables using familiar SQL commands in Amazon Redshift. We’ll guide you through configuring permissions for S3 table buckets using AWS Lake Formation. Finally, we’ll analyze customer and order datasets across both Redshift native and Apache Iceberg data formats to derive insights. The workflow is illustrated in the following diagram:

In this post we will walk you through following steps:

  1. Create an external database named customer_db in AWS Glue Data Catalog using Amazon Redshift SQL.
  2. Create an external table named customer in the Glue database and write customer data using Amazon Redshift SQL.
  3. Create table bucket named orders on Amazon S3 Tables to write orders data.
  4. Grant permissions using AWS Lake Formation to an IAM role for reading and writing to the orders table.
  5. Write orders data to the orders Amazon S3 table bucket.

This solution uses the following AWS services:

Prerequisites 

  • Create Amazon Redshift data warehouse (provisioned or Serverless).
  • Permissions to create database on AWS Glue Data Catalog from Redshift.
  • Create a new AWS Glue database called customer_db or use an existing database of your choice. If you use an existing database or a different name, replace customer_db with your actual database name in the subsequent commands.
  • S3 bucket and S3 Table bucket in the same AWS Region as your Redshift cluster.
  • Have access to an IAM role that is a Lake Formation data lake administrator. For instructions, refer to Create a data lake administrator.
  • Create IAM role RedshifticebergRole with following policy. Add managed permission for AmazonRedshiftQueryEditorV2.
    {
        "Version": "2012-10-17",
        "Statement": [
                        {
                            "Sid": "VisualEditor0",
                            "Effect": "Allow",
                            "Action": "redshift:GetClusterCredentialsWithIAM",
                            "Resource": "arn:aws:redshift:<YOUR-REGION>:<AWS-ACCOUNT-NUMBER>:dbname::<YOUR-REDSHIFT-CLUSTER-NAME>/*"
                        }
                    ]
    }

Setting up your environment

To set up your environment, complete the following steps.

Creating Apache Iceberg tables in Amazon S3 standard buckets

  1. Connect to Redshift using Query Editor V2.
  2. Create user for the Federated role RedshifticebergRole.
    Create user IAMR:RedshifticebergRole

  3. Verify you have an Amazon Redshift External Schema configured. Run following script on Redshift:
    CREATE EXTERNAL SCHEMA demo_iceberg
    FROM DATA CATALOG DATABASE 'customer_db'
    IAM_ROLE 'arn:aws:iam::<AWS-ACCOUNT-NUMBER>:role/RedshiftCustomizedIcebergRole';

  4. Create external table customer in Apache Iceberg table format in the demo_iceberg external schema created above and then insert data.

    Use this two-step approach when you need control over column definitions or plan to append data.

    Replace your S3 bucket name in place of <<your-bucket>>.

    -- Step 1: Define your table structure
    CREATE TABLE demo_iceberg.customer
    (
    customer_id bigint,
    customer_name varchar,
    email varchar,
    city varchar
    )
    USING ICEBERG
    LOCATION 's3://<<your-bucket>>/iceberg-data/customers/';
    
    -- Step 2: Insert data
                  
    (1, 'Customer1 Smith', '[email protected]', 'New York'),
    (2, 'Customer2 Johnson', '[email protected]', 'Los Angeles'),
    (3, 'Customer3 Brown', '[email protected]', 'Chicago'),
    (4, 'Customer4 Davis', '[email protected]', 'Houston'),
    (5, 'Customer5 Wilson', '[email protected]', 'Phoenix'),
    (6, 'Customer6 Miller', '[email protected]', 'Philadelphia'),
    (7, 'Customer7 Garcia', '[email protected]', 'San Antonio'),
    (8, 'Customer8 Rodriguez', '[email protected]', 'San Diego'),
    (9, 'Customer9 Martinez', '[email protected]', 'Dallas'),
    (10, 'Customer10 Anderson', '[email protected]', 'San Jose'),
    (11, 'Customer11 Taylor', '[email protected]', 'Austin'),
    (12, 'Customer12 Thomas', '[email protected]', 'Jacksonville'),
    (13, 'Customer13 Jackson', '[email protected]', 'Fort Worth'),
    (14, 'Customer14 White', '[email protected]', 'Columbus'),
    (15, 'Customer15 Harris', '[email protected]', 'Charlotte');
    
    -- Step 3: Select data
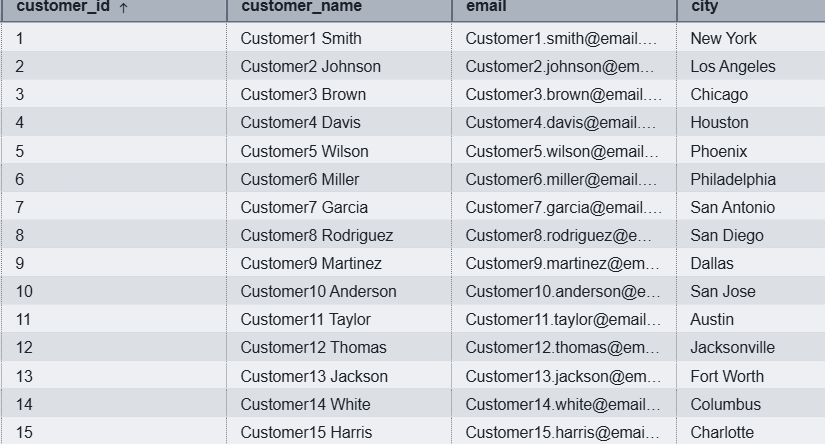
    SELECT * FROM demo_iceberg.customer;
    

    Figure 2: Result from demo_iceberg.customer

  5. Grant access to external schema for user IAMR:RedshifticebergRole:
    Grant usage on schema demo_iceberg to "IAMR:RedshifticebergRole";

Create Apache Iceberg tables in Amazon S3 Table buckets

Amazon S3 table buckets are integrated with AWS Lake Formation, which serves as the central authority for managing data access permissions. When working with Apache Iceberg tables, Lake Formation provides a unified security framework that simplifies access control across your entire data lake. This centralized approach makes sure consistent and efficient permission management, alleviating the need to handle permissions in multiple places.

To create an S3 table bucket:

  1. Go to Amazon S3, choose Table buckets in the left navigation pane.
  2. On the Table buckets page, in the Integration with AWS analytics services section, choose Enable integration.
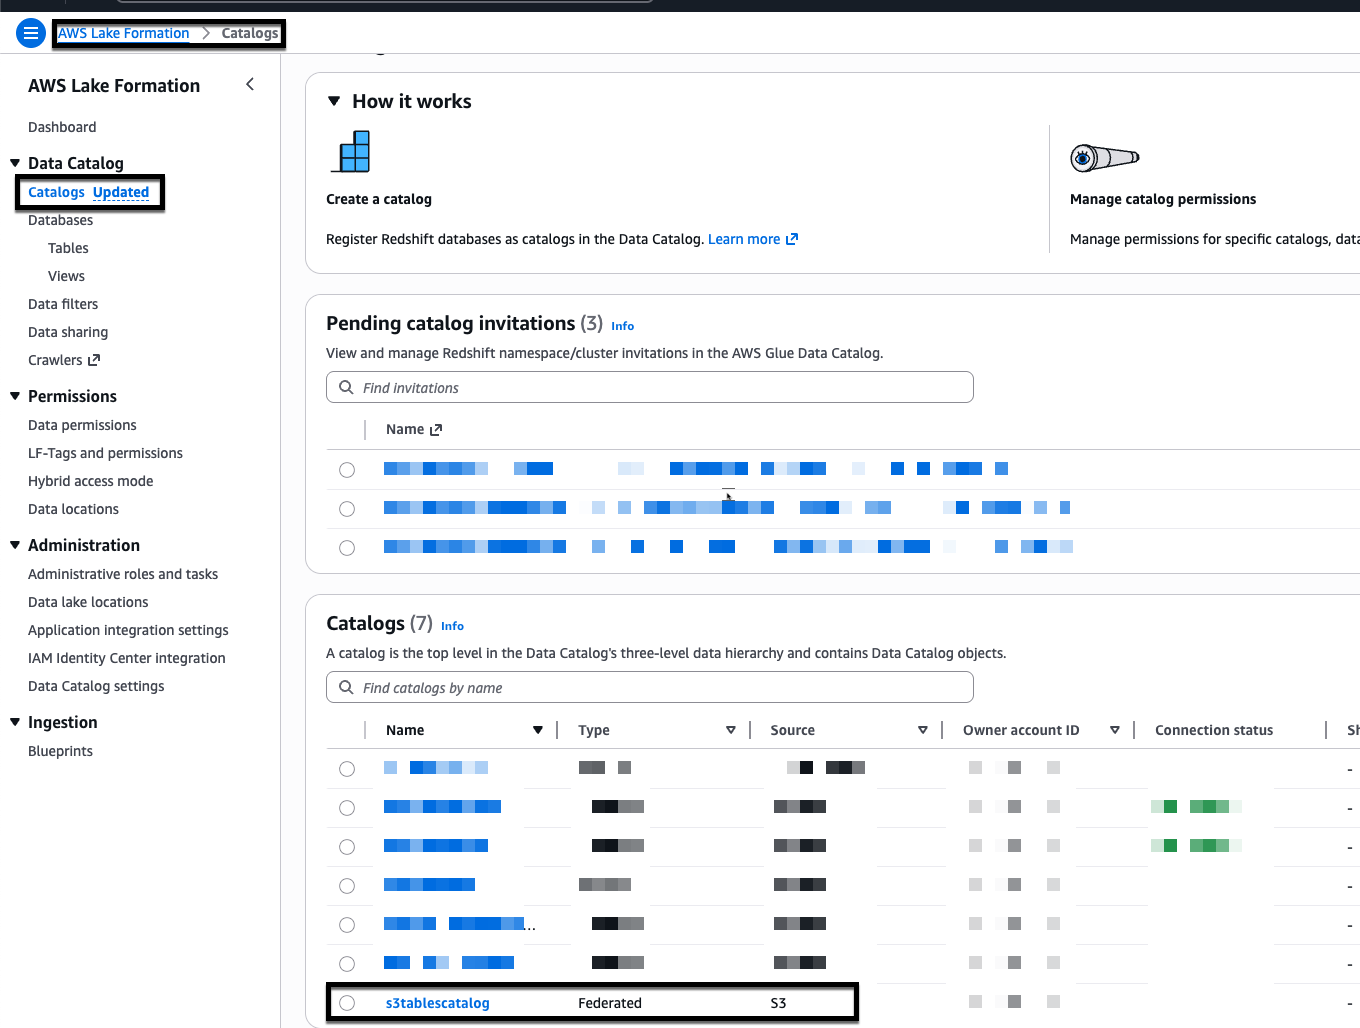
  3. In the Table buckets list, choose the Create table bucket button and enter a name for your table bucket, for example, iceberg-write-blog, and choose Create table bucket. After creation, the bucket will appear in the S3 tables catalog, s3tablescatalog, in the Lake Formation console.
  4. In the AWS Lake Formation console, choose Catalogs, in the Catalogs table select s3tablescatalog to open the detail page for that table.
  5. On the s3tablescatalog details page, under Catalogs, choose the table bucket iceberg-write-blog.
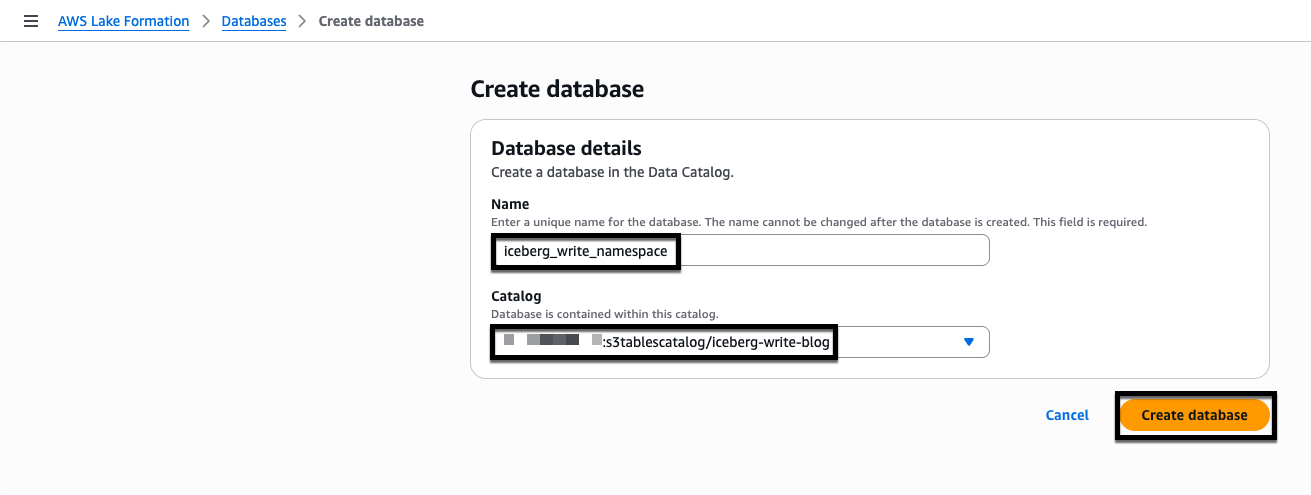
  6. On the iceberg-write-blog details page, under Databases, choose Create database.
  7. Enter the database name iceberg_write_namespace, select the Catalog from the drop down menu, and choose Create database.
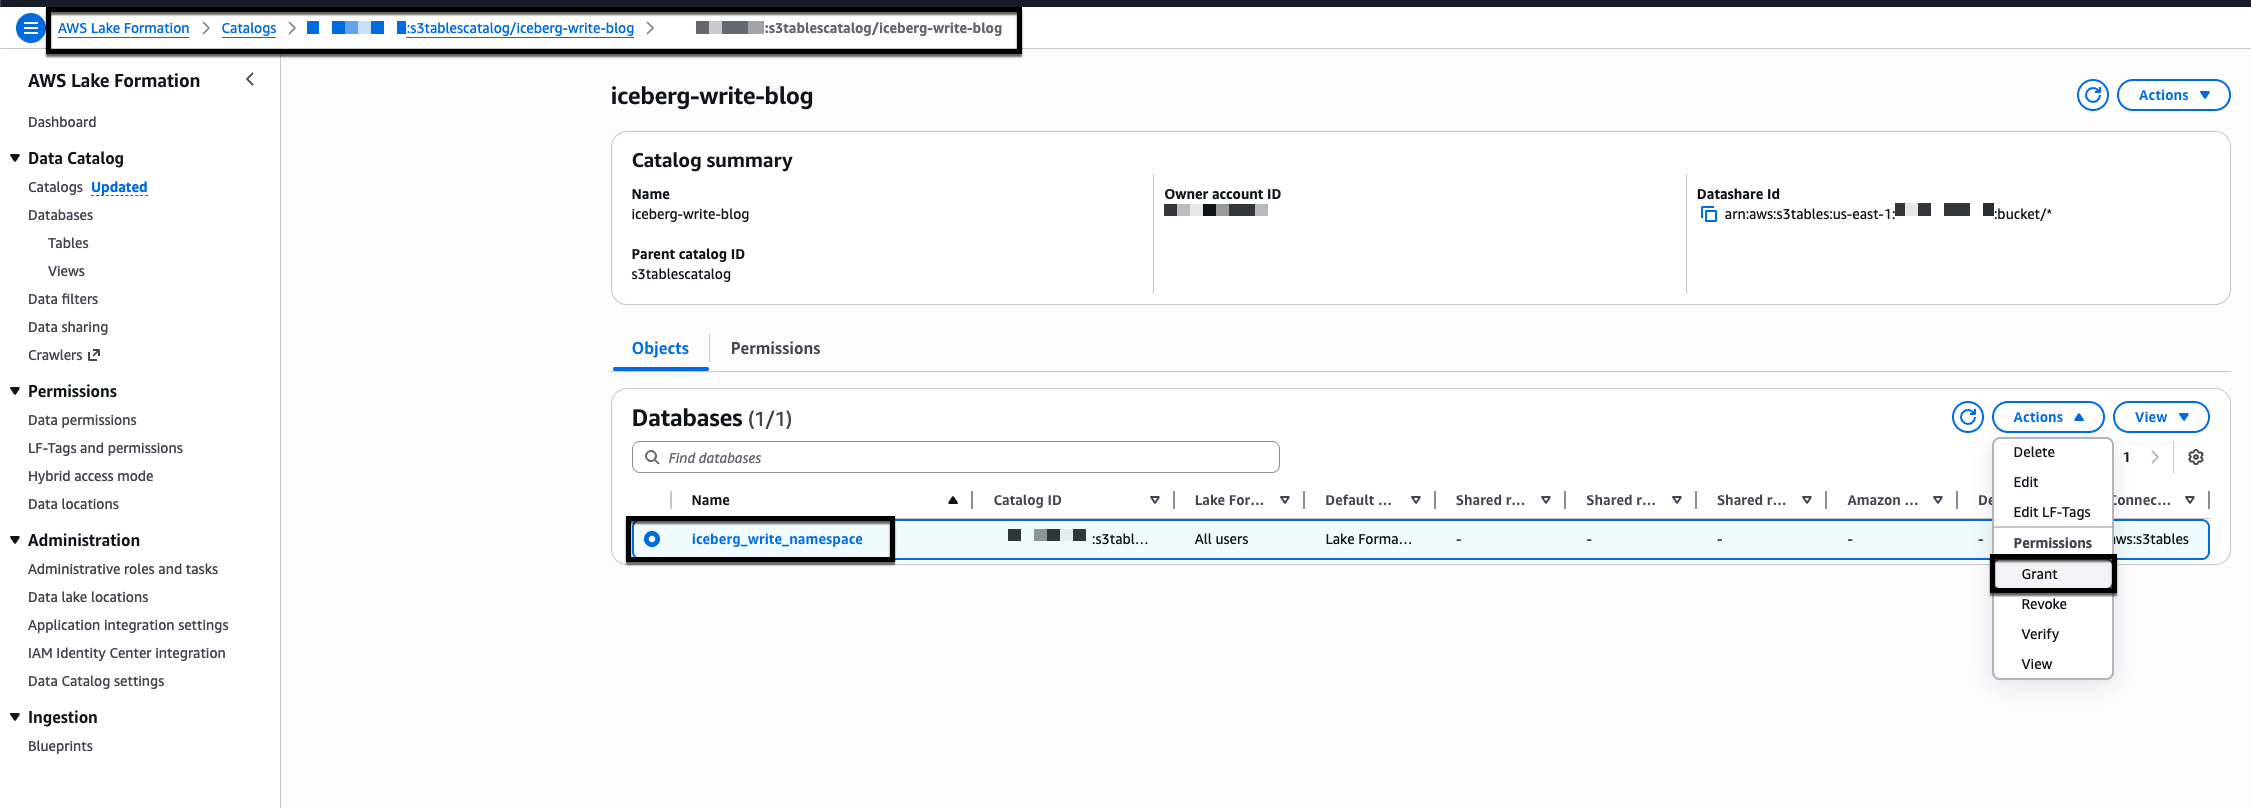
  8. Grant a permission to create a table in the database to the Lake Formation IAM role. On the iceberg-write-blog details page select the radio button for iceberg_write_namespace, choose Actions, Grant.
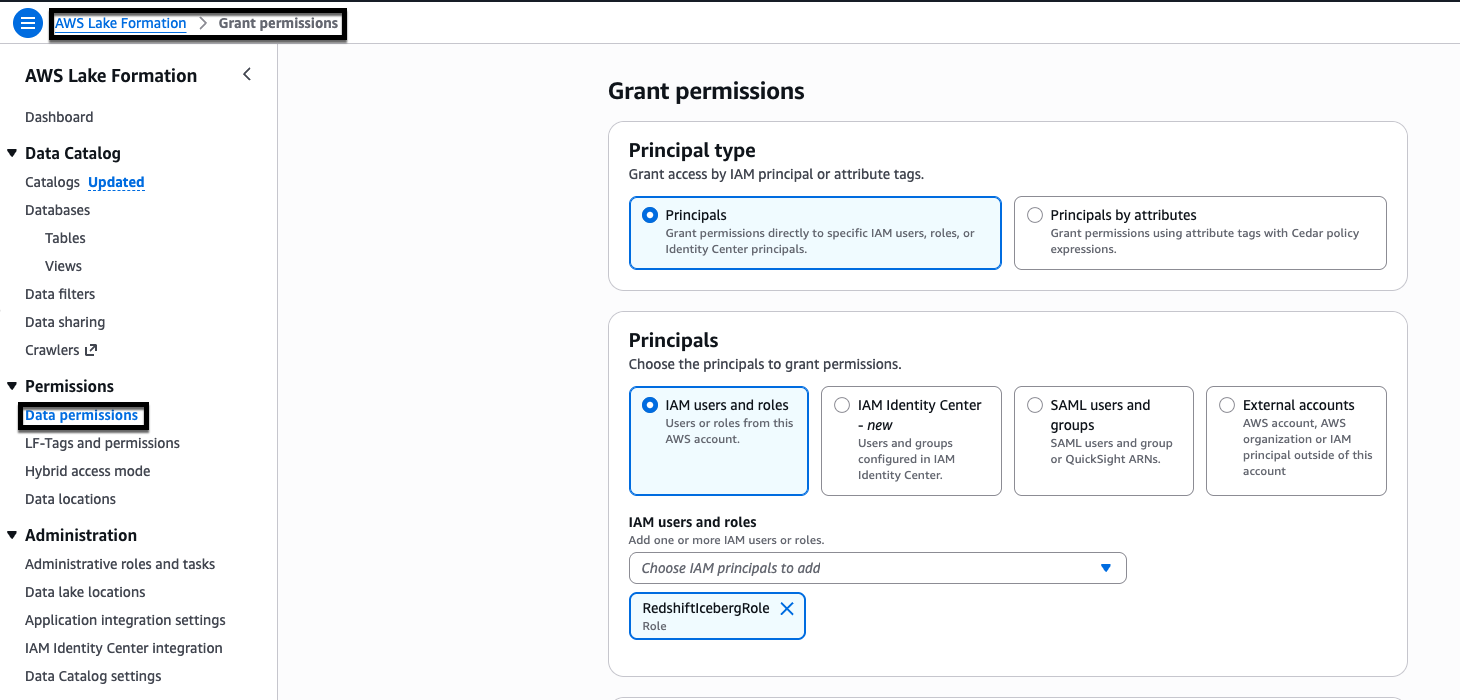
  9. On the Grant permissions page, under Principal type select Principals, under Principals select IAM users and roles, in the IAM users and roles drop down menu select RedshifticebergRole.
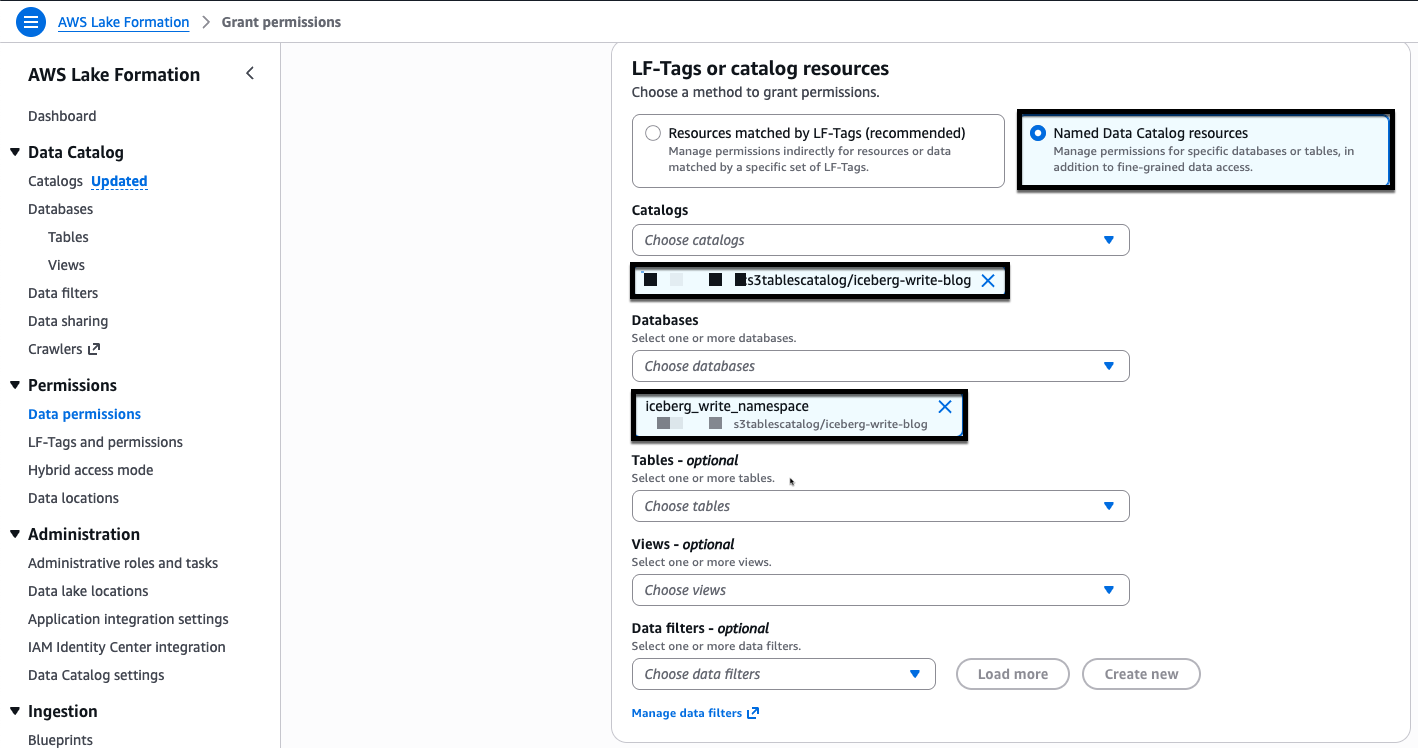
  10. For LF-Tags or catalog resources, choose Named Data Catalog resources, for Catalogs select iceberg-write-blog and for Databases select iceberg_write_namespace.
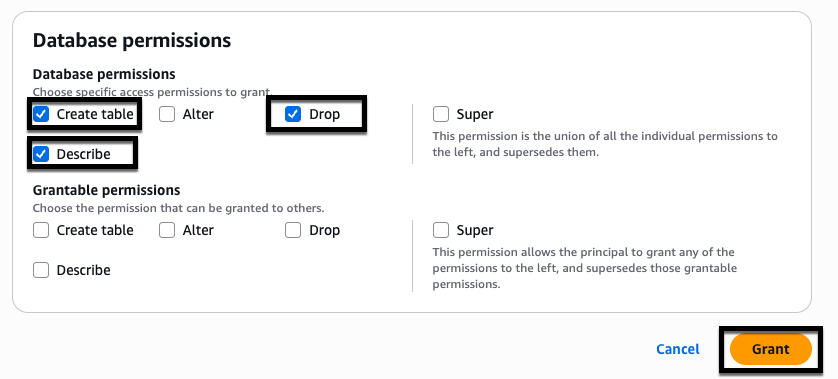
  11. For Database permissions select the checkbox for Create table, Drop, and Describe, then choose Grant.

Creating Apache Iceberg tables in Amazon Redshift using Amazon S3 table buckets

AWS Lake Formation catalogs are automatically mounted on Amazon Redshift data warehouses in same account. Amazon Redshift writes directly to S3 Tables using the auto mounted S3 table catalog. The SQL syntax for writing to Apache Iceberg tables stored in S3 table buckets is similar to the syntax for Apache Iceberg tables stored in S3 standard buckets. The key difference is the auto mounted S3 Table catalog, which supports three-part notation access. This feature alleviates the need to create an EXTERNAL SCHEMA when referencing data lake Apache Iceberg tables residing in S3 Table buckets.

To create the Apache Iceberg table:

  1. Switch to the RedshifticebergRole. To access S3 tables through the Redshift Query Editor V2, you must use a Federated user account, the RedshifticebergRole has been granted the necessary Lake Formation permissions.
  2. Log in to Redshift using the Query Editor V2 Federated user option.
  3. In Query Editor V2, create the table named orders in Apache Iceberg table format:
    CREATE TABLE "iceberg-write-blog@s3tablescatalog".iceberg_write_namespace.orders
    (
     customer_id BIGINT,
     order_id BIGINT,
     Total_order_amt DECIMAL(10,2),
     Total_order_tax_amt REAL,
     tax_pct DOUBLE PRECISION,
     order_date DATE,
     order_created_at_tz TIMESTAMPTZ,
     is_active_ind BOOLEAN
    )
    USING ICEBERG 
    PARTITIONED BY (DAY(order_date));
    

  4. Insert data into the table using standard SQL:
    INSERT INTO "iceberg-write-blog@s3tablescatalog".iceberg_write_namespace.orders
    (order_date, order_id, customer_id, total_order_amt, total_order_tax_amt, tax_pct, order_created_at_tz, is_active_ind)
    VALUES
    ('2024-01-15', 1001, 1, 125.50, 10.04, 0.08, '2024-01-15 10:30:00-06:00', true),
    ('2024-02-20', 1002, 2, 89.99, 6.75, 0.075, '2024-02-20 14:22:15-06:00', true),
    ('2024-03-10', 1003, 3, 234.75, 20.78, 0.0885, '2024-03-10 09:15:30-06:00', false),
    ('2024-04-05', 1004, 1, 67.25, 5.38, 0.08, '2024-04-05 16:45:00-05:00', true),
    ('2024-05-18', 1005, 4, 156.80, 12.54, 0.08, '2024-05-18 11:20:45-05:00', true),
    ('2024-06-22', 1006, 5, 45.99, 4.14, 0.09, '2024-06-22 13:10:20-05:00', true),
    ('2024-07-14', 1007, 2, 312.40, 24.99, 0.08, '2024-07-14 08:35:10-05:00', false),
    ('2024-08-30', 1008, 6, 78.50, 7.07, 0.09, '2024-08-30 15:25:35-05:00', true),
    ('2024-09-12', 1009, 3, 199.99, 18.00, 0.09, '2024-09-12 12:40:50-05:00', true),
    ('2024-10-08', 1010, 7, 523.75, 41.90, 0.08, '2024-10-08 17:15:25-05:00', true),
    ('2024-10-25', 1011, 4, 92.30, 8.31, 0.09, '2024-10-25 10:05:15-05:00', false),
    ('2024-11-02', 1012, 8, 167.45, 13.40, 0.08, '2024-11-02 14:50:40-06:00', true),
    ('2024-11-08', 1013, 1, 34.99, 2.80, 0.08, '2024-11-08 09:30:20-06:00', true),
    ('2024-11-09', 1014, 9, 445.60, 40.10, 0.09, '2024-11-09 16:20:55-06:00', true),
    ('2024-11-10', 1015, 5, 278.85, 22.31, 0.08, '2024-11-10 11:45:30-06:00', true);
    

  5. Create a Redshift local_orders table and insert sample records:
    CREATE TABLE dev.public.local_orders
    (
    customer_id BIGINT,
    order_id BIGINT,
    Total_order_amt DECIMAL(10,2),
    Total_order_tax_amt REAL,
    tax_pct DOUBLE PRECISION,
    order_date DATE,
    order_created_at_tz TIMESTAMPTZ,
    is_active_ind BOOLEAN
    );
    
    
    INSERT INTO dev.public.local_orders
    (customer_id, order_id, Total_order_amt, Total_order_tax_amt, tax_pct, order_date, order_created_at_tz, is_active_ind)
    VALUES
    (1001, 5001, 299.99, 24.00, 0.08, '2024-01-15', '2024-01-15 14:30:00-05:00', true),
    (1002, 5002, 1250.50, 100.04, 0.08, '2024-01-16', '2024-01-16 09:15:22-05:00', true),
    (1003, 5003, 75.25, 6.02, 0.08, '2024-01-16', '2024-01-16 16:45:33-05:00', true),
    (1004, 5004, 499.99, 40.00, 0.08, '2024-01-17', '2024-01-17 11:20:45-05:00', true),
    (1005, 5005, 149.50, 11.96, 0.08, '2024-01-17', '2024-01-17 13:55:12-05:00', false),
    (1002, 5006, 899.99, 72.00, 0.08, '2024-01-18', '2024-01-18 10:05:30-05:00', true),
    (1006, 5007, 45.75, 3.66, 0.08, '2024-01-18', '2024-01-18 15:40:18-05:00', true),
    (1007, 5008, 1500.00, 120.00, 0.08, '2024-01-19', '2024-01-19 08:25:55-05:00', true),
    (1008, 5009, 250.25, 20.02, 0.08, '2024-01-19', '2024-01-19 12:10:40-05:00', true),
    (1009, 5010, 725.75, 58.06, 0.08, '2024-01-20', '2024-01-20 14:15:28-05:00', true);
    

  6. Using the CREATE TABLE AS (CTAS) format, create a table from the existing table with no compression:
    CREATE TABLE "iceberg-write-blog@s3tablescatalog".iceberg_write_namespace.orders_new 
    using ICEBERG
    TABLE PROPERTIES ('compression_type'='uncompressed')
    AS
    select * from dev.public.local_orders;
    

  7. Select data with standard SQL using the three-part notation:
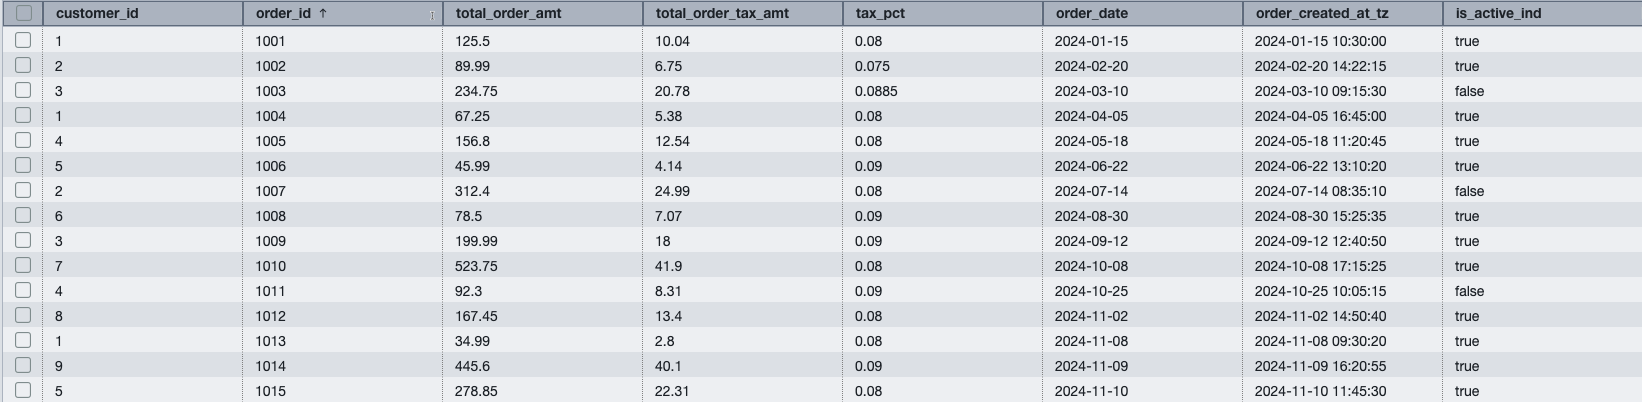
    select * from "iceberg-write-blog@s3tablescatalog".iceberg_write_namespace.orders;

    You can also use the USE clause to specify the default database (and omit the database name):

    USE "iceberg-write-blog@s3tablescatalog";
    
    select * from iceberg_write_namespace.orders;

    The resulting table will look like the following image:

  8. Set a schema search path to further simplify table access by omitting the schema name from the notation:
    -- Redshift default database is set to 'iceberg-write-blog@s3tablescatalog'
    USE "iceberg-write-blog@s3tablescatalog";
    
    -- Redshift will search 'iceberg_write_namespace' to resolve table orders
    set search_path to iceberg_write_namespace;
    
    select * from orders;

  9. Show table:
    show table "iceberg-write-blog@s3tablescatalog".iceberg_write_namespace.orders 
    
    --Result
    CREATE TABLE "iceberg-write-blog@s3tablescatalog".iceberg_write_namespace.orders 
    (
    customer_id bigint,
    order_id bigint,
    total_order_amt decimal(10, 2),
    total_order_tax_amt float,
    tax_pct double precision,
    order_date date,
    order_created_at_tz timestamptz,
    is_active_ind Boolean
    )
    USING ICEBERG
    PARTITIONED BY (DAY(order_date))
    TABLE PROPERTIES ('compression_type'='snappy');

Bringing it together

Let’s demonstrate how to combine data from two sources and show how they can work together in a single query.

  • Customer data stored in standard S3 buckets
  • Orders data stored in S3 table buckets
  1. Log in to Redshift using Federated user:
    select 
    b.order_date,
    b.order_id,
    b.total_order_amt,
    CONVERT_TIMEZONE('America/Los_Angeles', b.order_created_at_tz) AS order_pacific_time,
    a.customer_name,
    a.email,
    a.city
    from dev.demo_iceberg.customer a join "iceberg-write-blog@s3tablescatalog".iceberg_write_namespace.orders b
    on(a.customer_id = b.customer_id)
    where b.order_date between '2024-01-15' and '2024-10-25'
    and b.is_active_ind=true;

    The result from the consolidated query:

  2. Drop table:
    Drop TABLE "iceberg-write-blog@s3tablescatalog".iceberg_write_namespace.orders_new;

Clean up

To avoid ongoing charges, follow these steps in order:

  1. Drop Apache Iceberg tables:
    DROP TABLE dev.demo_iceberg.customer;
    DROP TABLE "iceberg-write-blog@s3tablescatalog".iceberg_write_namespace.orders;

  2. Remove S3 objects, replace your-bucket with the name of the bucket you created:
    aws s3 rm s3://<your-bucket>/iceberg/ --recursive

  3. Remove Lake Formation permissions, replace your-bucket with the name of the bucket you created:
    aws lakeformation deregister-resource --resource-arn arn:aws:s3:::<your-bucket>

Conclusion

With Apache Iceberg write support in Amazon Redshift you can to build flexible data architectures that combine the performance of a data warehouse with the scalability of a data lake. You can now write data directly to Apache Iceberg tables while maintaining ACID compliance and partitioning for query optimization. You can use Amazon Redshift to create Apache Iceberg tables in your data lake, making them immediately queryable through Amazon EMR or Amazon Athena.

To learn more, review the Amazon Redshift Iceberg integration and Writing to Apache Iceberg tables documentation. Visit the AWS Database Blog for latest updates.


About the authors

Sanket Hase

Sanket Hase

Sanket is an Engineering Manager with the Amazon Redshift team, leading query execution teams in the areas of data lake analytics, hardware-software co-design, and vectorized query execution.

Harshida Patel

Harshida Patel

Harshida is a Principal Solutions Architect, Analytics with AWS.

Ritesh Kumar Sinha

Ritesh Kumar Sinha

Ritesh is an Analytics Specialist Solutions Architect based out of San Francisco. He has helped customers build scalable data warehousing and big data solutions for over 16 years. He loves to design and build efficient end-to-end solutions on AWS. In his spare time, he loves reading, walking, and doing yoga.

Raghu Kuppala

Raghu Kuppala

Raghu is an Analytics Specialist Solutions Architect experienced working in the databases, data warehousing, and analytics space. Outside of work, he enjoys trying different cuisines and spending time with his family and friends.

Xiening Dai

Xiening Dai

Xiening is a Principal Software Engineer working on Redshift Query Processing and Data Lake.