Post Syndicated from Sitaraman Vijay Krishna original https://aws.amazon.com/blogs/devops/closed-loop-incident-response-connect-aws-devops-agent-to-opensearch/
The gap in most observability setups isn’t the data, it’s closing the loop between incident detection and response. Your Amazon OpenSearch Service domain already stores structured logs and distributed traces, detects anomalies through alerting monitors, and fires notifications reliably. But when the system sends that alert lands at 2 AM, your engineers must still investigate manually. The investigating engineer opens Dashboards, crafts domain-specific language (DSL) queries, hunts for correlated trace IDs, pivots to AWS CloudTrail, and pieces together a root cause. That manual loop can take anywhere from minutes for straightforward issues to hours when failures cascade across microservices.
What if you closed the loop by connecting an AI agent directly to the indices that triggered the alert?
This post shows you how to connect AWS DevOps Agent to your OpenSearch observability data using the Model Context Protocol (MCP). The same alert that would page a human instead triggers the agent to query the logs and traces automatically, correlate them with AWS CloudTrail and Amazon CloudWatch, and deliver a root cause analysis.
Note: AWS DevOps Agent access to logs and traces in OpenSearch is controlled by the fine-grained access control (FGAC) role it is given.
We present three hosting paths for the MCP server so you can pick by AWS Region and operational preference: self-managed on Amazon Elastic Container Service (Amazon ECS) (AWS Fargate behind an internal Network Load Balancer (NLB), reachable through Amazon VPC Lattice, which works everywhere today), Amazon Bedrock AgentCore (a one-click AWS CloudFormation template, where available), or the built-in MCP endpoint on OpenSearch 3.3+ (no separate server). All paths use the official opensearch-mcp-server-py package.
By the end, you can deploy the MCP server (any of the three paths), register it as a Capability Provider, configure the AWS Identity and Access Management (IAM)-to-FGAC role mapping, route your OpenSearch alerts to the agent’s Event Channel, and verify the closed loop with a controlled failure.
Solution overview
The architecture creates a closed loop: your OpenSearch domain handles both detection and investigation, with AWS DevOps Agent orchestrating the response.
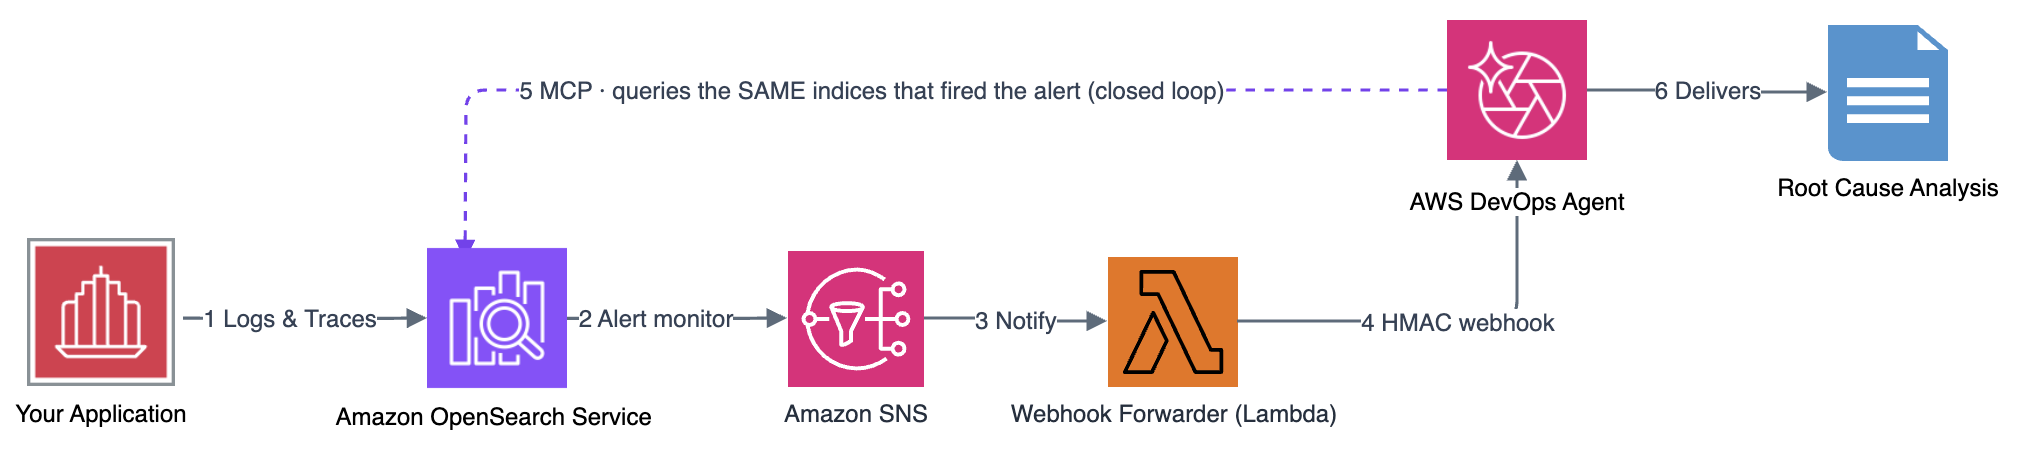
Figure 1: Architecture for Amazon OpenSearch alert to AWS DevOps Agent MCP investigation
Closed-loop architecture: OpenSearch Alerting triggers Amazon Simple Notification Service (Amazon SNS), which flows through a webhook forwarder to the Event Channel of AWS DevOps Agent. The agent investigates by querying OpenSearch indices using MCP tools, correlates with CloudTrail and CloudWatch, and delivers a root cause analysis.
The loop runs in six stages:
- Applications emit logs and traces to OpenSearch.
- Alerting monitors detect anomalies and publish to Amazon SNS.
- Amazon SNS triggers the webhook forwarder AWS Lambda function.
- The webhook forwarder Lambda transforms each notification into a hash-based message authentication code (HMAC)-signed payload for the agent’s Event Channel.
- AWS DevOps Agent queries the OpenSearch indices through MCP and correlates them with CloudTrail and CloudWatch.
- AWS DevOps Agent delivers a root cause analysis.
The critical insight: AWS DevOps Agent consumes remote MCP servers registered as Capability Providers. AWS DevOps Agent doesn’t connect to local MCP servers running on developer workstations (those are used by OpenSearch MCP apps for IDEs). The agent needs a network-accessible endpoint: either self-managed on Amazon ECS, hosted on Bedrock AgentCore, or built into the OpenSearch domain itself (3.3+).
Choosing a hosting path
This post walks through the self-managed path in detail (works everywhere today) and calls out the AgentCore and built-in 3.3+ alternatives at each step.
Prerequisites
Confirm the following before starting:
- An Amazon OpenSearch Service managed domain (2.x+) with FGAC enabled, application logs and traces already indexed, and Alerting monitors publishing to an SNS topic.
- AWS DevOps Agent enabled in your account.
- AWS Cloud Development Kit (AWS CDK) (
npm install -g aws-cdk, Node.js 18+) and AWS Command Line Interface (AWS CLI) v2 configured with admin access to your OpenSearch domain.
Note: This walkthrough assumes you already have an application emitting logs and traces to OpenSearch. The infrastructure in this post is shown as inline CDK snippets you can drop into your own CDK app and adapt to your environment.
Step 1: Deploy the OpenSearch MCP server
Choose the path that fits your Region. The suggested options host the official opensearch-mcp-server-py and expose the same MCP tools (SearchIndexTool, ListIndexTool, and the broader observability tool set) to AWS DevOps Agent.
Option A: Self-managed on Amazon ECS and NLB (deploy anywhere)
This path runs the MCP server on ECS Fargate behind an internal Network Load Balancer and exposes it to AWS DevOps Agent through a VPC Lattice private connection. It works in every Region today.
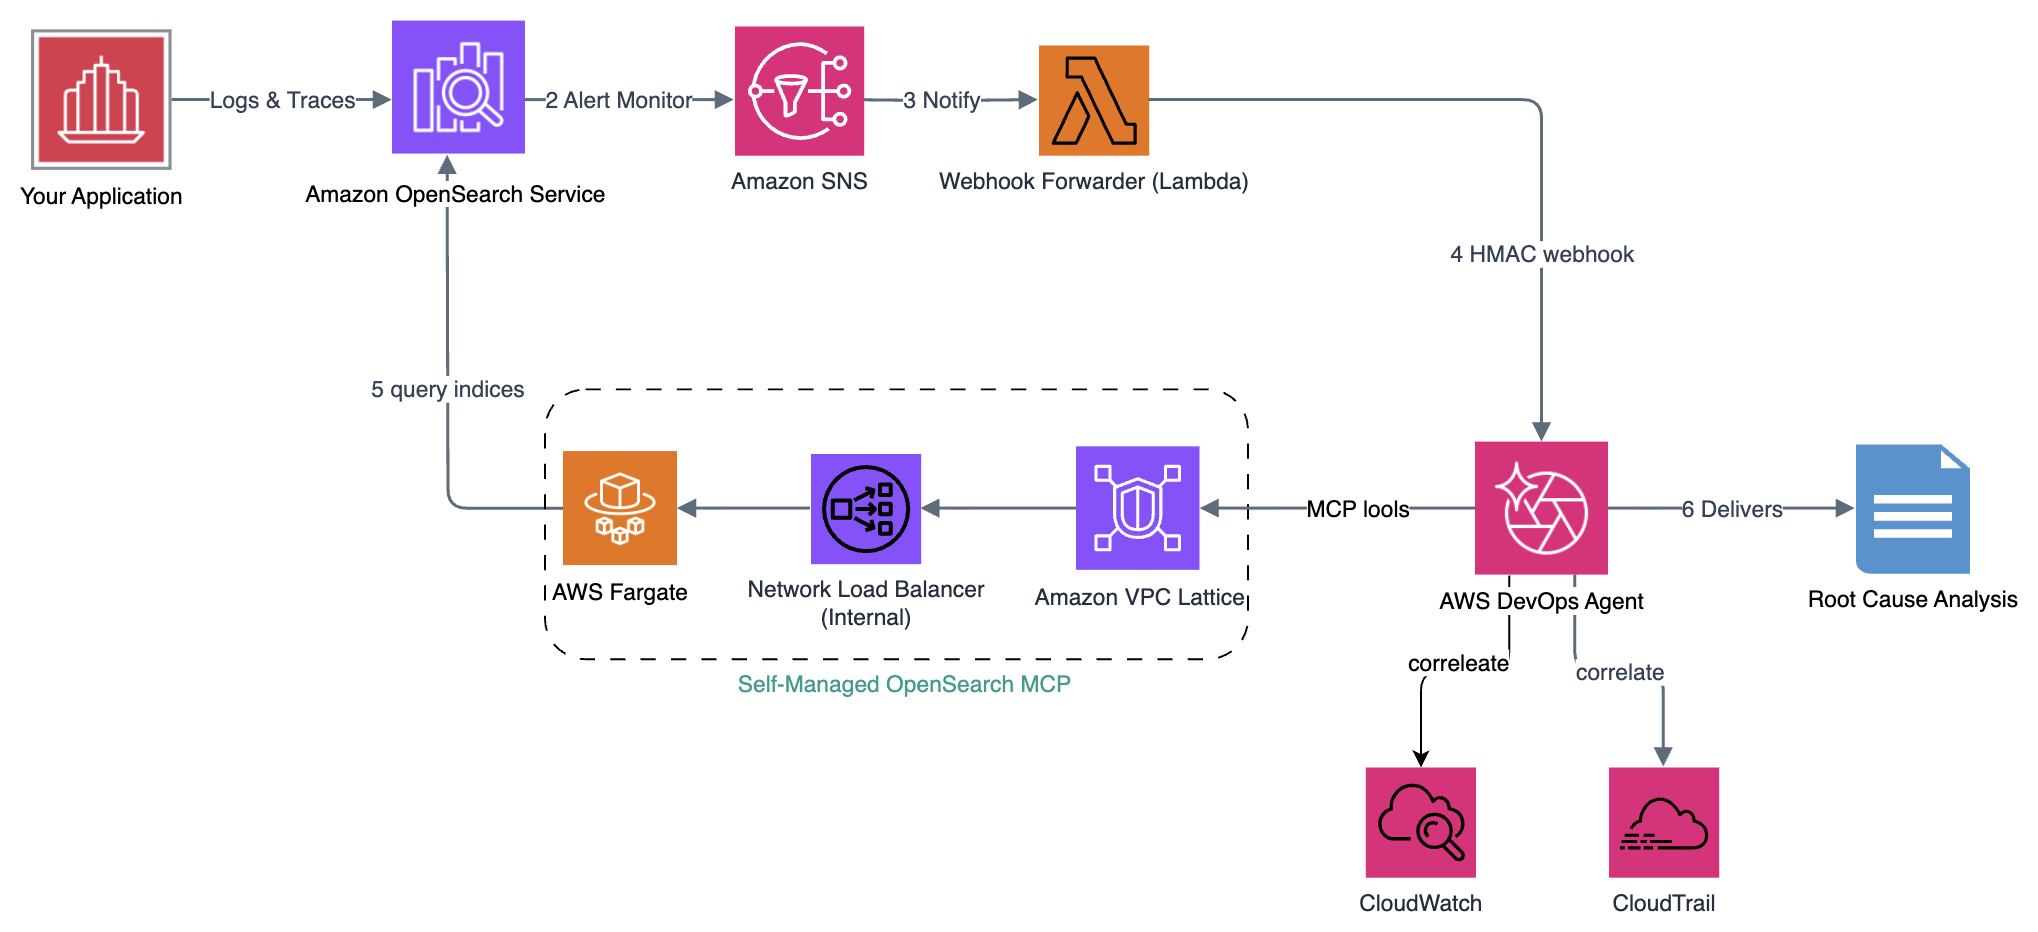
Figure 2: Architecture for self-managed OpenSearch MCP deployed on AWS Fargate
1. Generate a Transport Layer Security (TLS) certificate for the MCP server
AWS DevOps Agent requires HTTPS endpoints. Generate a self-signed certificate whose subject alternative name (SAN) matches your NLB DNS name, and import it to AWS Certificate Manager (ACM):
Save the returned certificate Amazon Resource Name (ARN) for the next step.
Why the SAN matters: VPC Lattice validates the certificate against the host address you configure for the private connection. If the SAN doesn’t match the NLB DNS, TLS validation fails and the connection never reaches Completed.
2. Define the MCP server in your CDK app
Run opensearch-mcp-server-py as an Amazon ECS Fargate service behind an internal NLB. The following snippet shows the essential wiring. Adapt it to your existing CDK app:
Deploy it (cdk deploy --require-approval broadening --region <region>) and note the NLB DNS and task role ARN from the stack outputs. You’ll need the stack outputs for the private connection (Step 2) and the FGAC mapping (Step 3).
The server starts in streamable-HTTP mode (–transport stream). Installing the package at container startup adds approximately 30 seconds to the first task boot up time. The higher task sizing (1024 MB/512 CPU) helps pip install complete quickly, and the health check’s unhealthyThresholdCount: 5 gives the service approximately 2.5 minutes to stabilize. For production, bake the package into a prebuilt image to avoid startup latency entirely.
3. Critical: Use a Network Load Balancer (NLB), not an Application Load Balancer (ALB)
The OpenSearch MCP servers use the streamable-HTTP transport, which delivers responses as Server-Sent Events (SSE) with chunked transfer encoding. Application Load Balancers (ALBs) operate at Layer 7 and can strip the Transfer-Encoding: chunked header, breaking the SSE stream. Network Load Balancers operate at Layer 4 (TCP) and pass HTTP framing untouched after TLS termination. Therefore deploy a streamable-HTTP MCP server behind an NLB with TLS termination and not an ALB.
Important: The NLB must have a security group so VPC Lattice resource gateway ENIs can reach it, and a security group can only be attached to an NLB at creation time (it cannot be added later). The CDK stack attaches one. If you build your own NLB, specify the security group when you create it.
Option B: Amazon Bedrock AgentCore (managed, where available)
If your Region supports the integration, the OpenSearch console provides a one-click CloudFormation template that deploys opensearch-mcp-server-py on AgentCore.
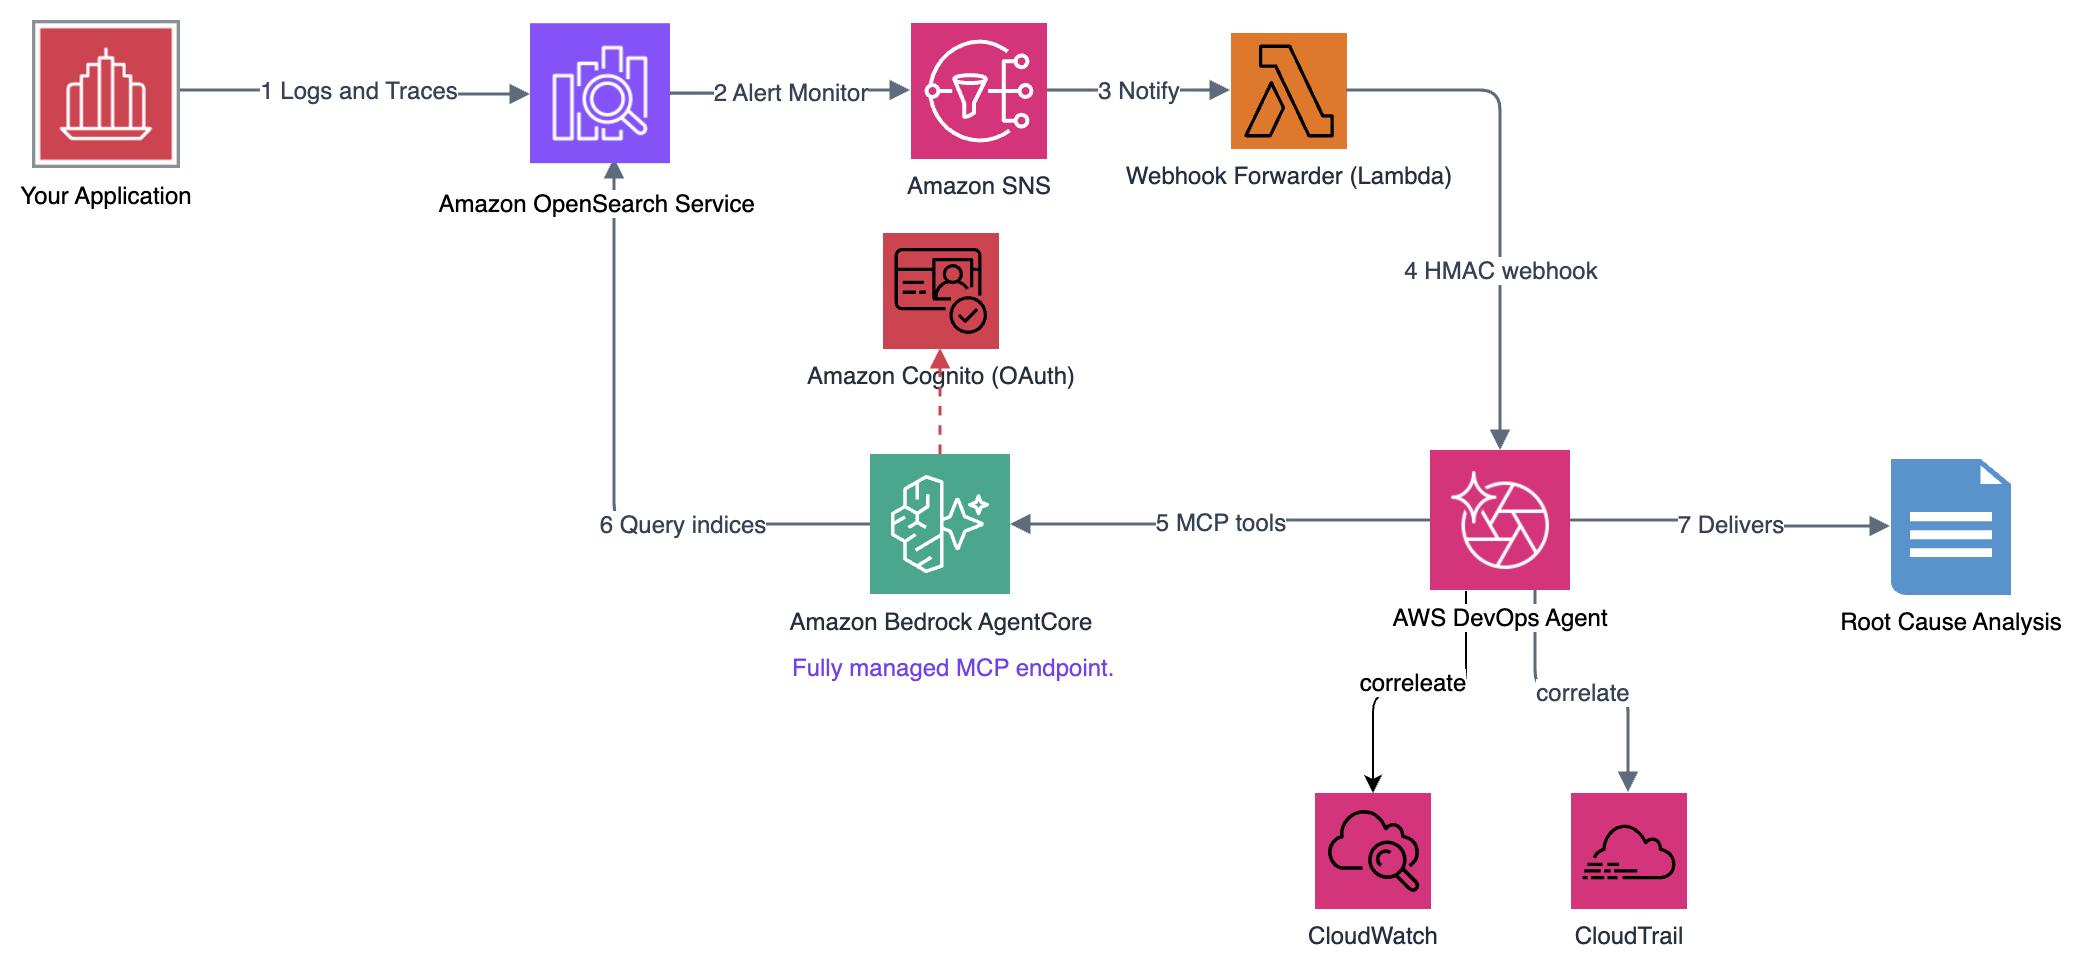
Figure 3: Architecture for OpenSearch MCP deployed on Amazon Bedrock AgentCore
- Open the Amazon OpenSearch Service console, select your domain, and go to Integrations.
- Locate the MCP server template and choose Launch stack.
- Provide the parameters:
| Parameter | Description | Example |
OpenSearchEndpoint |
Your domain’s endpoint | https://my-domain.<region>.es.amazonaws.com |
AWSRegion |
Region where the domain runs | <region> |
AgentName |
Logical name for this MCP server | opensearch-observability-mcp |
After the stack reaches CREATE_COMPLETE, note from the Outputs tab: AgentCoreEndpoint, CognitoClientId, CognitoClientSecret, and McpServerRoleArn (needed for FGAC in Step 3).
Verify the tools are registered:
Option C: OpenSearch 3.3+ built-in MCP
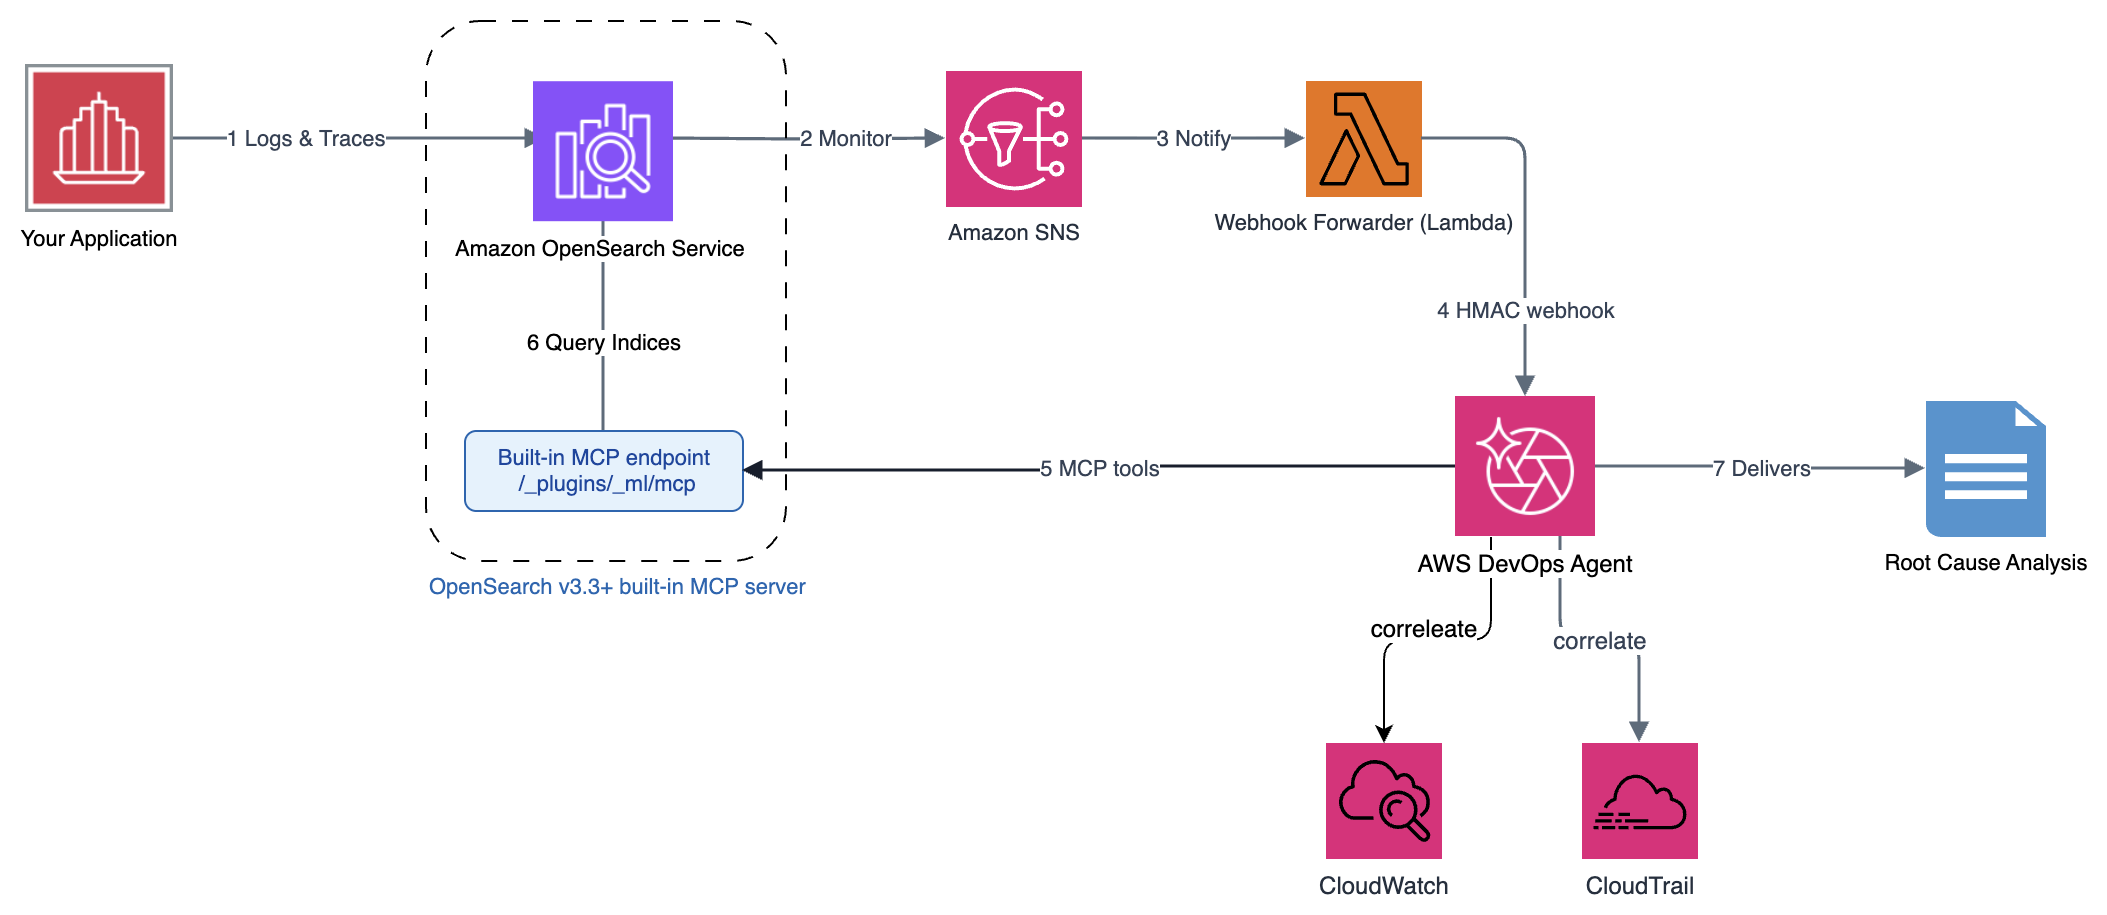
Figure 4: MCP deployment architecture for domains running OpenSearch version 3.3+
This is the simplified path for domains running OpenSearch 3.3+. These versions have a built-in MCP endpoint, so no separate server deployment is needed. Enable the endpoint with two API calls:
Your MCP endpoint is live at https://<domain-endpoint>/_plugins/_ml/mcp. In Step 2, register this URL directly with AWS DevOps Agent using SigV4 authentication (service=es).
Step 2: Register with AWS DevOps Agent
With the MCP server running, register it as a Capability Provider so AWS DevOps Agent can invoke its tools during investigations.
The private connection in section 2.1 applies only to the self-managed path (Option A). For the AgentCore and built-in paths, skip to section 2.2.
2.1 Create a private connection
A private connection creates a secure network path between AWS DevOps Agent and your NLB using Amazon VPC Lattice.
- Open the AWS DevOps Agent console.
- Navigate to Capability Providers then Private connections and choose Create a new connection.
- Configure the connection with these settings:
- For Name, enter
opensearch-mcp-connection. - Select your virtual private cloud (VPC) and private subnets (one per Availability Zone (AZ)).
- Attach a security group that allows inbound TCP 443.
- For Host address, enter your NLB DNS name (the Step 1 output), and set TCP port to 443.
- For Certificate public key, paste the contents of
/tmp/mcp-cert.pem.
- For Name, enter
- Configure the connection with these settings:
- Choose Create Connection and wait for status Completed (~5–10 minutes).
2.2 Register the MCP server
Then register the Capability Provider. The fields differ by path:
| Field | Self-managed (ECS) | AgentCore | Built-in (3.3+) |
| Name | opensearch-observability |
opensearch-observability |
opensearch-observability |
| Endpoint URL | https://<nlb-dns>/mcp |
https://<AgentCoreEndpoint> |
https://<domain-endpoint>/_plugins/_ml/mcp |
| Private connection | opensearch-mcp-connection |
— | — |
| Authentication | API key (x-api-key) |
OAuth | SigV4 |
| OAuth client ID / secret | — | from stack outputs | — |
| SigV4 service | — | — | es |
2.3 Configure allowed tools
Classify the MCP tools as read-only so the agent can query but not mutate your domain: SearchIndexTool, ListIndexTool (and, if present, GetMappingsTool and GetShardsTool).
2.4 Verify the registration
In the AWS DevOps Agent console test interface, ask:
“List the indices in my OpenSearch domain that match
application-logs-*”
The agent should invoke the list tool and return your index names. A 403 Forbidden or security_exception means you haven’t configured the FGAC mapping yet. Continue to Step 3. A connection timeout on the self-managed path points to the private connection status or NLB security group.
Step 3: Configure FGAC role mapping
OpenSearch managed domains with FGAC enforce a strict separation: IAM authenticates the caller, but the internal security plugin of OpenSearch authorizes access to the indices. Without an explicit mapping between the IAM role and an OpenSearch backend role, authenticated requests still receive 403 Forbidden.
Identify the role to map
| Path | IAM Role | Where to find it |
| Self-managed (ECS) | ECS task role | CDK output McpTaskRoleArn (from the Step 1 snippet) |
| AgentCore | MCP server role (trust: agentcore.bedrock.amazonaws.com) |
CloudFormation Outputs → McpServerRoleArn |
| Built-in endpoint | DevOps Agent role (trust: aidevops.amazonaws.com) |
DevOps Agent console → Agent Space → IAM Configuration |
Apply the role mapping (recommended: scoped to your indices)
With the role identified, apply the mapping. We recommend that you scope it to your observability indices rather than granting cluster-wide read, so you can control which data the agent can query. The first call creates a read-only role restricted to those indices. The second maps your IAM role to it:
Verify:
Step 4: Wire up alert routing
Your OpenSearch Alerting monitors already fire to SNS. The remaining connection is a lightweight Lambda that transforms those SNS notifications into the format the AWS DevOps Agent Event Channel expects, with HMAC signing for payload integrity. This is the piece that closes the loop: investigations trigger automatically, without a human forwarding the alert.
4.1 The webhook forwarder
The forwarder performs two operations: payload transformation and HMAC-SHA256 signing.
The complete implementation adds retry logic (three attempts with exponential backoff at 1, 2, and 4 seconds), AWS Secrets Manager integration for HMAC secret caching, and structured JSON error logging.
4.2 Deploy the forwarder
Define the forwarder as a Lambda subscribed to your alerting SNS topic. Package the preceding transformation and signing logic as the handler, wire it up in AWS CDK, and deploy with cdk deploy --require-approval broadening --region <region>:
4.3 Configure the Event Channel
With the forwarder deployed, create the webhook in the AWS DevOps Agent console and wire its URL and signing secret back into the Lambda.
- In the AWS DevOps Agent console, go to Agent Space, Webhooks, Agent Space Webhook, and then choose Add webhook.
- Complete the setup steps: verify the data schema, configure HMAC authentication, and generate the URL and credentials.
- Note the HMAC signing secret and store it in the AWS Secrets Manager secret referenced by the forwarder (
devops-agent-webhook-secret). See Create an AWS Secrets Manager secret in the AWS Secrets Manager User Guide. - Set the generated Webhook URL as the
WEBHOOK_URLenvironment variable on the forwarder Lambda (theeventChannelUrlprop in the preceding snippet).
Note: Creating an OpenSearch Alerting monitor (if you don’t have one yet).
If you don’t have a monitor yet, create an SNS notification channel (Notifications plugin) and a query-level alerting monitor over application-logs-* that triggers when error_count > 5 and posts to that channel. Full request bodies are in the OpenSearch Alerting docs. The action’s message_template must emit monitor_name, trigger_name, severity, period_start, period_end, and results to match the forwarder’s schema.
The IAM role (role_arn) needs sns:Publish permission on your topic and a trust policy allowing es.amazonaws.com to assume it. The destination_id in the action must match the config_id from the notification channel.
4.4 Verify delivery
Publish a test alert to your SNS topic:
Check the forwarder’s CloudWatch Logs for:
Note: 401 Unauthorized means the HMAC secret in Secrets Manager doesn’t match the Event Channel secret. Connection refused means the Event Channel URL is wrong or the Lambda lacks outbound access.
Step 5: Verify the closed loop
With all four components connected (MCP server, Capability Provider, FGAC mapping, and alert routing), trigger a controlled failure to verify the full loop.
5.1 Inject failure
Set reserved concurrency to zero on one of your application’s Lambda functions. This causes all invocations to be throttled:
5.2 Generate traffic
Send requests to trigger errors that will appear in your OpenSearch logs:
5.3 Expected timeline
After you inject the failure and generate traffic, events should unfold roughly as follows. Use this timeline to confirm each stage of the loop is firing:
| Elapsed | Event |
| T+0s | put-function-concurrency executed |
| T+30s | Throttle errors appear in application-logs-* index |
| T+~120s | Alerting monitor evaluates and triggers |
| T+~130s | SNS → Forwarder Lambda → Event Channel delivery |
| T+~135s | DevOps Agent begins investigation |
| T+~300s | Root cause analysis delivered |
What AWS DevOps Agent produces
The agent identified the root cause by querying the same data that triggered the alert, which completes the closed loop.
5.4 Revert the failure
After the investigation completes, restore normal capacity by removing the reserved concurrency limit you set earlier:
Note: If the agent doesn’t begin investigation within 3 minutes, check: (1) the forwarder Lambda executed (CloudWatch Logs), (2) the Event Channel shows the received event, and (3) the Capability Provider is registered and healthy.
Cost considerations
This walkthrough adds roughly $70/month (as of September 2026, and varies by AWS Region and usage): ECS Fargate MCP task approximately $15, network address translation (NAT) gateway approximately $35, NLB approximately $18, Secrets Manager approximately $0.40, and the Lambda forwarder under $1. The AgentCore path removes the NLB and ECS costs but adds AgentCore hosted-endpoint charges. Your existing OpenSearch domain and application aren’t included.
Security considerations
The design keeps everything inside the VPC: OpenSearch and the MCP server run in private subnets with nothing public-facing, and AWS DevOps Agent reaches the MCP server over a VPC Lattice private connection. NLB terminates TLS (OpenSearch enforces HTTPS, TLS 1.2 minimum), and encryption at rest is enabled. IAM is least-privilege: the MCP server’s role maps to a read-only OpenSearch backend role scoped to your observability indices.
For production, also consider Security Assertion Markup Language (SAML)/IAM FGAC, request validation in front of the MCP server, and VPC endpoints for Amazon Elastic Container Registry (Amazon ECR), CloudWatch, and Secrets Manager.
Cleanup
Verify the resources are removed: ECS tasks, NLB, NAT Gateway, AgentCore hosted endpoint (if used), and the Secrets Manager secret.
Conclusion
You connected AWS DevOps Agent to your OpenSearch observability data through MCP, with three hosting paths so Region availability doesn’t block you: self-managed ECS (everywhere today), AgentCore (low-ops, where available), or the built-in 3.3+ endpoint. The loop is now closed: the same domain that stores your data and fires alerts becomes the investigation source, and the agent can help determine why an alert fired automatically.
Start with one alert that fires frequently and costs your team time to investigate manually. Connect it through this pipeline, watch the agent produce its first root cause analysis, and iterate from there.
Related resources
- AWS DevOps Agent documentation
- Connecting MCP Servers to DevOps Agent
- Securely connect AWS DevOps Agent to private services in your VPCs
- OpenSearch MCP Server (opensearch-mcp-server-py)
- Hosting OpenSearch MCP Server with Amazon Bedrock AgentCore
- Amazon OpenSearch Service
- Model Context Protocol specification