All posts by Trevor Schiavone

Well-architected best practices for software supply chain security

Post Syndicated from Trevor Schiavone original https://aws.amazon.com/blogs/security/well-architected-best-practices-for-software-supply-chain-security/

There have been multiple notable supply chain attacks using the npm Registry since September: Shai-Hulud, Chalk/Debug, one abusing tea.xyz tokens, and recently axios. Thanks to community efforts involving the Amazon Inspector team, the Open Source Security Foundation, and others, the affected packages were quickly flagged, which reduced the impact of these incidents.

Supply chain attacks like Shai-Hulud exploit vulnerabilities on two fronts: compromised maintainer accounts that publish malicious packages, and consumer environments that download and execute those packages. The Shai-Hulud attack, shown in Figure 1, succeeded because maintainer credentials were compromised through phishing, enabling threat actors to publish malicious versions of popular packages. Incidents like these highlight the need for strong security practices within the software supply chain, and effective defense requires addressing both sides. Package maintainers need protections that prevent account compromise and limit sprawl when credentials are stolen. Package consumers need layered defenses that detect malicious packages, prevent their deployment, and limit damage when compromise occurs.

In this post, we explore best practices for package consumers. These practices are aligned with the AWS Well-Architected Framework – Security Pillar and you can use them to reduce exposure to similar threats and limit their impact if they occur.
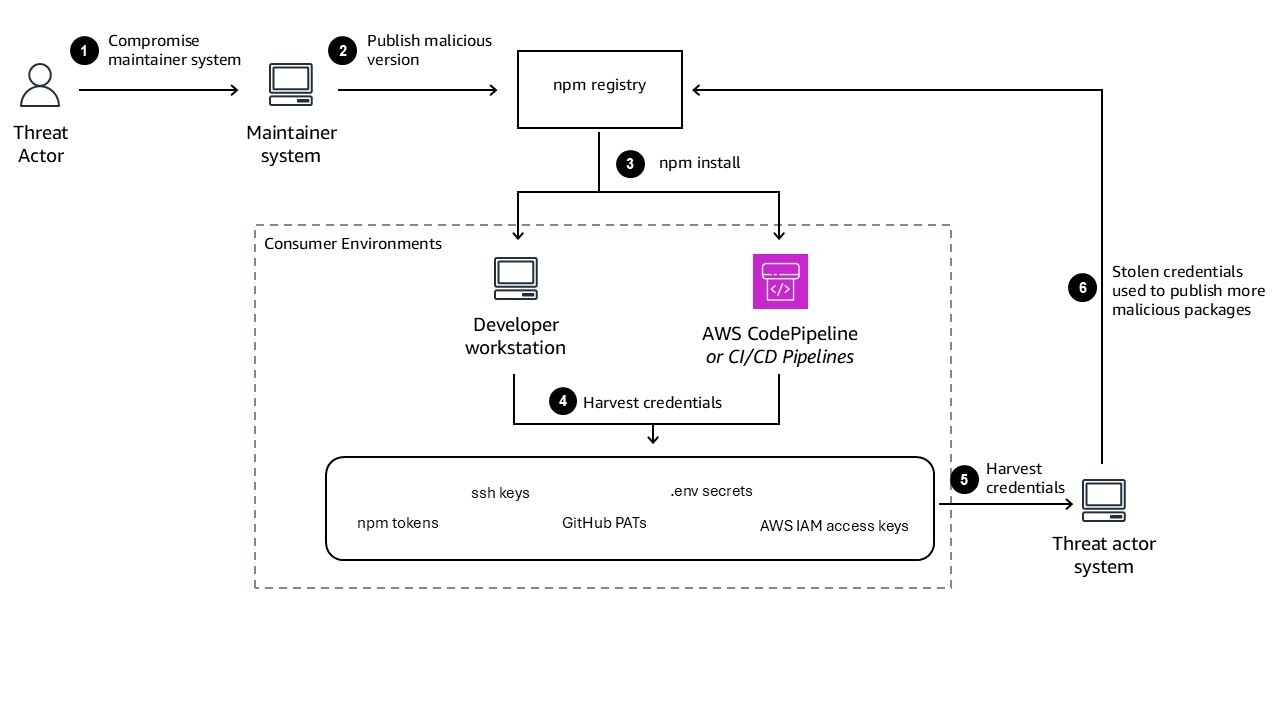
Figure 1: Architecture diagram showing Shai-Hulud attack flow

Figure 1: Architecture diagram showing Shai-Hulud attack flow

Use temporary credentials and grant least privilege

When Shai-Hulud executed in developer environments and continuous integration and delivery (CI/CD) pipelines, it scanned for secrets such as npm tokens, GitHub tokens, and AWS Identity and Access Management (IAM) access keys. Long-term credentials exposed in this way enabled threat actors to propagate the malware further and access cloud resources. Recent incidents have shown organizations discovering multiple leaked IAM credential pairs, with concerns about additional exposed credentials and potential compromise of CI/CD pipelines.

Removing long-lived credentials from your developer environments and CI/CD pipelines reduces the scope of exposure in the event a system is compromised. For developers working locally, the new AWS CLI login command (aws login) simplifies the process of acquiring short-lived CLI credentials and removes the need to store long-lived credentials in configuration files. AWS IAM Identity Center also provides a straightforward way to acquire temporary credentials that expire automatically. For CI/CD pipelines, OpenID Connect (OIDC) federation with GitHub Actions, GitLab CI, or other platforms provide temporary credentials for each job without storing long-lived tokens. IAM can also federate AWS Identities to external services, allowing your AWS workloads to securely access external services without using long-term credentials. Temporary credentials expire automatically, limiting the window of exposure if a pipeline is compromised.

If you’re interacting with a third-party service that doesn’t support temporary credentials, consider storing the credentials to centralized storage using AWS Secrets Manager or AWS Systems Manager Parameter Store. Limit access to these secrets, require the use of temporary credentials, and apply automatic rotation and audit logging to reduce the risk of exposure of these credentials.

To reduce risk from credential exposure:

In the event of a security incident where credentials might be exposed, immediately rotate all long-term credentials to limit the scope of impact. Use Amazon GuardDuty and AWS CloudTrail to detect abnormal IAM activity and identify which credentials might have been compromised.

Implement defense in depth

Even with temporary credentials and least privilege, a single compromised account can enable threat actors to publish malicious packages or access sensitive resources. Defense in depth creates multiple layers of protection that work together to prevent sprawl after initial compromise. While adding approval workflows to every operation would dramatically decrease deployment speed, implementing them strategically for sensitive workloads provides balanced security.

The key principle is to ensure that if one credential or account is compromised, additional controls prevent that compromise from spreading across your organization. This includes multi-factor authentication (MFA) for access combined with different IAM roles for sensitive workloads. For single-developer open source projects, MFA becomes even more critical because there’s no separation of duties through multiple maintainers.

For package maintainers working in team environments, requiring multiple approvers to release packages to production creates separation of duties. However, developers can still trigger merge requests that initiate deployment pipelines, so multi-party approval should be implemented within the pipeline itself for sensitive deployments. This ensures that even if a developer’s credentials are compromised and they trigger a deployment, the pipeline requires additional approval before releasing to production.

For package consumers, multi-approval workflows in deployment pipelines help ensure that if a malicious package passes initial scanning, human review can catch suspicious changes before production deployment. Artifact signing provides a complementary cryptographic layer that works alongside these process controls.

The Shai-Hulud attack succeeded because compromised maintainer credentials allowed threat actors to publish malicious packages directly to the public npm registry. For package consumers, the defense is ensuring that packages pulled from public registries cannot reach production without verification. Artifact signing is one concrete implementation of this layered approach. By cryptographically binding a package or container image to the identity that produced it, signing creates a verification layer that is independent of the credential used to trigger the build—meaning a compromised developer credential alone isn’t sufficient to introduce an unverified artifact into your deployment pipeline.

Artifact signing as part of defense in depth

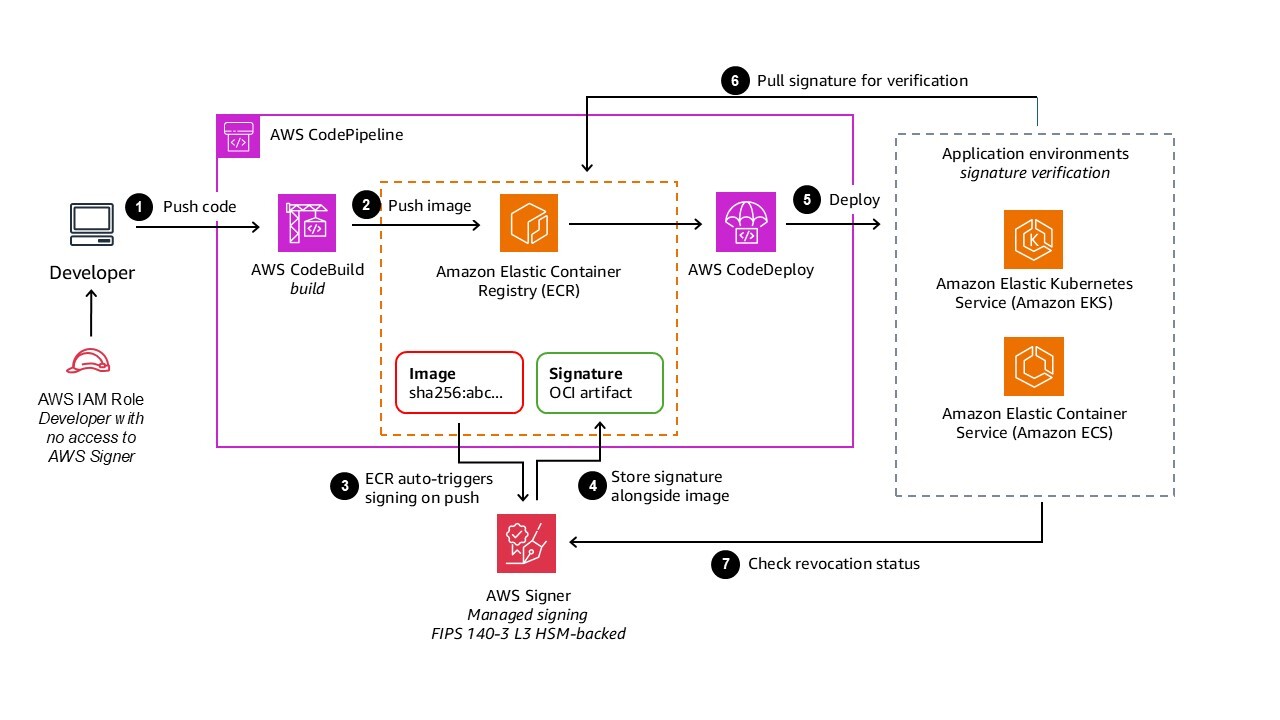
AWS Signer provides cryptographic signing for packages, creating an additional verification layer within your defense in depth strategy. The signing authorization model separates concerns: developer credentials shouldn’t have signing permissions. Only CI/CD pipeline roles should have signing permissions through the signer:StartSigningJob API. Signer uses FIPS 140-3 Level 3 validated hardware security modules (HSMs) to store signing keys, providing strong cryptographic protection.

The container image signing workflow, shown in Figure 2, demonstrates how signing integrates seamlessly into existing processes:

Figure 2: Diagram showing Signer signing workflow

Figure 2: Diagram showing Signer signing workflow

The benefits of Signer compared to building custom signing infrastructure include:

  • Fully managed: No need to build custom signing infrastructure or manage certificate lifecycle
  • Automated: Amazon ECR managed signing happens automatically on image push without manual steps
  • Centralized governance: Single signing profile can be used across multiple accounts and pipelines
  • Native integration: Built-in integration with Notation and Kyverno for signature verification in Amazon EKS
  • FIPS 140-3 Level 3 compliance: Meets stringent regulatory requirements for cryptographic operations

Audit logging for all signing operations enables detection of unusual patterns such as signing from new IP addresses, unusual times, or rapid succession of signing jobs. For every credential in your system, consider who can access what, how they prove their identity, and what second layer prevents sprawl if that credential is compromised. Artifact signing, combined with centralized storage and Software Bills of Materials (SBOMs), provides layered protection against tampering and malicious packages.

Centralize dependency management

By centralizing package and dependency management, you can validate and approve dependencies before they’re used in applications and quickly audit dependencies in the event of a supply chain security incident. Recent incidents have shown organizations discovering compromised npm packages in their internal artifact repositories, requiring rapid assessment of which applications might be affected.

On AWS, you can use AWS CodeArtifact to host and manage your organization’s software packages. You can use the package group configuration to define an approved list of upstream sources and block access to all others—a direct control against typosquatting attacks, where malicious packages are published under names that closely resemble legitimate ones. Rather than relying on developers to identify suspicious package names at install time, package group configuration enforces the boundary at the repository level. Centralization also helps you pin versions of dependencies to prevent automatic updates from pulling in malicious versions and quickly remove compromised dependencies across your software portfolio when an incident occurs.

For container images, Amazon ECR provides centralized image storage with AWS Key Management Service (AWS KMS) encryption and lifecycle policies. Combine Amazon ECR with Amazon Inspector scanning to continuously validate image integrity.

For additional guidance see SEC11-BP05: Centralize services for packages and dependencies.

npm provenance attestation

For npm packages specifically, provenance attestations provide a complementary control on the consumer side. Available since npm 9.5, npm provenance links a published package to the specific source repository and CI/CD workflow that produced it, using Sigstore as the underlying signing infrastructure. When a package is installed, the npm CLI can verify that the published artifact matches the attested build provenance—providing confidence that the package wasn’t tampered with between build and publication. For organizations consuming open source npm packages, checking for provenance attestations before adding a new dependency is a low-friction signal of supply chain integrity. Package maintainers publishing to npm can enable provenance by running npm publish with the –provenance flag from a supported CI/CD environment such as GitHub Actions.

For additional guidance see SEC11-BP06: Deploy software programatically and, from the DevOps Lens of the AWS Well-Architected Framework, DL.CS.2: Sign code artifacts after each build

Scan dependencies throughout the software development lifecycle

AWS provides services to help you scan dependencies continuously, from development through deployment:

  • In development: Kiro can perform software composition analysis during code reviews to identify vulnerable third-party code.
  • In code repositories and pipelines: Amazon Inspector scans first-party code, third-party dependencies, and Infrastructure as Code for vulnerabilities.
  • For container images: Amazon Inspector provides continuous vulnerability scanning of Amazon ECR images. Amazon Inspector can also be integrated directly into CI/CD pipelines to scan images before they are pushed to Amazon ECR or deployed, helping you block compromised dependencies earlier in the release cycle.

Traditional vulnerability scanners focus on known CVEs—publicly disclosed vulnerabilities with assigned identifiers. Supply chain attacks like Shai-Hulud involve malicious packages that function as zero-days: they’re intentionally crafted by threat actors and actively exploited before a CVE is assigned. Traditional vulnerability scanners that rely on CVE databases won’t detect these packages until they’ve been formally identified and catalogued, which can take days or weeks.

Detecting these requires behavioral analysis at scale and community collaboration, not just static signature matching. The operational scale of AWS—with threat intelligence from sources like MadPot and incident response data across millions of customers—enables detection of suspicious package behavior across multiple environments simultaneously. When a newly published package exhibits credential-harvesting behavior in multiple customer accounts within hours of publication, that cross-account signal enables rapid identification. These findings are contributed to community-maintained databases like the OpenSSF Malicious Packages Repository (github.com/ossf/malicious-packages), which assigns a formal identifier (MAL-ID) and shares it across the security community. For the tea.xyz token farming campaign, the average time from submission to formal identification was approximately 30 minutes. AWS services like Amazon Inspector participate in this community loop, contributing findings and ingesting newly assigned MAL-IDs to surface threats in your environment.

A related threat model worth understanding is the sleeper package: a package that appears benign at publication and activates malicious behavior only after a delay or trigger condition. Static analysis alone is insufficient to catch these packages because the malicious payload isn’t present or active at install time. Amazon Inspector behavioral analysis is specifically designed to detect this class of threat, complementing static vulnerability scanning.

Software Bills of Materials (SBOMs) in SPDX or CycloneDX format enable you to quickly assess exposure during incidents. When responding to supply chain incidents, use SBOMs to identify which applications contain compromised packages, prioritize remediation, and assess blast radius. In the Shai-Hulud incident, the compromised packages (MAL-2025-46974 and CVE-2025-59144) were identified early, providing actionable findings that customers could remediate quickly. Organizations that had scanning enabled but experienced alert fatigue may have missed critical alerts, highlighting the importance of proper alert routing and prioritization.
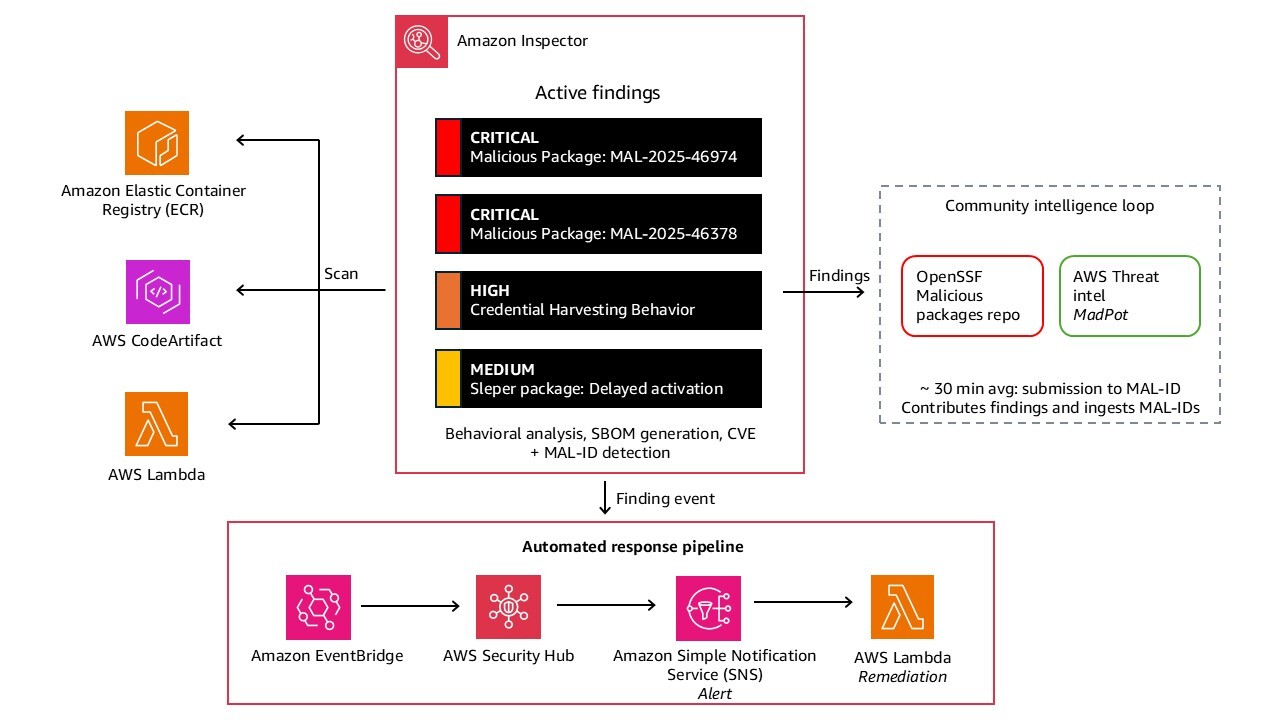
Figure 3: Screenshot of Amazon Inspector console showing malicious package findings

Figure 3: Screenshot of Amazon Inspector console showing malicious package findings

For additional guidance see SEC11-BP02: Automate testing throughout the development and release lifecycle.

Configure logging and monitoring

Visibility into activity is essential to detect anomalous behavior early. Configure logging and centralize those logs for analysis:

  • Enable application and service logging
  • Centralize and monitor logs across accounts
  • Use GuardDuty to continuously monitor for malicious activity and anomalous API calls
  • Aggregate findings with AWS Security Hub and enforce configuration best practices with AWS Config

CloudTrail logging provides audit trails for credential access and API activity. When responding to supply chain incidents, review CloudTrail logs for specific events that indicate credential compromise or malicious activity: sts:AssumeRole calls from unexpected IP addresses or regions, secretsmanager:GetSecretValue or ssm:GetParameter calls from unfamiliar sources, ecr:PutImage from developer workstations bypassing CI/CD pipelines, lambda:UpdateFunctionCode outside normal deployment windows, iam:CreateAccessKey followed by immediate API activity, and codecommit:GitPush or codebuild:StartBuild from unusual IP addresses. When combined with Amazon EventBridge rules, you can trigger automated responses when Amazon Inspector detects malicious packages or when these unusual credential access patterns occur.

Organizations affected by recent supply chain attacks have used CloudTrail analysis to determine the scope of credential exposure and identify which resources might have been accessed by compromised credentials. This forensic capability is essential for understanding blast radius and ensuring complete remediation.

For additional guidance see the best practices in SEC04: Detection.

These components of a defense in depth strategy work together to prevent sprawl after initial compromise and help you to detect and respond to the event. Figure 4. shows how these fit together.
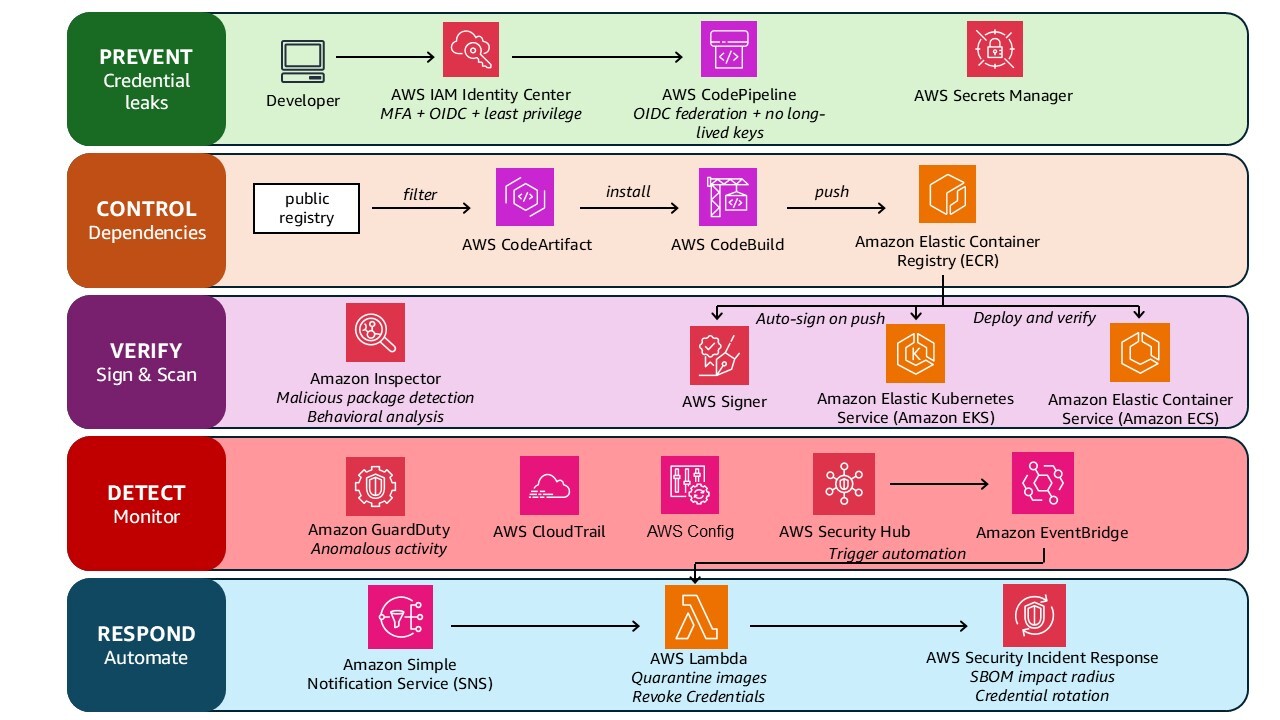
Figure 4: Architecture diagram showing defense architecture

Figure 4: Architecture diagram showing defense architecture

Additional best practices

The Security pillar of the Well-Architected Framework also provides organizational best practices that are applicable to improving security processes across all dimensions of your organization. Relevant best practices include SEC11-BP01: Train for application security; SEC11-BP08: Build a program that embeds security ownership in workload teams; and SEC10: Incident Response.

Conclusion

Recent incidents including Shai-Hulud, Chalk/Debug, and tea.xyz reflect ongoing efforts by threat actors to target the the package registries, CI/CD pipelines, and developer credentials for increased attack surface and propagation. A single compromised maintainer account or malicious package can propagate across thousands of consumer environments simultaneously. The controls described in this post are designed with that threat model in mind. Temporary credentials limit the value of stolen tokens, centralized dependency management and upstream blocking reduce the attack surface at the registry level, artifact signing ensures that even if a build pipeline is compromised, unsigned artifacts cannot reach production, and dependency scanning throughout your software lifecycle helps you identify compromised packages early, before they can impact you. Each layer narrows the window of opportunity for a threat actor.

Learn more

See the following blogs and workshops to dive deeper on this topic:

If you have feedback about this post, submit comments in the Comments section below.

Trevor Schiavone

Trevor Schiavone

Trevor is a Senior Solutions Architect with a background in application development and architecture. He brings a builder’s perspective to helping customers design secure, scalable, and innovative solutions on AWS. He is also an active part of the AWS security community with a focus on application security and identity.

Desiree Brunner

Desiree Brunner

Desiree is a Security Specialist Solutions Architect working with regulated customers as part of the AWS EMEA Security & Compliance team. She builds on her background in DevOps and platform engineering to support her customers in designing secure, compliant cloud environments. Passionate about mental health and knowledge sharing, she regularly speaks at AWS events and supports teams on their cloud security journey.

Secure your Express application APIs in minutes with Amazon Verified Permissions

Post Syndicated from Trevor Schiavone original https://aws.amazon.com/blogs/security/secure-your-express-application-apis-in-minutes-with-amazon-verified-permissions/

Today, Amazon Verified Permissions announced the release of @verifiedpermissions/authorization-clients-js, an open source package that developers can use to implement external fine-grained authorization for Express.js web application APIs in minutes when using Verified Permissions.

Express is a minimal and flexible Node.js web application framework that provides a robust set of features for web and mobile applications. By using this standardized integration with Verified Permissions, developers can externalize authorization using up to 90 percent less code compared to writing their own custom integrations, saving them time and effort and improving application security posture by reducing the amount of custom integration code.

Why externalize authorization?

Traditionally, developers implemented authorization within their application by embedding authorization logic directly into application code. This embedded authorization logic is designed to support a few permissions, but as applications evolve, there is often a need to incrementally update the embedded authorization logic to support more complex use cases, resulting in code that is complex and difficult to maintain. As code complexity increases, further evolving the security model and performing audits of permissions becomes more challenging, resulting in an application that becomes more difficult to maintain over its lifecycle.

By externalizing authorization, you can decouple authorization logic from your application. This yields multiple benefits including freeing up development teams to focus on application logic and simplifying software audits.

One approach to externalize authorization from your application code is to use Cedar. Cedar is an open source language and software development kit (SDK) for writing and enforcing authorization policies for your applications. You specify fine-grained permissions as Cedar policies, and your application authorizes access requests by calling the Cedar SDK. For example, if you’re building a pet store application, you can use the following Cedar policy to control that only a user with a jobLevel of employee can access the POST /pets API.


permit (
	principal,
	action in [Action::"POST /pets"], 
	resource
) when {
	principal.jobLevel = "employee"
};

One option for using Cedar is to self-manage the implementation; you can find an example for this pattern in another post: Secure your application APIs in 5 minutes with Cedar.

Self-managed Cedar provides the benefits of externalizing authorization but requires ongoing operational management. Organizations are responsible for Cedar version upgrades, applying security patches, managing policies, and auditing authorizations. Another option for using Cedar is to use Verified Permissions. Verified Permissions removes these operational requirements by providing a managed service for Cedar. Verified Permissions manages scaling, simplifies policy governance by supporting centralized policy management, and logs policy changes and authorization requests to simplify auditing.

This post describes how web application developers can use the new Express package to simplify the integration of Express web applications with Verified Permissions. The step-by-step guide uses a sample Pet Store application to show how access to APIs can be restricted based on user groups. You can find the sample Pet Store application in the verifiedpermissions repository on GitHub.

Pet Store application API overview

The Pet Store application is used to manage a pet store. The pet store is built using Express with Node.js and exposes the APIs in the following table.

API Description
GET /api/pets Returns the list of available pets
GET /api/pets/{petId} Returns the specified pet found
POST /api/pets Adds a pet to the pet store
PUT /api/pets/{petId} Updates an existing pet
DELETE /api/pets/{petId} Removes a pet from the pet store

This application doesn’t allow all users to access all APIs. Instead, it enforces the following rules:

  • Administrators: Full access to pets and management functions
  • Employees: Can view, create, and update pets
  • Customers: Can view pets and create new pets

Implementing authorization for the Pet Store APIs

Let’s walk through how to secure your application APIs using Verified Permissions and the new package for Express. The initial application, with no authorization, can be found in the start folder; use this to follow along with the post. You can find a completed version of the application in the finish folder.

When completed, you’ll have implemented the application architecture shown in Figure 1. A React frontend application that uses Amazon Cognito for authentication. The application then includes the identity token returned from Cognito as an authorization header to the Express backend APIs. The Express backend, using the new Verified Permissions authorization middleware package, calls Verified Permissions to authorize the user request.

Figure 1: Architecture of the Pet Store application

Figure 1: Architecture of the Pet Store application

Prerequisites

Before you get started, make sure you have the following prerequisites in place.

Step 1: Set up the AWS CLI

Some of the commands require the AWS Command Line Interface (AWS CLI). See Installing or updating to the latest version of the AWS CLI and Configuring settings for the AWS CLI.

Step 2: Set up an OpenID Connect identity provider and a database

The Pet Store application uses an OpenID Connect (OIDC) identity provider to manage users. For this example, you use an Amazon Cognito user pool called PetStoreUserPool with three users, one Admin, one Employee, and one Customer.

The application also uses a Amazon DynamoDB database to store the pets.

You can set up Amazon Cognito and DynamoDB in your AWS account by running the following command in the /start directory.

./scripts/setup-infrastructure.sh

The setup script will prompt you to set passwords for the three users (passwords must be at least 8 characters and require at least one number, one uppercase letter, and one lowercase letter).

Note the outputs of running this script because you’ll use them in step 5 of Integrate Verified Permissions.

Note: In your own applications, you can set up Amazon Cognito by following the instructions in Create a new application in the Amazon Cognito console, or you can bring your own OIDC identity provider.

Step 3 (optional): Run the application

Now that the infrastructure is set up, you can run the application. In two separate terminals, run the following commands in the /start directory:

./scripts/run-backend-dev.sh
./scripts/run-frontend-dev.sh

Test the application by creating some pets.

Integrate Verified Permissions

With the prerequisites in place, the next step is to integrate Verified Permissions. Verified Permissions can be integrated into an Express application in six steps:

  1. Create a Verified Permissions policy store
  2. Add the Cedar and Verified Permissions authorization middleware packages
  3. Create and deploy a Cedar schema
  4. Create and deploy Cedar policies
  5. Connect the Verified Permissions policy store to your OIDC identity provider
  6. Update the application code to call Verified Permissions to authorize API access

The Verified Permissions integration happens with the Express web application backend. All commands in the section should be run in the /start/backend directory.

Step 1: Create a Verified Permissions policy store 

  1. Create a policy store in Verified Permissions using the AWS CLI by running the following command
    aws verifiedpermissions create-policy-store  --validation-settings "mode=STRICT"
    

    Example successful command output:

    {
        "policyStoreId": "AAAAbbbbCCCCdddd",
        "arn": "arn:aws:verifiedpermissions::111122223333:policy-store/AAAAbbbbCCCCdddd",
        "createdDate": "2025-06-05T19:30:37.896119+00:00",
        "lastUpdatedDate": "2025-06-05T19:30:37.896119+00:00"
    }
    

  2. Save the policyStoreId value from the command output to use in step 3.

Step 2: Add the Cedar and Verified Permissions authorization middleware packages

  • Run the following command to add two new dependencies on @verifiedpermissions/authorization-clients and @cedar-policy/authorization-for-expressjs
    npm i --save @verifiedpermissions/authorization-clients
    npm i --save @cedar-policy/authorization-for-expressjs
    

Step 3: Create and deploy the Cedar schema 

A Cedar schema defines the authorization model for an application, including the entity types in the application and the actions users are allowed to take. You attach your schema to your Verified Permissions policy stores, and when policies are added or modified, the service automatically validates the policies against the schema.

The @cedar-policy/authorization-for-expressjs package can analyze the OpenAPI specification of your application and generate a Cedar schema. Specifically, the paths object in the OpenAPI schema is required in your specification.

If you don’t have an OpenAPI spec, you can generate one using the tool of your choice. There are several open source libraries that you can use to do this for Express; you might need to add some code to your application, generate the OpenAPI spec, and then remove the code. Alternatively, some generative AI based tools such as the Amazon Q Developer CLI are effective at generating OpenAPI spec documents. Regardless of how you generate the spec, be sure to validate the correct output from the tool.

For the sample application an OpenAPI spec document has been included and is named openapi.json.

  1. Run the following command to generate the Cedar schema.
    npx @cedar-policy/authorization-for-expressjs generate-schema --api-spec schemas/openapi.json --namespace PetStoreApp --mapping-type SimpleRest
    

    Example successful command output:

    Cedar schema successfully generated. Your schema files are named: v2.cedarschema.json, v4.cedarschema.json.
    v2.cedarschema.json is compatible with Cedar 2.x and 3.x
    v4.cedarschema.json is compatible with Cedar 4.x and required by the nodejs Cedar plugins.
    

  2. Next, format the Cedar schema for use with the AWS CLI. The specific format required is described in the documentation Amazon Verified Permissions policy store schema. To format the Cedar schema run the following command.
    ../scripts/prepare-cedar-schema.sh v2.cedarschema.json v2.cedarschema.forAVP.json
    

    Example successful command output:

    Cedar schema prepared successfully: v2.cedarschema.forAVP.json
    You can now use it with AWS CLI:
    

  3. After the schema is formatted, run the following command to upload the schema to Verified Permissions. Note that you need to replace <policy store id> with the actual policy store ID, which is provided as an output from the command in step 1.
    aws verifiedpermissions put-schema --definition file://v2.cedarschema.forAVP.json --policy-store-id <policy store id>
    

    Example successful command output:

    {
        "policyStoreId": "AAAAbbbbCCCCdddd",
        "namespaces": [
            "PetStoreApp"
        ],
        "createdDate": "2025-06-03T20:19:33.480528+00:00",
        "lastUpdatedDate": "2025-06-05T19:42:45.198325+00:00"
    }
    

Step 4: Create and deploy Cedar policies

If no policies are configured, Cedar denies authorization requests. The next step is to create policies that will allow specific user groups access to specific resources. The Express framework integration helps bootstrap this process by generating example policies based on the previously generated schema. You can then then customize these policies based on your use cases.

  1. Run the following command to generate sample Cedar policies.
    npx @cedar-policy/authorization-for-expressjs generate-policies --schema v2.cedarschema.json
    

    Example successful command output:

    Cedar policy successfully generated in policies/policy_1.cedar
    Cedar policy successfully generated in policies/policy_2.cedar
    

    Two sample policies are generated in the /policies directory: policy_1.cedar and policy_2.cedar.

    policy_1.cedar provides permissions for users in the admin user group to perform any action on any resource.

    
    // policy_1.cedar
    // Allows admin usergroup access to everything
    permit (
    	principal in PetStoreApp::UserGroup::"admin",
    	action,
    	resource
    );
    

    policy_2.cedar provides more access to the individual actions defined in the Cedar schema with a place holder for a specific group.

    // policy_2.cedar
    // Allows more granular user group control, change actions as needed
    permit (
        principal in PetStoreApp::UserGroup::"ENTER_THE_USER_GROUP_HERE",
        action in
            [PetStoreApp::Action::"GET /pets",
             PetStoreApp::Action::"POST /pets",
             PetStoreApp::Action::"GET /pets/{petId}",
             PetStoreApp::Action::"PUT /pets/{petId}",
             PetStoreApp::Action::"DELETE /pets/{petId}"],
        resource
    );
    

    Note that if you specified an operationId in the OpenAPI specification, the action names defined in the Cedar Schema will use that operationId instead of the default <HTTP Method> /<PATH> format. In this case, make sure that the naming of your actions in your Cedar policies matches the naming of your actions in your Cedar schema.

    For example, if you want to call your action AddPet instead of POST /pets, you could set the operationId in your OpenAPI specification to AddPet. The resulting action in the Cedar policy would be PetStoreApp::Action::"AddPet"

    Create a third policy file called policy_3.cedar and then replace the contents of each file with the following policies. Replace <userpoolId> in each policy with the Cognito User Pool Id copied earlier.

    Note: In a real use case, consider renaming your Cedar policy files based on their contents, for example, allow_customer_group.cedar.

    // Defines permitted administrator user group actions
    permit (
        principal in PetStoreApp::UserGroup::"<userPoolId>|administrator",
        action,
        resource
    );
    

    // Defines permitted employee user group actions
    permit (
        principal in PetStoreApp::UserGroup::"<userPoolId>|employee",
        action in
            [PetStoreApp::Action::"GET /pets",
             PetStoreApp::Action::"POST /pets",
             PetStoreApp::Action::"GET /pets/{petId}",
             PetStoreApp::Action::"PUT /pets/{petId}"],
        resource
    );
    

    // Defines permitted customer user group actions
    permit (
        principal in PetStoreApp::UserGroup::"<userPoolId>|customer",
        action in
            [PetStoreApp::Action::"GET /pets",
             PetStoreApp::Action::"POST /pets",
             PetStoreApp::Action::"GET /pets/{petId}"],
        resource
    );
    

  2. The policies need to be formatted so that they work with the AWS CLI for Verified Permissions. The specific format is described in the AWS CLI Verified Permissions documentation. Run the following command to format the policies.
    ../scripts/convert_cedar_policies.sh
    

    Example successful command output:

    Converting policies/policy_1.cedar to policies/json/policy_1.json
    Created policies/json/policy_1.json
    Converting policies/policy_2.cedar to policies/json/policy_2.json
    Created policies/json/policy_2.json
    Converting policies/policy_3.cedar to policies/json/policy_3.json
    Created policies/json/policy_3.json
    Conversion complete. JSON policy files are in ../policies/json/
    

    The formatted policies will be output to the backend/policies/json/ directory.

  3. After formatting the policies, run the following three commands, one for each policy, to upload them to Verified Permissions. The policy store ID is returned after completing step 2. Replace <policy store id> with the actual policy store ID.
    aws verifiedpermissions create-policy  --definition file://policies/json/policy_1.json --policy-store-id <policy store id>
    aws verifiedpermissions create-policy  --definition file://policies/json/policy_2.json --policy-store-id <policy store id>
    aws verifiedpermissions create-policy  --definition file://policies/json/policy_3.json --policy-store-id <policy store id>
    

    Example successful command output:

    {
        "policyStoreId": "AAAAbbbbCCCCdddd",
        "policyId": "8AmzZYMw6Ux5DGBoX7w24m",
        "policyType": "STATIC",
        "principal": {
            "entityType": "PetStoreApp::UserGroup",
            "entityId": "<userPoolId>|administrator"
        },
        "createdDate": "2025-06-05T19:46:45.848602+00:00",
        "lastUpdatedDate": "2025-06-05T19:46:45.848602+00:00",
        "effect": "Permit"
    }
    

Alternatively, you can also copy and paste Cedar policies into Verified Permissions in the AWS Management Console.

Step 5: Connect the Verified Permissions policy store to your OIDC identity provider

By default, the Verified Permissions authorizer middleware reads a JSON Web Token (JWT) provided within the authorizationheader of the API request to get user information. Verified Permissions can validate the token in addition to performing authorization policy evaluation.

  1. To do this, create an identity source in Verified Permissions policy store. To simplify formatting in the AWS CLI command, we’ve defined the identity source configuration in identity-source-configuration.txtReplace the <userPoolArn> and <clientId> parameters in the following code block based on the outputs of running the setup-infrastructure.sh script in Step 2 of the prerequisites.
    // identity-source-configuration.txt
    {
        "cognitoUserPoolConfiguration": {
            "userPoolArn": "<userPoolArn>",
            "clientIds":["<clientId>"] ,
            "groupConfiguration": {
                  "groupEntityType": "PetStoreApp::UserGroup"
            }
        }
    }
    

  2. After you update the file, run the following command to update the Verified Permissions policy store. Replace <policy store id> with the actual policy store ID.
    aws verifiedpermissions create-identity-source --configuration file://identity-source-configuration.txt --policy-store-id <policy store id> --principal-entity-type PetStoreApp::User
    

Example successful command output:

{
    "createdDate": "2025-06-05T20:02:53.992782+00:00",
    "identitySourceId": "DTLvwdiKfdPmk2RWzSVfu2",
    "lastUpdatedDate": "2025-06-05T20:02:53.992782+00:00",
    "policyStoreId": "AAAAbbbbCCCCdddd"
}

Step 6: Update the application code to call Verified Permissions to authorize API access 

You now need to update the application to use the @verifiedpermissions/authorization-clients and @cedar-policy/authorization-for-expressjs dependencies. This will allow the application to call Verified Permissions to authorize the API requests.

  1. Add the dependencies and define the CedarAuthorizerMiddleware and AVPAuthorizer in the application by adding the following block of code to line 13 (directly after the import statements) of backend/app.ts. Replace <policystoreId> in the following code block with your actual Verified Permissions policy store ID.
    const { ExpressAuthorizationMiddleware } = require('@cedar-policy/authorization-for-expressjs');
    
    const { AVPAuthorizationEngine } = require('@verifiedpermissions/authorization-clients');
    
    const avpAuthorizationEngine = new AVPAuthorizationEngine({
        policyStoreId: <policyStoreId>,
        callType: 'identityToken'
    });
    
    const expressAuthorization = new ExpressAuthorizationMiddleware({
        schema: {
            type: 'jsonString',
            schema: fs.readFileSync(path.join(__dirname, '../v4.cedarschema.json'), 'utf8'),
        },
        authorizationEngine: avpAuthorizationEngine,
        principalConfiguration: { type: 'identityToken' },
        skippedEndpoints: [],
        logger: {
            debug: (s: any) => console.log(s),
            log: (s: any) => console.log(s),
        }
    });
    

  2. Configure the Express application to use the authorization middleware that you just defined. To do this, add the following line of code to the end of the block of app.use(..) statements that begin after the comment // Configure security and performance middleware (approximately line 48 depending on how you pasted the previous block of code).
    app.use(expressAuthorization.middleware);
    

You’ve now successfully set up authorization in your application by creating a Verified Permissions policy store, writing Cedar policies to define your authorization, and integrating your application with Verified Permissions.

Validating API security

You can use the frontend web application to verify that authorization has been applied to the APIs. In two separate terminals run the following commands in the /start directory

./scripts/run-backend-dev.sh
./scripts/run-frontend-dev.sh

In a browser navigate to http://localhost:3001 and sign in with one of the Amazon Cognito users you created earlier. Validate that the permissions policies are working as expected:

  • Administrators: Can view, create, update, and delete pets.
  • Employees: Can view, create, and update pets.
  • Customers: Can view pets and create new pets.

In the terminal for the Express application, you can see log output that provides additional details about the authorization decisions. For example, following an unauthorized action the terminal outputs the following:

Authorization result: {"type":"deny"}

Conclusion

The new @verifiedpermissions/authorization-clients-js package allows Express developers to integrate their application with Verified Permissions to decouple authorization logic from code. By decoupling your authorization logic and integrating your application with the Verified Permissions, you can improve developer productivity and simplify permissions and access audits.

To support analyzing and auditing permissions when writing cedar policies the open source Cedar project also recently open sourced the Cedar Analysis CLI to help developers perform policy analysis on their policies. You can learn more about this new tool in Introducing Cedar Analysis: Open Source Tools for Verifying Authorization Policies.

The framework packages are open source and available on GitHub under the Apache 2.0 license, with distribution through NPM. To learn more, see Amazon Verified Permissions and Cedar.

If you have feedback about this post, submit comments in the Comments section below.

Trevor Schiavone

Trevor Schiavone

Trevor is a Senior Solutions Architect at AWS. He works with customers to build secure, scalable, and innovative architectures. When not at work he’s usually out running, cycling, or travelling to new countries.

Rickard Lofstrom

Rickard Löfström

Ricard guides enterprises in building secure cloud environments as a Specialist Solution Architect in the AWS EMEA Security & Compliance team. He advises customers on implementing AWS security services, focusing on identity management, data protection, and infrastructure security controls. Rickard translates complex security requirements into technical solutions that enable organizations to meet their security objectives while maintaining operational efficiency.