Post Syndicated from Trevor Schiavone original https://aws.amazon.com/blogs/security/secure-your-express-application-apis-in-minutes-with-amazon-verified-permissions/
Today, Amazon Verified Permissions announced the release of @verifiedpermissions/authorization-clients-js, an open source package that developers can use to implement external fine-grained authorization for Express.js web application APIs in minutes when using Verified Permissions.
Express is a minimal and flexible Node.js web application framework that provides a robust set of features for web and mobile applications. By using this standardized integration with Verified Permissions, developers can externalize authorization using up to 90 percent less code compared to writing their own custom integrations, saving them time and effort and improving application security posture by reducing the amount of custom integration code.
Why externalize authorization?
Traditionally, developers implemented authorization within their application by embedding authorization logic directly into application code. This embedded authorization logic is designed to support a few permissions, but as applications evolve, there is often a need to incrementally update the embedded authorization logic to support more complex use cases, resulting in code that is complex and difficult to maintain. As code complexity increases, further evolving the security model and performing audits of permissions becomes more challenging, resulting in an application that becomes more difficult to maintain over its lifecycle.
By externalizing authorization, you can decouple authorization logic from your application. This yields multiple benefits including freeing up development teams to focus on application logic and simplifying software audits.
One approach to externalize authorization from your application code is to use Cedar. Cedar is an open source language and software development kit (SDK) for writing and enforcing authorization policies for your applications. You specify fine-grained permissions as Cedar policies, and your application authorizes access requests by calling the Cedar SDK. For example, if you’re building a pet store application, you can use the following Cedar policy to control that only a user with a jobLevel of employee can access the POST /pets API.
One option for using Cedar is to self-manage the implementation; you can find an example for this pattern in another post: Secure your application APIs in 5 minutes with Cedar.
Self-managed Cedar provides the benefits of externalizing authorization but requires ongoing operational management. Organizations are responsible for Cedar version upgrades, applying security patches, managing policies, and auditing authorizations. Another option for using Cedar is to use Verified Permissions. Verified Permissions removes these operational requirements by providing a managed service for Cedar. Verified Permissions manages scaling, simplifies policy governance by supporting centralized policy management, and logs policy changes and authorization requests to simplify auditing.
This post describes how web application developers can use the new Express package to simplify the integration of Express web applications with Verified Permissions. The step-by-step guide uses a sample Pet Store application to show how access to APIs can be restricted based on user groups. You can find the sample Pet Store application in the verifiedpermissions repository on GitHub.
Pet Store application API overview
The Pet Store application is used to manage a pet store. The pet store is built using Express with Node.js and exposes the APIs in the following table.
| API | Description |
| GET /api/pets | Returns the list of available pets |
| GET /api/pets/{petId} | Returns the specified pet found |
| POST /api/pets | Adds a pet to the pet store |
| PUT /api/pets/{petId} | Updates an existing pet |
| DELETE /api/pets/{petId} | Removes a pet from the pet store |
This application doesn’t allow all users to access all APIs. Instead, it enforces the following rules:
- Administrators: Full access to pets and management functions
- Employees: Can view, create, and update pets
- Customers: Can view pets and create new pets
Implementing authorization for the Pet Store APIs
Let’s walk through how to secure your application APIs using Verified Permissions and the new package for Express. The initial application, with no authorization, can be found in the start folder; use this to follow along with the post. You can find a completed version of the application in the finish folder.
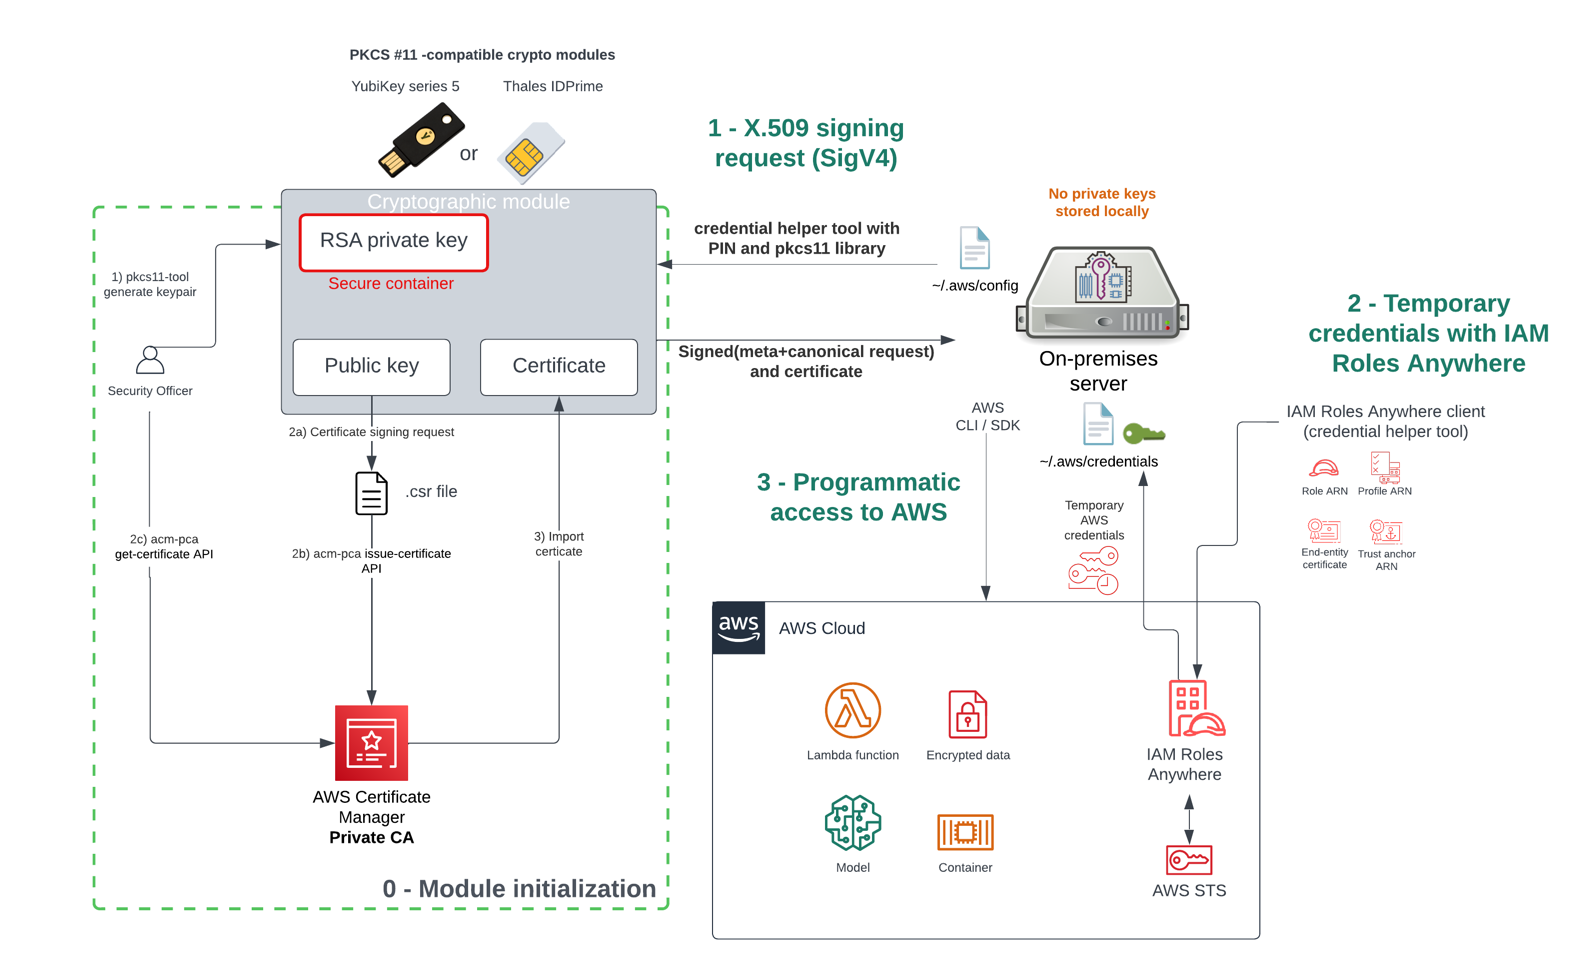
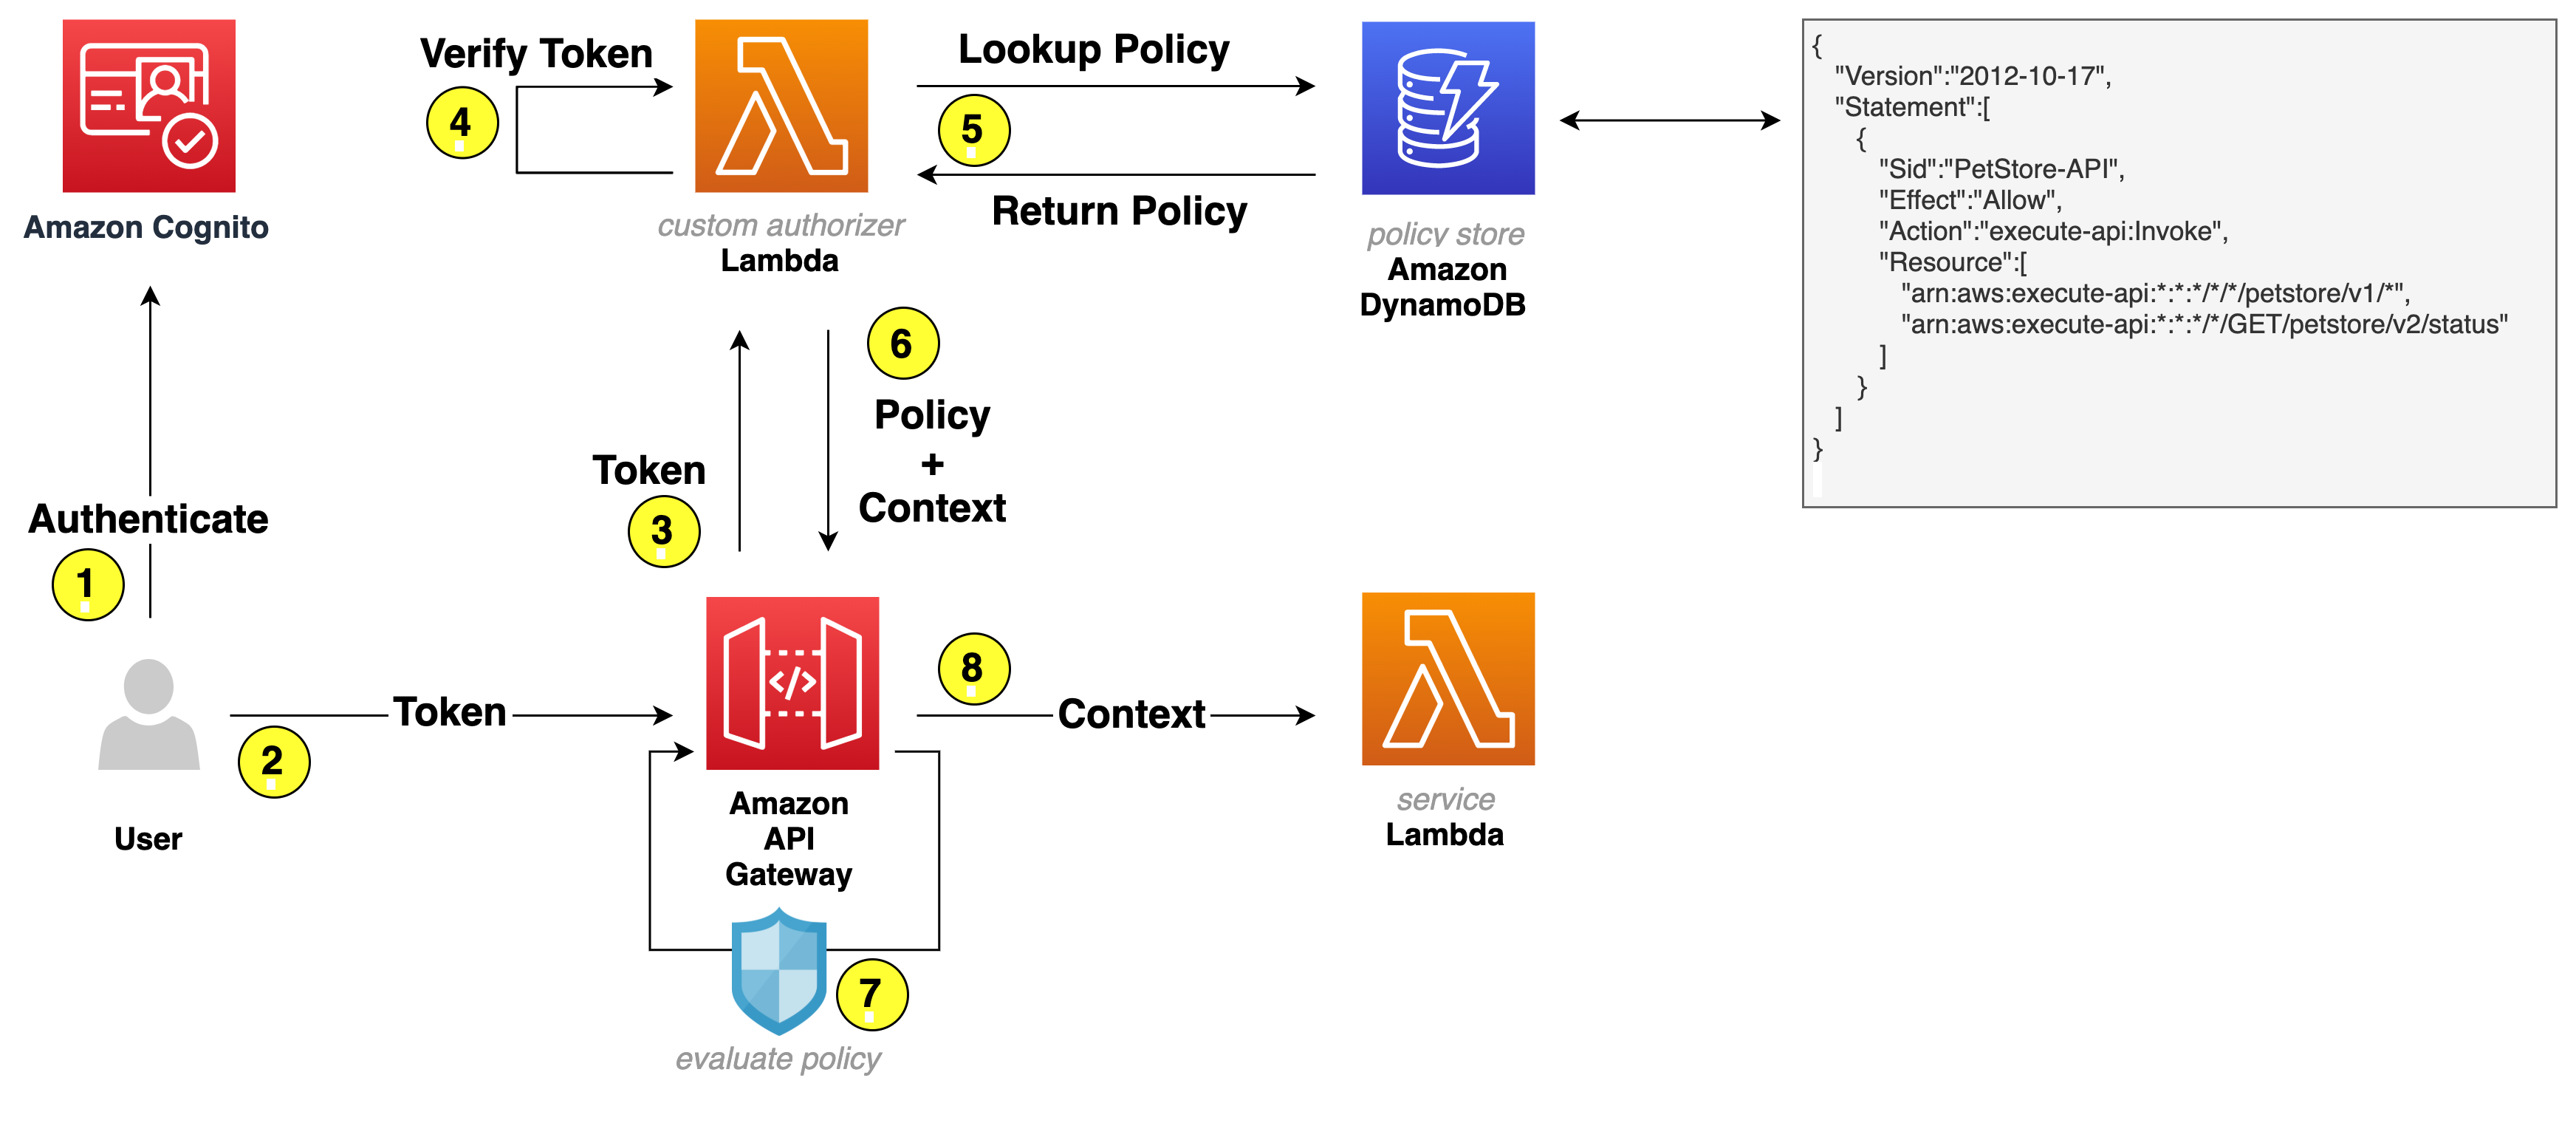
When completed, you’ll have implemented the application architecture shown in Figure 1. A React frontend application that uses Amazon Cognito for authentication. The application then includes the identity token returned from Cognito as an authorization header to the Express backend APIs. The Express backend, using the new Verified Permissions authorization middleware package, calls Verified Permissions to authorize the user request.

Figure 1: Architecture of the Pet Store application
Prerequisites
Before you get started, make sure you have the following prerequisites in place.
Step 1: Set up the AWS CLI
Some of the commands require the AWS Command Line Interface (AWS CLI). See Installing or updating to the latest version of the AWS CLI and Configuring settings for the AWS CLI.
Step 2: Set up an OpenID Connect identity provider and a database
The Pet Store application uses an OpenID Connect (OIDC) identity provider to manage users. For this example, you use an Amazon Cognito user pool called PetStoreUserPool with three users, one Admin, one Employee, and one Customer.
The application also uses a Amazon DynamoDB database to store the pets.
You can set up Amazon Cognito and DynamoDB in your AWS account by running the following command in the /start directory.
The setup script will prompt you to set passwords for the three users (passwords must be at least 8 characters and require at least one number, one uppercase letter, and one lowercase letter).
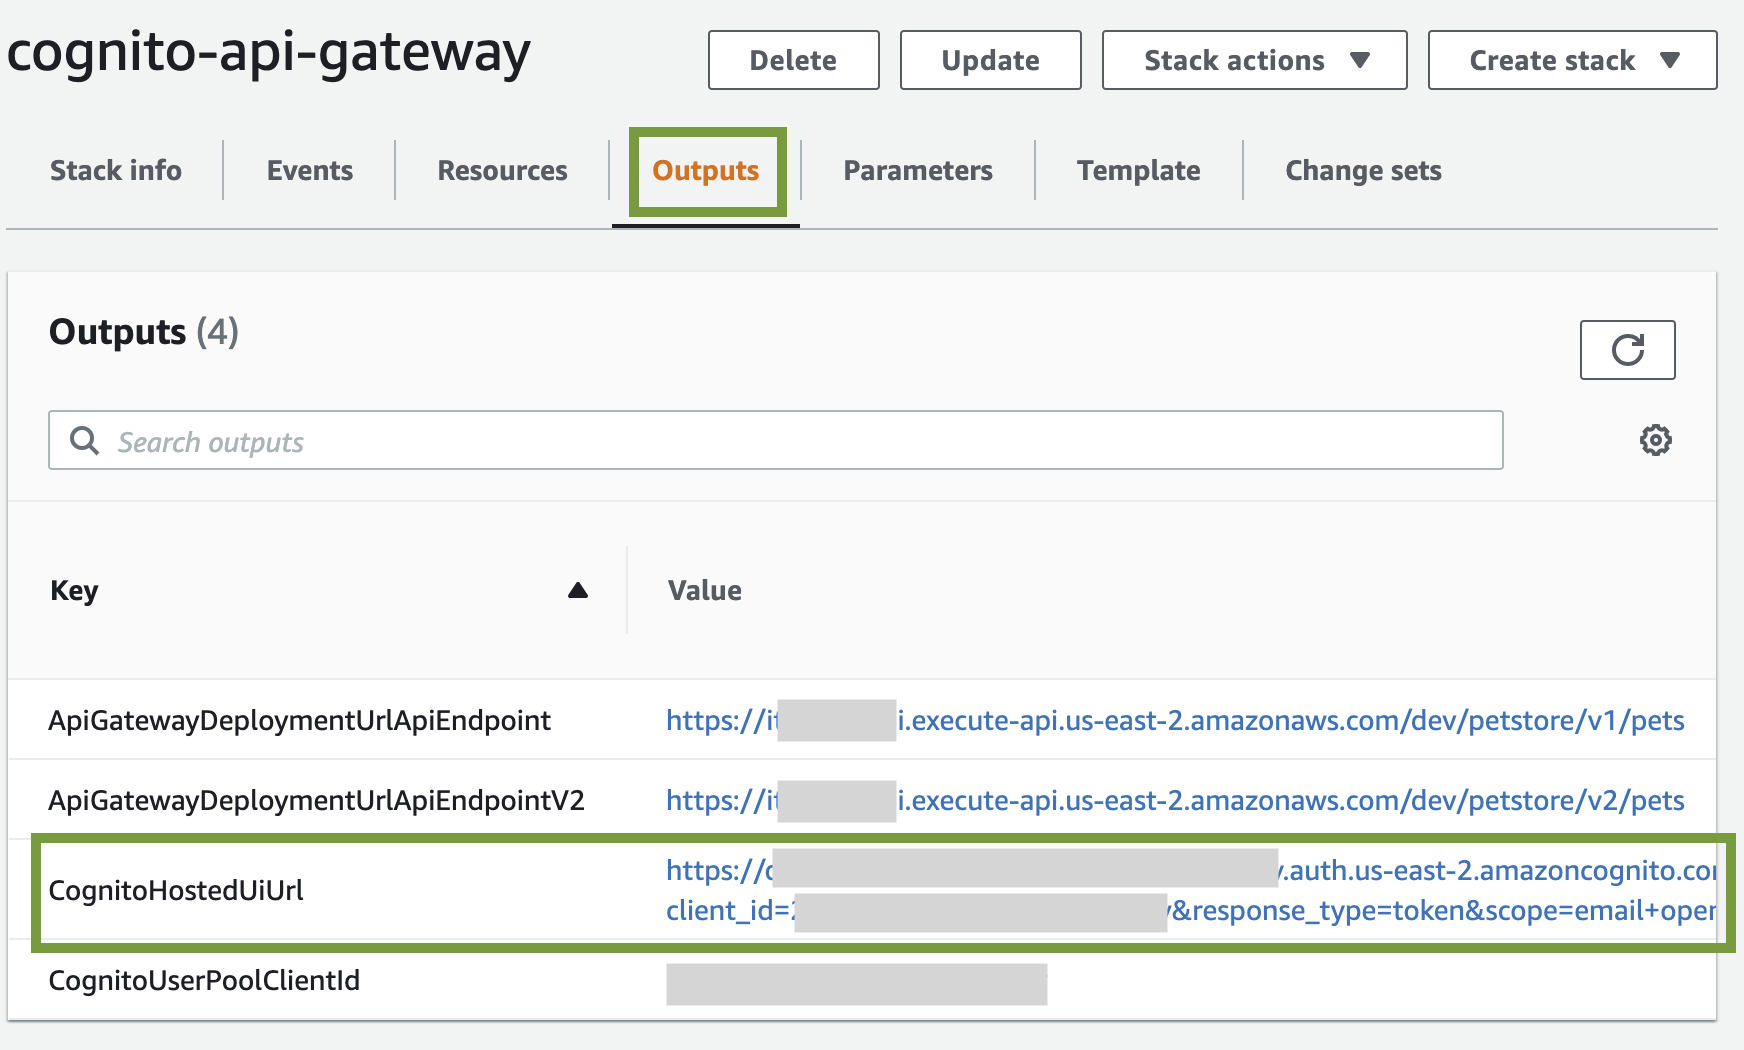
Note the outputs of running this script because you’ll use them in step 5 of Integrate Verified Permissions.
Note: In your own applications, you can set up Amazon Cognito by following the instructions in Create a new application in the Amazon Cognito console, or you can bring your own OIDC identity provider.
Step 3 (optional): Run the application
Now that the infrastructure is set up, you can run the application. In two separate terminals, run the following commands in the /start directory:
Test the application by creating some pets.
Integrate Verified Permissions
With the prerequisites in place, the next step is to integrate Verified Permissions. Verified Permissions can be integrated into an Express application in six steps:
- Create a Verified Permissions policy store
- Add the Cedar and Verified Permissions authorization middleware packages
- Create and deploy a Cedar schema
- Create and deploy Cedar policies
- Connect the Verified Permissions policy store to your OIDC identity provider
- Update the application code to call Verified Permissions to authorize API access
The Verified Permissions integration happens with the Express web application backend. All commands in the section should be run in the /start/backend directory.
Step 1: Create a Verified Permissions policy store
- Create a policy store in Verified Permissions using the AWS CLI by running the following command
Example successful command output:
- Save the
policyStoreIdvalue from the command output to use in step 3.
Step 2: Add the Cedar and Verified Permissions authorization middleware packages
- Run the following command to add two new dependencies on
@verifiedpermissions/authorization-clientsand@cedar-policy/authorization-for-expressjs
Step 3: Create and deploy the Cedar schema
A Cedar schema defines the authorization model for an application, including the entity types in the application and the actions users are allowed to take. You attach your schema to your Verified Permissions policy stores, and when policies are added or modified, the service automatically validates the policies against the schema.
The @cedar-policy/authorization-for-expressjs package can analyze the OpenAPI specification of your application and generate a Cedar schema. Specifically, the paths object in the OpenAPI schema is required in your specification.
If you don’t have an OpenAPI spec, you can generate one using the tool of your choice. There are several open source libraries that you can use to do this for Express; you might need to add some code to your application, generate the OpenAPI spec, and then remove the code. Alternatively, some generative AI based tools such as the Amazon Q Developer CLI are effective at generating OpenAPI spec documents. Regardless of how you generate the spec, be sure to validate the correct output from the tool.
For the sample application an OpenAPI spec document has been included and is named openapi.json.
- Run the following command to generate the Cedar schema.
Example successful command output:
- Next, format the Cedar schema for use with the AWS CLI. The specific format required is described in the documentation Amazon Verified Permissions policy store schema. To format the Cedar schema run the following command.
Example successful command output:
- After the schema is formatted, run the following command to upload the schema to Verified Permissions. Note that you need to replace
<policy store id>with the actual policy store ID, which is provided as an output from the command in step 1.Example successful command output:
Step 4: Create and deploy Cedar policies
If no policies are configured, Cedar denies authorization requests. The next step is to create policies that will allow specific user groups access to specific resources. The Express framework integration helps bootstrap this process by generating example policies based on the previously generated schema. You can then then customize these policies based on your use cases.
- Run the following command to generate sample Cedar policies.
Example successful command output:
Two sample policies are generated in the
/policiesdirectory:policy_1.cedarandpolicy_2.cedar.policy_1.cedarprovides permissions for users in theadminuser group to perform any action on any resource.policy_2.cedarprovides more access to the individual actions defined in the Cedar schema with a place holder for a specific group.Note that if you specified an
operationIdin the OpenAPI specification, the action names defined in the Cedar Schema will use thatoperationIdinstead of the default<HTTP Method> /<PATH>format. In this case, make sure that the naming of your actions in your Cedar policies matches the naming of your actions in your Cedar schema.For example, if you want to call your action
AddPetinstead ofPOST /pets, you could set theoperationIdin your OpenAPI specification toAddPet. The resulting action in the Cedar policy would bePetStoreApp::Action::"AddPet"Create a third policy file called
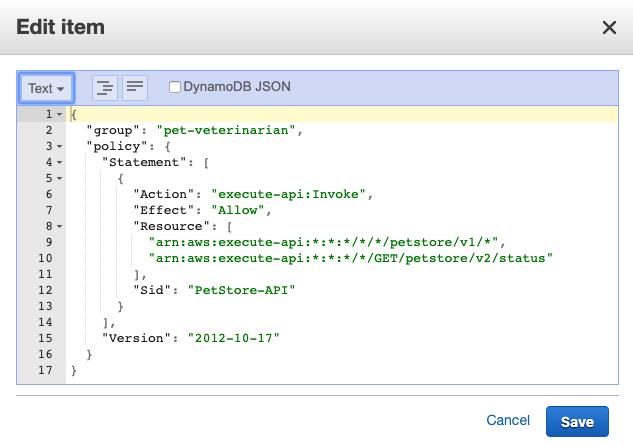
policy_3.cedarand then replace the contents of each file with the following policies. Replace<userpoolId>in each policy with the Cognito User Pool Id copied earlier.Note: In a real use case, consider renaming your Cedar policy files based on their contents, for example,
allow_customer_group.cedar. - The policies need to be formatted so that they work with the AWS CLI for Verified Permissions. The specific format is described in the AWS CLI Verified Permissions documentation. Run the following command to format the policies.
Example successful command output:
The formatted policies will be output to the
backend/policies/json/directory. - After formatting the policies, run the following three commands, one for each policy, to upload them to Verified Permissions. The policy store ID is returned after completing step 2. Replace
<policy store id>with the actual policy store ID.Example successful command output:
Alternatively, you can also copy and paste Cedar policies into Verified Permissions in the AWS Management Console.
Step 5: Connect the Verified Permissions policy store to your OIDC identity provider
By default, the Verified Permissions authorizer middleware reads a JSON Web Token (JWT) provided within the authorizationheader of the API request to get user information. Verified Permissions can validate the token in addition to performing authorization policy evaluation.
- To do this, create an identity source in Verified Permissions policy store. To simplify formatting in the AWS CLI command, we’ve defined the identity source configuration in
identity-source-configuration.txtReplace the<userPoolArn>and<clientId>parameters in the following code block based on the outputs of running thesetup-infrastructure.sh scriptin Step 2 of the prerequisites. - After you update the file, run the following command to update the Verified Permissions policy store. Replace
<policy store id>with the actual policy store ID.
Example successful command output:
Step 6: Update the application code to call Verified Permissions to authorize API access
You now need to update the application to use the @verifiedpermissions/authorization-clients and @cedar-policy/authorization-for-expressjs dependencies. This will allow the application to call Verified Permissions to authorize the API requests.
- Add the dependencies and define the
CedarAuthorizerMiddlewareandAVPAuthorizerin the application by adding the following block of code to line 13 (directly after the import statements) ofbackend/app.ts. Replace<policystoreId>in the following code block with your actual Verified Permissions policy store ID. - Configure the Express application to use the authorization middleware that you just defined. To do this, add the following line of code to the end of the block of
app.use(..)statements that begin after the comment// Configure security and performance middleware(approximately line 48 depending on how you pasted the previous block of code).
You’ve now successfully set up authorization in your application by creating a Verified Permissions policy store, writing Cedar policies to define your authorization, and integrating your application with Verified Permissions.
Validating API security
You can use the frontend web application to verify that authorization has been applied to the APIs. In two separate terminals run the following commands in the /start directory
In a browser navigate to http://localhost:3001 and sign in with one of the Amazon Cognito users you created earlier. Validate that the permissions policies are working as expected:
- Administrators: Can view, create, update, and delete pets.
- Employees: Can view, create, and update pets.
- Customers: Can view pets and create new pets.
In the terminal for the Express application, you can see log output that provides additional details about the authorization decisions. For example, following an unauthorized action the terminal outputs the following:
Conclusion
The new @verifiedpermissions/authorization-clients-js package allows Express developers to integrate their application with Verified Permissions to decouple authorization logic from code. By decoupling your authorization logic and integrating your application with the Verified Permissions, you can improve developer productivity and simplify permissions and access audits.
To support analyzing and auditing permissions when writing cedar policies the open source Cedar project also recently open sourced the Cedar Analysis CLI to help developers perform policy analysis on their policies. You can learn more about this new tool in Introducing Cedar Analysis: Open Source Tools for Verifying Authorization Policies.
The framework packages are open source and available on GitHub under the Apache 2.0 license, with distribution through NPM. To learn more, see Amazon Verified Permissions and Cedar.
If you have feedback about this post, submit comments in the Comments section below.