All posts by Vinodh Kannan Sadayamuthu

IAM authentication with OAuth 2.0 for Amazon MQ for RabbitMQ

Post Syndicated from Vinodh Kannan Sadayamuthu original https://aws.amazon.com/blogs/big-data/iam-authentication-with-oauth-2-0-for-amazon-mq-for-rabbitmq/

This is Part 3 of a three-part series on authentication and authorization for Amazon MQ for RabbitMQ. For an overview of all available methods, see Authentication and Authorization Options for Amazon MQ for RabbitMQ. For certificate-based mTLS and SSL authentication, see Part 1. For OAuth 2.0, LDAP, Entra ID, and HTTP authentication, see Part 2.

When you run Amazon MQ for RabbitMQ at scale without AWS Identity and Access Management (IAM) authentication, you face a common challenge: managing static credentials across multiple services, each requiring its own username and password. This approach creates operational overhead through password rotation, credential distribution, and the risk of inadvertent secret disclosure. IAM authentication with OAuth 2.0 removes these static credentials. Clients authenticate with their existing IAM identity instead.

This post covers the key configuration options for using IAM as an OAuth 2.0 provider and demonstrates a multi-tenant use case with vhost-level isolation enforced by IAM roles and broker-level scope aliases.

Amazon MQ for RabbitMQ supports IAM-based authentication through OAuth 2.0, so you have centralized access control without managing broker-local credentials. The clients authenticate using their existing IAM identity. Tokens expire automatically, and access control lives entirely in IAM roles and broker configuration.

Note: IAM authentication for Amazon MQ for RabbitMQ requires RabbitMQ versions 3.13 and 4.2 or later. Amazon MQ for ActiveMQ brokers doesn’t support this feature.

Important: IAM outbound federation must be configured and available in your AWS account before you enable IAM authentication on your broker.

Overview

This post covers two aspects of IAM-based authentication for Amazon MQ for RabbitMQ:

  1. IAM as an OAuth 2.0 identity provider: How Amazon MQ uses IAM outbound federation and the RabbitMQ OAuth 2.0 plugin to authenticate clients using short-lived JSON Web Tokens (JWTs) issued by AWS Security Token Service (AWS STS), eliminating broker-local credentials.
  2. Multi-tenant isolation with IAM roles and scope aliases: How per-tenant IAM roles combined with RabbitMQ scope aliases restrict access to specific virtual hosts (vhosts), enforcing tenant isolation at both the authentication and broker layers.

Both capabilities work together to provide credential-free authentication, centralized access control, and a comprehensive audit trail through AWS CloudTrail.

How IAM authentication works

IAM authentication for Amazon MQ for RabbitMQ uses the RabbitMQ OAuth 2.0 plugin with IAM serving as the identity provider through IAM outbound federation. Instead of managing usernames and passwords in the broker, clients authenticate using short-lived JWTs issued by AWS STS.

When a client connects to a broker configured with IAM authentication:

  1. The client application uses its IAM credentials from an IAM role attached to its AWS Lambda function, Amazon Elastic Container Service (Amazon ECS) task, Amazon Elastic Kubernetes Service (Amazon EKS) pod, or Amazon Elastic Compute Cloud (Amazon EC2) instance to call AWS STS.
  2. AWS STS evaluates the caller’s IAM policies for sts:GetWebIdentityToken.
  3. If the policy allows the request, AWS STS issues a signed JWT that encodes the caller’s identity and the permitted RabbitMQ scopes.
  4. The client connects to the Amazon MQ broker and presents the JWT as an OAuth 2.0 bearer token (passed as the password).
  5. The broker retrieves the AWS STS public keys through the JSON Web Key Set (JWKS) endpoint and validates the token signature, expiration, and audience claim.
  6. The broker extracts the caller’s IAM role ARN from the token’s sub claim, matches it against configured scope aliases, and grants the corresponding RabbitMQ permissions.

The following diagram shows the IAM authentication flow.
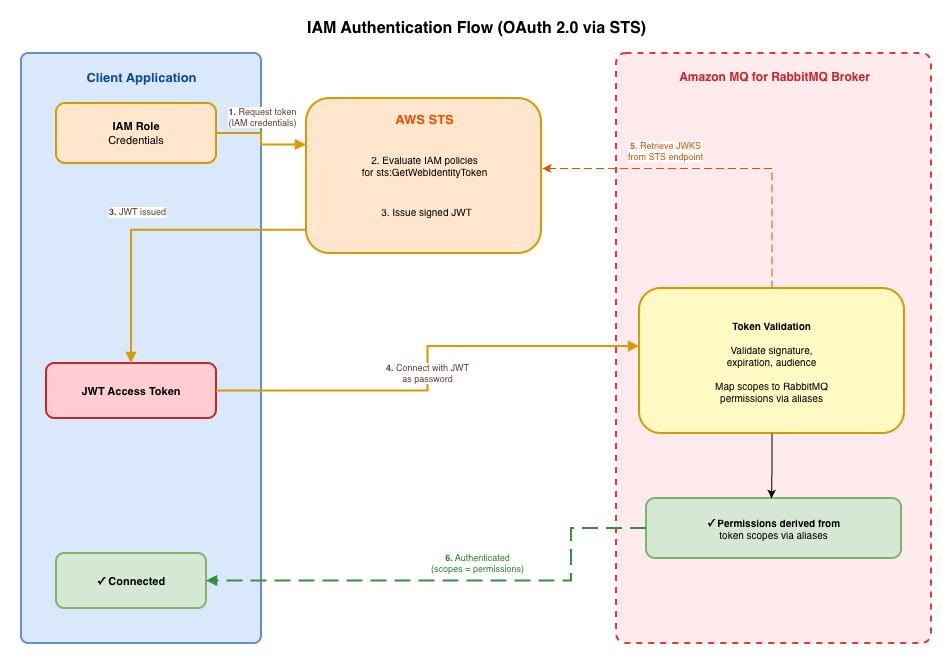
IAM authentication flow from a client IAM role through AWS STS token issuance to broker validation through the JWKS endpoint

Benefits over traditional username/password authentication

The following table compares traditional username/password authentication with IAM-based OAuth 2.0 authentication across the operational dimensions that matter most at scale.

Aspect Traditional (username/password) IAM-based (OAuth 2.0 JWT)
Credential management Manual creation, distribution, and rotation Automatic through IAM roles. No broker-local credentials
Credential lifetime Static until manually rotated Short-lived (5 minutes–1 hour). Automatic expiration
Access control Broker-local permissions per user Centralized through IAM roles mapped to broker scope aliases
Audit trail Broker logs only AWS CloudTrail logs every token issuance and policy evaluation
Tenant isolation Manual permission configuration per user Per-role scope aliases enforce vhost restrictions at the broker
Onboarding/offboarding Create/delete RabbitMQ users and distribute credentials Create/delete IAM roles. No credential distribution needed

Key configuration

The following rabbitmq.conf snippet shows the essential settings for IAM-based OAuth 2.0 authentication:

# Enable OAuth 2.0 authentication with IAM, with internal as fallback
auth_backends.1 = oauth2
auth_backends.2 = internal

# Token validation - account-specific JWKS endpoint
auth_oauth2.jwks_uri = https://<issuer-id>.tokens.sts.global.api.aws/.well-known/jwks.json
auth_oauth2.https.hostname_verification = wildcard

# Resource server configuration
auth_oauth2.resource_server_id = rabbitmq
auth_oauth2.scope_prefix = rabbitmq/

# Required: extract identity from the 'sub' claim in STS JWTs
auth_oauth2.additional_scopes_key = sub

# Scope alias maps IAM role ARN to RabbitMQ permissions
auth_oauth2.scope_aliases.1.alias = arn:aws:iam::<account-id>:role/RabbitMqAdminRole
auth_oauth2.scope_aliases.1.scope = rabbitmq/tag:administrator rabbitmq/read:*/* rabbitmq/write:*/* rabbitmq/configure:*/*

# Enable OAuth for the Management UI
management.oauth_enabled = true

Note: The auth_oauth2.jwks_uri value is account-specific. Obtain it by running aws iam enable-outbound-web-identity-federation, which returns an issuer identifier URL. Append /.well-known/jwks.json to form the full JWKS URI.

The following table describes each configuration setting shown in the preceding snippet.

Setting Purpose
auth_backends.1 = oauth2 Enables the OAuth 2.0 authentication backend
auth_backends.2 = internal Fallback to internal auth for the system monitoring user
auth_oauth2.jwks_uri Account-specific JWKS endpoint (from IAM outbound federation) for validating token signatures
auth_oauth2.resource_server_id Identifies this broker as a resource server. Must match the --audience value used when requesting tokens
auth_oauth2.scope_prefix Prefix applied to scope values (for example, rabbitmq/)
auth_oauth2.additional_scopes_key JWT claim key where RabbitMQ looks for the identity used in scope alias matching (must be sub for STS JWTs)
auth_oauth2.scope_aliases..alias The IAM role ARN that maps to a set of RabbitMQ permissions
auth_oauth2.scope_aliases..scope The RabbitMQ permissions granted when the alias matches
auth_oauth2.https.hostname_verification Set to wildcard for AWS STS endpoint certificate validation
management.oauth_enabled Enables OAuth token authentication for the Management API/UI

IAM policy with vhost restriction

The IAM policy condition is what enforces tenant isolation at the authentication layer. The following policy restricts a role to requesting tokens scoped to a specific vhost:

{
    "Version": "2012-10-17",
    "Statement": [
        {
            "Effect": "Allow",
            "Action": [
                "sts:GetWebIdentityToken",
                "sts:TagGetWebIdentityToken"
            ],
            "Resource": "*"
        }
    ]
}
Policy element Purpose
sts:GetWebIdentityToken Authorizes JWT token issuance through STS
sts:TagGetWebIdentityToken Allows attaching request tags (such as scope) to the token request

Vhost-level isolation is enforced at the broker layer through scope aliases (see the following Multi-tenant isolation with IAM section), not through IAM policy conditions. Each IAM role maps to a specific set of RabbitMQ permissions through the broker configuration, and the broker denies any access not granted by the matching scope alias.

Important considerations

  • IAM authentication is supported on Amazon MQ for RabbitMQ versions 3.13 and 4.2 or later. It isn’t supported on Amazon MQ for ActiveMQ brokers.
  • IAM authentication requires IAM outbound federation to be configured and available in your AWS account. Make sure that the outbound federation is enabled before configuring IAM-based authentication on your broker.
  • With AWS STS, you can request web identity tokens with a duration between 300 seconds (5 minutes) and 3600 seconds (1 hour) with the --duration-seconds parameter. Implement token caching and refresh logic in your client applications to avoid requesting a new token on every connection.
  • Don’t embed IAM user credentials in application code or environment variables. Attach IAM roles to AWS Lambda functions, Amazon ECS tasks, Amazon EKS pods, or Amazon EC2 instances so that credentials are issued and rotated automatically by the AWS runtime.
  • The IAM policy evaluation happens before any broker interaction. If the policy denies the sts:GetWebIdentityToken request, AWS STS returns AccessDenied and no connection is attempted.
  • Amazon MQ automatically creates a system user named monitoring-AWS-OWNED-DO-NOT-DELETE with monitoring-only permissions. This user uses RabbitMQ’s internal authentication system even on IAM-enabled brokers, and Amazon MQ restricts it to loopback interface access only.

Limitations

  • Scope claim configuration: You can’t use a scope claim directly because the JWT token from AWS STS places the caller’s identity (IAM role ARN) in the sub claim rather than a standard scope claim. This requires setting auth_oauth2.additional_scopes_key = sub and using scope aliases in the RabbitMQ configuration to map IAM role ARNs to RabbitMQ permissions. This limitation also prevents using IAM policies for authorization fully, requiring RabbitMQ configuration for authorization instead.

For information about how to configure IAM authentication and authorization for your Amazon MQ for RabbitMQ brokers, see the following Implementation guide section.

Multi-tenant isolation with IAM

IAM-based authentication is particularly effective for multi-tenant architectures where you need to enforce data isolation across a shared RabbitMQ infrastructure. By combining per-tenant IAM roles with RabbitMQ scope aliases, you enforce isolation at three layers:

  • IAM layer: Trust policies restrict which principals (Lambda functions, ECS tasks, EKS pods) can assume each tenant’s IAM role. A service belonging to Tenant A cannot assume Tenant B’s role.
  • Broker layer: Scope aliases make sure that each role ARN only receives permissions for its own vhost. Even if a client attempts to connect to a different vhost, the broker denies access because the token’s sub claim maps to permissions for a different vhost only.
  • Audit layer: CloudTrail logs every role assumption and AWS STS token request, including the IAM principal and whether the request was granted or denied.

The following diagram shows the multi-tenant architecture.
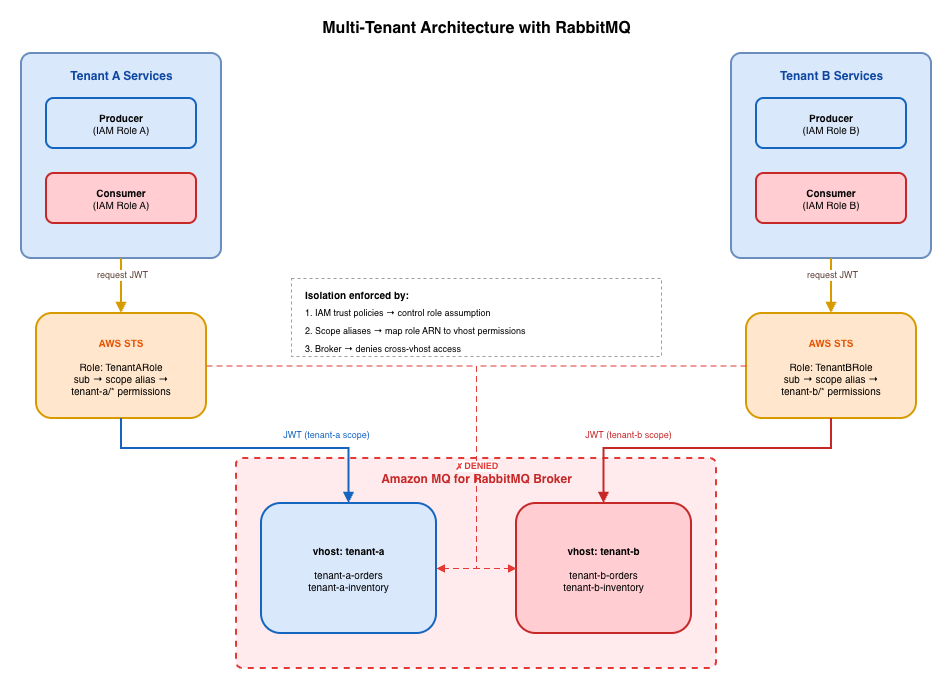
Multi-tenant architecture where per-tenant IAM roles map through AWS STS and broker scope aliases to isolated tenant-a and tenant-b vhosts

Broker configuration for multi-tenant isolation

AMQP-only access (default): For tenants that connect through AMQP to produce and consume messages:

# Tenant A - AMQP access to tenant-a vhost only
auth_oauth2.scope_aliases.2.alias = arn:aws:iam::<account-id>:role/TenantARole
auth_oauth2.scope_aliases.2.scope = rabbitmq/configure:tenant-a/* rabbitmq/write:tenant-a/* rabbitmq/read:tenant-a/*

# Tenant B - AMQP access to tenant-b vhost only
auth_oauth2.scope_aliases.3.alias = arn:aws:iam::<account-id>:role/TenantBRole
auth_oauth2.scope_aliases.3.scope = rabbitmq/configure:tenant-b/* rabbitmq/write:tenant-b/* rabbitmq/read:tenant-b/*

With Management API access (optional): For tenants that also need HTTP API access for monitoring or management:

# Tenant A - AMQP + Management API access to tenant-a vhost
auth_oauth2.scope_aliases.2.alias = arn:aws:iam::<account-id>:role/TenantARole
auth_oauth2.scope_aliases.2.scope = rabbitmq/tag:management rabbitmq/configure:tenant-a/* rabbitmq/write:tenant-a/* rabbitmq/read:tenant-a/*

# Tenant B - AMQP + Management API access to tenant-b vhost
auth_oauth2.scope_aliases.3.alias = arn:aws:iam::<account-id>:role/TenantBRole
auth_oauth2.scope_aliases.3.scope = rabbitmq/tag:management rabbitmq/configure:tenant-b/* rabbitmq/write:tenant-b/* rabbitmq/read:tenant-b/*

The tag:management scope grants access to the RabbitMQ Management HTTP API, limited to resources the tenant already has permissions for. Most producer/consumer workloads (Lambda, ECS tasks) connect through AMQP and do not need this tag. Add it only for tenants that require monitoring or management capabilities through the HTTP API.

How isolation is enforced

When Tenant A’s service connects to the broker:

  1. The service assumes TenantARole using its attached IAM role credentials.
  2. AWS STS issues a JWT with sub = arn:aws:iam::<account-id>:role/TenantARole.
  3. The service connects to the broker with the JWT as the password.
  4. The broker matches the sub claim against scope aliases and grants configure:tenant-a/*, write:tenant-a/*, and read:tenant-a/*.
  5. If the service attempts to connect to vhost tenant-b, the broker returns NOT_ALLOWED - access to vhost 'tenant-b' refused for user 'arn:aws:iam::<account-id>:role/TenantARole'.

Trust policy for tenant isolation

Each tenant role uses a trust policy that restricts which principals can assume it:

{
    "Version": "2012-10-17",
    "Statement": [
        {
            "Effect": "Allow",
            "Principal": {
                "AWS": "arn:aws:iam::<account-id>:role/TenantAServiceRole"
            },
            "Action": "sts:AssumeRole"
        }
    ]
}

This ensures that only Tenant A’s services can obtain tokens that map to Tenant A’s vhost permissions.

Client authentication pattern

Each client application uses its IAM role credentials to obtain a short-lived token from AWS STS, then presents that token as the password when connecting to the broker:

import boto3
import pika
import ssl

class TokenManager:
    def __init__(self):
        self.sts_client = boto3.client("sts")

    def get_token(self, role_arn: str) -> str:
        # Assume the tenant's IAM role
        assumed = self.sts_client.assume_role(
            RoleArn=role_arn,
            RoleSessionName="rabbitmq-session"
        )
        # Create STS client with assumed role credentials
        sts = boto3.client(
            "sts",
            aws_access_key_id=assumed["Credentials"]["AccessKeyId"],
            aws_secret_access_key=assumed["Credentials"]["SecretAccessKey"],
            aws_session_token=assumed["Credentials"]["SessionToken"],
        )
        # Get web identity token
        response = sts.get_web_identity_token(
            Audience=["rabbitmq"],
            SigningAlgorithm="ES384",
            DurationSeconds=300,
        )
        return response["WebIdentityToken"]

class RabbitMQClient:
    def __init__(self, broker_host: str, vhost: str, role_arn: str):
        self.broker_host = broker_host
        self.vhost = vhost
        self.role_arn = role_arn
        self.token_manager = TokenManager()

    def connect(self) -> pika.channel.Channel:
        token = self.token_manager.get_token(self.role_arn)
        credentials = pika.PlainCredentials(
            username="", password=token
        )
        parameters = pika.ConnectionParameters(
            host=self.broker_host,
            port=5671,
            virtual_host=self.vhost,
            credentials=credentials,
            ssl_options=pika.SSLOptions(ssl.create_default_context()),
        )
        return pika.BlockingConnection(parameters).channel()

The token manager caches tokens and refreshes them before expiration, so your application does not request a new token on every connection. For long-running connections outside Lambda (such as Amazon ECS tasks or EC2-hosted services), add connection recovery logic to handle token expiry gracefully and reconnect with a fresh token when needed.

Comparing IAM authentication with other approaches

The following table compares IAM authentication with the other authentication methods available for Amazon MQ for RabbitMQ, so you can choose the approach that best fits your security and operational requirements.

Aspect IAM (OAuth 2.0 through STS) OAuth 2.0 (external IdP) Username/Password
Identity provider IAM / STS External OAuth 2.0 IdP Broker-local
Credential type Short-lived JWT Short-lived JWT Static password
Credential management Automatic through IAM roles Managed by external IdP Manual creation and rotation
Tenant isolation Per-role scope aliases restrict vhost access at the broker layer Token scopes Manual per-user permissions
Audit trail AWS CloudTrail IdP-specific logs Broker logs only
AWS integration Native (IAM roles, STS, CloudTrail) Requires external IdP configuration None

Implementation guide

Cleaning up

To avoid ongoing charges, delete the resources you created during this walkthrough:

  1. Delete the test IAM roles (TenantARole, TenantBRole) and their associated trust policies.
  2. If you created a dedicated Amazon MQ broker for testing, delete the broker from the Amazon MQ console.
  3. Remove any test virtual hosts and their queues from your broker configuration.

For production deployments, retain your IAM roles and broker configuration but review your scope aliases periodically to remove unused tenant mappings.

Conclusion

This post demonstrated how IAM-based OAuth 2.0 authentication works for Amazon MQ for RabbitMQ, and how per-tenant IAM roles combined with broker scope aliases enforce multi-tenant isolation. Clients authenticate using their existing IAM roles, AWS STS issues short-lived JWTs, and the broker validates tokens using the AWS STS JWKS endpoint. Scope aliases map each role ARN to vhost-specific permissions, ensuring tenants can only access their own resources.

Combined with the certificate-based authentication covered in Part 1 and the OAuth 2.0, LDAP, Entra ID, and HTTP integrations covered in Part 2, you now have a detailed picture of the authentication and authorization options available for Amazon MQ for RabbitMQ. Choose the approach that fits your identity infrastructure or combine multiple methods for defense-in-depth security.

If you have questions or feedback about this post, leave a comment in the Comments section. For troubleshooting help, visit the AWS re:Post community for Amazon MQ.

For more information about Amazon MQ security, see the following resources:


About the authors

Vinodh Kannan Sadayamuthu

Vinodh Kannan Sadayamuthu

Vinodh is a Senior Specialist Solutions Architect at Amazon Web Services (AWS). His expertise centers on AWS messaging and streaming services, where he provides architectural best practices consultation to AWS customers.

Paras Jain

Paras Jain

Paras is a Senior Solutions Architect at AWS. He works with Security Independent Software Vendors (ISVs) to build and deploy scalable, secure, and resilient applications. He lives in Ashburn, VA and enjoys spending time with his wife, two kids, and a dog.

OAuth 2.0, LDAP, and HTTP auth for Amazon MQ for RabbitMQ

Post Syndicated from Vinodh Kannan Sadayamuthu original https://aws.amazon.com/blogs/big-data/oauth-2-0-ldap-and-http-auth-for-amazon-mq-for-rabbitmq/

This is Part 2 of a three-part series on authentication and authorization for Amazon MQ for RabbitMQ. For an overview of all available methods, see Authentication and Authorization Options for Amazon MQ for RabbitMQ. For certificate-based mTLS and SSL authentication, see Part 1. For AWS Identity and Access Management (IAM) authentication, see Part 3.

When you deploy Amazon MQ for RabbitMQ in an enterprise environment, authentication quickly becomes more complex than a single broker configuration. Your organization might already have an Active Directory managing thousands of users, or a cloud identity provider handling application access, or workloads that require short-lived, token-based credentials. Maintaining a separate set of static RabbitMQ credentials alongside these systems creates operational overhead and introduces security gaps. This is especially true when users change roles, leave the organization, or when credentials need to be rotated across multiple brokers.

Amazon MQ for RabbitMQ supports OAuth 2.0, LDAP, and HTTP-based authentication backends, so you can connect your broker directly to the identity infrastructure you already use. This post explains how each approach works, highlights the key configurations, and helps you decide which one fits your use case.

Overview

This post covers three authentication and authorization integrations for Amazon MQ for RabbitMQ:

  1. OAuth 2.0: Token-based authentication where clients obtain short-lived tokens from an identity provider and present them to the broker as bearer credentials. The broker validates tokens using JSON Web Key Sets (JWKS) and derives permissions from token scopes.
  2. LDAP: Directory-based authentication where the broker delegates credential verification to an LDAP directory such as Active Directory. Users authenticate with their directory credentials, and RabbitMQ permissions map to LDAP group memberships.
  3. HTTP authentication backend: A flexible approach where the broker delegates authentication and authorization decisions to an external HTTP service, so you can implement custom logic or integrate with identity systems that don’t support OAuth 2.0 or LDAP natively.

All three approaches eliminate the need to manage broker-local credentials. They provide centralized user management, fine-grained access control, and audit capabilities through your existing identity infrastructure.

How OAuth 2.0 authentication works

OAuth 2.0 authentication eliminates static broker credentials by using short-lived tokens issued by an external identity provider. Instead of storing usernames and passwords in the broker, clients obtain access tokens and present them as credentials when connecting.

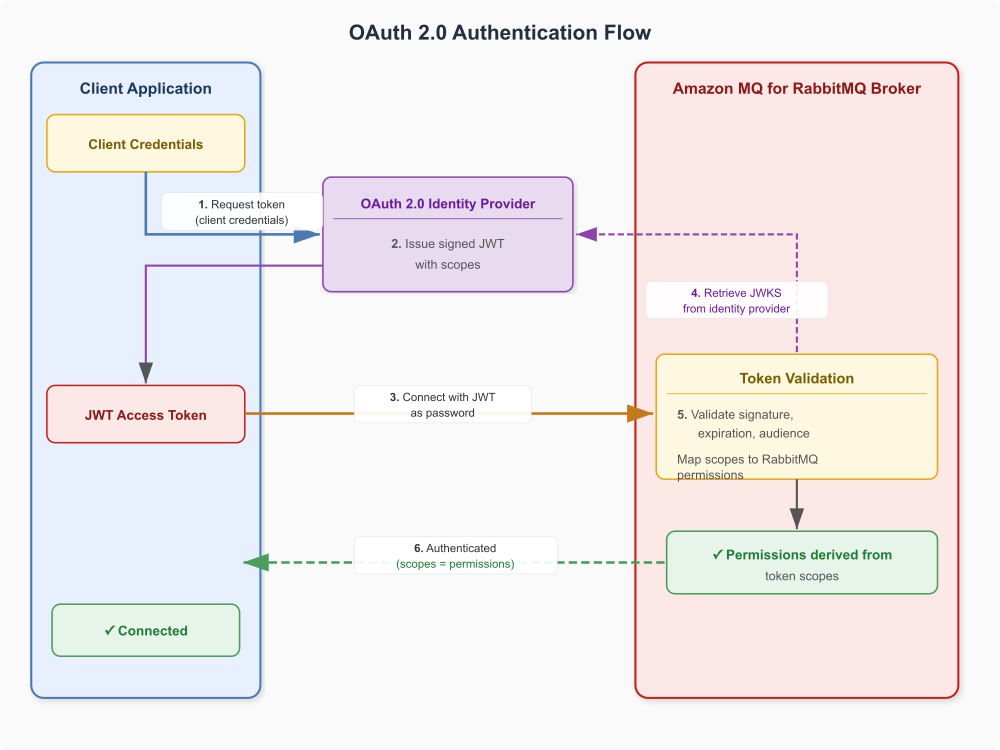
When a client connects to a broker configured with OAuth 2.0 authentication:

  1. The client requests an access token from the OAuth 2.0 identity provider, specifying the required scopes.
  2. The identity provider validates the client credentials and issues a signed JWT (JSON Web Token) containing the granted scopes.
  3. The client connects to the Amazon MQ broker and presents the JWT as the password.
  4. The broker retrieves the identity provider’s public keys through the JWKS endpoint.
  5. The broker validates the token signature, expiration, and audience claim.
  6. The broker extracts RabbitMQ permissions from the token scopes and grants access accordingly.

The following diagram shows the OAuth 2.0 authentication flow.

OAuth 2.0 authentication flow between a client, an identity provider, and the Amazon MQ for RabbitMQ broker

Figure 1: OAuth 2.0 authentication flow for Amazon MQ for RabbitMQ

Scope-to-permission mapping

The broker maps OAuth 2.0 scopes to RabbitMQ permissions using a configurable prefix. For example, with the resource server ID rabbitmq, the following scopes grant specific access:

OAuth 2.0 scope RabbitMQ permission
rabbitmq.read:*/* Read access to all resources in all vhosts
rabbitmq.write:*/* Write access to all resources in all vhosts
rabbitmq.configure:*/* Configure access to all resources in all vhosts
rabbitmq.read:orders/* Read access to all resources in the orders vhost
rabbitmq.tag:management Management UI access
rabbitmq.tag:administrator Administrator access

Key configuration

The following rabbitmq.conf snippet shows the essential settings for OAuth 2.0 authentication:

# Enable OAuth 2.0 authentication (with internal fallback for the monitoring user)
auth_backends.1 = oauth2
auth_backends.2 = internal

# OAuth 2.0 resource server configuration
auth_oauth2.resource_server_id = rabbitmq
auth_oauth2.preferred_username_claims.1 = sub

# JWKS endpoint for token validation
auth_oauth2.jwks_uri = https://your-idp.example.com/.well-known/jwks.json

# Additional token validation
auth_oauth2.issuer = https://your-idp.example.com
auth_oauth2.scope_prefix = rabbitmq.

# Skip audience validation for IdPs that do not emit an aud claim matching resource_server_id
auth_oauth2.verify_aud = false

The following table describes each configuration setting.

Setting Purpose
auth_backends.1 = oauth2 Enables the OAuth 2.0 authentication backend (use auth_backends.2 = internal for the monitoring user fallback)
auth_oauth2.resource_server_id Identifies this broker as a resource server. Used as the scope prefix
auth_oauth2.preferred_username_claims.1 JWT claim used to extract the username for display and logging
auth_oauth2.jwks_uri URL of the identity provider’s JWKS endpoint for token signature validation (named jwks_url on RabbitMQ 3.x, jwks_uri on 4.x)
auth_oauth2.issuer Expected token issuer. Tokens from other issuers are rejected
auth_oauth2.verify_aud Whether the broker validates the token’s aud claim against resource_server_id. Set to false for IdPs that do not emit a matching aud
auth_oauth2.scope_prefix Prefix applied to scopes when mapping to RabbitMQ permissions

Important considerations

  1. By default the broker validates the token’s aud (audience) claim against the resource_server_id and rejects tokens without a match. Some identity providers (for example, Amazon Cognito) don’t emit an aud claim matching the resource server. For those, set auth_oauth2.verify_aud = false.
  2. If your identity provider cannot issue scopes in the native RabbitMQ form (for example, it disallows the * wildcard), use auth_oauth2.scope_aliases entries to translate the provider’s scope names to RabbitMQ scopes such as rabbitmq.read:*/*.
  3. Configure short-lived tokens (one hour or less) and implement token refresh logic in your client applications.
  4. The JWKS endpoint must be reachable from the broker’s network. For private identity providers, verify network connectivity and DNS resolution.
  5. On RabbitMQ 3.x the JWKS endpoint setting is auth_oauth2.jwks_url. On RabbitMQ 4.x it is auth_oauth2.jwks_uri. Use the setting name that matches your broker engine version.
  6. Amazon MQ automatically creates a system user named monitoring-AWS-OWNED-DO-NOT-DELETE with monitoring-only permissions. This user uses the internal RabbitMQ authentication system even on OAuth 2.0-enabled brokers.

How LDAP authentication works

LDAP authentication connects your RabbitMQ broker to an existing directory service such as Active Directory. Instead of managing users locally in the broker, the broker delegates authentication to the LDAP server and derives permissions from directory group memberships. This centralizes user management and lets you apply your existing password policies, account lockout rules, and audit trails to broker access.

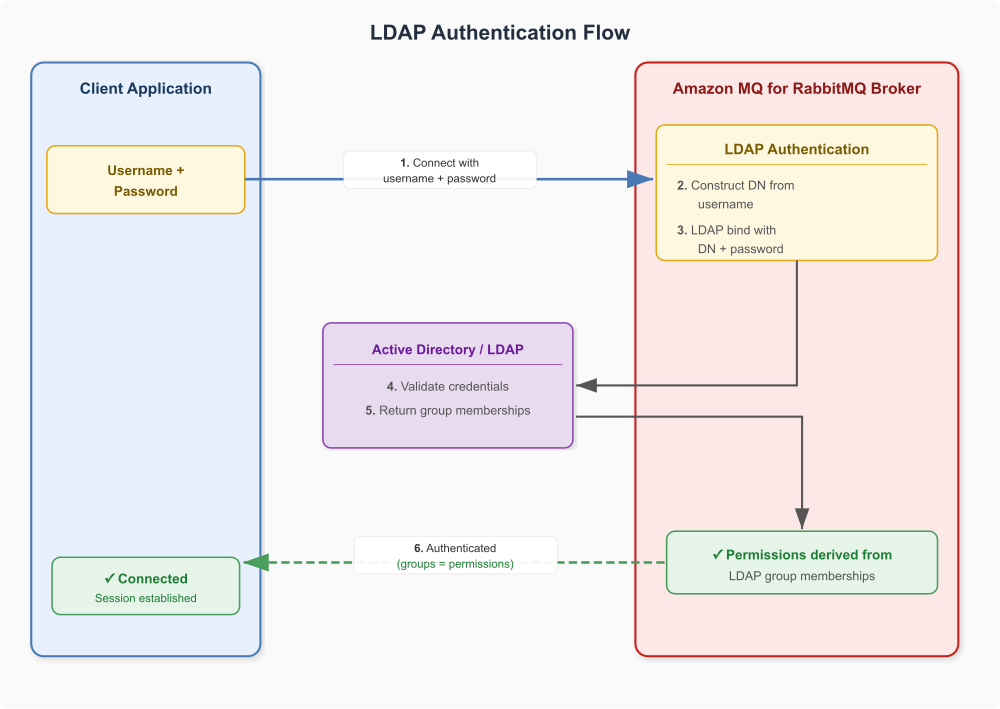
When a client connects to a broker configured with LDAP authentication:

  1. The client connects to the Amazon MQ broker with a username and password.
  2. The broker constructs a Distinguished Name (DN) from the username using the configured user_dn_pattern.
  3. The broker performs an LDAP bind operation against the directory server using the constructed DN and the client’s password.
  4. If the bind succeeds, the broker queries the directory for the user’s group memberships.
  5. The broker maps group memberships to RabbitMQ permissions (vhost access, resource permissions, and management tags).
  6. The client is authenticated and authorized based on the LDAP query results.

The following diagram shows the LDAP authentication flow.

LDAP authentication flow showing the Amazon MQ broker binding to a directory server and mapping group memberships to permissions

Figure 2: LDAP authentication flow for Amazon MQ for RabbitMQ

LDAP directory structure

This implementation uses a group-centric LDAP model where RabbitMQ concepts (vhosts, exchanges, queues, and tags) are represented as sub-OUs under a single groups hierarchy:

OU=rabbitmq
├── OU=users
│   ├── CN=app-orders-producer
│   └── CN=app-orders-consumer
│
└── OU=groups
    ├── OU=vhosts
    │   ├── CN=vhost-orders
    │   └── CN=vhost-payments
    │
    ├── OU=exchanges
    │   ├── CN=orders-publisher
    │   └── CN=payments-publisher
    │
    ├── OU=queues
    │   ├── CN=orders-consumer
    │   └── CN=payments-consumer
    │
    └── OU=tags
        ├── CN=rmq-admin
        └── CN=rmq-monitor

Users are assigned to groups based on their required access. For example, app-orders-producer would be a member of vhost-orders and orders-publisher, granting it access to the orders vhost and write permissions on the orders exchange.

Key configuration

The following rabbitmq.conf snippet shows the essential settings for LDAP authentication:

# Enable LDAP as primary backend with internal as fallback
auth_backends.1 = ldap
auth_backends.2 = internal

# LDAP server connection (LDAPS on port 636)
auth_ldap.servers.1 = your-active-directory-server.example.com
auth_ldap.port = 636
auth_ldap.user_dn_pattern = CN=${username},OU=users,OU=rabbitmq,DC=example,DC=com
auth_ldap.use_ssl = true
auth_ldap.ssl_options.verify = verify_peer
auth_ldap.log = true

# AWS integration: assume an IAM role to retrieve the CA certificate for LDAPS
aws.arns.assume_role_arn = arn:aws:iam::111122223333:role/AmazonMqLdapRole
aws.arns.auth_ldap.ssl_options.cacertfile = arn:aws:s3:::your-ca-cert-bucket/ca-cert.pem

# Management console tags
auth_ldap.queries.tags = '''
[{administrator, {in_group, "CN=rmq-admin,OU=tags,OU=groups,OU=rabbitmq,DC=example,DC=com"}},
{management, {in_group, "CN=rmq-monitor,OU=tags,OU=groups,OU=rabbitmq,DC=example,DC=com"}}]
'''

# Vhost access control
auth_ldap.queries.vhost_access = '''
{in_group, "CN=vhost-${vhost},OU=vhosts,OU=groups,OU=rabbitmq,DC=example,DC=com"}
'''

# Resource access control
auth_ldap.queries.resource_access = '''
{for, [{permission, configure,
{in_group, "CN=rmq-admin,OU=tags,OU=groups,OU=rabbitmq,DC=example,DC=com"}},
{permission, write,
{for, [{resource, exchange,
{in_group, "CN=orders-publisher,OU=exchanges,OU=groups,OU=rabbitmq,DC=example,DC=com"}}]}},
{permission, read,
{for, [{resource, queue,
{in_group, "CN=orders-consumer,OU=queues,OU=groups,OU=rabbitmq,DC=example,DC=com"}}]}}]}
'''

The following table describes each configuration setting.

Setting Purpose
auth_backends.1 = ldap Sets LDAP as the primary authentication backend
auth_backends.2 = internal Falls back to internal authentication if LDAP is unavailable
auth_ldap.servers.1 LDAP server hostname or IP address
auth_ldap.user_dn_pattern Template for constructing the user DN from the provided username
auth_ldap.port LDAP server port; 636 for LDAPS
auth_ldap.use_ssl Enables an encrypted LDAPS connection to the directory server. Amazon MQ requires that you explicitly set either auth_ldap.use_ssl = true or auth_ldap.use_starttls = true. The broker fails configuration validation if neither is set.
auth_ldap.ssl_options.verify Certificate verification mode for the LDAPS connection. Verify_peer validates the server certificate
aws.arns.assume_role_arn ARN of the IAM role the broker assumes to retrieve the CA certificate
aws.arns.auth_ldap.ssl_options.cacertfile ARN of the CA certificate (in S3) used to validate the LDAP server’s TLS certificate
auth_ldap.queries.tags Maps directory group membership to the administrator and management console tags
auth_ldap.queries.vhost_access LDAP query that determines which vhosts a user can access based on group membership
auth_ldap.queries.resource_access LDAP query that determines resource-level permissions (configure, write, read) based on group membership

Important considerations

  1. Amazon MQ requires an encrypted LDAP connection: you must explicitly set either auth_ldap.use_ssl = true (LDAPS on port 636) or auth_ldap.use_starttls = true (StartTLS on port 389). The broker rejects the configuration if neither is set. Unencrypted LDAP transmits credentials in plaintext, so always use one of these options to protect credentials in transit between the broker and your directory server.
  2. The user_dn_pattern must match your directory’s organizational structure exactly. Verify the pattern with an LDAP browser before applying it to the broker.
  3. With Active Directory, user DNs are usually based on the display name rather than the sign-in name, so a fixed user_dn_pattern often will not match. In that case, configure DN lookup (auth_ldap.dn_lookup_bind, auth_ldap.dn_lookup_base, and auth_ldap.dn_lookup_attribute = sAMAccountName) so the broker resolves each username to its full DN before binding.
  4. LDAP configuration changes require a broker reboot to take effect. However, user permission changes in the directory (group membership additions or removals) take effect immediately for new connections.
  5. Configure the internal backend as a fallback to maintain access if the LDAP server becomes temporarily unavailable.

How HTTP authentication works

The HTTP authentication backend delegates all authentication and authorization decisions to an external HTTP service. When a client connects, the broker sends requests over HTTPS to your service, which responds with allow or deny decisions. Amazon MQ requires encrypted connections and rejects any configuration that uses a plain http endpoint. This approach provides maximum flexibility for integrating with identity systems that don’t support OAuth 2.0 or LDAP natively, or when you need custom authentication logic. The HTTP authentication backend is available on Amazon MQ for RabbitMQ version 4 and above.

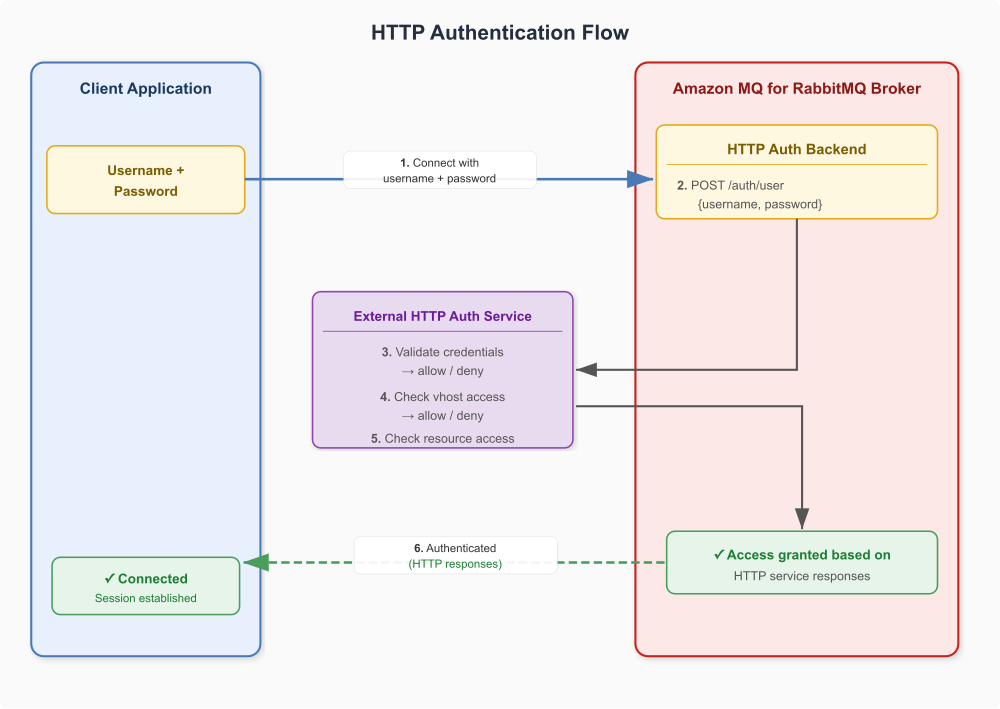
When a client connects to a broker configured with HTTP authentication:

  1. The client connects to the Amazon MQ broker with a username and password.
  2. The broker sends an HTTPS POST request to the configured authentication endpoint with the username and password.
  3. The external authentication service validates the credentials against its identity store and responds with allow or deny.
  4. For each authorization check (vhost access, resource permissions, topic permissions), the broker sends additional HTTPS requests to the corresponding endpoints.
  5. The authentication service evaluates the authorization request and responds with allow, deny, or allow with tags.
  6. The client is authenticated and authorized based on the authentication service responses.

The following diagram shows the HTTP authentication flow.

HTTP authentication flow showing the Amazon MQ broker sending credential and authorization checks to an external HTTP service

Figure 3: HTTP authentication flow for Amazon MQ for RabbitMQ

The broker sends HTTPS POST requests to four endpoints. Each endpoint must return a plain-text response:

Endpoint Request parameters Expected response
/auth/user username, password allow [tag1, tag2] or deny
/auth/vhost username, vhost, ip allow or deny
/auth/resource username, vhost, resource, name, permission allow or deny
/auth/topic username, vhost, resource, name, permission, routing_key allow or deny

Key configuration

The following rabbitmq.conf snippet shows the essential settings for HTTP authentication:

# Enable the HTTP backend with caching to reduce load on the auth service
auth_backends.1 = cache
auth_backends.2 = http
auth_cache.cached_backend = http

# HTTP authentication endpoints (HTTPS required)
auth_http.http_method = post
auth_http.user_path = https://your-auth-service.example.com/auth/user
auth_http.vhost_path = https://your-auth-service.example.com/auth/vhost
auth_http.resource_path = https://your-auth-service.example.com/auth/resource
auth_http.topic_path = https://your-auth-service.example.com/auth/topic

# TLS configuration for the HTTPS connection to the auth service
auth_http.ssl_options.verify = verify_peer
auth_http.ssl_options.sni = your-auth-service.example.com

# AWS integration: IAM role and CA certificate for secure credential retrieval
aws.arns.assume_role_arn = <your-assume-role-arn>
aws.arns.auth_http.ssl_options.cacertfile = <your-ca-cert-arn>

The following table describes each configuration setting.

Setting Purpose
auth_backends.1 = cache auth_backends.2 = http Enables the HTTP authentication backend with a cache layer in front, which reduces the number of calls to your authentication service
auth_http.user_path URL the broker calls to authenticate users
auth_http.vhost_path URL the broker calls to check vhost access
auth_http.resource_path URL the broker calls to check resource permissions (queues, exchanges)
auth_http.topic_path URL the broker calls to check topic-level permissions
auth_http.http_method HTTP method the broker uses to call the endpoints. Set to post
auth_http.ssl_options.verify Certificate verification mode for the HTTPS connection to the auth service. Verify_peer validates the server certificate
auth_http.ssl_options.sni Server Name Indication hostname sent during the TLS handshake with the auth service
aws.arns.assume_role_arn ARN of the IAM role the broker assumes to securely retrieve the CA certificate
aws.arns.auth_http.ssl_options.cacertfile ARN of the CA certificate the broker uses to validate the auth service’s TLS certificate

Important considerations

  1. The HTTP authentication service must be highly available. If the service is unreachable, all authentication attempts fail. Consider deploying it behind a load balancer with health checks.
  2. HTTPS is mandatory for all authentication endpoints. The broker rejects any endpoint configured with a plain http URL, ensuring credentials are always protected in transit.
  3. Front the HTTP backend with the cache backend (auth_backends.1 = cache) to reduce the number of calls to your authentication service and improve connection latency. Also keep your service’s response times low to avoid connection timeouts and degraded broker performance.
  4. The authentication service receives plaintext passwords. Make sure the service handles credentials securely and doesn’t log them.
  5. The broker connects to your authentication service over TLS. Configure certificate validation with auth_http.ssl_options.verify = verify_peer, and provide the CA certificate and the IAM role for retrieving it through the aws.arns.auth_http.ssl_options.cacertfile and aws.arns.assume_role_arn settings.

Implementation guides

For step-by-step deployment and validation instructions, see the following resources:

  1. Amazon MQ for RabbitMQ OAuth 2.0 authentication – Configure OAuth 2.0 token-based authentication for Amazon MQ.
  2. Amazon MQ for RabbitMQ LDAP integration – Configure LDAP directory integration for Amazon MQ.
  3. Amazon MQ for RabbitMQ HTTP authentication backend – Configure the HTTP authentication backend for Amazon MQ.
  4. Amazon MQ samples repository – AWS Cloud Development Kit (AWS CDK) stacks and sample code for LDAP and OAuth 2.0 integrations.

Conclusion

This post explained how OAuth 2.0, LDAP, and HTTP authentication backends work for Amazon MQ for RabbitMQ, and when to use each one. OAuth 2.0 provides token-based, passwordless authentication with automatic credential expiration. LDAP connects your broker to existing directory infrastructure for centralized user and group management. The HTTP backend offers maximum flexibility for custom identity integrations. Used individually or in combination, these approaches eliminate broker-local credential management and provide centralized access control through your existing identity infrastructure.

In the next post in this series, we cover IAM authentication and OAuth 2.0 authorization for Amazon MQ for RabbitMQ.

For more information about Amazon MQ security, see the following resources:

  1. Amazon MQ Developer Guide: Security
  2. RabbitMQ OAuth 2.0 plugin documentation
  3. RabbitMQ LDAP plugin documentation
  4. Amazon MQ samples repository

If you have questions or feedback about this post, leave a comment in the Comments section. For troubleshooting help, visit the AWS re:Post community for Amazon MQ.


About the authors

Vinodh Kannan Sadayamuthu

Vinodh Kannan Sadayamuthu

Vinodh is a Senior Specialist Solutions Architect at Amazon Web Services (AWS). His expertise centers on AWS messaging and streaming services, where he provides architectural best practices consultation to AWS customers.

Sarath Kumar Kallayil Sreedharan

Sarath Kumar Kallayil Sreedharan

Sarath Kumar K.S. is a Senior Technical Account Manager/Enterprise Support lead at Amazon Web Services. Sarath works with enterprise customers to help them architect and build highly reliable and cost-effective solutions on AWS. He specializes in serverless, messaging technologies, and AI services, and has a background in application development and architecture. In his spare time, he enjoys reading, traveling, playing cricket, and spending time with his family

Authentication and authorization options for Amazon MQ for RabbitMQ

Post Syndicated from Vinodh Kannan Sadayamuthu original https://aws.amazon.com/blogs/big-data/authentication-and-authorization-options-for-amazon-mq-for-rabbitmq/

Managing authentication for message brokers at scale is complex: credentials sprawl, audit requirements, and integration with existing identity providers create operational overhead. The default approach of creating RabbitMQ users with static usernames and passwords works for getting started, but it quickly becomes a liability at scale. Credentials must be distributed securely, rotated regularly, and revoked promptly when team members change roles or leave the organization. For regulated industries, auditors want to see that your messaging infrastructure enforces the same identity and access controls as the rest of your environment.

Different organizations have different identity infrastructures. Some manage users through Active Directory. Others have standardized on OAuth 2.0. Platform teams building on AWS want to use AWS Identity and Access Management (IAM) roles and policies they understand. Security-conscious environments might require certificate-based authentication where no passwords are transmitted over the network at all.

Amazon MQ for RabbitMQ supports multiple authentication and authorization methods, so you can connect your broker to the identity infrastructure you already use. This post introduces the available options and helps you choose the right one for your use case.

Authentication methods at a glance

Amazon MQ for RabbitMQ supports the following authentication and authorization methods:

Method Credential type User management Recommended for
Simple credentials Username / password Broker-local Getting started, development environments
OAuth 2.0 Bearer tokens from external identity provider External identity provider Workloads that need short-lived tokens from a third-party identity provider
IAM authentication Short-lived JSON Web Tokens (JWTs) from AWS Security Token Service (AWS STS) IAM AWS-native workloads, multi-tenant isolation, credential-free authentication
LDAP Directory credentials Active Directory or LDAP server Organizations with existing directory services
HTTP-based auth backend Username / password validated by external server External HTTP server Custom auth logic, centralized user management across brokers
SSL certificate authentication Certificate only (passwordless) Broker-local (username extracted from cert) Eliminating passwords entirely with certificate-only identity
Mutual TLS (mTLS) Certificate and username/password Broker-local Adding transport-layer certificate verification to existing credential-based auth

Choosing the right method

The right choice depends on your existing identity infrastructure, security requirements, and operational preferences.

Simple credentials

The default method. You create RabbitMQ users with usernames and passwords directly on the broker. This is a straightforward way to get started, but it requires you to manage credentials manually. Choose this for development, testing, or small-scale deployments where credential management overhead is acceptable.

OAuth 2.0

Clients obtain short-lived tokens from any OAuth 2.0-compatible identity provider and present them to the broker as bearer tokens. Choose this when you have an existing identity provider (other than IAM) that issues tokens for your applications, and you want automatic token expiration without managing broker-local credentials.

IAM authentication

IAM serves as an identity provider. Client applications use their IAM credentials to obtain a short-lived JWT from AWS Security Token Service (AWS STS) and present it as a bearer token. IAM policies control which roles can obtain tokens. RabbitMQ scope aliases on the broker map each role’s Amazon Resource Name (ARN) to specific resource permissions (read, write, configure, and administrator). AWS CloudTrail logs every token issuance for auditing. Choose this when your workloads run on AWS compute services with IAM roles, and you want credential-free, IAM-native authentication with broker-level authorization.

LDAP

Connect your broker to an existing directory service such as Active Directory. Users authenticate with their directory credentials, and RabbitMQ permissions map to LDAP group memberships. Choose this when your organization already manages users and groups through a directory service, and you want to apply existing password policies and group-based access control to broker access.

HTTP-based auth backend

Delegates authentication and authorization decisions to a custom HTTPS server. The broker sends HTTP requests to your server for user validation, virtual host access, resource permissions, and topic permissions. Choose this when you need custom authentication logic, want to centralize user management across multiple brokers, or need to integrate with an identity system that doesn’t support OAuth 2.0 or LDAP natively.

SSL certificate authentication

Removes passwords entirely. The broker uses the EXTERNAL Simple Authentication and Security Layer (SASL) mechanism to extract the client’s identity directly from the X.509 certificate (for example, from the Common Name field) and uses it as the RabbitMQ username. With this method, your application doesn’t transmit credentials over the network. Choose this when your security policy requires passwordless authentication, and you manage client identities through a public key infrastructure (PKI).

Mutual TLS (mTLS)

Adds certificate verification on top of existing username/password authentication. During the TLS handshake, the client validates the broker’s certificate and the broker validates the client’s certificate, then the client provides a username and password at the application layer. This gives you two-factor security: something you have (the certificate) plus something you know (the password). Choose this when compliance frameworks require mutual authentication, but you want to retain your existing username/password authentication flow.

Conclusion

Amazon MQ for RabbitMQ version 4 supports seven authentication and authorization methods. With these methods, you can align your message broker security with your existing identity infrastructure. Your organization might standardize on IAM, manage identities through Active Directory, federate access through a third-party identity providers like Okta or Microsoft Entra ID, or rely on PKI for certificate-based trust. In each case, you can eliminate the operational overhead of managing static credentials at scale.

Choose your implementation path:

For sample code and infrastructure templates, clone the
Amazon MQ samples repository and deploy the CDK stack for your chosen authentication method.

About the authors

Vinodh Kannan Sadayamuthu

Vinodh Kannan Sadayamuthu

Vinodh is a Senior Specialist Solutions Architect at Amazon Web Services (AWS). His expertise centers on AWS messaging and streaming services, where he provides architectural best practices consultation to AWS customers.

Vignesh Selvam

Vignesh Selvam

Vignesh is the Principal Product Manager for Amazon MQ at AWS. He works with customers to solve their messaging needs and with the open-source communities for innovating with message brokers. Prior to joining AWS, he built products for security and analytics.

Migrate JMS applications to Amazon MQ for RabbitMQ with minimal changes

Post Syndicated from Vinodh Kannan Sadayamuthu original https://aws.amazon.com/blogs/big-data/migrate-jms-applications-to-amazon-mq-for-rabbitmq-with-minimal-changes/

Running JMS applications on on-premises brokers or Apache ActiveMQ requires manual patching cycles, capacity planning for peak loads, and maintaining high availability across multiple data centers. With Amazon MQ version 4 and above, you can migrate your existing JMS applications without rewriting your messaging layer, removing weeks of rewrite work.

This post shows you how to migrate your JMS applications and walks through a complete setup, from creating the broker to sending and receiving messages. You will also see a real-world scenario: migrating an existing Apache ActiveMQ workload to an Amazon MQ broker running RabbitMQ. The post covers configuration changes, monitoring with Amazon CloudWatch, and validation steps to make sure that your migration succeeds.

Amazon MQ version 4 and above includes built-in support for the RabbitMQ JMS Client and the JMS Topic Exchange plugin. The RabbitMQ JMS Client and JMS Topic Exchange plugin work together, allowing your existing JMS applications to connect using familiar JMS APIs. You update the connection factory configuration and broker endpoint. Your business logic, message producers, consumers, and listeners stay exactly as written.

Understanding JMS and AMQP

How the RabbitMQ JMS Client works

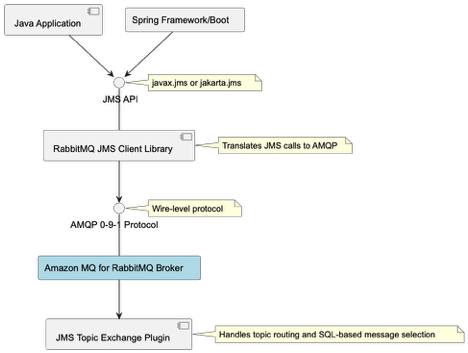
Use the RabbitMQ JMS Client to connect your Java application to Amazon MQ. The client translates your JMS API calls (javax.jms or jakarta.jms) into AMQP 0-9-1 messages that the broker understands.

Advanced Message Queuing Protocol (AMQP) defines how messages are formatted and transmitted across the network at the wire level. This means that non-Java services can consume the same messages using native AMQP clients, making the protocol language-agnostic

Architecture diagram showing JMS to AMQP translation: Java and Spring applications use the JMS API and RabbitMQ JMS Client Library to communicate with an Amazon MQ broker running RabbitMQ via the AMQP 0-9-1 protocol.

JMS version support

Migrate at the JMS version that your application already uses. The client supports JMS 1.1, 2.0, and 3.1 (Jakarta Messaging), so you don’t need to upgrade your application code before migrating brokers. The client integrates with Spring Framework and Spring Boot applications without requiring custom bean factories or application context configuration.

Because the JMS abstraction layer sits between your application and the broker, most migrations require only a connection factory change, not a logic rewrite.

RabbitMQ JMS Topic Exchange plugin

Your existing publish/subscribe patterns work without client-side routing logic. The JMS Topic Exchange plugin adds server-side support for JMS topic semantics, handling topic routing and SQL-based message selection directly in the broker.

The plugin handles SQL-based message selection (JMS selectors like OrderType = `Electronics` AND Priority > 5) and topic hierarchies with wildcard pattern matching (* for single level, # for multiple levels). Your application uses standard JMS topic APIs (createTopic(), setMessageSelector()) without additional filtering logic.

Getting started

This walkthrough shows you how to set up Amazon MQ and connect your existing JMS application. You will create a broker, configure the connection factory, and send and receive messages.

Prerequisites

You need an existing JMS application built on Apache ActiveMQ or another JMS provider to migrate. If you don’t have one, you can still follow Steps 1–5 to create a broker and test the connection pattern. Before you begin, confirm that you have the following in place:

  • An active AWS account
  • AWS Command Line Interface (AWS CLI) installed. For instructions, see Installing the AWS CLI.
  • Java 11 or later installed on your local development environment.
  • An AWS Identity and Access Management (IAM) principal (user or role) with the AmazonMQFullAccess managed policy attached.
  • Maven or Gradle for dependency management.

Amazon MQ broker charges apply based on instance type and usage. Review the Amazon MQ pricing page before you start.

Step 1: Create an Amazon MQ for RabbitMQ broker

The following command creates a single-instance broker running RabbitMQ 4.2 on an mq.m7g.medium instance.

aws mq create-broker \ 
--broker-name my-rabbitmq-broker \ 
--engine-type rabbitmq \ 
--engine-version 4.2 \ 
--deployment-mode SINGLE_INSTANCE \ 
--host-instance-type mq.m7g.medium \ 
--auto-minor-version-upgrade \ 
--publicly-accessible \ 
--users "Username=admin,Password=[PASSWORD]" \ 
--region us-west-2

Replace <broker-name> with the name that you want to give to the broker. Replace <username> and <password> as described in the create-broker CLI documentation. After the command runs successfully, the command line displays the BrokerArn and BrokerId.

Note: This command creates a publicly accessible broker for demonstration purposes only. For production workloads, create brokers in private subnets within your VPC and restrict access using security groups. Don’t use the –publicly-accessible flag. For more information, see Security best practices for Amazon MQ.

The command returns output similar to:

{
    "BrokerArn": "arn:aws:mq:us-west-2:111122223333:broker:my-rabbitmq-broker:b-c8352341-ec91-4a78-ad9c-a57f23f235bb",
    "BrokerId": "b-c8352341-ec91-4a78-ad9c-a57f23f235bb"
}

Save the BrokerId value for the next step.

The broker takes approximately 15–20 minutes to reach the Running state. Run the following command every 2 minutes to check the status:

aws mq describe-broker --broker-id <BrokerId> --region us-west-2 --query 'BrokerState' 

Proceed to the next step after the broker state is RUNNING.

To get the broker endpoints, run:

aws mq describe-broker --broker-id <BrokerId> --region us-west-2 --query 'BrokerInstances'

Note the ConsoleURL and Endpoints from the output. The command returns output similar to:

[{
    "ConsoleURL": "https:// b-c8352341-ec91-4a78-ad9c-a57f23f235bb.mq.us-west-2.on.aws",
    "Endpoints": ["amqps://b-c8352341-ec91-4a78-ad9c-a57f23f235bb.mq.us-west-2.on.aws:5671"]
}]

Step 2: Add the RabbitMQ JMS Client dependency

Choose the dependency that matches your application’s current JMS version. If your imports reference javax.jms packages, use version 2.12.0. If your imports reference jakarta.jms packages (JMS 3.1 / Jakarta EE 9+), use version 3.4.0.

For JMS 1.1 and 2.0 (javax.jms):

<dependency>
<groupId>com.rabbitmq.jms</groupId>
<artifactId>rabbitmq-jms</artifactId>
<version>2.12.0</version>
</dependency>

For JMS 3.1 / Jakarta JMS 3.1 / Jakarta Messaging (jakarta.jms):

<dependency>
<groupId>com.rabbitmq.jms</groupId>
<artifactId>rabbitmq-jms</artifactId>
<version>3.4.0</version>
</dependency>

Step 3: Configure the connection factory

Store your broker credentials in AWS Secrets Manager before configuring the connection factory. This keeps credentials out of your source code and configuration files.

Create the secret:

aws secretsmanager create-secret \
--name dev-rabbitmq \
--description "Amazon MQ broker credentials" \
--secret-string '{"username":"admin","password":"[PASSWORD]"}' \ 
--region us-west-2

Add the AWS SDK for Secrets Manager to your pom.xml:

<dependency> 
<groupId>software.amazon.awssdk</groupId> 
<artifactId>secretsmanager</artifactId> 
<version>2.20.0</version> </dependency>

<dependency> 
<groupId>com.fasterxml.jackson.core</groupId> 
<artifactId>jackson-databind</artifactId> 
<version>2.15.0</version> 
</dependency>

Replace your existing broker URL with the Amazon MQ endpoint. In most cases, this is the only change required in your application configuration:

import com.rabbitmq.jms.admin.RMQConnectionFactory;
import software.amazon.awssdk.services.secretsmanager.SecretsManagerClient;
import software.amazon.awssdk.services.secretsmanager.model.GetSecretValueRequest;
import software.amazon.awssdk.services.secretsmanager.model.GetSecretValueResponse;
import software.amazon.awssdk.regions.Region;
import com.fasterxml.jackson.core.type.TypeReference;
import com.fasterxml.jackson.databind.ObjectMapper;
import java.util.Map;
import javax.jms.*; 

// Retrieve credentials from AWS Secrets Manager
Map<String, String> creds;
try (SecretsManagerClient secretsClient = SecretsManagerClient.builder().region(Region.US_WEST_2).build()) {    
    GetSecretValueResponse response = secretsClient.getSecretValue(GetSecretValueRequest.builder().secretId("dev-rabbitmq").build());        
    ObjectMapper objectMapper = new ObjectMapper();    
    creds = objectMapper.readValue(response.secretString(),new TypeReference<Map<String, String>>() {});
    } 

// Create and configure the connection factory
RMQConnectionFactory connectionFactory = new RMQConnectionFactory();
connectionFactory.setHost("b-c8352341-ec91-4a78-ad9c-a57f23f235bb.mq.us-west-2.on.aws");
connectionFactory.setPort(5671);connectionFactory.setVirtualHost("/");
connectionFactory.useSslProtocol();
connectionFactory.setUsername(creds.get("username"));
connectionFactory.setPassword(creds.get("password")); 

Replace the host value with your broker endpoint from Step 1.

The connection factory requires four parameters:

  • Host: Your broker endpoint from the describe-broker output
  • Port: 5671 for AMQP over TLS (Amazon MQ requires encryption in transit)
  • VirtualHost: “/” (the default RabbitMQ virtual host)
  • UseSslProtocol: true (required by Amazon MQ)

Step 4: Send messages

The following examples show how to send messages to a queue and a topic using the JMS 2.0 simplified API.

Point-to-point (queue) for one-to-one delivery:

try (JMSContext context = connectionFactory.createContext()) {
Queue queue = context.createQueue("orders");
context.createProducer().setProperty("OrderType", "Electronics").send(queue, "Order #12345");
System.out.println("Sent message to queue: orders");
}

Publish/subscribe (topic) for one-to-many broadcast:

try (JMSContext context = connectionFactory.createContext()) {
	Topic topic = context.createTopic("orders.electronics");
	context.createProducer().setProperty("MessageType", "Broadcast").send(topic, "New electronics order received!");
	System.out.println("Published message to topic: orders.electronics");
}

Message properties(OrderType, MessageType) are JMS headers that consumers can use for filtering. These properties become AMQP message headers when transmitted to the broker.

Step 5: Receive messages asynchronously

To receive messages asynchronously, attach a MessageListener to a consumer. The listener fires each time a message arrives.

Queue consumer:

Asynchronous consumers process messages in a background thread without blocking your main application logic. The MessageListener callback fires each time a message arrives, allowing your application to handle messages as they’re delivered rather than polling with receive().

try (JMSContext context = connectionFactory.createContext()) {
	Queue queue = context.createQueue("orders");
	JMSConsumer consumer = context.createConsumer(queue);
	consumer.setMessageListener(message -> {
		if (message instanceof TextMessage) {
			try {
				System.out.println("Received: " + ((TextMessage) message).getText());
			} catch (JMSException e) {
				e.printStackTrace();
			}
		}
	});

	System.out.println("Listening for messages on queue: orders");

	// Keep the consumer active for 30 seconds
	Thread.sleep(30000);
}

Topic subscriber:

try (JMSContext context = connectionFactory.createContext()) {
	Topic topic = context.createTopic("orders.electronics");
	JMSConsumer consumer = context.createConsumer(topic);
	consumer.setMessageListener(message -> {
		if (message instanceof TextMessage) {
			try {
				System.out.println("Subscriber received: " + ((TextMessage) message).getText());
			} catch (JMSException e) {
				e.printStackTrace();
			}
		}
	});

	System.out.println("Subscribed to topic: orders.electronics");

	// Keep the consumer active for 30 seconds
	Thread.sleep(30000);}

The Thread.sleep(30000) call keeps the consumer active for 30 seconds.

Use case: Migrating an ActiveMQ Workload to Amazon MQ for RabbitMQ

Migrate your Apache ActiveMQ applications to Amazon MQ by updating four configuration points. Your business logic, message producers, consumers, and listeners stay exactly as written. This walkthrough uses a real JMS 1.1 application with a centralized broker configuration class to show precisely which lines change and which remain identical.

Apache ActiveMQ powers messaging infrastructure for thousands of Java applications worldwide. If you run JMS applications on ActiveMQ, you can migrate to Amazon MQ for RabbitMQ with minimal code changes. The following steps demonstrate a complete migration using an application that includes a centralized broker configuration class, a message producer, and a message consumer.

Step 1: Update the Maven dependency

Replace the ActiveMQ client dependencies with the RabbitMQ JMS client in your pom.xml. The rabbitmq-jms artifact includes the RabbitMQ AMQP client and JMS API as transitive dependencies, so a single entry replaces both ActiveMQ artifacts.

Before (ActiveMQ):

<dependency>
<groupId>org.apache.activemq</groupId>
<artifactId>activemq-client</artifactId>
<version>5.18.6</version>
</dependency>

<dependency>
<groupId>org.apache.activemq</groupId>
<artifactId>activemq-pool</artifactId>
<version>5.18.6</version>n>5.18.6</version>
</dependency>

After (Amazon MQ):

<dependency>
<groupId>com.rabbitmq.jms</groupId>
<artifactId>rabbitmq-jms</artifactId>
<version>2.12.0</version>
</dependency>

The rabbitmq-jms artifact pulls in the RabbitMQ AMQP client and the JMS API as transitive dependencies, so a single entry replaces both ActiveMQ artifacts.

Step 2: Update the broker configuration

If your application centralizes connection details in a shared configuration class, that class is the only file that needs to change. The queue name and everything else your application references remain the same.

Before (ActiveMQ):

// BrokerConfig.java - ActiveMQ version
public final class BrokerConfig {
	// OpenWire endpoint
	public static final String BROKER_URL = "tcp://localhost:61616";
	public static final String USERNAME = "[PASSWORD]";
	public static final String PASSWORD = "[PASSWORD]";
	public static final String QUEUE_NAME = "demo.queue";
	private BrokerConfig() {}}

After (Amazon MQ):

// BrokerConfig.java - Amazon MQ version

import com.fasterxml.jackson.core.type.TypeReference;import com.fasterxml.jackson.databind.ObjectMapper;
import software.amazon.awssdk.regions.Region;
import software.amazon.awssdk.services.secretsmanager.SecretsManagerClient;
import software.amazon.awssdk.services.secretsmanager.model.GetSecretValueRequest;
import software.amazon.awssdk.services.secretsmanager.model.GetSecretValueResponse;
import java.util.Map;

public final class BrokerConfig {
	// AMQPS endpoint (TLS required by Amazon MQ)
	public static final String BROKER_URL = "amqps://b-c8352341-ec91-4a78-ad9c-a57f23f235bb.mq.us-west-2.on.aws:5671";

	// Queue name carries over unchanged
	public static final String QUEUE_NAME = "demo.queue";

	// Secret name in AWS Secrets Manager
	private static final String SECRET_ID = "dev-rabbitmq";
	private static final Map<String, String> CREDENTIALS = loadCredentials();
	public static String getUsername() {return CREDENTIALS.get("username");}
	public static String getPassword() {return CREDENTIALS.get("password");}
	private static Map<String, String> loadCredentials() { 
		try (SecretsManagerClient client = SecretsManagerClient.builder().region(Region.US_WEST_2).build()) {
			GetSecretValueResponse response = client.getSecretValue(GetSecretValueRequest.builder().secretId(SECRET_ID).build());
			ObjectMapper mapper = new ObjectMapper();
			return mapper.readValue(response.secretString(), new TypeReference<Map<String, String>>() {});
		} catch (Exception e) {
			throw new RuntimeException("Failed to load broker credentials from Secrets Manager", e);
		}
	}
	private BrokerConfig() {}}

Two things changed in this file compared to the ActiveMQ version: the protocol prefix (tcp:// to amqps://) and the host and port (OpenWire on 61616 to AMQP over TLS on 5671). The queue name is identical. Credentials are no longer stored as static string constants. Instead, loadCredentials() retrieves them from AWS Secrets Manager at startup, and getUsername() and getPassword() expose them to the rest of the application. This follows AWS security best practices and streamlines credential rotation.

Step 3: Update the message producer

The producer requires two changes: the import statement and the factory instantiation. Every JMS API call after the factory (createConnection, createSession, createProducer, send) is identical to the ActiveMQ version.

Before (ActiveMQ):

import org.apache.activemq.ActiveMQConnectionFactory;
import javax.jms.*;

public class MessageProducer {
	public static void main(String[] args) {
		Connection connection = null;
		try {
			ActiveMQConnectionFactory factory = new ActiveMQConnectionFactory(BrokerConfig.USERNAME,BrokerConfig.PASSWORD,BrokerConfig.BROKER_URL);
			connection = factory.createConnection();
			connection.start();
			Session session = connection.createSession(false, Session.AUTO_ACKNOWLEDGE);
			Destination destination = session.createQueue(BrokerConfig.QUEUE_NAME);
			javax.jms.MessageProducer producer = session.createProducer(destination);
			producer.setDeliveryMode(DeliveryMode.PERSISTENT);
			for (int i = 1; i <= 5; i++) {
				TextMessage message = session.createTextMessage("Hello from ActiveMQ - message #" + i);
				producer.send(message);
				System.out.println("Sent: " + message.getText());
			}
			producer.close();
			session.close();
		} catch (JMSException e) {
			e.printStackTrace();
		} finally {
			if (connection != null) {
				try { 
					connection.close();
				} catch (JMSException ignored) {}}
			}
		}
	}

After (Amazon MQ):

import com.rabbitmq.jms.admin.RMQConnectionFactory;
import javax.jms.*;

public class MessageProducer {

	public static void main(String[] args) {
		Connection connection = null;
		try {
			RMQConnectionFactory factory = new RMQConnectionFactory();
			factory.setUri(BrokerConfig.BROKER_URL);
			factory.setUsername(BrokerConfig.getUsername());
			factory.setPassword(BrokerConfig.getPassword());

			// Everything below this line is identical to the ActiveMQ version
			connection = factory.createConnection();
			connection.start();
			Session session = connection.createSession(false, Session.AUTO_ACKNOWLEDGE);
			Destination destination = session.createQueue(BrokerConfig.QUEUE_NAME);
			javax.jms.MessageProducer producer = session.createProducer(destination);
			producer.setDeliveryMode(DeliveryMode.PERSISTENT);
			for (int i = 1; i <= 5; i++) {
				TextMessage message = session.createTextMessage("Hello from Amazon MQ - message #" + i);
				producer.send(message);
				System.out.println("Sent: " + message.getText());
			}
			producer.close();
			session.close();
		} catch (JMSException e) {
			e.printStackTrace();
		} finally {
			if (connection != null) {
				try {
					connection.close();
				} catch (JMSException ignored) {}
			}
		}
	}
}

The import changes from org.apache.activemq.ActiveMQConnectionFactory to com.rabbitmq.jms.admin.RMQConnectionFactory. The factory construction switches from a constructor that accepts credentials and URL to a no-arg constructor with explicit setter calls. Credentials are now retrieved from AWS Secrets Manager through BrokerConfig.getUsername() and BrokerConfig.getPassword(). That is the complete change set for the producer.

Step 4: Update the message consumer

The consumer follows the same pattern as the producer. Swap the factory class and import, update the credential calls, and keep everything else.

Before (ActiveMQ):

import org.apache.activemq.ActiveMQConnectionFactory;
import javax.jms.*;
public class MessageConsumer {
	public static void main(String[] args) {
		Connection connection = null;
		try {
			ActiveMQConnectionFactory factory = new ActiveMQConnectionFactory(BrokerConfig.USERNAME, BrokerConfig.PASSWORD, BrokerConfig.BROKER_URL);
			connection = factory.createConnection();
			connection.start();
			Session session = connection.createSession(false, Session.AUTO_ACKNOWLEDGE);
			Destination destination = session.createQueue(BrokerConfig.QUEUE_NAME);
			javax.jms.MessageConsumer consumer = session.createConsumer(destination);
			System.out.println("Waiting for messages on queue: " + BrokerConfig.QUEUE_NAME);
			Message message;
			while ((message = consumer.receive(10000)) != null) {
				if (message instanceof TextMessage) {
					TextMessage textMessage = (TextMessage) message;
					System.out.println("Received: " + textMessage.getText());
				}
			}
			consumer.close();
			session.close();
		} catch (JMSException e) {
			e.printStackTrace();
		} finally {
			if (connection != null) {
				try { 
					connection.close(); 
				} catch (JMSException ignored) {}
			}
		}
	}
}

After (Amazon MQ):

import com.rabbitmq.jms.admin.RMQConnectionFactory;
import javax.jms.*;

public class MessageConsumer {
	public static void main(String[] args) {
		Connection connection = null;
		try {
			RMQConnectionFactory factory = new RMQConnectionFactory();
			factory.setUri(BrokerConfig.BROKER_URL);
			factory.setUsername(BrokerConfig.getUsername());
			factory.setPassword(BrokerConfig.getPassword());

			// Everything below this line is identical to the ActiveMQ version
			connection = factory.createConnection();
			connection.start();
			Session session = connection.createSession(false, Session.AUTO_ACKNOWLEDGE);
			Destination destination = session.createQueue(BrokerConfig.QUEUE_NAME);
			javax.jms.MessageConsumer consumer = session.createConsumer(destination);
			System.out.println("Waiting for messages on queue: " + BrokerConfig.QUEUE_NAME);
			Message message;
			while ((message = consumer.receive(10000)) != null) {
				if (message instanceof TextMessage) {
					TextMessage textMessage = (TextMessage) message;
					System.out.println("Received: " + textMessage.getText());
				}
			}
			consumer.close();
			session.close();
		} catch (JMSException e) {
			e.printStackTrace();
		} finally {
			if (connection != null) {
				try { 
					connection.close(); 
				} catch (JMSException ignored) {}
			}
		}
	}
}

The import changes from org.apache.activemq.ActiveMQConnectionFactory to com.rabbitmq.jms.admin.RMQConnectionFactory. The factory construction switches to a no-arg constructor with explicit setter calls, and BrokerConfig.USERNAME / BrokerConfig.PASSWORD are replaced with BrokerConfig.getUsername() / BrokerConfig.getPassword(). The session creation, queue lookup, consumer setup, and message processing loop are identical to the ActiveMQ version.

Configuration

The following table summarizes the changes required when migrating from Apache ActiveMQ.


ActiveMQ Amazon MQ for RabbitMQ
Maven dependency activemq-client 5.18.6 rabbitmq-jms 2.12.0
Connection factory class ActiveMQConnectionFactory RMQConnectionFactory
Import package org.apache.activemq com.rabbitmq.jms.admin
Broker URL format tcp://host:61616 amqps://broker-id.mq.region.on.aws:5671
Protocol OpenWire AMQP 0-9-1
Port 61616 (OpenWire) 5671 (AMQP over TLS)
TLS Optional Required
Credentials Plain text / JNDI AWS Secrets Manager (recommended)
Virtual host N/A / (default)
JMS version support JMS 1.1 JMS 1.1, 2.0, 3.1 (Jakarta)
Queue/Topic names demo.queue demo.queue (no change)
JMS API calls Standard JMS 1.1 Standard JMS 1.1 (no change)

Validating the migration

Run your application against Amazon MQ for RabbitMQ in a staging environment before directing production traffic to the new broker. Verify that messages flow correctly, consumers process as expected, and no data loss occurs during cutover.

The RabbitMQ management console provides real-time visibility into broker operations. Access it through the ConsoleURL from your broker details. The console shows queue depths, consumer counts, and message rates. Use it during testing to identify routing or throughput issues before production deployment

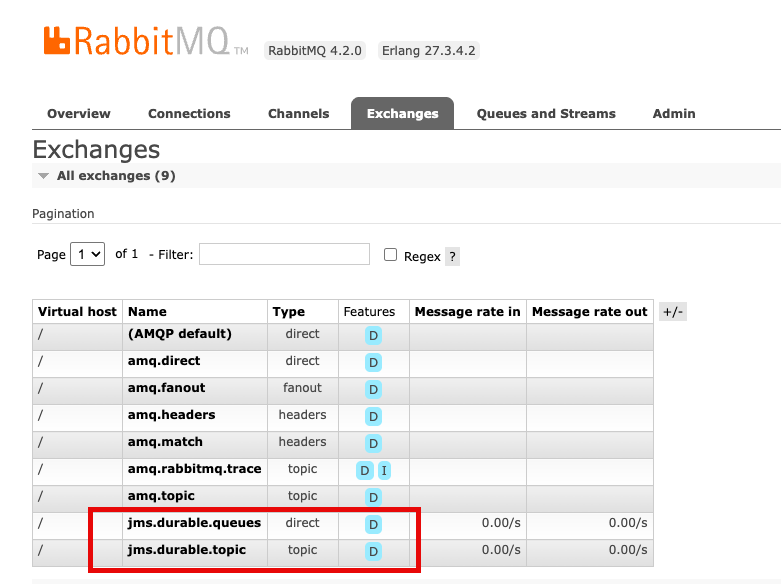
The console displays jms.durable.queues and jms.durable.topic exchanges. The JMS client creates these automatically when your application creates queues and topics, so no manual exchange configuration is required.

RabbitMQ management console showing jms.durable.queues and jms.durable.topic exchanges created automatically by the JMS client.

Monitoring with Amazon CloudWatch

Amazon MQ publishes broker metrics to Amazon CloudWatch with no additional configuration needed. This gives you persistent monitoring and alerting that works alongside the rest of your AWS observability setup, beyond what the RabbitMQ management console provides in real time.

After your JMS messages reach the Amazon MQ for RabbitMQ broker, they’re transported as AMQP messages, which means standard RabbitMQ operational best practices apply. Keep queue depth low to avoid memory pressure and consumer lag. Follow message durability and reliability guidelines to prevent message loss during broker restarts. For connection management, review broker setup and connection best practices to avoid connection churn.

Set Amazon CloudWatch alarms on MessageCount and ConnectionCount first. A rising queue depth with a stable or dropping consumer count is an early signal of a processing bottleneck. A sudden drop in connections can indicate a client configuration issue that’s more straightforward to catch before it affects production traffic.

Clean up

To avoid ongoing charges after testing, delete the Amazon MQ broker and Secrets Manager secret using the AWS CLI.

Delete the broker:

aws mq delete-broker --broker-id <your-broker-id> --region us-west-2

Delete the Secrets Manager secret:

aaws secretsmanager delete-secret \
--secret-id dev-rabbitmq \
--force-delete-without-recovery \
--region us-west-2

Broker deletion is permanent and can’t be undone. Amazon MQ removes all messages, configurations, and user credentials. Leaving the broker running incurs hourly charges based on the instance type, plus storage costs for message data retained on the broker.

Conclusion

In this post, we walked you through how to migrate your JMS applications. We also walked through a complete setup, from creating the broker to sending and receiving messages. Migrating the broker is the straightforward part. The more significant question is what you do next. After your JMS application is running on Amazon MQ for RabbitMQ, you have access to native AMQP clients, which means non-Java services can start consuming the same messages without a JMS layer. A Java-centric messaging system becomes a shared event backbone that service can participate in. The migration is a starting point, not just a lift-and-shift.

Next Steps

To get started with your migration, create your first Amazon MQ for RabbitMQ broker. For detailed technical guidance, see the Amazon MQ Developer Guide and explore the RabbitMQ JMS Client documentation.


About the authors


Vinodh Kannan is a Senior Specialist Solutions Architect at Amazon Web Services (AWS). His expertise centers on AWS messaging and streaming services, where he provides architectural best practices consultation to AWS customers.
Akhil Melakunta
Akhil Melakunta is a Senior Solutions Architect at Amazon Web Services (AWS) with over 12 years of industry experience. His expertise spans AI/ML, serverless, and messaging services, where he guides enterprise customers through large-scale cloud transformations on AWS.

Vignesh Selvam is the Principal Product Manager for Amazon MQ at AWS. He works with customers to solve their messaging needs and with the open-source communities for innovating with message brokers. Prior to joining AWS, he built products for security and analytics.