Post Syndicated from Sumeet Joshi original https://aws.amazon.com/blogs/big-data/federate-single-sign-on-access-to-amazon-redshift-query-editor-v2-with-okta/
Amazon Redshift query editor v2 is a web-based SQL client application that you can use to author and run queries on your Amazon Redshift data warehouse. You can visualize query results with charts and collaborate by sharing queries with members of your team. You can use query editor v2 to create databases, schemas, tables, and load data from Amazon Simple Storage Service (Amazon S3) using the COPY command or by using a wizard. You can browse multiple databases and run queries on your Amazon Redshift data warehouse or data lake, or run federated queries to operational databases such as Amazon Aurora. Because it’s a managed SQL editor in your browser and it’s integrated with your single sign-on (SSO) provider, Amazon Redshift query editor v2 reduces the number of steps to the first query so you gain insights faster.
Amazon Redshift query editor v2 integration with your identity provider (IdP) automatically redirects the user’s browser to the query editor v2 console instead of Amazon Redshift console. This enables your users to easily access Amazon Redshift clusters through query editor v2 using federated credentials without managing database users and passwords.
In this post, we focus on Okta as the IdP and illustrate how to set up your Okta application and AWS Identity and Access Management (IAM) permissions. We also demonstrate how you can limit the access for your users to use only query editor v2 without giving them access to perform any admin functions on the AWS Management Console.
Solution overview
The high-level steps in this post are as follows:
- Set up Okta, which contains your users organized into logical groups and AWS account federation application.
- Set up two IAM roles: one that establishes a trust relationship between your IdP and AWS, and a second role that Okta uses to access Amazon Redshift.
- Complete Okta advanced configuration:
- Finalize the Okta configuration by inputting the roles that you just created.
- Define a default relay state to direct users to Amazon Redshift query editor v2 after successful SAML authentication.
- Configure the SAML PrincipalTagAttribute. This element allows you to pass attributes as session tags in the SAML assertion. For more information about session tags, see Passing session tags in AWS STS.
- Set up Amazon Redshift database groups:
- Create groups within the Amazon Redshift database to match the Okta groups.
- Authorize these groups to access certain schemas and tables.
- Access Amazon Redshift query editor v2 using your enterprise credentials and query your Amazon Redshift database.
- Sign in to your Okta account and access the application assigned to you. The application directs you to Amazon Redshift query editor v2 using federated login.
- Access and query your Amazon Redshift database.
Prerequisites
This post assumes that you have the following prerequisites:
- An Okta account – If you don’t have access to an Okta account, you can start a 30-day free trial.
- An Amazon Redshift cluster – For instructions, see Create a sample Amazon Redshift cluster.
- Query editor v2 configured – If this is the first time logging in to query editor v2 from your account, you first need to configure the encryption key. For more information, refer to Configuring your AWS account.
Set up Okta
First, we set up the Okta application and create users and groups. Complete the following steps:
- Log in to your Okta admin console using the URL
https://<prefix>-admin.okta.com/admin/dashboard, where <prefix> is specific to your account and was created at account setup. - On the admin console, choose Admin.

- Under Directory in the navigation pane, choose People.
- To add users, choose Add person.
The following screenshot shows the users that we created.

- To add groups into Okta, choose Groups in the navigation pane, then choose Add group.
The following screenshot shows two groups that we created. We addedJanetoanalyst_usersandMiketobi_users.

- Under Applications in the navigation pane, choose Applications and choose Browse App Catalog.
- Search for AWS Account Federation and choose Add.

- After you add the application, choose AWS Account Federation.

- Leave the values in General Settings at their default and choose Next.
- Under Sign-On Options, select SAML 2.0.
- Choose the Identity Provider metadata link to download the metadata file in .xml format.


Configure IAM roles
Next, you set up an IAM role that establishes a trust relationship between the IdP and AWS. You also create an IAM role that Okta uses to access Amazon Redshift query editor v2.
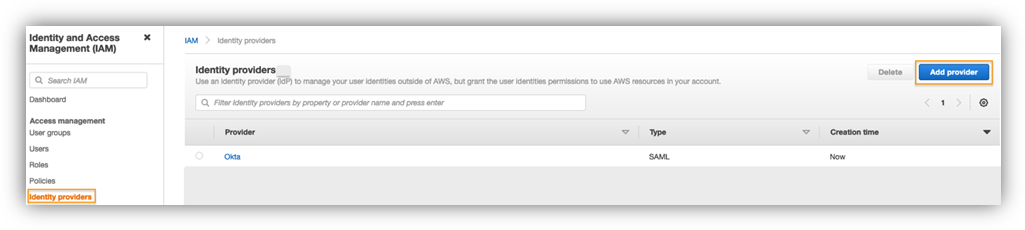
- On the IAM console, under Access management in the navigation pane, choose Identity providers.
- Choose Add provider.

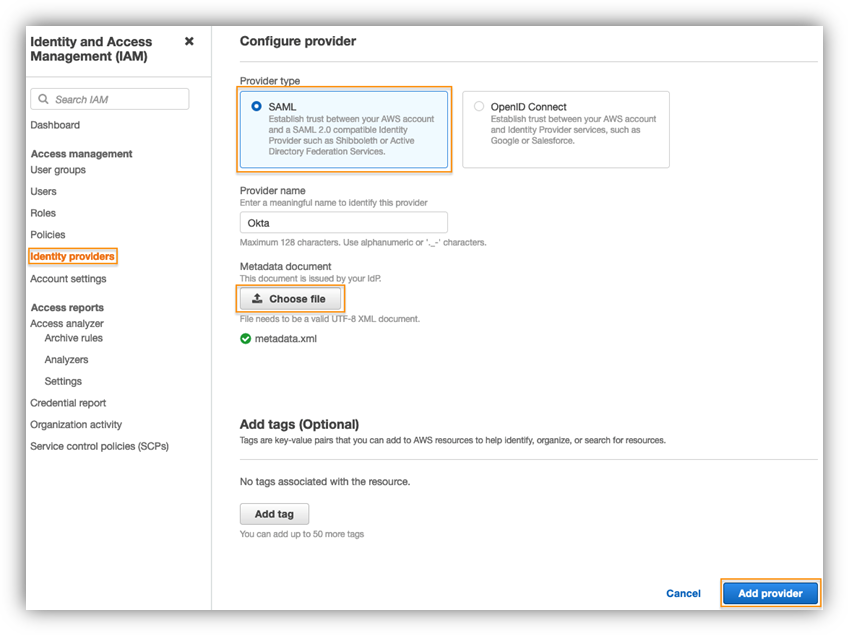
- For Provider type¸ select SAML.
- For Provider name¸ enter a name.
- Choose Choose file and upload the metadata file you downloaded.
- Choose Add provider.

Now you create the IAM SAML 2.0 federation role. - On the IAM console, choose Roles in the navigation pane.
- Choose Create role.
- For Trusted entity type, select SAML 2.0 federation.
- For SAML 2.0-based provider, choose the IdP you created in the previous step.
- Select Allow programmatic and AWS Management Console access.

- Choose Next and then choose Create Policy.


Amazon Redshift query editor v2 provides multiple managed policies to access the query editor. For a list of managed policies, refer to Configuring your AWS account. The managed policy enables you to limit the access for your users to use only query editor v2 without giving them access to perform any admin functions on the console. For this post, we use the AmazonRedshiftQueryEditorV2ReadSharing managed policy and create a custom policy.
In the following code, provide your Region, account, and cluster parameters to grant access to Amazon Redshift to get cluster credentials, create users, and allow users to join groups:
The group membership lasts only for the duration of the user session. Additionally, there is no CreateGroup permission because groups need to be manually created and granted DB privileges.
- Attach the policy you created to the role.
The following screenshot shows the summary page for the role.

- Modify the trust relationships for your role and add
sts:TagSessionpermission.
When using session tags, trust policies for all roles connected to the IdP passing tags must have the sts:TagSession permission. For roles without this permission in the trust policy, theAssumeRoleoperation fails. - Choose Update policy.


Set up Okta advanced configuration
In this section, you finalize the Okta configuration by adding the IAM roles that you just created. You set up SAML PrincipalTag attributes such as RedshiftDbUser and RedshiftDbGroups, which are passed in the SAML assertion to federate the access to Amazon Redshift query editor v2. You also define a default relay state, which is the URL that users are directed to after a successful authentication through SAML.
- In your Okta account, open the AWS Account Federation app.
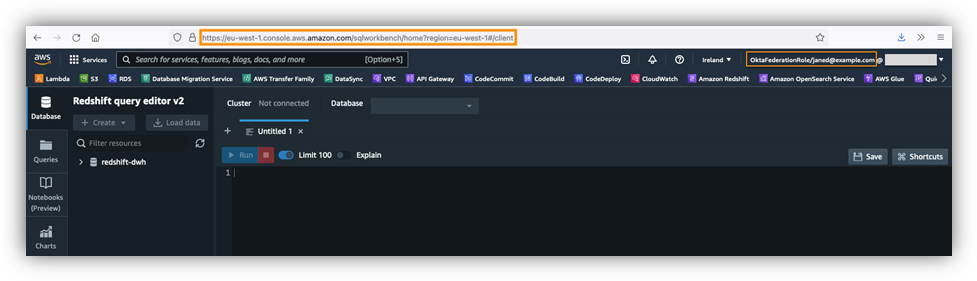
- On the Sign On tab, set Default Relay State to the query editor URL, using the format
https://<region>.console.aws.amazon.com/sqlworkbench/home. For this post, we usehttps://eu-west-1.console.aws.amazon.com/sqlworkbench/home. - Choose Attributes and set up the following attribute mappings:
- Set the DB user using
PrincipalTag:RedshiftDbUser. This uses the user name in the directory. This is a required tag and defines the database user that is used by query editor v2. - Set the DB groups using
PrincipalTag:RedshiftDbGroups. This uses the Okta groups to fill the principal tags. Its value must be a colon-separated list. - Set the transitive keys using
TransitiveTagKeys. This prevents users from changing the session tags in case of role chaining.
- Set the DB user using
These tags are forwarded to the redshift:GetClusterCredentials API to get credentials for your cluster. The following table summarizes their attribute configuration.
| Name | Name Format | Value |
| https://aws.amazon.com/SAML/Attributes/PrincipalTag:RedshiftDbUser | Unspecified | user.username |
| https://aws.amazon.com/SAML/Attributes/PrincipalTag:RedshiftDbGroups | Unspecified | String.join(“:”, isMemberOfGroupName(“analyst_users”) ? ‘analyst_users’ : ”, isMemberOfGroupName(“bi_users”) ? ‘bi_users’ : ”) |
| https://aws.amazon.com/SAML/Attributes/TransitiveTagKeys | Unspecified | Arrays.flatten(“RedshiftDbUser”, “RedshiftDbGroups”) |

- Under Advanced Sign-on Settings¸ select Use Group Mapping.
- Enter the IdP and IAM role ARNs, which are globally unique, and make sure that Okta is directed to your AWS account.

- Authorize users to use the AWS Account Federation application by selecting their respective groups or individual user accounts. In this example, we authorized users by group.


Set up Amazon Redshift database groups
Next, you set up groups in the Amazon Redshift database to match the Okta groups. You also authorize these groups to access certain schemas and tables.
- Log in to your Amazon Redshift cluster with an admin account.
- Create groups that match the IdP group names, and grant the appropriate permissions to tables and schemas:
In Okta, you created the user Jane and assigned Jane to the analyst_users group.
In the Amazon Redshift database, you created two database groups: analyst_users and bi_users.
When user Jane logs in via federated authentication to Amazon Redshift using query editor v2, the user is created if it doesn’t already exist and the analyst_users database group is assumed. The user Jane can query tables only in sales_analysis schema.
Because user Jane isn’t part of the bi_users group, when they try to access the sales_bi schema, they get a permission denied error.
The following diagram illustrates this configuration.

Access Amazon Redshift query editor v2
Now you’re ready to connect to your Amazon Redshift cluster using Amazon Redshift query editor v2 using federated login. Log in to your Okta account with your user credentials and under My Apps¸ choose Amazon Redshift Query Editor V2.

You’re redirected to the Amazon Redshift query editor v2 URL that you specified as the default relay state.
Connect to an Amazon Redshift database and run queries
Now let’s set up the connection to your Amazon Redshift cluster.
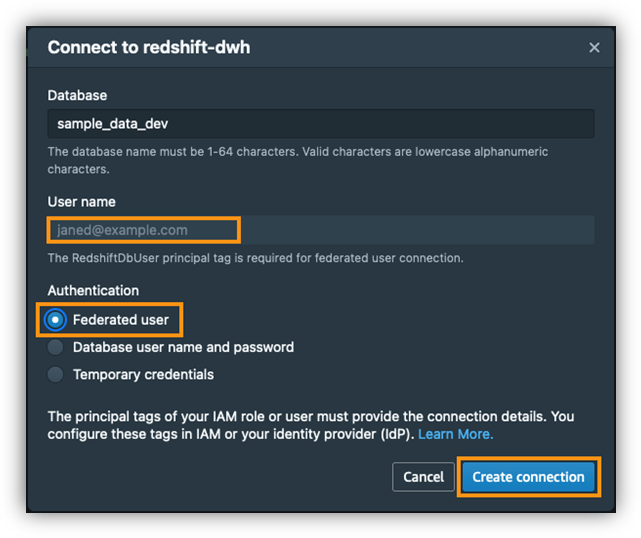
- In the query editor, choose your cluster (right-click) and choose Create connection.
- For Database, enter a name.
- For Authentication, select Federated user.
The user name is prepopulated with your federated login information. - Choose Create connection.

When you’re connected to your Amazon Redshift database, you can verify the connection details, as shown in the following screenshot. Notice the session-level group association as per the group assignment in your Okta application configuration. In this case, user Jane is assigned to the analyst_users group.
This user has access to SELECT all tables in the sales_analysis schema and no access to the sales_bi schema. You can run the following statements to test your access.
The following screenshot shows the results from a query to the sales_analysis.store_sales_us table.

When user Jane tries to access the tables in the sales_bi schema, they get a permission denied error.

Summary
In this post, we demonstrated how to federate SSO access to Amazon Redshift query editor v2 using Okta as your IdP. We showed how to set up Okta, set different PrinicpalTag attributes for query editor v2, and pass group memberships defined in your Okta IdP to your Amazon Redshift cluster. We showed how to log in to Amazon Redshift query editor v2 using federated login and validate the configuration by running a few queries. This solution allows you to control access to Amazon Redshift database objects, and your users can easily access Amazon Redshift clusters through query editor v2 using federated credentials without managing database users and passwords.
If you have any feedback or questions, please leave them in the comments.
About the Authors
 Sumeet Joshi is an Analytics Specialist Solutions Architect based out of New York. He specializes in building large-scale data warehousing solutions. He has over 16 years of experience in the data warehousing and analytical space.
 Bhanu Pittampally is an Analytics Specialist Solutions Architect based out of Dallas. He specializes in building analytical solutions. His background is in data and analytics for over 14 years. His LinkedIn profile can be found here.
 Erol Murtezaoglu, a Technical Product Manager at AWS, is an inquisitive and enthusiastic thinker with a drive for self-improvement and learning. He has a strong and proven technical background in software development and architecture, balanced with a drive to deliver commercially successful products. Erol highly values the process of understanding customer needs and problems, in order to deliver solutions that exceed expectations.
 Yanis Telaoumaten is a Software Development Engineer at AWS. His passions are building reliable software and creating tools to allow other engineers to work more efficiently. In the past years, he worked on identity, security and reliability of Redshift services