Post Syndicated from Ashok Dasineni original https://aws.amazon.com/blogs/big-data/configure-an-automated-email-sync-for-federated-sso-users-to-access-amazon-quicksight/
Amazon QuickSight is a scalable, serverless, embeddable, machine learning (ML)-powered business intelligence (BI) service built for the cloud that supports identity federation in both Standard and Enterprise editions. Organizations are working towards centralizing their identity and access strategy across all their applications, including on premises, third-party, and applications on AWS. Many organizations use identity providers (IdPs) based on OIDC or SAML-based protocols like Microsoft Azure Active Directory (Azure AD) or Okta to control and manage user authentication and authorization centrally. If your organization uses such IdPs for cloud applications, you may want to enable federation to QuickSight without needing to create and manage users multiple times. This authorizes users to access QuickSight assets—analyses, dashboards, folders, and datasets—through centrally managed Azure AD or Okta.
After you configure federation to QuickSight with Okta or federation with Azure AD, QuickSight users are asked to enter their email address when they log in for the first time.
This email request may create confusion for some users as to which email address they should use. To avoid this confusion, organizations want to streamline the user login process and prevent users from entering any emails other than their corporate email. To ensure that, the QuickSight admin can now use the new automated email sync feature for federated SSO users. With this new feature, admins can set up QuickSight and SSO such that email addresses for end-users are automatically synced at first-time login. This prevents any manual errors during entry, or users signing up with personal email addresses. Administrators can set up controls so that only corporate-assigned email addresses are used when users are provisioned to their QuickSight account through their IdP.
The following screenshot shows the current email address prompt screen for QuickSight upon first login.

In this post, we go through the steps to achieve automated email sync between your IdP and QuickSight for both Okta and Azure AD.
Solution overview
The steps involved in email syncing for federated SSO users are as follows:
- Configure your IdP to send the user email as part of the assertion.
- Enable email syncing for federated users via the QuickSight console.
- Validate the email sync from your IdP.
Configure your IdP to send the user email as part of the assertion
This step is applicable for setting up any third-party IdPs as part of federated SSO. For this post, we outline the separate steps for Okta and Azure AD.
Configure Okta to send the user email as part of the assertion
To configure Okta, complete the following steps:
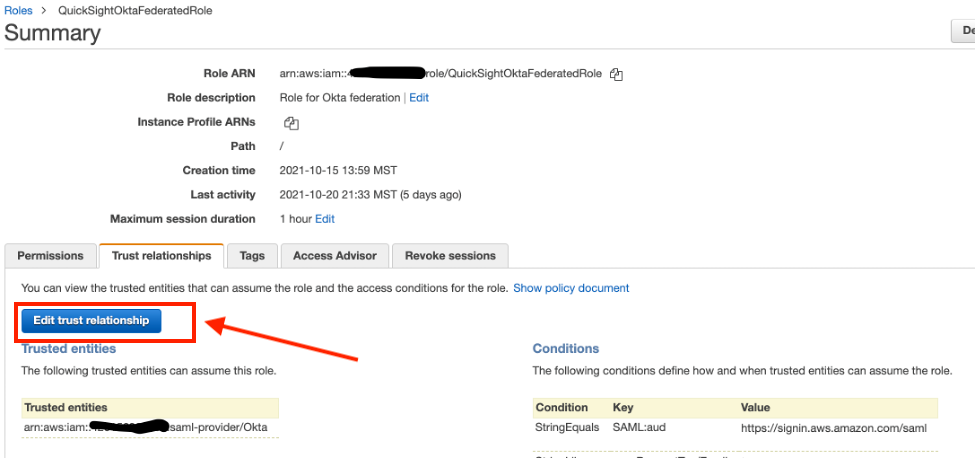
- On the IAM console, choose Roles in the navigation pane.
- Search for the role you use with
AssumeRoleWithSAML(for this post, it’s calledQuickSightOktaFederatedRole).

- On the Trust relationships tab, choose Edit trust relationship.

- For the policy details, enter the following JSON:
- Choose Update Trust Policy.
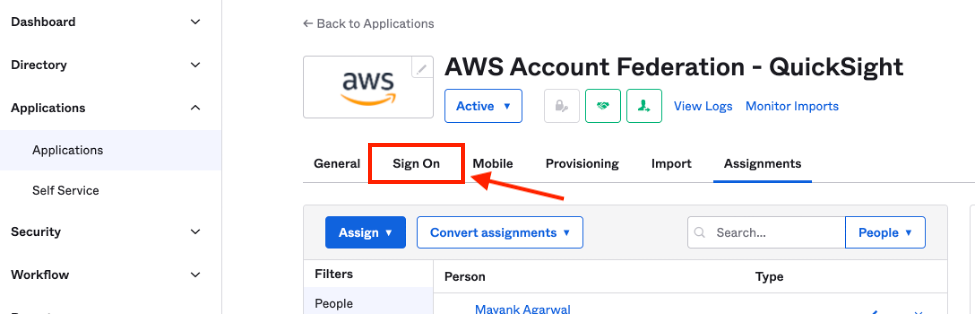
The IT administrator (responsible for managing Okta’s configuration) makes the following changes in the Okta configuration via Okta’s admin console: - Log in to the Okta admin console.
- Choose Applications in the navigation pane.

- Choose the Okta application for QuickSight federation (in this case, it’s called AWS Account Federation – QuickSight).

- Choose the Sign On tab.

- In the Settings section, choose Edit.

- Select SAML 2.0 and expand the Attributes section.

- Add an attribute statement as follows:
- For Name, enter
https://aws.amazon.com/SAML/Attributes/PrincipalTag:Email. - For Name format, select URI reference.
- For Value, enter
user.email.
- For Name, enter
- Choose Save.


Configure Azure AD to send the user email as part of the assertion
To configure Azure AD, complete the following steps:
- On the IAM console, choose Roles in the navigation pane.
- Search for the role you use with
AssumeRoleWithSAML(for this post, it’s calledQuickSightAzureFederatedRole).

- On the Trust relationships tab, choose Edit trust policy.

- For the policy details, enter the following JSON:
- Choose Update Policy.
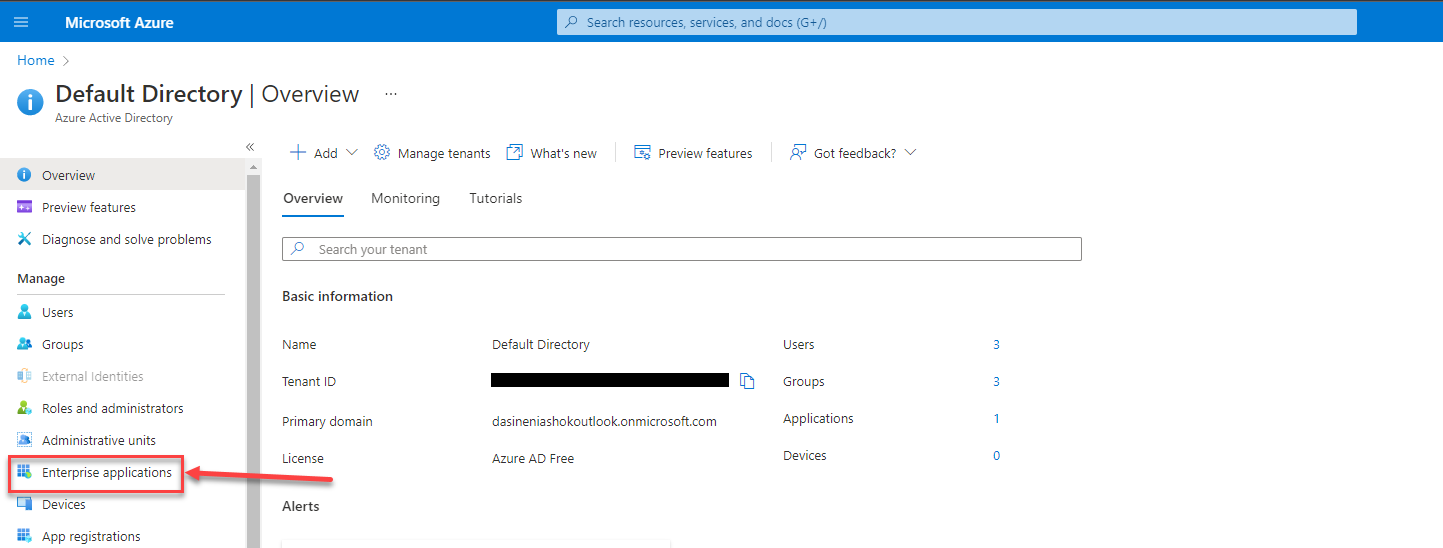
The IT administrator responsible for managing Azure AD configuration makes the following changes in the Azure configuration via Azure’s admin console: - Log in to your Azure portal using the administrator account.
- Under Azure services, open Azure Active Directory and under Manage, choose Enterprise applications.

- Choose the Azure application for QuickSight federation (in this case, it’s called Amazon Quicksight).

- Choose Single sign-on under Manage or Set up single sign on.

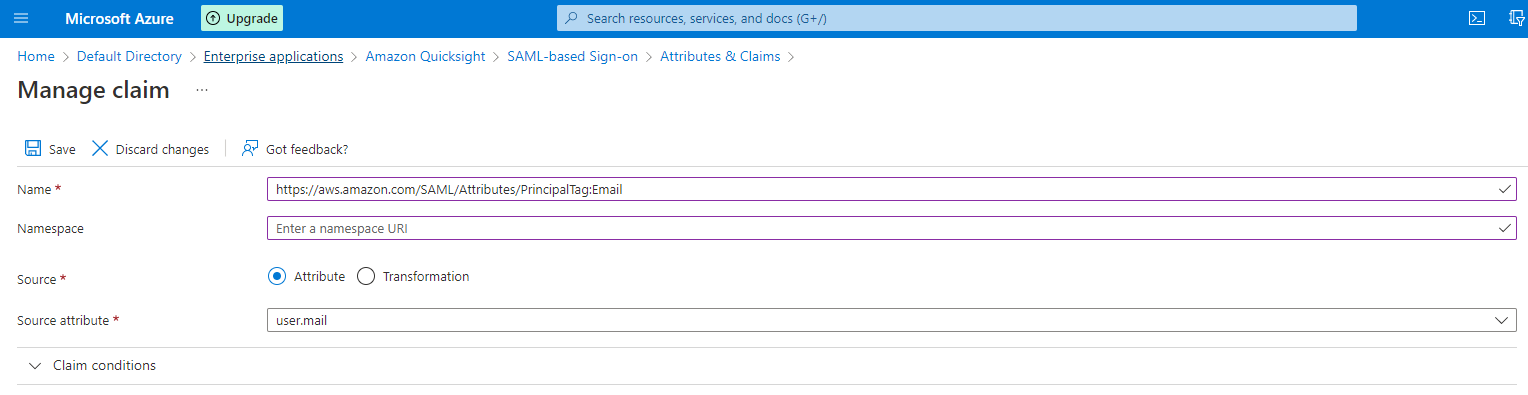
- Under Attributes & Claims, choose Edit.

- Choose Add new claim.
- Add the claim information as follows:
- For Name, enter
https://aws.amazon.com/SAML/Attributes/PrincipalTag:Email. - For Source, select Attribute.
- For Source Attribute, enter
user.mail.

- For Name, enter
- Choose Save.


The new claim for the user email is added under Additional claims.

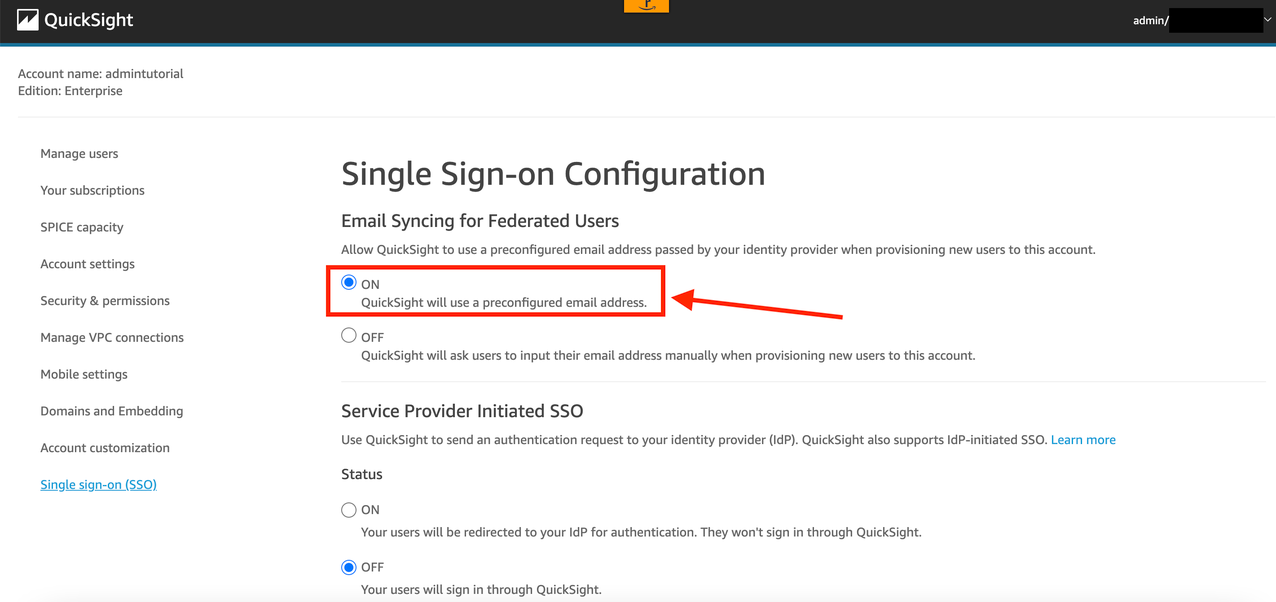
Enable email syncing for federated users in QuickSight
Now we’re ready to enable email syncing for federated users. Complete the following steps:
- On the QuickSight console, on the user name menu, choose Manage QuickSight.

- Choose Single sign-on (SSO) in the navigation pane.

- In the Email Syncing for Federated Users section, select ON.


Validate the email sync from your IdP
In this section, we walk through the steps to validate your email sync from both Okta and Azure AD.
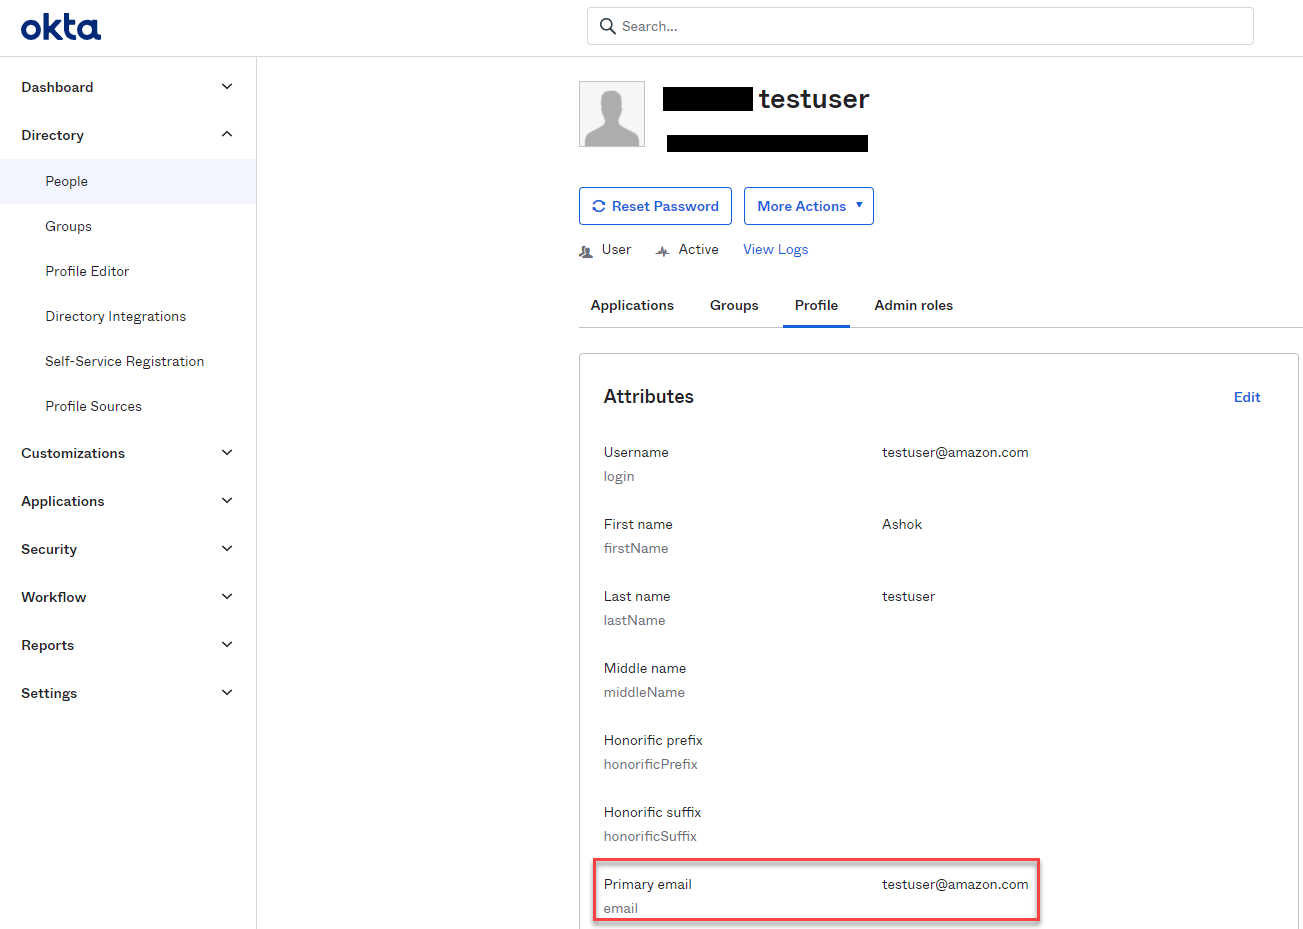
Validate the email sync from Okta
On the Okta console, verify if the user profile has a valid email in the Primary email attribute. This is the key value for email sync with QuickSight.
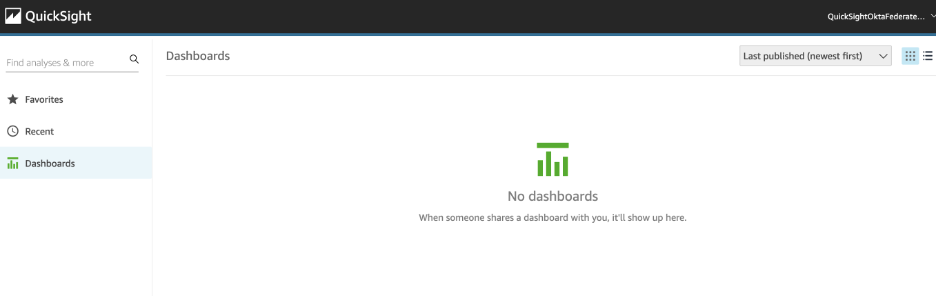
Users now have the option to launch the QuickSight application from Okta.

Users can directly go to the QuickSight console without providing an email address.
Validate the email sync from Azure AD
From the Azure console, verify if the user profile has valid information under the Email attribute. This is the key value for email sync with QuickSight.

When users launch the QuickSight application from the Azure console or myapps.microsoft.com, they can directly go to the QuickSight console without providing an email address.
The following screenshot shows how to access QuickSight from the Azure console.

The following screenshot shows how to access QuickSight from myapps.microsoft.com.

Both options bring the user to the QuickSight console.
Summary
This post provided a step-by-step guide for configuring an automated email sync from both Okta and Azure. Although this post demonstrated the automated email sync to QuickSight, you can replicate this solution using your choice of IdPs. For more information related to this new feature, refer to Configuring email syncing for federated users in Amazon QuickSight.
For additional discussions and help getting answers to your questions, check out the QuickSight Community.
About the authors
 Ashok Dasineni is a Solutions Architect for Amazon QuickSight. Before joining AWS, Ashok worked with clients and organizations in Banking and financial domain, focusing on fraud research and prevention. He designed and implemented innovative solutions to improve business process, reduce cost and increase revenue, enabling companies around the world to achieve their highest potential through data.
 Raji Sivasubramaniam is a Sr. Solutions Architect at AWS, focusing on Analytics. Raji is specialized in architecting end-to-end Enterprise Data Management, Business Intelligence and Analytics solutions for Fortune 500 and Fortune 100 companies across the globe. She has in-depth experience in integrated healthcare data and analytics with wide variety of healthcare datasets including managed market, physician targeting and patient analytics.
 Srikanth Baheti is a Specialized World Wide Sr. Solution Architect for Amazon QuickSight. He started his career as a consultant and worked for multiple private and government organizations. Later he worked for PerkinElmer Health and Sciences & eResearch Technology Inc, where he was responsible for designing and developing high traffic web applications, highly scalable and maintainable data pipelines for reporting platforms using AWS services and Serverless computing.