Post Syndicated from Sumeet Joshi original https://aws.amazon.com/blogs/big-data/accelerate-resize-and-encryption-of-amazon-redshift-clusters-with-faster-classic-resize/
Amazon Redshift has improved the performance of the classic resize feature and increased the flexibility of the cluster snapshot restore operation. You can use the classic resize operation to resize a cluster when you need to change the instance type or transition to a configuration that can’t be supported by elastic resize. This could take the cluster offline for many hours during the resize, but now the cluster can typically be available to process queries in minutes. Clusters can also be resized when restoring from a snapshot and in those cases there could be restrictions.
You can now also restore an encrypted cluster from an unencrypted snapshot or change the encryption key. Amazon Redshift uses AWS Key Management Service (AWS KMS) as an encryption option to provide an additional layer of data protection by securing your data from unauthorized access to the underlying storage. Now you can encrypt an unencrypted cluster with a KMS key faster by simply specifying a KMS key ID when modifying the cluster. You can also restore an AWS KMS-encrypted cluster from an unencrypted snapshot. You can access the feature via the AWS Management Console, SDK, or AWS Command Line Interface (AWS CLI). Please note that these features only apply to the clusters or target clusters with the RA3 node type.
In this post, we show you how the updated classic resize option works and also how it significantly improves the amount of time it takes to resize or encrypt your cluster with this enhancement. We also walk through the steps to resize your Amazon Redshift cluster using Faster Classic Resize.
Existing resize options
We’ve worked closely with our customers to learn how their needs evolve as their data scales or as their security and compliance requirements change. To address and meet your ever-growing demands, you often have to resize your Amazon Redshift cluster and choose an optimal instance type that delivers the best price/performance. As of this writing, there are three ways you can resize your clusters: elastic resize, classic resize, and the snapshot, restore, and resize method.
Among the three options, elastic resize is the fastest available resize mechanism because it works based on slice remapping instead of full data copy. And classic resize is used primarily when cluster resize is outside the allowed slice ranges by elastic resize, or the encryption status should be changed. Let’s briefly discuss these scenarios before describing how the new migration process helps.
Current limitations
The current resize options have a few limitations of note.
- Configuration changes – Elastic resize supports the following RA3 configuration changes by design. So, when you need to choose a target cluster outsize the ranges mentioned in the following table, you should choose classic resize.
| Node Type | Growth Limit | Reduction Limit |
| ra3.16xlarge | 4x (from 4 to 16 nodes, for example) | To one-quarter of the number (from 16 to 4 nodes, for example) |
| ra3.4xlarge | 4x | To one-quarter of the number |
| ra3.xlplus | 2x (from 4 to 8 nodes, for example) | To one-quarter of the number |
Also, elastic resize can’t be performed if the current cluster is a single-node cluster or isn’t running on an EC2-VPC platform. These scenarios also drive customers to choose classic resize.
- Encryption changes – You may need to encrypt your Amazon Redshift cluster based on security, compliance, and data consumption requirements. Currently, in order to modify encryption on an Amazon Redshift cluster, we use classic resize technology, which internally performs a deep copy operation of the entire dataset and rewrites the dataset with the desired encryption state. To avoid any changes during the deep copy operation, the source cluster is placed in read-only mode during the entire operation, which can take a few hours to days depending on the dataset size. Or, you might be locked out altogether if the data warehouse is down for a resize. As a result, the administrators or application owners can’t support Service Level Agreements (SLAs) that they have set with their business stakeholders.
Switching to the Faster Classic Resize approach can help speed up the migration process when turning on encryption. This has been one of the requirements for cross-account, cross-Region data sharing enabled on unencrypted clusters and integrations with AWS Data Exchange for Amazon Redshift. Additionally, Amazon Redshift Serverless is encrypted by default. So, to create a data share from a provisioned cluster to Redshift Serverless, the provisioned cluster should be encrypted as well. This is one more compelling requirement for Faster Classic Resize.
Faster Classic Resize
Faster Classic Resize works like elastic resize, but performs similar functions like classic resize, thereby offering the best of both approaches. Unlike classic resize, which involves extracting tuples from the source cluster and inserting those tuples on the target cluster, the Faster Classic Resize operation doesn’t involve extraction of tuples. Instead, it starts from the snapshots and the data blocks are copied over to the target cluster.
The new Faster Classic Resize operation involves two stages:
- Stage 1 (Critical path) – This first stage consists of migrating the data from the source cluster to the target cluster, during which the source cluster is in read-only mode. Typically, this is a very short duration. Then the cluster is made available for read and writes.
- Stage 2 (Off critical path) – The second stage involves redistributing the data as per the previous data distribution style. This process runs in the background off the critical path of migration from the source to target cluster. The duration of this stage is dependent on the volume to distribute, cluster workload, and so on.
Let’s see how Faster Classic Resize works with configuration changes, encryption changes, and restoring an unencrypted snapshot into an encrypted cluster.
Prerequisites
Complete the following prerequisite steps:
- Take a snapshot from the current cluster or use an existing snapshot.
- Provide the AWS Identity and Access Management (IAM) role credentials that are required to run the AWS CLI. For more information, refer to Using identity-based policies (IAM policies) for Amazon Redshift.
- For encryption changes, create a KMS key if none exists. For instructions, refer to Creating keys.
Configuration changes
As of today, you can initiate Faster Classic Resize through the AWS CLI when the required cluster configuration change is beyond what is allowed by elastic resize. The feature will be added to the console in a future release. As of this writing, you can use it change your cluster configuration from DC2, DS2, and RA3 node types to any RA3 node type. However, changing from RA3 to DC2 or DS2 is not supported yet.
We did a benchmark on Faster Classic Resize with different cluster combinations and volumes. The following table summarizes the results comparing critical paths in classic resize and Faster Classic Resize.
| Volume | Source Cluster | Target Cluster | Classic Resize Duration (min) |
Faster Classic Resize Stage1 Duration (min) |
% Faster |
| 10 TB | ra3 4xlarge – 6 nodes | ra3 16xlarge – 8 nodes | 78 | 11 | 86% |
| 10 TB | ra3 16xlarge – 8 nodes | ra3 4xlarge – 2 nodes | 738 | 11 | 99% |
| 10 TB | dc2 8xlarge – 6 nodes | ra3 4xLarge – 2 nodes | 706 | 8 | 99% |
| 3 TB | ra3 4xLarge – 2 nodes | ra3 16xLarge – 4 nodes | 53 | 11 | 79% |
| 3 TB | ra3 16xLarge – 4 nodes | ra3 4xLarge – 2 nodes | 244 | 7 | 97% |
| 3 TB | dc2 8xlarge – 6 nodes | ra3 4xLarge – 2 nodes | 251 | 7 | 97% |
The Faster Classic Resize option consistently completed in significantly less time and made the cluster available for read and write operations in a short time. Classic resize took a longer time in all cases and kept the cluster in read-only mode, making it unavailable for writes. Also, the classic resize duration is comparatively longer when the target cluster configuration is smaller than the original cluster configuration.
Perform Faster Classic Resize
As of this writing, the feature isn’t available on the console. You can use either of the following two methods to resize your cluster using Faster Classic Resize via the AWS CLI.
- Modify cluster method – Resize an existing cluster without changing the endpoint
The following are the steps involved:
-
- Take a snapshot on the current cluster prior to performing the resize operation.
- Determine the target cluster configuration and run the following command from the AWS CLI:
For example:
- Snapshot restore method – Restore an existing snapshot to the new cluster with the new cluster endpoint
The following are the steps involved:
-
- Identify the snapshot for restore and a unique name for the new cluster.
- Determine the target cluster configuration and run the following command from the AWS CLI:
For example:
Monitor the resize process
Monitor the progress through the cluster management console. You can also check the events generated by the resize process. The resize completion status is logged in events along with the duration it took for the resize. The following screenshot shows an example.

It’s important to note that you may observe longer query times in the second stage of Faster Classic Resize. During the first stage, the data for tables with dist-key distribution style is transferred as dist-even. Later, a background process converts them back to dist-key (in stage 2). However, background processes are running behind the scenes to get the data redistributed to the original distribution style (the distribution style before the cluster resize). You can monitor the progress of the background processes by querying the stv_xrestore_alter_queue_state table. It’s important to note that tables with ALL, AUTO, or EVEN distribution styles don’t require redistribution post-resize. Therefore, they’re not logged in the stv_xrestore_alter_queue_state table. The counts you observe in these tables are for the tables with distribution style as Key before the resize operation.
See the following example query:
The following table shows that for 60 tables data redistribution is finished, for 323 tables data redistribution is pending, and for 1 table data redistribution is in progress.

We ran tests to assess time to complete the redistribution. For 10 TB of data, it took approximately 5 hours and 30 minutes on an idle cluster. For 3 TB, it took approximately 2 hours and 30 minutes on an idle cluster. The following is a summary of tests performed on larger volumes:
- A snapshot with 100 TB where 70% of blocks needs redistribution would take 10–40 hours
- A snapshot with 450 TB where 70% of blocks needs redistribution would take 2–8 days
- A snapshot with 1600 TB where 70% of blocks needs redistribution would take 7–27 days
The actual time to complete redistribution is largely dependent on data volume, cluster idle cycles, target cluster size, data skewness, and more. Therefore, we recommend performing Faster Classic Resize when there is enough of an idle window (such as weekends) for the cluster to perform redistribution.
Encryption changes
You can encrypt your Amazon Redshift cluster from the console (the modify cluster method) or using the AWS CLI using the snapshot restore method. Amazon Redshift performs the encryption change using Faster Classic Resize. The operation only takes a few minutes to complete and your cluster is available for both read and write. With Faster Classic Resize, you can change an unencrypted cluster to an encrypted cluster or change the encryption key using the snapshot restore method.
For this post, we show how you can change the encryption using the Amazon Redshift console. To test the timings, we created multiple Amazon Redshift clusters using TPC-DS data. The Faster Classic Resize option consistently completed in significantly less time and made clusters available for read and write operations faster. Classic resize took a longer time in all cases and kept the cluster in read-only mode. The following table contains the summary of the results.
| Data Volume | Cluster | Encryption (Classic Resize) Duration (min) |
Encryption (Faster Classic Resize) Duration (min) |
% Faster |
| 10 TB | ra3.4xlarge – 2 nodes | 580 | 11 | 98% |
| 10 TB | ra3.xlplus – 2 nodes | 680 | 16 | 98% |
| 3 TB | ra3.4xlarge – 2 nodes | 527 | 9 | 98% |
| 3 TB | ra3.xlplus – 2 nodes | 570 | 10 | 98% |
Now, let’s perform the encryption change from an unencrypted cluster to an encrypted cluster using the console. Complete the following steps:
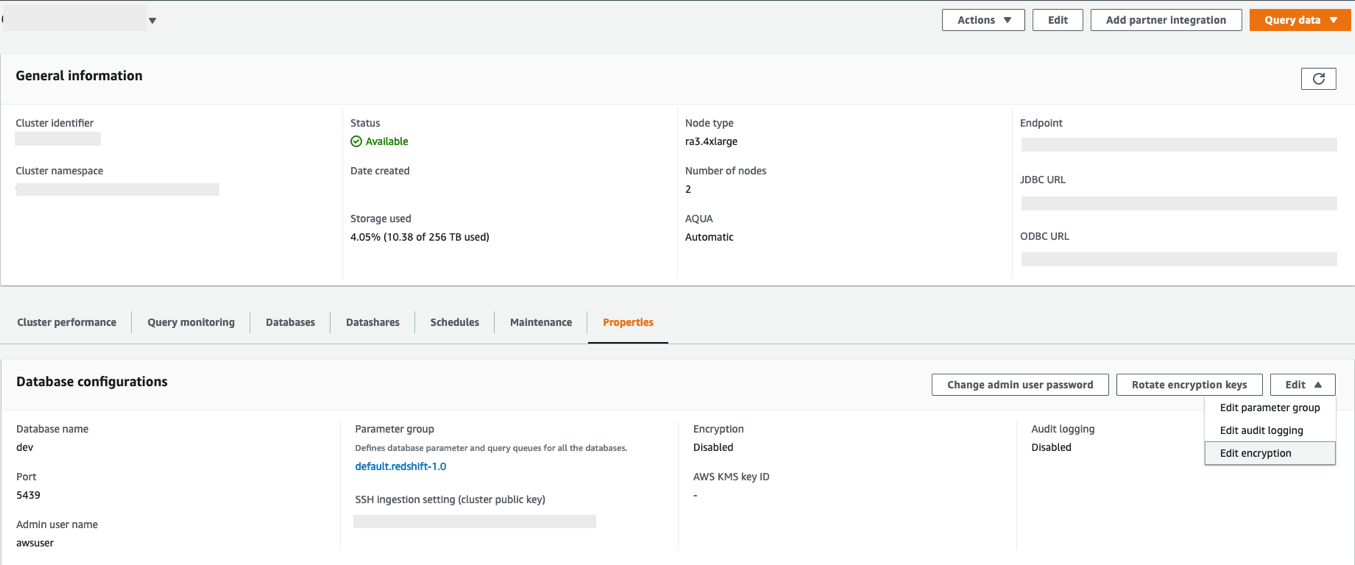
- On the Amazon Redshift console, navigate to your cluster.
- On the Properties tab, on the Edit drop-down menu, choose Edit encryption.

- For Encryption, select Use AWS Key Management Service (AWS KMS).
- For AWS KMS, select Default Redshift key.
- Choose Save changes.


You can monitor the progress of your encryption change on the Events tab. As shown in the following screenshot, the entire process to change the encryption took approximately 11 minutes.

Restore an unencrypted snapshot to an encrypted cluster
As of today, the Faster Classic Resize option to restore an unencrypted snapshot into an encrypted cluster or to change the encryption key is available only through the AWS CLI. When triggered, the restored cluster operates in read/write mode immediately. The encryption state change for restored blocks that are unencrypted operates in the background, and newly ingested blocks continue to be encrypted.
Restore the snapshot using the following command into a new cluster. (Replace the indicated parameter values; --encrypted and --kms-key-id are required).
When to use which resize option
The following flow chart provides guidance on which resize option is recommended when changing your cluster encryption status or resizing to a new cluster configuration.

Summary
In this post, we talked about the improved performance of Amazon Redshift’s classic resize feature and how Faster Classic Resize significantly improves your ability to scale your Amazon Redshift clusters using the classic resize method. We also talked about when to use different resize operations based on your requirements. We demonstrated how it works from the console (for encryption changes) and using the AWS CLI. We also showed the results of our benchmark test and how it significantly improves the migration time for configuration changes and encryption changes for your Amazon Redshift cluster.
To learn more about resizing your clusters, refer to Resizing clusters in Amazon Redshift. If you have any feedback or questions, please leave them in the comments.
About the authors
 Sumeet Joshi is an Analytics Specialist Solutions Architect based out of New York. He specializes in building large-scale data warehousing solutions. He has over 17 years of experience in the data warehousing and analytical space.
 Satesh Sonti is a Sr. Analytics Specialist Solutions Architect based out of Atlanta, specialized in building enterprise data platforms, data warehousing, and analytics solutions. He has over 16 years of experience in building data assets and leading complex data platform programs for banking and insurance clients across the globe.
 Krishna Chaitanya Gudipati is a Senior Software Development Engineer at Amazon Redshift. He has been working on distributed systems for over 14 years and is passionate about building scalable and performant systems. In his spare time, he enjoys reading and exploring new places.
 Yanzhu Ji is a Product Manager on the Amazon Redshift team. She worked on the Amazon Redshift team as a Software Engineer before becoming a Product Manager. She has a rich experience of how the customer-facing Amazon Redshift features are built from planning to launching, and always treats customers’ requirements as first priority. In her personal life, Yanzhu likes painting, photography, and playing tennis.