Post Syndicated from Richard Whitworth original https://aws.amazon.com/blogs/architecture/behavior-driven-chaos-with-aws-fault-injection-simulator/
A common challenge organizations face is how to gain confidence in and provide evidence for the continuous resilience of their workloads. Using modern chaos engineering principles can help in meeting this challenge, but the practice of chaos engineering can become complex. As a result, both the definition of the inputs and comprehension of the outputs of the process can become inaccessible to non-technical stakeholders.
In this post, we will explore a working example of how you can build chaos experiments using human readable language, AWS Fault Injection Simulator (FIS), and a framework familiar to Developers and Test Engineers. In turn, this will help you to produce auditable evidence of your workload’s continuous resilience in a way that is more engaging and understandable to a wider community of stakeholders.
If you are new to chaos engineering, including the process and benefits, a great place to start is with the Architecture Blog post on workload resiliency.
Chaos experiment attributes
For a chaos experiment to be considered complete, the experiment should exhibit the following attributes:
- Defined steady state
- Hypothesis
- Defined variables and experiment actions to take
- Verification of the hypothesis
Combining FIS and Behave
FIS enables you to create the experiment actions outlined in the list of chaos experiment attributes. You can use the actions in FIS to simulate the effect of disruptions on your workloads so that you can observe the resulting outcome and gain valuable insights into the workload’s resilience. However, there are additional attributes that should be defined when writing a fully featured chaos experiment.
This is what combining Python-style Behave with FIS enables you to do (other behavior-driven development frameworks exist for different languages). By approaching chaos experiments in this way, you get the benefit of codifying all of your chaos experiment attributes, such as the hypothesis, steady state and verification of the hypothesis using human readable Gherkin syntax, then automating the whole experiment in code.
Using Gherkin syntax enables non-technical stakeholders to review, validate, and contribute to chaos experiments, plus it helps to ensure the experiments can be driven by business outcomes and personas. If you have defined everything as code, then the whole process can be wrapped into the appropriate stage of your CI/CD pipelines to ensure existing experiments are always run to avoid regression. You can also iteratively add new chaos experiments as new business features are enabled in your workloads or you become aware of new potential disruptions. In addition, using a behavior-driven development (BDD) framework, like Behave, also enables developers and test engineers to deliver the capability quickly since they are likely already familiar with BDD and Behave.
The remainder of this blog post provides an example of this approach using an experiment that can be built on to create a set of experiments for your own workloads. The code and resources used throughout this blog are available in the AWS Samples aws-fis-behaviour-driven-chaos repository, which provides a CloudFormation template that builds the target workload for our chaos experiment.
The workload comprises an Amazon Virtual Private Cloud with a public subnet, an EC2 Auto-scaling Group and EC2 instances running NGINX. The CloudFormation template also creates an FIS experiment template, comprising a standard FIS Amazon Elastic Compute Cloud (Amazon EC2) action. For your own implementation, we recommend that you keep the CloudFormation for FIS separate to the CloudFormation, which builds the workload so that it can be maintained independently. Please note, for simplicity, they are together in the same repo for this blog.
Note: The Behave code in the repo is structured in a way we suggest you adopt for your own repo. It keeps the scenario definition separated from the Python-specific implementation of the steps and in turn the outline of the steps is separated from the step helper methods. This will allow you to build a set of re-usable step helper methods that can be dropped-into/called-from any Behave step. This can help keep your test codebase as DRY and efficient as possible as it grows. This can be very challenging for large test frameworks.
Figure 1 shows the AWS services and components we’re interacting with in this post.
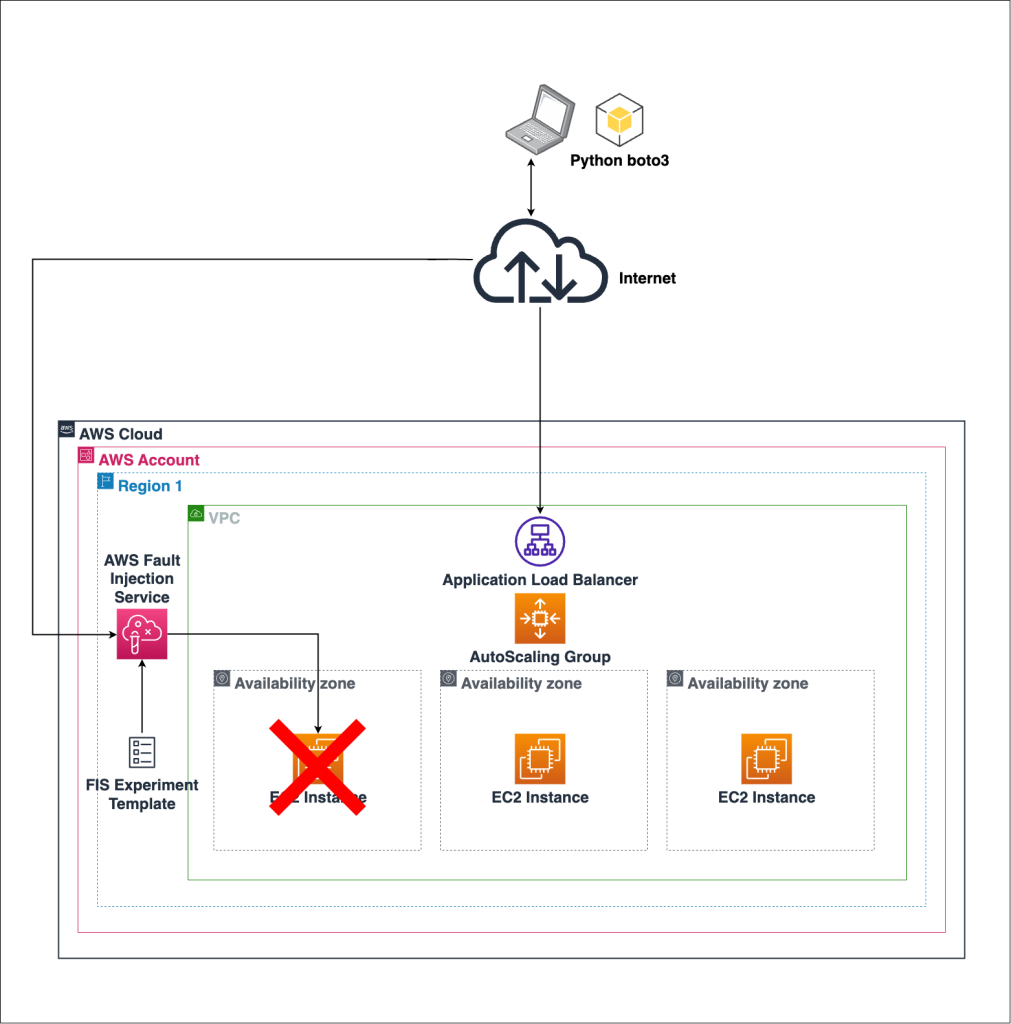
Figure 1. Infrastructure for the chaos experiment
Defining and launching the chaos experiment
We start by defining our chaos experiment in Gherkin syntax with the Gherkin’s Scenario being used to articulate the hypothesis for our chaos experiment as follows:
Scenario: My website is resilient to infrastructure failure
Given My website is up and can serve 10 transactions per second
And I have an EC2 Auto-Scaling Group with at least 3 running EC2 instances
And I have an EC2 Auto-Scaling Group with instances distributed across at least 3 Availability Zones
When an EC2 instance is lost
Then I can continue to serve 10 transactions per second
And 90 percent of transactions to my website succeed
Our initial Given, And steps validate that the conditions and environment that we are launching the Scenario in are sufficient for the experiment to be successful (the steady state). Therefore, if the environment is already out of bounds (read: the website isn’t running) before we begin, then the test will fail anyway, and we don’t want a false positive result. Since the steps are articulated as code using Behave, the test report will demonstrate what caused the experiment to fail and be able to identify if it was an environmental issue (false positive) rather than a true positive failure (the workload didn’t respond as we anticipated) during our chaos experiment.
The Given, And steps are launched using steps like the following example. Steps, in turn, call the relevant step_helper functions. Note how the phrases from the scenario are represented in the decorator for the step_impl function; this is how you link the human readable language in the scenario to the Python code that initiates the test logic.
@step("My website is up and can serve {number} transactions per second")
def step_impl(context, number):

    target = f"http://{context.config.userdata['website_hostname']}"

    logger.info(f'Sending traffic to target website: {target} for the next 60 seconds, please wait....')
    send_traffic_to_website(target, 60, "before_chaos", int(number))

    assert verify_locust_run(int(number), "before_chaos") is True
Once the Given, And steps have initiated successfully, we are satisfied that the conditions for the experiment are appropriate. Next, we launch the chaos actions using the When step. Here, we interact with FIS using boto3 to start the experiment template that was created earlier using CloudFormation. The following code snippet shows the code, which begins this step:
@step("an EC2 instance is lost")
def step_impl(context):

    if "fis" not in context.clients:
        create_client("fis", context)

    state = start_experiment(
        context.clients["fis"], context.config.userdata["fis_experiment_id"]
    )["experiment"]["state"]["status"]
    logger.info(f"FIS experiment state is: {state}")

    assert state in ["running", "initiating"]
The experiment template being used here is intentionally a very simple, single-step experiment as an example for this blog. FIS enables you to create very elaborate multi-step experiments in a straightforward manner, for more information please refer to the AWS FIS actions reference.
The experiment is now in flight! We launched the Then, And steps to validate our hypothesis expressed in the Scenario. Now, we query the website endpoint to see if we get any failed requests:
@step("I can continue to serve {number} transactions per second")
def step_impl(context, number):

    target = f"http://{context.config.userdata['website_hostname']}"

    logger.info(f'Sending traffic to target website {target} for the next 60 seconds, please wait....')
    send_traffic_to_website(target, 60, "after_chaos", int(number))

    assert verify_locust_run(int(number), "after_chaos") is True


@step("{percentage} percent of transactions to my website succeed")
def step_impl(context, percentage):

    assert success_percent(int(percentage), "after_chaos") is True
You can add as many Given, When, Then steps to validate your Scenario (the experiment’s hypothesis) as you need; for example, you can use additional FIS actions to validate what happens if a network failure prevents traffic to a subnet. You can also code your own actions using AWS Systems Manager or boto3 calls of your choice.
In our experiment, the results have validated our hypothesis, as seen in Figure 2.

Figure 2. Hypothesis validation example
There are a few different ways to format your results when using Behave so that they are easier to pull into a report; Allure is a nice example.
To follow along, the steps in the Implementation Details section will help launch the chaos experiment at your CLI. As previously stated, if you were to use this approach in your development lifecycle, you would hoist this into your CI/CD pipeline and tooling and not launch it locally.
Implementation details
Prerequisites
To deploy the chaos experiment and test application, you will need:
- An AWS account
- Access to AWS CloudShell or have the AWS CLI installed with a configured profile and appropriate AWS Access Keys. Please ensure you have a recent and working version of Python (v3.9 or newer).
Note: Website availability tests are initiated from your CLI in the sample code used in this blog. If you are traversing a busy corporate proxy or a network connection that is not stable, then it may cause the experiment to fail.
Further, to keep the prerequisites as minimal and self-contained as possible for this blog, we are using Locust as a Python library, which is not a robust implementation of Locust. Using a Behave step implementation, we instantiate a local Locust runner to send traffic to the website we want to test before and after the step, which takes the chaos action. For a robust implementation in your own test suite, you could build a Locust implementation behind a REST API or use a load-testing suite with an existing REST API, like Blazemeter, which can be called from a Behave step and run for the full length of the experiment.
The CloudFormation that you will launch with this post creates some public facing EC2 instances. You should restrict access to just your public IP address using the instructions below. You can find your IP at https://checkip.amazonaws.com/. Use the IP address shown with a trailing /32 e.g. 1.2.3.4/32
Environment preparation
Clone the git repository aws-fis-behaviour-driven-chaos that contains the blog resources using the below command:
git clone https://github.com/aws-samples/aws-fis-behaviour-driven-chaos.git
We recommend creating a new, clean Python virtual environment and activating it:
python3 -m venv behavefisvenv
source behavefisvenv/bin/activate
Deployment steps
To be carried out from the root of the blog repo:
- Install the Python dependencies into your Python environment:
pip install -r requirements.txt - Create the test stack and wait for completion (ensure you replace the parameter value for AllowedCidr with your public IP address):
aws cloudformation create-stack --stack-name my-chaos-stack --template-body file://cloudformation/infrastructure.yaml --region=eu-west-1 --parameters ParameterKey=AllowedCidr,ParameterValue=1.2.3.4/32 --capabilities CAPABILITY_IAM
aws cloudformation wait stack-create-complete --stack-name my-chaos-stack --region=eu-west-1 - Once the deployment reaches a create-complete state, retrieve the stack outputs:
aws cloudformation describe-stacks --stack-name my-chaos-stack --region=eu-west-1 - Copy the OutputValue of the stack Outputs for AlbHostname and FisExperimentId into the behave/userconfig.json file, replacing the placeholder values for website_hostname and fis_experiment_id, respectively.
- Replace the region value in the behave/userconfig.json file with the region you built the stack in (if altered in Step 2).
- Change directory into behave/.
cd behave/ - Launch behave:
behave
Once completed, Locust results will appear inside the behave folder (Figure 3 is an example).
Figure 3. Example CLI output

Cleanup
If you used the CloudFormation templates that we provided to create AWS resources to follow along with this blog post, delete them now to avoid future recurring charges.
To delete the stack, run:
aws cloudformation delete-stack --stack-name my-chaos-stack --region=eu-west-1 &&
aws cloudformation wait stack-delete-complete --stack-name my-chaos-stack --region=eu-west-1
Conclusion
This blog post has given usable and actionable insights into how you can wrap FIS actions, plus experiment templates in a way that fully defines and automates a chaos experiment with language that will be accessible to stakeholders outside of the test engineering team. You can extend on what is presented here to test your own workloads with your own methods and metrics through a powerful suite of chaos experiments, which will build confidence in your workload’s continuous resilience and enable you to provide evidence of this to the wider organization.