Post Syndicated from Raj Ramasubbu original https://aws.amazon.com/blogs/big-data/build-stateful-streaming-applications-with-apache-spark-4-0-on-amazon-emr-serverless/
Apache Spark 4.0 represents a major milestone in stream processing, introducing new capabilities that fundamentally change how developers build stateful streaming applications. At the heart of these improvements is the transformWithState API – a new capability that enables first-class support for timers, automatic state management, and schema evolution to Spark Structured Streaming.
With Spark 4.0 now available on Amazon EMR Serverless, developers can build stateful streaming applications using the transformWithState API in a fully managed, serverless environment that automatically scales based on workload demands. This combination delivers the power of sophisticated stream processing without the operational overhead of cluster management.
In this post, we demonstrate how to build a production-ready IoT device monitoring system using Spark 4.0’s transformWithState API on Amazon EMR Serverless. This example showcases the key capabilities of stateful streaming and provides a template you can adapt for your own use cases.
Apache Spark 4.0: introducing transformWithState
Apache Spark 4.0’s latest streaming features solve common production challenges in stateful applications by introducing native timer support and advance state management capabilities for complex event processing workflows. The new transformWithState API provides:
Key features of transformWithState
- Native timer support: Register timers that fire callbacks at specific times for use cases like heartbeat monitoring, session timeout detection, and SLA violation alerts.
- Automatic state TTL (Time-To-Live): Configure automatic expiration policies to prevent state from growing indefinitely. This is useful for use cases like session state size control, clearing stale device telemetry, maintaining a recency cache, or tracking invalid logins within the last hour for fraud detection.
- Schema evolution: Evolve state schema without restarting from a new checkpoint. Add optional fields, remove fields, or widen numeric types. This is particularly valuable for use cases where data structures are dynamic, and application downtime for schema migration is not acceptable, enabling more resilient and flexible real-time streaming applications.
- Multiple state variables: Support for multiple independent state variables (
ValueState,ListState,MapState) per key, well-suited for building complex, real-time applications that require sophisticated state management, such as storing a history of recent error codes, tracking counts of various alert types, or maintaining multiple dimensions of user activity within a single stateful operator. - State observability: Query application state mid-stream using the State Data Source Reader for debugging and monitoring. This is especially valuable in applications that require maintaining and evolving state through several steps, such as detection of sophisticated event patterns across multiple streams and over time, where visibility into state transitions is critical for troubleshooting and validation.
- Operator chaining: Chain multiple stateful operators together for complex multi-stage processing pipelines.
These capabilities make Spark 4.0 ideal for applications that were previously difficult or impossible to implement efficiently, such as complex event processing, session analytics, anomaly detection, and real-time monitoring systems.
Use case: IoT heartbeat monitoring
Consider a fleet of 100,000 IoT sensors deployed across manufacturing facilities. Each sensor sends a heartbeat signal every 20 seconds to indicate it’s operational. Your operations team needs to be alerted within 30 seconds if any sensor goes offline, with repeat alerts every 60 seconds until the sensor comes back online.
This seemingly simple requirement presents several technical challenges. The application must maintain the last heartbeat timestamp for each of the 100,000 devices while independently managing timers to detect missed signals per device. It also needs to handle out-of-order heartbeats caused by network delays and clean up state for decommissioned devices to prevent unbounded memory growth. All of this must happen at scale, processing millions of events per minute with low latency, while recovering gracefully from failures without losing state.
To address the specific challenges of IoT heartbeat monitoring described above, we present a solution built on the transformWithState API in Spark 4.0. With its native timer support, automatic state management, and built-in fault tolerance, making it the ideal solution for IoT heartbeat monitoring at scale.
Solution overview
Our solution architecture follows a serverless, event-driven design:
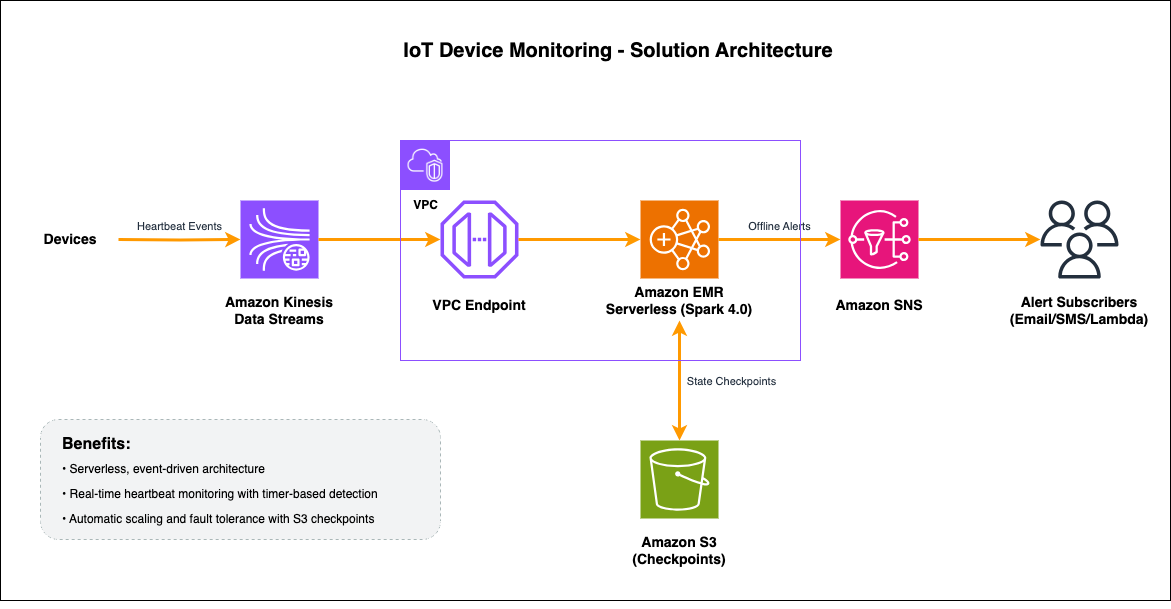
- IoT devices send heartbeat events to Amazon Kinesis Data Streams containing device ID, timestamp, and metadata (battery level, signal strength, firmware version).
- Amazon EMR Serverless reads from Kinesis using the Spark aws-kinesis connector using VPC Endpoint for Kinesis, then parses JSON events into structured DataFrames and grouping by
device_id. transformWithStateprocesses each device’s stream. On heartbeat arrival, it updates state and registers a 30-second timer; when the timer expires without a new heartbeat, it emits an offline alert.- State is automatically persisted to RocksDB locally and checkpointed to Amazon Simple Storage Service (Amazon S3), enabling fault-tolerant recovery and exactly-once processing semantics.
- Alerts are delivered via Amazon Simple Notification Service (Amazon SNS) to configured subscribers (email, SMS, AWS Lambda, webhooks).
Prerequisites
Before implementing this solution, verify that you have:
- AWS account: With permissions for EMR Serverless, Kinesis, SNS, S3, VPC, and IAM.
- AWS Command Line Interface (AWS CLI): Configured with appropriate credentials.
- VPC setup: VPC with private subnets and security groups configured.
- Kinesis VPC interface endpoint: VPC endpoint for private connectivity to Kinesis.
- Kinesis Data Stream: Created for ingesting heartbeat events (for example,
iot-heartbeats). For testing your streaming data solution, refer to Test your streaming data solution with the new Amazon Kinesis Data Generator. - SNS topic: Created for sending alerts (for example,
iot-alerts). - S3 bucket: For storing application code, dependencies, and checkpoints.
Step-by-step implementation
The following steps walk you through setting up an EMR Serverless application with Spark 4.0, configuring the stateful streaming processor, and deploying the IoT heartbeat monitoring solution.
Step 1: Create the EMR serverless application
Run the following command in your terminal using the AWS CLI. Replace the subnet and security group IDs with the values from your VPC setup.
The command returns a JSON response containing the application details. Note the applicationId value from the output, as you will need it in subsequent steps.
Step 2: Implement the heartbeat monitor
The core of our solution is the HeartbeatMonitor class that extends StatefulProcessor. This class demonstrates the key features of Spark 4.0’s transformWithState API. Download the full implementation script and upload it to your local S3 bucket for execution. Let’s walk through each component to understand how it works.
2.1 Initialize state variables
The init() method is called once when the processor is initialized. This is where we define and register our state variables.
In the init() method, we use StatefulProcessorHandle to define and initialize two per-key state variables, last_seen and device_info, using Spark’s StructType schemas and the getValueState() API. These state variables are automatically stored in RocksDB and checkpointed to S3, allowing for fault-tolerant state management across streaming micro-batches.
2.2 Handle incoming heartbeat events and register timers
The handleInputRows() method is called whenever new events arrive for a device. This is where we update state and register timers.
The handleInputRows() method processes incoming heartbeat events for each device by extracting the latest timestamp, updating the last_seen state, and managing timers. It cancels existing ones and registering a new 30-second expiry timer to detect future inactivity. Because alerts are only emitted upon timer expiration, the method yields an empty dataframe during normal heartbeat processing.
2.3 Handle timer expiration and emit alerts
The handleExpiredTimer() method is called when a registered timer fires. This is where we detect offline devices and emit alerts.
The handleExpiredTimer() method is triggered automatically when a device’s inactivity timer expires, retrieving the last_seen state to calculate the offline duration and yielding an alert dataframe to the output stream. It also registers a follow-up timer for repeat alerts every 60 seconds, which continues until a new heartbeat arrives and cancels the timer via handleInputRows().
There are several ways you could extend this solution for production use. You could implement exponential backoff for repeat alerts to reduce noise, for example, alerting after 60 seconds, then 2 minutes, then 5 minutes, and so on. Other improvements could include adding severity escalation based on offline duration, integrating with notification services like Amazon SNS for downstream alerting, or setting a maximum retry limit to stop alerts for permanently decommissioned devices.
2.4 Apply transformWithState to the streaming DataFrame
Now we connect everything together by applying our HeartbeatMonitor processor to the streaming data.
The streaming pipeline parses JSON heartbeat events from Kinesis, partitions them by device_id, and applies the HeartbeatMonitor stateful processor using transformWithStateInPandas() with processing-time timers and append output mode. The resulting alert stream is written to SNS via foreachBatch() with checkpointing enabled for fault tolerance and micro-batches triggered every 10 seconds.
To summarize, implementing the heartbeat monitor requires just three methods. The init() method sets up your state variables, handleInputRows() processes incoming heartbeats and manages timers, and handleExpiredTimer() generates offline alerts. The transformWithState API handles the underlying complexity of state management, checkpointing, and timer scheduling automatically.
Step 3: Create IAM role for job execution
Create an IAM role that allows EMR Serverless to assume it for running your Spark job. For detailed instructions on creating an IAM role, see Creating an IAM role. Use the following trust policy for the role.
Attach a permissions policy that grants the role access to read from the Kinesis stream, write to the S3 bucket for checkpoints and application artifacts, and publish alerts to the SNS topic:
Step 4: Upload external dependencies required for executing the streaming job
In this step, you will download the required external dependencies and upload them to your S3 bucket to make them available for your EMR Serverless streaming job.
- Spark-kinesis-connector.jar (download link) and copy to local S3 bucket
s3://your-bucket/jars/spark-kinesis-connector.jar. - Protobuf Dependency (download link) and copy to local S3 bucket
s3://your-bucket/pyfiles/protobuf_pkg.tar.gz.
Step 5: Submit the streaming job
Now that the application, IAM role, and dependencies are in place, you can submit the streaming job. This step configures the Spark job parameters and submits it to your EMR Serverless application in streaming mode. For more details on submitting jobs, see Starting a job run.
First, create a file named job-driver.json with the following content. Replace the S3 paths with the locations where you uploaded your script and dependencies in the previous steps.
Then, run the following command to submit the job. Replace the application ID and account ID with your own values.
Running transformWithState on Amazon EMR Serverless provides several operational advantages over self-managed Spark clusters. In streaming mode, the Spark driver remains alive between micro-batches, eliminating the overhead of repeatedly starting and stopping the application. You don’t need to provision or manage executors because EMR Serverless automatically scales compute resources up and down based on workload demands, so you only pay for what you use. Your IoT heartbeat monitor can handle traffic spikes, such as thousands of devices reconnecting simultaneously after a network outage, without manual intervention. EMR Serverless also provides built-in job resiliency, real-time monitoring, and enhanced log management, reducing the operational burden of running streaming applications in production.
Testing the solution
Now that our streaming application is deployed, let’s test it by sending heartbeat events and observing the offline detection behavior.
Step 1: Open AWS CloudShell
Open AWS CloudShell in your AWS account from the AWS Management Console.
Step 2: Send heartbeat events using CLI
Execute the following bash script to send heartbeat events every 10s.
Update the timestamp field to use the current time for each event or use a script to automate sending events at regular intervals.
Step 3: Observe normal operation
As you send heartbeat events every 10 seconds, the Spark application receives each event and updates the device’s state. A timer is then registered for 30 seconds in the future. Each new heartbeat cancels the existing timer and registers a new one, effectively resetting the countdown. As long as heartbeats continue to arrive within the 30-second window, no alerts are sent.
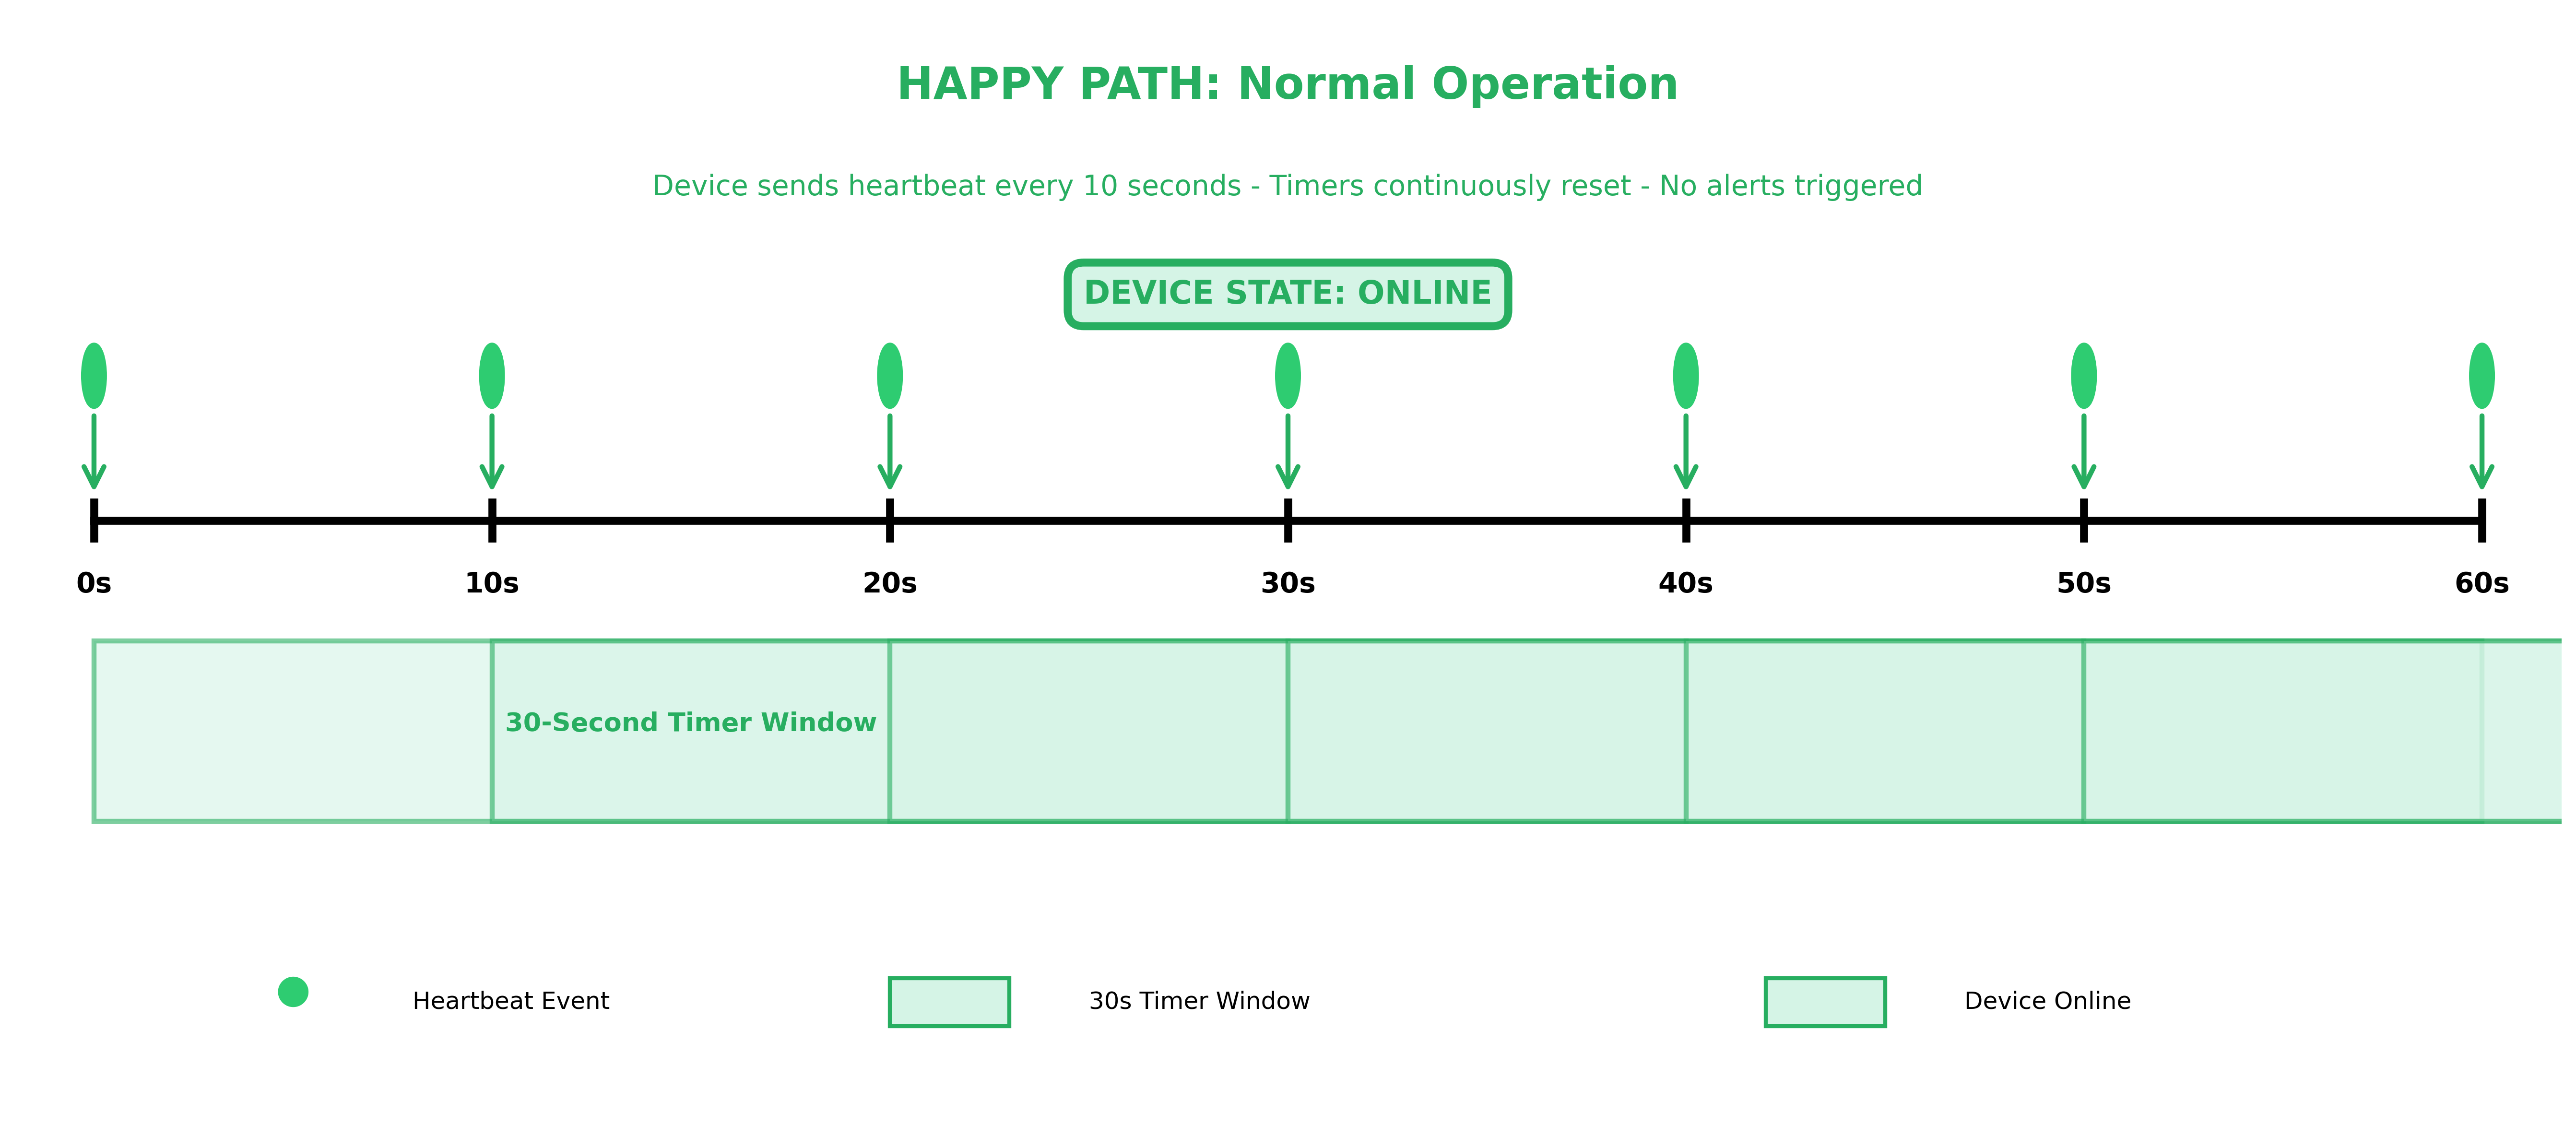
The above timeline diagram shows a 60-second window of normal device operation. Heartbeat events arrive every 10 seconds (at 0s, 10s, 20s, 30s, 40s, 50s, and 60s), each resetting the 30-second timer window. Because every heartbeat arrives well within the 30-second threshold, the timer never expires, the device state remains online, and no alerts are triggered.
Step 4: Test offline detection
Stop sending heartbeat events for the device and wait 30 seconds. You should receive an SNS alert indicating the device is offline.
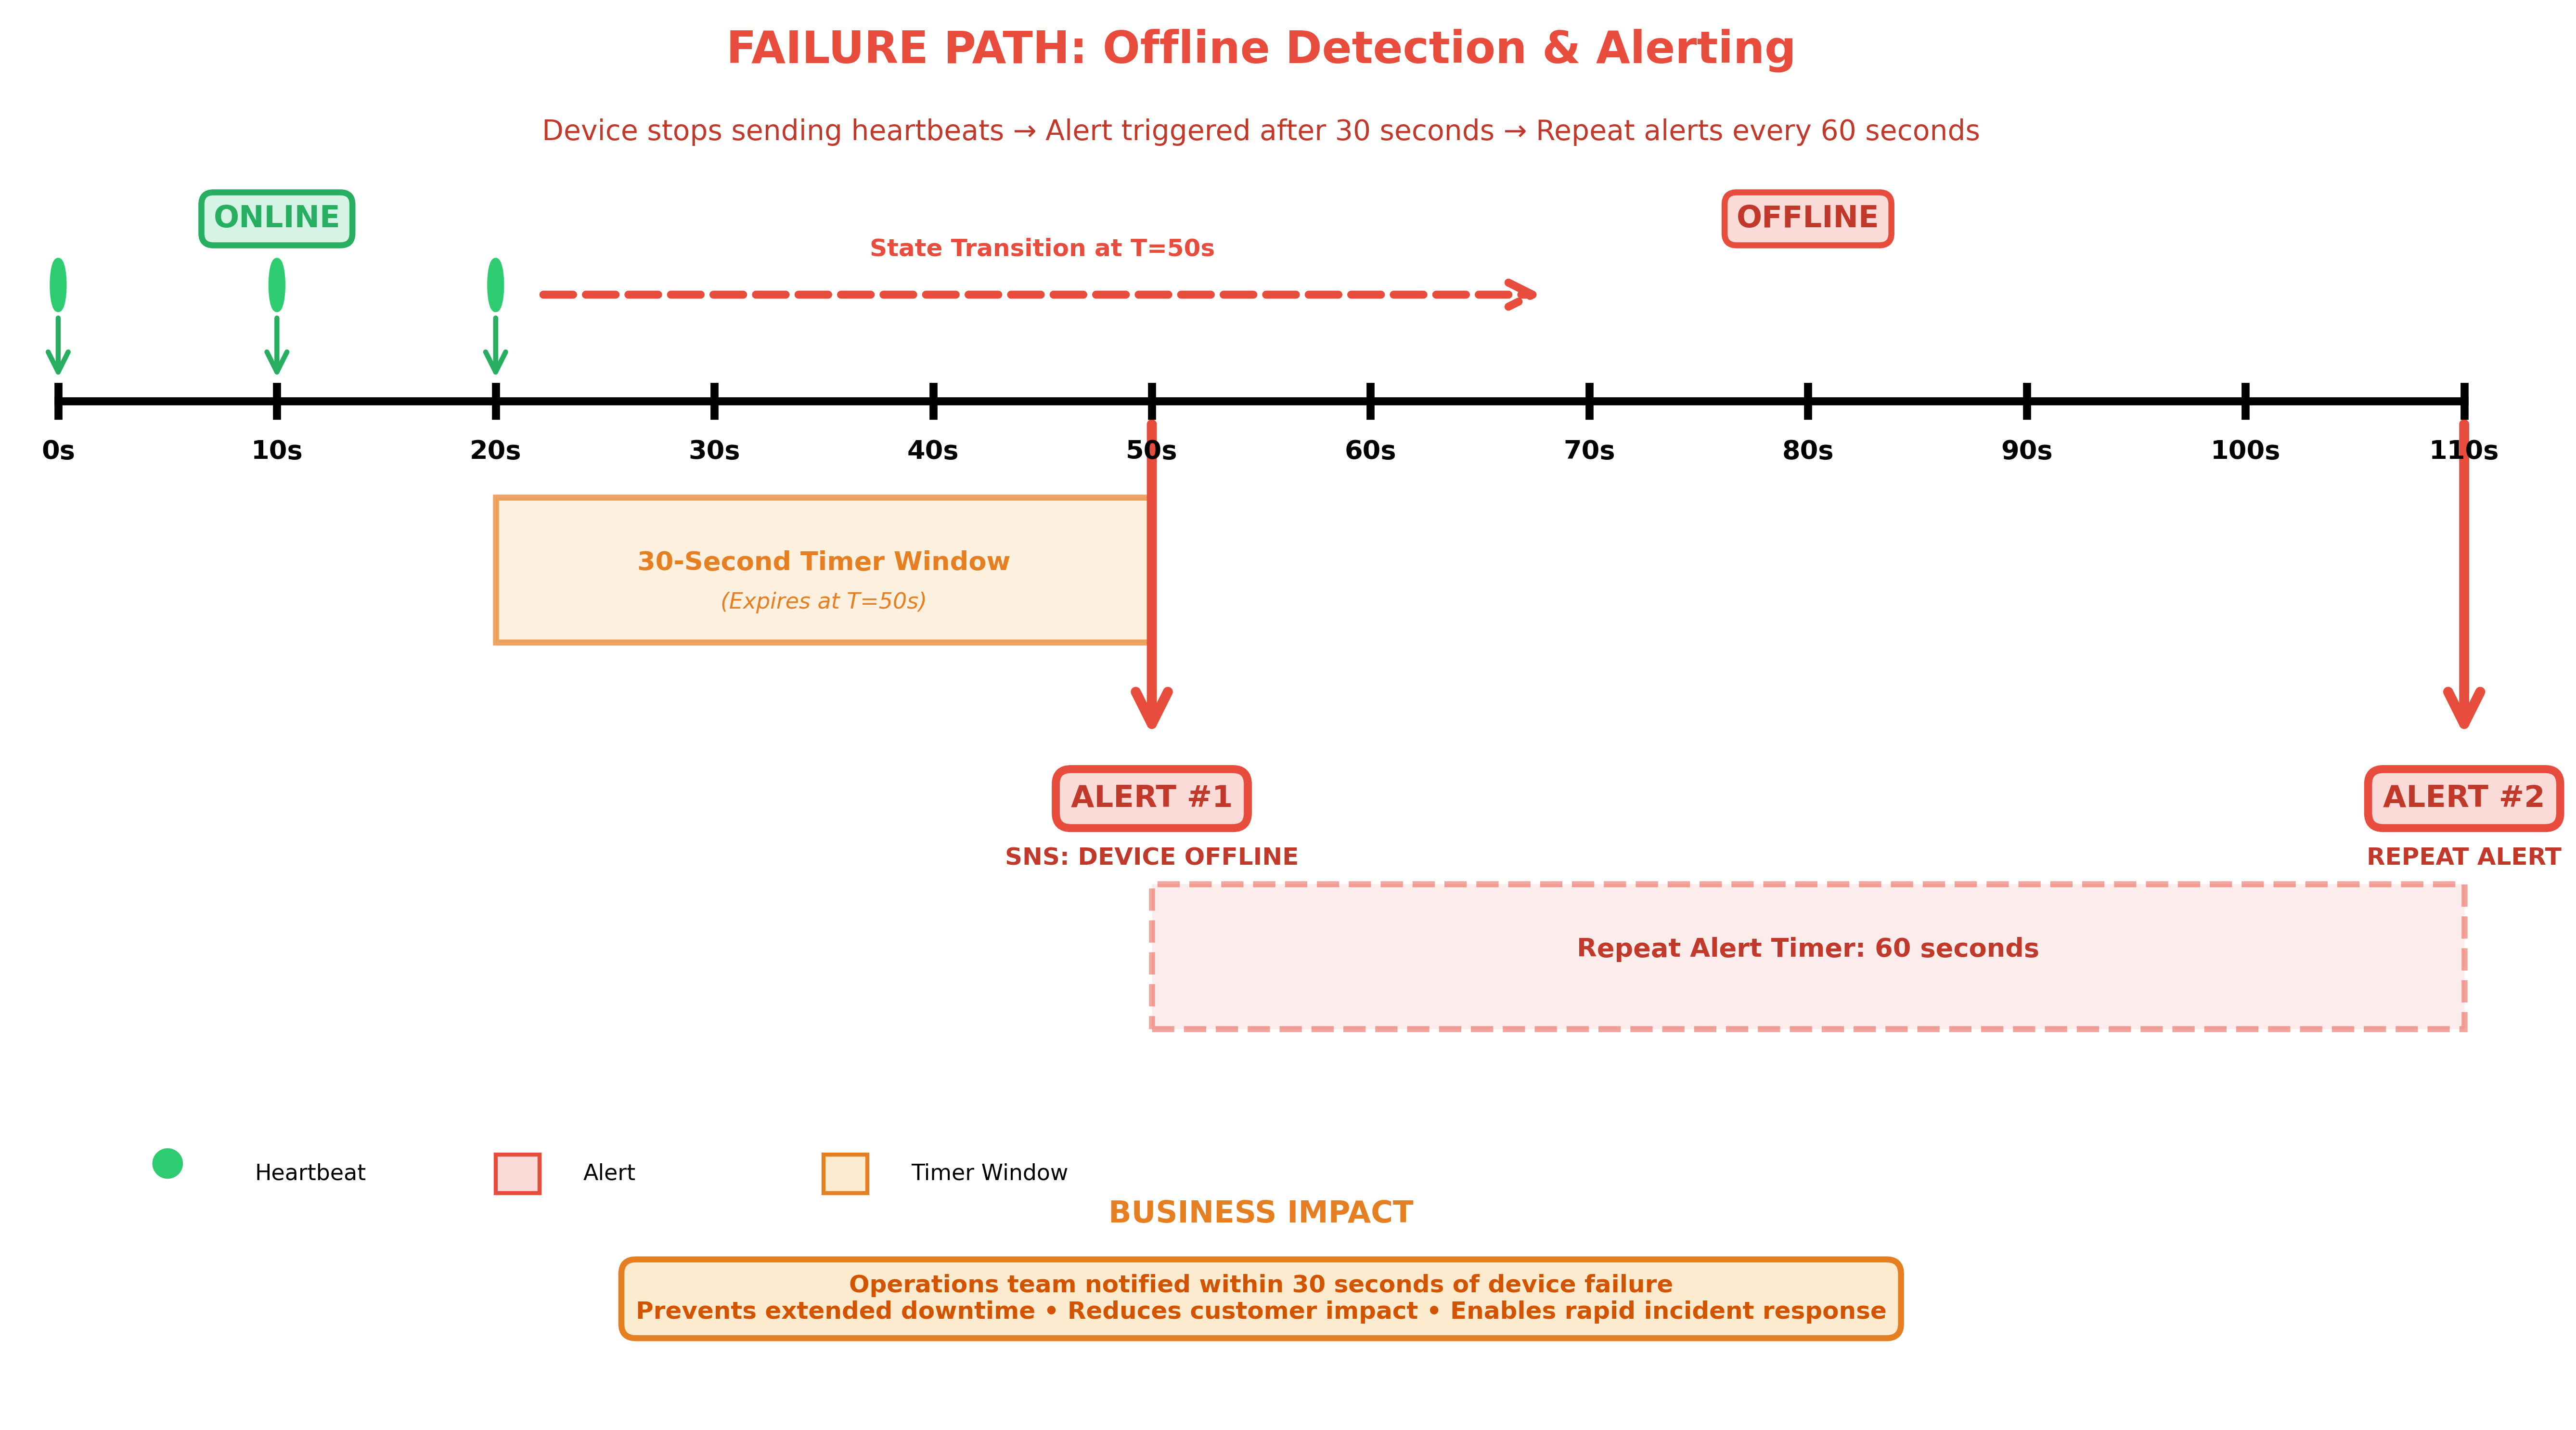
Timeline diagram showing offline detection over 110 seconds. Device sends heartbeats at 0s, 10s, and 20s before going offline. The 30-second timer expires at 50s triggering Alert #1 via SNS, followed by a repeat Alert #2 at 110s after a 60-second repeat timer.
If you continue to not send heartbeats, additional alerts will be sent every 60 seconds.
Step 5: Test device recovery
Resume sending heartbeat events using the same CLI command. The application will cancel all existing timers for the device and will stop sending SNS alerts.

Timeline diagram showing the complete device recovery lifecycle over 140 seconds across three phases: normal operation with heartbeats, offline detection with SNS alerts, and recovery where timers are canceled and the device returns to online state
Clean up
To avoid incurring ongoing charges, follow these steps to clean up the resources.
Step 1: Stop the EMR serverless application
Stop your running streaming job:
Step 2: Delete the EMR serverless application
Step 3: Delete kinesis data stream
Step 4: Remove S3 objects
Delete the checkpoint data, scripts, and dependencies from your S3 bucket:
Real-world use cases for stateful streaming
The transformWithState API enables developers to build sophisticated streaming applications that were previously difficult to implement. Here are a few examples of how it can be applied across industries.
Telecommunications and network monitoring: Telecom providers need to detect network anomalies and SLA violations as they happen across millions of concurrent sessions. With transformWithState, developers can maintain per-session state to track call detail records, compare real-time network metrics against established baselines, and trigger alerts the moment thresholds are breached. Automatic state TTL ensures that completed session records are cleaned up without manual intervention.
Financial services and fraud detection: Detecting fraud requires correlating multiple signals across a sequence of transactions in real time. With transformWithState, developers can maintain per-account state that tracks transaction histories, flags suspicious patterns like rapid purchases across geographies, and calculates rolling risk scores. Multiple state variables per key allow tracking different dimensions of activity, such as transaction velocity, location changes, and spending deviations, within a single stateful operator.
E-commerce and customer engagement: Understanding customer behavior in real time is critical for driving conversions. Using transformWithState, developers can build session-aware applications that track browsing and cart activity with timer-based state expiration, detecting cart abandonment after a configurable timeout and triggering personalized re-engagement notifications. The State Data Source Reader enables teams to inspect session state mid-stream, making it easier to debug and validate real-time customer journey logic.
Conclusion
Apache Spark 4.0’s transformWithState API represents a significant advancement in stateful stream processing, making it simpler to build complex real-time applications like IoT device monitoring. Combined with Amazon EMR Serverless, you get a fully managed platform that scales automatically and eliminates infrastructure management overhead.
This post demonstrates how to use the native timer support capability of transformWithState to build a real-time IoT device monitoring application. We encourage you to explore other capabilities such as Automatic State TTL, Schema Evolution, and Multiple State Variables on Amazon EMR Serverless to build more sophisticated streaming applications tailored to your needs.