Post Syndicated from Alunnata Mulyadi original https://aws.amazon.com/blogs/big-data/aws-glue-python-shell-now-supports-python-3-9-with-a-flexible-pre-loaded-environment-and-support-to-install-additional-libraries/
AWS Glue is the central service of an AWS modern data architecture. It is a serverless data integration service that allows you to discover, prepare, and combine data for analytics and machine learning. AWS Glue offers you a comprehensive range of tools to perform ETL (extract, transform, and load) at the right scale. AWS Glue Python shell jobs are designed for running small-to-medium size ETL, and triggering SQLs (including long-running queries) on Amazon Redshift, Amazon Athena, Amazon EMR, and more.
Today, we are excited to announce a new release of AWS Glue Python shell that supports Python 3.9 with more pre-loaded libraries. Additionally, it allows you to customize your Python shell environment with pre-loaded libraries and offers you PIP support to install other native or custom Python libraries.
The new release of AWS Glue Python shell includes the necessary Python libraries to connect your script to SQL engines and data warehouses like SQLAlchemy, PyMySQL, pyodbc, psycopg2, redshift, and more. It also supports communications with other AWS services such as Amazon OpenSearch Service (opensearch-py, elasticsearch), Amazon Neptune (gremlinpython), or Athena (PyAthena). It integrates Amazon SageMaker Data Wrangler for ETL tasks like loading and unloading data from data lakes, data warehouses, and databases. It also includes library support for data serialization in industry formats such as avro and et-xmlfile.
In this post, we walk you through on how to use AWS Glue Python shell to create an ETL job that imports an Excel file and writes it in a relational database and data warehouse. The job reads the Excel file as a Pandas DataFrame, creates a data profiling report, and exports it into your Amazon Simple Storage Service (Amazon S3) bucket. This routine cleans inaccurate information and imputes missing values based on predefined business rules. It writes the data into a target MySQL database for low-latency data access. Additionally, in parallel, the script exports the DataFrame in the data lake in columnar format to be copied into Amazon Redshift for reporting and visualization.
AWS Glue Python shell new features
The new release of AWS Glue Python shell allows you to use new features of Python 3.9 and add custom libraries to your script using job parameter configurations. This gives you more flexibility to write your Python code and reduces the need to manually maintain and update Python libraries needed for your code.
Customized pre-loaded library environments
AWS Glue Python shell for Python 3.9 comes with two library environment options:
- analytics (default) – You can run your script in a fullly pre-loaded environment for complex analytics workloads. This option loads the full package of libraries.
- none – You can choose an empty environment for simple and fast ETL jobs. This option only loads
awscliandbotocoreas basic libraries.
You can set this option by using the library-set parameter in the job creation, for example:
For your reference, the following table lists the libraries included in each option.
| Python version | Python 3.9 | |
| Library set | analytics (default) | none |
| avro | 1.11.0 | . |
| awscli | 1.23.5 | 1.23.5 |
| awswrangler | 2.15.1 | . |
| botocore | 1.23.5 | 1.23.5 |
| boto3 | 1.22.5 | . |
| elasticsearch | 8.2.0 | . |
| numpy | 1.22.3 | . |
| pandas | 1.4.2 | . |
| psycopg2 | 2.9.3 | . |
| pyathena | 2.5.3 | . |
| PyMySQL | 1.0.2 | . |
| pyodbc | 4.0.32 | . |
| pyorc | 0.6.0 | . |
| redshift-connector | 2.0.907 | . |
| requests | 2.27.1 | . |
| scikit-learn | 1.0.2 | . |
| scipy | 1.8.0 | . |
| SQLAlchemy | 1.4.36 | . |
| s3fs | 2022.3.0 | . |
Added support for library compilers
In this release, you can import and install libraries as part of the script, including your own C-based libraries. You have PIP support to install native or customer provided Python libraries with the support of the following compilers:
- gcc
- gcc-c++
- gmake
- cmake
- cython
- boost-devel
- conda
- python-dev
If you want to include a new package during your job creation, you can add the job parameter --additional-python-modules followed by the name of the library and the version. For example:
How to use the new features with the AWS Glue Python shell script
Now that we have introduced the new features, let’s create a Python 3.9 job with additional libraries with AWS Glue Python shell. You have two options to create and submit a job: you can use the interface of AWS Glue Studio, or the AWS Command Line Interface (AWS CLI) for a programmatic approach.
AWS Glue Studio
To use AWS Glue Studio, complete the following steps:
- On the AWS Glue Studio console, create a new job and select Python Shell script editor.

- Enter a job name and enter your Python script.

- On the Job details tab, enter an optional description.
- For IAM role¸ choose your job role.
- For Python version, choose Python 3.9.
- Select Load common Python libraries.

- Choose the script and the temporary files locations.
- Include the additional libraries as job parameters (
--additional-python-modules).


AWS CLI
With the new release, you can now use the AWS CLI with the new parameters. The following is an example of an AWS CLI statement to create the AWS Glue Python shell script job with Python 3.9:
Let’s explore the main differences from the previous AWS Glue Python shell versions:
- Set the option
PythonVersionwithin the--commandparameter to 3.9. - To add new libraries, use
--additional-python-modulesas a new parameter and then list the library and the required version as follows:boto3=1.22.13. - Include
library-setwithin –default-arguments and choose one of the values, such asdefault/analytics/none.
Solution overview
This tutorial demonstrates the new features using a common use case where data flows into your system as spreadsheet files reports. In this case, you want to quickly orchestrate a way to serve this data to the right tools. This script imports the data from Amazon S3 into a Pandas DataFrame. It creates a profiling report that is exported into your S3 bucket as an HTML file. The routine cleans inaccurate information and imputes missing values based on predefined business rules. It writes the data directly from Python shell to an Amazon Relational Database Service (Amazon RDS) for MySQL server for low-latency app response. Additionally, it exports the data into a Parquet file and copies it into Amazon Redshift for visualization and reporting.
In our case, we treat each scenario as independent tasks with no dependency between them. You only need to create the infrastructure for the use cases that you want to test. Each section provides guidance and links to the documentation to set up the necessary infrastructure.
Prerequisites
There are a few requirements that are common to all scenarios:
- Create an S3 bucket to store the input and output files, script, and temporary files.

Then, we create the AWS Identity and Access Management (IAM) user and role necessary to create and run the job. - Create an IAM AWS Glue service role called
glue-blog-roleand attach the AWS managed policyAWSGlueServiceRolefor general AWS Glue permissions.If you’re also testing an Amazon Redshift or Amazon RDS use case, you need to grant the necessary permission to this role. For more information, refer to Using identity-based policies (IAM policies) for Amazon Redshift and Identity-based policy examples for Amazon RDS. - Create an IAM user with security credentials and configure your AWS CLI in your local terminal.
This allows you to create and launch your scripts from your local terminal. It is recommended to create a profile associated to this configuration.The dataset used in this example is an Excel file containing Amazon Video Review data with the following structure. In a later step, we place the Excel file in our S3 bucket to be processed by our ETL script.

- Finally, to work with sample data, we need four Python modules that were made available in AWS Glue Python shell when the parameter
library-setis set toanalytics:boto3awswranglerPyMySQLPandas


Note that Amazon customer reviews are not licensed for commercial use. You should replace this data with your own authorized data source when implementing your application.
Load the data
In this section, you start writing the script by loading the data used in all the scenarios.
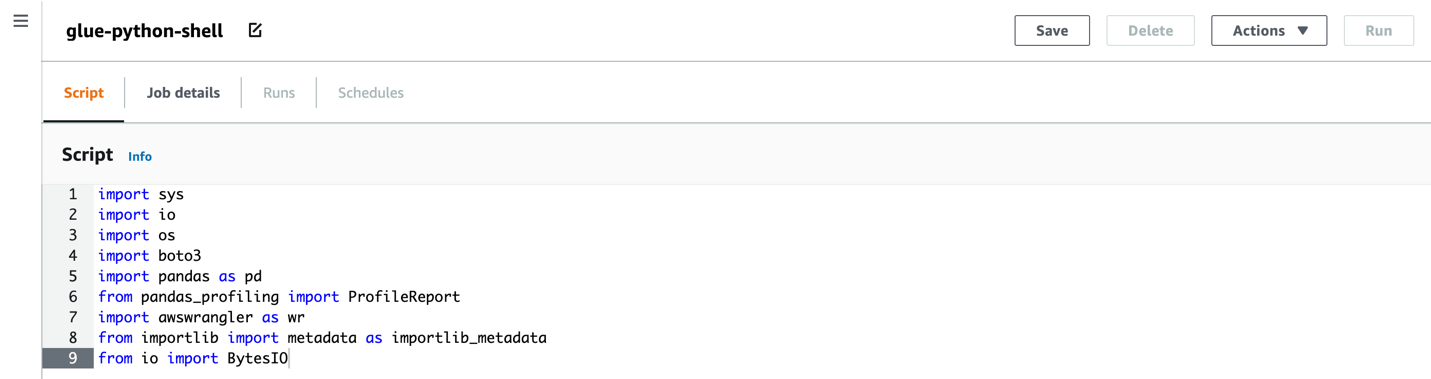
- Import the libraries that we need:
- Read the Excel spreadsheet into a DataFrame:
Scenario 1: Data profiling and dataset cleaning
To assist with basic data profiling, we use the pandas-profiling module and generate a profile report from our Pandas DataFrame. Pandas profiling supports output files in JSON and HTML format. In this post, we generate an HTML output file and place it in an S3 bucket for quick data analysis.
To use this new library during the job, add the --additional-python-modules parameter from the job details page in AWS Glue Studio or during job creation from the AWS CLI. Remember to include this package in the imports of your script:
A common problem that we often see when dealing with a column’s data type is the mix of data types are identified as an object in a Pandas DataFrame. Mixed data type columns are flagged by pandas-profiling as Unsupported type and stored in the profile report description. We can access the information and standardize it to our desired data types.
The following lines of code loop every column in the DataFrame and check if any of the columns are flagged as Unsupported by pandas-profiling. We then cast it to string:
To further clean or process your data, you can access variables provided by pandas-profiling. The following example prints out all columns with missing values:
Scenario 2: Export data in columnar format and copy it to Amazon Redshift
In this scenario, we export our DataFrame into Parquet columnar format, store it in Amazon S3, and copy it to Amazon Redshift. We use Data Wrangler to connect our script to Amazon Redshift. This Python module is already included in the analytics environment. Complete the following steps to set up the necessary infrastructure:
- Create an Amazon Redshift cluster in same Region as the AWS Glue Python shell job.
- Create an AWS Glue Data Catalog connection with Amazon Redshift. Remember that creating a connection also requires a VPC endpoint for Amazon S3.
Now we can write raw data to Amazon S3 in Parquet format and to Amazon Redshift.
A common partition strategy is to divide rows by year, month, and day from your date column and apply multi-level partitioning. This approach allows fast and cost-effective retrieval for all rows assigned to a particular year, month, or date. Another strategy to partition your data is by using a specific column directly. For example, using review_date as a partition gives you single level of directory for every unique date and stores the corresponding data in it.
In this post, we prepare our data for the multi-level date partitioning strategy. We start by extracting year, month, and day from our date column:
With our partition columns ready, we can use the awswrangler module to write to Amazon S3 in Parquet format:
To query your partitioned data in Amazon S3, you can use Athena, our serverless interactive query service. For more information, refer to Partitioning data with Athena.
Next, we write our DataFrame directly to Amazon Redshift internal storage by using Data Wrangler. Writing to Amazon Redshift internal storage is advised when you’re going to use this data frequently for complex analytics, large SQL operations, or business intelligence (BI) reporting. In Amazon Redshift, it’s advised to define the distribution style and sort key on the table to improve cluster performance. If you’re not sure about the right value for those parameters, you can use the Amazon Redshift auto distribution style and sort key and follow Amazon Redshift advisor recommendations. For more information on Amazon Redshift data distribution, refer to Working with data distribution styles.
Scenario 3: Data ingestion into Amazon RDS
In this scenario, we open a connection between AWS Glue Python shell and ingest the data directly into Amazon RDS for MySQL. The infrastructure you require for this scenario is an RDS for MySQL database in the same Region as the AWS Glue Python shell job. For more information, refer to Creating a MySQL DB instance and connecting to a database on a MySQL DB instance.
With the PyMySQL and boto3 modules, we can now connect to our RDS for MySQL database and write our DataFrame into a table.
Prepare the variables for connection and generate a database authentication token for database login:
For more information about using an SSL connection with your RDS instance, refer to Using SSL/TLS to encrypt a connection to a DB instance.
Connect to your RDS for MySQL database and write a Pandas DataFrame into the table with the following code:
You need to create a table in Amazon RDS for MySQL prior to running the insert statement. Use the following DDL to create the demo_blog.amazon_video_review table:
When the data is available in database, you can perform a simple aggregation as follows:
Create and run your job
After you finalize your code, you can run it from AWS Glue Studio or save it in a script .py file and submit a job with the AWS CLI. Remember to add the necessary parameters in your job creation depending of the scenario you’re testing. The following job parameters cover all the scenarios:
Review the results
In this section, we review the expected results for each scenario.
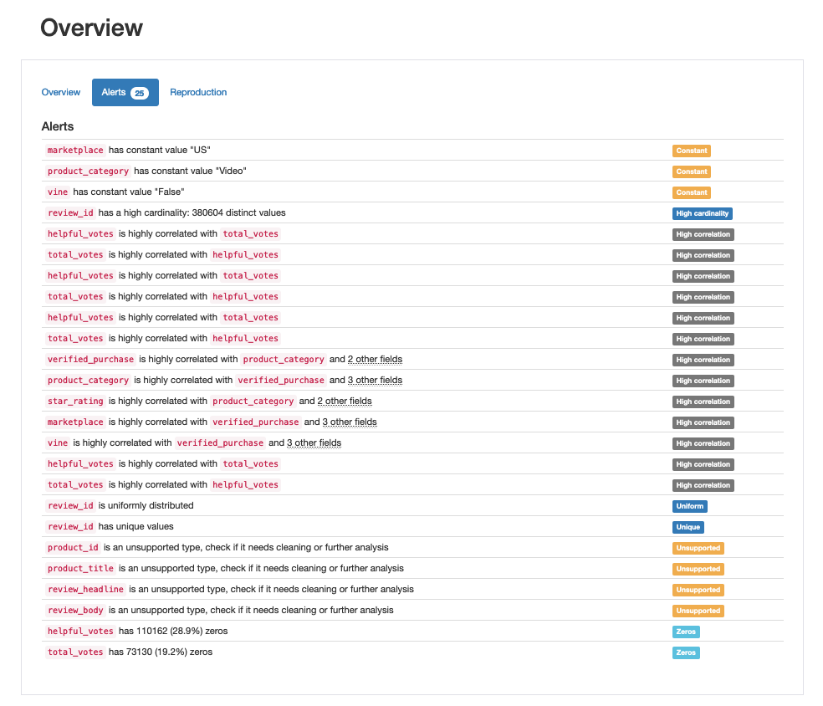
In Scenario 1, pandas-profiling generates a data report in HTML format. In this report, you can visualize missing values, duplicated values, size estimations, or correlations between columns, as shown in the following screenshots.


For Scenario 2, you can first review the Parquet file written to Amazon S3 in Parquet format with partition year/month/day.

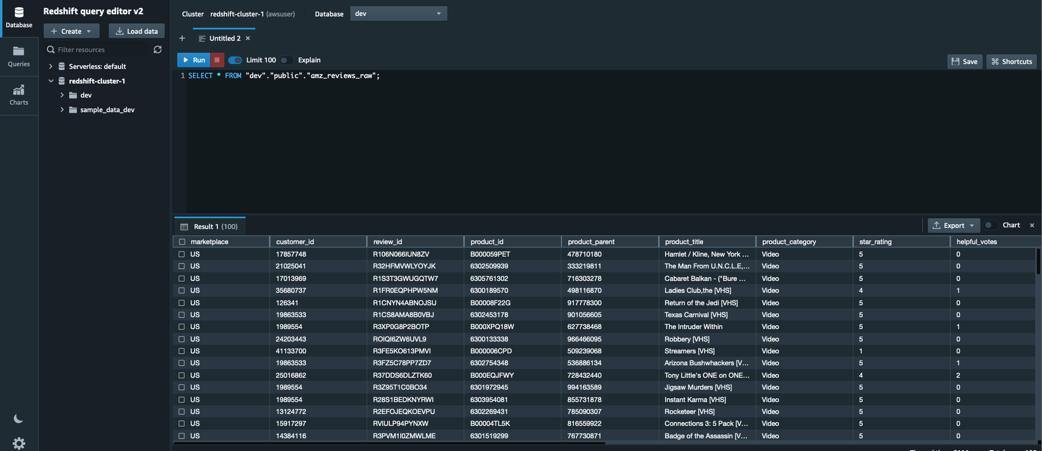
Then you can use the Amazon Redshift query editor to query and visualize the data.
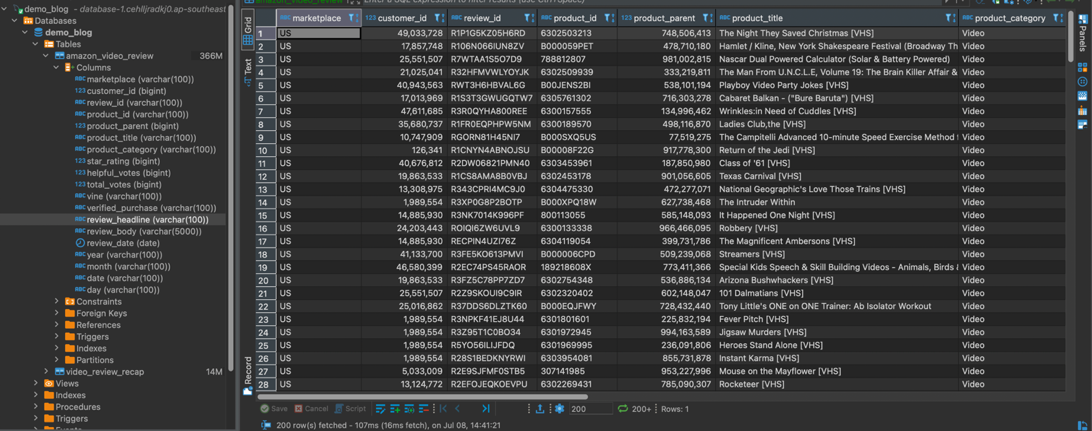
For Scenario 3, you can use a JDBC connection or database IDE to connect to your RDS database and query the data that you just ingested.
Clean up
AWS Glue Python shell is a serverless routine that won’t incur in any extra charges when it isn’t running. However, this demo used several services that will incur in extra costs. Clean up after completing this walkthrough with the following steps:
- Remove the contents of your S3 bucket and delete it. If you encounter any errors, refer to Why can’t I delete my S3 bucket using the Amazon S3 console or AWS CLI, even with full or root permissions.
- Stop and delete the RDS DB instance. For instructions, see Deleting a DB instance.
- Stop and delete the Amazon Redshift cluster. For instructions, refer to Deleting a cluster.
Conclusion
In this post, we introduced AWS Glue Python shell with Python 3.9 support and more pre-loaded libraries. We presented the customizable Python shell environment with pre-loaded libraries and PIP support to install other native or custom Python libraries. We covered the new features and how to get started through AWS Glue Studio and the AWS CLI. We also demonstrated a step-by-step tutorial of how you can easily use these new capabilities to accomplish common ETL use cases.
To learn more about AWS Glue Python shell and this new feature, refer to Python shell jobs in AWS Glue.
About the authors
 Alunnata Mulyadi is an Analytics Specialist Solutions Architect at AWS. Alun has over a decade of experience in data engineering, helping customers address their business and technical needs. Outside of the work, he enjoys photography, cycling, and basketball.
 Quim Bellmunt is an Analytics Specialist Solutions Architect at Amazon Web Services. Quim has a PhD in Computer Science and Knowledge Graph focusing on data modeling and transformation. With over 6 years of hands-on experience in the analytics and AI/ML space, he enjoys helping customers create systems that scale with their business needs and generate value from their data. Outside of the work, he enjoys walking with his dog and cycling.
 Kush Rustagi is a Software Development Engineer on the AWS Glue team with over 4 years of experience in the industry having worked on large-scale financial systems in Python and C++, and is now using his scalable system design experience towards cloud development. Before working on Glue Python Shell, Kush worked on anomaly detection challenges in the fin-tech space. Aside from exploring new technologies, he enjoys EDM, traveling, and learning non-programming languages.