Post Syndicated from Cedric Pelvet original https://aws.amazon.com/blogs/big-data/managed-cross-region-disaster-recovery-for-amazon-opensearch-service/
Amazon OpenSearch Service already offers high availability within a single AWS Region through Multi-Availability Zone (Multi-AZ) deployments. Some organizations, however, need a multi-Region architecture to meet specific business requirements. These include strict recovery point and recovery time objectives, data residency mandates, and business continuity plans for mission-critical search and AI workloads.
Until now, meeting that bar on Amazon OpenSearch Service meant building and operating your own replication with cross-cluster replication or dual writes to multiple Regions. That took months of engineering and ongoing maintenance, offered no coordinated way to switch roles between Regions, and gave no guaranteed recovery point objective (RPO).
Amazon OpenSearch Service now offers managed disaster recovery for domains running OpenSearch 3.7 or later. Managed disaster recovery replicates your data from a primary domain in one Region to a secondary domain in another and keeps the secondary continuously in sync. When you need to move your workload, you use API-driven switchover and failover. It provides an RPO under 1 minute and a recovery time objective (RTO) under 20 minutes, and you can set it up in two steps.
In this post, we explain how managed disaster recovery works, what to check before you start, and how to set it up, monitor it, and switch Regions.
Who should use managed disaster recovery
Managed disaster recovery is built for workloads where downtime or data loss has a direct business, customer, or compliance cost. Common patterns include:
- Customer-facing search: Ecommerce, product catalog, and site search, where downtime means lost revenue and a degraded customer experience.
- Financial services and risk: Fraud detection, transaction search, and risk analytics, where regulators expect demonstrated cross-Region recoverability and regular disaster recovery exercises.
- Mission-critical operational data: Search and analytics that support incident response, security investigations, or regulated record retrieval, where teams need uninterrupted access to data.
If your recovery plan requires a copy of your OpenSearch data in another Region and a tested way to move your workload there, managed disaster recovery replaces the replication pipeline you would otherwise build and operate yourself.
Solution overview
Managed disaster recovery pairs two OpenSearch Service domains in different Regions. One domain is the primary: It accepts reads and writes. The other is the secondary: It continuously receives changes from the primary and serves reads only. The following diagram shows the architecture.
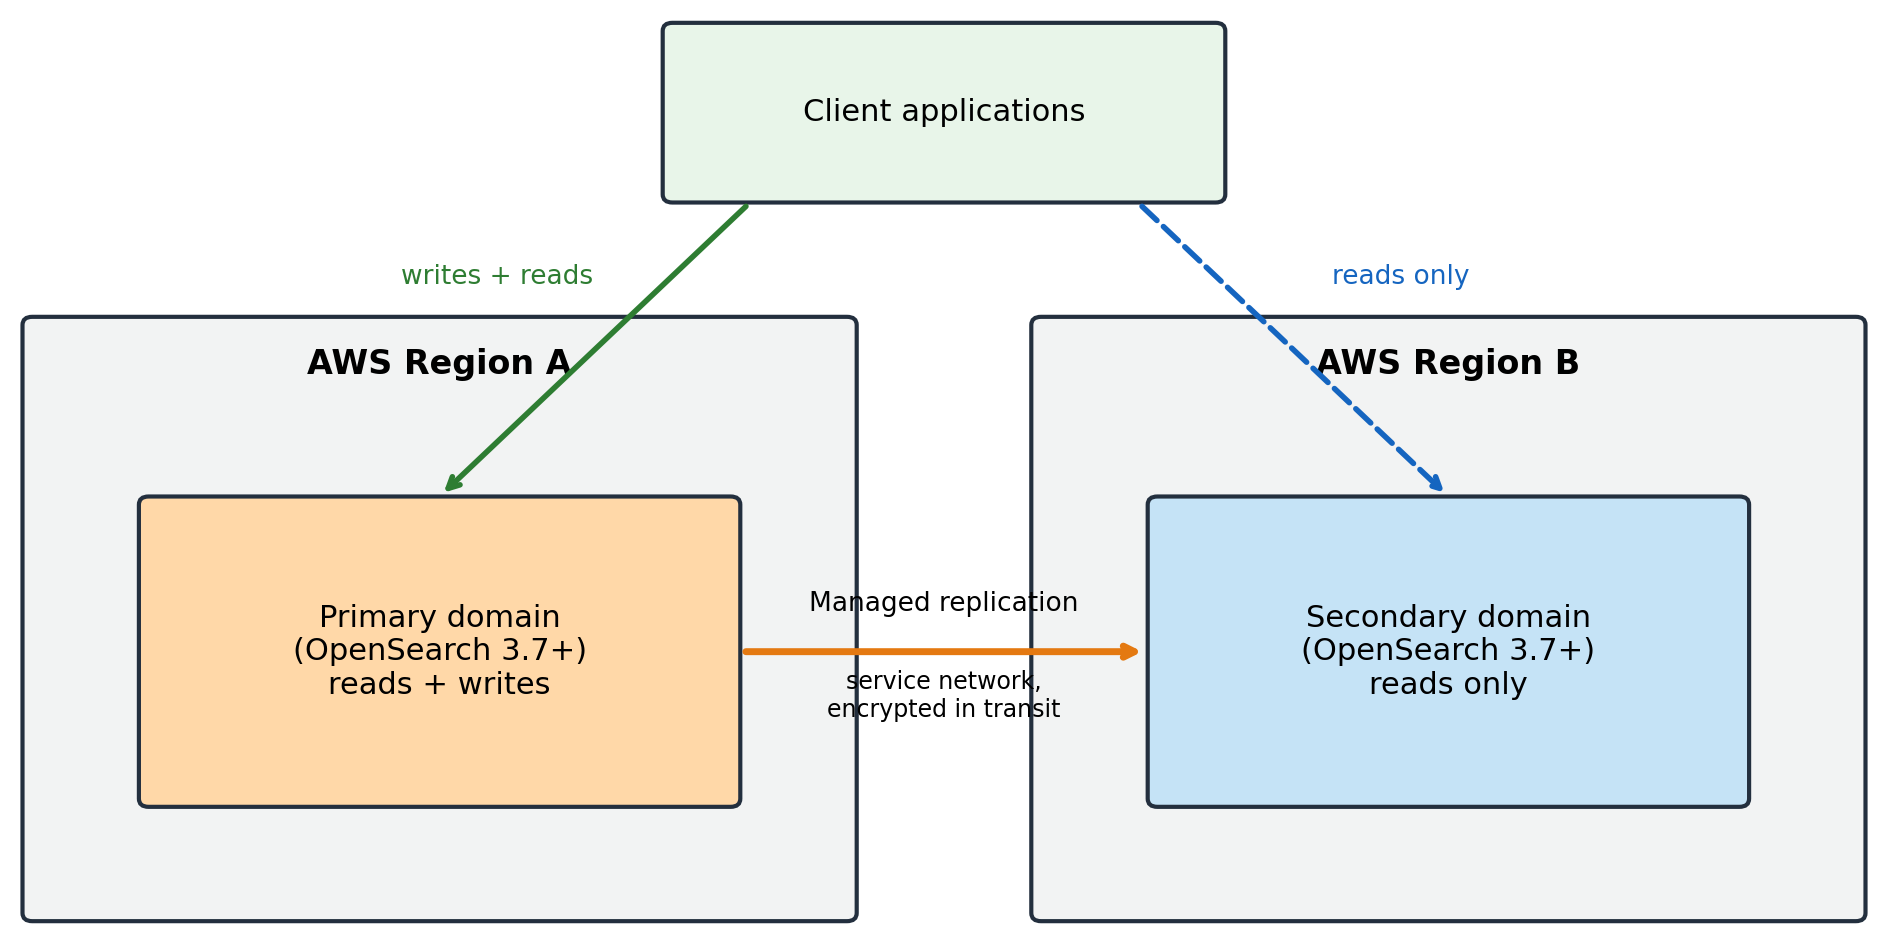
Figure 1: Managed disaster recovery pairs a primary domain in one Region with a read-only secondary domain in another, with managed replication between them
When you pair the domains, the service first copies the existing Lucene segments from the primary to the secondary. After this initial copy, every new document and update is indexed on both the primary and the secondary domain. Replication traffic stays within the OpenSearch Service network, so you don’t need to set up virtual private cloud (VPC) peering or any networking, and data is encrypted in transit. Because both domains index the data, the secondary is ready to take over as primary at any time.
Both domains serve reads, but only the current primary accepts writes. When roles change, you redirect your application’s writes to the new primary. For more details, see the Switch Regions section later in this post.
There are two ways to move the primary role to the other Region. The following table compares them and later sections refer back to this table.
| Switchover | Failover | |
| Type of event | Planned | Unplanned |
| Coordination | Coordinated role swap between both domains. | Unilateral promotion of the secondary. |
| Data loss | Zero: pending writes replicate before roles swap. | Writes not yet replicated are lost, bounded by replication lag (RPO). |
| When to use | Regulatory exercises, maintenance, planned Region moves, issues outside OpenSearch Service. | The primary domain is unavailable. |
| Call on | The secondary domain being promoted. | The secondary domain being promoted. |
You can also manage replication health from a built-in dashboard on the AWS Management Console, and the service supports customer managed AWS Key Management Service (AWS KMS) keys for encryption at rest.
Prerequisites and limitations
Before you start, confirm that your environment meets the following requirements:
- Engine version: Both domains run OpenSearch 3.7 or later. If you’re on an earlier version, see Upgrade to OpenSearch 3.7 with a clone-based upgrade at the end of this section.
- Same AWS account: The primary and secondary domains must be in the same AWS account, in different Regions.
- Matching sizes: Both domains index all data and use the same number of primary shards and replicas, so they need similar CPU, memory, and storage capacity.
- UltraWarm, Writable Warm, and Optimized engine for log analytics: Domains that use UltraWarm or Writable Warm storage or the OpenSearch Optimized engine for log analytics aren’t supported in this release.
- Configuration isn’t replicated: Managed disaster recovery replicates data. Index State Management (ISM) policies, index templates, settings, and roles aren’t replicated, so manage them on both domains with infrastructure as code (see Best practices later in this post).
- Client redirection: The service doesn’t redirect application writes after a switchover or failover. Your application or runbook must do this.
Upgrade to OpenSearch 3.7 with a clone-based upgrade
If your domains run an earlier version, you can upgrade them to OpenSearch 3.7 with a clone-based upgrade. Instead of upgrading your existing cluster in place, OpenSearch Service creates a clone of your domain on the target version and keeps it in sync with your data. Your domain keeps serving traffic from the original cluster. With a clone-based upgrade, you can:
- Validate first: Test the clone with your own read requests before it takes effect.
- Cut over when you’re ready: You choose when to move traffic. Writes are blocked during cutover, which can last up to several minutes.
- Cancel or roll back: Cancel any time before cutover, or roll back to the original cluster during a retention period that you set.
Clone-based upgrades are available for domains running Elasticsearch 7.10 or OpenSearch 1.1 or later. Earlier versions need an in-place upgrade first. You’re charged for both the original cluster and the clone while you validate and during the retention period. Before you upgrade, take a manual snapshot and run the pre-upgrade check. For details, see Upgrading Amazon OpenSearch Service domains.
Set up managed disaster recovery
You can set up managed disaster recovery on the console or with the AWS Command Line Interface (AWS CLI). In both cases, the flow is:
- Create the primary domain (OpenSearch 3.7 or later) and start indexing and searching.
- Create the secondary domain of the same version in a different Region, with matching size.
- Pair the primary with the secondary.
- Check the replication status.
Set up on the console
On the AWS Management Console, open Amazon OpenSearch Service and select your primary domain. The disaster recovery section is available for domains running OpenSearch 3.7 or later.
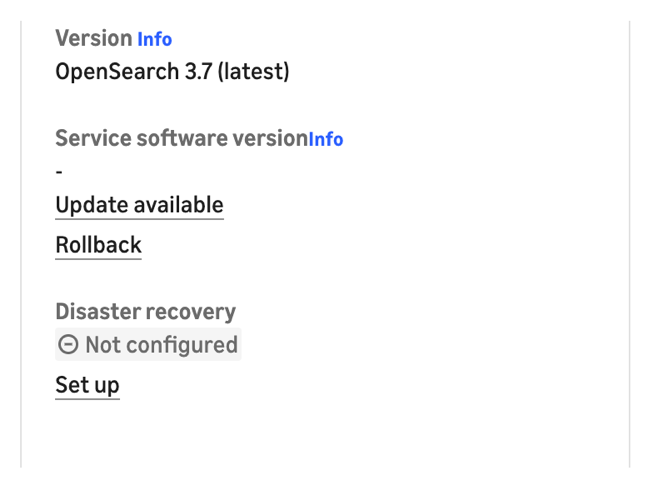
Figure 2: The domain summary shows the disaster recovery status as Not configured with a Set up link

Figure 3: An information banner offering a Set up disaster recovery button
Choose Set up or Set up disaster recovery, and then enter the Amazon Resource Name (ARN) of the secondary domain.
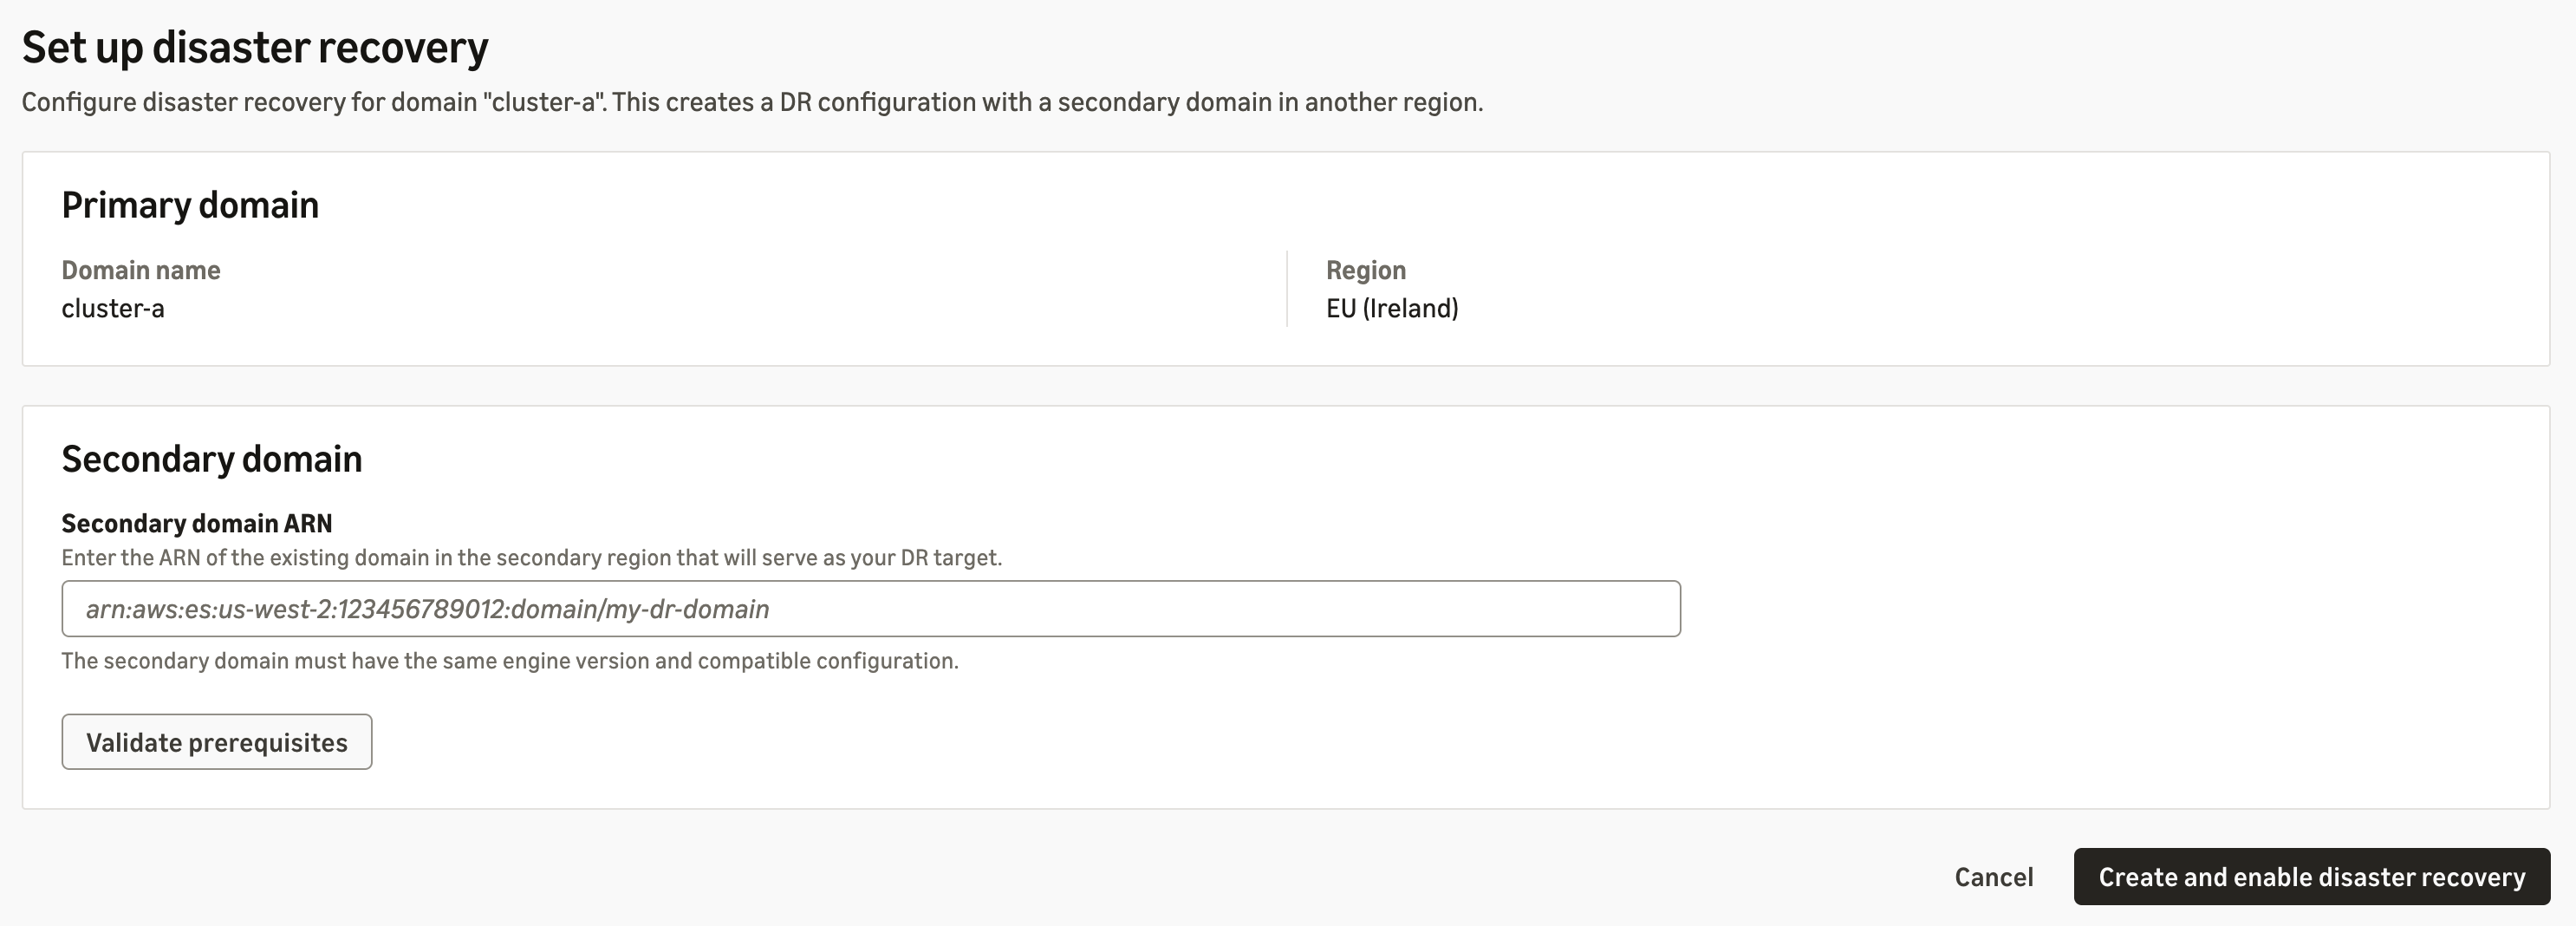
Figure 4: The setup page, where you enter the secondary domain ARN and validate the prerequisites
Choose Validate prerequisites. When the domains are compatible, the console displays the message “These domains can be paired for disaster recovery.” Choose Create and enable disaster recovery. Pairing takes a few minutes.
Set up with the AWS CLI
Run the following command in the primary Region to add the secondary domain as a replication peer:
Before pairing, you can call the CompareDomainConfiguration API to find where the two domains’ configurations differ across key categories.
Check the replication status
On the console, choose Manage in the disaster recovery section to view the peer role and replication status.
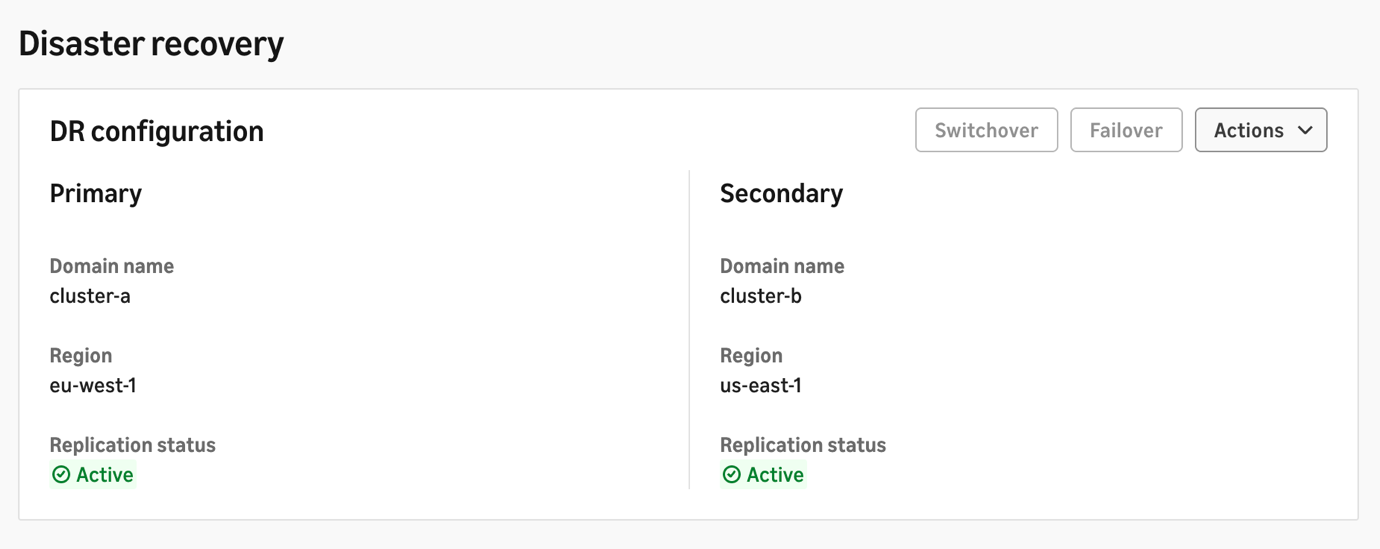
Figure 5: The disaster recovery dashboard, showing both domains with an Active replication status
With the AWS CLI, call DescribeDomainReplication on either domain to see the peer role and replication status. To stop replication, call RemoveReplicationPeer. Each domain keeps its data.
Monitor replication
Managed disaster recovery publishes the following Amazon CloudWatch metrics on the secondary domain. We recommend creating alarms on each.
| Metric | Unit | What it measures | Healthy value | Suggested alarm |
| DisasterRecoveryReplicationLagTime | Milliseconds | How far behind the primary the secondary is | Up to 10 seconds, even when caught up | Sustained above your RPO budget (for example, > 30,000 ms for 5 minutes) |
| DisasterRecoveryReplicationLagOps | Count | Changes the secondary hasn’t applied yet | A few seconds under active writes, workload dependent. | Growing continuously over several periods |
| DisasterRecoveryBootstrappingIndices | Count | Indices still doing their first full copy | 0 (non-zero right after setup or new index creation) | Non-zero longer than your expected initial sync time |
| DisasterRecoveryDegradedIndices | Count | Indices replicating but not fully healthy | 0 | > 0 for 15 minutes |
| DisasterRecoveryFailedIndices | Count | Indices where replication stopped with an error and no longer receive changes | 0 | > 0 (any datapoint) |
For more information, see Monitoring Amazon OpenSearch Service domains.
Switch Regions with switchover or failover
Use switchover for planned events and failover when the primary is unavailable (see the comparison table in Solution overview). In both cases, call the API on the secondary domain that you’re promoting.
Perform a planned switchover
SwitchoverReplication performs a coordinated role swap with zero data loss. Run it on the secondary domain:
Perform an unplanned failover
FailoverReplication promotes the secondary to primary unilaterally. Data written to the old primary but not yet replicated is lost. The loss is bounded by the replication lag. Because of this, the command requires the --allow-data-loss flag:
Redirect client writes
Managed disaster recovery doesn’t redirect your applications. Both domains stay readable, but only the primary is writable, so after a switchover or failover your applications must send writes to the newly promoted primary. Make the write-path update part of the same runbook step as the API call, for example by updating a DNS record, a configuration parameter, or a service discovery entry.
After a switchover or failover
After a switchover, the former primary becomes the secondary and replication continues in the reverse direction with no further action.
After a failover, when the original domain is available again, you can fail back. The original domain needs to be re-seeded before it can be used again for replication. After the re-seed, you can switch over to restore the original primary Region.
Performance results
We measured setup, initial sync, steady-state replication lag, planned switchover, and unplanned failover across multiple r7g instance sizes and data footprints. The tests used synthetic Apache log data with a sustained write load of 240 MBps.
Domain details:
- R7g.4xlarge domain: 6 data nodes + 3× m7g.large cluster managers, 12 TiB gp3 per node.
- R7g.8xlarge domain: 6 data nodes + 3× m7g.large cluster managers, 12 TiB gp3 per node.
- Indices use 12 primary shards + 1 replica, rollover at 50 GB per primary shard.
Note: Results can vary by workload, data size, and configuration.
Setup and initial sync
Pairing is one API call and completed in 1 to 3 minutes in our tests, from 1 TiB to 10 TiB. Initial sync time depends on data size.
| Data | Instance | Turn on disaster recovery | Full initial sync |
| 1 TiB | r7g.4xlarge | ~1 min | 20min |
| 10 TiB | r7g.4xlarge | ~1 min | 2 hr 31 min |
| 10 TiB | r7g.8xlarge | ~1 min | 2 hr 18 min |
Steady-state replication lag
Replication lag is how far behind the secondary is under sustained write load, measured with DisasterRecoveryReplicationLagTime (p95 over the test window).
| Data | Instance | Write load | Replication lag (p95) |
| 1 TiB | r7g.4xlarge | 240 MBps | ~10 s |
| 10 TiB | r7g.4xlarge | 240 MBps | ~10 s |
| 10 TiB | r7g.8xlarge | 240 MBps | ~10 s |
Planned switchover
Pending writes replicate to the new primary before the role swap completes, so data loss is zero. RTO is how long clients see writes fail before the new primary accepts them.
| Data | Instance | Write load | Writes down (RTO) | Data loss |
| 1 TiB | r7g.4xlarge | 240 MBps | 36.8 s | 0 |
| 10 TiB | r7g.4xlarge | 240 MBps | 38 s | 0 |
| 10 TiB | r7g.8xlarge | 240 MBps | 57 s | 0 |
Unplanned failover
RPO is how many seconds of writes were lost. Role flip confirmed is how long until the control plane confirms the promotion. Writes down is how long until clients receive HTTP 201 from the new primary.
| Data | Instance | Write load | Role flip confirmed | Writes down (RTO) | Data loss (RPO) |
| 1 TiB | r7g.4xlarge | 240 MBps | 6.4 s | 69 s | ~8 s (~2.0M docs) |
| 10 TiB | r7g.4xlarge | 240 MBps | 8.1 s | 61 s | ~10 s (~2.46M docs) |
| 10 TiB | r7g.8xlarge | 240 MBps | 5.8 s | 60 s | ~10 s (~2.46M docs) |
Key takeaways
In our tests, we saw the following results:
- RPO: Unplanned failover lost about 8 to 10 seconds of writes, well within the under-1-minute RPO target. Planned switchover lost no data.
- RTO: Writes resumed in about 1 minute after failover and under 1 minute after switchover, well within the under-20-minute RTO target.
- Scale: Pairing time, lag, and recovery times stayed roughly constant from 1 TiB to 10 TiB. Only the one-time initial sync grows with data size.
Best practices
- Manage configuration with infrastructure as code – Keep index templates, ISM policies, settings, and roles in a Git repository and apply them to both domains, for example with the OpenSearch Terraform provider.
- Upgrade the secondary first – When upgrading engine versions, upgrade the secondary domain first and the active primary last. We recommend testing the performance of the new version on the secondary, then upgrading the primary after the secondary domain upgrade is validated. Don’t run mixed versions permanently.
- Size domains to match – Keep instance types, counts, storage, and shard configuration aligned, and use CompareDomainConfiguration to detect drift.
- Decide your failover automation – Failover is manual by design, because the right trigger differs by business. You can build event-driven automation using CloudWatch alarms and the failover and switchover APIs.
- Exercise your runbook – Use switchover regularly to rehearse Region moves, including the client write redirection step.
Pricing
There is no additional charge for managed disaster recovery. You pay for the secondary domain’s instances and for cross-Region data transfer. For instance pricing, see Amazon OpenSearch Service pricing.
Conclusion and next steps
Managed disaster recovery gives Amazon OpenSearch Service domains continuous cross-Region replication, a zero-data-loss planned switchover, and a bounded-RPO failover, without building and operating your own replication pipeline. It serves regulated industries and business-critical workloads with strict availability, recovery, and business continuity requirements.
To get started:
- Create or upgrade domains to OpenSearch 3.7 or later in two Regions in the same AWS account.
- Pair them on the console or with the AddReplicationPeer API.
- Set CloudWatch alarms on the replication metrics, and build and rehearse your switchover and failover runbook.
For more information, see the Amazon OpenSearch Service disaster recovery documentation and the API reference, open the OpenSearch Service console, or view a demo video.

