Post Syndicated from Durga Prasad original https://aws.amazon.com/blogs/big-data/build-a-contract-compliance-search-system-with-amazon-opensearch/
For legal and compliance teams, auditing a repository of thousands of contracts for a single regulatory obligation shouldn’t take weeks. But with keyword search, it often does. A search for “inadvertent access notification” returns exact matches while missing functionally equivalent clauses such as “security incident disclosure” or “unauthorized access reporting.” This creates two problems:
Discovery gap: Critical risk exposure goes undetected because keyword search cannot match semantically equivalent terms across different contracts.
Review latency: After finding relevant contracts, legal counsel must manually scan lengthy documents to locate the specific clauses that matter. This process can stretch from minutes to hours per document.
Amazon OpenSearch Service is a fully managed search and analytics service that configures, manages, and scales OpenSearch clusters in the AWS Cloud. It supports use cases from log analytics and application monitoring to full-text search and real-time security analytics. It also supports AI-powered semantic search.
Amazon OpenSearch Service addresses both problems through two capabilities:
- Semantic search retrieves contracts based on meaning rather than exact keyword matches, closing the discovery gap.
- Semantic highlighting pinpoints the exact clauses within retrieved contracts that answer the query, reducing review time from hours of manual scanning to seconds of targeted reading.
In this post, you build a contract compliance search system that combines semantic search with semantic highlighting in Amazon OpenSearch Service. You deploy the solution using two AWS CloudFormation stacks, test it with synthetic contract documents, and see how a single query surfaces both the right contracts and the right clauses within them.
Solution overview
The solution uses a two-stage retrieval and extraction pipeline. First, semantic search identifies relevant contracts across the repository. Then, semantic highlighting marks the specific clauses within those contracts that match the query intent.
The following diagram illustrates the solution architecture:
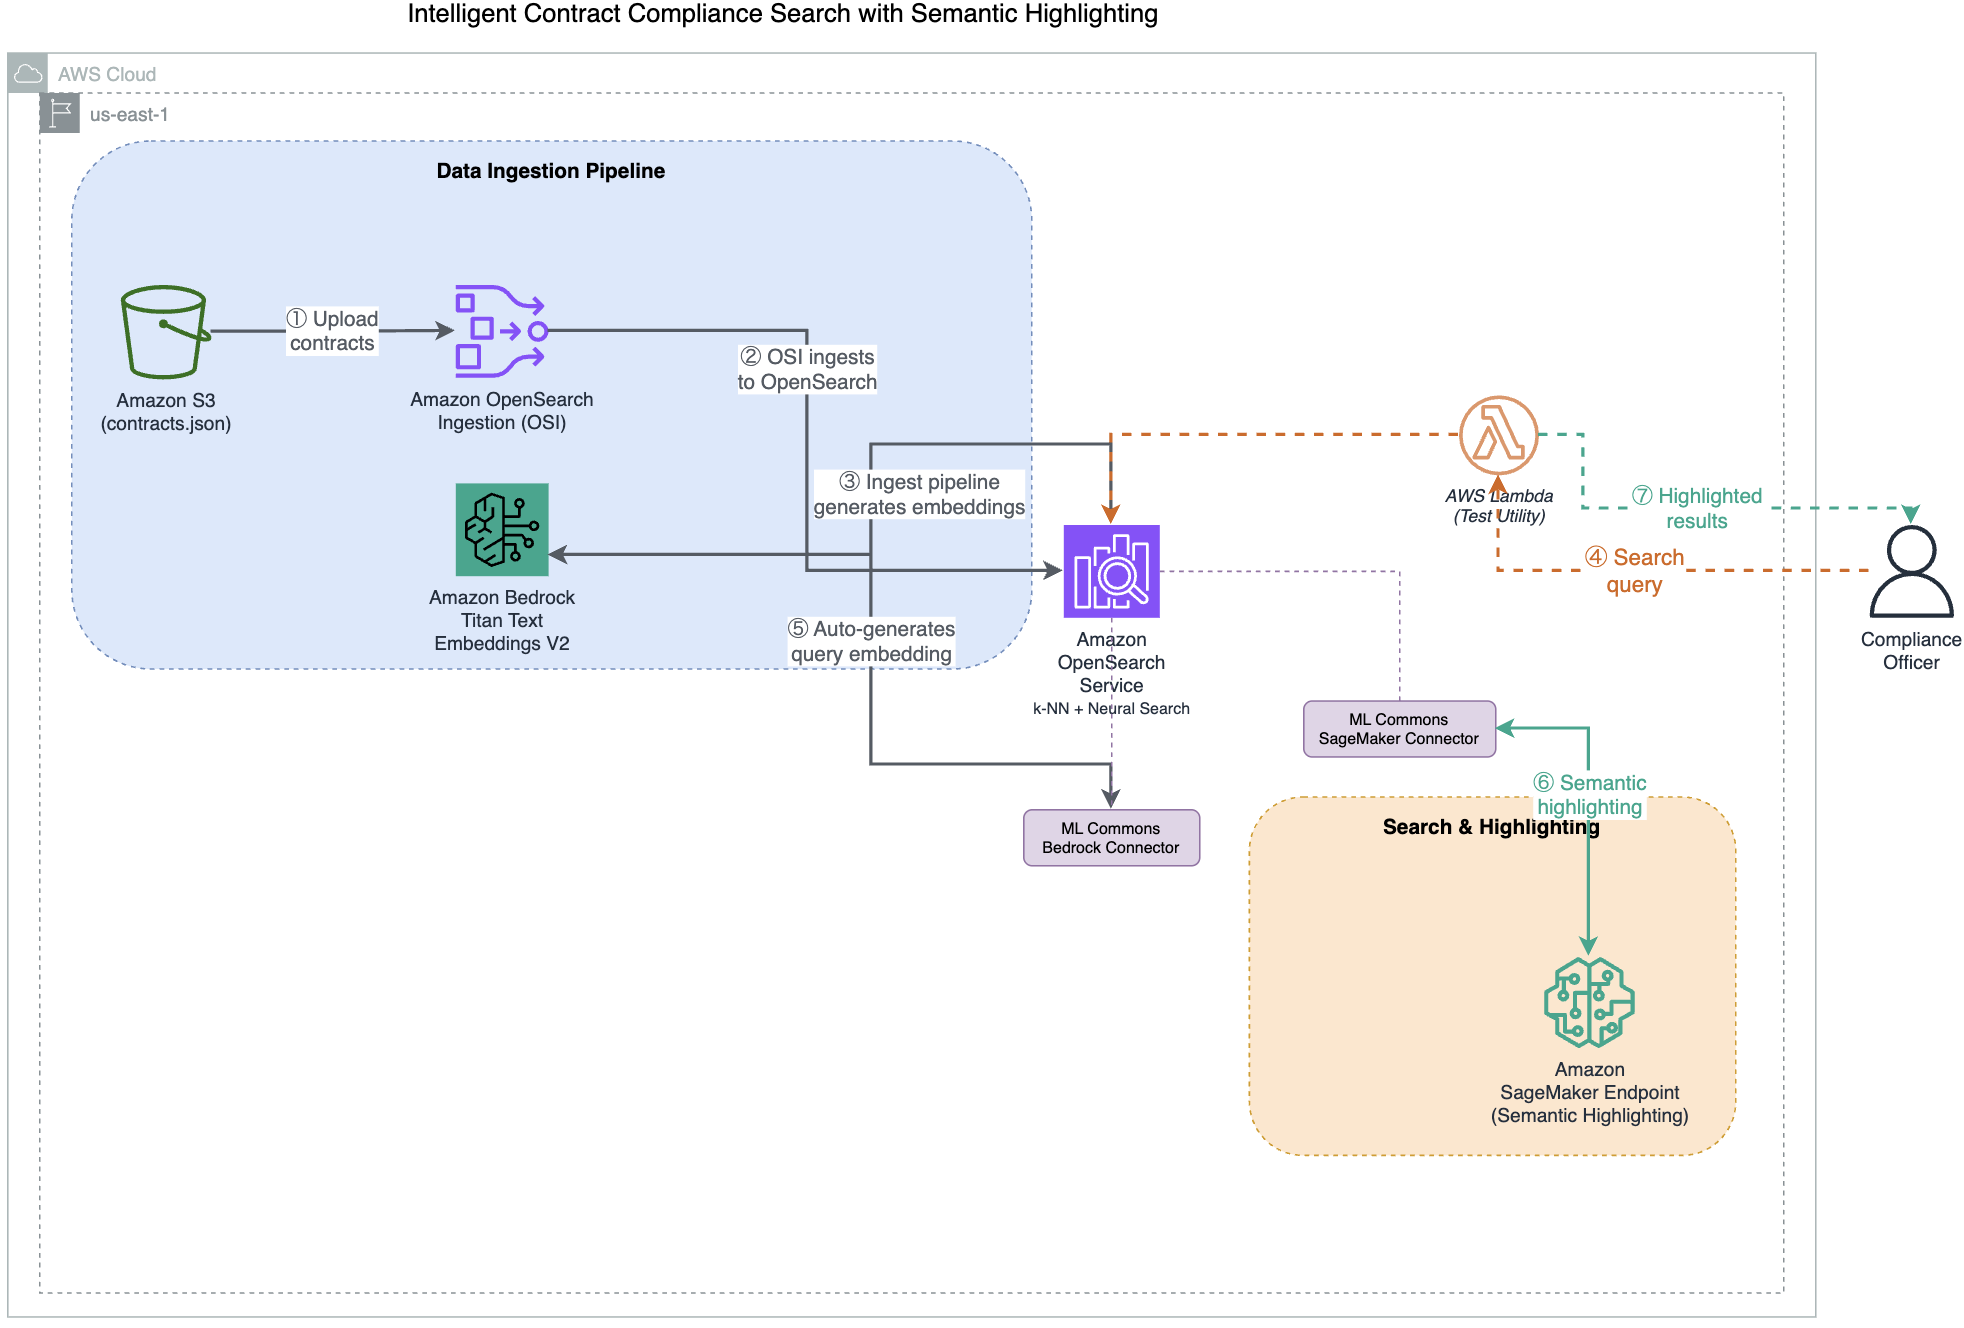
- Upload contracts to Amazon Simple Storage Service (Amazon S3) – Contract documents (JSON format) are uploaded to an Amazon S3 bucket, which serves as the centralized document repository.
- Amazon OpenSearch Ingestion (OSI) reads from S3 – A serverless OSI pipeline detects new documents in the S3 bucket and reads them for processing.
- OpenSearch ingest pipeline generates embeddings through Amazon Bedrock – As documents arrive, the ingest pipeline’s
text_embeddingprocessor invokes Amazon Titan Text Embeddings V2 through an ML Commons Bedrock connector. This converts contract text into 1024-dimension vector representations, stored in a k-NN index that uses the faiss engine. - User submits a search query – A user queries the system with natural language (for example, “data protection regulations”) through a test AWS Lambda function that forwards the request to OpenSearch using the neural query type.
- OpenSearch generates the query embedding – OpenSearch converts the user’s natural language query into a vector embedding using the same machine learning (ML) Commons Amazon Bedrock connector and Amazon Titan V2 model.
- Amazon OpenSearch Service performs semantic search – OpenSearch uses k-NN vector similarity to retrieve contracts that are semantically relevant to the query, even when exact terminology differs.
- Amazon SageMaker AI performs semantic highlighting – The
opensearch-semantic-highlighter-v1model, hosted on an Amazon SageMaker AI GPU endpoint, scores sentence relevance using cross-encoder inference and wraps the matching clauses in<em>tags for targeted reading.
How semantic search and semantic highlighting work together
The system processes queries in two steps:
Step 1 – Semantic search (document discovery): You query the contract corpus using natural language. The system retrieves contracts with semantically similar concepts, even when exact terminology differs. For example, searching for “force majeure” returns contracts discussing “natural disasters” or “unforeseeable circumstances” because the system understands these concepts are related.
Step 2 – Semantic highlighting (clause identification): After relevant contracts are retrieved, semantic highlighting automatically marks the clauses that semantically match your search intent. Instead of scanning pages of legal text, you immediately see the specific paragraphs that answer your question.
The difference between standard keyword highlighting and semantic highlighting is significant:
- Keyword highlighting wraps individual matching words:
<em>termination</em>and<em>rights</em>. - Semantic highlighting wraps entire relevant clauses:
<em>Upon termination, the consultant must return all confidential information and proprietary materials within 15 business days.</em>.
This reduces false positives, cuts review time, and provides explainability for why each document was retrieved.
Semantic highlighting model deployment
Before the system can highlight clauses based on meaning, the opensearch-semantic-highlighter-v1 model must be deployed to an Amazon SageMaker AI GPU endpoint and registered with the OpenSearch ML Commons plugin through a remote connector.
Stack 2 of the CloudFormation deployment automates this process. It performs the following steps:
- Downloads the model artifact from an AWS-managed source and deploys it to an Amazon SageMaker AI endpoint (
ml.g5.xlarge). - Creates a remote ML Commons connector in OpenSearch that points to the SageMaker endpoint.
- Registers the model with the
QUESTION_ANSWERINGfunction so that OpenSearch can use the model’s cross-encoder capabilities to score sentence relevance at query time.
The equivalent manual registration call (handled automatically by the stack) is:
You don’t need to run this manually. The deployment script and CloudFormation stack handle model registration end-to-end. The resulting model ID is automatically passed to the query Lambda function for use in semantic highlighting requests.
Index configuration
The index uses a k-NN vector field with 1024 dimensions (matching the Amazon Titan V2 output) and the faiss engine with HNSW method. The mapping includes both a knn_vector field for semantic retrieval and a standard text field for keyword matching and highlighting. When you search for “liability limits,” OpenSearch first retrieves documents through vector similarity, then uses the Amazon SageMaker AI model to identify and wrap the specific relevant sentences in <em> tags.
Implementation steps
This section walks you through deploying the solution using two AWS CloudFormation stacks and two shell scripts. You first set up the core infrastructure (OpenSearch, ingestion pipeline, and ML Commons Bedrock connector), then deploy the semantic highlighting model on Amazon SageMaker AI.
Prerequisites
To deploy this solution, you need:
- An active AWS account with permissions to create Amazon S3 buckets, AWS Lambda functions, Amazon SageMaker AI endpoints, Amazon Bedrock model access, Amazon OpenSearch Ingestion pipelines, Amazon OpenSearch Service domains, and AWS Identity and Access Management (IAM) roles (including
iam:PassRoleandsts:AssumeRole). For the exact least-privilege policy, seeiam-deployer-policy.jsonin the repository. Both CloudFormation stacks require theCAPABILITY_NAMED_IAMacknowledgement. - Amazon Bedrock model access enabled for Amazon Titan Text Embeddings V2 (
amazon.titan-embed-text-v2:0). - Familiarity with AWS CloudFormation.
- Estimated deployment time: approximately 35 minutes.
- Estimated cost: approximately USD $ 2.00–3.00 for a quick demo. Delete the stacks promptly after testing.
- This post uses US East (N. Virginia) as the deployment AWS Region. Verify service availability in your preferred Region before deploying.
Deploy the solution
The solution deploys using two AWS CloudFormation stacks and two shell scripts. The demo includes synthetic contract documents covering common contract types including software licenses, data processing agreements, managed services, and software as a service (SaaS) subscriptions.
Clone the repository and run the deployment script:
The deployment script creates the following resources across two stacks:
Stack 1:
- An Amazon OpenSearch Service domain with fine-grained access control.
- An Amazon OpenSearch Ingestion (OSI) pipeline that reads contracts from S3 and sends them to OpenSearch for indexing.
- An ML Commons Bedrock connector and ingest pipeline that automatically generates 1024-dimension vector embeddings through Amazon Titan Text Embeddings V2 during document indexing.
- A test Lambda function for querying the OpenSearch index using keyword, neural, or hybrid search with semantic highlighting support.
- An S3 bucket for storing contract documents.
- IAM roles for Lambda functions, the OSI pipeline, and OpenSearch access.
Stack 2:
- An Amazon SageMaker AI endpoint hosting the semantic highlighting model.
- A Lambda function that creates an ML Commons remote connector in OpenSearch and registers the highlighting model.
After both stacks deploy, the script automatically configures OpenSearch (role mappings, Amazon Bedrock connector, embedding model, k-NN index), ingests the sample contract data, and registers the semantic highlighting model.
The total deployment takes approximately 35 minutes to complete.
(Optional) Automated deployment with Claude Code CLI
If you have Claude Code CLI installed, you can deploy the solution using an AI-assisted workflow that creates a least-privilege IAM role scoped to this demo before deploying:
Claude Code reads the repository instructions, assumes the deployer role, deploys both CloudFormation stacks in order, runs the setup scripts, and verifies the deployment end-to-end. The deployer role restricts actions to resources prefixed with os-demo-*, following the principle of least privilege.
Test the solution
After the deployment succeeds, follow these steps to test the solution.
- On the Lambda console, choose Functions in the navigation pane.
- Choose the function that has
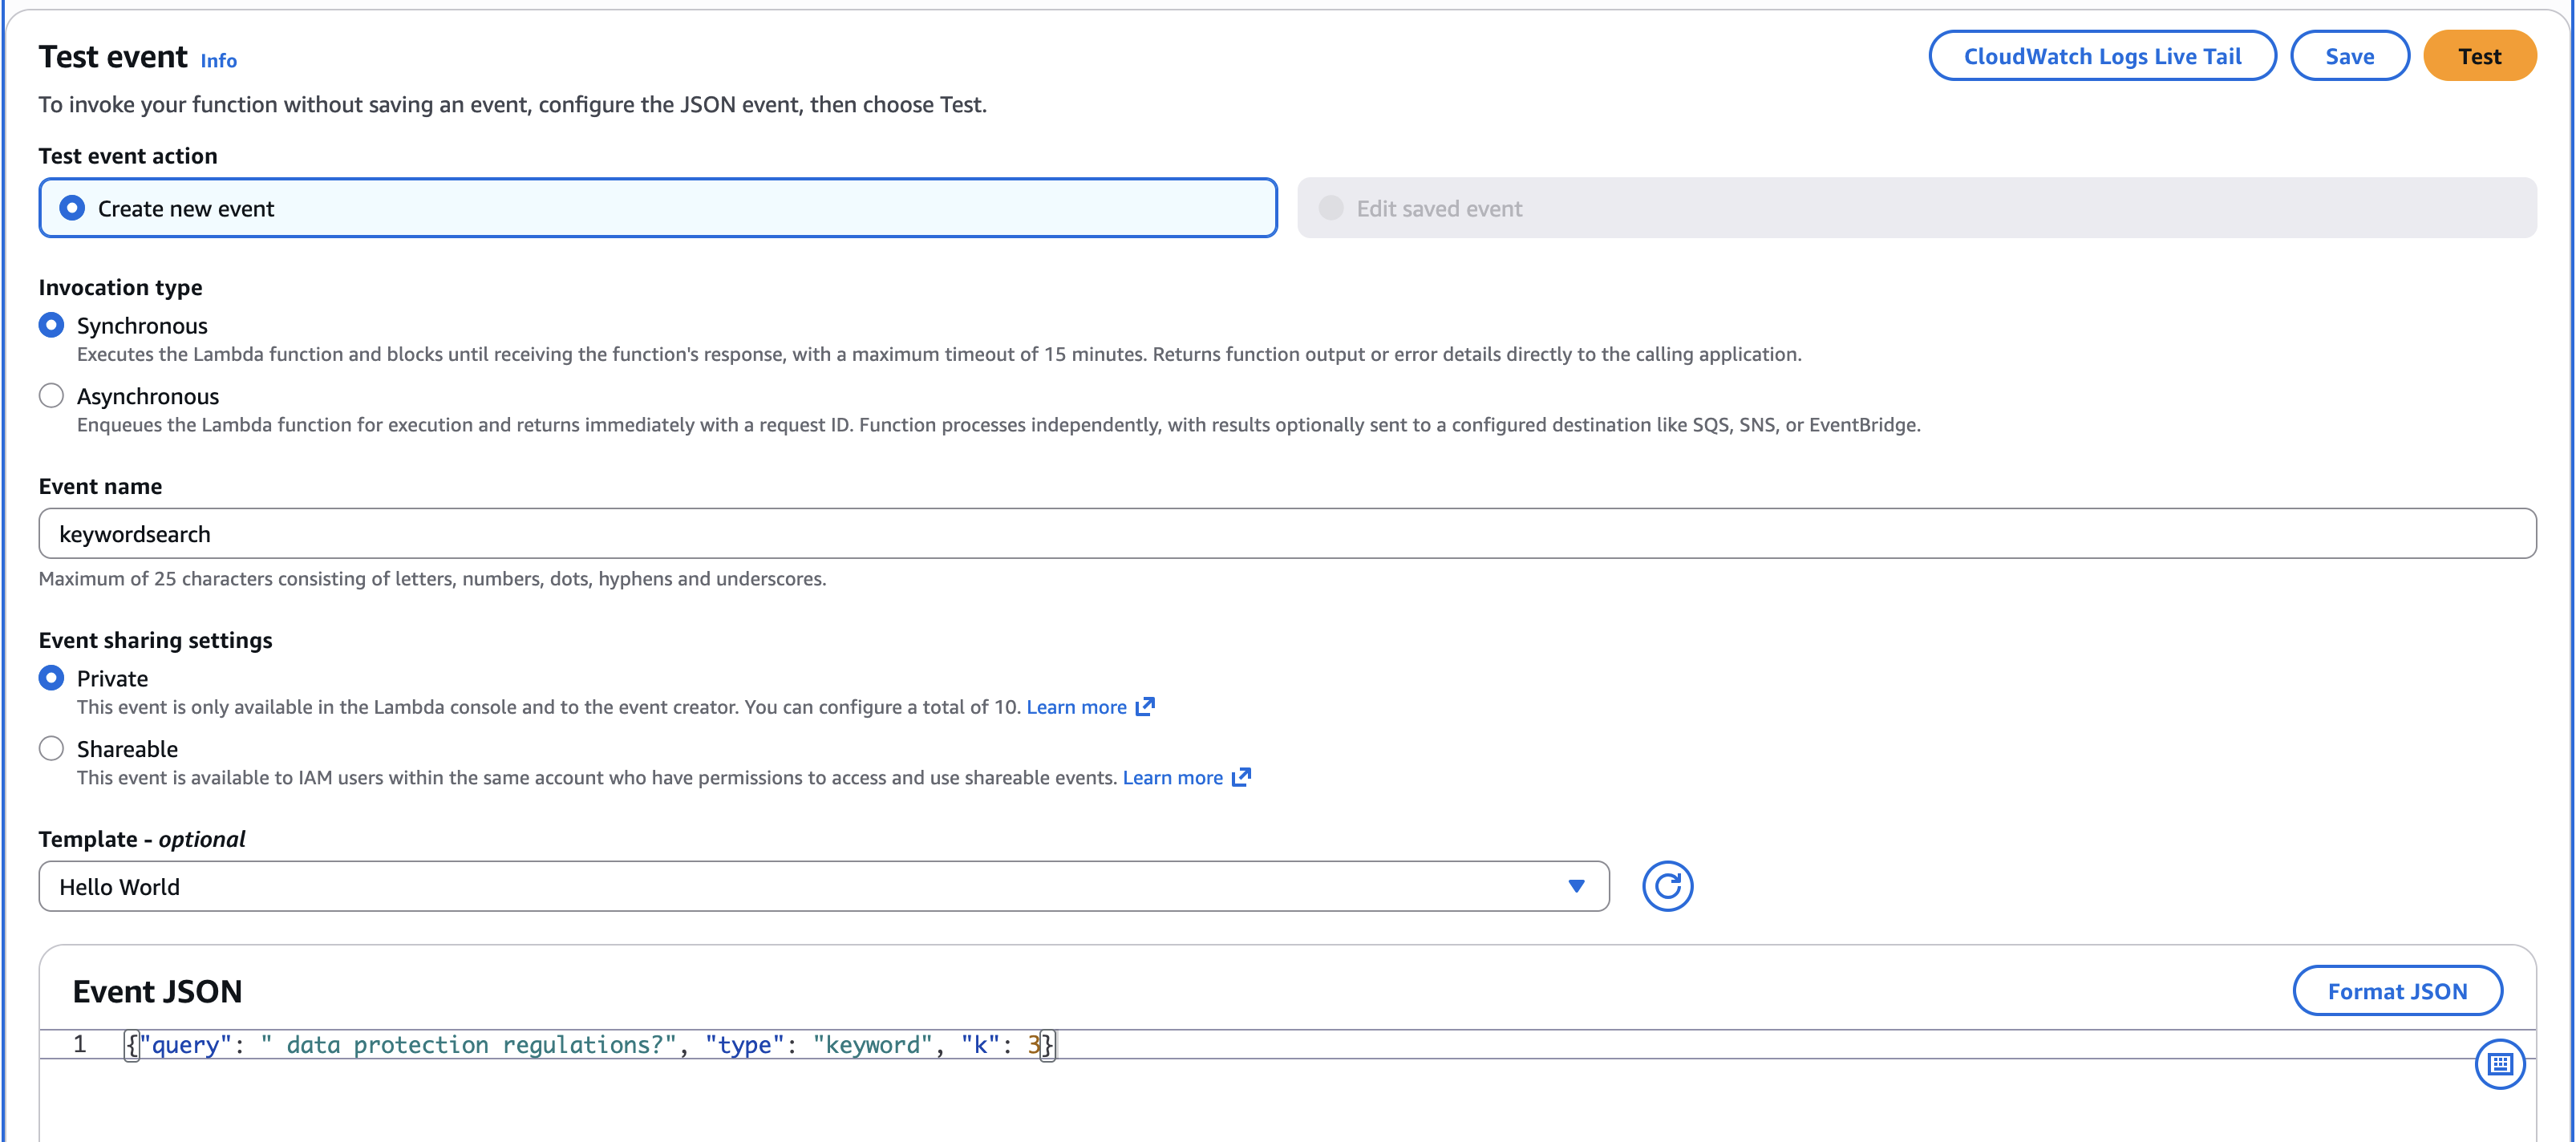
os-demo-queryin its name. - On the Test tab, in the Event JSON paste this keyword search query
{"query": "data protection regulations?", "type": "keyword", "k": 3} - Choose Test to run the Lambda function.
The following screenshot shows the Lambda function test configuration on the AWS Management Console with the keyword search query.
The function processes the query in two ways depending on the search type:
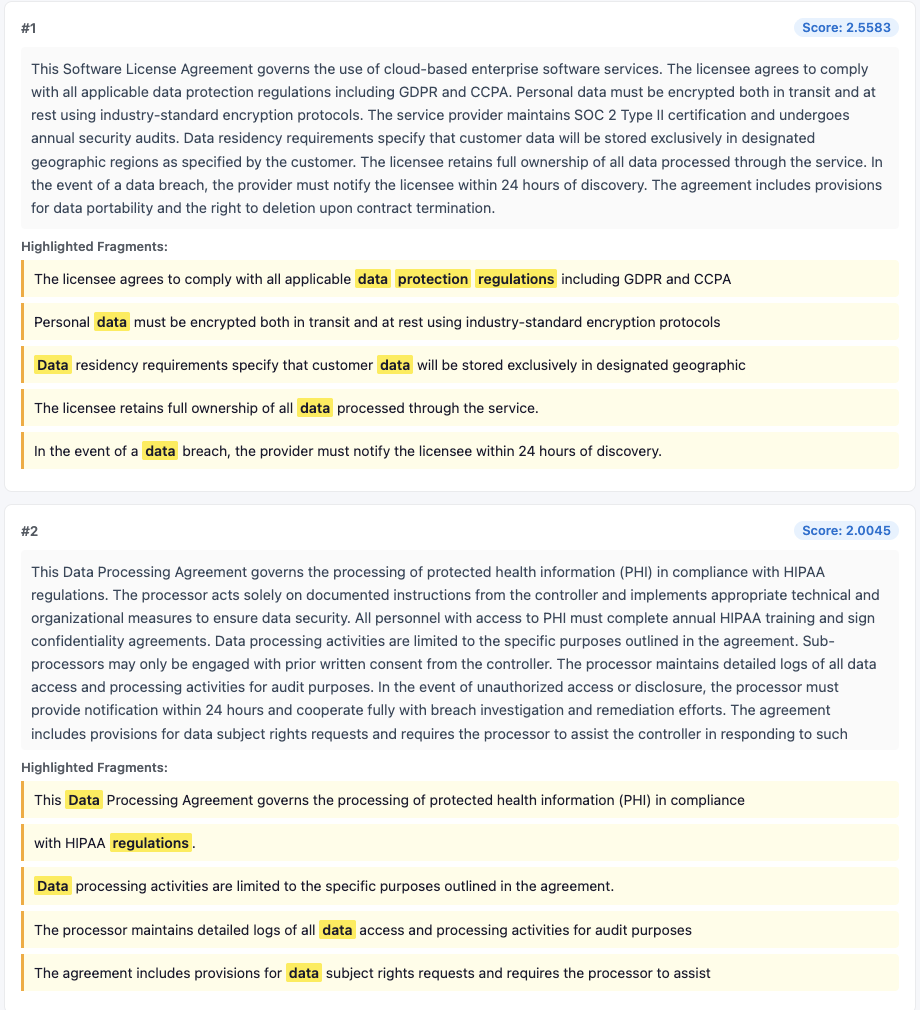
For keyword search (enter: keyword): The function sends a standard match query to OpenSearch, which returns documents containing the exact query terms. The highlight fragments wrap individual matching words like <em>termination</em> and <em>rights</em>.
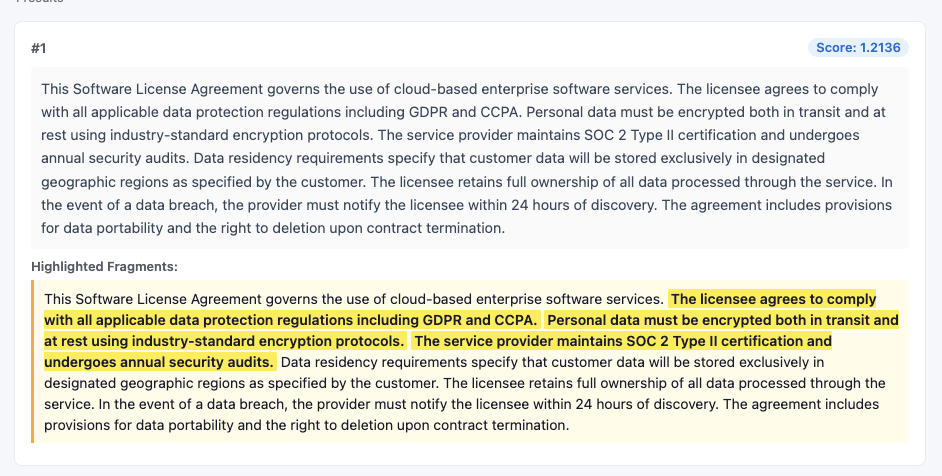
For neural search (enter: neural): The function sends a hybrid query to OpenSearch combining k-NN (semantic similarity) with keyword matching. OpenSearch automatically generates the query embedding through the ML Commons Amazon Bedrock connector using the same Amazon Titan V2 model. This returns semantically related documents even if they don’t contain the exact query terms. The SageMaker endpoint powers the semantic highlighting, identifying the most relevant clauses within each retrieved document. It wraps entire passages like <em>Upon termination, the consultant must return all confidential information and proprietary materials within 15 business days.</em>.
- Download the highlight viewer HTML file and open it in the browser. This file helps you view the highlighted text.
- Copy the entire execution output of the Lambda execution, paste it into the placeholder in the HTML file, and then choose Load Results.
- The following screenshot shows that only the matching keywords are highlighted.
- Next, paste the neural search query as input to the Lambda function to see how semantic highlighting works:
{"query": "data protection regulations", "type": "neural", "k": 1} - Choose Test to run, and then paste the entire output into the HTML viewer.
The viewer now displays entire sentences highlighted instead of individual keywords.
Optimizing for scale: batch semantic highlighting
In a standard search, a query might return dozens of relevant contracts. Using the default single inference mode, OpenSearch makes a separate ML call for every document in the result set. For a compliance officer reviewing 50 contracts, this sequential processing introduces noticeable latency.
OpenSearch 3.3 introduced batch inference mode to address this. Batch inference collects the matching documents and processes them in a single ML inference call. In the contract compliance use case, this shifts the performance characteristic from multiple sequential roundtrips to a single parallel execution on the Amazon SageMaker AI GPU.
To enable batch inference, first configure the cluster setting:
Then add batch_inference: true to your highlight options. The following query searches for data privacy clauses across the contracts and highlights the top 10 results using a single batch call:
Best practices
Follow these recommendations to optimize performance, security, and cost-efficiency when deploying the contract compliance search system in production.
- Experiment with overlapping chunk sizes (for example, 500 characters with a 10 percent overlap) in your OSI pipeline to verify that context is preserved for long indemnification or liability clauses.
- Verify that your Amazon S3 buckets and OpenSearch domains are encrypted using AWS Key Management Service (AWS KMS). For production workloads containing sensitive data, make sure that all traffic stays within your virtual private cloud (VPC) through interface endpoints.
This demo uses simplified configurations for learning purposes. For production deployments, implement VPC isolation, AWS KMS encryption with customer-managed keys, and multi-AZ OpenSearch clusters.
Clean up resources
To avoid ongoing charges, delete the AWS CloudFormation stacks and associated resources:
- On the AWS CloudFormation console, choose Stacks in the navigation pane.
- Select the
os-demo-highlightingstack (Stack 2) and choose Delete. Wait for deletion to complete. - Select the
os-demo-searchstack (Stack 1) and choose Delete. Stack deletion takes approximately 10–15 minutes to complete.
The stack deletion will automatically remove:
- OpenSearch domain.
- SageMaker model and endpoint.
- Lambda functions.
- IAM roles and policies.
- After both stacks are deleted, manually delete the S3 bucket (
opensearch-cfn-semantic-highlighting-us-east-1-<ACCOUNT_ID>) created for model artifacts. This bucket is provisioned at deploy time and is not managed by CloudFormation. Replace<ACCOUNT_ID>with your AWS account ID in the bucket name.
Conclusion
In this post, you built a contract compliance search system that combines semantic search with semantic highlighting in Amazon OpenSearch Service. The system helps close the discovery gap by retrieving contracts based on meaning rather than exact keywords, and it reduces review latency by highlighting the specific clauses that answer your query.
While we focused on legal agreements, the architecture described here is a blueprint for domains requiring high-stakes document discovery, including:
- Regulatory filings: Identifying specific compliance mandates in financial reports.
- Technical documentation: Pinpointing troubleshooting steps across massive product manuals.
- Research and academia: Isolating specific methodologies within thousands of scientific papers.
- Internal knowledge bases: Empowering employees to find exact policy language instantly.
To get started, deploy the solution from the sample repository on GitHub and try semantic search in the Amazon OpenSearch Service console. For more information about semantic search, see Semantic search in the Amazon OpenSearch Service Developer Guide.


 Durga Prasad is a Sr Lead Consultant enabling customers build their Data Analytics solutions on AWS. He is a coffee lover and enjoys playing badminton.
 Murali Reddy is a Lead Consultant at Amazon Web Services (AWS), helping customers build and implement data analytics solution. When he’s not working, Murali is an avid bike rider and loves exploring new places.