Post Syndicated from Kevin S. Ridolfi original https://aws.amazon.com/blogs/architecture/basf-digital-farming-builds-a-stac-based-solution-on-amazon-eks/
This post was co-written with Frederic Haase and Julian Blau with BASF Digital Farming GmbH.
At xarvio – BASF Digital Farming, our mission is to empower farmers around the world with cutting-edge digital agronomic decision-making tools. Central to this mission is our crop optimization platform, xarvio FIELD MANAGER, which delivers actionable insights through a range of geospatial assets, including satellite imagery, drone data, and application maps from sprayers.
In this post, we show you how we built a scalable geospatial data solution on AWS to efficiently catalog, manage, and visualize both raster and vector datasets through the web. We walk you through our solution based on the SpatioTemporal Asset Catalog (STAC) specification and the open source eoAPI ecosystem, detailing the solution architecture, key technologies, and lessons learned during deployment. This builds upon a previous post on efficient satellite imagery ingestion using AWS Serverless, extending our discussion to the full lifecycle of geospatial data management at scale.
Requirements for our geospatial data solution
BASF Digital Farming’s xarvio FIELD MANAGER platform operates at exceptional scale in the geospatial data ecosystem, processing hundreds of millions of satellite images that translate into STAC items, which further decompose into billions of individual geospatial artifacts. Unlike traditional satellite data providers such as European Space Agency (ESA) who work with predictable, structured data flows, we operate in an inherently dynamic agricultural environment where we ingest near-daily satellite imagery per field from a diverse array of sensors and providers globally. Our mission to support farmers worldwide with advanced digital agronomic decision advice demands a reliable, cloud-based infrastructure capable of handling this massive data velocity and volume and applying advanced quality assurance processes including cloud detection and anomaly detection algorithms. The platform’s true value emerges through our machine learning (ML) pipelines that transform raw satellite data into actionable insights. For example, estimating accurate absolute biomass such as Leaf Area Index (LAI) helps farmers make precise, data-driven agronomic decisions that optimize crop yield and resource utilization across fields worldwide.
STAC and eoAPI ecosystem
To efficiently manage our growing archive of geospatial data, we adopted the Spatio Temporal Asset Catalog (STAC) specification, an open standard that provides a common language to describe and catalog raster and vector datasets. With STAC, we can standardize metadata across diverse sources like satellite imagery, UAV datasets, and prescription maps, making it straightforward to search, filter, and retrieve assets across our platform. We built our platform using the eoAPI ecosystem, an integrated suite of open source tools designed to handle the full lifecycle of geospatial data on the cloud. At its core is pgSTAC, which provides a performant PostGIS-backed STAC API implementation. With pgSTAC, we can index millions of STACi Items efficiently, with support for spatial, temporal, and attribute-based filtering at scale. On top of that, we use Tiles in PostGIS (TiPG) to serve tiled vector data directly from our PostGIS database. This enables real-time visualization of field boundaries, management zones, and application histories as lightweight Mapbox Vector Tiles (MVT), without requiring an external tile server. For raster assets, including satellite and drone imagery, we rely on TiTiler, a modern dynamic tile server built for Cloud Optimized GeoTIFFs (COGs). With TiTiler, we can stream imagery on-demand as WMTS or XYZ tiles, perform dynamic rendering (such as NDVI or false color composites), and integrate seamlessly into web maps and mobile apps.
Solution overview
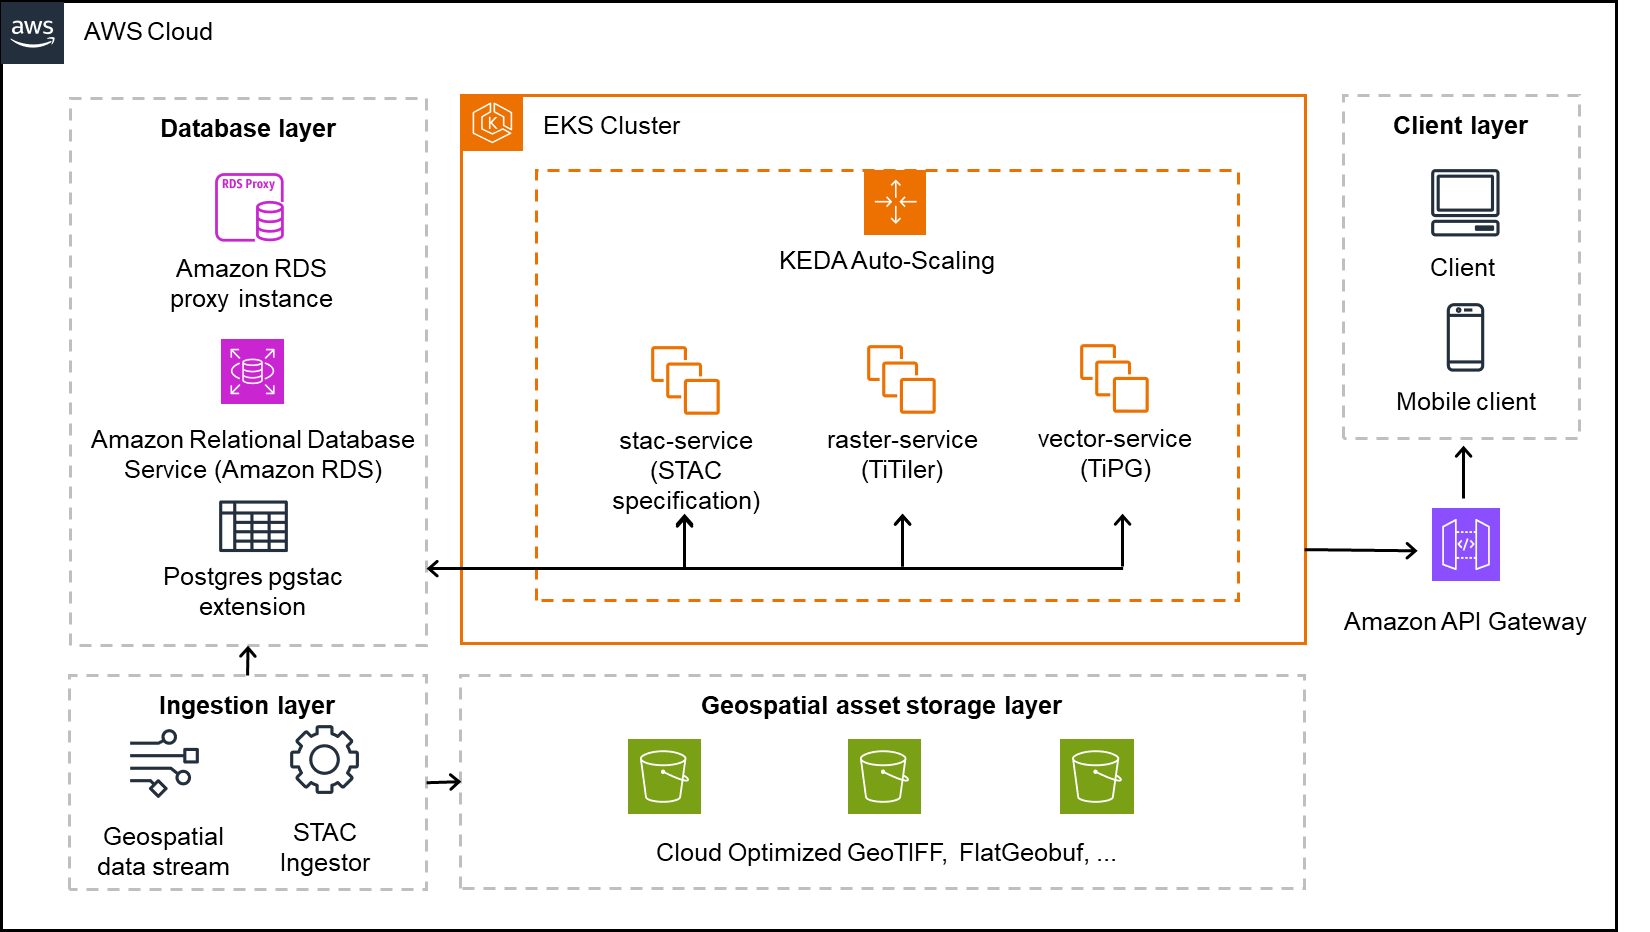
The following architecture diagram shows how we implemented our geospatial data platform on AWS. In this section, we explain each component of the architecture and how they work together to process millions of satellite images and geospatial assets daily. The solution uses Amazon Elastic Kubernetes Service (Amazon EKS) as the core computing platform, with Amazon Simple Storage Service (Amazon S3) for storage and Amazon Relational Database Service (Amazon RDS) for metadata management. We break down the architecture into four main layers: core services, storage, database, and ingestion.
Core services layer
The solution uses an EKS cluster hosting three key services:
- stac-service – Implements the STAC API specification to catalog and serve metadata for both raster and vector datasets
- raster-service – Powered by TiTiler, this service dynamically renders and tiles cloud-optimized raster data (for example, COGs) for seamless integration into web and mobile maps
- vector-service – Built with TiPG, this component serves vector data (for example, boundaries or application zones) as tiled MVT layers directly from the database or from Amazon S3
These services are containerized and orchestrated within Kubernetes, allowing for high availability, modular separation, and simplified continuous integration and delivery (CI/CD) workflows.
KEDA-based automatic scaling
We use Kubernetes Event-Driven Autoscaling (KEDA) to scale our platform services dynamically based on real-time workloads. With KEDA, we can scale individual pods based on precise event-driven metrics such as the STAC ingestion queue depth or visualization request load. This supports responsive performance during peak activity while maintaining lean resource usage during idle periods, aligning perfectly with our need for elasticity in a data-intensive, variable-load environment.
Geospatial asset storage layer
The platform stores all raw and processed geospatial assets in S3 buckets, optimized for performance and durability. This layer holds COGs for raster imagery and FlatGeobuf or similar formats for vector data. These formats are chosen for their support of streaming access, indexing, and cloud-based performance.
Database layer
The metadata backbone of the system is a PostgreSQL database hosted on Amazon RDS, extended with the pgSTAC plugin. This setup enables efficient indexing and querying of millions of STAC items and collections. An RDS proxy sits in front of the database, providing connection pooling and resiliency, especially under bursty or concurrent access patterns common in geospatial applications.
Ingestion layer
An independent ingestion component handles batch or streaming geospatial data inputs. This component processes satellite imagery, drone data, or prescription maps and pushes relevant metadata into the STAC API and storage assets into Amazon S3. The ingestion engine is decoupled from serving infrastructure, enabling asynchronous and large-scale data loading.
Amazon API Gateway and clients
Public access to the platform is handled through Amazon API Gateway, allowing clients—whether browser-based or mobile—to interact securely with the services. The API gateway provides a unified entrypoint and is used for applying rate limiting, authorization, and routing policies.
Solution benefits
The solution offers the following benefits:
- Rapid onboarding with STAC standardization – By aligning with the STAC specification, we’ve significantly reduced the time to onboard new data domains like sprayer application maps. Compared to previous approaches in our legacy system, metadata modeling and integration are now both standardized and automated, so we can expose new geospatial data products to clients in days instead of weeks or months.
- Optimized storage with COGs and Amazon S3 – Storing raster and vector assets in Amazon S3 using cloud-optimized formats (such as COGs for imagery or FlatGeobuff for vectors) reduces storage costs while enabling low-latency, streaming access. This avoids the need for preprocessing or extract, transform, and load (ETL)-heavy pipelines and simplifies client delivery.
- Large-scale ingestion with a batch STAC ingestor – Our custom STAC ingestor supports both real-time and batch-mode operations. This has made it possible to onboard satellite constellations, drone imagery, and historical datasets in bulk without disrupting running services. The ingestion service uses optimized database ingestion functions, capable of ingesting thousands of items per second, providing high-throughput and reliable data integration at scale.
- PostgreSQL, pgSTAC, and Amazon RDS Proxy for a scalable metadata backbone – With pgSTAC and Amazon RDS Proxy, we benefit from advanced spatial-temporal querying while making sure database connection management is handled gracefully, even under high concurrency. This combination offers reliability without compromising performance.
- Scalable deployment with Amazon EKS – Hosting the solution on Amazon EKS provides full control over deployments, resource tuning, and service orchestration. Combined with automatic scaling, we dynamically adjust compute capacity based on demand, facilitating resilience and cost-efficiency.
Learnings
As part of building this solution, we learned the following:
- RDS Proxy is essential for automatically scaled environments – Given our use of automatic scaling pods in Amazon EKS, we found that RDS Proxy is critical. It handles connection pooling efficiently and protects the underlying PostgreSQL database from connection exhaustion during sudden scale-up events. Without it, we encountered spiky load failures and blocked connections during high-ingest periods.
- Batch STAC ingestor is a core component – Our custom STAC ingestor proved to be an indispensable piece of the system. It interfaces directly with pgSTAC to perform large-scale, automated ingestions of geospatial metadata from streams and archives. Without this tool, onboarding data providers or processing legacy imagery at scale would have been labor-intensive and error-prone.
- COGs are non-negotiable – For fast, scalable visualization of large raster datasets, COGs are essential, particularly if raster datasets exceed several gigabytes. They enable efficient HTTP range requests, alleviate the need for preprocessing, and work seamlessly with TiTiler for real-time tile rendering. Non-COG formats led to noticeably slower performance and weren’t suitable for cloud-based visualization.
- Serverless-compliant, optimized for Amazon EKS (for now) – Although the architecture is designed to be serverless-compatible, we opted for an Amazon EKS first approach due to the nature of our other application landscape. Components like TiTiler and TiPG benefit from persistent, memory-tuned environments that are harder to achieve in a serverless runtime. However, the solution remains modular and stateless by design, and certain subsystems (such as ingestion triggers, notifications, or monitoring) are already candidates for future serverless migration to further improve elasticity and reduce operational overhead.
Conclusion
BASF Digital Farming GmbH has successfully implemented a STAC-based geospatial data platform on Amazon EKS, enabling efficient management and visualization of satellite imagery, drone data, and application maps. This architecture helps us onboard new data sources within weeks rather than months. The new platform also processes twice as much data in a single day while cutting costs by 50%, thanks to reduced data handling through the STAC schema and the efficiencies of automatic scaling. By adopting the STAC standard, the architecture improves data discoverability, reduces search latency, and supports more efficient analytic workflows.
Organizations looking to build similar geospatial data solutions can use AWS services like Amazon EKS, Amazon S3, and Amazon RDS along with open source tools like STAC and eoAPI to create scalable, cost-effective solutions. Learn more about building containerized applications on AWS at Containers on AWS.


 Randy DeFauw is a Senior Principal Solutions Architect at AWS. He holds an MSEE from the University of Michigan, where he worked on computer vision for autonomous vehicles. He also holds an MBA from Colorado State University. Randy has held a variety of positions in the technology space, ranging from software engineering to product management. He entered the big data space in 2013 and continues to explore that area. He is actively working on projects in the ML space and has presented at numerous conferences, including Strata and GlueCon.
 David Christian is a Principal Solutions Architect based out of Southern California. He has his bachelor’s in Information Security and a passion for automation. His focus areas are DevOps culture and transformation, infrastructure as code, and resiliency. Prior to joining AWS, he held roles in security, DevOps, and system engineering, managing large-scale private and public cloud environments.
 Prachi Kulkarni is a Senior Solutions Architect at AWS. Her specialization is machine learning, and she is actively working on designing solutions using various AWS ML, big data, and analytics offerings. Prachi has experience in multiple domains, including healthcare, benefits, retail, and education, and has worked in a range of positions in product engineering and architecture, management, and customer success.
 Richa Gupta is a Solutions Architect at AWS. She is passionate about architecting end-to-end solutions for customers. Her specialization is machine learning and how it can be used to build new solutions that lead to operational excellence and drive business revenue. Prior to joining AWS, she worked in the capacity of a Software Engineer and Solutions Architect, building solutions for large telecom operators. Outside of work, she likes to explore new places and loves adventurous activities.


 Durga Prasad is a Sr Lead Consultant enabling customers build their Data Analytics solutions on AWS. He is a coffee lover and enjoys playing badminton.
 Murali Reddy is a Lead Consultant at Amazon Web Services (AWS), helping customers build and implement data analytics solution. When he’s not working, Murali is an avid bike rider and loves exploring new places.


 Anand Komandooru is a Senior Cloud Architect at AWS. He joined AWS Professional Services organization in 2021 and helps customers build cloud-native applications on AWS cloud. He has over 20 years of experience building software and his favorite Amazon leadership principle is “
 Li Liu is a Senior Database Specialty Architect with the Professional Services team at Amazon Web Services. She helps customers migrate traditional on-premise databases to the AWS Cloud. She specializes in database design, architecture, and performance tuning.
 Neil Potter is a Senior Cloud Application Architect at AWS. He works with AWS customers to help them migrate their workloads to the AWS Cloud. He specializes in application modernization and cloud-native design and is based in New Jersey.
 Vivek Shrivastava is a Principal Data Architect, Data Lake in AWS Professional Services. He is a big data enthusiast and holds 14 AWS Certifications. He is passionate about helping customers build scalable and high-performance data analytics solutions in the cloud. In his spare time, he loves reading and finds areas for home automation.
 AWS Global Summits – Check your calendars and sign up for the AWS Summit close to where you live or work: