All posts by Lawton Pittenger

Simplifying policy management with URL and Domain Category filtering on AWS Network Firewall

Post Syndicated from Lawton Pittenger original https://aws.amazon.com/blogs/security/simplifying-policy-management-with-url-and-domain-category-filtering-on-aws-network-firewall/

Network administrators face a persistent challenge: maintaining domain blocklists and allowlists that keep pace with the internet. New websites and services emerge daily, and keeping these lists current requires constant manual updates that leave gaps in coverage. This challenge intensifies when managing access to rapidly evolving categories like AI services, where new tools launch on a regular basis.

AWS Network Firewall is a managed, stateful network firewall and intrusion detection and prevention service for fine-grained control of your virtual private cloud (VPC) network traffic. With URL and domain category filtering, security teams can use predefined categories to control access instead of managing individual domains. AWS-managed URL and domain categories stay current automatically as new domains are registered, removing the need for manual list maintenance.

This feature is especially useful for organizations navigating AI governance. Instead of manually tracking every new AI service, you can control access to the entire Artificial Intelligence and Machine Learning category while creating exceptions for approved services. The same approach works for social media, streaming sites, gambling, and dozens of other categories, all with built-in audit trails for compliance reporting.

In this post, we walk through URL and domain category filtering configurations for AWS Network Firewall, from basic rules to exception handling and monitoring strategies that give you visibility into how your workloads interact with external services.

Streamlined policy management with predefined categories

With URL and domain category filtering, you control website access using predefined categories instead of individually specifying sites in a domain list rule group. You can select from AWS-managed categories such as Social Networking, Gambling, or Artificial Intelligence and Machine Learning to implement and maintain filtering policies. AWS keeps these categories current automatically, so you don’t need to update firewall policies when new domains are registered.

Network Firewall offers two category filtering options. Domain category filters by domain name using the TLS Server Name Indication (SNI) field, with no decryption required. URL category filters by the full URL path, which requires TLS inspection for HTTPS traffic. To keep things straightforward, this post focuses on domain category filtering. To set up URL category filtering with TLS inspection, see Creating a TLS inspection configuration in Network Firewall.

Prerequisites

To follow the steps in this post, start by making sure that you have the following prerequisites in place:

  1. An existing Network Firewall deployment: This walkthrough assumes you have an existing Network Firewall deployment to filter egress traffic flows from your Amazon Virtual Private Cloud (Amazon VPC) in place. If you aren’t already using Network Firewall, see Getting started with AWS Network Firewall to set up your firewall before proceeding.
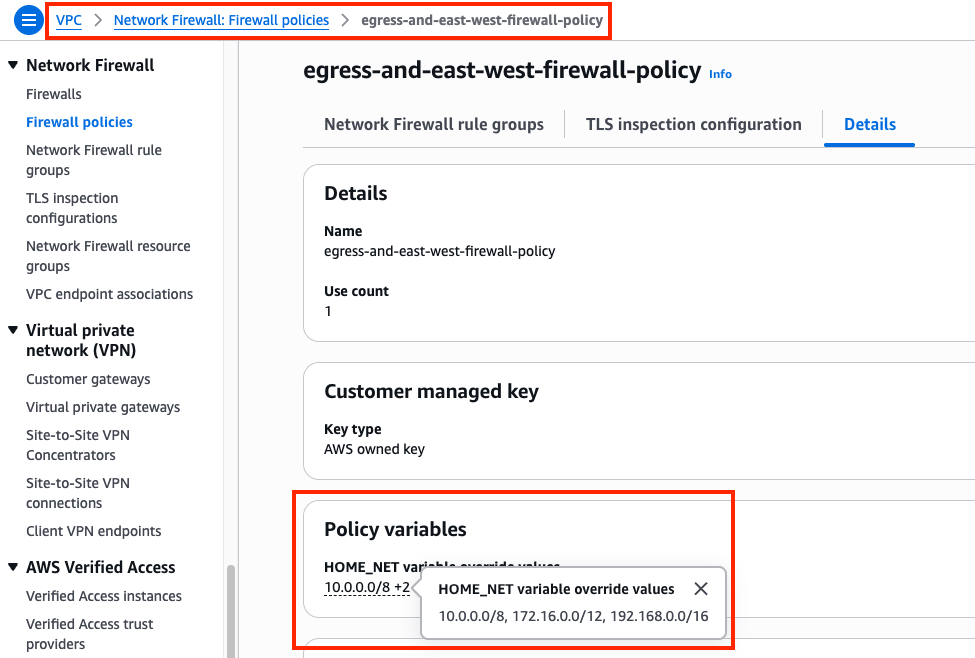
  2. The HOME_NET variable set correctly at the firewall policy level: The rules in this post use the $HOME_NET variable to scope traffic to your internal network. In the AWS Management Console for Amazon VPC, select your firewall policy under the Firewall policies tab, select the Details tab, and check the policy variables section under HOME_NET variable override values. We recommend setting this to all RFC 1918 private IP address ranges: 10.0.0.0/8, 172.16.0.0/12, and 192.168.0.0/16. When you set $HOME_NET at the policy level, all rule groups associated with that policy inherit the value automatically. Network Firewall automatically maps $EXTERNAL_NET to the inverse of $HOME_NET, so configuring HOME_NET correctly also configures $EXTERNAL_NET.
Figure 1: Firewall policy details tab showing the HOME_NET variable override values set to RFC 1918 private IP address ranges

Figure 1: Firewall policy details tab showing the HOME_NET variable override values set to RFC 1918 private IP address ranges

Create a category rule using the console rule builder

To get started quickly, you can create a domain category rule using the console’s built-in rule builder. In this example, we create a single alert rule for the Artificial Intelligence and Machine Learning category.

  1. Open the AWS Management Console, search for and open the Amazon VPC console.
  2. In the left navigation, scroll to Network Firewall and select Rule groups.
  3. Choose Create rule group.
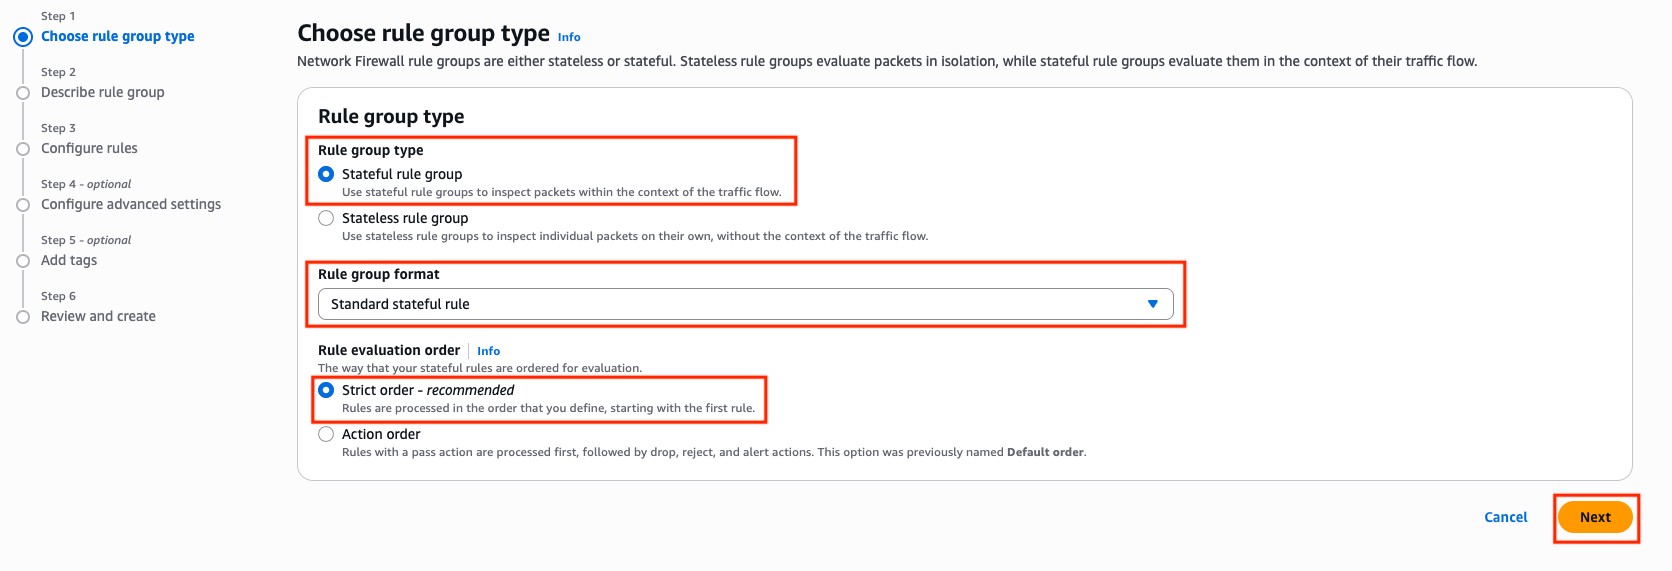
  4. For Rule group type, select Stateful rule group.
  5. For Rule group format, select Standard stateful rules.
  6. For Rule evaluation order, select Strict order. Choose Next.
    Figure 2: Create Network Firewall rule group page showing Stateful rule group type, Standard stateful rules format, and Strict order evaluation selected

    Figure 2: Create Network Firewall rule group page showing Stateful rule group type, Standard stateful rules format, and Strict order evaluation selected

  7. Enter Domain-Category-Rules for the Name, Domain Category Rules for the Description, and 50 for the Capacity. Choose Next.
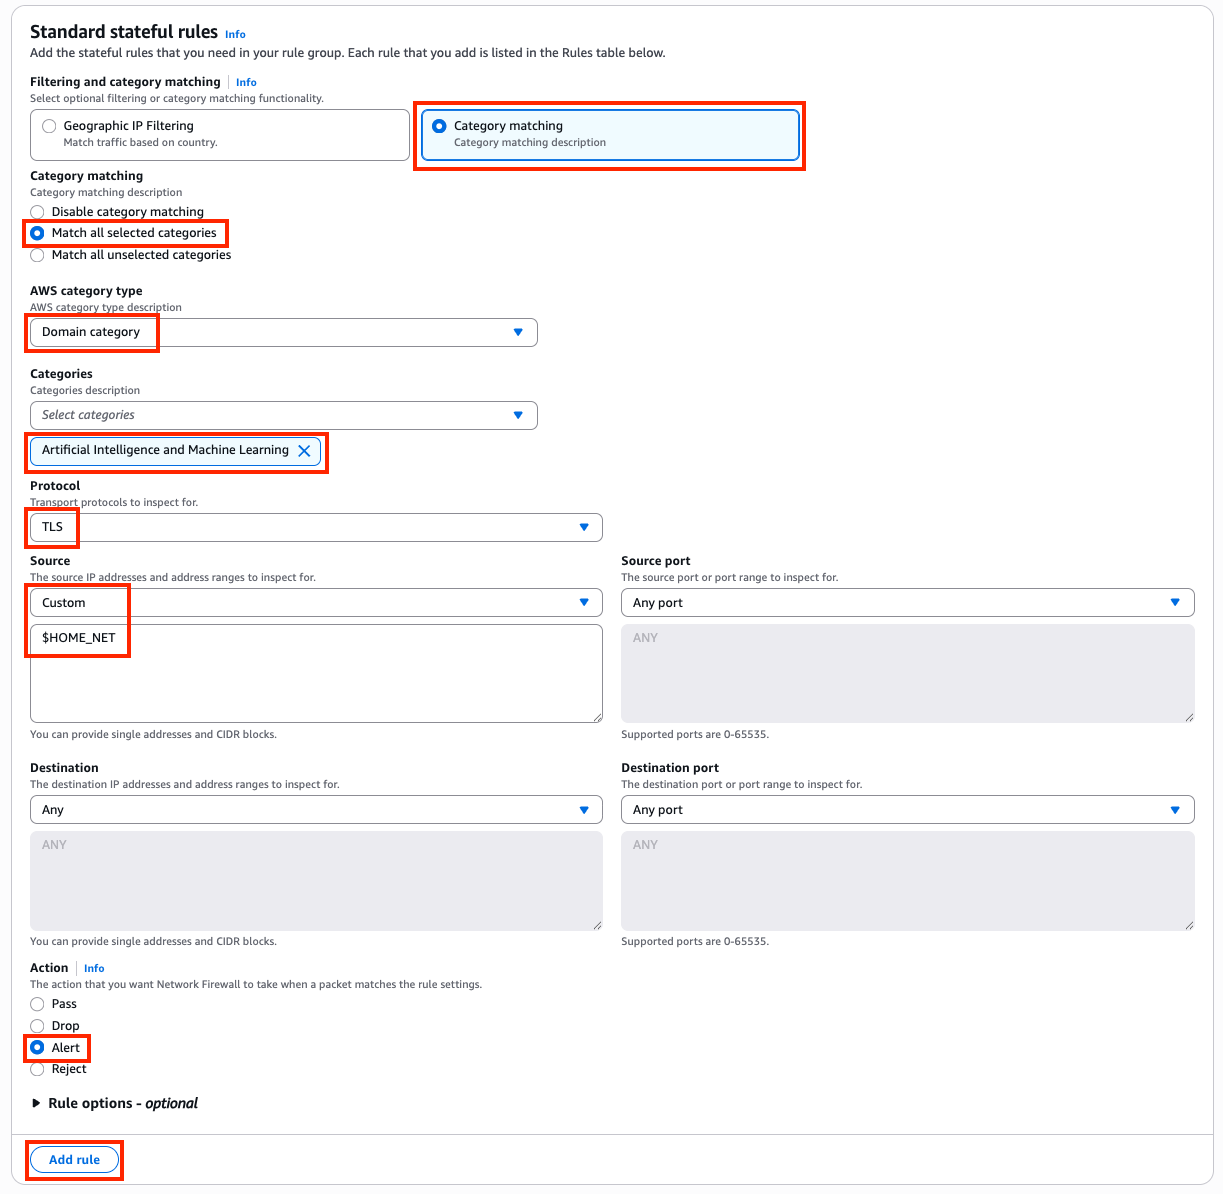
  8. In the rule group editor, select the Category Matching radio button.
  9. Under Category Matching, select Match all selected categories.
  10. Under AWS category type, select Domain Category from the dropdown.
  11. Under Categories, select Artificial Intelligence and Machine Learning.
  12. For Protocol, select TLS.
  13. For Source, select Custom, then enter $HOME_NET in the dialog box.
  14. Set the Destination IP to Any.
  15. For Action, select Alert.
  16. Choose Add rule to add this rule to the rule group. Choose Next.
    Figure 3: Completed category matching rule showing TLS protocol, $HOME_NET source, Any destination, and Alert action added to the rule group

    Figure 3: Completed category matching rule showing TLS protocol, $HOME_NET source, Any destination, and Alert action added to the rule group

  17. Under Customer managed key, leave the default setting (Customize encryption settings should remain unchecked).
  18. Under Add tags – optional, leave the default setting of no tags.
  19. Choose Next, then Create rule group.

This rule generates an alert log entry each time a connection matches a domain in the Artificial Intelligence and Machine Learning category. It doesn’t block traffic. To block traffic, change the action to Drop or Reject in step 15.

Creating the same rule using Suricata compatible rule strings

The console rule builder is a quick way to get started, but we recommend using Suricata compatible rule strings for production deployments. Suricata rules give you full control over rule options, make rules straightforward to copy, edit, share, and back up, and support the majority of the Suricata engine. For more information, see Limitations and caveats for stateful rules in AWS Network Firewall.

The following walkthrough creates the same alert rule you built with the console rule builder, this time using a Suricata rule string.

In the Amazon VPC console, navigate to Network Firewall, then select Network Firewall rule groups.

  1. Choose Create rule group.
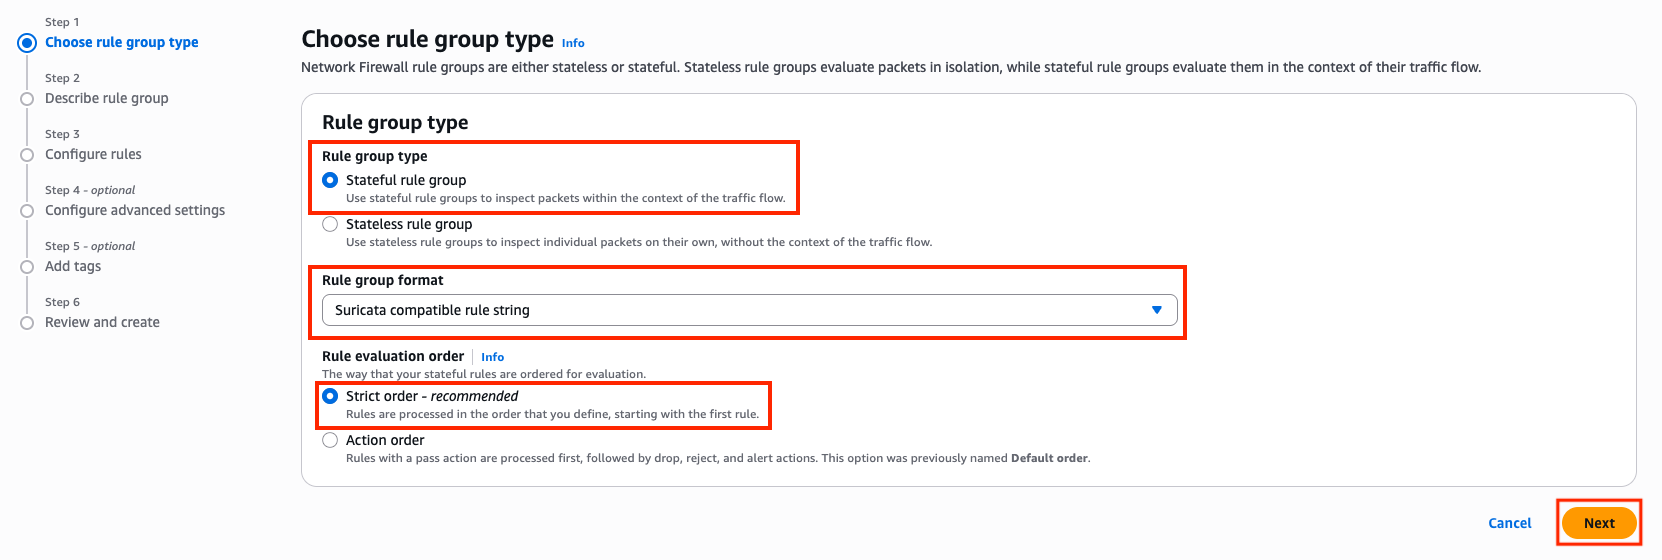
  2. For Rule group type, select Stateful rule group.
  3. For Rule group format, select Suricata compatible rule string.
  4. For Rule evaluation order, select Strict order. Choose Next.
    Figure 4: Create Network Firewall rule group page showing Stateful rule group type, Suricata compatible rule string format, and Strict order evaluation selected

    Figure 4: Create Network Firewall rule group page showing Stateful rule group type, Suricata compatible rule string format, and Strict order evaluation selected

  5. Enter Suricata-Domain-Category-Rules for the Name, Suricata Domain Category Rules for the Description, and 50 for the Capacity. Choose Next.
  6. Leave the Rule variables section empty. The $HOME_NET variable is inherited from the firewall policy, as configured in the prerequisites.
  7. Leave IP set references empty.
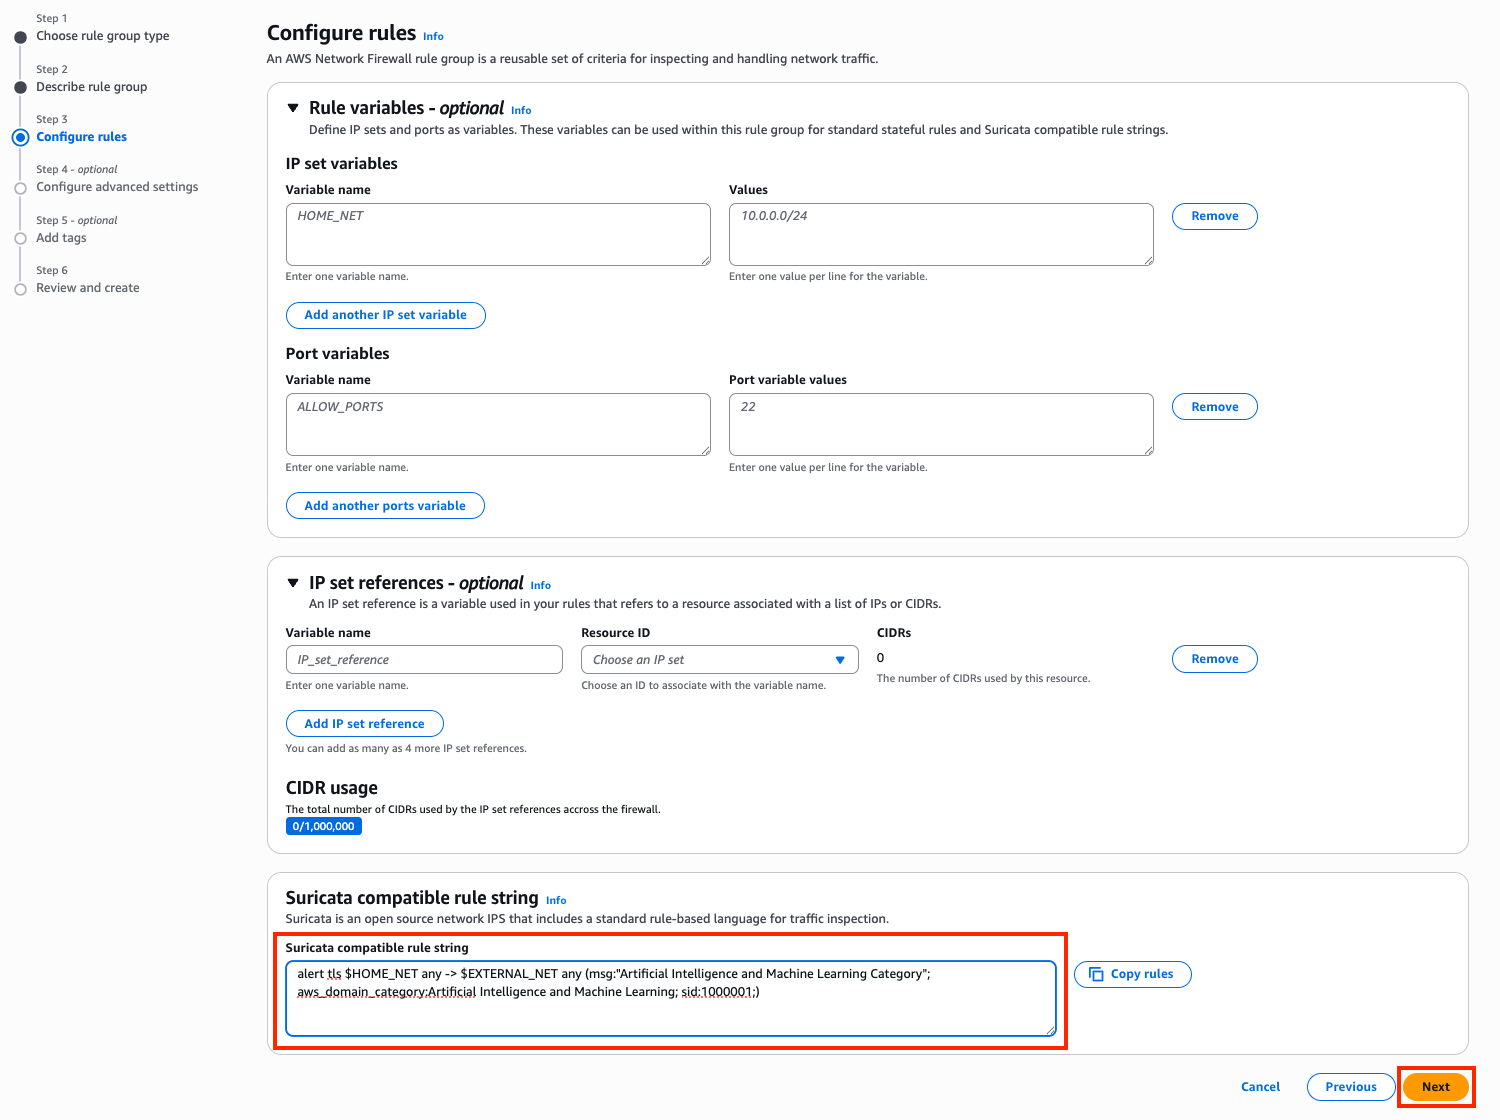
  8. Paste the following rule into the Suricata compatible rule string editor:
    alert tls $HOME_NET any -> $EXTERNAL_NET any (msg:"Artificial Intelligence and Machine Learning Category"; aws_domain_category:Artificial Intelligence and Machine Learning; sid:1000001;)

  9. Choose Next.
    Figure 5: Suricata compatible rule string editor with the domain category alert rule pasted in and the rule variables section left empty

    Figure 5: Suricata compatible rule string editor with the domain category alert rule pasted in and the rule variables section left empty

  10. Under Customer managed key, leave the default setting (Customize encryption settings should remain unchecked).
  11. Under Add tags – optional, leave the default setting of no tags. Choose Next.
  12. Choose Create rule group.
  13. After creating the rule group, return to your firewall policy and add it under Stateful rule groups. We recommend associating new rule groups in a development or test environment first to validate behavior before deploying to production.
The following table explains each component of this rule:

alert Action: generate an alert log entry when the rule matches. Other actions include pass, drop, and reject.
tls Protocol: inspect TLS traffic, matching against the SNI field in the TLS Client Hello.
$HOME_NET any -> $EXTERNAL_NET any Source and destination: match traffic from any internal IP address (HOME_NET) and port to any external IP address (EXTERNAL_NET) and port. The HOME_NET variable defines your internal network ranges, and the EXTERNAL_NET variable is automatically set to the inverse.
msg:”Artificial Intelligence and Machine Learning Category” The message written to the alert log when this rule is triggered.
aws_domain_category:Artificial Intelligence and Machine Learning The AWS-managed domain category to match against. The firewall looks up the destination domain in the category database and matches if the domain belongs to this category.
sid:1000001 A unique signature ID for this rule. Each rule in a rule group must have a unique SID.

Managing exceptions for approved services

You can manage exceptions to keep business-critical websites accessible. For example, say you need to allow access to OpenAI while blocking all other AI and ML traffic. To do this, return to the Suricata-Domain-Category-Rules rule group you created earlier and replace the basic alert rule with the following ruleset. Select the Suricata-Domain-Category-Rules rule group, under the Rules section, choose Edit.
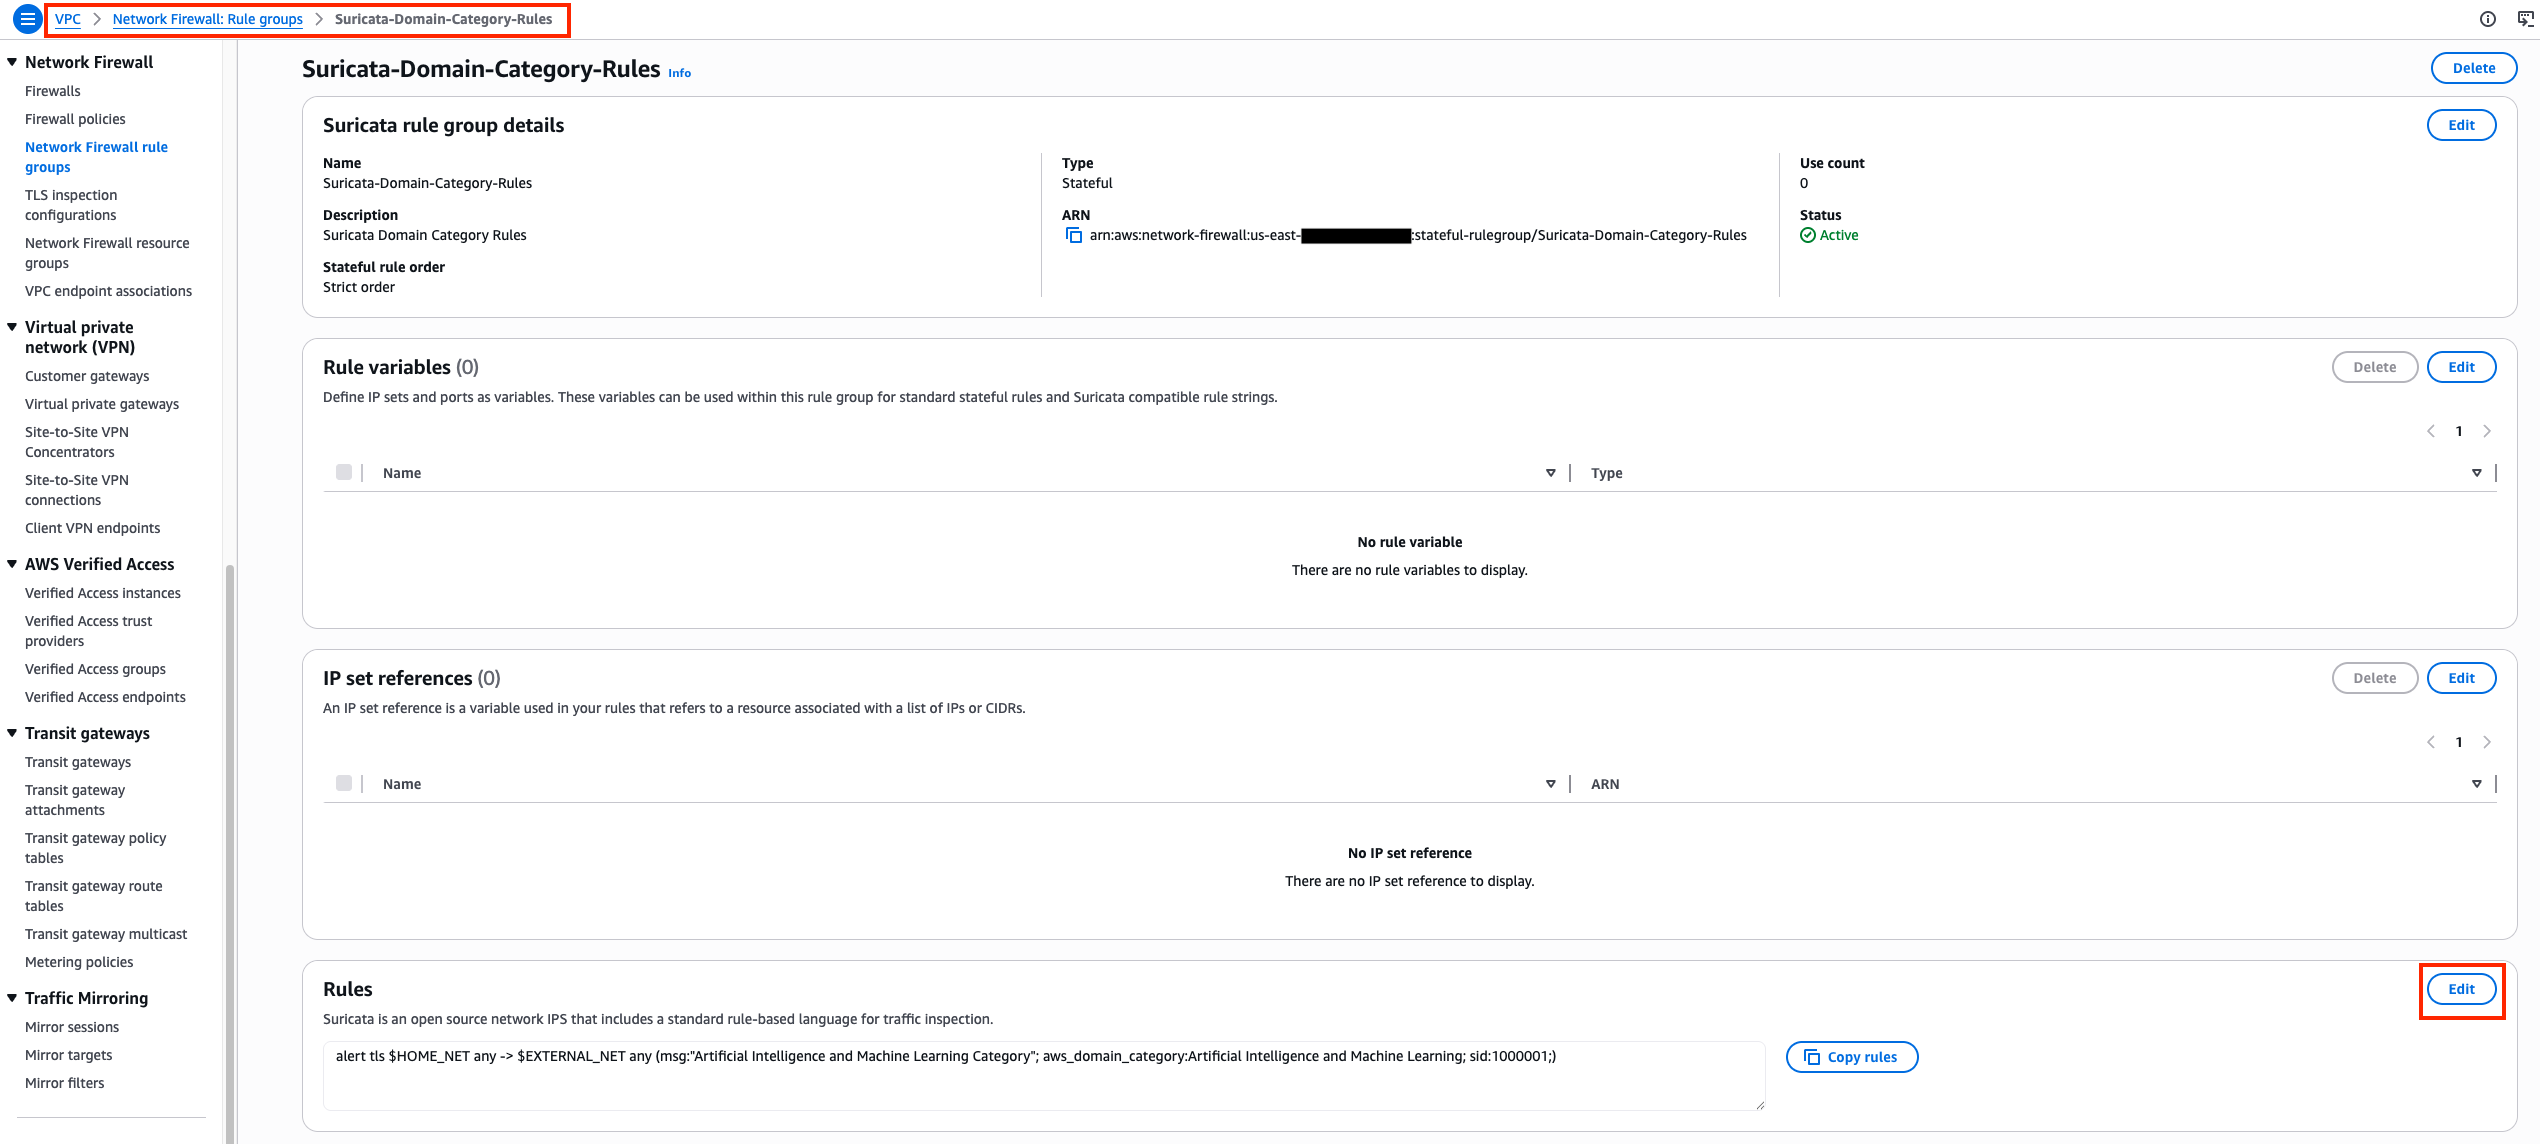
Figure 6: Selecting Suricata-Domain-Category-Rules rule group to edit with new rules

Figure 6: Selecting Suricata-Domain-Category-Rules rule group to edit with new rules

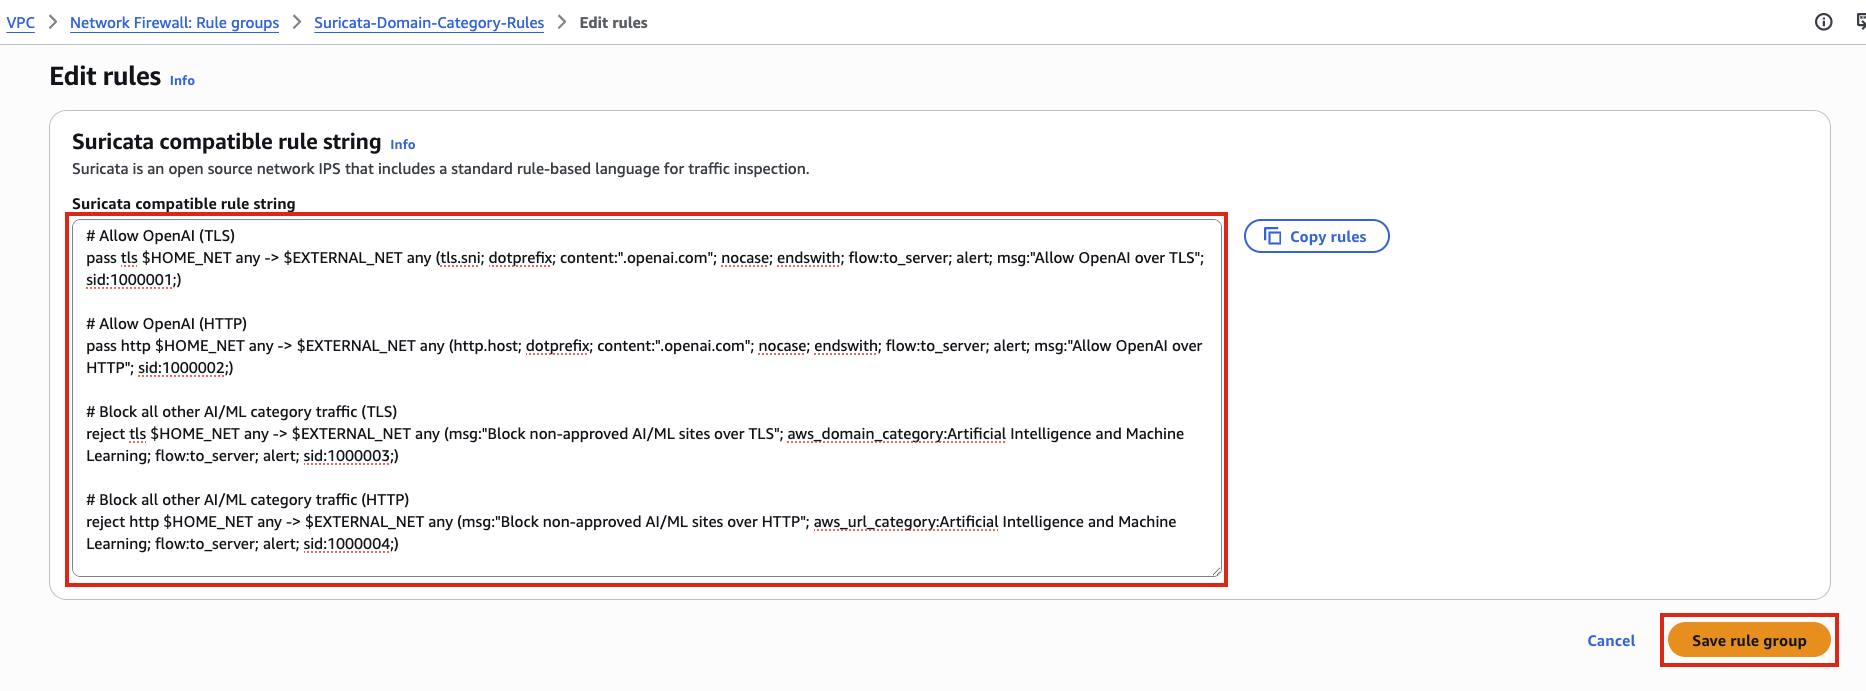
Paste in the following rules and choose Save rule group.
# Allow OpenAI (TLS)
pass tls $HOME_NET any -> $EXTERNAL_NET any (tls.sni; dotprefix; content:".openai.com"; nocase; endswith; flow:to_server; alert; msg:"Allow OpenAI over TLS"; sid:1000001;)

# Allow OpenAI (HTTP)
pass http $HOME_NET any -> $EXTERNAL_NET any (http.host; dotprefix; content:".openai.com"; nocase; endswith; flow:to_server; alert; msg:"Allow OpenAI over HTTP"; sid:1000002;)

# Block all other AI/ML category traffic (TLS)
reject tls $HOME_NET any -> $EXTERNAL_NET any (msg:"Block non-approved AI/ML sites over TLS"; aws_domain_category:Artificial Intelligence and Machine Learning; flow:to_server; alert; sid:1000003;)

# Block all other AI/ML category traffic (HTTP)
reject http $HOME_NET any -> $EXTERNAL_NET any (msg:"Block non-approved AI/ML sites over HTTP"; aws_url_category:Artificial Intelligence and Machine Learning; flow:to_server; alert; sid:1000004;)

Figure 7: Suricata compatible rule string editor with the exception-based ruleset containing pass rules for OpenAI and reject rules for the AI/ML category

Figure 7: Suricata compatible rule string editor with the exception-based ruleset containing pass rules for OpenAI and reject rules for the AI/ML category

With strict order evaluation, the firewall evaluates rules in the order you define them. The pass rules for OpenAI appear first, so matching traffic is allowed before the broader category block rules run.

To verify the rules are working as expected, test from a host that routes traffic through your network firewall. These commands suppress the response body and check the exit code of the curl request. If curl completes a TCP connection, it prints CONNECTION ALLOWED. If the firewall resets the connection, curl exits with a non-zero code and prints CONNECTION BLOCKED.

A request to openai.com should succeed because it matches the pass rule:

curl -s -o /dev/null https://openai.com && echo "CONNECTION ALLOWED" || echo "CONNECTION BLOCKED"

Result: CONNECTION ALLOWED

A request to chat.mistral.ai should be rejected because it matches the broader AI/ML category block rule:

curl -s -o /dev/null https://chat.mistral.ai && echo "CONNECTION ALLOWED" || echo "CONNECTION BLOCKED"

Result: CONNECTION BLOCKED

How to monitor category usage

When you add a domain category rule to your firewall policy, Network Firewall performs a category lookup for every connection that matches the rule’s protocol and IP specifications. The rules in this post match on $HOME_NET any -> $EXTERNAL_NET any, which means the firewall looks up the category for all outbound traffic originating from your internal network. This is why it’s important to have the $HOME_NET variable configured correctly at the firewall policy level. With this configuration, a single category rule is enough for category metadata to appear in your firewall logs across all matching connections, not just connections that match the specific category in your rule.

Each log entry includes an aws_category field containing a JSON array of all categories the destination domain belongs to. A single domain can map to multiple categories. For example, a request to chat.mistral.ai produces a log entry with “aws_category": "[\"Social Networking\",\"Artificial Intelligence and Machine Learning\"]” because that domain belongs to both categories.

You can access firewall logs through Amazon CloudWatch, Amazon Simple Storage Service (Amazon S3), and Amazon Data Firehose. These logs show which categorized websites your workloads access, helping you track usage patterns and enforce acceptable use policies.

The following sample log entry shows what a blocked request to chat.mistral.ai looks like using the exception-based rules from the previous section. The alert.signature field contains the rule’s msg value, and the aws_category field lists all categories the destination domain belongs to:

{ 

     "firewall_name": "egress-and-east-west-firewall", 

     "availability_zone": "us-east-1a", 

     "event_timestamp": "1775599146", 

     "event": { 

          "aws_category": "[\"Social Networking\",\"Artificial Intelligence and Machine Learning\"]", 

          "tx_id": 0, 

          "app_proto": "tls", 

          "src_ip": "10.1.1.100", 

          "src_port": 58664, 

          "event_type": "alert", 

          "alert": { 

                    "severity": 3, 

                    "signature_id": 1000003, 

                    "rev": 1, "signature": 

                    "Block non-approved AI/ML sites over TLS", 

                    "action": "blocked", 

                    "category": "" 

          }, 

          "flow_id": 763153567844057, 

          "dest_ip": "172.66.2.203", 

          "proto": "TCP", 

          "verdict": { 

                    "action": "drop", 

                    "reject-target": "to_client", 

                    "reject": [ 

                         "tcp-reset" 

                    ] 

          }, 

          "tls": { 

               "sni": "chat.mistral.ai", 

               "version": "UNDETERMINED" 

          }, 

          "dest_port": 443, 

          "pkt_src": "geneve encapsulation", 

          "timestamp": "2026-04-07T21:59:06.906761+0000", 

          "direction": "to_server" 

     } 

} 

The aws_category field shows the domain belongs to both the “Social Networking” and “Artificial Intelligence and Machine Learning” categories. The verdict field confirms the connection was dropped with a TCP reset sent to the client.

Traffic that matches a pass rule with the alert keyword also generates a log entry with the aws_category field populated. For example, a connection to chat.openai.com that matches the OpenAI exception rule from the earlier section produces a log entry with alert.action set to “allowed” and the same category metadata. This means your queries capture both blocked and allowed traffic.

Querying logs with CloudWatch Logs Insights

If you send your firewall logs to Amazon CloudWatch Logs, you can use CloudWatch Logs Insights to analyze category traffic patterns. A single connection can generate multiple log entries (for example, a reject rule log and a default action log for the same flow), so the following queries deduplicate by flow_id to count each connection only once. Because a single domain can belong to multiple categories, results are grouped by category combination. For example, traffic to a domain categorized as both “Social Networking” and “Artificial Intelligence and Machine Learning” appears as a single combined entry.

To get started, navigate to the CloudWatch console. In the left navigation pane under Logs, select Logs Insights. Under Query scope, leave Log group name selected, then select your AWS Network Firewall alert logs log group. For the time window, we recommend starting with the default of 1 hour to keep the queries light. Enter each of the following queries into the editor and choose Run query to review the results. Note that CloudWatch Logs Insights queries incur charges based on the amount of data scanned. See Amazon CloudWatch pricing for details.

Most accessed categories

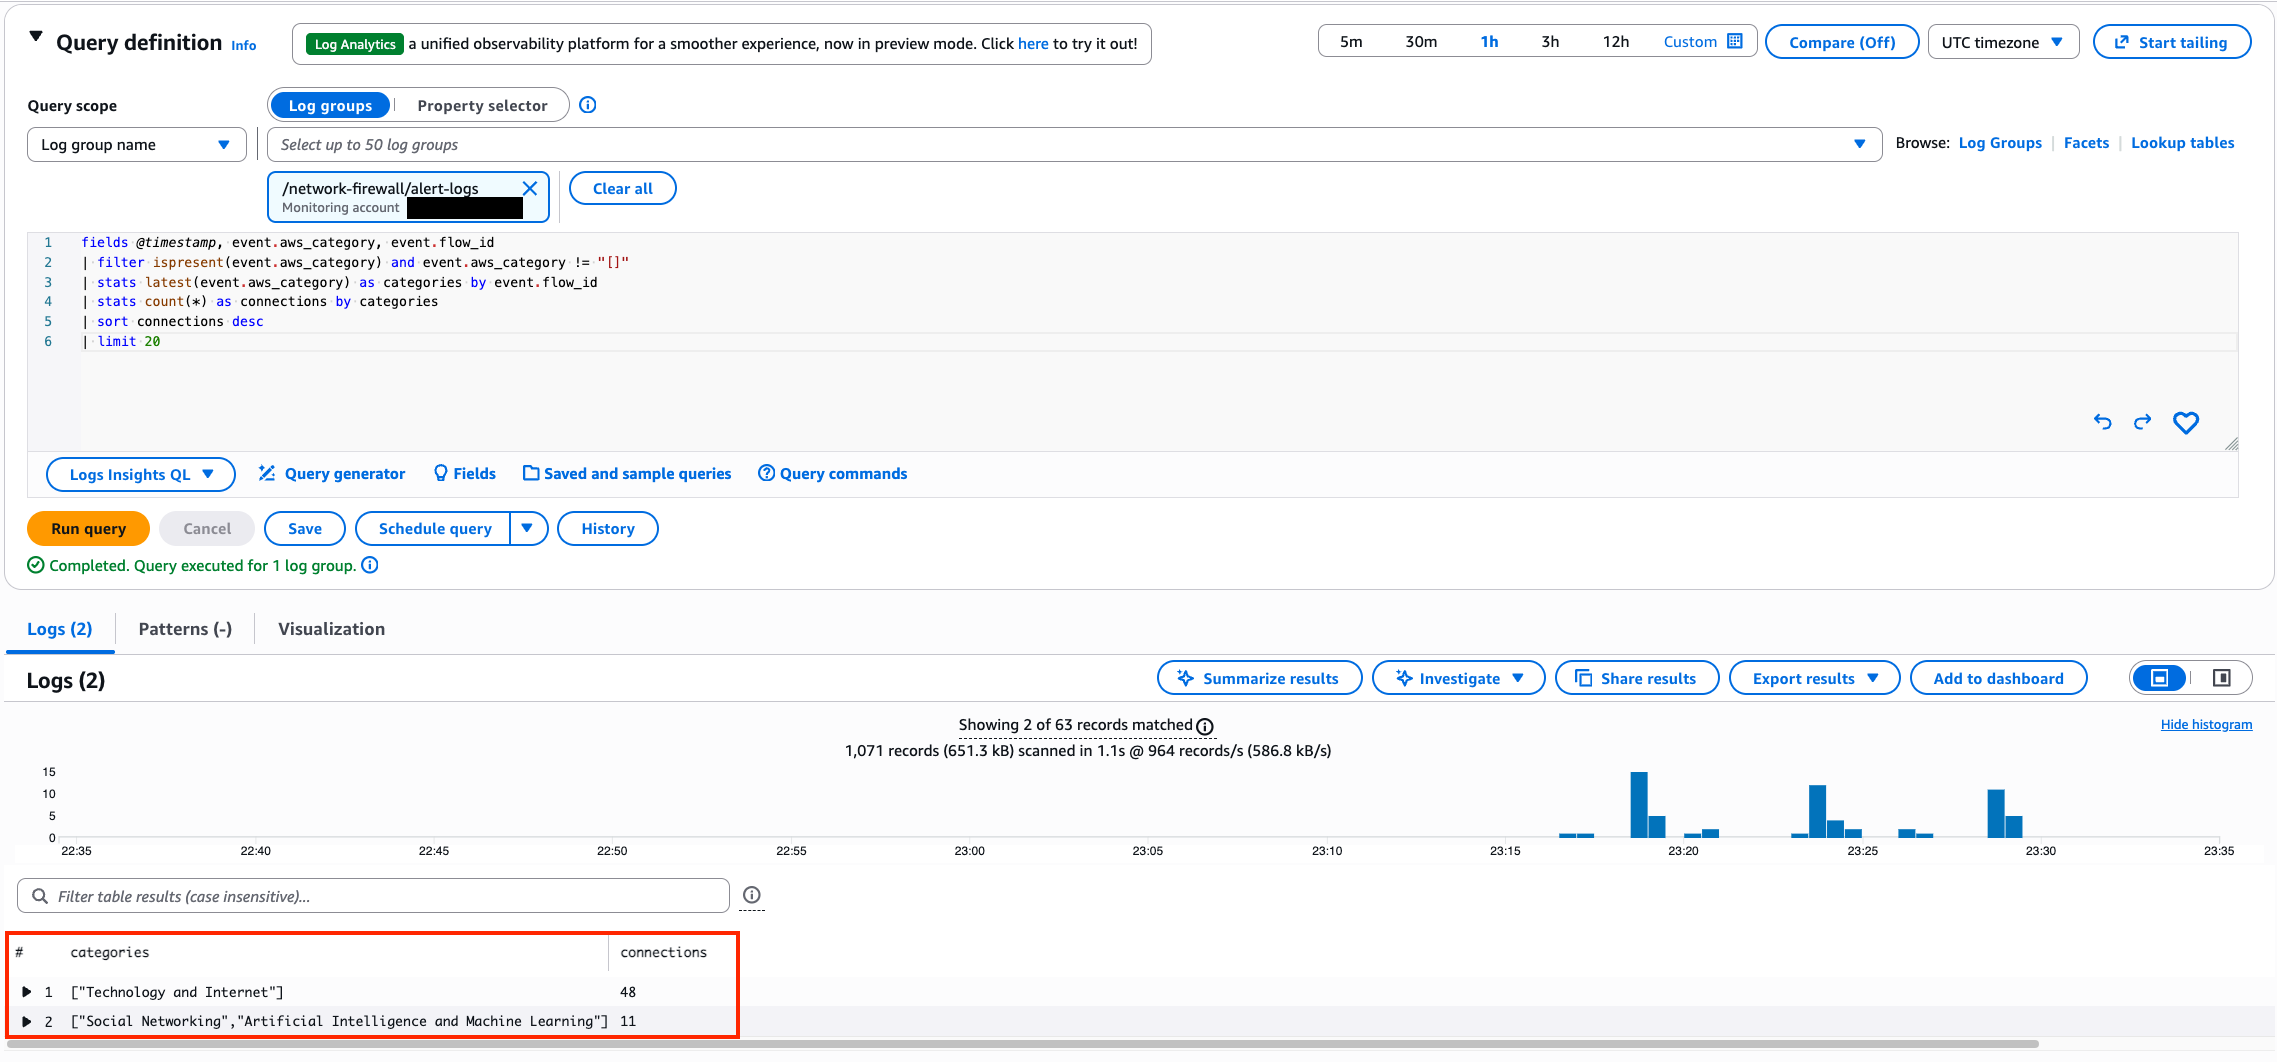
This query shows which category combinations your workloads connect to most frequently:
fields @timestamp, event.aws_category, event.flow_id
| filter ispresent(event.aws_category) and event.aws_category != "[]"
| stats latest(event.aws_category) as categories by event.flow_id
| stats count(*) as connections by categories
| sort connections desc
| limit 20

Figure 8: CloudWatch Logs Insights query results showing the most frequently accessed category combinations sorted by connection count

Figure 8: CloudWatch Logs Insights query results showing the most frequently accessed category combinations sorted by connection count

Least accessed categories

This query reverses the sort order to surface category combinations with the fewest connections, helping you identify categories that might not be relevant to your environment or that warrant further investigation:
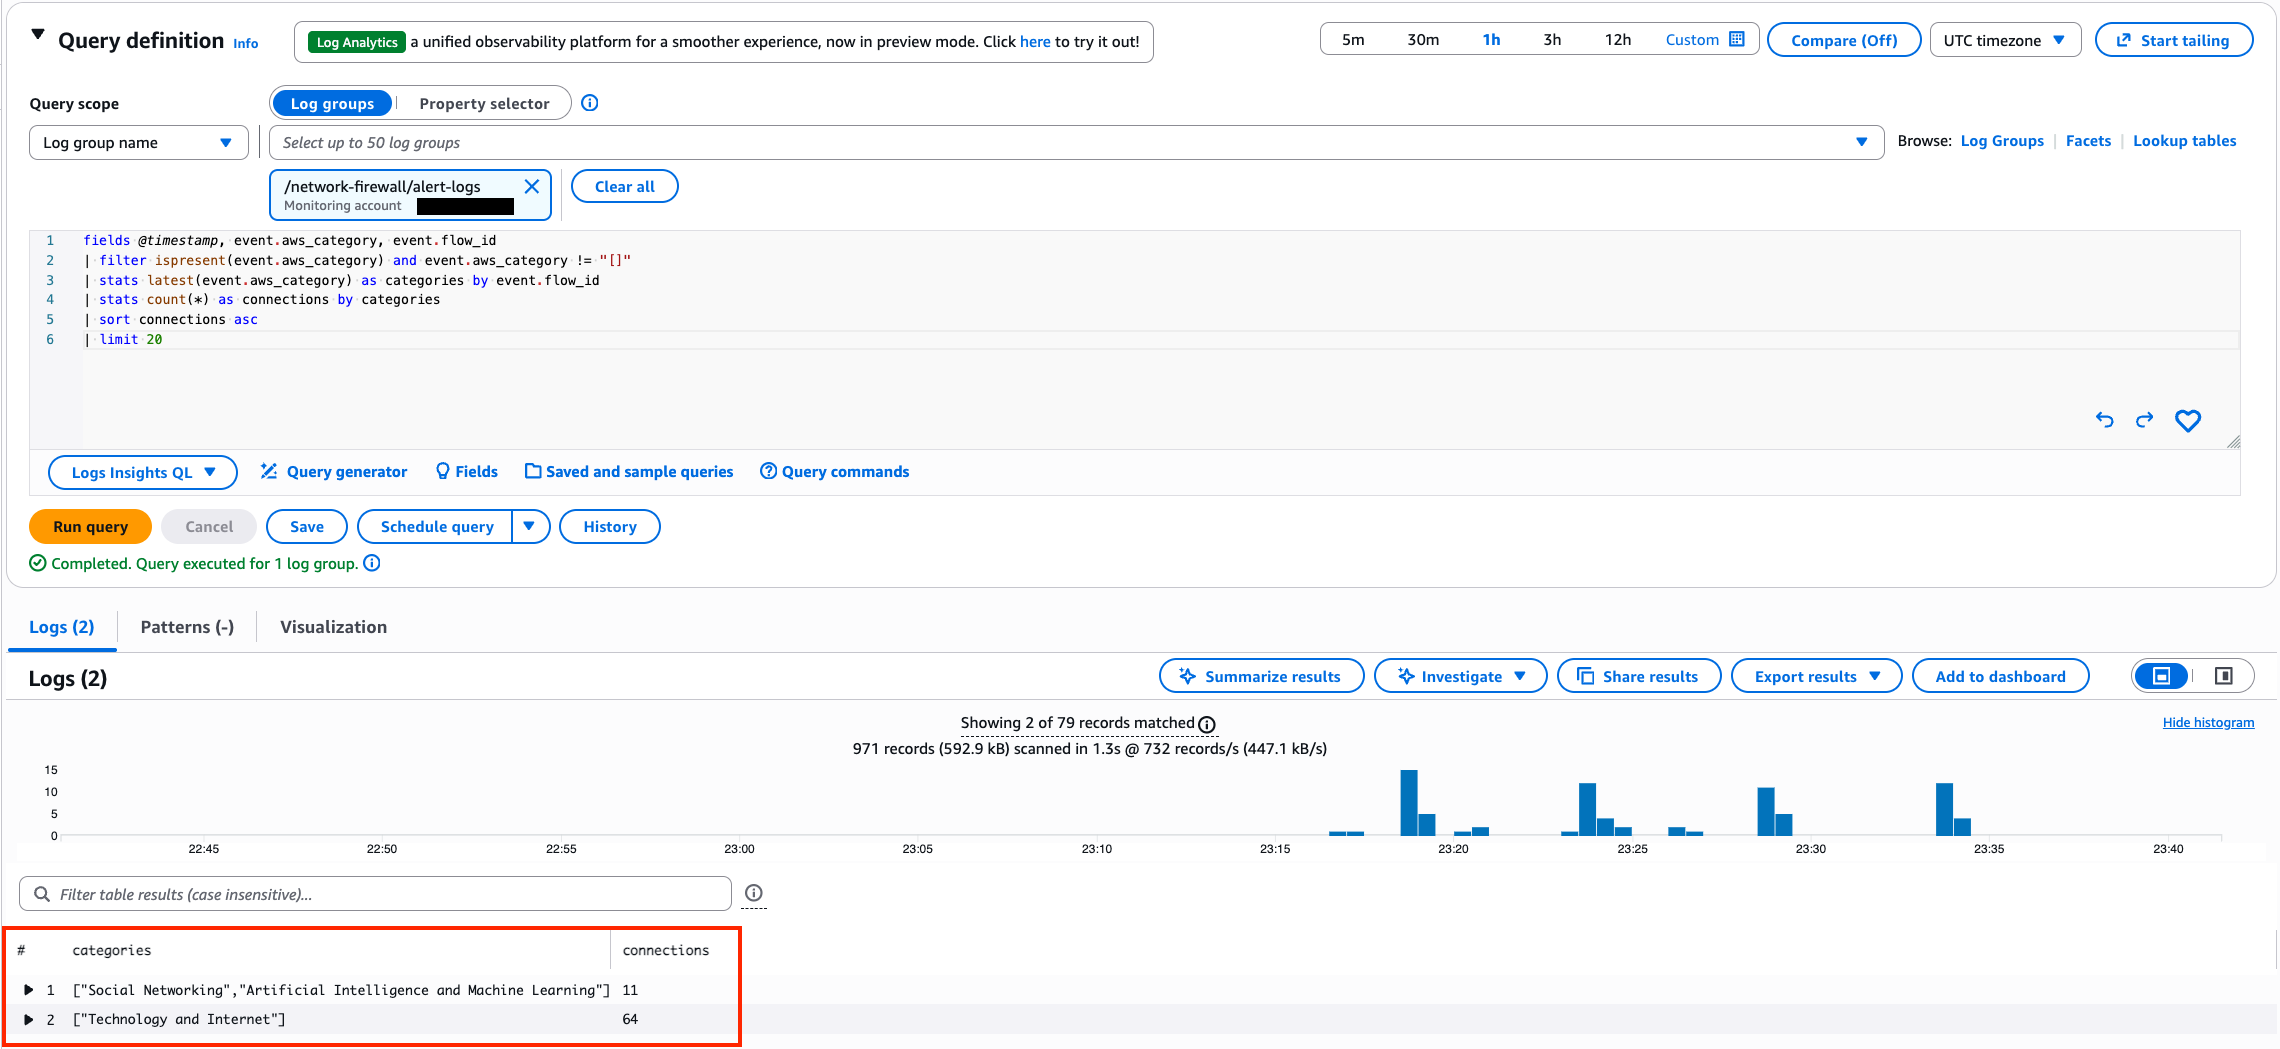
fields @timestamp, event.aws_category, event.flow_id
| filter ispresent(event.aws_category) and event.aws_category != "[]"
| stats latest(event.aws_category) as categories by event.flow_id
| stats count(*) as connections by categories
| sort connections asc
| limit 20

Figure 9: CloudWatch Logs Insights query results showing the least frequently accessed category combinations sorted by connection count ascending

Figure 9: CloudWatch Logs Insights query results showing the least frequently accessed category combinations sorted by connection count ascending

Most accessed categories, allowed traffic only

The event.verdict.action field indicates the actual outcome of each connection:drop for blocked traffic and alert for allowed traffic. This query shows which category combinations have the most allowed connections:
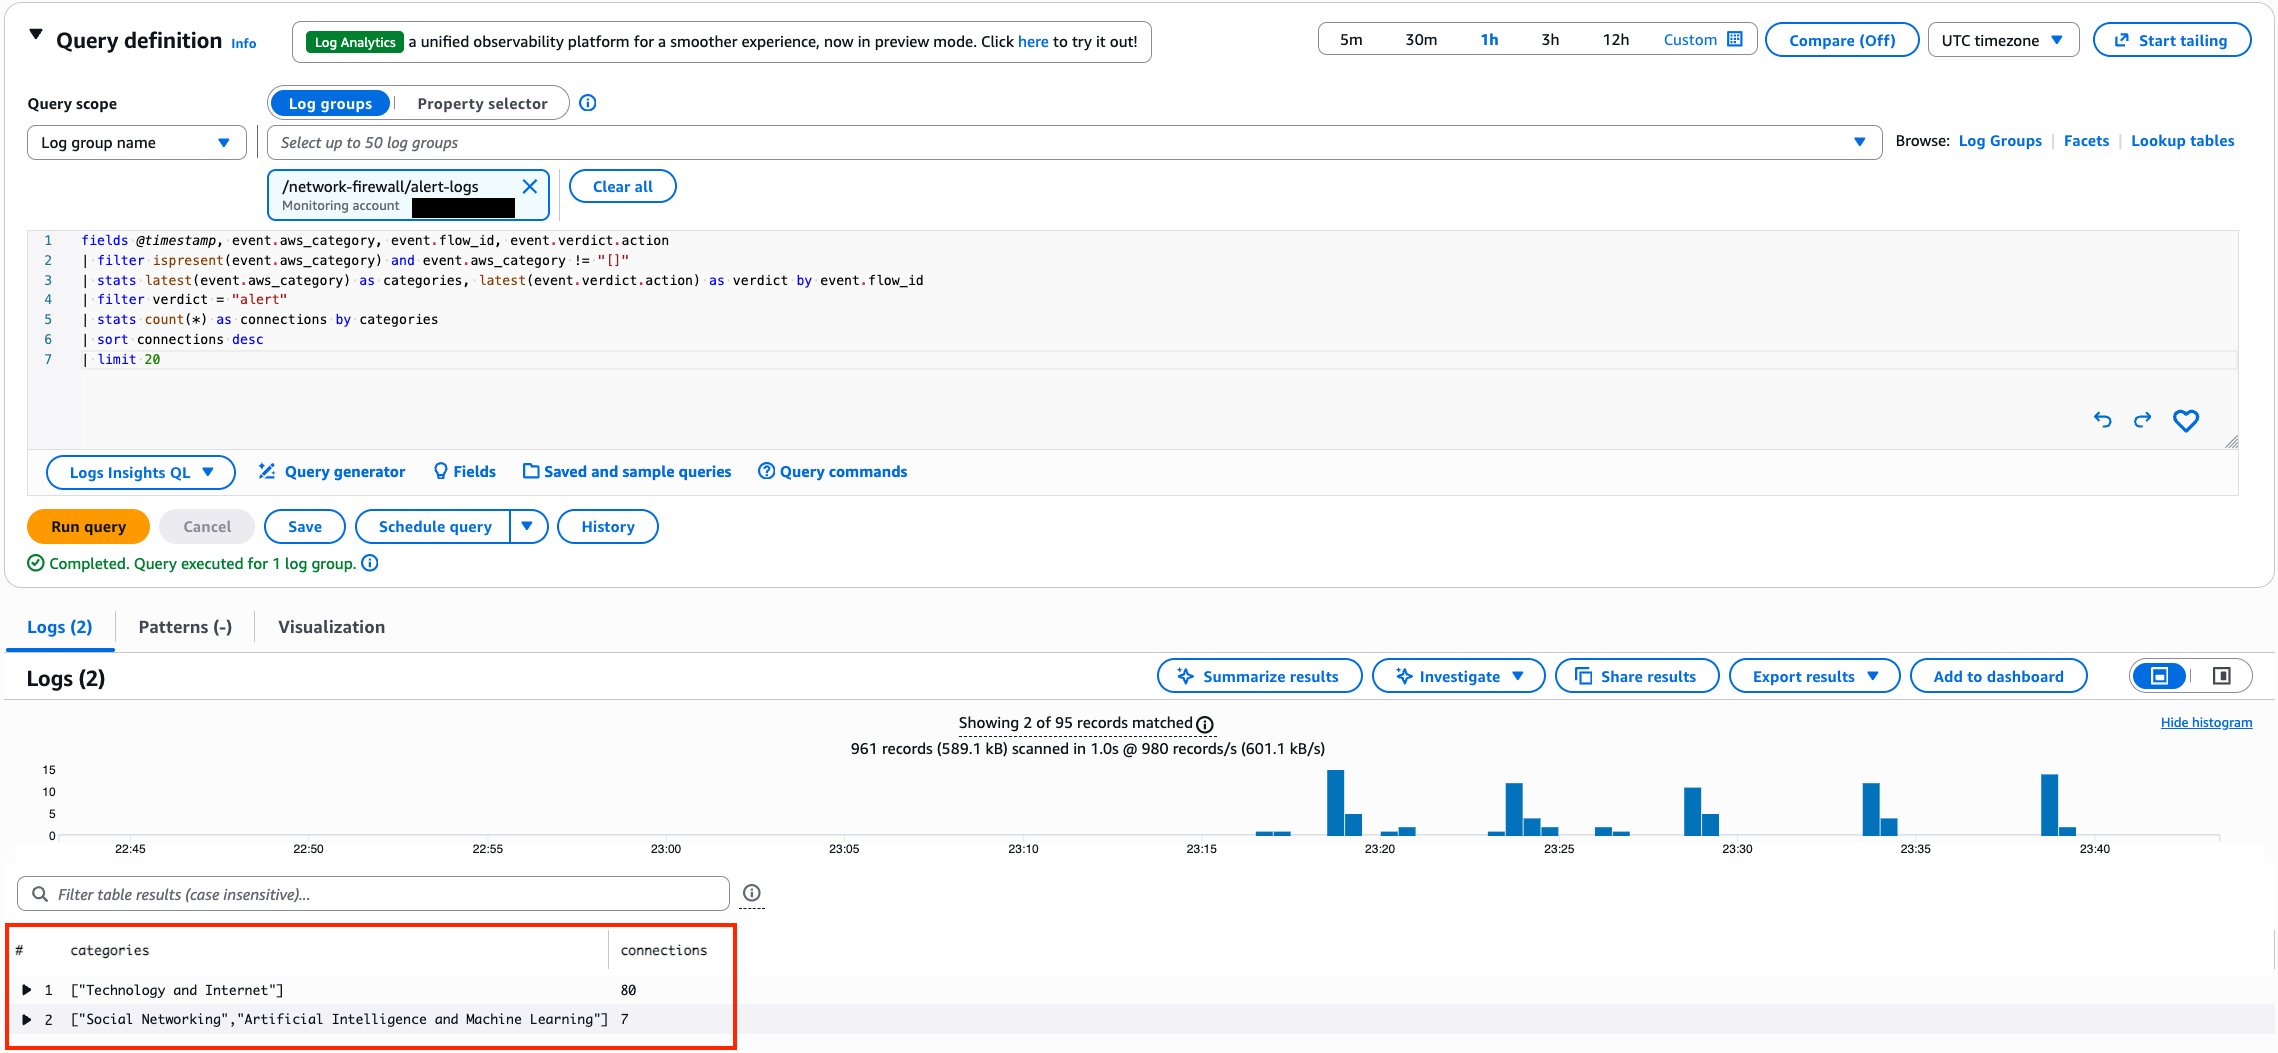
fields @timestamp, event.aws_category, event.flow_id, event.verdict.action
| filter ispresent(event.aws_category) and event.aws_category != "[]"
| stats latest(event.aws_category) as categories, latest(event.verdict.action) as verdict by event.flow_id
| filter verdict = "alert"
| stats count(*) as connections by categories
| sort connections desc
| limit 20

Figure 10: CloudWatch Logs Insights query results showing the most accessed category combinations filtered to allowed traffic only

Figure 10: CloudWatch Logs Insights query results showing the most accessed category combinations filtered to allowed traffic only

Most accessed categories, blocked traffic only

The same query filtered to blocked connections. Change the verdict filter to drop:
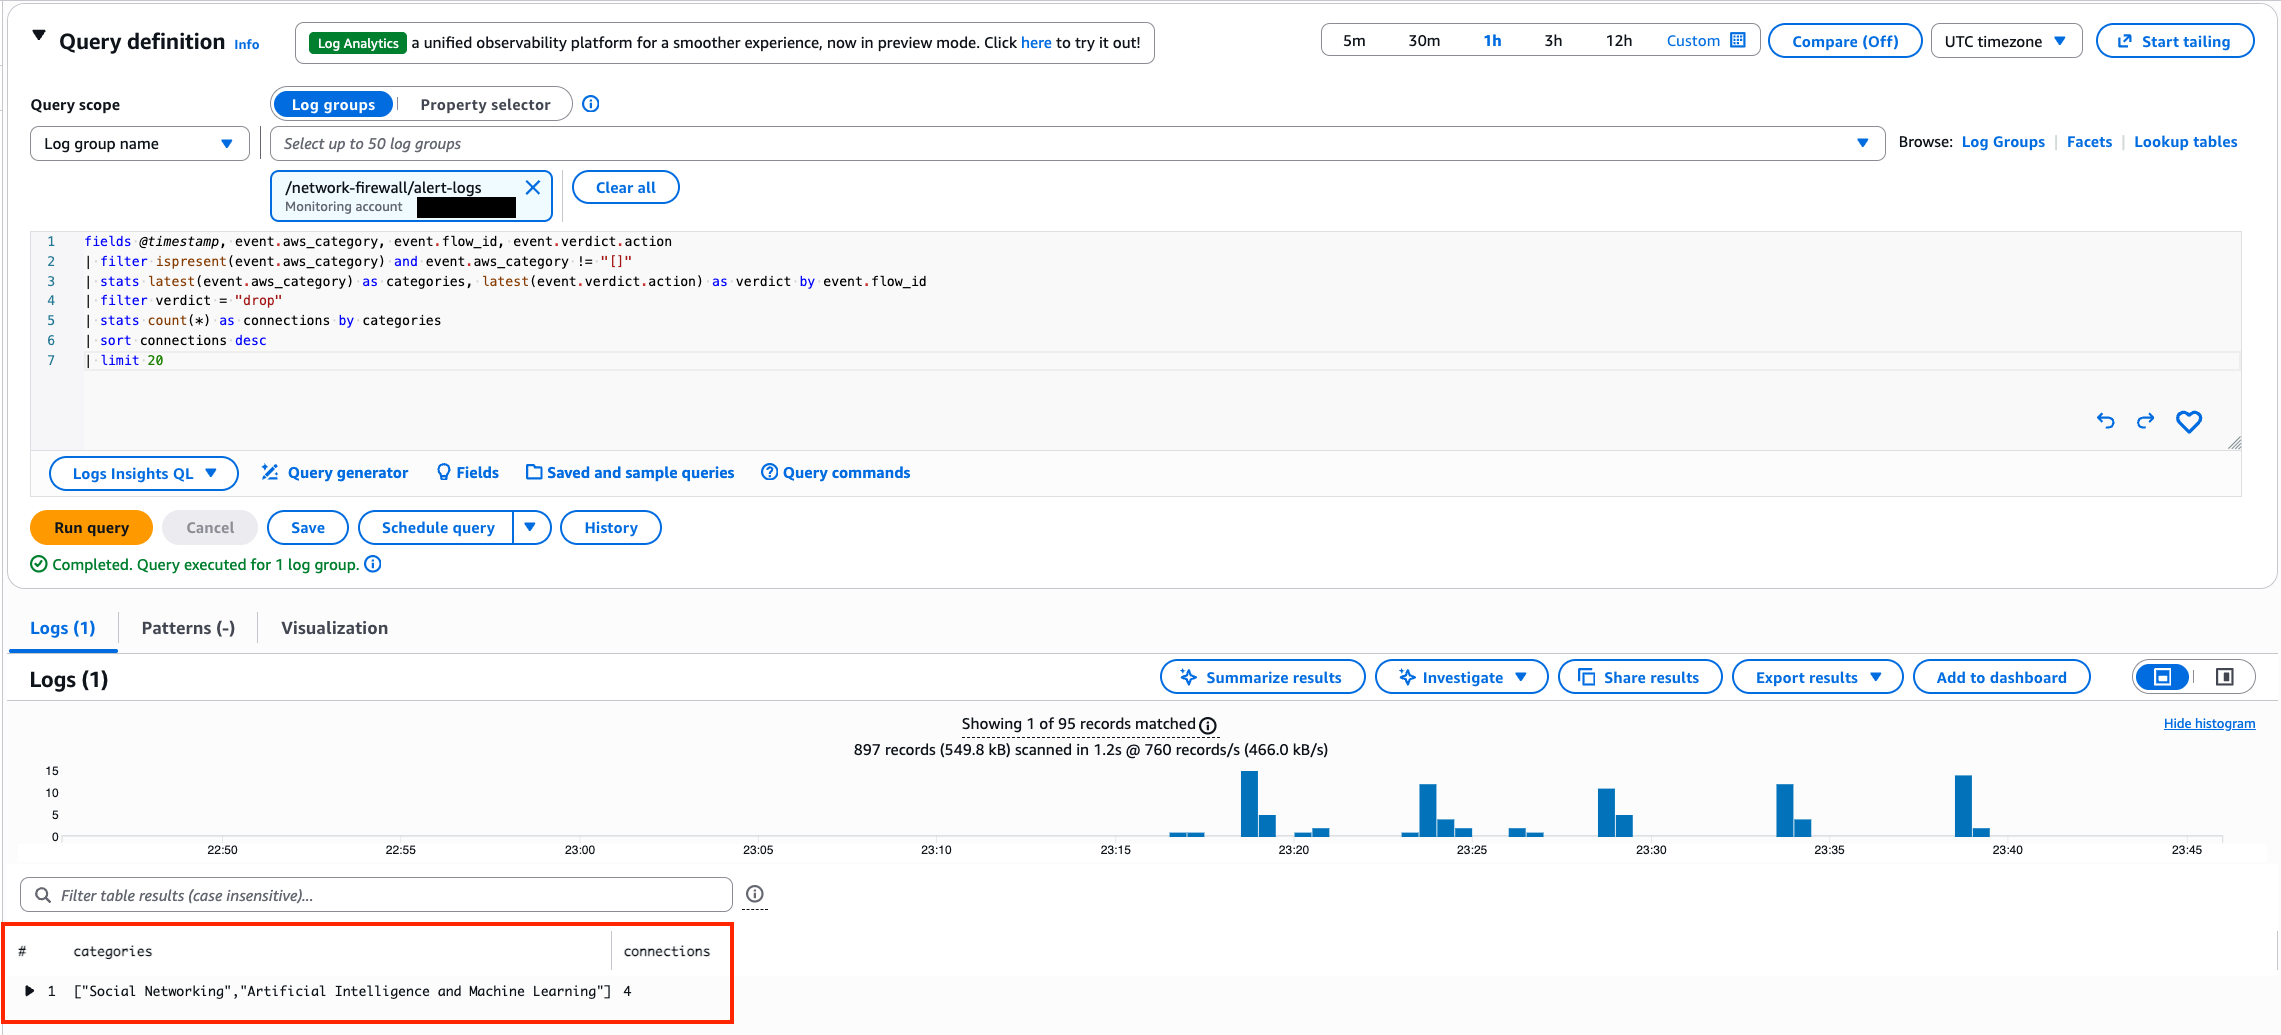
fields @timestamp, event.aws_category, event.flow_id, event.verdict.action
| filter ispresent(event.aws_category) and event.aws_category != "[]"
| stats latest(event.aws_category) as categories, latest(event.verdict.action) as verdict by event.flow_id
| filter verdict = "drop"
| stats count(*) as connections by categories
| sort connections desc
| limit 20

Figure 11: CloudWatch Logs Insights query results showing the most accessed category combinations filtered to blocked traffic only

Figure 11: CloudWatch Logs Insights query results showing the most accessed category combinations filtered to blocked traffic only

Drill down into a specific category

This query uses a like filter to find all traffic where the aws_category field contains a specific category, regardless of what other categories the domain also belongs to. In this example, the query returns all domains your workloads have connected to that map to the Artificial Intelligence and Machine Learning category, broken down by domain and verdict. Replace the category name in the like filter to investigate any category.
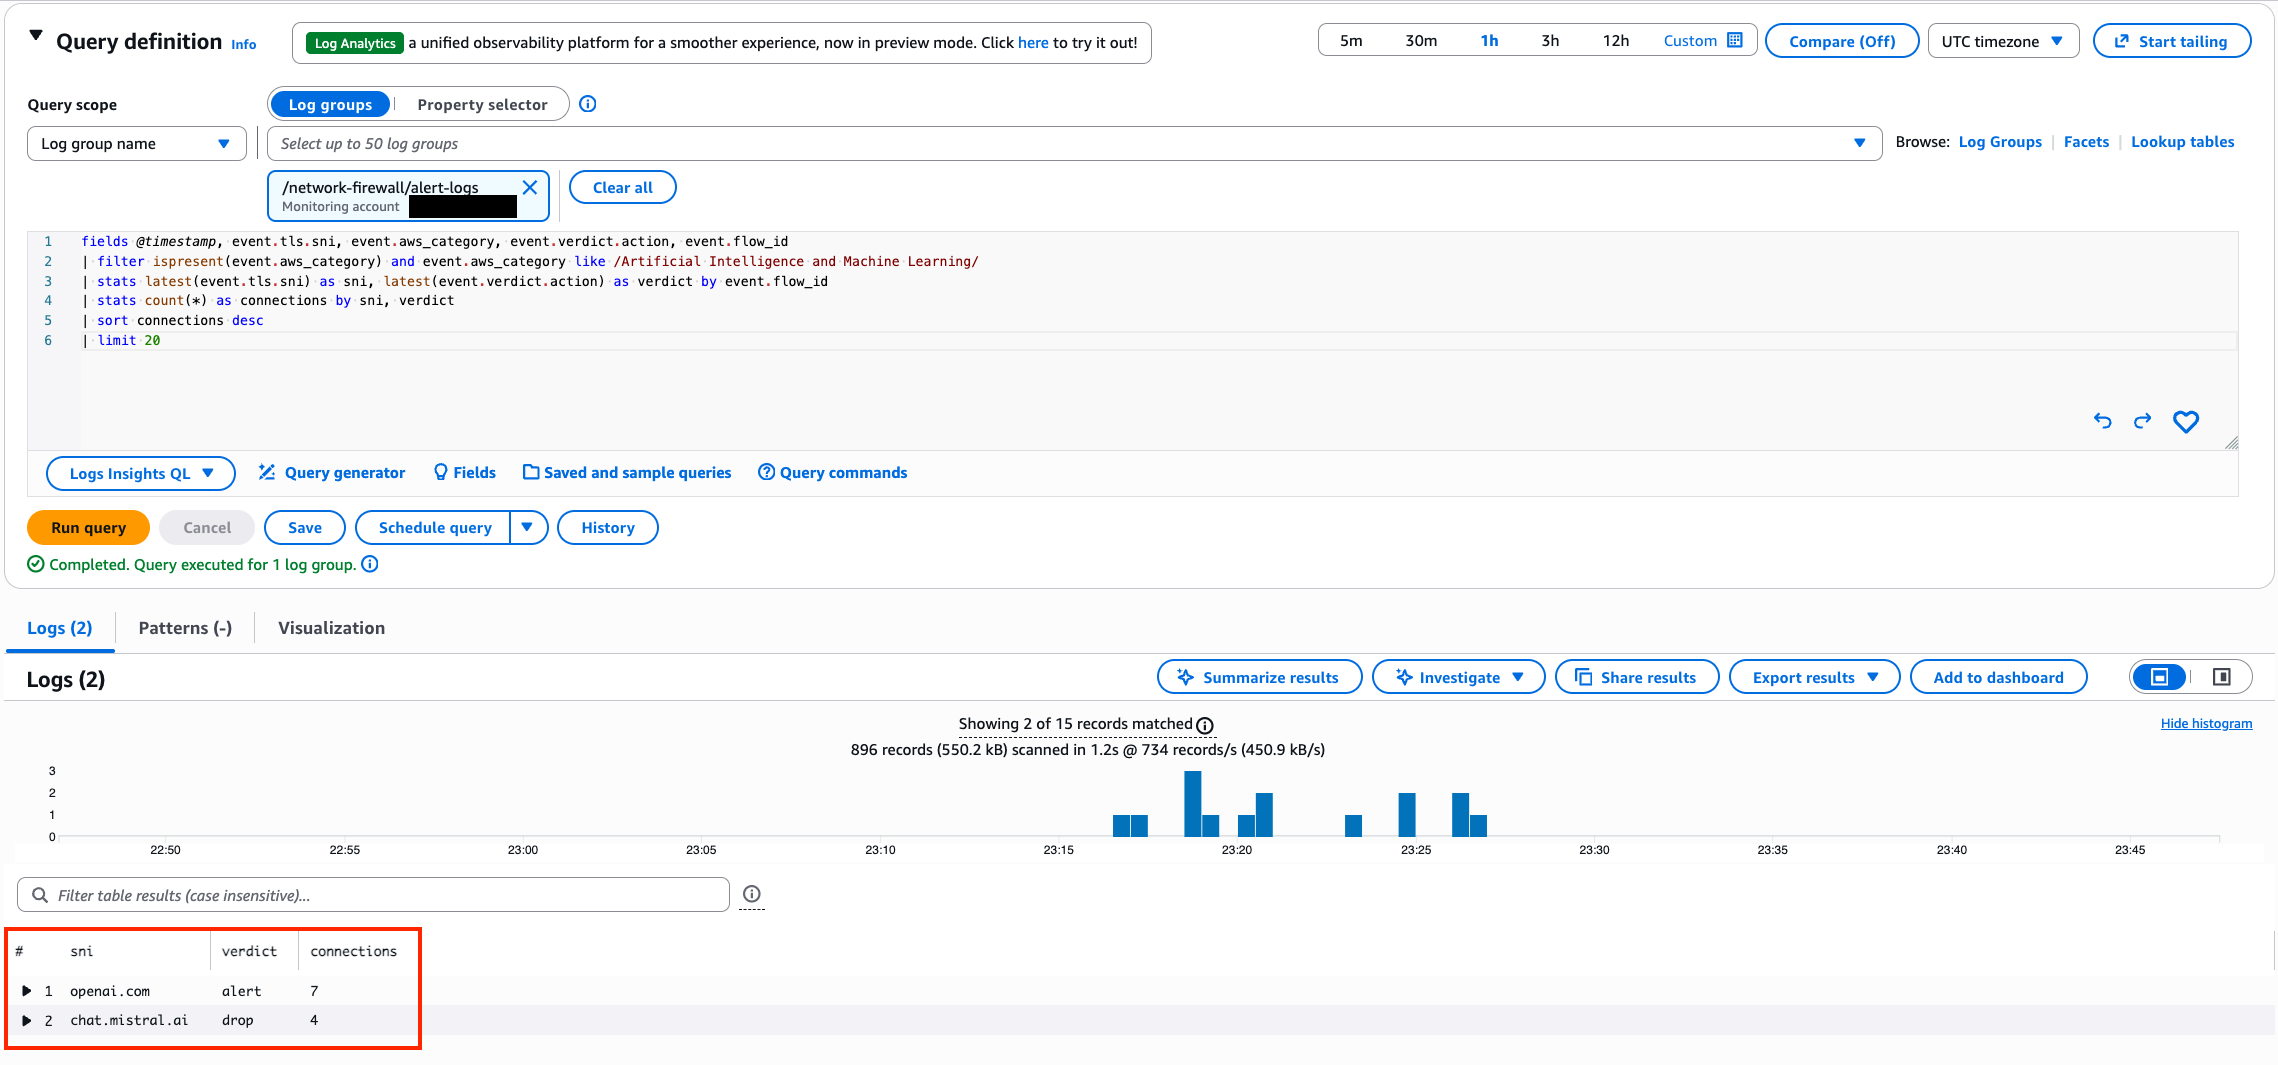
fields @timestamp, event.tls.sni, event.aws_category, event.verdict.action, event.flow_id
| filter ispresent(event.aws_category) and event.aws_category like /Artificial Intelligence and Machine Learning/
| stats latest(event.tls.sni) as sni, latest(event.verdict.action) as verdict by event.flow_id
| stats count(*) as connections by sni, verdict
| sort connections desc
| limit 20

Figure 12: CloudWatch Logs Insights query results showing a drill down into the Artificial Intelligence and Machine Learning category with connections broken down by domain and verdict

Figure 12: CloudWatch Logs Insights query results showing a drill down into the Artificial Intelligence and Machine Learning category with connections broken down by domain and verdict

Bandwidth consumption by category

This query shows which category combinations consume the most egress bandwidth. It correlates flow logs (which contain byte counts) with alert logs (which contain category data) using the shared flow_id field. To run this query, select both your alert log group and your flow log group in CloudWatch Logs Insights.
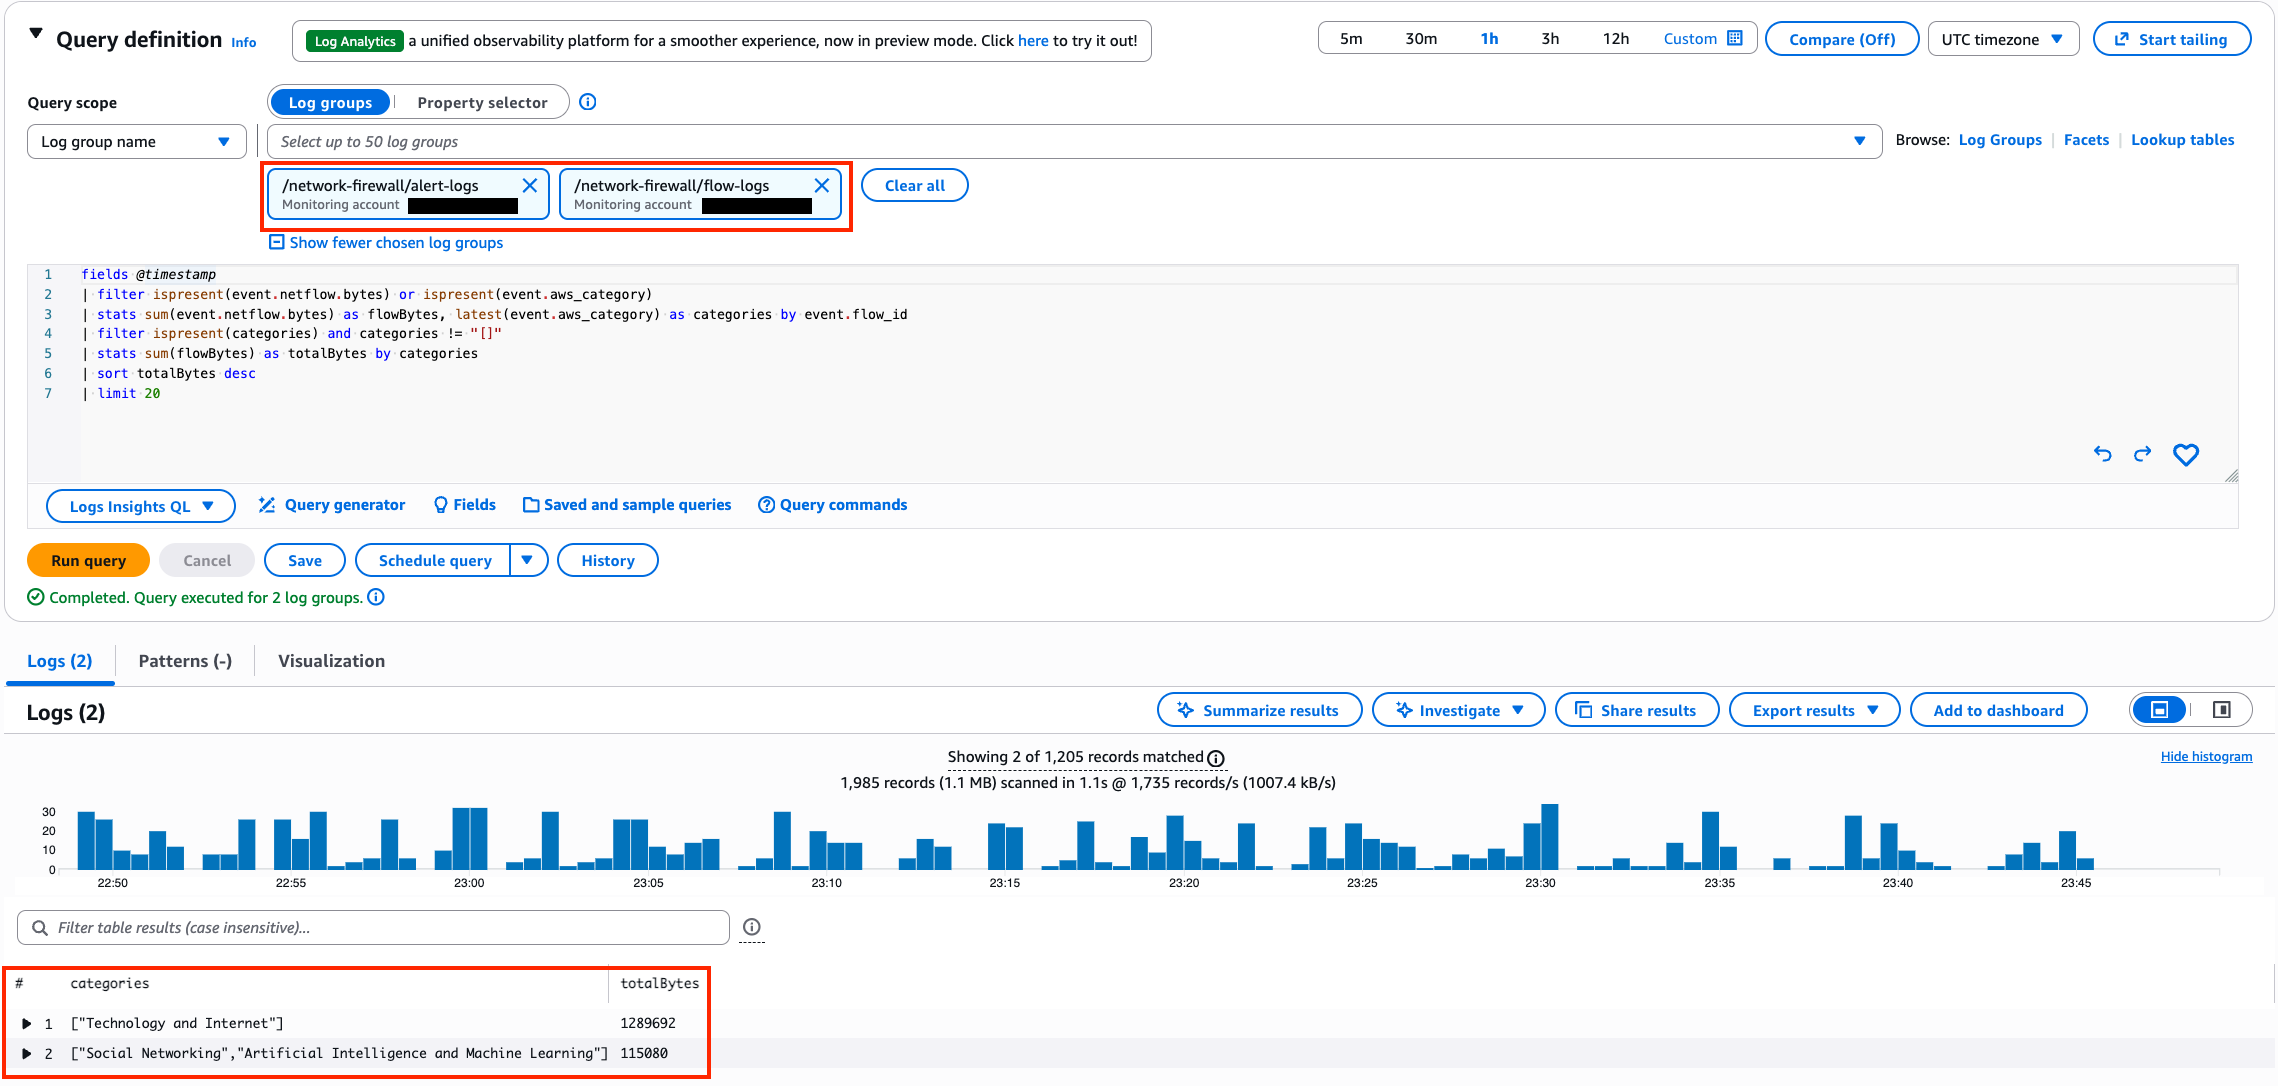
fields @timestamp
| filter ispresent(event.netflow.bytes) or ispresent(event.aws_category)
| stats sum(event.netflow.bytes) as flowBytes, latest(event.aws_category) as categories by event.flow_id
| filter ispresent(categories) and categories != "[]"
| stats sum(flowBytes) as totalBytes by categories
| sort totalBytes desc
| limit 20

Figure 13: CloudWatch Logs Insights query results showing bandwidth consumption by category combination sorted by total bytes descending

Figure 13: CloudWatch Logs Insights query results showing bandwidth consumption by category combination sorted by total bytes descending

These queries help you identify which categories your workloads access by volume, surface blocked and allowed traffic patterns, and pinpoint where the bulk of your egress bandwidth is going.

Conclusion

In this post, you walked through how to set up URL and domain category filtering on AWS Network Firewall, from creating your first category rule using both the console rule builder and Suricata compatible rule strings, to managing exceptions for approved services and monitoring category traffic patterns with CloudWatch Logs Insights. With AWS-managed categories that stay current automatically, you can control access to broad classes of websites without maintaining individual domain lists, and the built-in aws_category log field gives you the visibility to track how your workloads interact with external services.

This feature is available in all AWS commercial regions where AWS Network Firewall is supported.

To learn more, visit the AWS Network Firewall product page and the feature documentation.

Lawton Pittenger

Lawton Pittenger

Lawton is a Worldwide Security Specialist Solutions Architect at AWS, based in New York City. He specializes in helping customers design and implement effective network security controls. At AWS, he works with customers at scale and collaborates closely with service teams to drive continuous improvement in security services based on customer needs and feedback. Outside of work, his interests include skateboarding, snowboarding, and spending time in nature.

Sofia Aluma

Sofia Aluma-Santos

Sofía is a Sr. Security Specialist leading Network Security Go-To-Market and strategy. She helps customers build scalable, secure, resilient networks.

Eric Fortenbery

Eric Fortenbery

Eric is an AWS Solutions Architect based in Atlanta, GA who helps EdTech customers architect secure, scalable platforms.

Mostafa Elkhouly

Mostafa Elkhouly

With over a decade of experience in networking technologies and security, I’m your go-to tech enthusiast! When I’m not jet-setting or tinkering with the latest gadgets, I thrive on empowering customers to harness the full potential of AWS services.

Protect against advanced DNS threats with Amazon Route 53 Resolver DNS Firewall

Post Syndicated from Lawton Pittenger original https://aws.amazon.com/blogs/security/protect-against-advanced-dns-threats-with-amazon-route-53-resolver-dns-firewall/

Every day, millions of applications seamlessly connect users to the digital services they need through DNS queries. These queries act as an interface to the internet’s address book, translating familiar domain names like amazon.com into the IP addresses that computers use to appropriately route traffic. The DNS landscape presents unique security challenges and opportunities in Amazon Virtual Private Cloud (Amazon VPC) environments. First, DNS resolution acts as an early checkpoint that you can use to control network traffic before it even begins. Second, DNS queries in your VPC follow a distinct path through the Amazon Route 53 Resolver that operates independently from your standard internet gateway, bypassing other network security controls.

To address this, Amazon Route 53 Resolver DNS Firewall provides protection for DNS traffic, starting with traditional domain lists where you can explicitly allow or deny DNS resolution of specific domains. Also, included are AWS Managed Domain Lists, which automatically block known malicious domains identified through Amazon Threat Intelligence and our trusted security partners. While this approach works effectively to help prevent known threats, sophisticated bad actors are increasingly using techniques that traditional blocklists can’t catch.

Instead of relying solely on static lists, Amazon Route 53 Resolver DNS Firewall Advanced provides intelligent protection alongside these traditional controls. These advanced rules work like a skilled security analyst, watching for suspicious patterns in DNS queries in real time. By examining characteristics such as query length, entropy, and frequency, the service can spot potentially malicious activity even when encountering previously unknown domains. This approach enables detecting and blocking advanced threats like DNS tunneling and domain generation algorithms (DGAs)—techniques that bad actors use to establish hidden communication channels or connect malware to their control servers.

In this post, we take you on a practical journey exploring these DNS-based threats and tools to help prevent them. You’ll learn how to set up effective Route 53 Resolver DNS Firewall Advanced rules, and we provide a ready-to-deploy CloudFormation template with our recommended configurations. Finally, we demonstrate an example of real-world threat detection and show you how the service integrates with AWS Security Hub to improve visibility of alerts. By the time you finish reading this post, you’ll have a clear understanding of how to deploy Route 53 Resolver DNS Firewall rules to add an intelligent, proactive layer of security to your AWS environment.

Understanding the risks of DNS tunneling and DGAs

As mentioned earlier, the Route 53 Resolver provides a service-managed path to the internet that operates independently from your VPC’s internet gateway. While this architecture enables efficient DNS resolution, it can be exploited through techniques such as DNS tunneling. Let’s explore how these techniques work and why they present unique challenges.

DNS tunneling takes advantage of the DNS protocol’s basic function—asking questions about domain names and receiving answers from the authoritative nameserver for the domain. But instead of using DNS for its intended purpose of domain name resolution, tunneling encodes other types of data within DNS queries and responses. For example, rather than asking simply what is the IP address for example.com?, a tunneling exploit might embed data within a query like secretdata123.attacker.com, where secretdata123 contains encoded information. This can lead to DNS being used as a two-way communications command and control channel. Detecting and blocking DNS tunneling is a vital control for stopping data exfiltration and command and control (C2) communications.

DGAs represent a different challenge for DNS security. Rather than using a fixed, predictable domain name that can be quickly blocked, DGAs automatically create many possible domain names using mathematical formulas, which are then used as a destination for C2 traffic. For instance, a DGA might generate domains like xkt7py.com today and mn9qrs.com tomorrow. This makes it difficult to maintain effective blocklists, because the domains change frequently and appear random. Traditional threat intelligence feeds, which rely on identifying and blocking known malicious domains, struggle to keep pace with DGA-generated domains.

How DNS Firewall Advanced works

When examining a domain name, Route 53 Resolver DNS Firewall Advanced looks at multiple characteristics that help distinguish between legitimate and suspicious domains. For example, legitimate domain names typically use real words and follow predictable patterns that are designed to facilitate a human’s ability to recall and enter them accurately. In contrast, domains used for tunneling or generated by DGAs often contain random-looking strings of characters or unusual patterns.

Route 53 Resolver DNS Firewall Advanced builds its intelligence on extensive analysis of real-world domain usage patterns. It learns what legitimate domain names look like by studying the most resolved domains on the internet, combined with actual domain resolution patterns from across AWS. This real-world training data helps establish a baseline for normal domain name characteristics. DNS Firewall Advanced then contrasts these patterns against known techniques used in DNS tunneling and domain generation to identify suspicious activity.

The service analyzes various aspects of each domain name, including:

  • How the domain name is structured and broken into parts
  • The patterns of letters and numbers used
  • How closely the domain resembles natural language
  • The presence of common words versus random character combinations

The service analyzes queries in real time, processing each one in less than a millisecond, which maintains strong security controls without affecting your applications’ performance.

Route 53 Resolver DNS Firewall Advanced has customized protection levels that you can use to choose how aggressively you want to detect and respond to suspicious domains through confidence thresholds:

  • High confidence: This setting focuses on the most obvious threats, minimizing false positives. It’s ideal for production environments where blocking legitimate traffic could be disruptive.
  • Medium confidence: Provides balanced protection, suitable for most environments.
  • Low confidence: Offers the most detection but might require more tuning to avoid false positives. This setting is useful for high-security environments or for initial monitoring to understand traffic patterns.

You can combine these confidence levels with different actions (block or alert) to create a defense strategy that matches your security needs.

Manually create a DNS Firewall Advanced rule:

To start, we show you how to manually create a Route 53 Resolver DNS Firewall Advanced rule in the AWS Management Console. This rule will block DNS queries that it has detected to be DNS tunneling with high confidence.

To manually create a rule:

  1. In the Route 53 console, choose Rules in the navigation pane, and then choose Add rule.
    Figure 1: Rules in the Route 53 console

    Figure 1: Rules in the Route 53 console

  2. Enter a name for the rule and select DNS Firewall Advanced protections.
    Figure 2: Add a rule

    Figure 2: Add a rule

  3. Under DNS Firewall Advanced protection:
    1. Select DNS tunneling detection.
    2. For Confidence threshold, select High.
    3. Leave the Query type empty so that the rule applies to all query types.
    Figure 3: Select DNS protection options

    Figure 3: Select DNS protection options

  4. Under Action:
    1. Select Block.
    2. For the response, select OVERRIDE.
    3. For the Record value, enter dns-firewall-advanced-block.
    4. For the Record type, select CNAME.
    5. Choose Add rule.
    Figure 4: Configure actions for the rule

    Figure 4: Configure actions for the rule

We’ve created an AWS CloudFormation stack that deploys the following recommended Route 53 Resolver DNS Firewall rules in a DNS Firewall rule group. We recommend this configuration because it provides a balanced security approach—blocking high-confidence threats immediately while generating alerts for lower-confidence detections.

The inclusion of the AWS Managed Aggregate Threat List is particularly valuable because it combines domains from multiple threat categories (malware, ransomware, botnet, spyware, and DNS tunneling) into a blocklist. This consolidated list includes the domains from other AWS Managed Domain Lists, including those identified by GuardDuty threat intelligence systems, giving you broad protection against known malicious domains while the Route 53 DNS Firewall Advanced rules catch previously unseen threats.

For enterprise environments, you can scale this protection across your entire organization by using AWS Firewall Manager to automatically deploy and manage this rule group configuration consistently across the VPCs in your organization.

  • BLOCK – Aggregate Threat List (domains associated with multiple DNS threat categories including malware, ransomware, botnet, spyware, and DNS tunneling to help block multiple types of threats)
  • BLOCK – DNS Tunneling | Confidence: HIGH
  • BLOCK – DGAs | Confidence: HIGH
  • ALERT – DNS Tunneling | Confidence: LOW
  • ALERT – DGAs | Confidence: LOW

To deploy this rule group using a CloudFormation stack:

  1. Navigate to the CloudFormation console, choose Stacks from the navigation pane. Choose Create Stack in the upper right and select With new resources (standard).
    Figure 5: Create a stack

    Figure 5: Create a stack

  2. Download the CloudFormation template. Select Choose an existing template and then select Upload a template file and upload the CloudFormation stack. Choose Next.
    Figure 6: Use the CloudFormation template

    Figure 6: Use the CloudFormation template

  3. Enter a stack name and choose Next.
    Figure 7: Enter a stack name

    Figure 7: Enter a stack name

  4. Leave the default values for all options, select Next, and then choose Submit.
  5. Navigate to the Route 53 Resolver DNS Firewall by visiting the Amazon VPC console, scroll down to the DNS firewall section, and select the Rule groups tab.
  6. Select the newly created rule group.
  7. Select the Associated VPCs tab, choose Associate VPC, and then associate a VPC you want to protect and choose Associate.
    Figure 8: Associate a VPC

    Figure 8: Associate a VPC

Observability

Route 53 Resolver query logging provides detailed visibility into DNS queries made from resources associated with your VPCs, enabling you to monitor and analyze your DNS traffic for security and compliance purposes. By configuring query logging, you can capture essential information about each DNS request, including the domain name being queried, the record type, the response code, and the originating VPC and instance. Query logging is particularly valuable when used in conjunction with Route 53 Resolver DNS Firewall, because it helps you track blocked queries and fine-tune your security rules based on actual DNS traffic patterns in your environment. The following are examples of log entries generated when DNS Firewall detects and responds to suspicious activities, showing the detailed information available for security analysis and incident response.

Example log entry: DNS tunneling block

The following is an example of a DNS tunneling block.

{
    "version": "1.100000",
    "account_id": "11111111111",
    "region": "us-west-2",
    "vpc_id": "vpc-0fcc85bd45b791d5a",
    "query_timestamp": "2025-02-05T03:54:12Z",
    "query_name": "1WTE4CyL4Vf1LQDDAToimuqFBEtMXyYMsYP8zPgVyTagzSh5PvinuQcL6N8at4A.REZv3VqKU4x43DPcCKAzQk4UKoZjB3nDMukHAuKTtDckTqZ8SDDZ1iXRey6a5sD.mEDMdrzPocS9exqoBQ1xfSuKfvW.1.dnstunnel.com.",
    "query_type": "A",
    "query_class": "IN",
    "rcode": "NXDOMAIN",
    "answers": [
        {
            "Rdata": "dns-firewall-advanced-block.",
            "Type": "CNAME",
            "Class": "IN"
        }
    ],
    "srcaddr": "10.1.0.122",
    "srcport": "41859",
    "transport": "UDP",
    "srcids": {
        "instance": "i-0c738190f19db9a2c"
    },
    "firewall_rule_action": "BLOCK",
    "firewall_rule_group_id": "rslvr-frg-63efa138b43f428b",
    "firewall_protection": "DNS_TUNNELING"
}

Example log entry: DNS tunneling alert

The following is an example of a DNS tunneling alert.

{
    "version": "1.100000",
    "account_id": "11111111111",
    "region": "us-west-2",
    "vpc_id": "vpc-0fcc85bd45b791d5a",
    "query_timestamp": "2025-02-05T04:00:02Z",
    "query_name": "1WTEc8GwFH3qHY8XKjbhXuj43yGShMrhacqwJYSZkSqRQ95sagz64NUpnuj4R8R.S79aru2KRB8d9nCHEPdXWJxGT4aUjVMqtCRSq9EZXRCo8NH5cmLvmcho3hh1mbK.NqGY1X6M4qpMGX6dnTSHuCsZFbf.1.dnstunnel.com.",
    "query_type": "A",
    "query_class": "IN",
    "rcode": "NOERROR",
    "answers": [
        {
        "Rdata": "202.92.34.217",
        "Type": "A",
        "Class": "IN"
        }
    ],
    "srcaddr": "10.1.0.122",
    "srcport": "35116",
    "transport": "UDP",
    "srcids": {
        "instance": "i-0c738190f19db9a2c",
        "resolver_endpoint": "rslvr-out-e20639d3666748f58"
    },
    "firewall_rule_action": "ALERT",
    "firewall_rule_group_id": "rslvr-frg-63efa138b43f428b",
    "firewall_protection": "DNS_TUNNELING"
}

Integration with Security Hub

Security Hub provides you with a view of your security state in AWS and helps you to check your environment against security industry standards and best practices. Security Hub collects security data from across AWS accounts, AWS services, and supported third-party partner products, and helps you to analyze security trends and identify the highest priority security issues. It enables findings from both the Amazon: Route 53 Resolver DNS Firewall – AWS List and Amazon: Route 53 Resolver DNS Firewall Advanced list by default, so you’ll automatically receive these alerts without additional configuration. You only need to manually enable Amazon: Route 53 Resolver DNS Firewall – Custom List findings if you’re using custom domain lists in your rule groups. See Sending findings from Route 53 Resolver DNS Firewall to Security Hub for more information.

The following figure is an example of how Route 53 Resolver DNS Firewall Advanced findings appear in the Security Hub console, providing you with actionable security intelligence directly in your centralized dashboard.

Figure 9: DNS Firewall Advanced findings in Security Hub

Figure 9: DNS Firewall Advanced findings in Security Hub

Select a finding to view details such as Finding ID, Types, Workflow status, and so on.

Figure 10: Findings details

Figure 10: Findings details

Conclusion

Amazon Route 53 Resolver DNS Firewall Advanced represents a significant step forward in protecting organizations against sophisticated DNS-based threats. As mentioned, DNS queries sent to the Route 53 Resolver follow a unique path that bypasses traditional AWS security controls like security groups, NACLs, and even AWS Network Firewall—creating a security gap in many environments. Throughout this post, we’ve explored how DNS tunneling and DGA-based exploits take advantage of this blind spot, and how you can use Route 53 Resolver DNS Firewall Advanced to protect from these threats through real-time pattern analysis and anomaly detection. You learned how to configure the service in the AWS console and use the provided CloudFormation template with recommended rules that balance blocking high-confidence threats while alerting on potential issues. And you saw how query logging provides valuable visibility into your DNS traffic and how Security Hub integration centralizes your security findings. Implementing these capabilities helps you protect your infrastructure from sophisticated DNS-based exploits that traditional domain blocklists cannot catch, strengthening your cloud security posture while maintaining operational efficiency.

If you have feedback about this post, submit comments in the Comments section below.

Lawton Pittenger

Lawton Pittenger

Lawton is a Security Solutions Architect at AWS, based in New York City, focused on helping customers implement native AWS security services. Professionally, Lawton has worked in IT security roles, securing cloud environments. Outside of cloud security, his interests include skateboarding, snowboarding, and rock climbing.

Michael Leighty

Michael Leighty

Michael is a Senior Security Solutions Architect at AWS, based in Atlanta. He specializes in helping customers design and implement effective network security controls, drawing from extensive experience at leading network security vendors. At AWS, he works closely with service teams to drive continuous improvement in security services based on customer needs and feedback.