All posts by Mohammad Sabeel

Autonomous troubleshooting for Medallion Architecture with AWS DevOps Agent and Apache Spark Troubleshooting Agent

Post Syndicated from Mohammad Sabeel original https://aws.amazon.com/blogs/big-data/autonomous-troubleshooting-for-medallion-architecture-with-aws-devops-agent-and-apache-spark-troubleshooting-agent/

Every minute of data processing pipeline downtime delays business decisions, stalls downstream analytics, drives revenue loss, and erodes stakeholder confidence. Teams that run Medallion Architecture pipelines—a common data lakehouse pattern where data flows through bronze, silver, and gold layers with increasing quality—face cascading failures that impact revenue-critical reporting and machine learning workloads. As you scale these multi-stage pipelines with Amazon Managed Workflows for Apache Airflow (MWAA), AWS Glue, and Amazon Redshift, troubleshooting failures becomes increasingly complex. When a mission-critical job fails, an engineer must sift through gigabytes of logs across interconnected systems. This means spending hours on incident investigations, examining execution timelines and resource metrics, and cross-referencing findings with Amazon CloudWatch and recent deployment changes to find the root cause. This requires deep familiarity with the underlying technologies, expertise not every team member has. When the right engineer is unavailable during off-hours, pipeline downtime extends and downstream consumers wait. The cycle of detect, investigate, fix, and repeat is costly and entirely reactive. A proactive operational model moves issue identification upstream, catching and addressing problems before they disrupt your data pipelines.

In this post, we show you how to diagnose multi-layer Medallion Architecture pipeline failures in minutes using AWS DevOps Agent with Apache Spark Troubleshooting Agent integrated as an MCP server.

What is AWS DevOps Agent and Apache Spark Troubleshooting Agent?

AWS DevOps Agent is an autonomous investigation agent powered by AI that automatically diagnoses operational issues across your AWS environment. When a failure occurs, the agent independently gathers evidence from logs, metrics, and configurations across interconnected services, identifies the root cause, and delivers actionable remediation steps, all without human intervention. It integrates with your existing workflows through webhooks and delivers findings directly to communication channels like Slack. With AWS DevOps Agent, you can replace the reactive cycle of detect, investigate, fix, and repeat with autonomous, proactive troubleshooting. The agent acts as your always-on, on-call engineer, starting its investigation the moment a failure occurs, whether during business hours or in the middle of the night.

Apache Spark Troubleshooting Agent is an AI-powered, fully managed Model Context Protocol (MCP) server that data engineers can use to diagnose Spark application failures across Amazon EMR, AWS Glue, and Amazon SageMaker AI Notebooks using natural language. It automatically correlates Spark History Server data, distributed executor logs, and configuration patterns to identify root causes and deliver actionable recommendations. This removes hours of manual investigation across multiple consoles and log files.

Use case

The following sections walk through a common Medallion Architecture failure scenario and show how autonomous troubleshooting resolves it.

The scenario

Consider this scenario: a gold layer AWS Glue job fails with “Missing data for not-null field.” The logs don’t reveal the actual problem. The root cause is a subtle data quality issue introduced upstream in the silver layer, a job that succeeded without errors. Without autonomous troubleshooting, you would manually trace data lineage across Amazon Simple Storage Service (Amazon S3), Amazon Redshift, and multiple AWS Glue job logs to find the source.

The solution

When integrated with the Apache Spark Troubleshooting Agent, AWS DevOps Agent identifies the gold layer Amazon Redshift write failure, traces it back to silver layer data corruption, and provides detailed root causes and actionable recommendations. The investigation typically completes within 3 to 5 minutes.

Solution overview

The following diagram shows the Medallion Architecture data flow across bronze, silver, and gold layers.
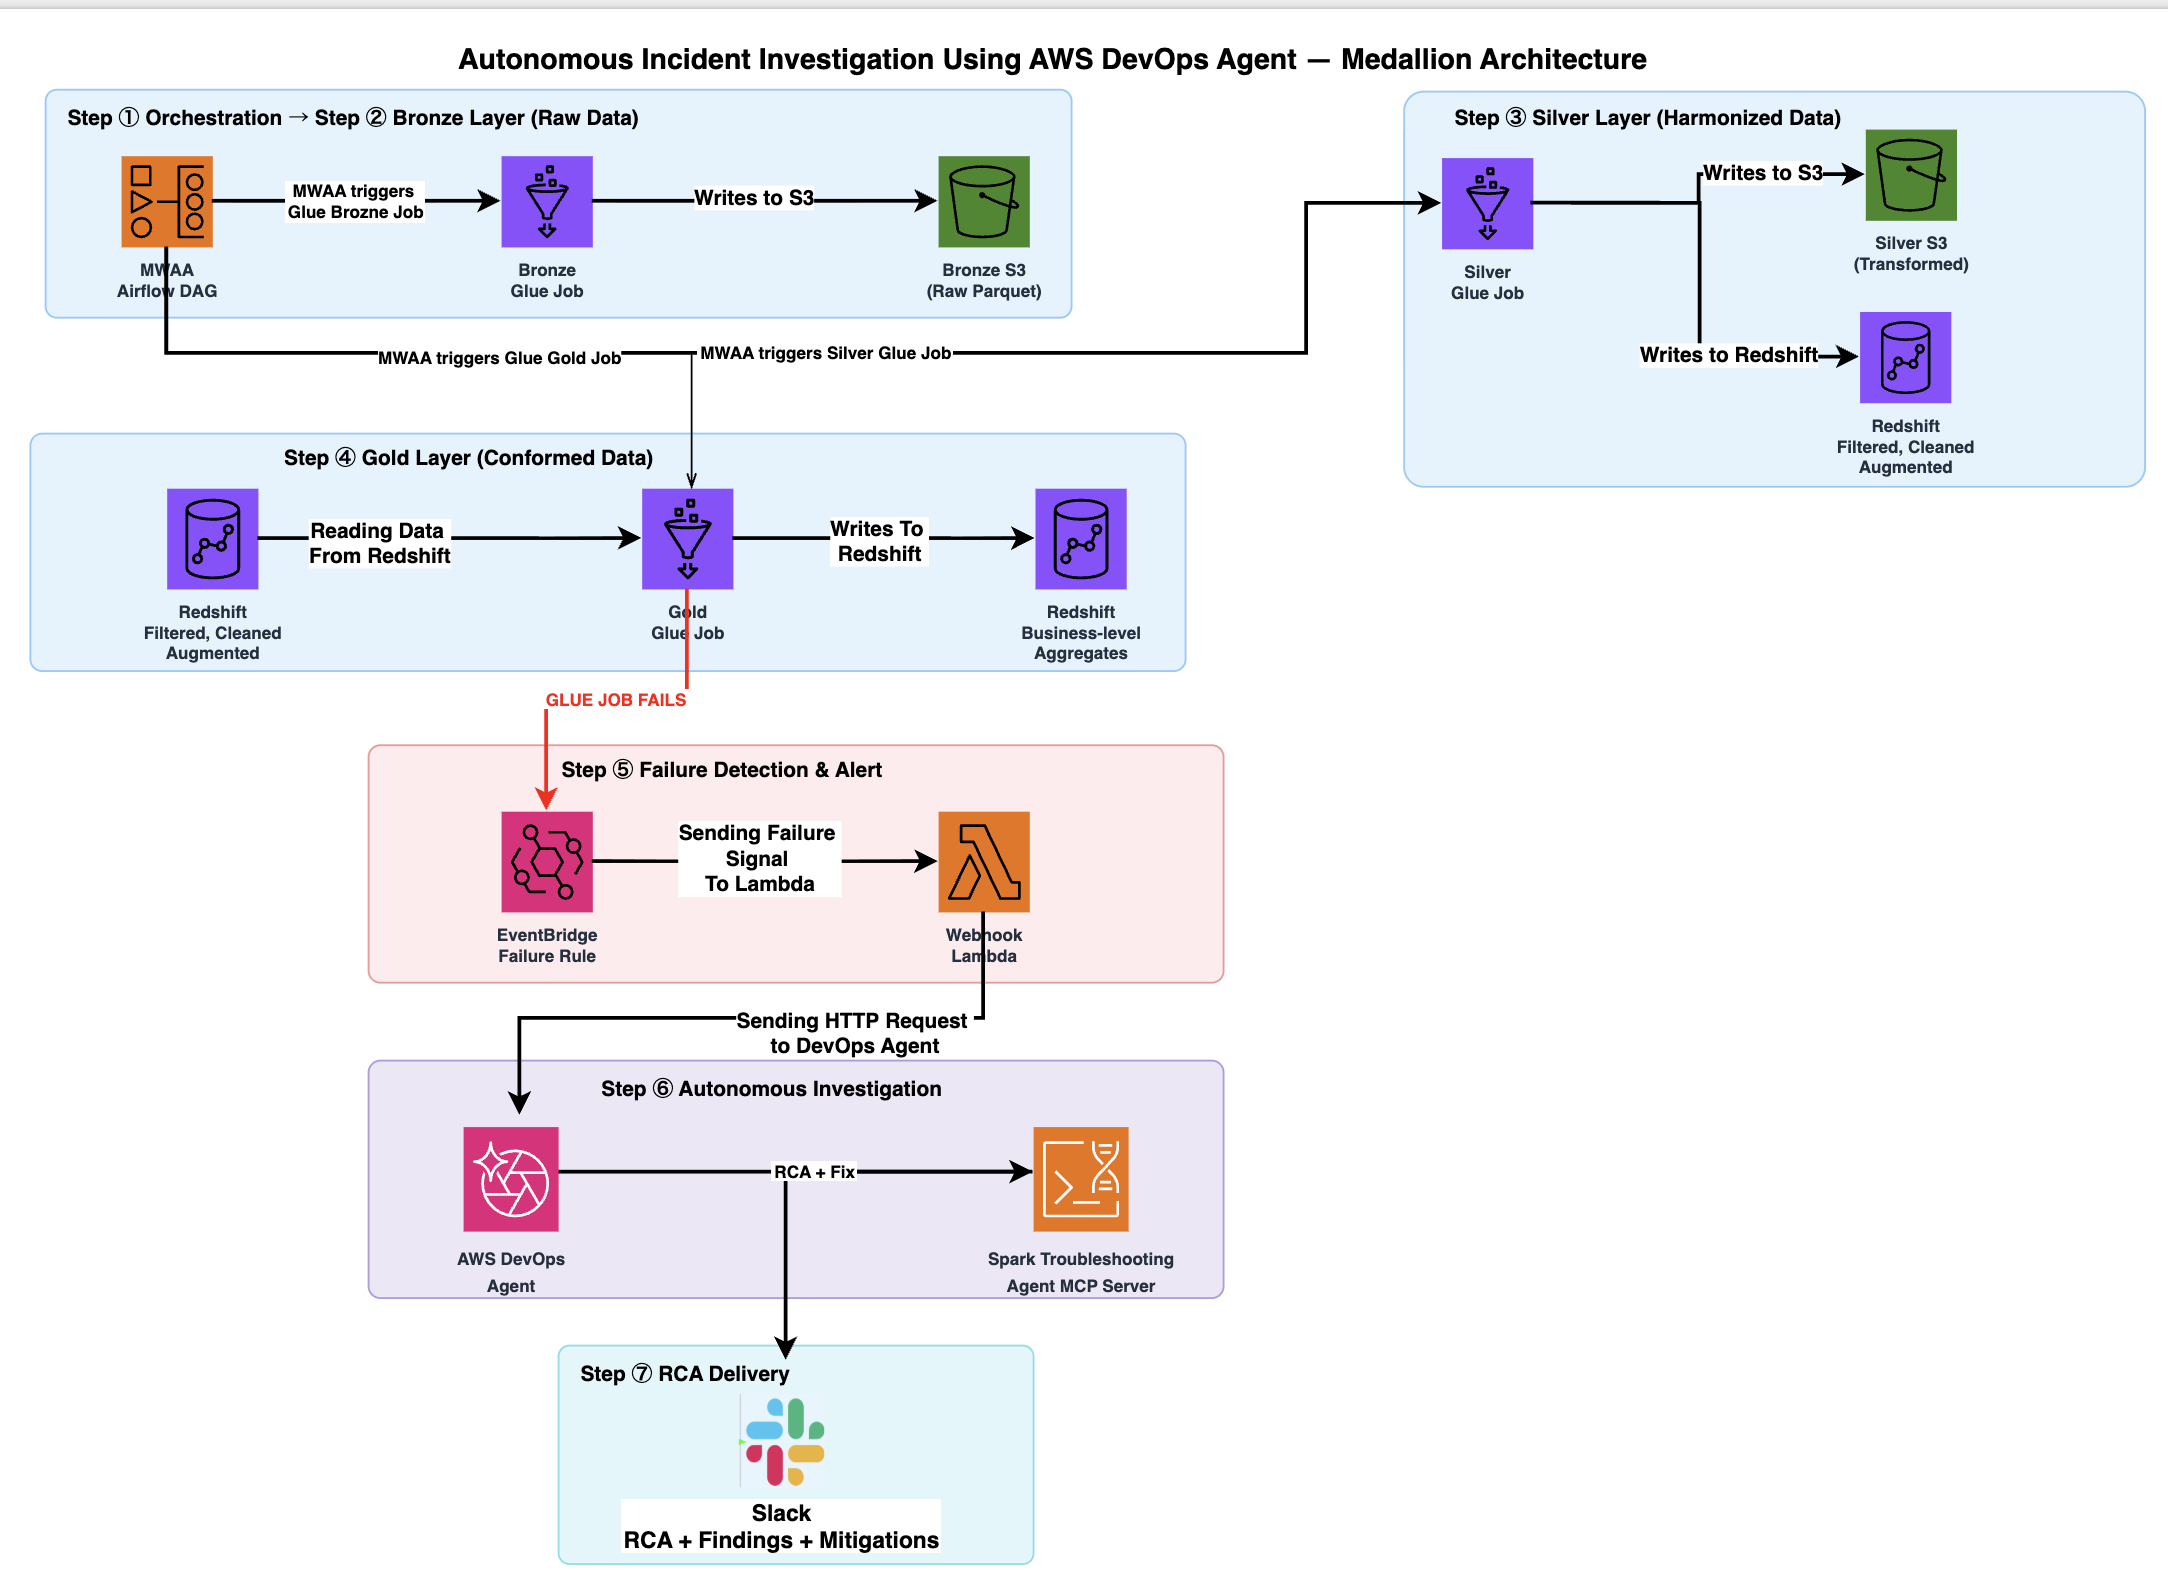
Medallion Architecture data flow showing the bronze layer in Amazon S3, the silver layer in Amazon S3 and Amazon Redshift, and the gold layer in Amazon Redshift, with Amazon MWAA orchestrating AWS Glue jobs and AWS DevOps Agent investigating failures

The architecture flow includes the following steps:

  1. Amazon MWAA triggers the Medallion pipeline directed acyclic graph (DAG), orchestrating three AWS Glue jobs sequentially: bronze layer, silver layer, and gold layer.
  2. The bronze layer job generates 50,000 synthetic ecommerce order records and writes raw Parquet files to Amazon S3.
  3. The silver layer job reads bronze data from Amazon S3, applies transformations, and writes the results to two destinations in parallel: Amazon S3, and Amazon Redshift (filtered, cleaned, and augmented data in the silver_ecommerce table). This job silently introduces data corruption in approximately 8 percent of total_amount values.
  4. The gold layer job reads from the Amazon Redshift silver_ecommerce table, performs aggregation, and attempts to write business-level aggregates back to the Amazon Redshift gold_ecommerce_summary table. If upstream data corruption introduces NULL values, this job fails with “Missing data for not-null field” because those NULL values violate the NOT NULL constraint.
  5. When the gold layer job enters a FAILED state, Amazon EventBridge captures the AWS Glue Job State Change event and invokes an AWS Lambda function. The Lambda function retrieves webhook credentials from AWS Secrets Manager, constructs an HMAC-signed event payload containing the job name, run ID, and error details, and sends it to AWS DevOps Agent.
  6. AWS DevOps Agent receives the HTTP POST request to the webhook and starts an autonomous investigation. It authenticates with Amazon Cognito using the OAuth 2.0 client credentials flow, then sends an MCP request through Amazon Bedrock AgentCore Gateway. The AgentCore Gateway invokes a Signature Version 4 (SigV4) Proxy Lambda, which signs the request and forwards it to the Apache Spark Troubleshooting Agent MCP Server. The MCP Server analyzes Spark event logs, executor metrics, and error stack traces for the failed gold job.
  7. AWS DevOps Agent delivers the investigation to your configured Slack channel. The delivery includes root cause analysis, upstream data lineage back to the silver layer corruption, and step-by-step remediation recommendations.

Walkthrough

In the following sections, you deploy a three-layer Medallion Architecture pipeline that processes ecommerce order data. Complete the steps to get started with autonomous troubleshooting using AWS DevOps Agent.

Prerequisites

Before you begin, verify that you have the following:

  • An AWS account. Your AWS Identity and Access Management (IAM) user or role must have the following permissions:
    • iam:CreateRole, iam:AttachRolePolicy, iam:PutRolePolicy
    • lambda:CreateFunction, lambda:AddPermission
    • glue:CreateJob, glue:StartJobRun
    • redshift:CreateCluster, redshift:GetClusterCredentials
    • airflow:CreateEnvironment
    • events:PutRule, events:PutTargets
    • sqs:CreateQueue
    • secretsmanager:CreateSecret
    • kms:CreateKey
    • ec2:CreateVpc, ec2:CreateSubnet, ec2:CreateSecurityGroup
    • cloudformation:CreateStack, cloudformation:DescribeStacks
    • Alternatively, you can use the AdministratorAccess managed policy for simplicity in a dev/test environment.
  • AWS Command Line Interface (AWS CLI) version 2.30.0 or later, installed and configured with appropriate credentials.
  • (Optional) A Slack workspace if you want investigation results delivered to a channel.

Set up AWS DevOps Agent

In this section, you configure AWS DevOps Agent to receive and investigate pipeline failure events. This involves three tasks: creating an Agent Space (your investigation workspace), optionally connecting a Slack channel for notifications, and generating a webhook endpoint that your pipeline uses to send failure alerts to the agent.

Create an Agent Space

  1. Open the AWS DevOps Agent console.
  2. Choose Create Agent Space.
  3. Enter a name (for example, medallion-troubleshooting).
  4. Choose Create.

Connect Slack integration (optional)

If you use Slack for internal communication, you can configure it to receive investigation results.

  1. In the AWS DevOps Agent console, go to Agent Spaces, select medallion-troubleshooting and then Communications.
  2. Choose Add integration and choose Slack.
  3. Choose Next to allow AWS DevOps Agent to access your Slack workspace, and choose Allow.
  4. Provide the Slack workspace and the Channel ID where you want investigation results delivered, then choose Next.
  5. Enter the following command in your channel chat to complete the integration: /invite @AWS DevOps Agent.
    • While running this command, when prompted, choose the correct region where the Agent Space is provisioned.

Create a webhook

  1. In your Agent Space, go to Webhooks.
  2. Choose Add webhook and choose Next on the two following pages.
  3. Choose Generate URL and secret key, and give the webhook a name (for example, medallion-failure-webhook).
  4. After creation, copy and save the Webhook URL (HTTPS endpoint) and Secret Key. You can also choose Download .csv to save this information to a secure location. Select the checkbox labeled I’ve saved and stored my URL and secret key, then choose Add.

Note the Webhook URL and Secret Key for later. You provide them as parameters when you create the AWS CloudFormation stack.

Deploy the AWS CloudFormation stack

The AWS CloudFormation template deploys the full Medallion Architecture pipeline. This includes an Amazon Virtual Private Cloud (Amazon VPC) with private subnets, an Amazon Redshift cluster (ra3.xlplus, single-node), and three AWS Glue jobs. It also creates an Amazon MWAA environment, Amazon EventBridge rules, AWS Lambda functions, and an AgentCore Gateway with Amazon Cognito OAuth authentication.

You can deploy the stack using one of two methods. Use Option A if you prefer a visual, guided experience through the AWS Management Console. Use Option B if you prefer working from the command line or need to integrate the deployment into a script or automation workflow.

Before you start, download the CloudFormation template from GitHub.

Option A: AWS Management Console (recommended)

  1. Open the AWS CloudFormation console and choose Create stackWith existing resources (import resources) or Upload a template file.
  2. Choose Choose file, select the downloaded blog-medallion-stack.yaml, then choose Next.
  3. For Stack name, enter medallion-troubleshooting.
  4. Fill in the parameters:
    • For WebhookUrl, enter your AWS DevOps Agent webhook URL (from Agent Space settings).
    • For WebhookSecret, enter the webhook secret for authentication.
  5. Choose Next, select I acknowledge that AWS CloudFormation might create IAM resources with custom names, then choose Submit.

Option B: AWS CLI

aws cloudformation create-stack \
    --stack-name medallion-troubleshooting \
    --template-body file://blog-medallion-stack.yaml \
    --parameters \
        ParameterKey=WebhookUrl,ParameterValue=<YOUR-WEBHOOK-URL> \
        ParameterKey=WebhookSecret,ParameterValue=<YOUR-WEBHOOK-SECRET> \
    --capabilities <CAPABILITY_NAMED_IAM> \
    --region <YOUR-REGION>

Replace the placeholder values:

  • YOUR-WEBHOOK-URL – Your AWS DevOps Agent webhook URL (from Agent Space settings).
  • YOUR-WEBHOOK-SECRET – The webhook secret for authentication.
  • YOUR-REGION – The AWS Region.

Wait for the stack status to show CREATE_COMPLETE. In our testing, this took approximately 30–40 minutes.

Retrieve Amazon Cognito client credentials

After the stack is deployed, it creates an Amazon Cognito user pool with an OAuth 2.0 client for AWS DevOps Agent authentication. Retrieve the client secret using the command below. The --user-pool-id  and CognitoClientId needs to be copied from the stack outputs.

aws cognito-idp describe-user-pool-client \
    --user-pool-id <UserPoolId-from-outputs> \
    --client-id <CognitoClientId-from-outputs> \
    --query UserPoolClient.ClientSecret \
    --output text --region <YOUR-REGION>

Replace YOUR-REGION with the actual AWS Region value, and save this value for the MCP Server registration in the following step.

Register the Spark Troubleshooting MCP Server

The Spark Troubleshooting MCP Server gives AWS DevOps Agent the ability to analyze Apache Spark event logs, executor metrics, and error stack traces from your AWS Glue jobs. By registering this server, you connect the agent to the diagnostic tooling it needs to autonomously investigate pipeline failures.

To register the MCP Server in AWS DevOps Agent, complete the following steps:

  1. In the AWS DevOps Agent console, go to Agent Spaces, select medallion-troubleshooting and then Capabilities.
  2. In the MCP Servers section, choose Add or Add Source.
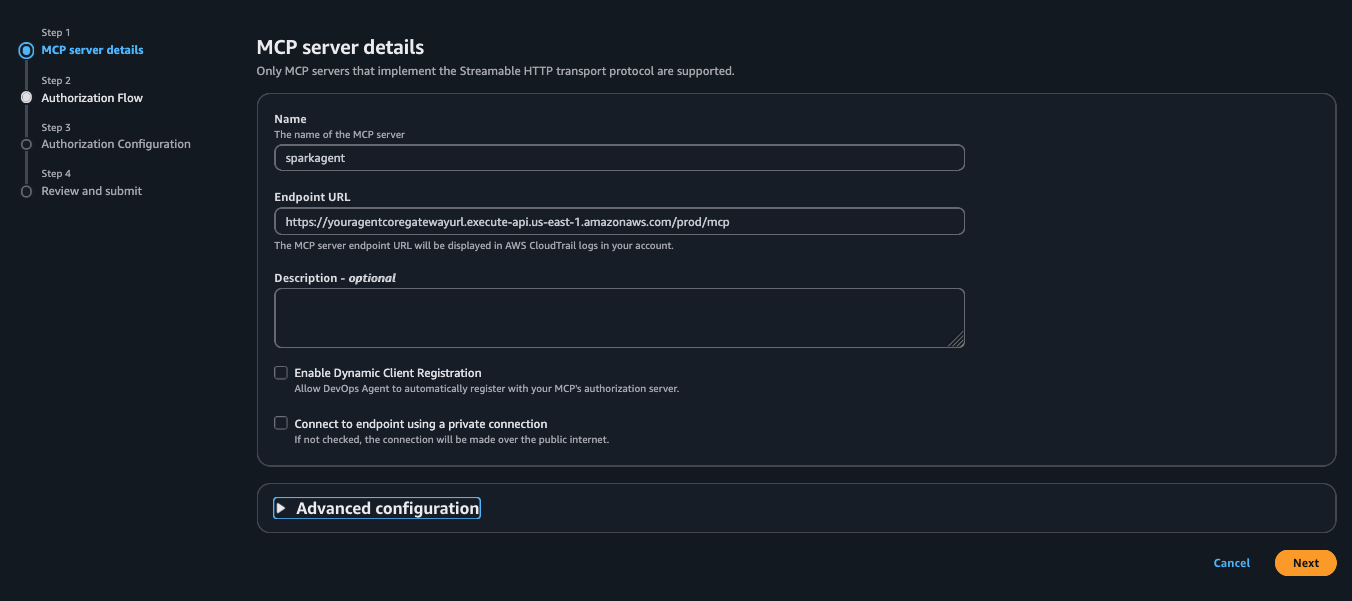
  3. Find New MCP Server Registration and choose Register.
  4. For Name, enter sparkagent.
  5. For Endpoint URL, enter the AgentCoreGatewayUrl value from the stack outputs.
  6. For Description, enter Apache Spark Troubleshooting MCP Server via AgentCore Gateway.
  7. Leave Enable Dynamic Client Registration cleared.
  8. Leave Connect to endpoint using a private connection cleared, then choose Next.Registration page for the Apache Spark Troubleshooting MCP Server in the AWS DevOps Agent console, showing endpoint URL and description fields
  9. Under Authorization Flow, select OAuth Client Credentials, and choose Next.
  10. For Client ID, enter the CognitoClientId value from the stack outputs.
  11. For Client Secret, enter the value you retrieved in the preceding step.
  12. For Exchange URL, enter the CognitoTokenEndpoint value from the stack outputs.
  13. For Add Scope, enter <stack-name>-mcp-proxy/invoke. For example, medallion-troubleshooting-mcp-proxy/invoke.
  14. Choose Next, review your configuration, and choose Add.
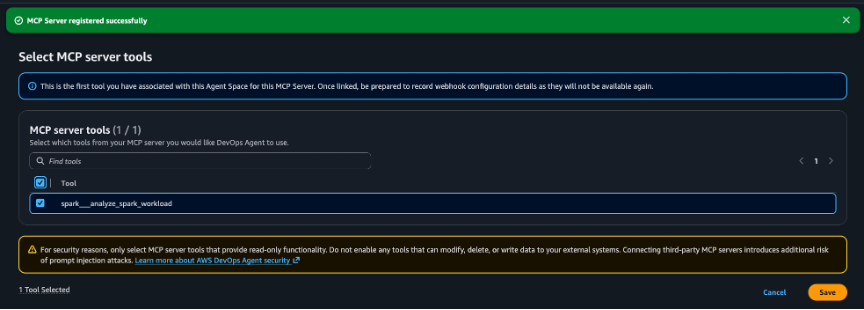
  15. Once you choose Add, on the following screen, click on the checkbox next to the spark___analyze_spark_workload. This is the root cause analysis tool which provides detailed troubleshooting for failed Apache Spark workloads.
    Selecting the tool within the AWS Managed Apache Spark Troubleshooting MCP server
  16. Choose Save as a last step. You will see the MCP Server associated successfully message on the top.
    Confirmation showing the successful Integration of AWS DevOps Agent Space with Apache Spark Troubleshooting MCP Server

See AWS DevOps Agent in action

Now that you have completed the prerequisites, you can see AWS DevOps Agent in action. Go to the Amazon MWAA Airflow Environments UI and click on Open Airflow UI under Airflow UI. It will open in a new browser tab. In the Airflow console, locate and manually trigger the medallion_architecture_pipeline DAG.
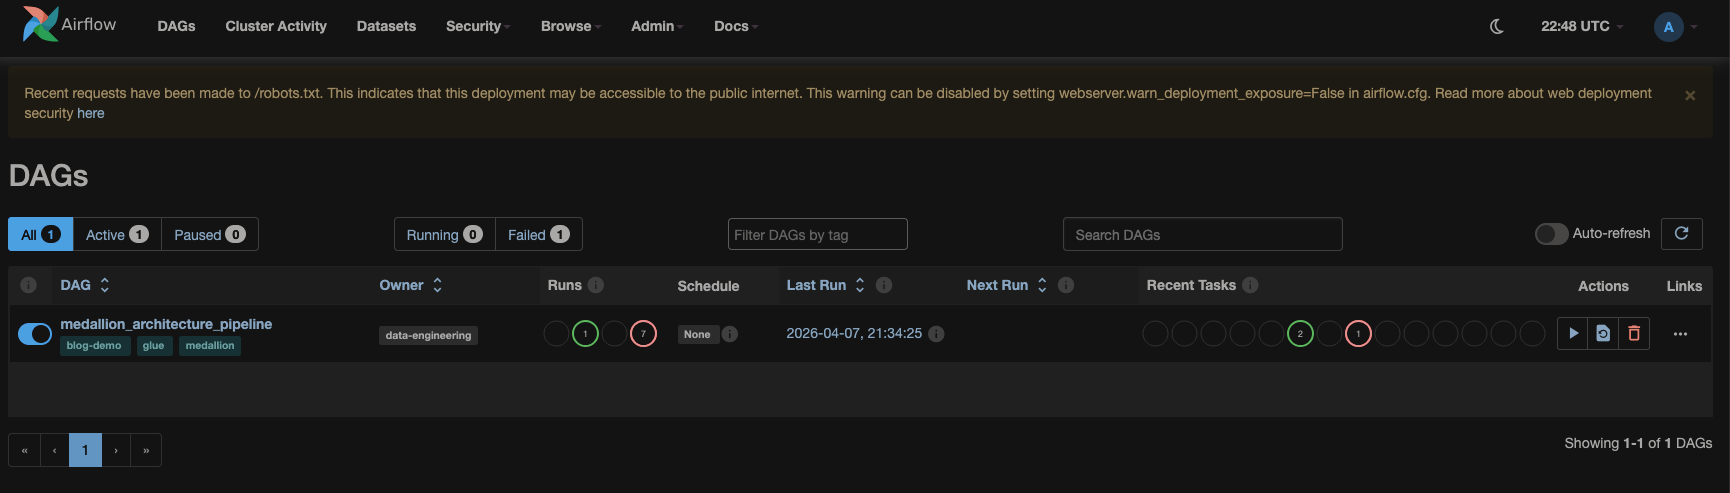
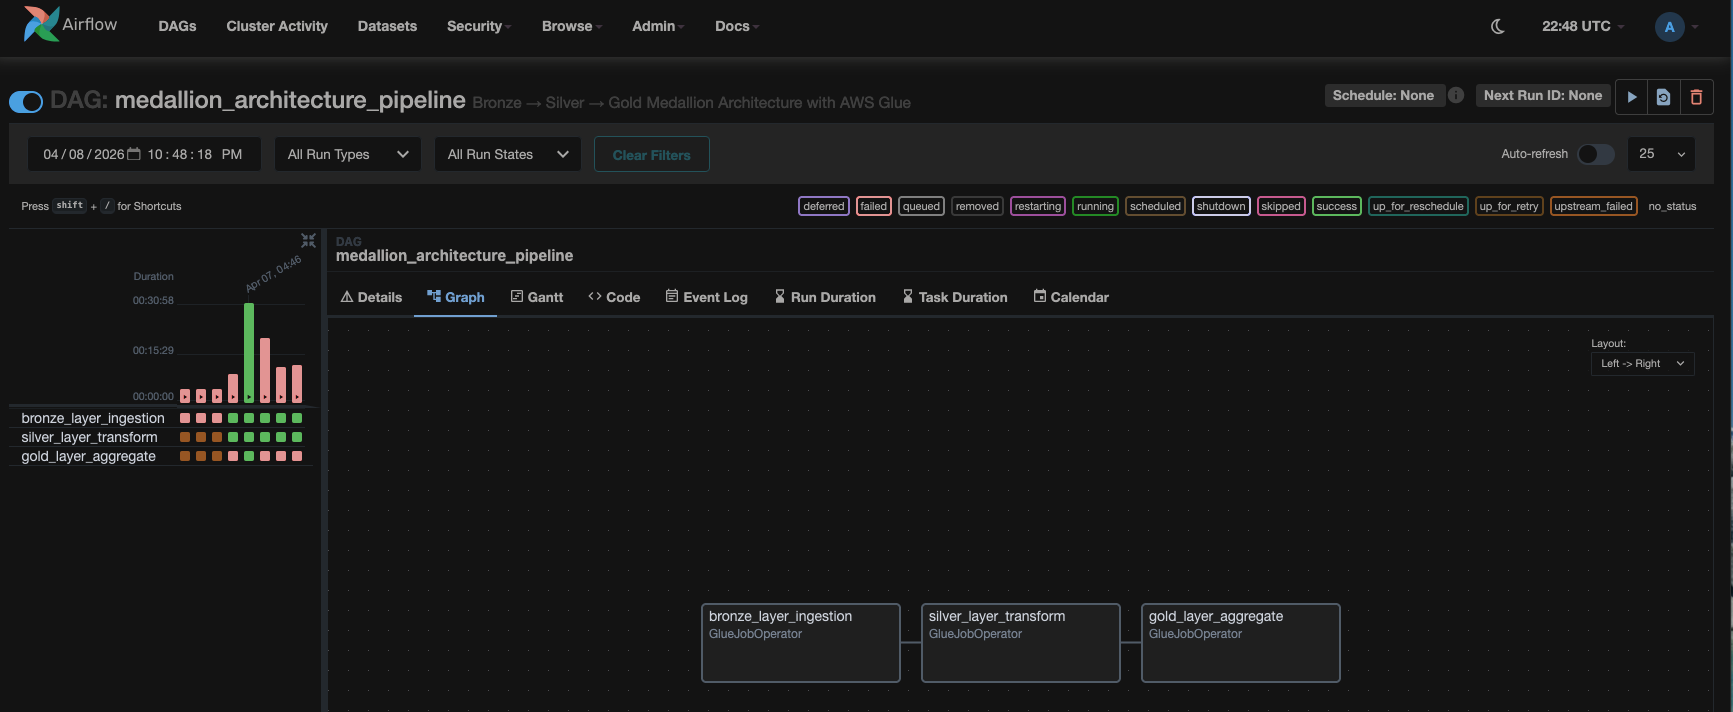
Amazon MWAA Airflow console showing the medallion_architecture_pipeline DAG with the Trigger DAG action selected

Amazon MWAA Airflow UI showing the medallion_architecture_pipeline DAG with bronze, silver, and gold tasks listed sequentially

The DAG runs three AWS Glue jobs sequentially:

  1. Bronze layer – This job generates 50,000 ecommerce order records and writes them to Amazon S3 as Parquet files.
  2. Silver layer – This job applies transformations and loads the results to both Amazon S3 and Amazon Redshift. It also silently injects approximately 8 percent of total_amount values with $ prefix strings, introducing hidden data corruption.
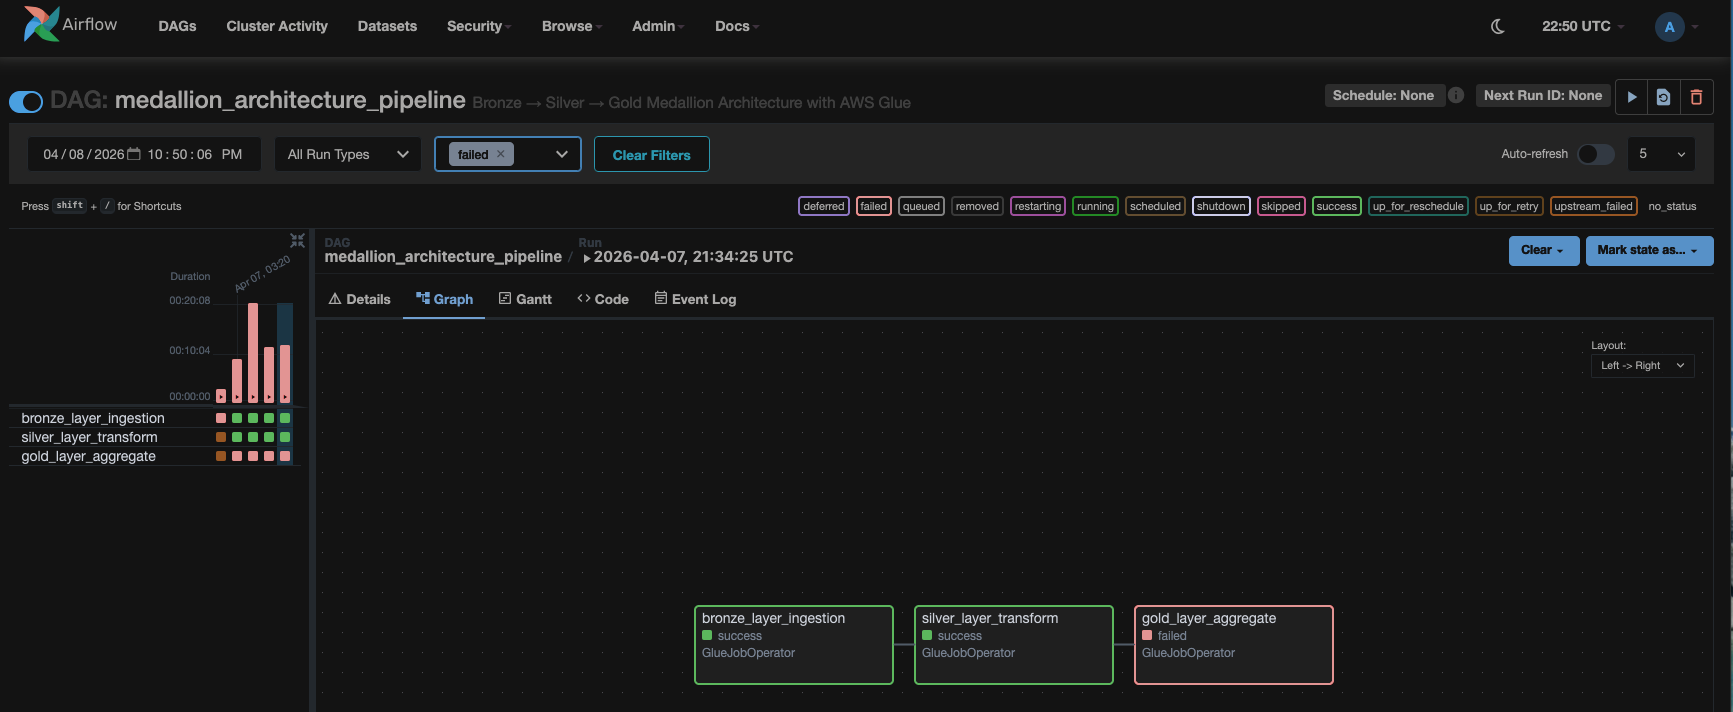
  3. Gold layer – This job reads from Amazon Redshift, casts total_amount to numeric (producing NULL values for the $-prefixed strings), and attempts to write aggregated results to the Amazon Redshift target table. It fails because the NULL values violate the NOT NULL constraint on revenue_total.

Amazon MWAA DAG run showing the bronze task succeeded, the silver task succeeded, and the gold task failed

With the components deployed and connected, the autonomous troubleshooting pipeline is ready to respond to failures. In this walkthrough, the silver layer job deliberately introduces data corruption to simulate a real-world data quality issue. This causes the gold layer job to fail, giving you the opportunity to see how AWS DevOps Agent responds.

As soon as the gold layer job fails, AWS DevOps Agent starts an autonomous investigation and uses the Apache Spark Troubleshooting MCP Server where needed.

Go to the AWS DevOps Management console and choose the medallion-troubleshooting under Agent Spaces. Next, select the Operator Access button. This will redirect you to Operator Console where you will see that the incident investigation automatically started in 1-2 minutes post Gold layer job failure.
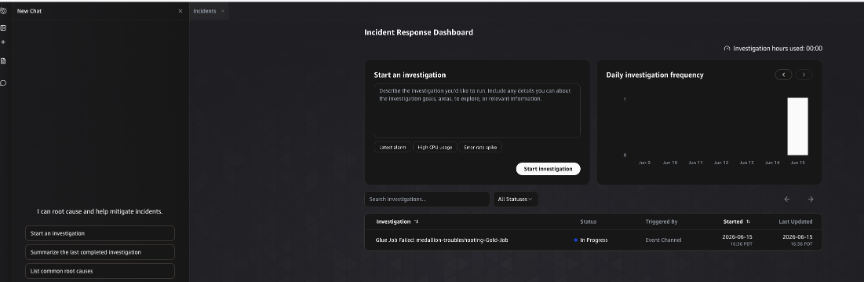
After the investigation completes, AWS DevOps Agent presents its findings within the incident analysis. The results are organized into two sections.

Root cause identified by AWS DevOps Agent

The agent identifies the underlying cause of the failure, tracing the gold layer write error back to data corruption introduced in the upstream silver layer AWS Glue job.
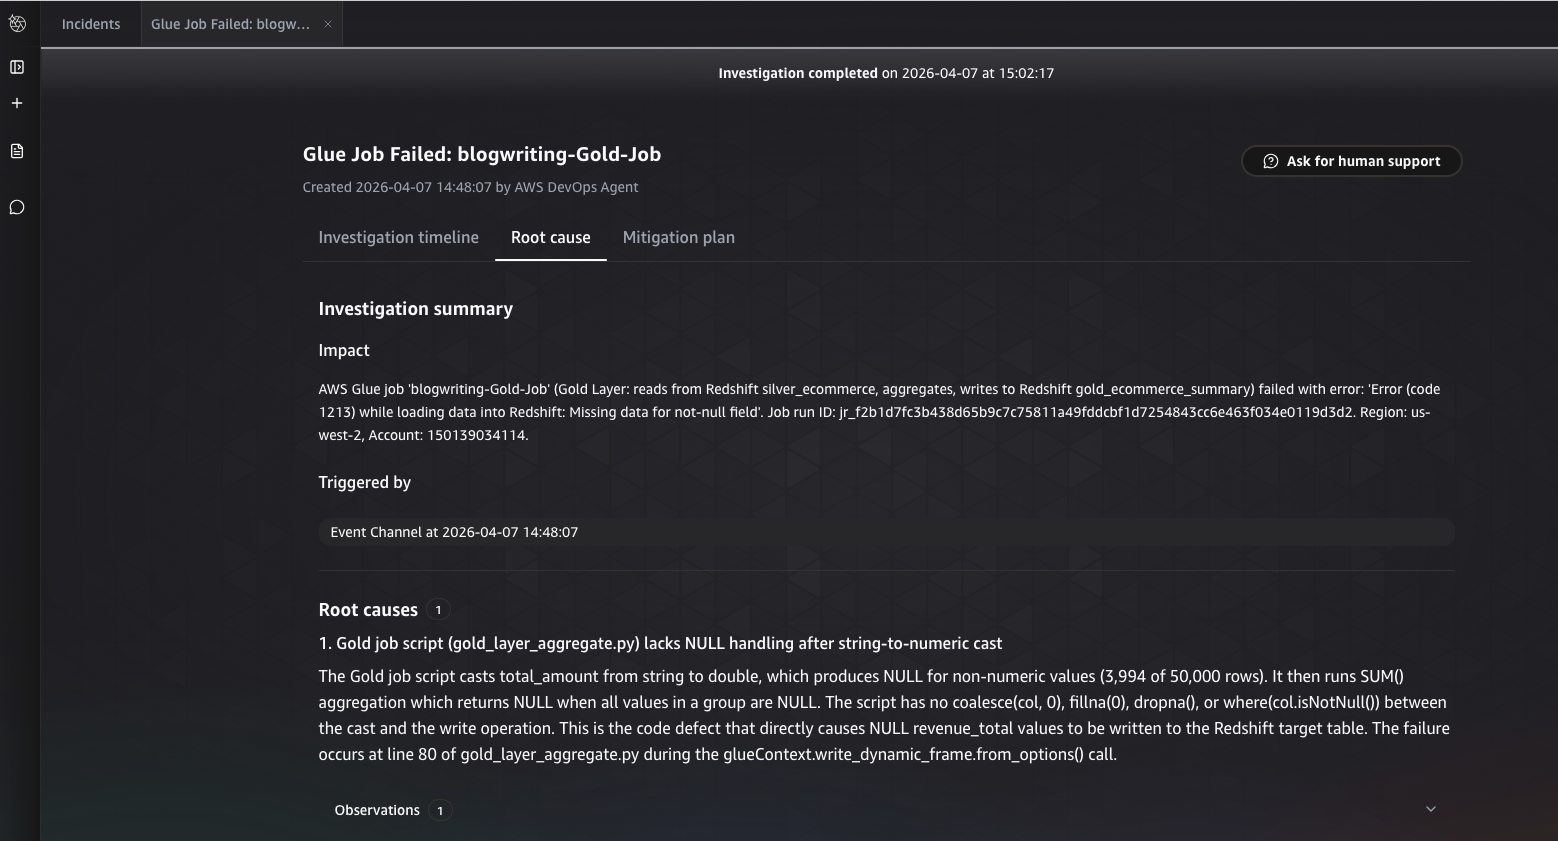
Root cause analysis from AWS DevOps Agent showing the gold layer write error traced back to silver layer data corruption

Mitigation plan generated by AWS DevOps Agent

On choosing Generate Mitigation Plan, the agent provides step-by-step remediation recommendations to resolve the issue and prevent recurrence.
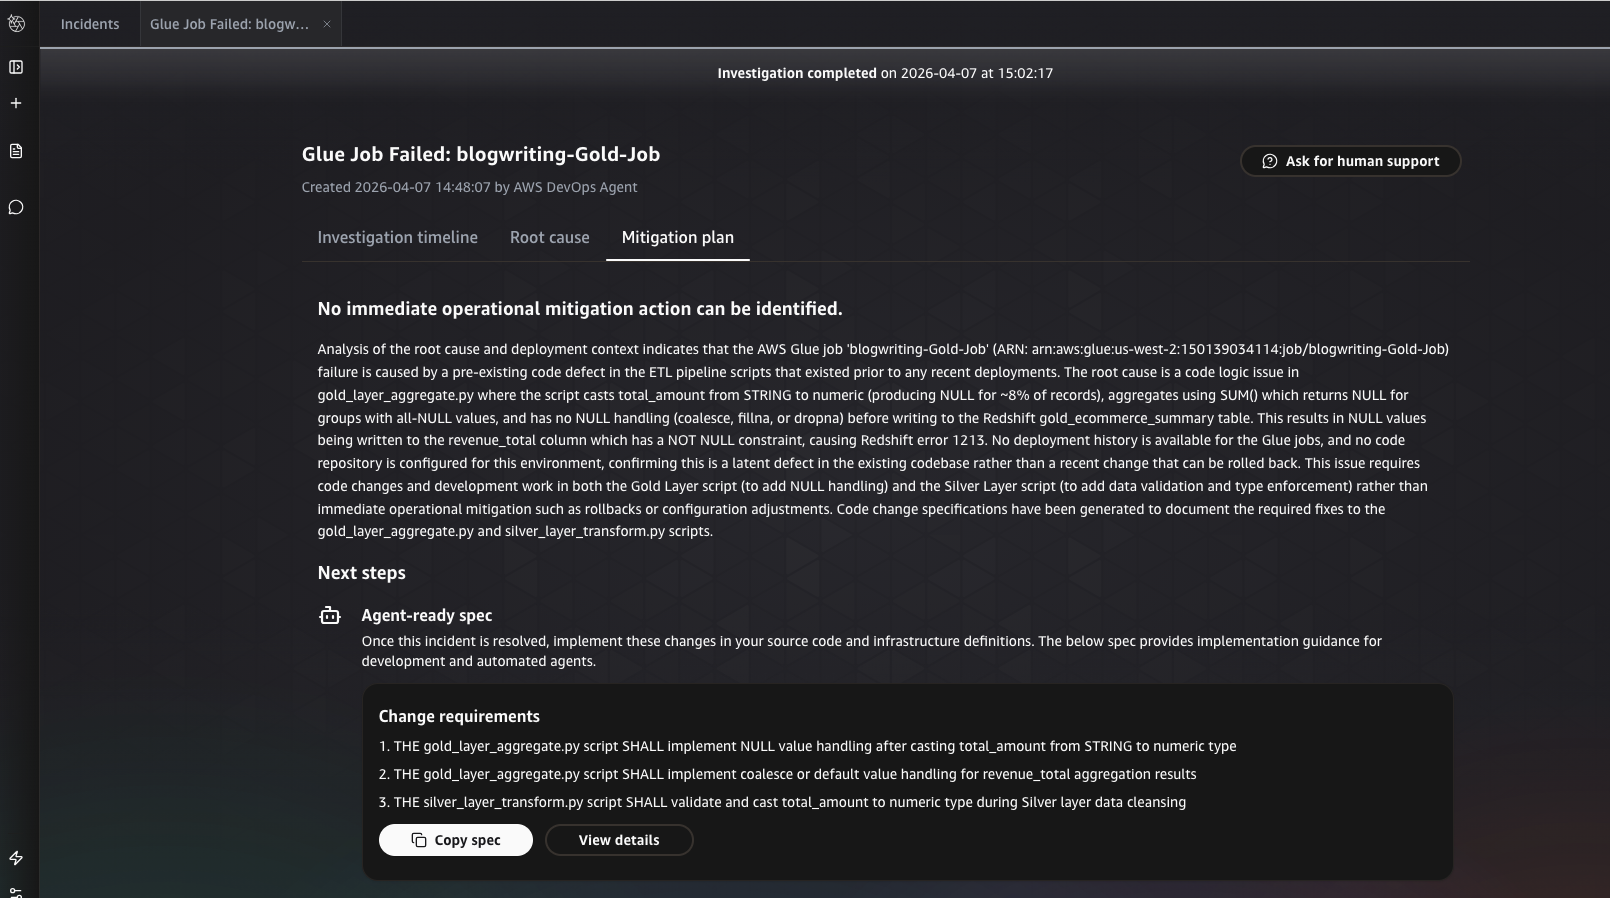
Mitigation plan from AWS DevOps Agent listing remediation steps to fix the silver layer data corruption and prevent recurrence

AWS DevOps Agent sends a notification to Slack

Slack channel showing the AWS DevOps Agent investigation summary with root cause identification and upstream data lineage trace

Typically, within 3–5 minutes, the agent delivers a detailed investigation in Slack that includes root cause identification, upstream data lineage tracking, and an actionable recommendation.

You have deployed an autonomous troubleshooting pipeline for Medallion Architecture data pipelines. The pipeline runs using AWS Glue, Amazon Redshift, and Amazon MWAA, with AWS DevOps Agent providing autonomous investigation. The agent traced a gold layer Amazon Redshift write failure back to a silver layer data quality issue. This type of diagnosis would typically require hours of manual investigation by an engineer with deep expertise in Apache Spark, Amazon Redshift, and data pipeline architecture. AWS DevOps Agent completed it autonomously within minutes.

If you need human assistance, you can use the Ask for human support feature within AWS DevOps Agent to open a case with AWS Support, automatically populated with relevant investigation context.

Enhanced investigations with AWS DevOps Agent Skills

AWS DevOps Agent autonomously investigates failures out of the box. You can enhance its diagnostic depth using Skills, a feature that provides the agent with domain-specific guidance tailored to your environment.

For Medallion Architecture pipelines, you can create Skills that instruct the agent to check for data type mismatches between pipeline layers when Amazon Redshift COPY errors occur, cross-reference silver layer data quality metrics with gold layer aggregation failures, or follow your internal runbook for escalating data quality issues to the upstream data engineering team.

To configure Skills, go to your Agent Space in the AWS DevOps Agent console and choose the Skills tab.

Clean up

To avoid incurring future charges, delete the resources you created during this walkthrough promptly after you finish testing.

To clean up resources, complete the following steps:

  1. Deregister the MCP Server. In the AWS DevOps Agent console, go to your Agent Space and choose the Capabilities tab. In the MCP Servers section, choose the sparkagent server, then choose Deregister.
  2. Delete the webhook. In your Agent Space, go to the Webhooks tab. Choose the medallion-failure-webhook, then choose Delete.
  3. Empty the Amazon S3 buckets. Open the Amazon S3 console. Locate the buckets created by the stack (their names start with medallion-troubleshooting). For each bucket, choose Empty, enter permanently delete to confirm, and choose Empty.
  4. Delete the AWS CloudFormation stack. Open the AWS CloudFormation console. Choose the medallion-troubleshooting stack, then choose Delete. Alternatively, run the following command:
aws cloudformation delete-stack \
    --stack-name medallion-troubleshooting \
    --region <your-region>

Wait for the stack deletion to complete.

  1. Delete any retained Amazon S3 buckets. Some Amazon S3 buckets might have a DeletionPolicy of Retain and aren’t automatically deleted with the stack. Return to the Amazon S3 console, locate any remaining buckets created by the stack, empty them using the process in the preceding step, and then choose Delete for each bucket.

Conclusion

In this post, you deployed an autonomous troubleshooting pipeline for Medallion Architecture data pipelines using AWS Glue, Amazon Redshift, Amazon MWAA, and AWS DevOps Agent. The agent traced a gold layer Amazon Redshift write failure back to a silver layer data quality issue—a diagnosis that would typically require hours of manual investigation by an engineer with deep expertise across multiple services.

As your data pipelines grow in complexity, so does the challenge of diagnosing failures that span multiple layers and services. AWS DevOps Agent reduces your mean time to resolution by autonomously investigating incidents the moment they occur, whether during business hours or at 2 AM. Your on-call engineers spend less time sifting through logs and more time building reliable data infrastructure. By shifting from reactive firefighting to autonomous, proactive troubleshooting, you can improve pipeline reliability, protect downstream analytics and machine learning workloads, and maintain stakeholder confidence in your data platform.

To learn how to structure Agent Spaces for investigation accuracy, scope resource access, and use infrastructure as code to streamline deployment, see Best practices for deploying AWS DevOps Agent in production. To learn how to evaluate and choose the right lakehouse pattern for your needs, see Navigating architectural choices for a lakehouse using Amazon SageMaker. For more about Apache Spark Troubleshooting Agent, see Introducing the Apache Spark Troubleshooting Agent for Amazon EMR and AWS Glue.
Next steps

Now that you have set up autonomous troubleshooting for your Medallion Architecture pipeline, consider exploring the following:


About the authors

Mohammad Sabeel

Mohammad Sabeel

Mohammad is a Senior Technical Account Manager (TAM) at Amazon Web Services (AWS) with over 14 years of experience in Information Technology (IT). As a member of the Technical Field Community for Analytics team, he is a subject matter expert in Analytics services including AWS Glue, Amazon Managed Workflows for Apache Airflow (MWAA), and Amazon Athena. Sabeel provides strategic guidance and proactive technical support to enterprise and ISV customers, helping them optimize their data analytics solutions, build resilient architectures, and accelerate cloud adoption. With deep subject matter expertise, he enables organizations to build scalable, efficient, and cost-effective data processing pipelines.

Ishan Gaur

Ishan Gaur

Ishan is a Principal Cloud Engineer at AWS. He has worked in the Analytics domain for the last 17 years, now focused on data analytics, AI/ML operations, and proactive cloud optimization. He works with enterprise customers to design resilient data pipelines, automate incident response, and adopt GenAI-powered services and operational tools. He’s passionate about turning reactive support patterns into proactive, self-healing architectures.

Build an analytics pipeline that is resilient to Avro schema changes using Amazon Athena

Post Syndicated from Mohammad Sabeel original https://aws.amazon.com/blogs/big-data/build-an-analytics-pipeline-that-is-resilient-to-avro-schema-changes-using-amazon-athena/

As technology progresses, the Internet of Things (IoT) expands to encompass more and more things. As a result, organizations collect vast amounts of data from diverse sensor devices monitoring everything from industrial equipment to smart buildings. These sensor devices frequently undergo firmware updates, software modifications, or configuration changes that introduce new monitoring capabilities or retire obsolete metrics. As a result, the data structure (schema) of the information transmitted by these devices evolves continuously.

Organizations commonly choose Apache Avro as their data serialization format for IoT data due to its compact binary format, built-in schema evolution support, and compatibility with big data processing frameworks. This becomes crucial when sensor manufacturers release updates that add new metrics or deprecate old ones, allowing for seamless data processing. For example, when a sensor manufacturer releases a firmware update that adds new temperature precision metrics or deprecates legacy vibration measurements, Avro’s schema evolution capabilities allow for seamless handling of these changes without breaking existing data processing pipelines.

However, managing schema evolution at scale presents significant challenges. For example, organizations need to store and process data from thousands of sensors and update their schemas independently, handle schema changes occurring as frequently as every hour due to rolling device updates, maintain historical data compatibility while accommodating new schema versions, query data across multiple time periods with different schemas for temporal analysis, and ensure minimal query failures due to schema mismatches.

To address this challenge, this post demonstrates how to build such a solution by combining Amazon Simple Storage Service (Amazon S3) for data storage, AWS Glue Data Catalog for schema management, and Amazon Athena for one-time querying. We’ll focus specifically on handling Avro-formatted data in partitioned S3 buckets, where schemas can change frequently while providing consistent query capabilities across all data regardless of schema versions.

This solution is specifically designed for Hive-based tables, such as those in the AWS Glue Data Catalog, and is not applicable for Iceberg tables. By implementing this approach, organizations can build a highly adaptive and resilient analytics pipeline capable of handling extremely frequent Avro schema changes in partitioned S3 environments.

Solution overview

In this post as an example, we’re simulating a real-world IoT data pipeline with the following requirements:

  • IoT devices continuously upload sensor data in Avro format to an S3 bucket, simulating real-time IoT data ingestion
  • The schema change happens frequently over time
  • Data will be partitioned hourly to reflect typical IoT data ingestion patterns
  • Data needs to be queryable using the most recent schema version through Amazon Athena.

To achieve these requirements, we demonstrate the solution using automated schema detection. We use AWS Command Line Interface (AWS CLI) and AWS SDK for Python (Boto3) scripts to simulate an automated mechanism that continually monitors the S3 bucket for new data, detects schema changes in incoming Avro files, and triggers necessary updates to the AWS Glue Data Catalog.

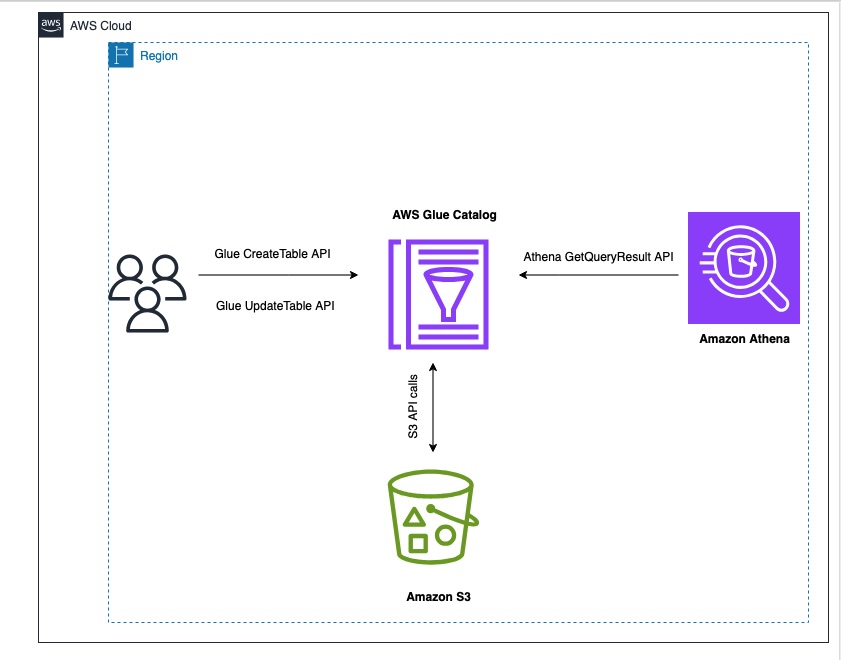
For schema evolution handling, our solution will demonstrate how to create and update table definitions in the AWS Glue Data Catalog, incorporate Avro schema literals to handle schema changes, and use the Athena partition projection for efficient querying across schema versions. The data steward or admin needs to know when and how the schema is updated so that the admin can manually change the columns in the UpdateTable API call. For validation and querying, we use Amazon Athena queries to verify table definitions and partition details and demonstrate successful querying of data across different schema versions. By simulating these components, our solution addresses the key requirements outlined in the introduction:

  • Handling frequent schema changes (as often as hourly)
  • Managing data from thousands of sensors updating independently
  • Maintaining historical data compatibility while accommodating new schemas
  • Enabling querying across multiple time periods with different schemas
  • Minimizing query failures due to schema mismatches

Although in a production environment this would be integrated into a sophisticated IoT data processing application, our simulation using AWS CLI and Boto3 scripts effectively demonstrates the principles and techniques for managing schema evolution in large-scale IoT deployments.

The following diagram illustrates the solution architecture.

Prerequisites:

To perform the solution, you need to have the following prerequisites:

Create the base table

In this section, we simulate the initial setup of a data pipeline for IoT sensor data. This step is crucial because it establishes the foundation for our schema evolution demonstration. This initial table serves as the starting point from which our schema will evolve. It allows us to demonstrate how to handle schema changes over time. In this scenario, the base table contains three key fields: customerID (bigint), sentiment (a struct containing customerrating), and dt (string) as a partition column. And Avro schema literal (‘avro.schema.literal’)along with other configurations. Follow these steps:

  1. Create a new file named `CreateTableAPI.py` with the following content. Replace 'Location': 's3://amzn-s3-demo-bucket/' with your S3 bucket details and <AWS Account ID> with your AWS account ID:
import boto3
import time

if __name__ == '__main__':
    database_name = " blogpostdatabase"
    table_name = "blogpost_table_test"
    catalog_id = ''
    client = boto3.client('glue')

    response = client.create_table(
        CatalogId=catalog_id,
        DatabaseName=database_name,
        TableInput={
            'Name': table_name,
            'Description': 'sampletable',
            'Owner': 'root',
            'TableType': 'EXTERNAL_TABLE',
            'LastAccessTime': int(time.time()),
            'LastAnalyzedTime': int(time.time()),
            'Retention': 0,
            'Parameters' : {
                'avro.schema.literal': '{"type" : "record", "name" : "customerdata", "namespace" : "com.data.test.avro", "fields" : [{ "name" : "customerID", "type" : "long", "default" : -1 },{ "name" : "sentiment", "type" : [ "null", { "type" : "record", "name" : "sentiment", "doc" : "***** CoreETL ******", "fields" : [ { "name" : "customerrating", "type" : "long", "default" : 0 }] } ], "default" : 0 }]}'
            },
            'StorageDescriptor': {
                'Columns': [
                    {
                        'Name': 'customerID',
                        'Type': 'bigint',
                        'Comment': 'from deserializer'
                    },
                    {
                        'Name': 'sentiment',
                        'Type': 'struct<customerrating:bigint>',
                        'Comment': 'from deserializer'
                    }
                ],
                'Location': 's3:///',
                'InputFormat': 'org.apache.hadoop.hive.ql.io.avro.AvroContainerInputFormat',
                'OutputFormat': 'org.apache.hadoop.hive.ql.io.avro.AvroContainerOutputFormat',
                'SerdeInfo': {
                    'SerializationLibrary': 'org.apache.hadoop.hive.serde2.avro.AvroSerDe',
                    'Parameters': {
                        'avro.schema.literal': '{"type" : "record", "name" : "customerdata", "namespace" : "com.data.test.avro", "fields" : [{ "name" : "customerID", "type" : "long", "default" : -1 },{ "name" : "sentiment", "type" : [ "null", { "type" : "record", "name" : "sentiment", "doc" : "***** CoreETL ******", "fields" : [ { "name" : "customerrating", "type" : "long", "default" : 0 } ] } ], "default" : 0 }]}'
                    }
                }
            },
            'PartitionKeys': [
                {
                    'Name': 'dt',
                    'Type': 'string'
                }
            ]
        }
    )

    print(response)
  1. Run the script using the command:
python3 CreateTableAPI.py

The schema literal serves as a form of metadata, providing a clear description of your data structure. In Amazon Athena, Avro table schema Serializer/Deserializer (SerDe) properties are essential for schema is compatible with the data stored in files, facilitating accurate translation for query engines. These properties enable the precise interpretation of Avro-formatted data, allowing query engines to correctly read and process the information during execution.

The Avro schema literal provides a detailed description of the data structure at the partition level. It defines the fields, their data types, and any nested structures within the Avro data. Amazon Athena uses this schema to correctly interpret the Avro data stored in Amazon S3. It makes sure that each field in the Avro file is mapped to the correct column in the Athena table.

The schema information helps Athena optimize query run by understanding the data structure in advance. It can make informed decisions about how to process and retrieve data efficiently. When the Avro schema changes (for example, when new fields are added), updating the schema literal allows Athena to recognize and work with the new structure. This is crucial for maintaining query compatibility as your data evolves over time. The schema literal provides explicit type information, which is essential for Avro’s type system. This provides accurate data type conversion between Avro and Athena SQL types.

For complex Avro schemas with nested structures, the schema literal informs Athena how to navigate and query these nested elements. The Avro schema can specify default values for fields, which Athena can use when querying data where certain fields might be missing. Athena can use the schema to perform compatibility checks between the table definition and the actual data, helping to identify potential issues. In the SerDe properties, the schema literal tells the Avro SerDe how to deserialize the data when reading it from Amazon S3.

It’s crucial for the SerDe to correctly interpret the binary Avro format into a form Athena can query. The detailed schema information aids in query planning, allowing Athena to make informed decisions about how to execute queries efficiently. The Avro schema literal specified in the table’s SerDe properties provides Athena with the exact field mappings, data types, and physical structure of the Avro file. This enables Athena to perform column pruning by calculating precise byte offsets for required fields, reading only those specific portions of the Avro file from S3 rather than retrieving the entire record.

Parameters' : {
                'avro.schema.literal': '{"type" : "record", "name" : "customerdata", "namespace" : "com.data.test.avro", "fields" : [{ "name" : "customerID", "type" : "long", "default" : -1 },{ "name" : "sentiment", "type" : [ "null", { "type" : "record", "name" : "sentiment", "doc" : "***** CoreETL ******", "fields" : [ { "name" : "customerrating", "type" : "long", "default" : 0 }] } ], "default" : 0 }]}'
            },
  1. After creating the table, verify its structure using the SHOW CREATE TABLE command in Athena:
CREATE EXTERNAL TABLE `blogpost_table_test`(
  `customerid` bigint COMMENT 'from deserializer', 
  `sentiment` struct<customerrating:bigint> COMMENT 'from deserializer')
PARTITIONED BY ( 
  `dt` string)
ROW FORMAT SERDE 
  'org.apache.hadoop.hive.serde2.avro.AvroSerDe' 
WITH SERDEPROPERTIES ( 
  'avro.schema.literal'='{\"type\" : \"record\", \"name\" : \"customerdata\", \"namespace\" : \"com.data.test.avro\", \"fields\" : [{ \"name\" : \"customerID\", \"type\" : \"long\", \"default\" : -1 },{ \"name\" : \"sentiment\", \"type\" : [ \"null\", { \"type\" : \"record\", \"name\" : \"sentiment\", \"doc\" : \"***** CoreETL ******\", \"fields\" : [ { \"name\" : \"customerrating\", \"type\" : \"long\", \"default\" : 0 } ] } ], \"default\" : 0 }]}') 
STORED AS INPUTFORMAT 
  'org.apache.hadoop.hive.ql.io.avro.AvroContainerInputFormat' 
OUTPUTFORMAT 
  'org.apache.hadoop.hive.ql.io.avro.AvroContainerOutputFormat'
LOCATION
  's3://amzn-s3-demo-bucket/'
TBLPROPERTIES (
  'avro.schema.literal'='{\"type\" : \"record\", \"name\" : \"customerdata\", \"namespace\" : \"com.data.test.avro\", \"fields\" : [{ \"name\" : \"customerID\", \"type\" : \"long\", \"default\" : -1 },{ \"name\" : \"sentiment\", \"type\" : [ \"null\", { \"type\" : \"record\", \"name\" : \"sentiment\", \"doc\" : \"***** CoreETL ******\", \"fields\" : [ { \"name\" : \"customerrating\", \"type\" : \"long\", \"default\" : 0 } ] } ], \"default\" : 0 }]}')

Note that the table is created with the initial schema as described below:

[
  {
    "Name": "customerid",
    "Type": "bigint",
    "Comment": "from deserializer"
  },
  {
    "Name": "sentiment",
    "Type": "struct<confirmedImpressions:bigint>",
    "Comment": "from deserializer"
  },
  {
    "Name": "dt",
    "Type": "string",
    "PartitionKey": "Partition (0)"
  }
]

With the table structure in place, you can load the first set of IoT sensor data and establish the initial partition. This step is crucial for setting up the data pipeline that will handle incoming sensor data.

  1. Download the example sensor data from the following S3 bucket
s3://aws-blogs-artifacts-public/artifacts/BDB-4745

Download initial schema from the first partition

aws s3 cp s3://aws-blogs-artifacts-public/artifacts/BDB-4745/dt=2024-03-21/initial_schema_sample1.avro 

Download second schema from the second partition

aws s3 cp s3://aws-blogs-artifacts-public/artifacts/BDB-4745/dt=2024-03-22/second_schema_sample2.avro

Download third schema from the third partition

aws s3 cp s3://aws-blogs-artifacts-public/artifacts/BDB-4745/dt=2024-03-23/third_scehama_sample3avro
  1. Upload the Avro-formatted sensor data to your partitioned S3 location. This represents your first day of sensor readings, organized in the date-based partition structure. Replace the bucket name amzn-s3-demo-bucket with your S3 bucket name and add a partitioned folder for the dt field.
s3://amzn-s3-demo-bucket/dt=2024-03-21/
  1. Register this partition in the AWS Glue Data Catalog to make it discoverable. This tells AWS Glue where to find your sensor data for this specific date:
ALTER TABLE  iot_sensor_data ADD PARTITION (dt='2024-03-21');
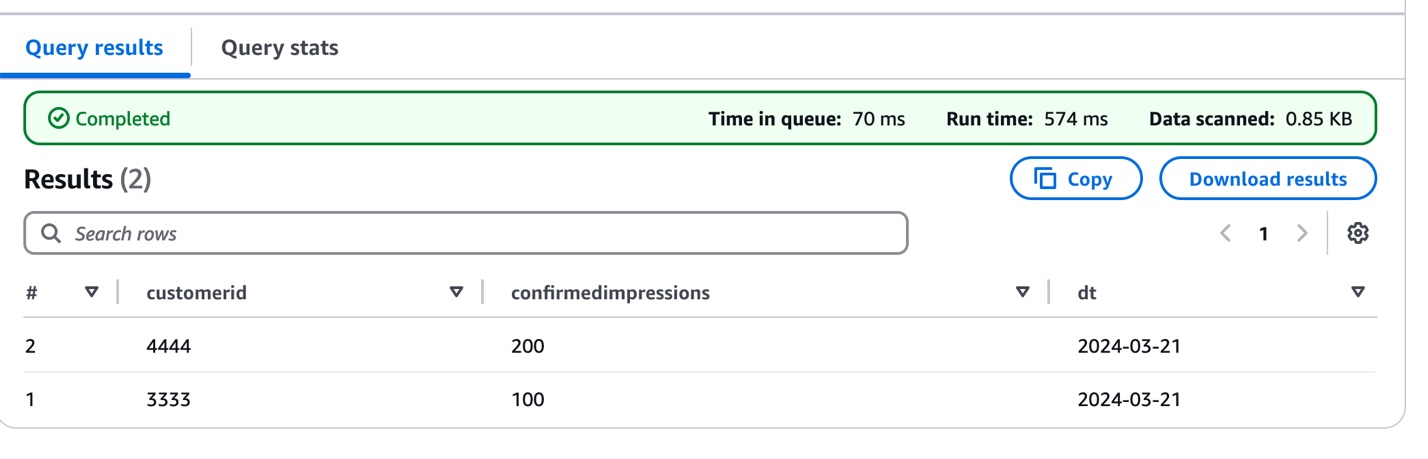
  1. Validate your sensor data ingestion by querying the newly loaded partition. This query helps verify that your sensor readings are correctly loaded and accessible:
SELECT * FROM "blogpostdatabase "."iot_sensor_data" WHERE dt='2024-03-21';

The following screenshot shows the query results.

This initial data load establishes the foundation for the IoT data pipeline, which means you can begin tracking sensor measurements while preparing for future schema evolution as sensor capabilities expand or change.

Now, we demonstrate how the IoT data pipeline handles evolving sensor capabilities by introducing a schema change in the second data batch. As sensors receive firmware updates or new monitoring features, their data structure needs to adapt accordingly. To show this evolution, we add data from sensors that now include visibility measurements:

  1. Examine the evolved schema structure that accommodates the new sensor capability:
{
  "fields": [
    {
      "Name": "customerid",
      "Type": "bigint",
      "Comment": "from deserializer"
    },
    {
      "Name": "sentiment",
      "Type": "struct<confirmedImpressions:bigint,visibility:bigint>",
      "Comment": "from deserializer"
    },
    {
      "Name": "dt",
      "Type": "string",
      "PartitionKey": "Partition (0)"
    }
  ]
}

Note the addition of the visibility field within the sentiment structure, representing the sensor’s enhanced monitoring capability.

  1. Upload this enhanced sensor data to a new date partition:
s3://amzn-s3-demo-bucket/dt=2024-03-22/
  1. Verify data consistency across both the original and enhanced sensor readings:
SELECT * FROM "blogpostdatabase"."blogpost_table_test" LIMIT 10;

This demonstrates how the pipeline can handle sensor upgrades while maintaining compatibility with historical data. In the next section, we explore how to update the table definition to properly manage this schema evolution, providing seamless querying across all sensor data regardless of when the sensors were upgraded. This approach is particularly valuable in IoT environments where sensor capabilities frequently evolve, which means you can maintain historical data while accommodating new monitoring features.

Update the AWS Glue table

To accommodate evolving sensor capabilities, you need to update the AWS Glue table schema. Although traditional methods such as MSCK REPAIR TABLE or ALTER TABLE ADD PARTITION work for small datasets for updating partition information, you can use an alternate method to handle tables with more than 100K partitions efficiently.

We use the Athena partition projection, which eliminates the need to process extensive partition metadata, which can be time-consuming for large datasets. Instead, it dynamically infers partition existence and location, allowing for more efficient data management. This method also speeds up query planning by quickly identifying relevant partitions, leading to faster query execution. Additionally, it reduces the number of API calls to the metadata store, potentially lowering costs associated with these operations. Perhaps most importantly, this solution maintains performance as the number of partitions grows, prodicing scalability for evolving datasets. These benefits combine to create a more efficient and cost-effective way of handling schema evolution in large-scale data environments.

To update your table schema to handle the new sensor data, follow these steps:

  1. Copy the following code into the UpdateTableAPI.py file:
import boto3

client = boto3.client('glue')

db = 'blogpostdatabase'
tb = 'blogpost_table_test'

response = client.get_table(
    DatabaseName=db,
    Name=tb
)

print(response)


table_input = {
    'Description': response['Table'].get('Description', ''),
    'Name': response['Table'].get('Name', ''),
    'Owner': response['Table'].get('Owner', ''),
    'Parameters': response['Table'].get('Parameters', {}),
    'PartitionKeys': response['Table'].get('PartitionKeys', []),
    'Retention': response['Table'].get('Retention'),
    'StorageDescriptor': response['Table'].get('StorageDescriptor', {}),
    'TableType': response['Table'].get('TableType', ''),
    'ViewExpandedText': response['Table'].get('ViewExpandedText', ''),
    'ViewOriginalText': response['Table'].get('ViewOriginalText', '')

}

for col in table_input['StorageDescriptor']['Columns']:
    if col['Name'] == 'sentiment':
        col['Type'] = 'struct<confirmedImpressions:bigint,visibility:bigint>'


table_input['StorageDescriptor']['SerdeInfo']['Parameters']['avro.schema.literal'] = '{"type" : "record", "name" : "customerdata", "namespace" : "com.data.test.avro", "fields" : [{ "name" : "customerID", "type" : "long", "default" : -1 },{ "name" : "sentiment", "type" : [ "null", { "type" : "record", "name" : "sentiment", "doc" : "***** CoreETL ******", "fields" : [ { "name" : "customerrating", "type" : "long", "default" : 0 },{"name":"visibility","type":"long","default":0}] } ], "default" : 0 }]}'
table_input['Parameters']['avro.schema.literal'] = '{"type" : "record", "name" : "customerdata", "namespace" : "com.data.test.avro", "fields" : [{ "name" : "customerID", "type" : "long", "default" : -1 },{ "name" : "sentiment", "type" : [ "null", { "type" : "record", "name" : "sentiment", "doc" : "***** CoreETL ******", "fields" : [ { "name" : "customerrating", "type" : "long", "default" : 0 },{"name":"visibility","type":"long","default":0} ] } ], "default" : 0 }]}'
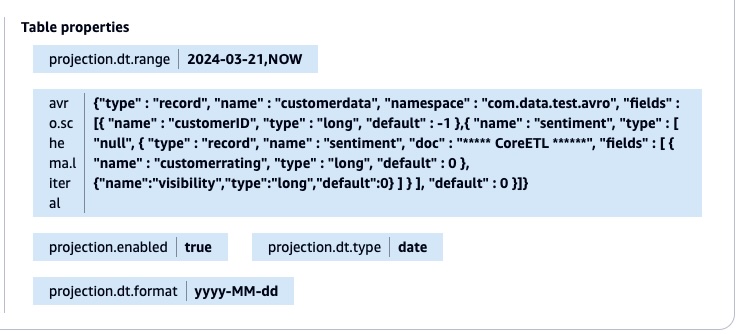
table_input['Parameters']['projection.dt.type'] = 'date'
table_input['Parameters']['projection.dt.format'] = 'yyyy-MM-dd'
table_input['Parameters']['projection.enabled'] = 'true'
table_input['Parameters']['projection.dt.range'] = '2024-03-21,NOW'

response = client.update_table(
    DatabaseName=db,
    TableInput=table_input
)

This Python script demonstrates how to update an AWS Glue table to accommodate schema evolution and enable partition projection:

  1. It uses Boto3 to interact with AWS Glue API.
  2. Retrieves the current table definition from the AWS Glue Data Catalog.
  3. Updates the 'sentiment' column structure to include new fields.
  4. Modifies the Avro schema literal to reflect the updated structure.
  5. Adds partition projection parameters for the partition column dt
    table_input['Parameters']['projection.dt.type'] = 'date'
    table_input['Parameters']['projection.dt.format'] = 'yyyy-MM-dd'
    table_input['Parameters']['projection.enabled'] = 'true'
    table_input['Parameters']['projection.dt.range'] = '2024-03-21,NOW'

    1. Sets projection type to 'date'
    2. Defines date format as 'yyyy-MM-dd'
    3. Enables partition projection
    4. Sets date range from '2024-03-21' to 'NOW'
projection.date.type='date' --> Data type of the partition column
projection.date.format='yyyy-MM-dd' -> Data format of the partition column
projection.enabled='true' -> Enable the partition projection
projection.date.range='2024-04-26,NOW'. -> The range of the partition column
  1. Run the script using the following command:
python3 UpdateTableAPI.py

The script applies all changes back to the AWS Glue table using the UpdateTable API call. The following screenshot shows the table property with the new Avro schema literal and the partition projection.

After the table property is updated, you don’t need to add the partitions manually using the MSCK REPAIR TABLE or ALTER TABLE command. You can validate the result by running the query in the Athena console.

SELECT * FROM "blogpostdatabase"." blogpost_table_test " limit 10;

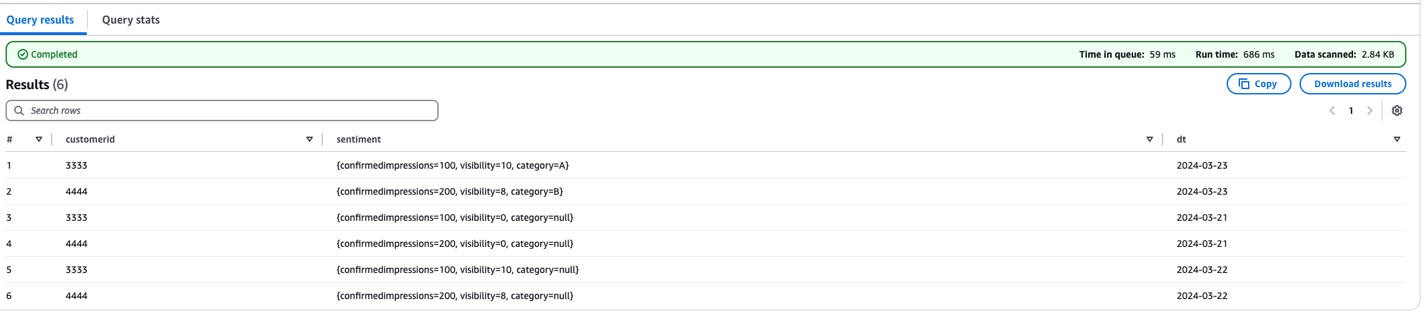
The following screenshot shows the query results.

This schema evolution strategy efficiently handles new data fields across different time periods. Consider the 'visibility' field introduced on 2024-03-22. For data from 2024-03-21, where this field doesn’t exist, the solution automatically returns a default value of 0. This approach makes the query consistent across all partitions, regardless of their schema version.

Here’s the Avro schema configuration that enables this flexibility:

{
  "type": "record",
  "name": "customerdata",
  "fields": [
    {"name": "customerID", "type": "long", "default": -1},
    {"name": "sentiment", "type": ["null", {
      "type": "record",
      "name": "sentiment",
      "fields": [
        {"name": "customerrating", "type": "long", "default": 0},
        {"name": "visibility", "type": "long", "default": 0}
      ]
    }], "default": null}
  ]
}

Using this configuration, you can run queries across all partitions without modifications, maintain backward compatibility without data migration, and support gradual schema evolution without breaking existing queries.

Building on the schema evolution example, we now introduce a third enhancement to the sensor data structure. This new iteration adds a text-based classification capability through a 'category' field (string type) to the sentiment structure. This represents a real-world scenario where sensors receive updates that add new classification capabilities, requiring the data pipeline to handle both numeric measurements and textual categorizations.

The following is the enhanced schema structure:

{
  "fields": [
    {
      "Name": "customerid",
      "Type": "bigint"
    },
    {
      "Name": "sentiment",
      "Type": "struct<confirmedImpressions:bigint,visibility:bigint,category:string>"
    },
    {
      "Name": "dt",
      "Type": "string"
    }
  ]
}

This evolution demonstrates how the solution flexibly accommodates different data types as sensor capabilities expand while maintaining compatibility with historical data.

To implement this latest schema evolution for the new partition (dt=2024-03-23), we update the table definition to include the ‘category’ field. Here’s the modified UpdateTableAPI.py script that handles this change:

  1. Update the file UpdateTableAPI.py:
import boto3

client = boto3.client('glue')

db = 'blogpostdatabase'
tb = 'blogpost_table_test'

response = client.get_table(
DatabaseName=db,
Name=tb
)

print(response)


table_input = {
'Description': response['Table'].get('Description', ''),
'Name': response['Table'].get('Name', ''),
'Owner': response['Table'].get('Owner', ''),
'Parameters': response['Table'].get('Parameters', {}),
'PartitionKeys': response['Table'].get('PartitionKeys', []),
'Retention': response['Table'].get('Retention'),
'StorageDescriptor': response['Table'].get('StorageDescriptor', {}),
'TableType': response['Table'].get('TableType', ''),
'ViewExpandedText': response['Table'].get('ViewExpandedText', ''),
'ViewOriginalText': response['Table'].get('ViewOriginalText', '')

}

for col in table_input['StorageDescriptor']['Columns']:
if col['Name'] == 'sentiment':
col['Type'] = 'struct<confirmedImpressions:bigint,visibility:bigint,category:string>'


table_input['StorageDescriptor']['SerdeInfo']['Parameters']['avro.schema.literal'] = '{"type" : "record", "name" : "customerdata", "namespace" : "com.data.test.avro", "fields" : [{ "name" : "customerID", "type" : "long", "default" : -1 },{ "name" : "sentiment", "type" : [ "null", { "type" : "record", "name" : "sentiment", "doc" : "***** CoreETL ******", "fields" : [ { "name" : "customerrating", "type" : "long", "default" : 0 },{"name":"visibility","type":"long","default":0},{"name":"category","type":"string","default":"null"} ] } ], "default" : 0 }]}'
table_input['Parameters']['avro.schema.literal'] = '{"type" : "record", "name" : "customerdata", "namespace" : "com.data.test.avro", "fields" : [{ "name" : "customerID", "type" : "long", "default" : -1 },{ "name" : "sentiment", "type" : [ "null", { "type" : "record", "name" : "sentiment", "doc" : "***** CoreETL ******", "fields" : [ { "name" : "customerrating", "type" : "long", "default" : 0 },{"name":"visibility","type":"long","default":0},{"name":"category","type":"string","default":"null"} ] } ], "default" : 0 }]}'
table_input['Parameters']['projection.dt.type'] = 'date'
table_input['Parameters']['projection.dt.format'] = 'yyyy-MM-dd'
table_input['Parameters']['projection.enabled'] = 'true'
table_input['Parameters']['projection.dt.range'] = '2024-03-21,NOW'

response = client.update_table(
DatabaseName=db,
TableInput=table_input
)
  1. Verify the changes by running the following query:
SELECT * FROM "blogpostdatabase"."blogpost_table_test" LIMIT 10;

The following screenshot shows the query results.

There are three key changes in this update:

  1. Added 'category' field (string type) to the sentiment structure
  2. Set default value "null" for the category field
  3. Maintained existing partition projection settings

To support that latest sensor data enhancement, we updated the table definition to include a new text-based 'category' field in the sentiment structure. The modified UpdateTableAPI script adds this capability while maintaining the established schema evolution patterns. It achieves this by updating both the AWS Glue table schema and the Avro schema literal, setting a default value of "null" for the category field.

This provides backward compatibility. Older data (before 2024-03-23) shows "null" for the category field, and new data includes actual category values. The script maintains the partition projection settings, enabling efficient querying across all time periods.

You can verify this update by querying the table in Athena, which will now show the complete data structure, including numeric measurements (customerrating, visibility) and text categorization (category) across all partitions. This enhancement demonstrates how the solution can seamlessly incorporate different data types while preserving historical data integrity and query performance.

Cleanup

To avoid incurring future costs, delete your Amazon S3 data if you no longer need it.

Conclusion

By combining Avro’s schema evolution capabilities with the power of AWS Glue APIs, we’ve created a robust framework for managing diverse, evolving datasets. This approach not only simplifies data integration but also enhances the agility and effectiveness of your analytics pipeline, paving the way for more sophisticated predictive and prescriptive analytics.

This solution offers several key advantages. It’s flexible, adapting to changing data structures without disrupting existing analytics processes. It’s scalable, able to handle growing volumes of data and evolving schemas efficiently. You can automate it and reduce the manual overhead in schema management and updates. Finally, because it minimizes data movement and transformation costs, it’s cost-effective.

Related references


About the authors

Mohammad Sabeel Mohammad Sabeel is a Senior Cloud Support Engineer at Amazon Web Services (AWS) with over 14 years of experience in Information Technology (IT). As a member of the Technical Field Community (TFC) Analytics team, he is a Subject matter expert in Analytics services AWS Glue, Amazon Managed Workflows for Apache Airflow (MWAA), and Amazon Athena services. Sabeel provides expert guidance and technical support to enterprise and strategic customers, helping them optimize their data analytics solutions and overcome complex challenges. With deep subject matter expertise he enables organizations to build scalable, efficient, and cost-effective data processing pipelines.

Indira Balakrishnan Indira Balakrishnan is a Principal Solutions Architect in the Amazon Web Services (AWS) Analytics Specialist Solutions Architect (SA) Team. She helps customers build cloud-based Data and AI/ML solutions to address business challenges. With over 25 years of experience in Information Technology (IT), Indira actively contributes to the AWS Analytics Technical Field community, supporting customers across various Domains and Industries. Indira participates in Women in Engineering and Women at Amazon tech groups to encourage girls to pursue STEM path to enter careers in IT. She also volunteers in early career mentoring circles.