Post Syndicated from Mohit Mehta original https://aws.amazon.com/blogs/big-data/orchestrate-an-etl-pipeline-using-aws-glue-workflows-triggers-and-crawlers-with-custom-classifiers/
Extract, transform, and load (ETL) orchestration is a common mechanism for building big data pipelines. Orchestration for parallel ETL processing requires the use of multiple tools to perform a variety of operations. To simplify the orchestration, you can use AWS Glue workflows. This post demonstrates how to accomplish parallel ETL orchestration using AWS Glue workflows and triggers. We also demonstrate how to use custom classifiers with AWS Glue crawlers to classify fixed width data files.
AWS Glue workflows provide a visual and programmatic tool to author data pipelines by combining AWS Glue crawlers for schema discovery and AWS Glue Spark and Python shell jobs to transform the data. A workflow consists of one of more task nodes arranged as a graph. Relationships can be defined and parameters passed between task nodes to enable you to build pipelines of varying complexity. You can trigger workflows on a schedule or on-demand. You can track the progress of each node independently or the entire workflow, making it easier to troubleshoot your pipelines.
You need to define a custom classifier if you want to automatically create a table definition for data that doesn’t match AWS Glue built-in classifiers. For example, if your data originates from a mainframe system that utilizes a COBOL copybook data structure, you need to define a custom classifier when crawling the data to extract the schema. AWS Glue crawlers enable you to provide a custom classifier to classify your data. You can create a custom classifier using a Grok pattern, an XML tag, JSON, or CSV. When the crawler starts, it calls a custom classifier. If the classifier recognizes the data, it stores the classification and schema of the data in the AWS Glue Data Catalog.
Use case
For this post, we use automated clearing house (ACH) and check payments data ingestion as an example. ACH is a computer-based electronic network for processing transactions, and check payments is a negotiable transaction drawn against deposited funds, to pay the recipient a specific amount of funds on demand. Both ACH and check payments data files, which are in fixed width format, need to be ingested in the data lake incrementally over a time series. As part of the ingestion, these two data types need to be merged to get a consolidated view of all payments. ACH and check payment records are consolidated into a table that is useful for performing business analytics using Amazon Athena.
Solution overview
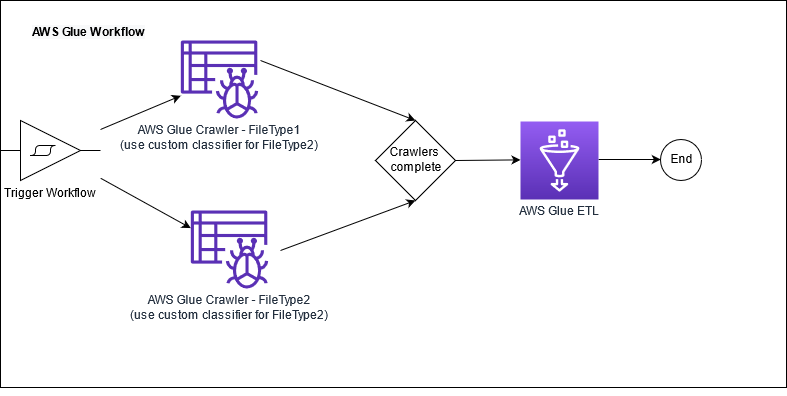
We define an AWS Glue crawler with a custom classifier for each file or data type. We use an AWS Glue workflow to orchestrate the process. The workflow triggers crawlers to run in parallel. When the crawlers are complete, the workflow starts an AWS Glue ETL job to process the input data files. The workflow tracks the completion of the ETL job that performs the data transformation and updates the table metadata in AWS Glue Data Catalog.
The following diagram illustrates a typical workflow for ETL workloads.
This post is accompanied by an AWS CloudFormation template that creates resources described by the AWS Glue workflow architecture. AWS CloudFormation enables you to model, provision, and manage AWS resources by treating infrastructure as code.
The CloudFormation template creates the following resources:
- An AWS Glue workflow trigger that is started manually. The trigger starts two crawlers simultaneously for processing the data file related to ACH payments and check payments, respectively.
- Custom classifiers for parsing incoming fixed width files containing ACH and check data.
- AWS Glue crawlers:
- A crawler to classify ACH payments in the RAW database. This crawler uses the custom classifier defined for ACH payments raw data. The crawler creates a table named ACH in the Data Catalog’s
RAWdatabase. - A crawler to classify check payments. This crawler uses the custom classifier defined for check payments raw data. This crawler creates a table named
Checkin the Data Catalog’s RAW database.
- A crawler to classify ACH payments in the RAW database. This crawler uses the custom classifier defined for ACH payments raw data. The crawler creates a table named ACH in the Data Catalog’s
- An AWS Glue ETL job that runs when both crawlers are complete. The ETL job reads the ACH and check tables, performs transformations using PySpark DataFrames, writes the output to a target Amazon Simple Storage Service (Amazon S3) location, and updates the Data Catalog for the
processedpaymenttable with new hourly partition. - S3 buckets designated as
RawDataBucket,ProcessedBucket, andETLBucket.RawDataBucketholds the raw payment data as it is received from the source system, andProcessedBucketholds the output after AWS Glue transformations have been applied. This data is suitable for consumption by end-users via Athena.ETLBucketcontains the AWS Glue ETL code that is used for processing the data as part of the workflow.
Create resources with AWS CloudFormation
To create your resources with the CloudFormation template, complete the following steps:
- Choose Launch Stack:

- Choose Next.

- Choose Next again.
- On the Review page, select I acknowledge that AWS CloudFormation might create IAM resources.
- Choose Create stack.


Examine custom classifiers for fixed width files
Let’s review the definition of the custom classifier.
- On the AWS Glue console, choose Crawlers.
- Choose the crawler
ach-crawler. - Choose the
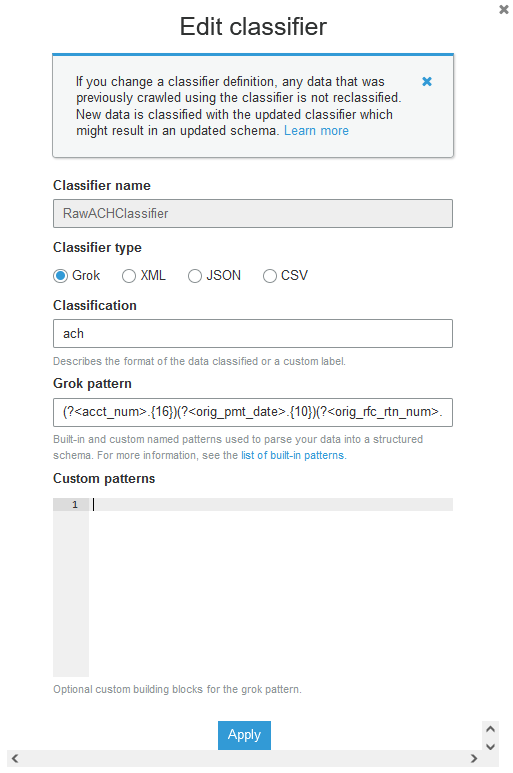
RawACHClassifierclassifier and review the Grok pattern.
This pattern assumes that the first 16 characters in the fixed width file are reserved for acct_num, and the next 10 characters are reserved for orig_pmt_date. When a crawler finds a classifier that matches the data, the classification string and schema are used in the definition of tables that are written to your Data Catalog.
Run the workflow
To run your workflow, complete the following steps:
- On the AWS Glue console, select the workflow that the CloudFormation template created.
- On the Actions menu, select Run.
This starts the workflow.
- When the workflow is complete, on the History tab, choose View run details.
You can review a graph depicting the workflow.
Examine the tables
In the Databases section under AWS Glue console, you can find a database named glue-database-raw, which contains two tables named ach and check. These tables are created by the respective AWS Glue crawler using the custom classification pattern specified.
Query processed data
To query your data, complete the following steps:
- On the AWS Glue console, select the database glue-database-processed.
- On the Action menu, choose View data.
The Athena console opens. If this is your first time using Athena, you need to set up the S3 bucket to store the query result.
- In the query editor, run the following query:
You can see the count of payment type in each account displayed from the processedpayment table.

Clean up
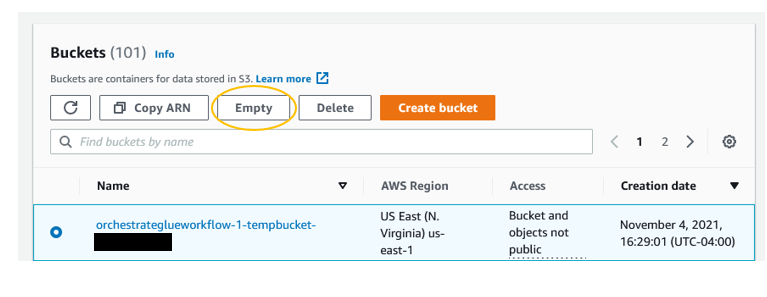
To avoid incurring ongoing charges, clean up your infrastructure by deleting the CloudFormation stack. However, you first need to empty your S3 buckets.
- On the Amazon S3 console, select each bucket created by the CloudFormation stack.
- Choose Empty.

- On the AWS CloudFormation console, select the stack you created.
- Choose Delete.
Conclusion
In this post we explored how AWS Glue Workflows enable data engineers to build and orchestrate a data pipeline to discover, classify and process standard and non-standard data files. We also discussed how to leverage AWS Glue Workflow along with AWS Glue Custom Classifier, AWS Glue Crawlers and AWS Glue ETL capabilities to ingest from multiple sources into a data lake. We also walked through how you can use Amazon Athena to perform interactive SQL analysis.
For more details on using AWS Glue Workflows, see Performing Complex ETL Activities Using Blueprints and Workflows in AWS Glue.
For more information on AWS Glue ETL jobs, see Build a serverless event-driven workflow with AWS Glue.
For More information on using Athena, see Getting Started with Amazon Athena.
Appendix: Create a regular expression pattern for a custom classifier
Grok is a tool that you can use to parse textual data given a matching pattern. A Grok pattern is a named set of regular expressions (regex) that are used to match data one line at a time. AWS Glue uses Grok patterns to infer the schema of your data. When a Grok pattern matches your data, AWS Glue uses the pattern to determine the structure of your data and map it into fields. AWS Glue provides many built-in patterns, or you can define your own. When defining you own pattern, it’s a best practice to test the regular expression prior to setting up the AWS Glue classifier.
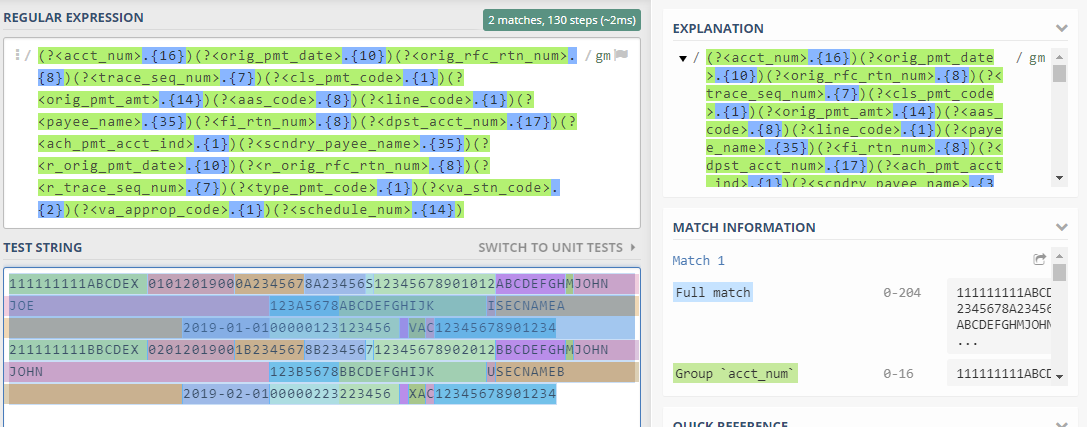
One way to do that is to build and test your regular expression by using https://regex101.com/#PYTHON. For this, you need to take a small sample from your input data. You can visualize the output of your regular expression by completing the following steps:
- Copy the following rows from the source file to the
test stringsection. - Construct the regex pattern based on the specifications. For example, the first 16 characters represent
acct_numfollowed byorig_pmt_dateof 10 characters. You should end up with a pattern as follows:
After you validate your pattern, you can create a custom classifier and attach it to an AWS Glue crawler.
About the Authors
 Mohit Mehta is a leader in the AWS Professional Services Organization with expertise in AI/ML and big data technologies. Prior to joining AWS, Mohit worked as a digital transformation executive at a Fortune 100 financial services organization. Mohit holds an M.S in Computer Science, all AWS certifications, an MBA from College of William and Mary, and a GMP from Michigan Ross School of Business.
 Meenakshi Ponn Shankaran is Senior Big Data Consultant in the AWS Professional Services Organization with expertise in big data. Meenakshi is a SME on working with big data use cases at scale and has experience in architecting and optimizing workloads processing petabyte-scale data lakes. When he is not solving big data problems, he likes to coach the game of cricket.


