All posts by Omama Khurshid

Building AI shopping agent using Amazon Bedrock AgentCore Runtime and Amazon OpenSearch Service

Post Syndicated from Omama Khurshid original https://aws.amazon.com/blogs/big-data/building-ai-shopping-agent-using-amazon-bedrock-agentcore-runtime-and-amazon-opensearch-service/

In this post, we explore how to build an online shopping AI agent. We focus on its architecture and implementation with Amazon OpenSearch Service, Amazon Bedrock AgentCore, and Strands Agents. Amazon Bedrock AgentCore is an agentic platform for deploying and operating those agents and tools securely at scale without managing infrastructure. AgentCore Runtime is the secure, serverless runtime that hosts your Strands Agents and tools as containerized applications. Strands Agents is an open source SDK for building AI agents. In this SDK, an agent is defined by a model, tools, and a prompt. Tools are callable functions that allow agents to perform actions beyond text generation, such as API calls, database queries, and file operations. The framework lets the model autonomously plan steps and invoke tools to complete tasks.

Today’s AI shopping assistants understand natural language, context, and shopping intent, creating a more human-like interaction. These assistants handle complex shopping requirements, such as “Find me a formal dress under $200 that’s appropriate for a summer wedding.” They maintain conversation history, process follow-up questions naturally, and provide personalized recommendations based on user preferences and past interactions. Customers can use visual search to upload images of items that they want, and the AI finds similar products across multiple retailers, matching styles and patterns. The goal is to provide instant, relevant, and personalized assistance at scale, creating a more efficient shopping journey for consumers worldwide.

AI agents combined with Retrieval Augmented Generation (RAG) on Amazon OpenSearch Service represent an evolution in conversational search. This integration builds AI agents on enriched catalogs, supporting context-aware and autonomous search experiences while maintaining accuracy and relevance through grounded responses.

Solution overview

The following diagram illustrates the solution architecture of an AI-powered online shopping agent built using Strands Agents, Amazon Bedrock AgentCore Runtime, and Amazon OpenSearch Service. For simplicity, the diagram doesn’t show authentication and authorization. In a production setup, secure access to the backend by using mechanisms such as Amazon API Gateway, AWS Identity and Access Management (IAM) roles, or OAuth-based authentication.
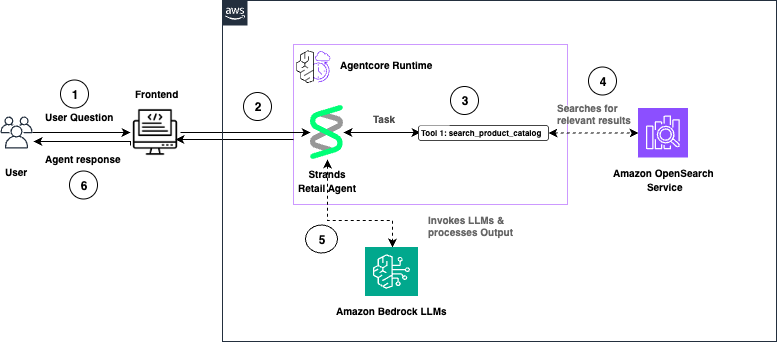
Architecture diagram showing an AI shopping agent: a user prompt flows from the front end to AgentCore Runtime, which routes the request to a Strands Retail Agent that calls a search tool against Amazon OpenSearch Service and an Amazon Bedrock LLM, then returns a natural-language response to the user.

The following is a walkthrough of the reference architecture:

  1. The user submits a question through the front-end application. AgentCore Runtime receives the request and routes it to the Strands Retail Agent.
  2. The Strands Agent processes the task and invokes the search_product_catalog tool.
  3. OpenSearch Service performs semantic search and returns relevant product results.
  4. The Strands Agent invokes Amazon Bedrock large language models (LLMs) to generate a natural language response.
  5. The agent response is returned to the user through the front end.

Walkthrough

The following section walks you through how to build an online shopping AI agent.

Prerequisites

To implement this solution, you need an AWS account. You also need an OpenSearch Service domain with OpenSearch version 2.13 or later. You can use an existing domain or create a new domain.

To use the vector search capabilities of OpenSearch Service with Strands Agents on AgentCore, you use ingest pipelines. These ingestion pipelines apply built-in processors to pre-process your documents before you index them in OpenSearch Service.

You use the text_embedding processor, which relies on the ML Commons plugin and a registered embedding model—Amazon Nova Multimodal Embeddings on Amazon Bedrock. OpenSearch Service uses the ML Commons plugin to generate vector embedding for your data and uses the same model to convert incoming queries into vectors. This supports semantic search across your indexed content.

You extend your semantic search backend by adding an agent built with Strands Agents and deployed on Amazon Bedrock AgentCore.

Code samples provided in this post are tested in Python 3.11. You only need to install Python 3.11 in your environment to execute the python scripts. You also need Node.js 18 or later installed to use the AgentCore CLI. The provided code scripts will deploy into your AWS account so make sure your terminal has access to necessary AWS credentials.

Install AgentCore CLI

Install the AgentCore CLI globally using npm:

npm install -g @aws/agentcore

Python Dependencies

You also need to create a requirements.txt file with following dependencies in your workspace to deploy the agents.

boto3
uv
opensearch-py
requests-aws4auth
strands-agents
strands-agents-tools
bedrock-agentcore

Run pip install -r requirements.txt in your terminal to install the required dependencies. To avoid conflicts with other dependencies in your system, you can use a virtual environment.

Now, walk through each step.

Step 1: Configure IAM permissions

Complete the following steps to register the Nova Multimodal Embeddings model with OpenSearch Service and verify that your OpenSearch Service domain has permission to invoke the Amazon Bedrock API.

  1. Go to the IAM console and create a new role with a custom trust policy. Add the following trust policy.
    {
      "Version": "2012-10-17",
      "Statement": [
        {
          "Sid": "Statement1",
          "Effect": "Allow",
          "Principal": {
            "Service": "opensearchservice.amazonaws.com"
          },
          "Action": "sts:AssumeRole"
        }
      ]
    }

  2. Skip adding a permission policy.
  3. Give your role a name and create it. For this post, we use OpenSearchBedrockEmbeddingRole as the role name. OpenSearch Service uses this role to invoke the Nova Multimodal Embeddings model on Amazon Bedrock.
  4. On the Permissions tab, attach an inline policy with the following permissions. For this post, we name this policy OpenSearchBedrockEmbeddingPolicy.
    {
      "Version": "2012-10-17",
      "Statement": [
        {
          "Sid": "Statement1",
          "Effect": "Allow",
          "Action": [
            "bedrock:InvokeAgent",
            "bedrock:InvokeModel"
          ],
          "Resource": [
            "arn:aws:bedrock:us-east-1::foundation-model/*"
          ]
        }
      ]
    }

  5. Create a passRole policy with the following JSON document and assign it to the IAM role that creates the ML connector. This lets the principal running the Python code pass the OpenSearchBedrockEmbeddingRole to OpenSearch. Replace <your-aws-account-id> with your own AWS account ID.
    {
      "Version": "2012-10-17",
      "Statement": [
        {
          "Effect": "Allow",
          "Action": "iam:PassRole",
          "Resource": "arn:aws:iam::\$<your-aws-account-id>:role/OpenSearchBedrockEmbeddingRole"
        }
      ]
    }

  6. By using fine-grained access control (FGAC), map the IAM role as a backend role for the ml_full_access role in the OpenSearch Dashboards Security plugin. This mapping lets the user create ML connectors:
    1. Log in to OpenSearch Dashboards and open the Security page from the navigation menu.
    2. Choose Roles and select ml_full_access.
    3. Choose Mapped Users and Manage Mapping.
    4. Under Backend roles, add the ARN of the IAM role that you created in the previous steps.
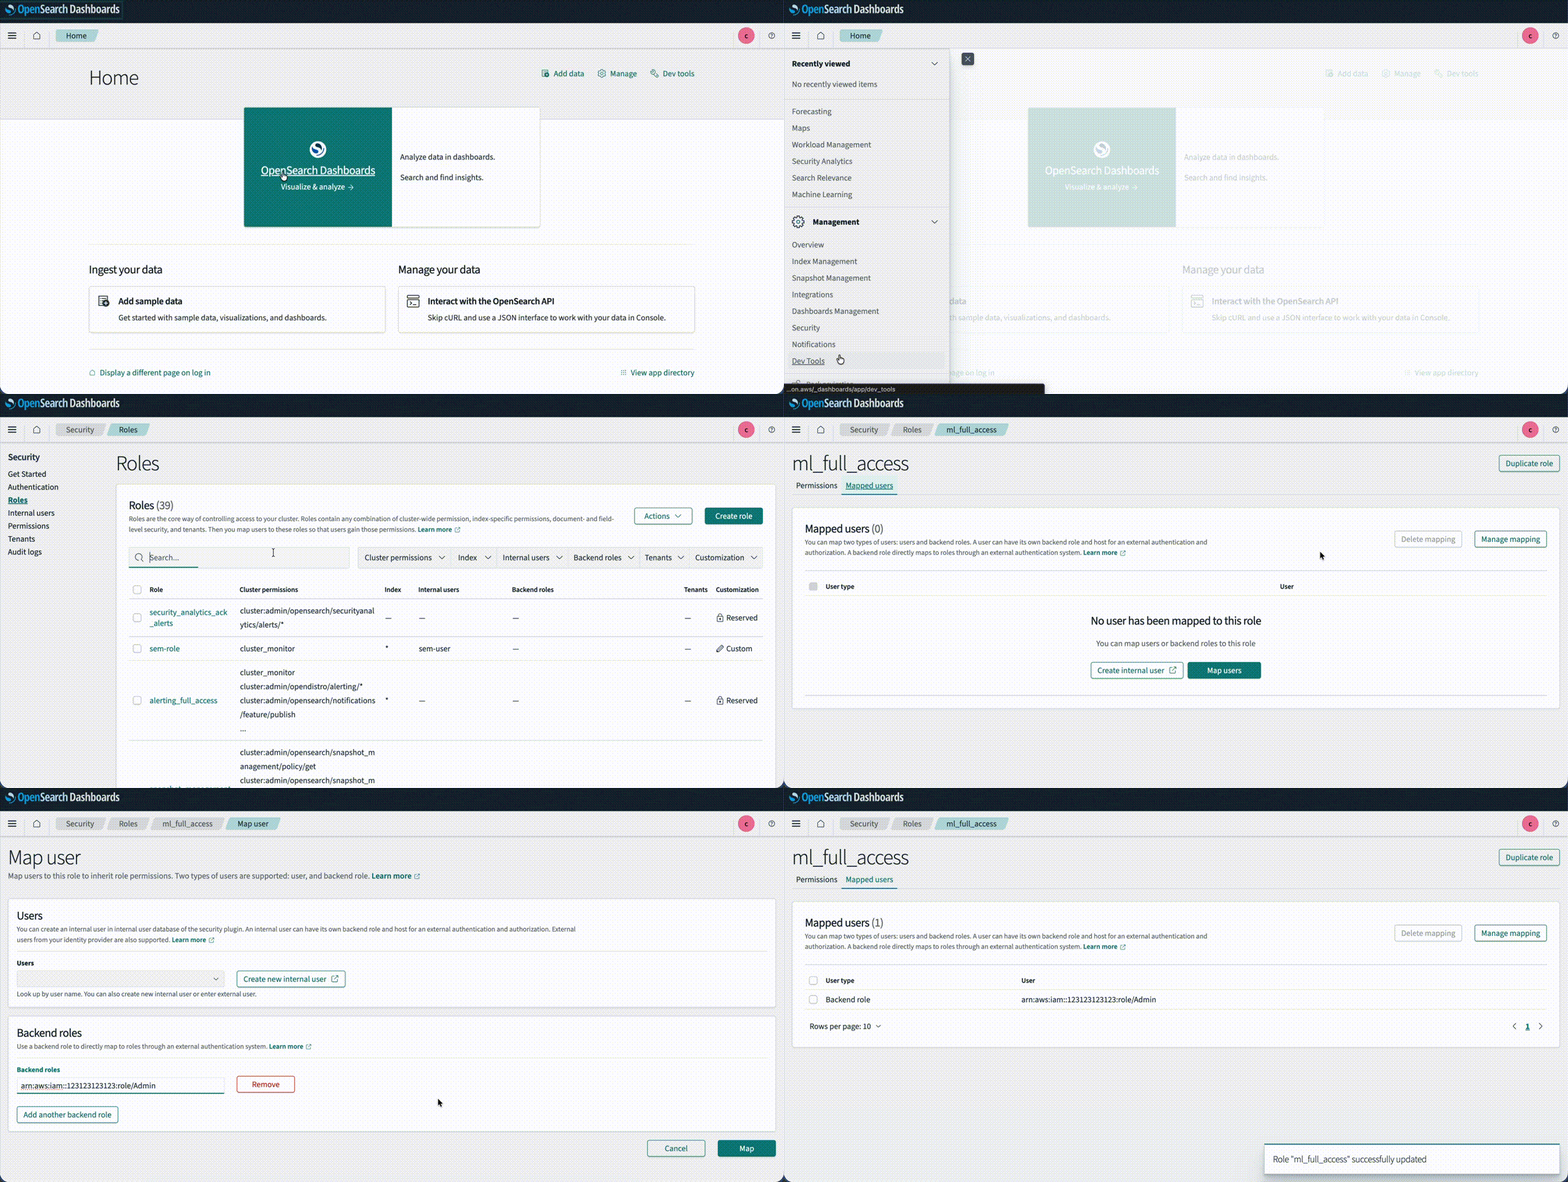
Animated demo of OpenSearch Dashboards Security plugin showing the ml_full_access role with the Mapped Users tab open and an IAM role being added as a backend role.

Step 2: Connect to the model by using OpenSearch ML Connectors

In this section, you create an ML connector to link OpenSearch Service with the Bedrock Nova Multimodal Embeddings model. You then register and deploy the model so you can use it for neural search queries.

  1. Create a file named create-connector.py with the following code. Replace <your hostname>, <your region>, and <your account id> placeholders within the code.
import boto3
import requests
from requests_aws4auth import AWS4Auth
host = '<your hostname>'##CHANGE THIS
region = '<your region>' ##CHANGE THIS
account_id = '<your account id>' ##CHANGE THIS
service = 'es'
credentials = boto3.Session().get_credentials()
awsauth = AWS4Auth(credentials.access_key, credentials.secret_key, region, service, session_token=credentials.token)
path = '/_plugins/_ml/connectors/_create'
url = host + path
payload = {
"name": "Amazon Bedrock Nova multimodal model - text embedding",
"description": "Test connector for Amazon Bedrock Nova multimodal model - text embedding",
"version": 1,
"protocol": "aws_sigv4",
"credential": {
"roleArn": f"arn:aws:iam::{account_id}:role/OpenSearchBedrockEmbeddingRole"
},
"parameters": {
"region": region,
"service_name": "bedrock",
"model": "amazon.nova-2-multimodal-embeddings-v1:0",
"input_docs_processed_step_size": 1,
"dimensions": 1024,
"embeddingTypes": [
"float"
],
"truncationMode": "NONE"
},
"actions": [
{
"action_type": "predict",
"method": "POST",
"headers": {
"content-type": "application/json",
"x-amz-content-sha256": "required"
},
"url": "https://bedrock-runtime.${parameters.region}.amazonaws.com/model/${parameters.model}/invoke",
"request_body": "{\\n \\"taskType\\": \\"SINGLE_EMBEDDING\\",\\n \\"singleEmbeddingParams\\": {\\n \\"embeddingPurpose\\": \\"GENERIC_INDEX\\",\\n \\"embeddingDimension\\": ${parameters.dimensions},\\n \\"text\\": {\\n \\"truncationMode\\": \\"${parameters.truncationMode}\\",\\n \\"value\\": \\"${parameters.inputText}\\"\\n }\\n }\\n}",
"pre_process_function": "connector.pre_process.bedrock.nova.text_embedding",
"post_process_function": "connector.post_process.bedrock.nova.embedding"
}
]
}
headers = {"Content-Type": "application/json"}
r = requests.post(url, auth=awsauth, json=payload, headers=headers, timeout=15)
print(r.status_code)
print(r.text)
  1. Run python create-connector.py in your terminal by using the IAM role with ml_full_access and passRole permissions created in the previous step. This script creates a connector between OpenSearch Service and the Bedrock Nova Multimodal Embeddings model.
  2. The program responds with connector_id. Take a note of it. Then, navigate to OpenSearch Dashboards and open Dev Tools. Create a model group against which to register this model in the OpenSearch Service domain.
POST /_plugins/_ml/model_groups/_register
{
  "name": "agent-conversational-search-model-group",
  "description": "A model group for bedrock Nova embedding models used for conversational search"
}
  1. Register a model by using connector_id and model_group_id.
POST /_plugins/_ml/models/_register
{
  "name": "nova-2-multimodal-embedding-v1",
  "function_name": "remote",
  "model_group_id": "<model group id>",
  "description": "Nova 2 Multimodal Embeddings Model",
  "connector_id": "<connector id>",
  "interface": {}
}
  1. Run the following API call to deploy the model. Use the registered model ID from the previous step.
POST /_plugins/_ml/models/<registered-model-id>/_deploy

Step 3: Create an ingest pipeline for data indexing

Use the following code to create an ingest pipeline for data indexing. The pipeline establishes a connection to the embedding model, retrieves the embedding for the title field, and stores it in the OpenSearch index.

PUT /_ingest/pipeline/nova_multimodal_embedding
{
  "description": "Text embedding pipeline using nova_multimodal_embedding",
  "processors": [
    {
      "text_embedding": {
        "model_id": "<deployed model id>",
        "field_map": {
          "title": "title_vector"
        }
      }
    }
  ]
}

Step 4: Create an index for storing data

Create an index named product for storing data by using Dev Tools. This index stores raw text and 1024-dimensional embeddings of the title field, and uses the ingest pipeline you created in the previous step.

PUT /product
{
  "settings": {
    "index": {
      "default_pipeline": "nova_multimodal_embedding",
      "knn": true
    }
  },
  "mappings": {
    "properties": {
      "title": {
        "type": "text",
        "analyzer": "standard"
      },
      "title_vector": {
        "type": "knn_vector",
        "dimension": 1024,
        "method": {
          "name": "hnsw",
          "space_type": "cosinesimil",
          "engine": "lucene"
        }
      },
      "price": {
        "type": "float"
      },
      "description": {
        "type": "text"
      },
      "category": {
        "type": "keyword"
      },
      "image_url": {
        "type": "text"
      },
      "rating": {
        "properties": {
          "rate": {
            "type": "float"
          },
          "count": {
            "type": "integer"
          }
        }
      }
    }
  }
}

Step 5: Ingest sample data

Use the following code to ingest the sample product data in Dev Tools.

POST /_bulk
{"index": {"_index": "product", "_id": "2"}}
{"id":2,"title":"Mens Casual Premium Slim Fit T-Shirts","price":22.3,"description":"Slim-fitting style, contrast raglan long sleeve, three-button henley placket, light weight & soft fabric for breathable and comfortable wearing.","category":"men's clothing","image":"https://fakestoreapi.com/img/71-3HjGNDUL._AC_SY879._SX._UX._SY._UY_.jpg","rating":{"rate":4.1,"count":259}}
{"index": {"_index": "product", "_id": "3"}}
{"id":3,"title":"Mens Cotton Jacket","price":55.99,"description":"great outerwear jackets for Spring/Autumn/Winter, suitable for many occasions, such as working, hiking, camping, mountain/rock climbing, cycling, traveling or other outdoors.","category":"men's clothing","image":"https://fakestoreapi.com/img/71li-ujtlUL._AC_UX679_.jpg","rating":{"rate":4.7,"count":500}}
{"index": {"_index": "product", "_id": "4"}}
{"id":4,"title":"Mens Casual Slim Fit","price":15.99,"description":"The color could be slightly different between on the screen and in practice.","category":"men's clothing","image":"https://fakestoreapi.com/img/71YXzeOuslL._AC_UY879_.jpg","rating":{"rate":2.1,"count":430}}
{"index": {"_index": "product", "_id": "5"}}
{"id":5,"title":"John Hardy Women's Legends Naga Gold & Silver Dragon Station Chain Bracelet","price":695,"description":"From our Legends Collection, the Naga was inspired by the mythical water dragon that protects the ocean's pearl.","category":"jewelery","image":"https://fakestoreapi.com/img/71pWzhdJNwL._AC_UL640_QL65_ML3_.jpg","rating":{"rate":4.6,"count":400}}

Step 6: Query the index

Run the following API call to test semantic search by using the Nova Multimodal Embeddings model.

GET /product/_search
{
  "_source": false,
  "fields": [
    "title",
    "price",
    "category",
    "image"
  ],
  "size": 3,
  "query": {
    "neural": {
      "title_vector": {
        "query_text": "jacket",
        "model_id": "<deployed model id>",
        "k": 5
      }
    }
  }
}

The output of the preceding query should look like the following.

{
  ...
  "hits": {
    "total": {
      "value": 4,
      "relation": "eq"
    },
    "max_score": 0.8333229,
    "hits": [
      {
        "_index": "product",
        "_id": "3",
        "_score": 0.8333229,
        "fields": {
          "image": [
            "https://fakestoreapi.com/img/71li-ujtlUL._AC_UX679_.jpg"
          ],
          "title": [
            "Mens Cotton Jacket"
          ],
          "category": [
            "men's clothing"
          ],
          "price": [
            55.99
          ]
        }
      }
      ...
    ]
  }
}

Step 7: Create an agent with Strands and Bedrock AgentCore Runtime

Now, create the Strands Agent that uses Anthropic Claude Sonnet 4.6 on Amazon Bedrock to search products from the OpenSearch Service index. To do so:

  • Import the Runtime app with from bedrock_agentcore.runtime import BedrockAgentCoreApp.
  • Initialize the app in your code with app = BedrockAgentCoreApp().
  • Create the OpenSearch Service connection and search query with the @tool decorator.
  • Decorate the invocation function with the @app.entrypoint decorator.
  • Let AgentCore Runtime control the running of the agent with app.run().

Now, complete the following steps:

  1. Make sure that you have installed the necessary dependencies from the Prerequisites section of this post.
  2. Create and save a file named search_agent.py with the following code. Replace <your hostname>, <your region>, and <your account id> placeholders within the code.
    from strands import Agent, tool
    import argparse
    import json
    from bedrock_agentcore.runtime import BedrockAgentCoreApp
    from strands.models import BedrockModel
    import boto3
    from opensearchpy import OpenSearch, RequestsHttpConnection
    from requests_aws4auth import AWS4Auth
    app = BedrockAgentCoreApp()
    @tool
    def search_products(query: str, size: int = 5):
    try:
    # OpenSearch configuration
    host = '' ## CHANGE THIS, DOMAIN ENDPOINT WITHOUT HTTPS!
    region = '' ##CHANGE THIS
    model_id= '' ##CHANGE THIS with your deployed model id in OpenSearch
    service = 'es'
    credentials = boto3.Session().get_credentials()
    awsauth = AWS4Auth(credentials.access_key, credentials.secret_key, region, service, session_token=credentials.token)
    # Create OpenSearch client
    client = OpenSearch(
    hosts=[{'host': host, 'port': 443}],
    http_auth=awsauth,
    use_ssl=True,
    verify_certs=True,
    connection_class=RequestsHttpConnection
    )
    """Search products in OpenSearch using neural search"""
    search_body = {
    "_source": False,
    "fields": ["title", "price", "category", "image"],
    "size": size,
    "query": {
    "neural": {
    "title_vector": {
    "query_text": query,
    "model_id": model_id,
    "k": 3
    }
    }
    }
    }
    response = client.search(
    body=search_body,
    index="product"
    )
    products = []
    for hit in response['hits']['hits']:
    fields = hit.get('fields', {})
    product = {
    'title': fields.get('title', [''])[0] if fields.get('title') else '',
    'price': fields.get('price', [''])[0] if fields.get('price') else '',
    'category': fields.get('category', [''])[0] if fields.get('category') else '',
    'image': fields.get('image', [''])[0] if fields.get('image') else ''
    }
    products.append(product)
    return f"Found {len(products)} products: {json.dumps(products, indent=2)}"
    except Exception as e:
    return f"Search error: {str(e)}"
    model_id = "global.anthropic.claude-haiku-4-5-20251001-v1:0"
    model = BedrockModel(
    model_id=model_id,
    )
    agent = Agent(
    model=model,
    tools=[search_products],
    system_prompt="You're a helpful assistant. You can do product search, and tell the product details."
    )
    @app.entrypoint
    def strands_agent_bedrock(payload):
    """
    Invoke the agent with a payload
    """
    user_input = payload.get("prompt")
    print("User input:", user_input)
    response = agent(user_input)
    return response.message['content'][0]['text']
    if __name__ == "__main__":
    #strands_agent_bedrock({"prompt": "Search jacket"}) ##UNCOMMENT THIS FOR TESTING
    #app.run() ##UNCOMMENT THIS FOR DEPLOYMENT, MAKE SURE THE ABOVE LINE IS COMMENTED WHEN YOU ARE DEPLOYING TO AGENTCORE

    This deploys your agent locally for testing purposes.

  3. Navigate to the IAM console and add the AmazonBedrockLimitedAccess permission policy to the principal running the code.
  4. Navigate to OpenSearch Dashboards and, from the left menu, choose Security plugin, then choose Roles.
  5. Choose Create Role.
  6. Name the role agentcore-permissions.
  7. Under cluster permissions, add cluster:admin/opensearch/ml/models/get and cluster:admin/opensearch/ml/predict.
  8. Under index permissions, enter product* as the index pattern. Add search and get permissions.
  9. Create the role.
  10. Choose the role you created, switch to the Mapped Users tab, choose Manage mapping, and add the role that you use for running the Python code as a backend role.
  11. Uncomment the line strands_agent_bedrock({"prompt": "Search jacket"}) and make sure the app.run() line is commented in the code.
  12. Run python search_agent.py in your terminal to start the shopping agent. The output should look similar to the following.
    "Here are the jacket search results:\n\n1. **Mens Cotton Jacket** - $55.99\n2. **Mens Casual Slim Fit** - $15.99\n3. **Mens Casual Premium Slim Fit T-Shirts** - $22.30\n4. **John Hardy Women's Legends Naga Gold & Silver Dragon Station Chain Bracelet** - $695.00\n\nThe most relevant jacket option is the **Mens Cotton Jacket** at $55.99. Would you like to know more about any of these products?

  13. Comment strands_agent_bedrock({"prompt": "Search jacket"}) and uncomment the app.run() line in the code before going into the next step.

Step 8: Configure and launch your agent to Bedrock AgentCore Runtime

The AgentCore CLI is a command-line tool provided by AWS that simplifies deployment of agents to Amazon Bedrock AgentCore Runtime. When you run the CLI deployment command, it automates the entire deployment workflow: it creates the necessary IAM execution role with proper permissions, packages your Python application code along with its dependencies, uses AWS CodeBuild to build an optimized Docker container image, pushes that container image to Amazon Elastic Container Registry (ECR), and finally provisions the AgentCore Runtime environment that hosts your containerized agent. This eliminates the need for manual Dockerfile creation, container builds, or infrastructure management.

  1. Before you start this step, make sure you have gone through section 7 and installed the AgentCore CLI and Python dependencies listed in the Prerequisites section.
  2. Create a policy named AgentCoreAccessPolicy with the following permissions and attach it to the role running the code. Replace <ACCOUNT_ID> and <REGION> placeholders.
{
  "Version": "2012-10-17",
  "Statement": [
    {
      "Sid": "BedrockAgentCoreServiceAccess",
      "Effect": "Allow",
      "Action": [
        "bedrock-agentcore:*"
      ],
      "Resource": "*"
    },
    {
      "Sid": "ECRAuthorizationToken",
      "Effect": "Allow",
      "Action": [
        "ecr:GetAuthorizationToken"
      ],
      "Resource": "*"
    },
    {
      "Sid": "ECRRepositoryAccess",
      "Effect": "Allow",
      "Action": [
        "ecr:BatchCheckLayerAvailability",
        "ecr:GetDownloadUrlForLayer",
        "ecr:BatchGetImage",
        "ecr:PutImage",
        "ecr:InitiateLayerUpload",
        "ecr:UploadLayerPart",
        "ecr:CompleteLayerUpload",
        "ecr:DescribeRepositories",
        "ecr:CreateRepository",
        "ecr:ListImages",
        "ecr:DescribeImages"
      ],
      "Resource": [
        "arn:aws:ecr:<REGION>:<ACCOUNT_ID>:repository/bedrock-agentcore-*"
      ]
    },
    {
      "Sid": "CodeBuildProjectAccess",
      "Effect": "Allow",
      "Action": [
        "codebuild:CreateProject",
        "codebuild:UpdateProject",
        "codebuild:StartBuild",
        "codebuild:BatchGetBuilds",
        "codebuild:DeleteProject"
      ],
      "Resource": "*"
    },
    {
      "Sid": "IAMRoleManagement",
      "Effect": "Allow",
      "Action": [
        "iam:CreateRole",
        "iam:AttachRolePolicy",
        "iam:PutRolePolicy",
        "iam:GetRole",
        "iam:GetRolePolicy",
        "iam:PassRole",
        "iam:DeleteRole",
        "iam:DeleteRolePolicy",
        "iam:DetachRolePolicy",
        "iam:CreateServiceLinkedRole"
      ],
      "Resource": [
        "arn:aws:iam::<ACCOUNT_ID>:role/BedrockAgentCoreExecutionRole-*",
        "arn:aws:iam::<ACCOUNT_ID>:role/AmazonBedrockAgentCoreSDKCodeBuild-*",
        "arn:aws:iam::<ACCOUNT_ID>:role/aws-service-role/runtime-identity.bedrock-agentcore.amazonaws.com/AWSServiceRoleForBedrockAgentCoreRuntimeIdentity"
      ]
    },
    {
      "Sid": "CloudWatchLogsAccess",
      "Effect": "Allow",
      "Action": [
        "logs:CreateLogGroup",
        "logs:CreateLogStream",
        "logs:PutLogEvents",
        "logs:PutResourcePolicy"
      ],
      "Resource": "arn:aws:logs:<REGION>:<ACCOUNT_ID>:log-group:/aws/bedrock-agentcore/*"
    },
    {
      "Sid": "CloudWatchLogsResourcePolicy",
      "Effect": "Allow",
      "Action": [
        "logs:PutResourcePolicy"
      ],
      "Resource": "*"
    },
    {
      "Sid": "S3BucketManagement",
      "Effect": "Allow",
      "Action": [
        "s3:CreateBucket",
        "s3:PutBucketPolicy",
        "s3:PutBucketVersioning",
        "s3:PutBucketPublicAccessBlock",
        "s3:PutLifecycleConfiguration",
        "s3:PutObject",
        "s3:GetObject",
        "s3:ListBucket"
      ],
      "Resource": [
        "arn:aws:s3:::bedrock-agentcore-codebuild-sources-<ACCOUNT_ID>-*",
        "arn:aws:s3:::bedrock-agentcore-codebuild-sources-<ACCOUNT_ID>-*/*"
      ]
    }
  ]
}
  1. Create a file named agentcore.yaml in your project directory with the following configuration. Replace <REGION>, <ACCOUNT_ID>, and <OPENSEARCH_DOMAIN_NAME> placeholders:
# AgentCore Runtime Configuration
  runtime:
    name: shopping-search-agent-runtime
    entrypoint: search_agent.py:strands_agent_bedrock
    region: <REGION>  # CHANGE THIS - Your AWS region (e.g., us-east-1)

    execution_role:
      create: true
      name: BedrockAgentCoreExecutionRole-shopping-agent
      policies:
        - policy_name: BedrockAndOpenSearchAccess
          policy_document:
            Version: "2012-10-17"
            Statement:
              - Sid: BedrockModelAccess
                Effect: Allow
                Action:
                  - bedrock:InvokeModel
                  - bedrock:InvokeModelWithResponseStream
                Resource:
                  - arn:aws:bedrock:*::foundation-model/*
                  - arn:aws:bedrock:<REGION>:<ACCOUNT_ID>:inference-profile/*  # CHANGE THIS - Replace <REGION> and <ACCOUNT_ID>
              - Sid: OpenSearchAccess
                Effect: Allow
                Action:
                  - es:ESHttpGet
                  - es:ESHttpPost
                  - es:ESHttpPut
                Resource: arn:aws:es:<REGION>:<ACCOUNT_ID>:domain/<OPENSEARCH_DOMAIN_NAME>/*  # CHANGE THIS - Replace all three placeholders
              - Sid: CloudWatchLogsAccess
                Effect: Allow
                Action:
                  - logs:CreateLogGroup
                  - logs:CreateLogStream
                  - logs:PutLogEvents
                Resource: arn:aws:logs:<REGION>:<ACCOUNT_ID>:log-group:/aws/bedrock-agentcore/runtimes/*  # CHANGE THIS - Replace <REGION> and <ACCOUNT_ID>
              - Sid: ECRImageAccess
                Effect: Allow
                Action:
                  - ecr:GetAuthorizationToken
                  - ecr:BatchGetImage
                  - ecr:GetDownloadUrlForLayer
                Resource: "*"

    container:
      architecture: arm64  # Options: arm64 or x86_64
      requirements_file: requirements.txt

    ecr:
      auto_create: true
  1. Run the following command in your terminal to deploy the agent to AgentCore Runtime:
    • Create the AgentCore project and replace with your search agent.
      agentcore create --name ShoppingAgent --defaults
      cd ShoppingAgent
      cp ../search_agent.py app/ShoppingAgent/main.py

    • Add OpenSearch and other dependencies:
      cd app/ShoppingAgent
      uv add opensearch-py requests-aws4auth boto3
      cd ../..

    • Deploy the agent to Agentcore Runtime. This process takes approximately 5-10 minutes.
      agentcore deploy

    • Once deployment completes, verify the runtime status:
      agentcore status

      You should see:

      ShoppingAgent: Deployed - Runtime: READY (arn:aws:bedrock-agentcore:<REGION>:<ACCOUNT_ID>:runtime/ShoppingAgent_...)
      
      URL: https://bedrock-agentcore.<REGION>.amazonaws.com/runtimes/.../invocations

Step 9: Configure OpenSearch Service access

Map your AgentCore execution role to an OpenSearch backend role so the agent can access your data.

  1. Navigate to OpenSearch Dashboards. From the left menu, choose the Security plugin, then choose Roles.
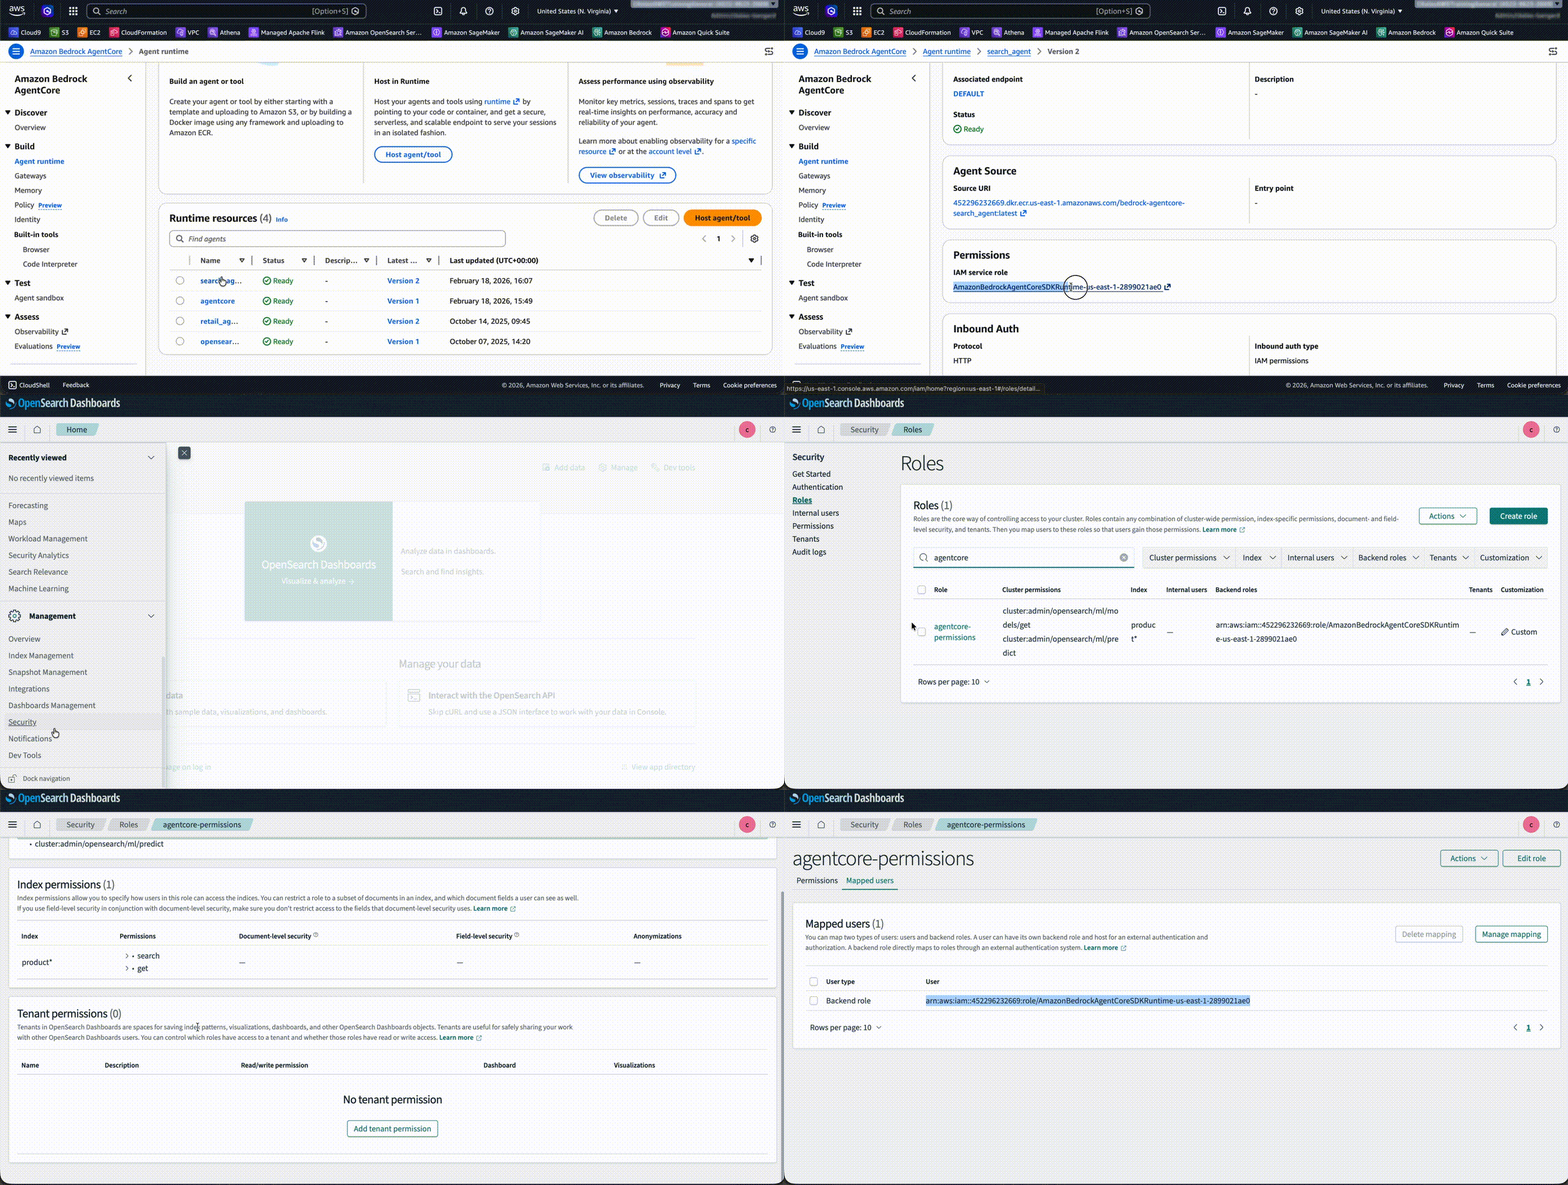
  2. Search for agentcore-permissions and choose the role. Then, navigate to the Mapped Users tab, choose Manage mapping, and add arn:aws:iam::<ACCOUNT_ID>:role/AmazonBedrockAgentCoreSDKRuntime-us-east-1-custom as a backend role. Replace the <ACCOUNT_ID> placeholder with your account ID.

Animated demo of OpenSearch Dashboards Security plugin showing the agent-permissions role with the Mapped Users tab open and the AgentCore SDK runtime IAM role added as a backend role.

Step 10: Invoke the Bedrock AgentCore Runtime

You can test the agent in Agent Sandbox. Enter the prompt Search jacket less than 50$, and the agent returns the relevant result from the OpenSearch Service index with a summary.
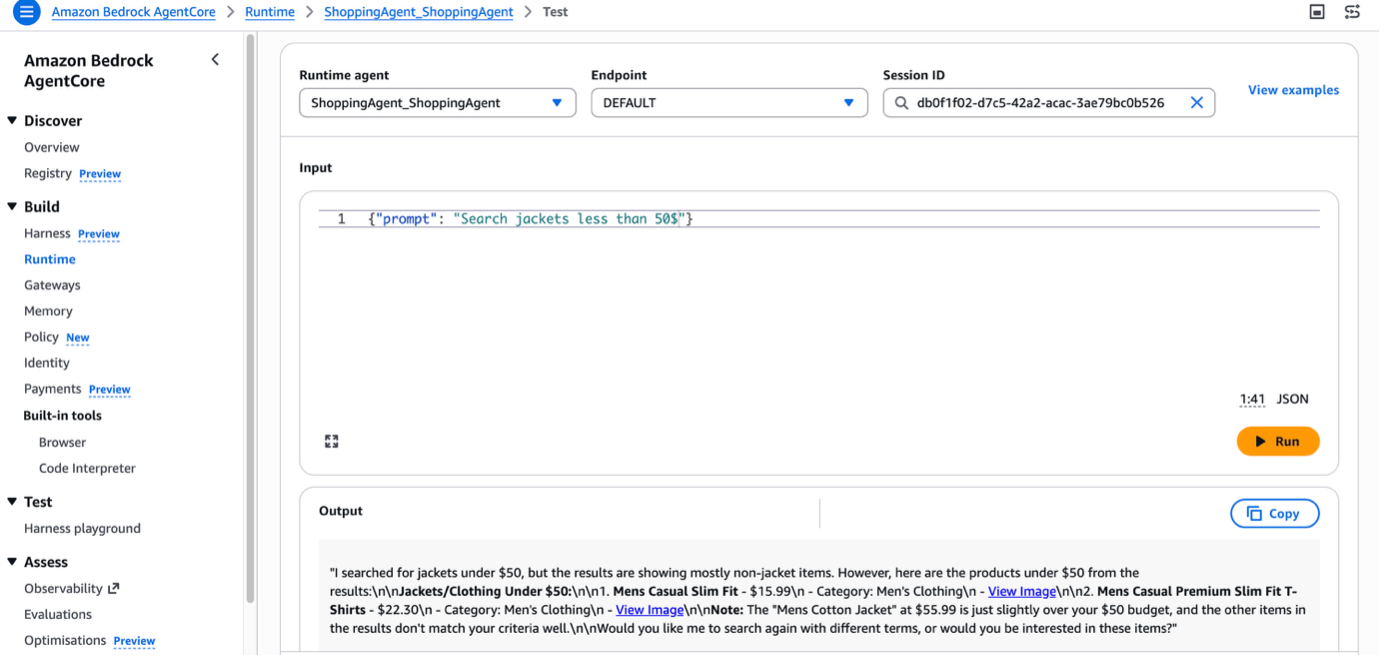
Agent Sandbox console showing a shopping agent response that returns the Mens Cotton Jacket as the relevant result for the prompt “Search jacket less than 50$”.

In real-world scenarios, you can design a search application with a Strands Agent deployed in AgentCore Runtime. You can add AgentCore Memory, which gives your AI agents the ability to remember past interactions and provide more context-aware, personalized conversations.

Cleanup

To avoid incurring future charges, delete the resources created while building this solution:

  1. Delete the OpenSearch Service domain.
  2. Delete the Amazon Bedrock AgentCore Runtime resources.

Conclusion

In this post, you saw how to create a conversational search with Amazon OpenSearch Service and Strands Agents. You also learned how to deploy the agent on Amazon Bedrock AgentCore Runtime. You can further enhance this shopping agent by using other AgentCore capabilities. For example, AgentCore Memory retains user preferences and past interactions across sessions, AgentCore Identity manages shopper authentication and access control, and AgentCore Observability helps you monitor and debug agent behavior in production. Together, these services help you build shopping experiences that deliver instant, relevant assistance at scale.

Now it’s your turn. Build your own conversational search experience by integrating OpenSearch Service and Strands Agents with your product catalog. To learn more, see the Amazon OpenSearch Service and Amazon Bedrock AgentCore detail pages.

About the authors

Omama Khurshid

Omama Khurshid

Omama is an GTM Specialist Solutions Architect Analytics at Amazon Web Services. She focuses on helping customers across various industries build reliable, scalable, and efficient solutions. Outside of work, she enjoys spending time with her family, listening to music, and learning new technologies.

Jumana Nagaria

Jumana Nagaria

Jumana is a Prototyping Architect at AWS. She builds innovative prototypes with customers to solve their business challenges. She is passionate about cloud computing and data analytics. Outside of work, Jumana enjoys travelling, reading, painting, and spending quality time with friends and family.

Canberk Keles

Canberk Keles

Canberk is a Solutions Architect at Amazon Web Services, helping software companies achieve their business goals by leveraging AWS technologies. He is part of OpenSearch specialist community within AWS and has been guiding customers harness the power of OpenSearch. Outside of work, he enjoys sports, reading, traveling and playing video games.

Zero-ETL integrations with Amazon OpenSearch Service

Post Syndicated from Omama Khurshid original https://aws.amazon.com/blogs/big-data/zero-etl-integrations-with-amazon-opensearch-service/

Amazon OpenSearch Service is a fully managed service that reduces operational overhead, provides enterprise-grade security, high availability, and scalability, and enables you to quickly deploy real-time search, analytics, and generative AI applications. OpenSearch itself is an open-source, distributed search and analytics suite that supports a wide range of use cases, including real-time monitoring, log analytics, and full-text search. OpenSearch Service offers zero-ETL integrations with other Amazon Web Service (AWS) services, enabling seamless data access and analysis without the need for maintaining complex data pipelines.

Zero-ETL refers to a set of integrations designed to minimize or eliminate the need to build traditional extract, transform, load (ETL) pipelines. Traditional ETL processes can be time-consuming and difficult to develop, maintain, and scale. In contrast, zero-ETL integrations allow direct, point-to-point data movement and can also support querying across data silos without physically moving the data.

In this post, we explore various zero-ETL integrations available with OpenSearch Service that can help you accelerate innovation and improve operational efficiency. We cover following types of integrations, their key features, architecture, benefits, pricing, limitation and some general best practices.

  1. Log and storage integrations
  2. Database integrations

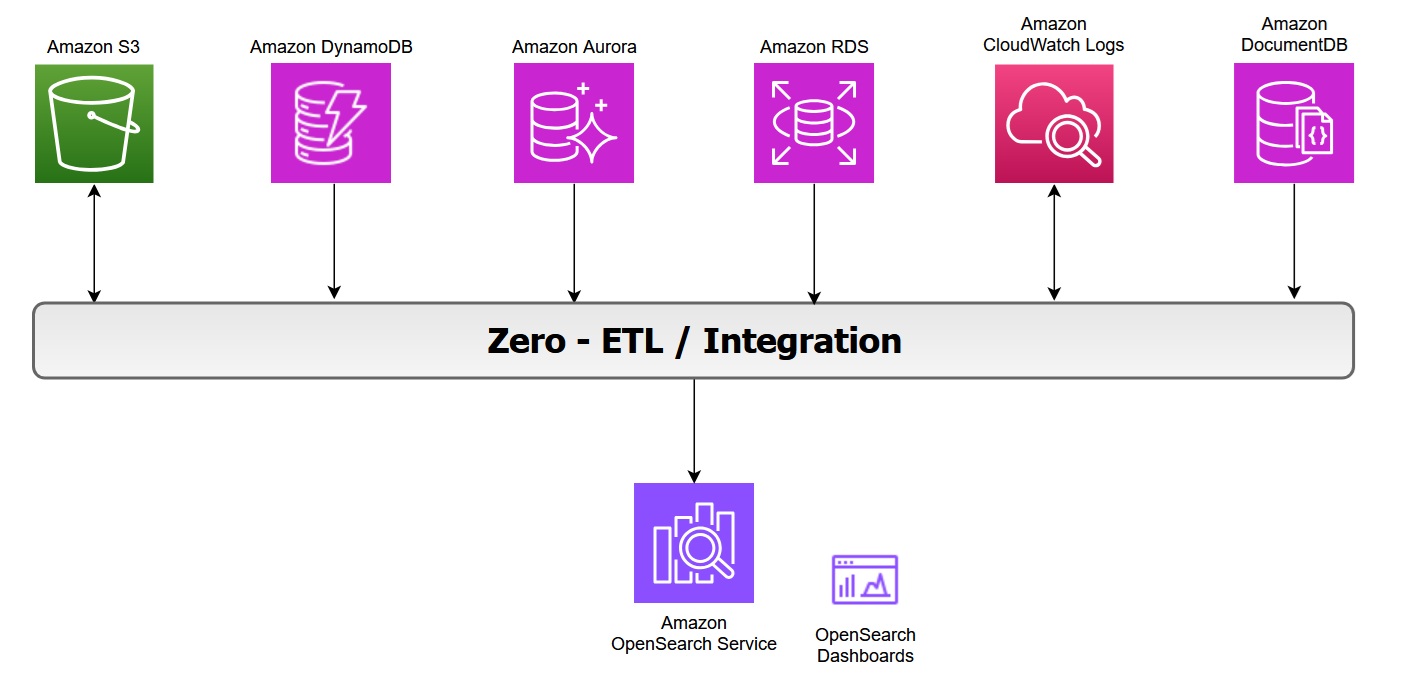
The following diagram illustrates the zero-ETL integration architecture in AWS, showing how various AWS services feed data into OpenSearch Service and its associated dashboards:

Zero ETL with Amazon OpenSearch Service

Zero-ETL integration with Amazon S3

Amazon OpenSearch Service direct queries with Amazon S3 provides a zero-ETL integration to reduce the operational complexity of duplicating data or managing multiple analytics tools by enabling you to directly query their operational data, reducing costs and time to action.

Key features of this integration include:

  1. In-place querying: You can use rich analytics capabilities of OpenSearch Service SQL and PPL directly on infrequently-queried data stored outside of OpenSearch Service in Amazon S3.
  2. Selective data ingestion: You can choose which data to bring into OpenSearch Service for detailed analysis, optimizing costs and speeding up queries with indexes like skipping or covering indexes.

The zero-ETL integration with Amazon S3 supports OpenSearch Service. For more information on architecture and feature see the post Modernize your data observability with Amazon OpenSearch Service zero-ETL integration with Amazon S3.

In log analytics use cases, we categorize operational log data into two types:

  • Primary data includes the most recent and frequently accessed logs used for real-time monitoring and analysis.
  • Secondary data consists of historical logs that are accessed less frequently but retained for compliance or trend analysis.

You can offload infrequently queried data, such as archival or compliance data, to Amazon S3. With direct query, you can analyze analytics from Amazon S3 without data movement or duplication. However, query performance in OpenSearch Service might slow down when you’re accessing external data sources due to factors like network latency, data transformation, or large data volumes. You can optimize your query performance by using OpenSearch indexes, such as a skipping index, covering index, or materialized view.

While Amazon S3 direct query integration with OpenSearch Service provides on-demand access to data stored in Amazon S3, it is important to remember that OpenSearch’s alerting, monitoring, anomaly detection, and security analytics capabilities can only operate on data that has been explicitly ingested into OpenSearch Service indices. These capabilities would not work with direct query with Amazon S3. However, it will work if the data is indexed with covering or materialized index.

Benefits

With direct queries with Amazon S3, you no longer need to build complex ETL pipelines or incur the expense of duplicating data in both OpenSearch Service and Amazon S3 storage. You also save time and effort by not having to move back and forth between different tools during your analysis.

Pricing

OpenSearch Service separately charges for the compute needed to query your external data in addition to maintaining indexes in OpenSearch Service. Costs for Direct Query is based on the data volume scanned, query execution time, query frequency and frequency with which the indexed data in OpenSearch is kept updated. For more information, see Amazon OpenSearch Service Pricing.

Considerations

In case you are using OpenSearch service to query directly data on Amazon S3, consider the limitations with Direct Query.

Best practices

These are some general and Amazon S3 recommendations for using direct queries in OpenSearch Service. For more information, see Recommendations for using direct queries in Amazon OpenSearch Service.

  • Use the COALESCE SQL function to handle missing columns and ensure results are returned.
  • Use limits on your queries to ensure you aren’t pulling too much data back.
  • If you plan to analyze the same dataset many times, create an indexed view to fully ingest and index the data into OpenSearch Service and drop it when you have completed the analysis.
  • Drop acceleration jobs and indexes when they’re no longer needed.
  • Ingest data into Amazon S3 using partition formats of year, month, day, hour to speed up queries.
  • When you build skipping indexes, use Bloom filters for fields with high cardinality and min/max indexes for fields with large value ranges. Bloom filters are a space efficient probabilistic data structure that lets you quickly check whether an item is possibly in a set. For high-cardinality fields, consider using a value-based approach to improve query efficiency.
  • Use Index State Management to maintain storage for materialized views and covering indexes.

Zero-ETL integration with Amazon CloudWatch Logs

Amazon CloudWatch Logs serves as a centralized monitoring and storage solution for log files generated across various AWS services. This unified logging service offers a highly scalable platform where all your logging data converges into one manageable system. It provides comprehensive functionality for log management, including real-time viewing, pattern searching, field-based filtering, and secure archival capabilities. By presenting all logs chronologically in a unified stream, CloudWatch Logs eliminates the complexity of managing multiple log sources, transforming diverse logging data into a coherent, time-ordered sequence of events.

The zero-ETL integration between Amazon CloudWatch and Amazon OpenSearch Service enables direct log analysis and visualization while avoiding data redundancy, thereby reducing both technical complexity and costs. You can now leverage two additional query languages alongside the existing CloudWatch Logs Insights QL when using CloudWatch Logs, while as an OpenSearch user, you gain the ability to query CloudWatch logs directly.

Review New Amazon CloudWatch and Amazon OpenSearch Service launch an integrated analytics experience, to explore how the integration works between OpenSearch Service and Amazon CloudWatch Logs.

Benefits

  • The enhanced CloudWatch Logs Insights console now incorporates OpenSearch PPL and SQL functionality. Users can perform complex log analysis using SQL JOIN operations and various functions (including JSON, mathematical, datetime, and string operations). The PPL option provides additional data filtering and analysis capabilities.
  • The integration offers ready-to-use dashboards for various AWS services like Amazon Virtual Private Cloud (VPC), AWS CloudTrail, and AWS Web Application Firewall (WAF). These pre-configured visualizations enable quick insights into metrics such as flow patterns, top users, data transfer volumes, and temporal analysis, without requiring manual dashboard configuration.
  • You can now analyze CloudWatch logs through OpenSearch UI Discover and execute SQL and PPL queries. At the writing of this post, the query execution is limited to 50 log groups.
  • The direct access and analysis of CloudWatch data within OpenSearch Service removes the need for traditional ETL processes, eliminates separate data ingestion pipelines and avoids data duplication. This streamlined approach significantly reduces both storage expenses and operational complexity. It delivers a more efficient data management solution that simplifies the entire workflow while maintaining cost-effectiveness.

Pricing

When you use OpenSearch Service direct queries, you incur separate charges for OpenSearch Service and the resource used to process and store your data on Amazon CloudWatch Logs. As you run direct queries, you see charges for OpenSearch Compute Units (OCUs) per hour, listed as DirectQuery OCU usage type on your bill.

  • For interactive queries, OpenSearch Service handles each query with a separate pre-warmed job, without maintaining an extended session.
  • For indexed view queries, the indexed data is stored in an OpenSearch Serverless collection where you are charged for data indexed (IndexingOCU), data searched (SearchOCU), and data stored in GB.

You can find a pricing example on running an OpenSearch dashboard from either OpenSearch UI or CloudWatch Logs (pricing example n°7).

For more pricing information, see Amazon OpenSearch Service Direct Query pricing.

Considerations

In addition to the OpenSearch Service “direct queries” general limitations, if you are direct querying data in CloudWatch Logs, the following limitations apply:

  • The direct query integration with CloudWatch Logs is only available on OpenSearch Service collections and the OpenSearch user interface.
  • OpenSearch Serverless collections have networked payload limitations of 100 MiB.
  • CloudWatch Logs supports VPC Flow Logs, CloudTrail, and AWS WAF dashboard integrations installed from the console.

Best practices

Besides the general recommendations of OpenSearch Service direct querying, when using OpenSearch Service to direct query data in CloudWatch Logs, the following is recommended:

  • Specify the log group names within logGroupIdentifier in logGroups command to query multiple log groups in one query, see Multi-log group functions.
  • Enclose certain fields in backticks to successfully query them when using SQL or PPL commands. Backticks are needed for fields with special characters, such as `@SessionToken` or `LogGroup-A` (non-alphabetic and non-numeric). Refer to CloudWatch Logs Recommendations to see an example.

Zero-ETL integration with Amazon DynamoDB

Amazon DynamoDB zero-ETL integration with OpenSearch Service lets you perform a search on your DynamoDB data by automatically replicating and transforming it without custom code or infrastructure. This zero-ETL integration uses Amazon OpenSearch Ingestion to synchronize data between Amazon DynamoDB and OpenSearch Service cluster or OpenSearch Serverless collection within seconds of it being available.

It uses DynamoDB export to Amazon S3 to create an initial snapshot to load into OpenSearch Service. After the snapshot has been loaded, the plugin uses DynamoDB Streams to replicate any further changes in near real time. Turn on point-in-time recovery (PITR) for export and the DynamoDB Streams feature for ongoing replication.

This feature allows you to capture item-level changes in your table and push the changes to a stream. Every item in tables is processed as an event in OpenSearch Ingestion and can be modified with processors. You can also specify index mapping templates within ingestion pipelines to ensure that your Amazon DynamoDB fields are mapped to the correct fields in your OpenSearch indices.

To learn more, see DynamoDB zero-ETL integration with Amazon OpenSearch Service in the AWS documentation.

When configuring zero-ETL between DynamoDB and OpenSearch Service, consider the differences between the data models. You have the following options with data layout:

  1. Passthrough: Each item in DynamoDB table is directly mapped to one document in OpenSearch Index.
  2. Routing: A single DynamoDB table mapped to multiple OpenSearch Service indices. In DynamoDB, it is common to store denormalized data in one table to optimize for access patterns. For example, a single DynamoDB table containing both customer profiles and order information can be routed to separate OpenSearch Service indices:
    • Customer attributes → ‘customers’ index
    • Order attributes → ‘orders’ index

    You can achieve this by using the conditional routing feature in the OpenSearch ingestion pipeline.

  3. Merge: In some use cases, you need to combine data from multiple DynamoDB tables into a single OpenSearch index. You can use AWS Lambda integration with OpenSearch Ingestion to perform lookups on other DynamoDB tables and merge data from multiple DynamoDB tables.

Pricing

There is no additional cost to use this feature apart from the cost of the existing underlying components, including OpenSearch Ingestion charges OpenSearch Compute Units (OCUs) which is used to replicate data between Amazon DynamoDB and OpenSearch Service. Furthermore, this feature uses Amazon DynamoDB Streams for the change data capture (CDC), and you incur the standard costs for Amazon DynamoDB Streams.

Considerations

Consider the following limitations when you set up an OpenSearch Ingestion pipeline for DynamoDB:

  • At the writing of this post, the OpenSearch Ingestion integration with DynamoDB doesn’t support cross-Region and cross-account ingestion.
  • An OpenSearch Ingestion pipeline supports only one DynamoDB table as its source.

Best practices

For complete information, see Best practices for working with DynamoDB zero-ETL integration and OpenSearch Service

Integration with Amazon Aurora and Amazon RDS

Amazon RDS and Amazon Aurora integration with OpenSearch Service eliminates complex data pipelines and enables near real-time data synchronization between Amazon Aurora and Amazon RDS databases (including RDS for MySQL and RDS for PostgreSQL) with advanced search capabilities on transactional databases. You can use an OpenSearch Ingestion pipeline with Amazon RDS or Amazon Aurora to export existing data and stream changes (such as create, update, and delete) to OpenSearch Service domains and collections. The OpenSearch Ingestion pipeline incorporates change data capture (CDC) infrastructure to provide a high-scale, low-latency way to continuously stream data from Amazon RDS or Amazon Aurora.

This automated process keeps your data consistently up to date in OpenSearch Service, making it readily available for search and analysis purpose. The pipeline ensures data consistency by continuously polling or receiving changes from the Amazon Aurora cluster or Amazon RDS and updating the corresponding documents in the OpenSearch index. OpenSearch Ingestion supports end-to-end acknowledgement to ensure data durability. An OpenSearch Ingestion pipeline also maps incoming event actions into corresponding bulk indexing actions to help ingest documents. This keeps data consistent, so that every data change in Amazon RDS is reconciled with the corresponding document changes in OpenSearch.

For details on the architecture, refer to Integrating Amazon OpenSearch Ingestion with Amazon RDS and Amazon Aurora. To get started, refer to OpenSearch Ingestion pipeline with Amazon RDS or Using an OpenSearch Ingestion pipeline with Amazon Aurora.

Pricing

There is no additional charge for using this feature beyond the cost of your existing underlying resources, such as OpenSearch Service, OpenSearch Ingestion pipelines (OCUs), and Amazon RDS or Amazon Aurora. Additional costs may include storage used for enabling enhanced binlogs for MySQL and WAL logs for PostgreSQL for change data capture. You also incur storage costs for snapshot exports from your database to Amazon S3 used for the initial data.

Considerations

Consider the following limitations when you set up the integration for Amazon RDS or Amazon Aurora:

  • Support both Aurora MySQL or RDS for MySQL (8.0 and above) and Aurora PostgreSQL or RDS for PostgreSQL (16 and above).
  • Requires same-Region and same-account deployment, primary keys for optimal synchronization, and currently has no data definition language (DDL) statement support.
  • The integration only supports one Aurora PostgreSQL database per pipeline.
  • The existing pipeline configuration can’t be updated to ingest data from a different database and/or a different table. To update the database and/or table name of a pipeline, stop the pipeline and restart it with an updated configuration or create a new pipeline.
  • Ensure that the Amazon Aurora or Amazon RDS cluster has authentication enabled using AWS Secrets Manager, which is the only supported authentication mechanism.

Best practices

The following are some best practices to follow while setting up the integration with OpenSearch Service:

  • If a mapping template is not specified in OpenSearch, it automatically assigns field types using dynamic mapping based on the first document received. However, it is always recommended to define field types explicitly by creating a mapping template that suits your requirements.
  • To maintain data consistency, the primary and foreign keys of tables remain unchanged.
  • You can configure the dead-letter queues (DLQ) in your OpenSearch Ingestion pipeline. If you’ve configured the queue, OpenSearch Service sends all failed documents that can’t be ingested due to dynamic mapping failures to the queue.
  • Monitor recommended CloudWatch metrics to measure the performance of your ingestion pipeline.

Zero-ETL integration with Amazon DocumentDB

Amazon Document DB is a fully managed database service built for JSON data management at scale. It offers built-in text and vector search functionalities. By leveraging OpenSearch Service, you can execute search analytics, including features like fuzzy matching, synonym detection, cross-collection queries, and multilingual search capabilities on DocumentDB data.

The zero-ETL integration initiates the process with a full historical data extraction to OpenSearch using an ingestion pipeline. After the initial data load is completed, the pipelines read from Amazon DocumentDB change streams ensuring near real-time data consistency between the two systems. OpenSearch organizes the incoming data into indexes, with flexibility to either consolidate data from a DocumentDB collection into a single index or partition data across multiple indices. The ingestion pipelines synchronize all create, update, and delete operations from the DocumentDB collection, maintaining corresponding document modifications in OpenSearch. This ensures both data systems remain synchronised.

The pipelines offer configurable routing options, allowing data from a single collection to be written to one index or conditionally route to multiple indexes. Users can configure ingestion pipelines to stream data from Amazon DocumentDB to OpenSearch Service through three primary modes namely full load only, streaming change events without initial full load and full load followed by change streams. You can also monitor the state of ingestion pipelines in the OpenSearch service console. Additionally, you can use Amazon Cloudwatch to provide real-time metrics and logs and setting up alerts.

Pricing

There is no additional charge for using this feature apart from the cost of your existing underlying resources, including OpenSearch Service, OpenSearch Ingestion pipelines (OCUs), and Amazon DocumentDB. The integration performs an initial full load of Amazon DocumentDB data and continuously streams ongoing changes to OpenSearch Service using change streams. The change streams feature is disabled by default and does not incur any additional charges until the feature is enabled. Using change streams on a DocumentDB cluster incurs additional read and write input/output (I/O), as well as storage costs.

To learn more on pricing see the DocumentDB pricing page.

Considerations

The following are the limitations for the DocumentDB to OpenSearch Service integration:

  • Only one Amazon DocumentDB collection as the source per pipeline is supported.
  • Cross-region and cross-account data ingestion is not supported.
  • Amazon DocumentDB elastic clusters are not supported, only instance-based clusters are supported.
  • AWS Secrets Manager is the only supported authentication mechanism.
  • You can’t update an existing pipeline configuration to ingest data from a different database and/or a different collection. To update the database and/or collection name of a pipeline, create a new pipeline.

Best practices

The following are some best practices to follow while setting up the DocumentDB zero-ETL with OpenSearch Service:

  • Configure dead-letter queues (DLQ) to handle any failed document ingestion.
  • Configure AWS Secrets Manager and enable secrets rotation to provide the pipeline secure access.
  • If you’re using change streams in DocumentDB, it’s important to extend the retention period to up to 7 days. This ensures you don’t lose any data changes during the ingestion process.

To get started, see zero-ETL integration of Amazon DocumentDB with OpenSearch Service.

Benefits for Database Integrations

With zero-ETL integrations, you can use the powerful search and analytics features of OpenSearch Service directly on your latest database data. These include full-text search, fuzzy search, auto-complete, and vector search for machine learning (ML) workloads—enabling intelligent, real-time experiences that enhance your applications and improve user satisfaction. This integration uses change streams to automate the synchronisation of transactional data from Amazon Aurora, Amazon RDS, Amazon DynamoDB and Amazon DocumentDB to OpenSearch Service without manual intervention. Once the data is available in OpenSearch Service, you can perform real-time searches to quickly retrieve relevant results for your applications.This eliminates the need for manual Extract-Transform-Load (ETL) processes, reduces operational complexity, and accelerates time-to-insight for real-time dashboards, search, and analytics.

Conclusion

In this post, you learned that zero-ETL integrations represent a significant advancement in simplifying data analytics workflows and reducing operational complexity. As you’ve explored throughout this post, these integrations offer several advantages such as elimination of complex ETL pipelines and reduced infrastructure and operational costs by removing the need for intermediate storage and processing that enhance developer productivity.

It is time to accelerate your analytics journey with OpenSearch Service zero ETL – where your data flows seamlessly, eliminating complex pipelines and delivering real-time insights. Get started with Amazon OpenSearch Service or learn more about integrations with other services and applications in the AWS documentation.


About the authors

Omama Khurshid

Omama Khurshid

Omama is GTM Specialist Solutions Architect Analytics at Amazon Web Services. She focuses on helping customers across various industries build reliable, scalable, and efficient solutions. Outside of work, she enjoys spending time with her family, listening to music, and learning new technologies.

Canberk Keles

Canberk Keles

Canberk is an Associate Solutions Architect at Amazon Web Services, helping software companies achieve their business goals by leveraging AWS technologies. He is part of OpenSearch specialist community within AWS and has been guiding customers harness the power of OpenSearch. Outside of work, he enjoys sports, reading, traveling and playing video games.