All posts by Priyanka Chaudhary

Implement least-privilege access with designations in Amazon SageMaker Unified Studio

Post Syndicated from Priyanka Chaudhary original https://aws.amazon.com/blogs/big-data/implement-least-privilege-access-with-designations-in-amazon-sagemaker-unified-studio/

When teams move data and AI work to production in a shared environment, one question quickly becomes unavoidable: who can do what? Amazon SageMaker Unified Studio now answers it with designations, which are named permission sets that give administrators granular control over the actions each member can perform within a project. Administrators define a designation once, then assign it to project members. A member might sign in through an AWS Identity and Access Management (IAM) role, an IAM user, or an AWS IAM Identity Center user or group. In each case, designations help you give each persona only the access its responsibilities require. Effective access also depends on identity and resource policies, service control policies, permissions boundaries, group memberships, and how the customer configures permission sets and assignments. Designations integrate with AWS CloudFormation, and there is no additional charge to use them beyond Amazon SageMaker Unified Studio itself.

In this post, we walk through why differentiated permissions matter, how designations work, and how to create and assign your first designation using the console and the AWS Command Line Interface (AWS CLI).

The challenge: One project, many roles

A single SageMaker Unified Studio project often brings together data engineers, data stewards, analysts, and machine learning (ML) engineers, each needing very different access. Consider a financial services team running its Lakehouse and ML workflows in one project. Engineers build and schedule extract, transform, and load (ETL) pipelines, and a steward approves subscription requests to keep sensitive data governed. Analysts query curated tables for dashboards, and ML engineers iterate on models in notebooks. They all work on the same data, but their access needs differ. The steward shouldn’t alter production pipelines, analysts shouldn’t launch expensive compute, and the scheduled ETL service account shouldn’t share permissions with someone running exploratory experiments. In the past, common approaches included giving everyone the same broad project role or splitting the work across separate projects.

“We automated everything about how teams get set up in SageMaker Unified Studio. Projects are created, members are synced from our directory daily, and data sources are registered without anyone clicking a button. The one thing we couldn’t automate was controlling what each person could do once they were inside. Solution teams, data scientists, and business analysts all arrived with the same access. With designations, we now define each user type’s permissions as part of the same automation that creates the project, so the right access is enforced from day one.”

— Tim Kopacz, Cloud Platform Architect, Swiss Life Germany

Without a purpose-built mechanism to scope permissions within a project, organizations face operational risk. A user might accidentally delete a connection that disrupts a production workload or modify catalog settings outside their area of responsibility. Teams often work around this by creating a separate project for each persona to isolate access. That approach fragments data across project boundaries and adds provisioning and member-management overhead. As more teams onboard, these workarounds compound to slow adoption and increase the governance burden.

Designations address several common scenarios:

  • Controlling access to Notebooks: Grant members full access, read-only access, or no access to notebooks within a project, so compute-intensive interactive work is available only to the roles responsible for it. This helps control costs by limiting who can run notebook workloads.
  • Separating exploration from production: Grant exploratory users read and explore access while production service accounts run scheduled workflows, all within the same project.
  • Supporting governance workflows: Assign specific personas responsibility for data stewardship, subscription approval, and metadata management, which helps prevent other members from bypassing your review process.

How designations work

Designations separate policy definition from member assignment, which is what makes them reusable across projects.

  • Define once: A domain administrator creates a designation by selecting granular permissions. For example, publish an asset, create data products, or approve subscriptions. Permissions are grouped into categories such as Catalog, Project, Subscriptions, Connections, and Notebooks, and are backed by the Cedar policy language.
  • Assign per project: Within a project, the project owner assigns one designation to each member. When a member performs an action through the portal or the API, SageMaker Unified Studio evaluates the assigned designation. It permits or denies the action based on the permissions the designation contains. Additionally, a member can also inherit designations through single sign-on (SSO) group membership. If a user is directly assigned one designation and also belongs to a group assigned to another, the user receives the union of both permission sets. Because effective permissions are the union of direct and group-inherited designations, review SSO group assignments regularly so members don’t receive more access than intended.

Because a designation is defined once and assigned per project, you get consistent permissions across every project without recreating policies each time. Data engineers, stewards, analysts, and automated pipelines can work within the same project with different permissions, which keeps data unified in one place rather than fragmented across duplicate projects.

Designations complement your existing IAM controls rather than replace them, and they provide one consistent authorization layer across every user type that SageMaker Unified Studio supports. This matters because SageMaker Unified Studio supports IAM roles, IAM users, SSO users, and SSO groups. You can’t attach IAM policies directly to SSO users or groups within SageMaker Unified Studio. Designations apply uniformly to all of these principals, so every user type is governed by the same permission model within a project.

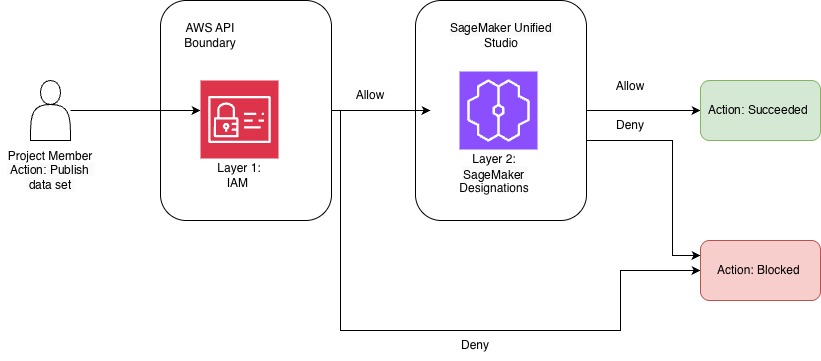
Authorization happens in two layers. First, IAM evaluates whether a principal can invoke an API at the AWS API boundary. If IAM allows the call, the designation then evaluates whether the assigned permission set grants the specific action within the project. You don’t need to modify your existing IAM policies to adopt designations, but we still recommend that you continue to scope IAM roles to least privilege.

For example, the AmazonSageMakerDomainExecution role might hold the IAM permission to perform an API action such as datazone:CreateListingChangeSet, the permission to publish a data asset. The next layer is the designation: the action succeeds only if the project member’s designation includes the Manage Asset Publishing permission to publish assets in that project. Both layers must allow the action, and an IAM Deny blocks the call regardless of what the designation permits.

The following diagram shows how a project member’s request to publish a data set passes through both authorization layers.
Request to publish a data set passing through two layers: IAM at the API boundary, then the project designation

Figure 1: How a request to publish a data set passes through the IAM and designation authorization layers

The request first reaches the AWS API boundary, where IAM (layer 1) evaluates whether the principal can call the API. If IAM denies the call, the action is blocked. If IAM allows it, SageMaker Unified Studio (layer 2) evaluates the member’s designation. The action succeeds only when the designation also allows it. Otherwise, the action is blocked.

Managed designations

Every domain includes two AWS managed designations at the project level so you can start immediately:

  • Owner – Full control over all project resources, including project member management.
  • Contributor – Full access except for project member management and project deletion. Because Contributor is broad, we recommend custom designations for personas that don’t need full access.

You can view the permissions for these managed designations, but you can’t edit or delete them. To create your own permission sets, you build custom designations for the personas your organization needs.

Create a designation on the console

Designations are created and managed from the domain management portal. Only users whose profile is a domain administrator can access it. The domain management portal is separate from the Amazon SageMaker Unified Studio portal where members do their day-to-day work. In this example, we create an ML Engineer designation for members who build workloads through notebooks.

  1. Sign in to the SageMaker Unified Studio domain management portal.
  2. In the navigation pane, choose Designations. The Managed tab shows the AWS managed Owner and Contributor designations.
  3. Choose Create designation.
  4. For Name, enter ML Engineer, and add a Description.
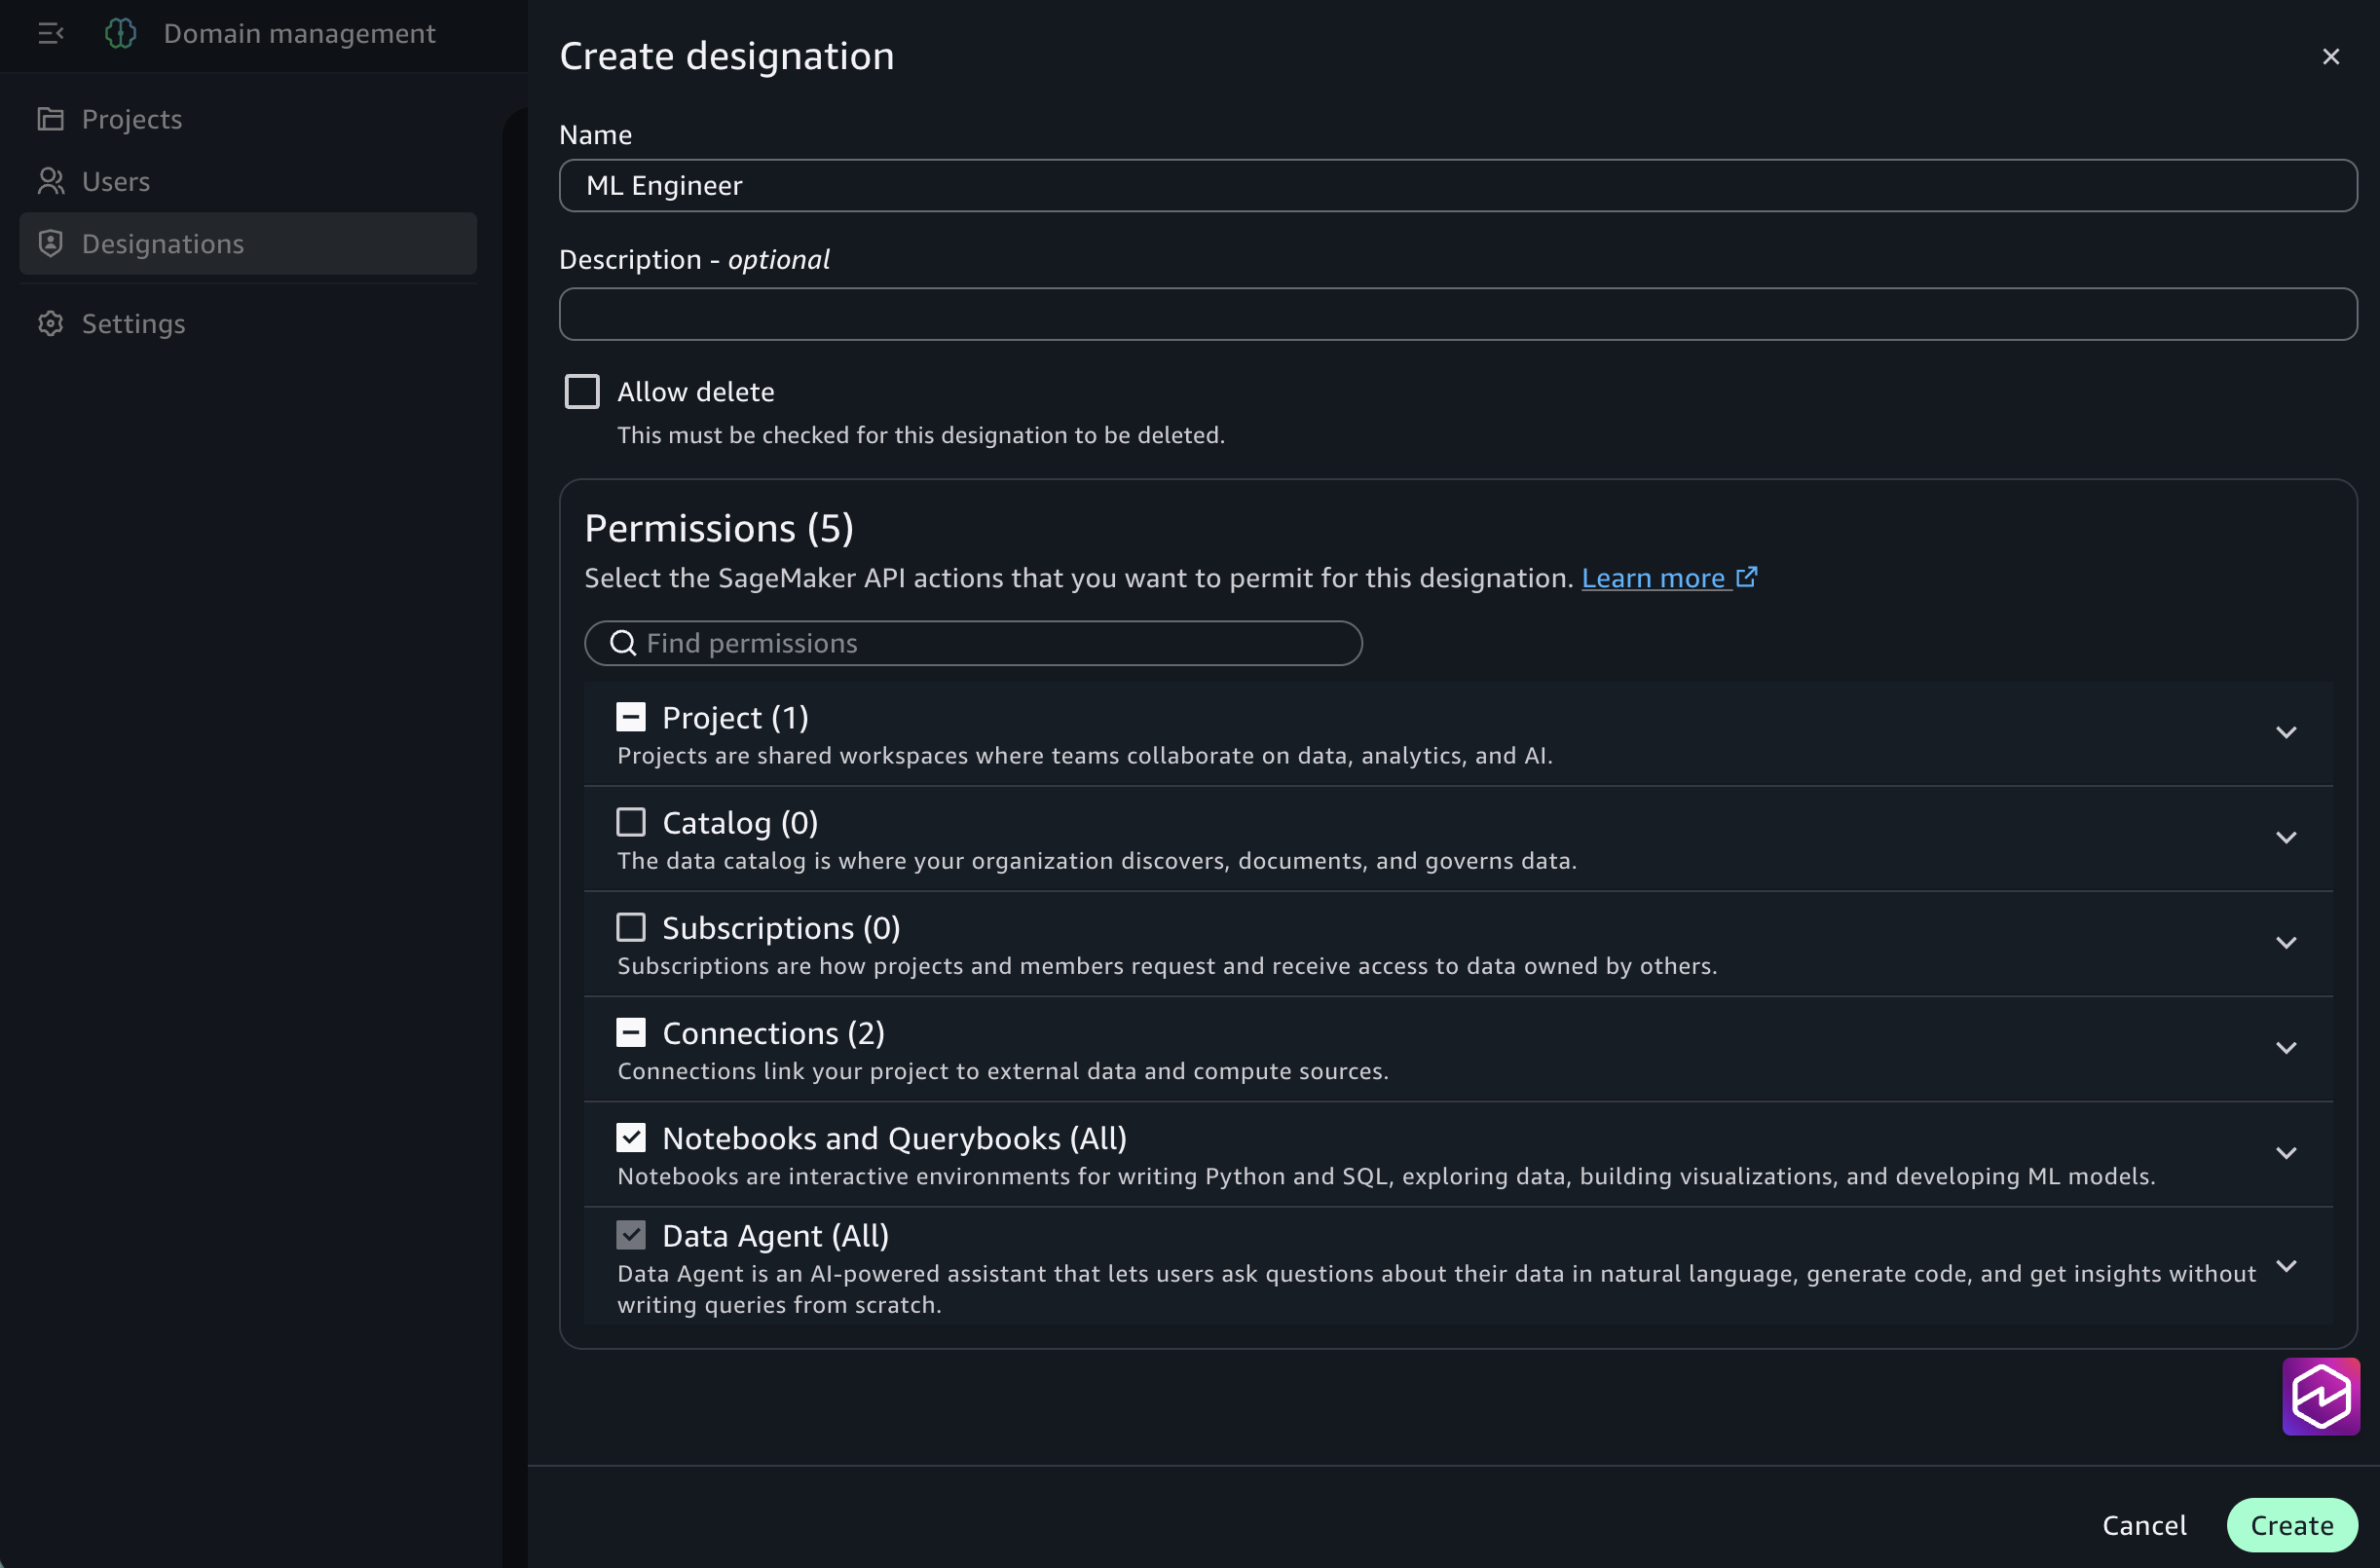
  5. In the visual permission selector, expand the Notebook category and select only the permissions this persona requires, for example, Read-only actions for reviewers, or All Actions only for members who author notebooks.
  6. Choose Create.
Create designation page in the domain management portal with the visual permission selector expanded

Figure 2: Creating a designation in the Amazon SageMaker Unified Studio domain management portal, using the visual permission selector to choose the actions to include

The ML Engineer designation is now available to every project in the domain. You can also create a designation by duplicating an existing one, which pre-selects a set of permissions for you to customize. Review the pre-selected permissions and remove any that the new persona doesn’t need.

Assign a designation to a project member

After creation, a designation is available to every project in the domain. You can assign it from two places, depending on your domain type.

From the SageMaker Unified Studio portal (Identity Center-based domains), assign the designation from a project where you are an owner, or if your designation has the Manage Membership permission. Grant Manage Membership only to trusted project members. A member who has the Manage Membership permission can assign designations with more permissions than their own.

  1. Navigate to the project in the SageMaker Unified Studio portal.
  2. Choose the Members tab.
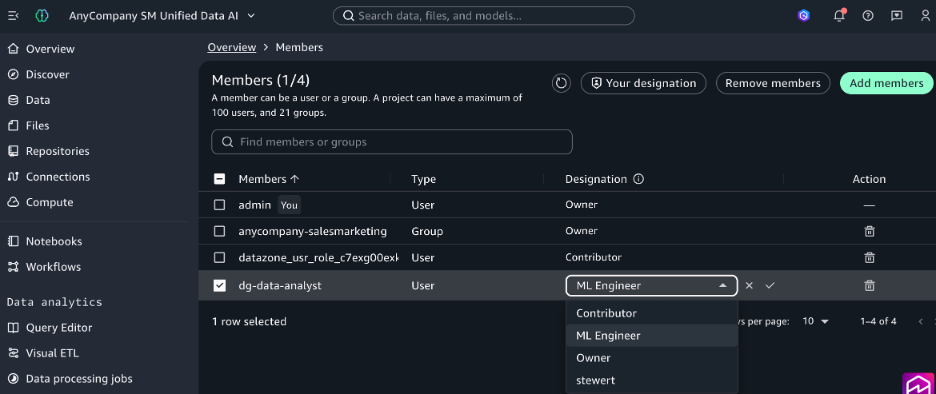
  3. To update an existing member, choose a designation from the Designation column for that user. To add a new member, choose Add member and select the member.
  4. For Designation, choose ML Engineer.
SageMaker Unified Studio portal Members tab assigning the ML Engineer designation to a project member

Figure 3: Assigning a designation to a project member from the Amazon SageMaker Unified Studio portal (Identity Center-based domains) using the Role list on the Members tab

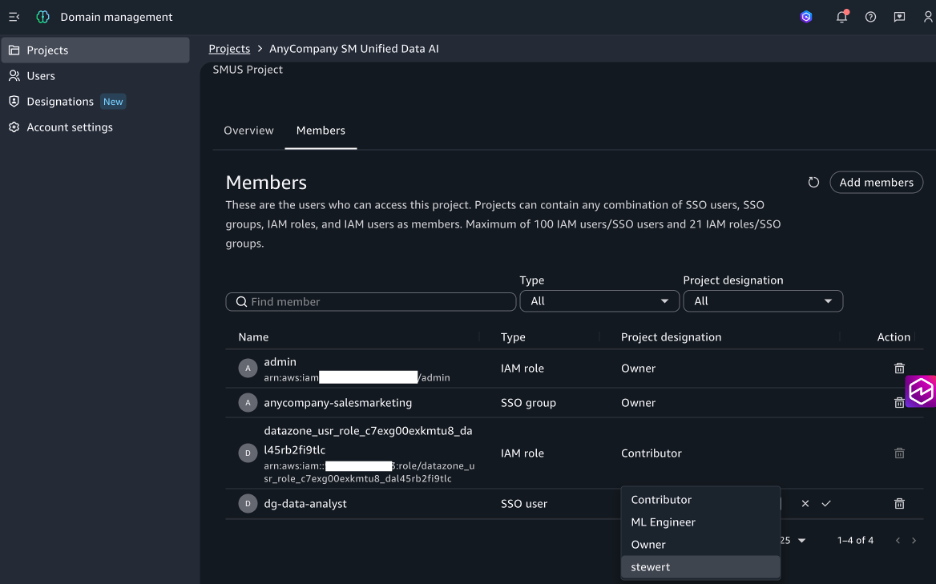
From the domain management portal (both IAM and Identity Center-based domains):

  1. Sign in to the domain management portal and choose Projects in the navigation pane.
  2. Select the project, then choose the Members tab.
  3. To update an existing member, choose a designation from the Project designation column. To add a new member, choose Add members and select the type and member.
  4. For Designation, choose the designation to assign, then choose Save.
Domain management portal Members tab assigning a designation using the Project designation column

Figure 4: Assigning a designation from the domain management portal (both IAM and Identity Center-based domains) using the Project designation column on the Members tab

When the assigned user logs in to the project, they are permitted to create notebooks. Every project member is assigned a designation. Members without a valid designation have no permissions in the project.

Automate the full lifecycle with the AWS CLI and infrastructure as code (IaC)

You can manage the entire lifecycle, from creating a designation to assigning it, programmatically. This is useful for codifying governance and rolling it out at scale.

Prerequisites:

The IAM principal that runs these commands needs permissions (scoped to the domain) such as datazone:CreateDesignation, datazone:UpdateDesignation, and datazone:DeleteDesignation to manage designations. They need datazone:CreateProjectMembership to assign the designation to project members. Grant only the actions you need.

Create a designation with the AWS CLI:

aws datazone create-designation \
  --domain-identifier "dzd_example1234" \
  --name "Data Engineer" \
  --description "Runs data source and asset creation tasks" \
  --policy 'permit(principal, action in [
      DataZone::Action::"CreateDataSource",
      DataZone::Action::"UpdateDataSource",
      DataZone::Action::"CreateAsset"
    ], resource);'

Assign the designation when you add a member to a project:

aws datazone create-project-membership \
  --domain-identifier "dzd_example1234" \
  --project-identifier "proj_example5678" \
  --member '{"userIdentifier": "u-abc123def456"}' \
  --designation "USER_CREATED_DESIGNATION" \
  --user-created-designation-id "123456789"

Because designations are supported as resources in AWS CloudFormation, you can define them in your templates, version them in source control, and deploy them across domains through your existing infrastructure-as-code pipelines. You can also manage assignments with the CreateProjectMembership and UpdateProjectMembership API operations, so the full workflow can be automated without using the console.

Update designations as your needs evolve

When you update a designation’s permissions, the change takes effect immediately for all members assigned that designation across all projects, with no reassignment required. This means you can start with the minimum permissions each persona needs, and add permissions as requirements or new capabilities emerge. Because updates apply immediately across all projects, review designation changes through your change-management process and use AWS CloudTrail to audit them.

Delete a designation

Designations include an Allow delete property that is turned off by default, so a designation can’t be deleted until you explicitly allow it. When you create or edit a designation, set Allow delete to make the designation eligible for deletion. Once allowed, you can delete the designation even if project members are still assigned to it.

When you delete a designation that is still in use, those members remain in the project, but their assigned designation becomes invalid. They have no permissions in the project until the project owner reassigns them a valid designation. Plan deletions accordingly so members are not left without access.

You can also set this property programmatically. The CreateDesignation API and AWS CLI accept a deletion protection parameter, so you can codify the setting in your infrastructure as code templates.

aws datazone create-designation \
  --domain-identifier "dzd_example1234" \
  --name "Data Engineer" \
  --deletion-protection \
  --description "Can manage data sources and create assets" \
  --policy 'permit(principal, action in [DataZone::Action::"CreateDataSource", DataZone::Action::"UpdateDataSource", DataZone::Action::"CreateAsset"], resource);'

To create the designation without delete protection, use the --no-deletion-protection flag.

Conclusion

Designations give administrators control over who can do what within each Amazon SageMaker Unified Studio project. Define named permission sets once and assign them per project to help enforce separation of duties across data engineers, stewards, analysts, ML engineers, and automated pipelines. You don’t need to duplicate projects or build a permission system outside SageMaker Unified Studio. Designations require no additional infrastructure or cost, integrate with AWS CloudFormation, and layer cleanly on top of your existing IAM controls.

To get started, open the domain management portal for your Amazon SageMaker Unified Studio domain, choose Designations, and create your first permission set. To learn more, see the Amazon SageMaker Unified Studio documentation.
About the authors

Priyanka Chaudhary

Priyanka Chaudhary

Priyanka is a Senior Solutions Architect at AWS specializing in data lake and analytics services. She helps customers design scalable, secure cloud solutions and guides strategic customers through their cloud journey. Outside of work, she enjoys time with friends and family, movies, and travel.

David Victoria

David Victoria

David is a Senior Technical Product Manager with Amazon SageMaker at AWS. He focuses on administration and governance capabilities needed for customers to support their analytics systems. He is passionate about helping customers realize the most value from their data in a secure, governed manner. Outside of work, he enjoys hiking, traveling, and spending time with family.

Building a real-time ICU patient analytics pipeline with AWS Lambda event source mapping

Post Syndicated from Priyanka Chaudhary original https://aws.amazon.com/blogs/big-data/building-a-real-time-icu-patient-analytics-pipeline-with-aws-lambda-event-source-mapping/

In hospital intensive care units (ICUs), continuous patient monitoring is critical. Medical devices generate vast amounts of real-time data on vital signs such as heart rate, blood pressure, and oxygen saturation. The key challenge lies in early detection of patient deterioration through vital sign trending. Healthcare teams must process thousands of data points daily per patient to identify concerning patterns, a task crucial for timely intervention and potentially life-saving care.

AWS Lambda event source mapping can help in this scenario by automatically polling data streams and triggering functions in real-time without additional infrastructure management. By using AWS Lambda for real-time processing of sensor data and storing aggregated results in secure data structures designed for large analytic datasets called Iceberg tables in Amazon Simple Storage Service (Amazon S3) buckets, medical teams can achieve both immediate alerting capabilities and gain long-term analytical insights, enhancing their ability to provide timely and effective care.

In this post, we demonstrate how to build a serverless architecture that processes real-time ICU patient monitoring data using Lambda event source mapping for immediate alert generation and data aggregation, followed by persistent storage in Amazon S3 with an Iceberg catalog for comprehensive healthcare analytics. The solution demonstrates how to handle high-frequency vital sign data, implement critical threshold monitoring, and create a scalable analytics platform that can grow with your healthcare organization’s needs and help monitor sensor alert fatigue in the ICU.

Architecture

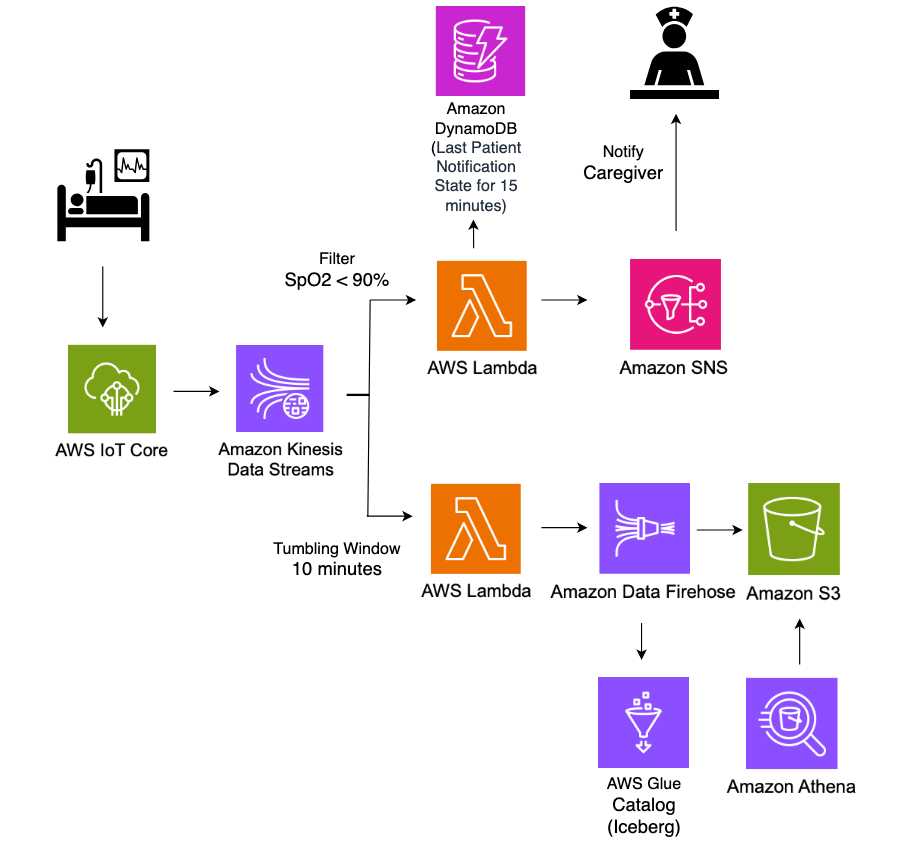
The following architecture diagram illustrates a real-time ICU patient analytics system.

Arch diagram

In this architecture, real-time patient monitoring data from hospital ICU sensors is ingested into AWS IoT Core, which then streams the data into Amazon Kinesis Data Streams. Two Lambda functions consume this streaming data concurrently for different purposes, both using Lambda event source mapping integration with Kinesis Data Streams. The first Lambda function uses the filtering feature of event source mapping to detect critical health events where SpO2(blood oxygen saturation) levels fall below 90%, immediately triggering notifications to caregivers through Amazon Simple Notification Service (Amazon SNS) for rapid response. The second Lambda function employs the tumbling window feature of event source mapping to aggregate sensor data over 10-minute time intervals. This aggregated data is then systematically stored in S3 buckets in Apache Iceberg format for historical analysis and reporting. The entire pipeline operates in a serverless manner, providing scalable, real-time processing of critical healthcare data while maintaining both immediate alerting capabilities and long-term data storage for analytics.

Amazon S3 data, with its support for Apache Iceberg table format, enables healthcare organizations to efficiently store and query large volumes of time-series patient data. This solution allows for complex analytical queries across historical patient data while maintaining high performance and cost efficiency.

Prerequisites

To implement the solution provided in this post, you should have the following:

  • An active AWS account
  • IAM permissions to deploy CloudFormation templates and provision AWS resources
  • Python installed on your machine to run the ICU patient sensor data simulator code

Deploy a real-time ICU patient analytics pipeline using CloudFormation

You use AWS CloudFormation templates to create the resources for a real-time data analytics pipeline.

  1. To get started, Sign in to the console as Account user and select the appropriate Region.
  2. Download and launch CloudFormation template  where you want to host the Lambda functions.
  3. Choose Next.
  4. On the Specify stack details page, enter a Stack name (for example, IoTHealthMonitoring).
  5. For Parameters, enter the following:
    1. IoTTopic: Enter the MQTT topic for your IoT devices (for example, icu/sensors).
    2. EmailAddress: Enter an email address for receiving notifications.
  6. Wait for the stack creation to complete. This process might take 5-10 minutes.
  7. After the CloudFormation stack completes, it creates following resources:
    1. An AWS IoT Core rule to capture data from the specified IoTTopic topic and routes it to Kinesis data stream.
    2. A Kinesis data stream for ingesting IoT sensor data.
    3. Two Lambda functions:
      • FilterSensorData: Monitors critical health metrics and sends alerts.
      • AggregateSensorData: Aggregates sensor data in 10 minutes window.
    4. An Amazon DynamoDB table (NotificationTimestamps) to store notification timestamps for rate limiting alerts.
    5. An Amazon SNS topic and subscription to send email notifications for critical patient conditions.
    6. An Amazon Data Firehose delivery stream to deliver processed data to Amazon S3 using Iceberg format.
    7. Amazon S3 buckets to store sensor data.
    8. Amazon Athena and AWS Glue resources for the database and an Iceberg table for querying aggregated data.
    9. AWS Identity and Access Management (IAM) roles and policies to support required permissions for Amazon IoT rules, Lambda functions, and Data Firehose streams.
    10. Amazon CloudWatch log groups to record for Kinesis Firehose activity and Lambda functions.

Solution walkthrough

Now that you’ve deployed the solution, let’s review a functional walkthrough. First, simulate patient vital signs data and send it to AWS IoT Core using the following Python code on your local machine. To run this code successfully, ensure you have the necessary IAM permissions to publish messages to the IoT topic in the AWS account where the solution is deployed.

import boto3
import json
import random
import time
# AWS IoT Data client
iot_data_client = boto3.client(
    'iot-data',
    region_name='us-west-2'
)
# IOT Topic to publish
topic = 'icu/sensors'
# Fixed set of patient IDs
patient_ids = [1, 2, 3, 4, 5, 6, 7, 8, 9, 10]
print("Infinite sensor data simulation...")
try:
    while True:
        for patient_id in patient_ids:
            # Generate sensor data
            message = {
                "patient_id": patient_id,
                "timestamp": int(time.time()),
                "spo2": random.randint(91, 99),
                "heart_rate": random.randint(60, 100),
                "temperature_f": round(random.uniform(97.0, 100.0), 1)
            }
            # Publish to topic
            response = iot_data_client.publish(
                topic=topic,
                qos=1,
                payload=json.dumps(message)
            )
            print(f"Published: {message}")
        # Wait 30 seconds before next round
        print("Sleeping for 30 seconds...\n")
        time.sleep(30)
except KeyboardInterrupt:
    print("\nSimulation stopped by user.")

The following is the format of a sample ICU sensor message produced by the simulator.

{
    "patient_id": 1,
    "timestamp": 1683000000,
    "spo2": 85,
    "heart_rate": 75,
    "temperature_f": 98.6
}

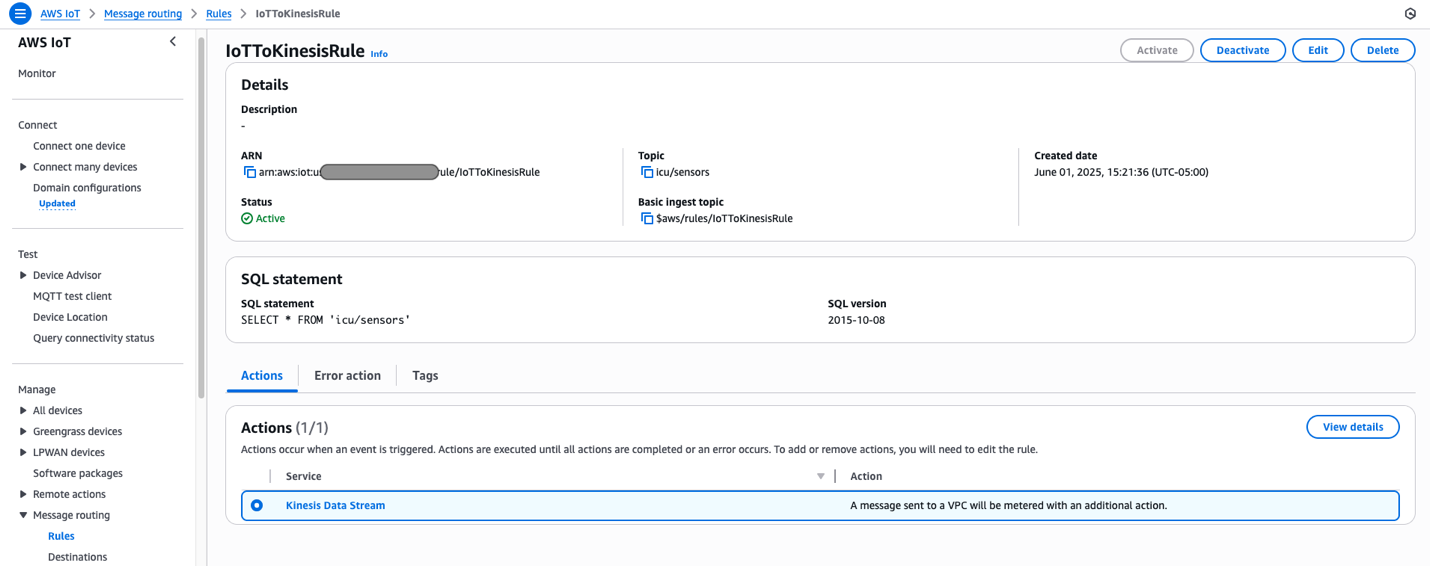
Data is published to the icu/sensors IoT topic every 30 seconds for 10 different patients, creating a continuous stream of ICU patient monitoring data. Messages published to AWS IoT Core are passed to Kinesis Data Streams using the following message routing rule deployed by our solution.

Two Lambda functions consume data from Data Streams concurrently, both using the Lambda event source mapping integration with Kinesis Data Streams.

Event source mapping

Lambda event source mapping automatically triggers Lambda functions in response to data changes from supported event sources like Amazon DynamoDB Streams, Amazon Kinesis Data Streams, Amazon Simple Queue Service (Amazon SQS), Amazon MQ, and Amazon Managed Streaming for Apache Kafka. This serverless integration works by having Lambda poll these sources for new records, which are then processed in configurable batch sizes ranging from 1 to 10,000 records. When new data is detected, Lambda automatically invokes the function synchronously, handling the scaling automatically based on the workload. The service supports at-least-once delivery and provides robust error handling through retry policies and dead-letter queues for failed events. Event source mappings can be fine-tuned through various parameters such as batch windows, maximum record age, and retry attempts, making them highly adaptable to different use cases. This feature is particularly valuable in event-driven architectures, so that customers can focus on business logic while AWS manages the complexities of event processing, scaling, and reliability.

Event source mapping uses tumbling windows and filtering to process and analyze data.

Tumbling windows

Tumbling windows in Lambda event processing enable data aggregation in fixed, non-overlapping time intervals, where each event belongs to exactly one window. This is ideal for time-based analytics and periodic reporting. When combined with event source mapping, this approach allows efficient batch processing of events within defined time periods (for example, 10-minute windows), enabling calculations such as average vital signs or cumulative fluid intake and output while optimizing function invocations and resource usage.

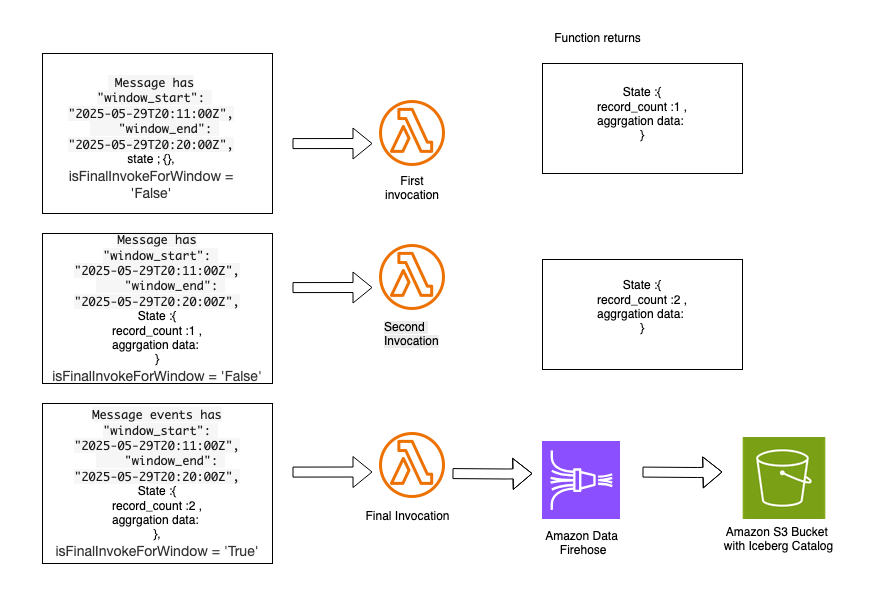
When you configure an event source mapping between Kinesis Data Streams and a Lambda function, use the Tumbling Window Duration setting, which appears in the trigger configuration in the Lambda console. The solution you deployed using the CloudFormation template includes the AggregateSensorData Lambda function, which uses a 10-minute tumbling window configuration. Depending on the volume of messages flowing through the Amazon Kinesis stream, the AggregateSensorData function can be invoked multiple times for each 10-minute window, sequentially, with the following attributes in the event supplied to the function.

  • Window start and end: The beginning and ending timestamps for the current tumbling window.
  • State: An object containing the state returned from the previous window, which is initially empty. The state object can contain up to 1 MB of data.
  • isFinalInvokeForWindow: Indicates if this is the last invocation for the tumbling window. This only occurs once per window period.
  • isWindowTerminatedEarly: A window ends early only if the state exceeds the maximum allowed size of 1 MB.

In a tumbling window, there is a series of Lambda invocations in the following pattern:

AggregateSensorData Lambda code snippet:

def handler(event, context):
    
    state_across_window = event['state']
    # Iterate through each record and decode the base64 data
    for record in event['Records']:
        encoded_data = record['kinesis']['data']
        partition_key = record['kinesis']['partitionKey']
        decoded_bytes = base64.b64decode(encoded_data)
        decoded_str = decoded_bytes.decode('utf-8')
        decoded_json = json.loads(decoded_str)
        # create partition_key attribute if it do not exists in state
        if partition_key not in state_across_window:
            state_across_window[partition_key] = {"min_spo2": decoded_json['spo2'], "max_spo2": decoded_json['spo2'], "avg_spo2": decoded_json['spo2'], "sum_spo2": decoded_json['spo2'], "min_heart_rate": decoded_json['heart_rate'], "max_heart_rate": decoded_json['heart_rate'], "avg_heart_rate": decoded_json['heart_rate'], "sum_heart_rate": decoded_json['heart_rate'], "min_temperature_f": decoded_json['temperature_f'], "max_temperature_f": decoded_json['temperature_f'], "avg_temperature_f": decoded_json['temperature_f'], "sum_temperature_f": decoded_json['temperature_f'], "record_count": 1}
        else:
            min_spo2 = state_across_window[partition_key]['min_spo2'] if state_across_window[partition_key]['min_spo2'] < decoded_json['spo2'] else decoded_json['spo2']
            max_spo2 = state_across_window[partition_key]['max_spo2'] if state_across_window[partition_key]['max_spo2'] > decoded_json['spo2'] else decoded_json['spo2']
            sum_spo2 = state_across_window[partition_key]['sum_spo2'] + decoded_json['spo2']
            min_heart_rate = state_across_window[partition_key]['min_heart_rate'] if state_across_window[partition_key]['min_heart_rate'] < decoded_json['heart_rate'] else decoded_json['heart_rate']
            max_heart_rate = state_across_window[partition_key]['max_heart_rate'] if state_across_window[partition_key]['max_heart_rate'] > decoded_json['heart_rate'] else decoded_json['heart_rate']
            sum_heart_rate = state_across_window[partition_key]['sum_heart_rate'] + decoded_json['heart_rate']
            
            min_temperature_f = state_across_window[partition_key]['min_temperature_f'] if state_across_window[partition_key]['min_temperature_f'] < decoded_json['temperature_f'] else decoded_json['temperature_f']
            max_temperature_f = state_across_window[partition_key]['max_temperature_f'] if state_across_window[partition_key]['max_temperature_f'] > decoded_json['temperature_f'] else decoded_json['temperature_f']
            sum_temperature_f = state_across_window[partition_key]['sum_temperature_f'] + decoded_json['temperature_f']
            
            record_count = state_across_window[partition_key]['record_count'] + 1
            avg_spo2 = sum_spo2/record_count
            avg_heart_rate = sum_heart_rate/record_count
            avg_temperature_f = sum_temperature_f/record_count
            
            state_across_window[partition_key] = {"min_spo2": min_spo2, "max_spo2": max_spo2, "avg_spo2": avg_spo2, "sum_spo2": sum_spo2, "min_heart_rate": min_heart_rate, "max_heart_rate": max_heart_rate, "avg_heart_rate": avg_heart_rate, "sum_heart_rate": sum_heart_rate, "min_temperature_f": min_temperature_f, "max_temperature_f": max_temperature_f, "avg_temperature_f": avg_temperature_f, "sum_temperature_f": sum_temperature_f, "record_count": record_count}
        
    # Determine if the window is final (window end)
    is_final_window = event.get('isFinalInvokeForWindow', False)
    # Determine if the window is terminated (window ended early)
    is_terminated_window = event.get('isWindowTerminatedEarly', False)
    window_start = event['window']['start']
    window_end = event['window']['end']
    if is_final_window or is_terminated_window:
        firehose_client = boto3.client('firehose')
        firehose_stream = os.environ['FIREHOSE_STREAM_NAME']
        for key, value in state_across_window.items():
            value['patient_id'] = key
            value['window_start'] = window_start
            value['window_end'] = window_end
            
            firehose_client.put_record(
                DeliveryStreamName= firehose_stream,
                Record={'Data': json.dumps(value) }
            )
        
        return {
            "state": {},
            "batchItemFailures": []
        }
    else:
        print(f"interim call for window: ws: {window_start} we: {window_end}")
        return {
            "state": state_across_window,
            "batchItemFailures": []
        }
  • The first invocation contains an empty state object in the event. The function returns a state object containing custom attributes that are specific to the custom logic in the aggregation.
  • The second invocation contains the state object provided by the first Lambda invocation. This function returns an updated state object with new aggregated values. Subsequent invocations follow this same sequence. Following is a sample of the aggregated state, which can be supplied to subsequent Lambda invocations within the same 10-minute tumbling window.
{
    "min_spo2": 88,
    "max_spo2": 90,
    "avg_spo2": 89.2,
    "sum_spo2": 625,
    "min_heart_rate": 21,
    "max_heart_rate": 22,
    "avg_heart_rate": 21.1,
    "sum_heart_rate": 148,
    "min_temperature_f": 90,
    "max_temperature_f": 91,
    "avg_temperature_f": 90.1,
    "sum_temperature_f": 631,
    "record_count": 7,
    "patient_id": "44",
    "window_start": "2025-05-29T20:51:00Z",
    "window_end": "2025-05-29T20:52:00Z"
}
  • The final invocation in the tumbling window has the isFinalInvokeForWindow flag set to the true. This contains the state returned by the most recent Lambda invocation. This invocation is responsible for passing aggregated state messages to the Data Firehose stream, which delivers data to the Amazon S3 bucket using Iceberg data format.
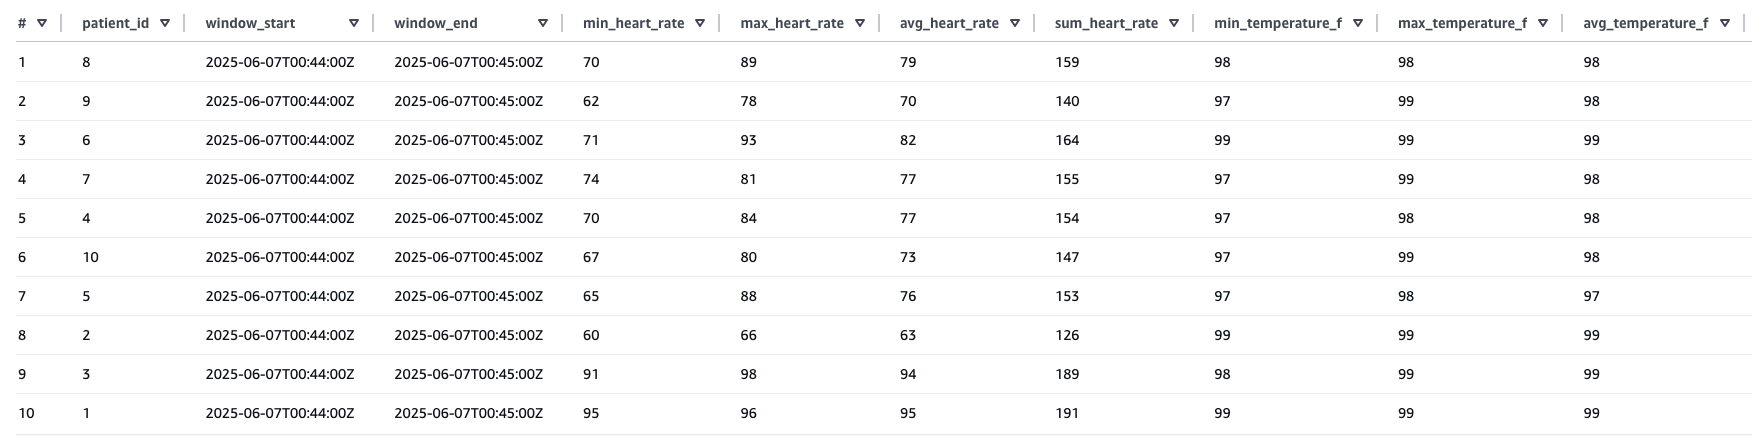
  • After the aggregated data is sent to Amazon S3, you can query the data using Athena.
Query: SELECT * FROM "cfdb_<<Database>>"."table_<<Table>>"

Sample result of the preceding Athena query:

Event source mapping with filtering

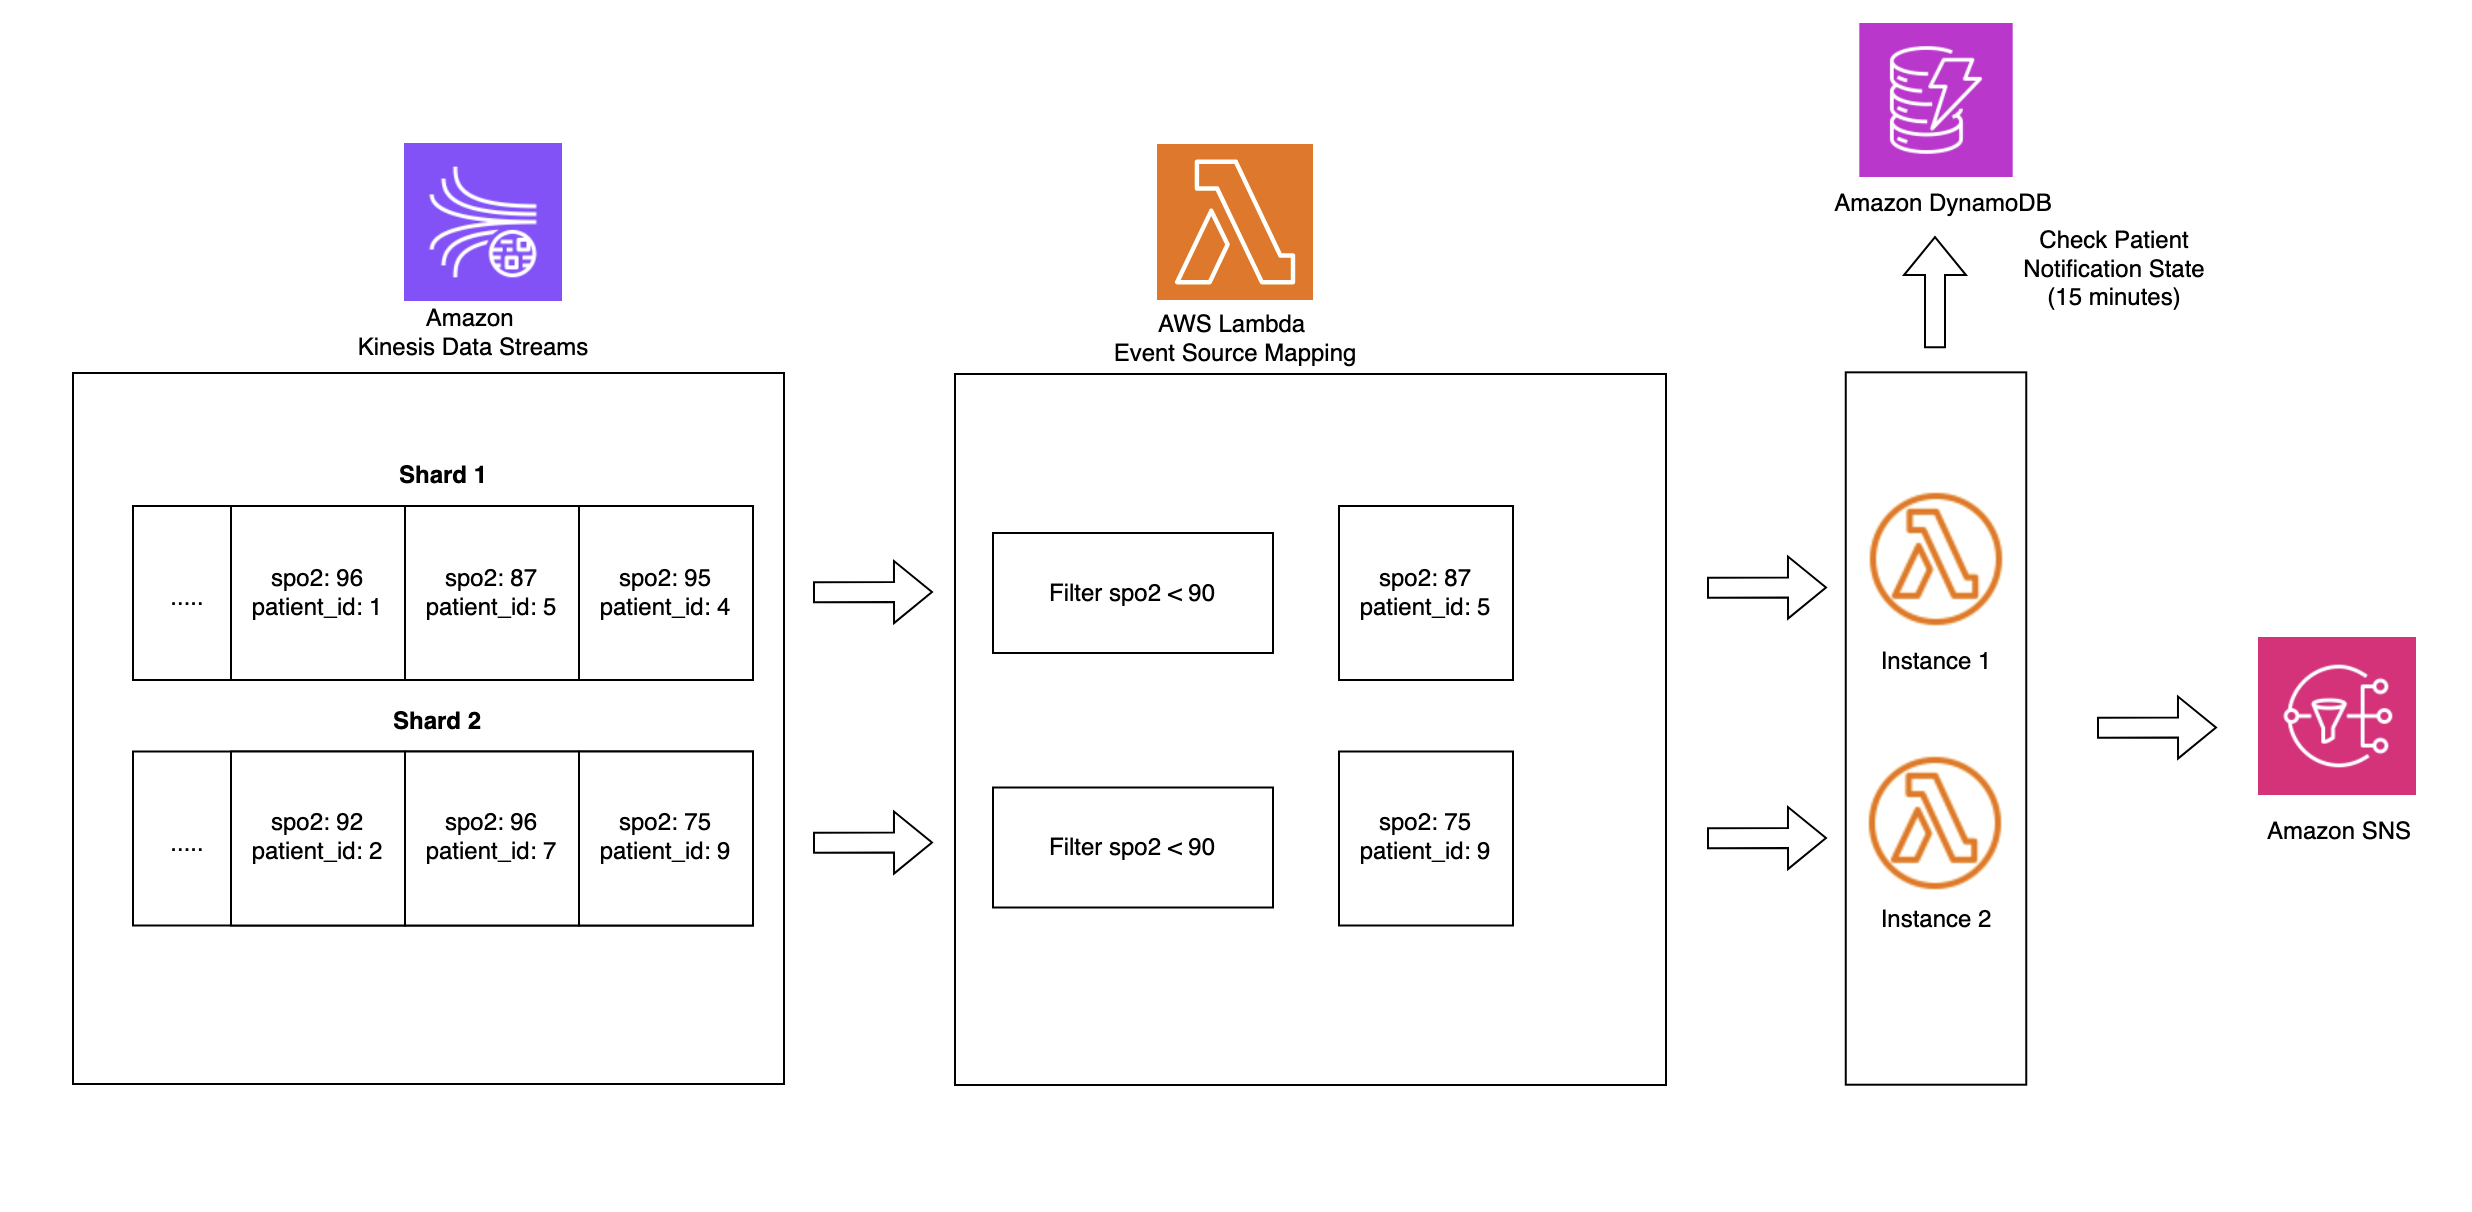
Lambda event source mapping with filtering optimizes data processing from sources like Amazon Kinesis by applying JSON pattern filtering before function invocation. This is demonstrated in the ICU patient monitoring solution, where the system filters for SpO2 readings from Kinesis Data Streams that are below 90%. Instead of processing all incoming data, the filtering capability is used to selectively processes only critical readings, significantly reducing costs and processing overhead. The solution uses DynamoDB for sophisticated state management, tracking low SpO2 events through a schema combining PatientID and timestamp-based keys within defined monitoring windows.

This state-aware implementation balances clinical urgency with operational efficiency by sending immediate Amazon SNS notifications when critical conditions are first detected while implementing a 15-minute alert suppression window to prevent alert fatigue among healthcare providers. By maintaining state across multiple Lambda invocations, the system helps ensure rapid response to potentially life-threatening situations while minimizing unnecessary notifications for the same patient condition. The integration of Lambda’event filtering, DynamoDB state management, and reliable alert delivery provided by Amazon SNS creates a robust, scalable healthcare monitoring solution that exemplifies how AWS services can be strategically combined to address complex requirements while balancing technical efficiency with clinical effectiveness.

Filter sensor data Lambda code snippet:

sns_client = boto3.client('sns')
dynamodb = boto3.resource('dynamodb')
table_name = os.environ['DYNAMODB_TABLE']
sns_topic_arn = os.environ['SNS_TOPIC_ARN']
table = dynamodb.Table(table_name)
FIFTEEN_MINUTES = 15 * 60  # 15 minutes in seconds
def handler(event, context):
    for record in event['Records']:
        print(f"Aggregated event: {record}")
        encoded_data = record['kinesis']['data']
        partition_key = record['kinesis']['partitionKey']
        decoded_bytes = base64.b64decode(encoded_data)
        decoded_str = decoded_bytes.decode('utf-8')
        # Check last notification timestamp from DynamoDB
        try:
            response = table.get_item(Key={'partition_key': partition_key})
            item = response.get('Item')
            now = int(time.time())
            if item:
                last_sent = item.get('timestamp', 0)
                if now - last_sent < FIFTEEN_MINUTES:
                    print(f"Notification for {partition_key} skipped (sent recently)")
                    continue
            # Send SNS Notification
            sns_response = sns_client.publish(
                TopicArn=sns_topic_arn,
                Message=f"Patient SpO2 below 90 percentage event information: {decoded_str}",
                Subject=f"Low SpO2 detected for patient ID {partition_key}"
            )
            print("Message sent to SNS! MessageId:", sns_response['MessageId'])
            # Update DynamoDB with current timestamp and TTL
            table.put_item(Item={
                'partition_key': partition_key,
                'timestamp': now,
                'ttl': now + FIFTEEN_MINUTES + 60  # Add extra buffer to TTL
            })
        except Exception as e:
            print("Error processing event:", e)
            return {
                'statusCode': 500,
                'body': json.dumps('Error processing event')
            }
    return {
        'statusCode': 200,
        'body': {}
    }

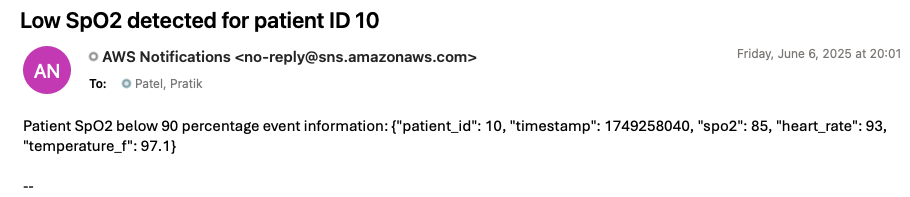
To generate an alert notification through the deployed solution, update the preceding simulator code by setting the SpO2 value to less than 90 and run it again. Within 1 minute, you should receive an alert notification at the email address you provided during stack creation. The following image is an example of an alert notification generated by the deployed solution.

Clean up

To avoid ongoing costs after completing this tutorial, delete the CloudFormation stack that you deployed earlier in this post. This will remove most of the AWS resources created for this solution. You might need to manually delete objects created in Amazon S3, because CloudFormation won’t remove non-empty buckets during stack deletion.

Conclusion

As demonstrated in this post, you can build a serverless real-time analytics pipeline for healthcare monitoring by using AWS IoT Core, Amazon S3 buckets with iceberg format, and Amazon Kinesis Data Streams integration with AWS Lambda event source mapping. This architectural approach eliminates the need for complex code while enabling rapid critical patient care alerts and data aggregation for analysis using Lambda. The solution is particularly valuable for healthcare organizations looking to modernize their patient monitoring systems with real-time capabilities. The architecture can be extended to handle various medical devices and sensor data streams, making it adaptable for different healthcare monitoring scenarios. This post presents one implementation approach, and organizations adopting this solution should ensure the architecture and code meets their specific application performance, security, privacy, and regulatory compliance needs.

If this post helps you or inspires you to solve a problem, we would love to hear about it!


About the authors

Nihar Sheth

Nihar Sheth

Nihar is a Senior Product Manager on the AWS Lambda team at Amazon Web Services. He is passionate about developing intuitive product experiences that solve complex customer problems and enable customers to achieve their business goals.

Pratik Patel

Pratik Patel

Pratik is Sr Technical Account Manager and streaming analytics specialist. He works with AWS customers and provides ongoing support and technical guidance to help plan and build solutions using best practices and proactively helps in keeping customers’ AWS environments operationally healthy.

Priyanka Chaudhary

Priyanka Chaudhary

Priyanka is Senior Solutions Architect at AWS. She is specialized in data lake and analytics services and helps many customers in this area. As a Solutions Architect, she plays a crucial role in guiding strategic customers through their cloud journey by designing scalable and secure cloud solutions. Outside of work, she loves spending time with friends and family, watching movies, and traveling.