Post Syndicated from Raji Sivasubramaniam original https://aws.amazon.com/blogs/big-data/secure-and-simplify-account-setup-and-access-management-with-new-amazon-quicksight-administrative-controls/
Amazon QuickSight is a fully-managed, cloud-native business intelligence (BI) service that makes it easy to connect to your data, create interactive dashboards, and share these with tens of thousands of users, either within the QuickSight interface, or embedded in software as a service (SaaS) applications or web portals. Unlike many BI solutions in the market today, QuickSight requires no server deployments or management for scaling to tens of thousands of users, and authors build dashboards using a web-based interface, without any client downloads needed. QuickSight also supports private VPC connectivity to AWS databases and analytics services such as Amazon Relational Database Service (Amazon RDS) and Amazon Redshift, and AWS Identity and Access Management (IAM) permissions-based access to Amazon Simple Storage Service (Amazon S3) and Amazon Athena, making it secure and easy to access data in AWS via QuickSight.
In this post, we explore three new features in QuickSight that enable administrators to further simplify QuickSight setup and access controls, which makes it easier than ever to scale QuickSight to all your AWS accounts.
Overview of new QuickSight features
Administrators can take advantage of the following new features in QuickSight:
- Service control policy based sign-up controls – Admins can now use service control policies (SCPs) to restrict QuickSight sign-up options within your organization. You can restrict the QuickSight edition (Standard or Enterprise), and also the type of identity mechanisms that can be used. For example, admins can set up service control policies that deny sign-ups for a QuickSight Standard Edition and turn off the ability to invite any users other than those possible via federated single sign-on (SSO). For more information, see Using Service Control Policies to Restrict Amazon QuickSight Sign-up Options.
- Automated email sync for federated SSO users – Admins can set up QuickSight and SSO such that email addresses for end-users are automatically synced at first-time login. This avoids any manual errors during entry, and prevents use of personal email addresses (such as Gmail or Hotmail). For example, administrators can make it so that only corporate-assigned email addresses are used when users are provisioned to their QuickSight account through their identity provider (IdP). For more information, see Configuring Email Syncing for Federated Users in Amazon QuickSight.
- Bring your own role during QuickSight account setup – QuickSight allows you to bring in data stored in several AWS services to create datasets, analyses, and dashboards. QuickSight uses an IAM role to specify permissions to the AWS resources (such as Amazon S3 or Athena) at the QuickSight account level (which you can further control within QuickSight). This service role was previously created during QuickSight sign-up, and required the user signing up to have permissions to create this role. Now, administrators signing up to QuickSight can pick from an existing role in their AWS account instead of QuickSight creating a custom service role for the account. This allows you to set up your own role for a group of codependent AWS services and QuickSight that you want to work together. For more information, see Passing IAM Roles to Amazon QuickSight.
Use case overview
Let’s walk through a use case for these features.
OkTank is an enterprise in the healthcare space, where it owns and manages multiple hospitals. OkTank’s IT infrastructure is managed centrally by a team that is responsible for ensuring security and governance of the entire IT infrastructure. Each individual facility has its own AWS account, which is a member of OkTank’s central AWS Organizations account.
Each hospital needs its own QuickSight account for gathering business intelligence and improving the healthcare service they provide to their customers. The central IT team requires that each hospital when setting up their QuickSight account only signs up for Enterprise edition. In addition, they want to authenticate each hospital’s QuickSight users (admins, authors, and readers) using Okta, which is their corporate IdP. This helps them make sure that QuickSight administrators can’t invite non-federated users intentionally or by mistake.
Administrators also want to make sure that when users get an invitation to sign up for their hospital’s QuickSight account, they only use pre-approved email address as configured in Okta and don’t enter their personal email address. This provides a seamless sign-up experience for new users because they don’t have to enter an email address anymore, and it provides more security because users can’t use their personal email for sign-up and future logins.
Finally, because AWS administrators manages other services such as Amazon S3 and Athena, which are being used by QuickSight, they have configured roles for each of these services. Administrators want to make sure they can use preconfigured roles when external services are being used by QuickSight. This makes sure that users and QuickSight admins can’t create their own roles for these services, and the roles can be enforced by administrators of those external services.
To enable all these setup and access controls, OkTank’s Organizations administrator and the hospital’s QuickSight administrator use the new features in the following order:
- Bring your own role during QuickSight account setup
- SCP-based sign-up controls
- Automated email sync for federated SSO users
Bring your own role during QuickSight account setup
OkTank uses Amazon S3 for storage, and wants to use it as a data source in all the hospitals’ QuickSight accounts. An IT administrator creates an IAM role for Amazon S3 that only allows read-only access to a QuickSight account and its users. During QuickSight account creation, the administrator can select the read-only Amazon S3 role. OkTank’s Organizations administrator for each hospital’s AWS account completes the following steps to create an Amazon S3 role and configure it to be used by QuickSight:
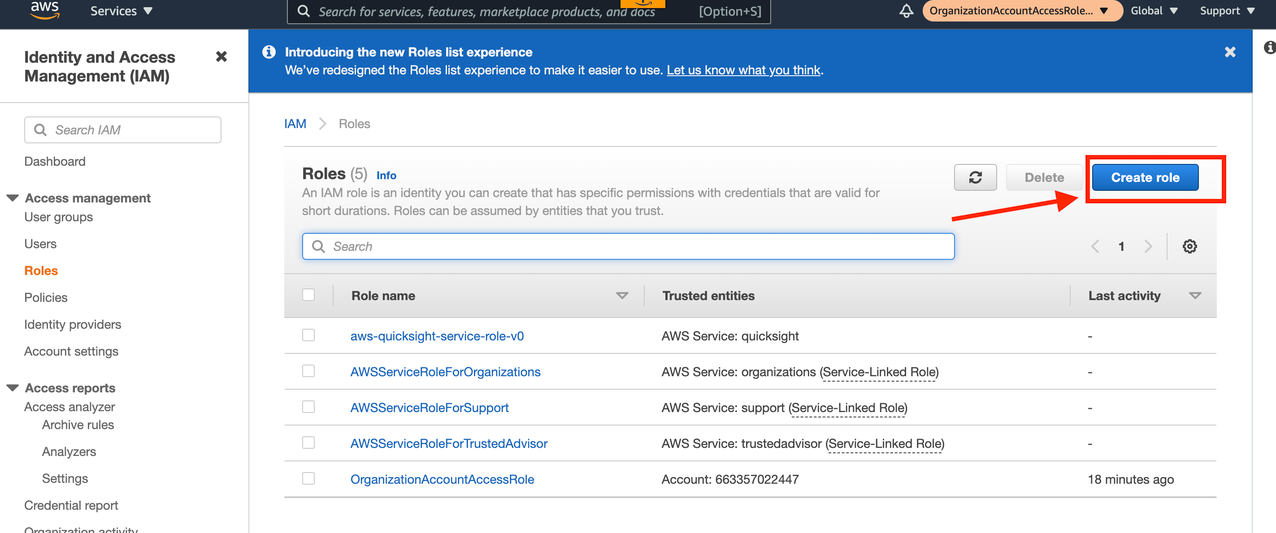
- On the IAM console, choose Roles in the navigation pane.

- Choose Create role.

- Choose AWS Service and choose S3.

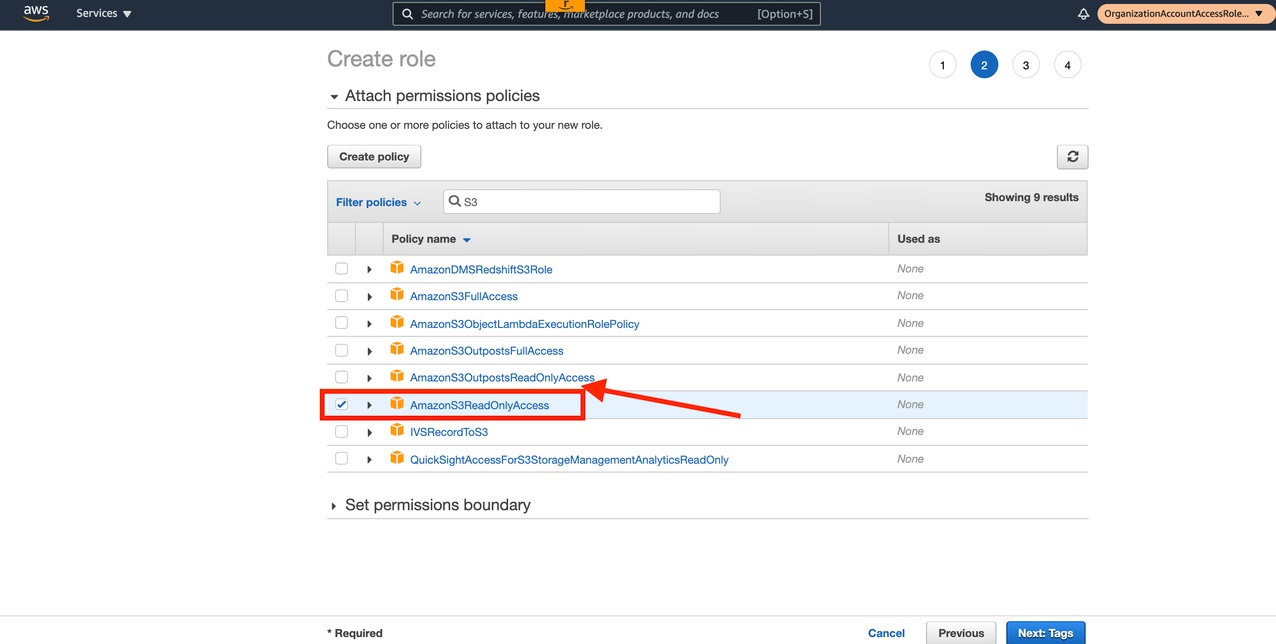
- Choose Next: Permissions.
- Search for S3 and select AmazonS3ReadOnlyAccess.
- Choose Next: Tags.

- Choose Next: Review.
- For Role name, enter
QuickSightS3Role. - Choose Create role.

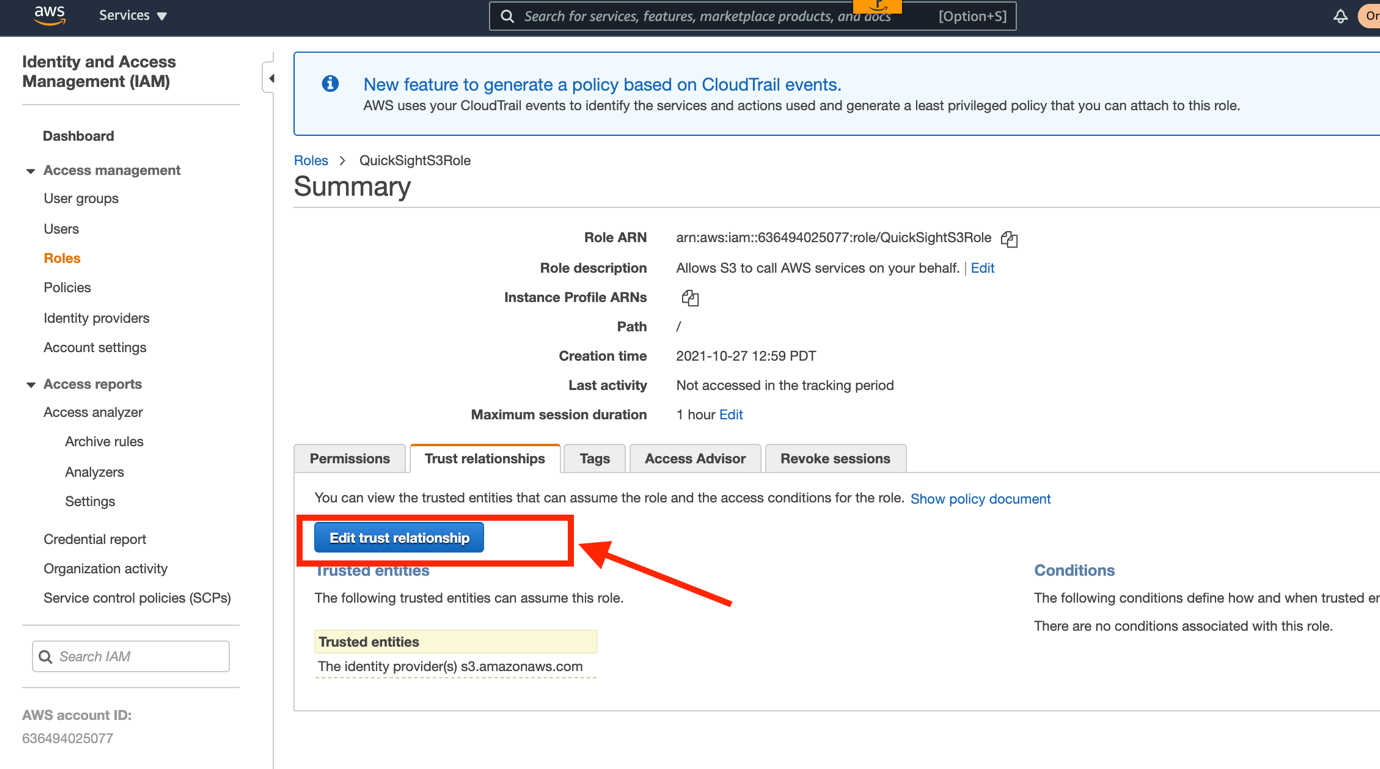
- Choose the newly created role.
- On the Trust relationships tab,
- Choose Edit trust relationship.

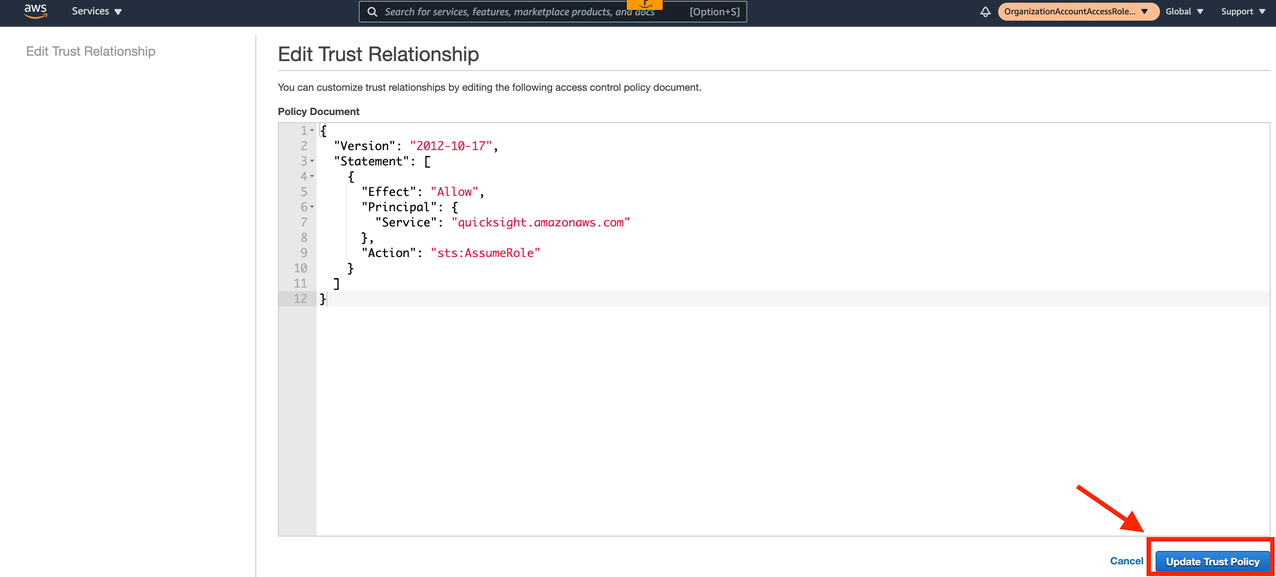
- Enter the following JSON:
- Choose Update Trust Policy.


This newly created role is now available for the administrator to choose while creating a QuickSight account in the next section.
SCP-based sign-up controls
To ensure that hospitals when creating their QuickSight account only choose Enterprise edition and their users are only invited via Okta, OkTank’s Organizations administrator completes the following steps:
- On the Organizations console, choose Policies in the navigation pane.
- Choose Service control policies.

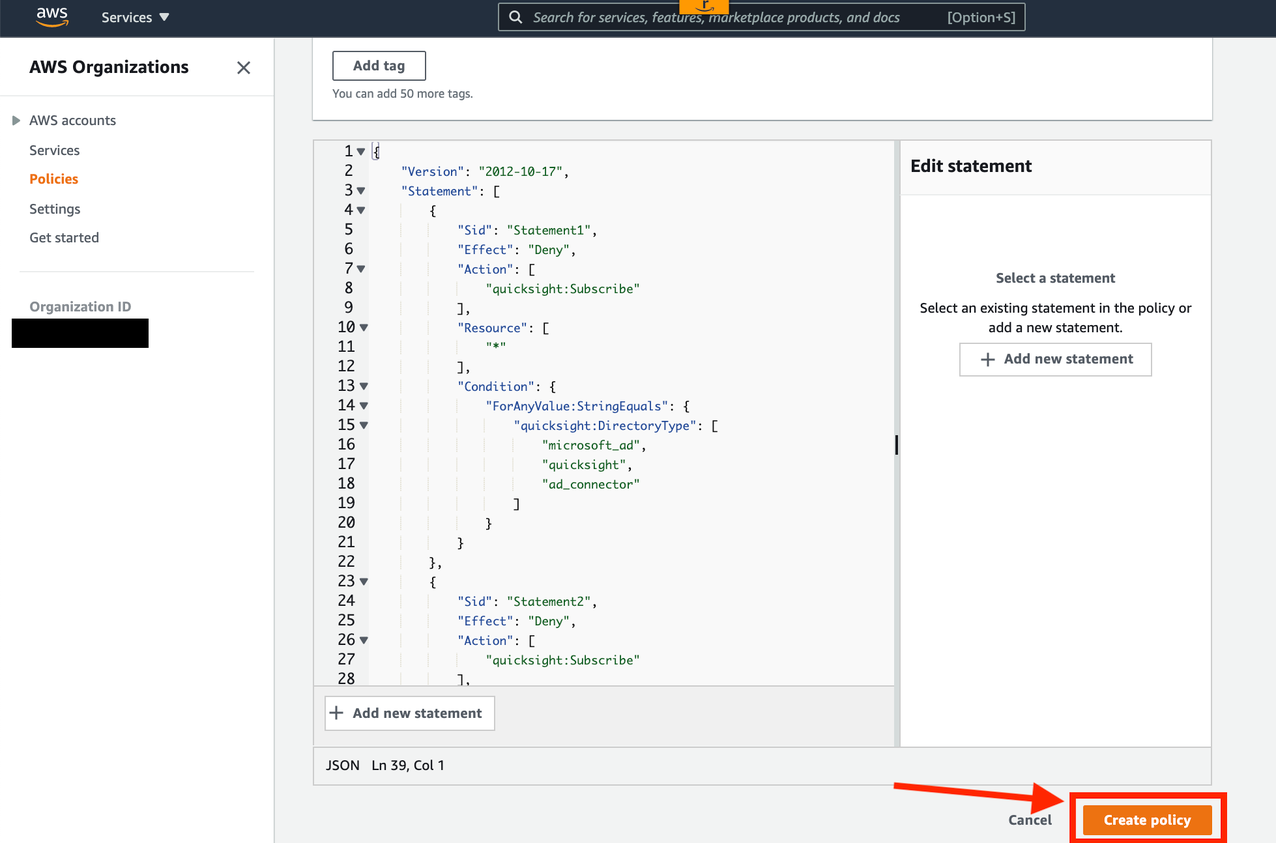
- Choose Create policy.

- For Policy name, enter
QuickSightSCP. - Enter the following JSON in the policy section:
- Choose Create policy.

- Choose AWS accounts in the navigation pane.
- Choose the Root account.

- On the Policies tab, under Service control policies, choose Attach.

- Select the policy
QuickSightSCPthat you created earlier and choose Attach policy.


Now the newly created policy is attached to all the hospital’s AWS accounts.
Test the sign-up controls
As the hospital’s AWS admin, you can test the sign-up controls to make sure they prevent you from using Standard Edition.
- When signing up for a QuickSight account, choose Standard.
- Select Use IAM federated identities & QuickSight-managed users.


You’re presented with the following error message.

As per the new SCP policy attached to the hospital’s AWS account, the admin has to choose Enterprise Edition and use IAM federated identities in order to successfully set up a QuickSight account.
- Choose Enterprise.
- Select Use IAM federated identities only.


The Amazon S3 read-only role that you created earlier is available in QuickSight.
- Select Use an existing role and choose QuickSightS3Role.
- Choose Finish.


After you make your selections per the SCP policy and the custom role for Amazon S3 read-only access, this QuickSight account is created successfully for the hospital.

Automated email sync for federated SSO users
The hospital’s QuickSight account is now set up to only accept users invited through federated SSO. In this case, they use Okta, which is their corporate IdP. After authentication via Okta is complete, the QuickSight users are asked to enter their email address when they log in for the very first time.

This email request may create confusion for some users as to which email address they should use.

The hospital’s QuickSight admin team wants to streamline the user login process and prevent users from entering any emails other than their corporate email. To ensure that, the hospital’s QuickSight admin decides to use the new automated email sync feature for federated SSO users. With this new feature, admins can set up QuickSight and SSO such that email addresses for end-users are automatically synced at first-time login. This prevents any manual errors during entry, or users signing up with personal email addresses. OkTank’s administrators can set up controls so that only corporate-assigned email addresses are used when users are provisioned to their QuickSight account through their IdP.
The hospital’s admin completes the following steps to use this feature:
- On the IAM console, choose Roles in the navigation pane.
- Search for the role you use with
AssumeRoleWithSAML(for this post, it’s calledQuickSightOktaFederatedRole).

- On the Trust relationships tab, choose Edit trust relationship.

- For the policy details, enter the following JSON:
- Choose Update Trust Policy.


OkTank’s central IT administrator (responsible for managing Okta’s configuration) makes the following changes in the Okta configuration via Okta’s admin console:
- Log in to the Okta admin console.
- Choose Applications in the navigation pane.

- Choose the Okta application for QuickSight federation (in this case, it’s called AWS Account Federation – QuickSight).

- Choose the Sign On tab.

- In the Settings section, choose Edit.

- Select SAML 2.0 and expand the Attributes section.

- Add an attribute statement as follows:
- For Name, enter
https://aws.amazon.com/SAML/Attributes/PrincipalTag:Email. - For Name format, select URI reference.
- For Value, select user.email.
- For Name, enter
- Choose Save.


Finally, after you update the trust relationship for the IAM role with AssumeRoleWithSAML and add a SAML attribute for the IAM Principal tag in Okta, the next step is to turn on email syncing for federated users in QuickSight.
OkTank’s central IT administrator (responsible for managing Okta’s configuration) makes the following changes in the Okta configuration via Okta’s admin console.
- On the QuickSight console, on the user name menu, choose Manage QuickSight.

- Choose Single sign-on (SSO) in the navigation pane.

- In the Email Syncing for Federated Users section, select ON.


Once turned on, users when launching the QuickSight application via the Okta console for the first time bypass the email request and are redirected to the QuickSight console.

Conclusion
With these features, administrators can now strengthen controls around QuickSight accounts and open up QuickSight access to more AWS accounts within your organization. Try out these features to strengthen the security of your QuickSight account and simplify end-user access, and share your feedback and questions in the comments.
Stay tuned for more new admin capabilities, and check out what’s new for the latest updates.
About the Authors
Raji Sivasubram aniam is a Specialist Solutions Architect at AWS, focusing on Analytics. Raji has 20 years of experience in architecting end-to-end Enterprise Data Management, Business Intelligence and Analytics solutions for Fortune 500 and Fortune 100 companies across the globe. She has in-depth experience in integrated healthcare data and analytics with wide variety of healthcare datasets including managed market, physician targeting and patient analytics. In her spare time, Raji enjoys hiking, yoga and gardening.
 Mayank Agarwal is a product manager for Amazon QuickSight, AWS’ cloud-native, fully managed BI service. He focuses on account administration, governance and developer experience. He started his career as an embedded software engineer developing handheld devices. Prior to QuickSight he was leading engineering teams at Credence ID, developing custom mobile embedded device and web solutions using AWS services that make biometric enrollment and identification fast, intuitive, and cost-effective for Government sector, healthcare and transaction security applications.


 Kareem Syed-Mohammed is a Product Manager at Amazon QuickSight. He focuses on embedded analytics, APIs, and developer experience. Prior to QuickSight he has been with AWS Marketplace and Amazon retail as a PM. Kareem started his career as a developer and then PM for call center technologies, Local Expert and Ads for Expedia. He worked as a consultant with McKinsey and Company for a short while.