Post Syndicated from Sean Beath original https://aws.amazon.com/blogs/big-data/use-fuzzy-string-matching-to-approximate-duplicate-records-in-amazon-redshift/
Amazon Redshift is a fully managed, petabyte-scale data warehouse service in the cloud. Amazon Redshift enables you to run complex SQL analytics at scale and performance on terabytes to petabytes of structured and unstructured data, and make the insights widely available through popular business intelligence (BI) and analytics tools.
It’s common to ingest multiple data sources into Amazon Redshift to perform analytics. Often, each data source will have its own processes of creating and maintaining data, which can lead to data quality challenges within and across sources.
One challenge you may face when performing analytics is the presence of imperfect duplicate records within the source data. Answering questions as simple as “How many unique customers do we have?” can be very challenging when the data you have available is like the following table.
| Name | Address | Date of Birth |
| Cody Johnson | 8 Jeffery Brace, St. Lisatown | 1/3/1956 |
| Cody Jonson | 8 Jeffery Brace, St. Lisatown | 1/3/1956 |
Although humans can identify that Cody Johnson and Cody Jonson are most likely the same person, it can be difficult to distinguish this using analytics tools. This identification of duplicate records also becomes nearly impossible when working on large datasets across multiple sources.
This post presents one possible approach to addressing this challenge in an Amazon Redshift data warehouse. We import an open-source fuzzy matching Python library to Amazon Redshift, create a simple fuzzy matching user-defined function (UDF), and then create a procedure that weights multiple columns in a table to find matches based on user input. This approach allows you to use the created procedure to approximately identify your unique customers, improving the accuracy of your analytics.
This approach doesn’t solve for data quality issues in source systems, and doesn’t remove the need to have a wholistic data quality strategy. For addressing data quality challenges in Amazon Simple Storage Service (Amazon S3) data lakes and data pipelines, AWS has announced AWS Glue Data Quality (preview). You can also use AWS Glue DataBrew, a visual data preparation tool that makes it easy for data analysts and data scientists to clean and normalize data to prepare it for analytics.
Prerequisites
To complete the steps in this post, you need the following:
- An AWS account.
- An Amazon Redshift cluster or Amazon Redshift Serverless endpoint.
- An S3 bucket.
- The open-source Python package TheFuzz—from this link, you need all files in the folder
thefuzzzipped and uploaded to the S3 bucket. - An AWS Identity and Access Management (IAM) role that provides read access to the created S3 bucket. This role will need to be set as the default role on the Amazon Redshift cluster or endpoint for the following steps to work.
The following AWS CloudFormation stack will deploy a new Redshift Serverless endpoint and an S3 bucket for use in this post.
![]()
All SQL commands shown in this post are available in the following notebook, which can be imported into the Amazon Redshift Query Editor V2.
Overview of the dataset being used
The dataset we use is mimicking a source that holds customer information. This source has a manual process of inserting and updating customer data, and this has led to multiple instances of non-unique customers being represented with duplicate records.
The following examples show some of the data quality issues in the dataset being used.
In this first example, all three customers are the same person but have slight differences in the spelling of their names.
| id | name | age | address_line1 | city | postcode | state |
| 1 | Cody Johnson | 80 | 8 Jeffrey Brace | St. Lisatown | 2636 | South Australia |
| 101 | Cody Jonson | 80 | 8 Jeffrey Brace | St. Lisatown | 2636 | South Australia |
| 121 | Kody Johnson | 80 | 8 Jeffrey Brace | St. Lisatown | 2636 | South Australia |
In this next example, the two customers are the same person with slightly different addresses.
| id | name | age | address_line1 | city | postcode | state |
| 7 | Angela Watson | 59 | 3/752 Bernard Follow | Janiceberg | 2995 | Australian Capital Territory |
| 107 | Angela Watson | 59 | 752 Bernard Follow | Janiceberg | 2995 | Australian Capital Territory |
In this example, the two customers are different people with the same address. This simulates multiple different customers living at the same address who should still be recognized as different people.
| id | name | age | address_line1 | city | postcode | state |
| 6 | Michael Hunt | 69 | 8 Santana Rest | St. Jessicamouth | 2964 | Queensland |
| 106 | Sarah Hunt | 69 | 8 Santana Rest | St. Jessicamouth | 2964 | Queensland |
Load the dataset
First, create a new table in your Redshift Serverless endpoint and copy the test data into it by doing the following:
- Open the Query Editor V2 and log in using the admin user name and details defined when the endpoint was created.
- Run the following CREATE TABLE statement:

- Run the following COPY command to copy data into the newly created table:
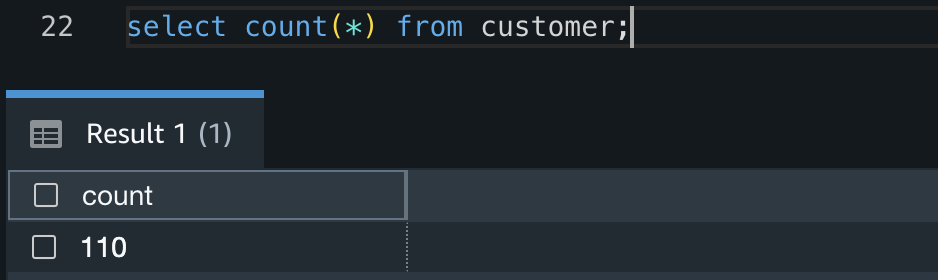
- Confirm the COPY succeeded and there are 110 records in the table by running the following query:


Fuzzy matching
Fuzzy string matching, more formally known as approximate string matching, is the technique of finding strings that match a pattern approximately rather than exactly. Commonly (and in this solution), the Levenshtein distance is used to measure the distance between two strings, and therefore their similarity. The smaller the Levenshtein distance between two strings, the more similar they are.
In this solution, we exploit this property of the Levenshtein distance to estimate if two customers are the same person based on multiple attributes of the customer, and it can be expanded to suit many different use cases.
This solution uses TheFuzz, an open-source Python library that implements the Levenshtein distance in a few different ways. We use the partial_ratio function to compare two strings and provide a result between 1–100. If one of the strings matches perfectly with a portion of the other, the partial_ratio function will return 100.
Weighted fuzzy matching
By adding a scaling factor to each of our column fuzzy matches, we can create a weighted fuzzy match for a record. This is especially useful in two scenarios:
- We have more confidence in some columns of our data than others, and therefore want to prioritize their similarity results.
- One column is much longer than the others. A single character difference in a long string will have much less impact on the Levenshtein distance than a single character difference in a short string. Therefore, we want to prioritize long string matches over short string matches.
The solution in this post applies weighted fuzzy matching based on user input defined in another table.
Create a table for weight information
This reference table holds two columns; the table name and the column mapping with weights. The column mapping is held in a SUPER datatype, which allows JSON semistructured data to be inserted and queried directly in Amazon Redshift. For examples on how to query semistructured data in Amazon Redshift, refer to Querying semistructured data.
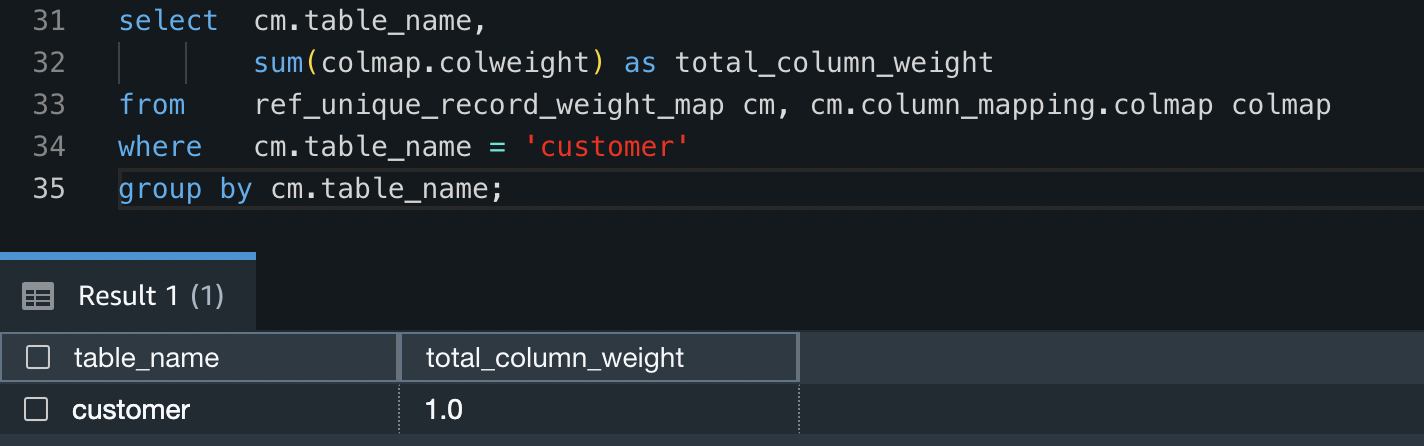
In this example, we apply the largest weight to the column address_line1 (0.5) and the smallest weight to the city and postcode columns (0.1).
Using the Query Editor V2, create a new table in your Redshift Serverless endpoint and insert a record by doing the following:
- Run the following CREATE TABLE statement:
- Run the following INSERT statement:
- Confirm the mapping data has inserted into the table correctly by running the following query:

- To check all weights for the
customertable add up to 1 (100%), run the following query:

User-defined functions
With Amazon Redshift, you can create custom scalar user-defined functions (UDFs) using a Python program. A Python UDF incorporates a Python program that runs when the function is called and returns a single value. In addition to using the standard Python functionality, you can import your own custom Python modules, such as the module described earlier (TheFuzz).
In this solution, we create a Python UDF to take two input values and compare their similarity.
Import external Python libraries to Amazon Redshift
Run the following code snippet to import the TheFuzz module into Amazon Redshift as a new library. This makes the library available within Python UDFs in the Redshift Serverless endpoint. Make sure to provide the name of the S3 bucket you created earlier.
Create a Python user-defined function
Run the following code snippet to create a new Python UDF called unique_record. This UDF will do the following:
- Take two input values that can be of any data type as long as they are the same data type (such as two integers or two varchars).
- Import the newly created
thefuzzPython library. - Return an integer value comparing the partial ratio between the two input values.
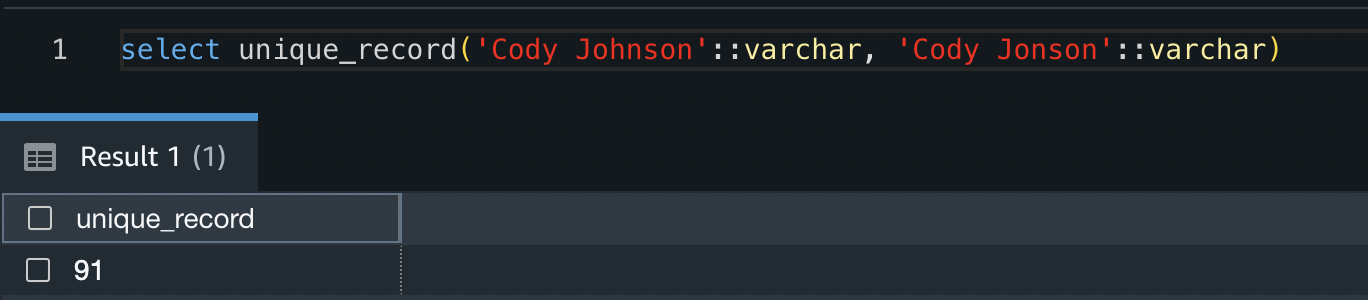
You can test the function by running the following code snippet:
The result shows that these two strings are have a similarity value of 91%.
Now that the Python UDF has been created, you can test the response of different input values.
Alternatively, you can follow the amazon-redshift-udfs GitHub repo to install the f_fuzzy_string_match Python UDF.
Stored procedures
Stored procedures are commonly used to encapsulate logic for data transformation, data validation, and business-specific logic. By combining multiple SQL steps into a stored procedure, you can reduce round trips between your applications and the database.
In this solution, we create a stored procedure that applies weighting to multiple columns. Because this logic is common and repeatable regardless of the source table or data, it allows us to create the stored procedure once and use it for multiple purposes.
Create a stored procedure
Run the following code snippet to create a new Amazon Redshift stored procedure called find_unique_id. This procedure will do the following:
- Take one input value. This value is the table you would like to create a golden record for (in our case, the
customertable). - Declare a set of variables to be used throughout the procedure.
- Check to see if weight data is in the staging table created in previous steps.
- Build a query string for comparing each column and applying weights using the weight data inserted in previous steps.
- For each record in the input table that doesn’t have a unique record ID (URID) yet, it will do the following:
- Create a temporary table to stage results. This temporary table will have all potential URIDs from the input table.
- Allocate a similarity value to each URID. This value specifies how similar this URID is to the record in question, weighted with the inputs defined.
- Choose the closest matched URID, but only if there is a >90% match.
- If there is no URID match, create a new URID.
- Update the source table with the new URID and move to the next record.
This procedure will only ever look for new URIDs for records that don’t already have one allocated. Therefore, rerunning the URID procedure multiple times will have no impact on the results.
Now that the stored procedure has been created, create the unique record IDs for the customer table by running the following in the Query Editor V2. This will update the urid column of the customer table.

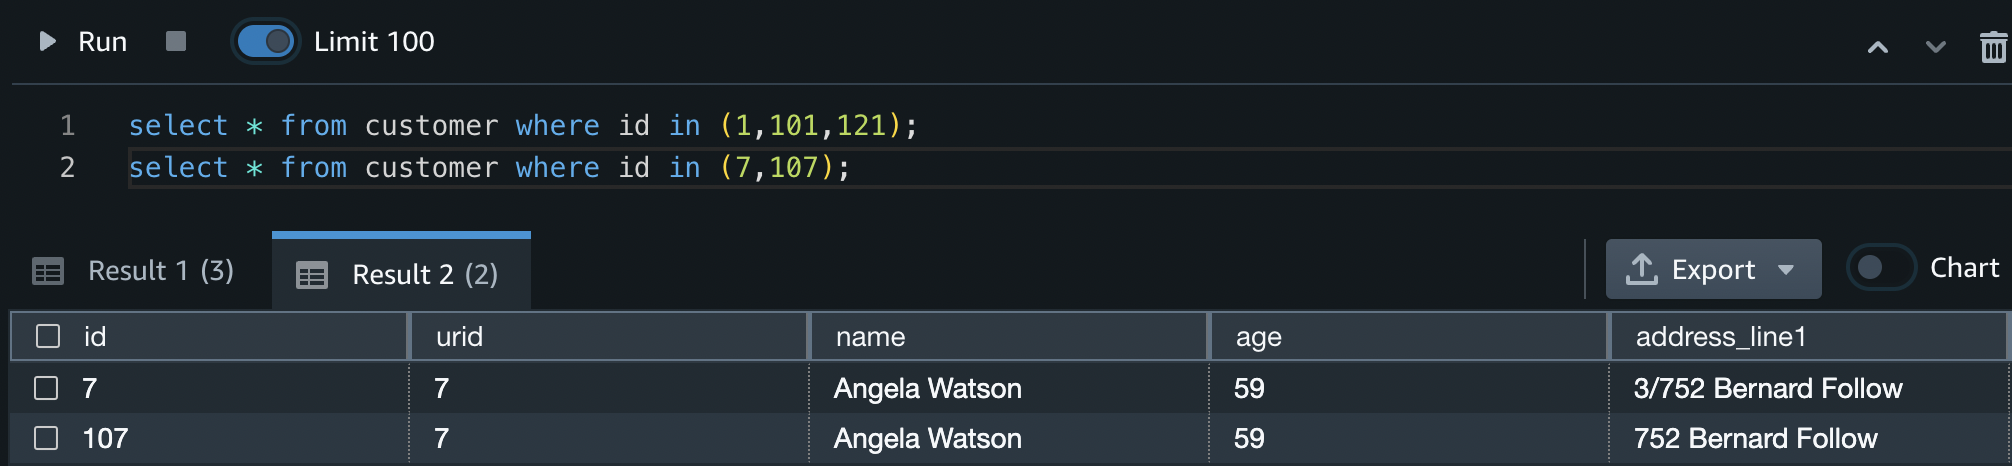
When the procedure has completed its run, you can identify what duplicate customers were given unique IDs by running the following query:

From this you can see that IDs 1, 101, and 121 have all been given the same URID, as have IDs 7 and 107.
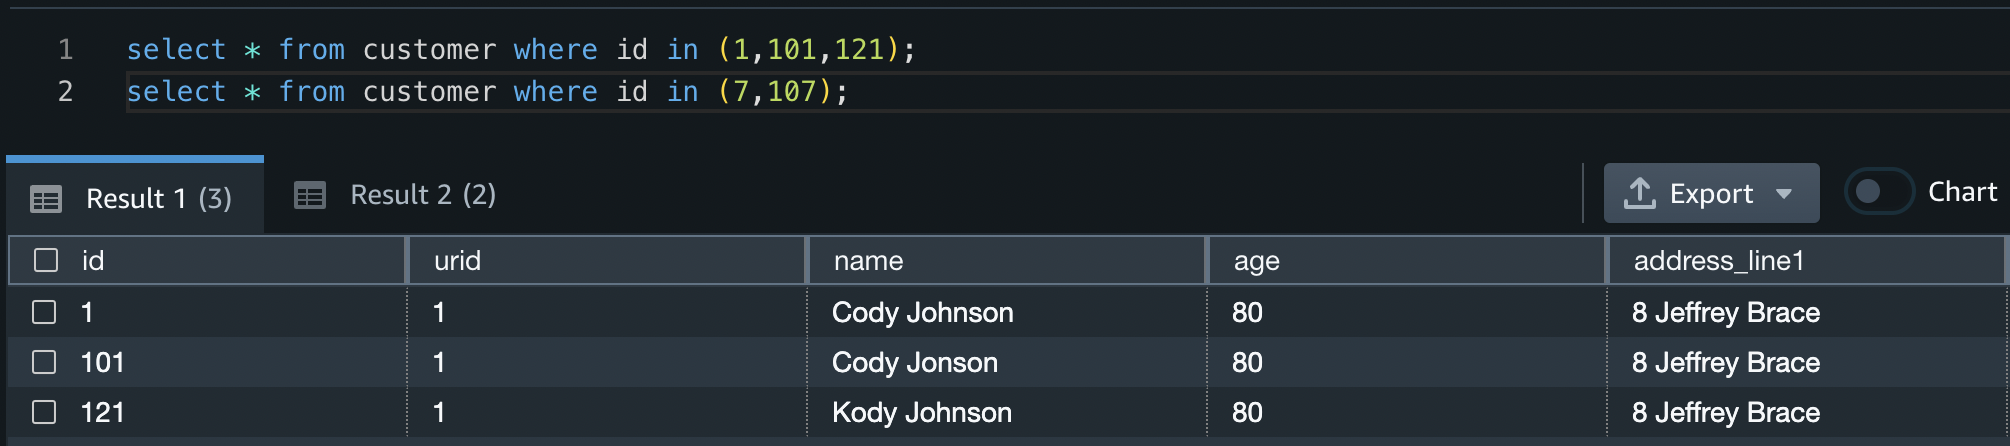
The procedure has also correctly identified that IDs 6 and 106 are different customers, and they therefore don’t have the same URID.

Clean up
To avoid incurring future reoccurring charges, delete all files in the S3 bucket you created. After you delete the files, go to the AWS CloudFormation console and delete the stack deployed in this post. This will delete all created resources.
Conclusion
In this post, we showed one approach to identifying imperfect duplicate records by applying a fuzzy matching algorithm in Amazon Redshift. This solution allows you to identify data quality issues and apply more accurate analytics to your dataset residing in Amazon Redshift.
We showed how you can use open-source Python libraries to create Python UDFs, and how to create a generic stored procedure to identify imperfect matches. This solution is extendable to provide any functionality required, including adding as a regular process in your ELT (extract, load, and transform) workloads.
Test the created procedure on your datasets to investigate the presence of any imperfect duplicates, and use the knowledge learned throughout this post to create stored procedures and UDFs to implement further functionality.
If you’re new to Amazon Redshift, refer to Getting started with Amazon Redshift for more information and tutorials on Amazon Redshift. You can also refer to the video Get started with Amazon Redshift Serverless for information on starting with Redshift Serverless.
About the Author

Sean Beath is an Analytics Solutions Architect at Amazon Web Services. He has experience in the full delivery lifecycle of data platform modernisation using AWS services and works with customers to help drive analytics value on AWS.