All posts by Yukiko Iwazumi

Amazon S3 Tables with dbt: Iceberg-based data transformations using AWS Glue

Post Syndicated from Yukiko Iwazumi original https://aws.amazon.com/blogs/big-data/amazon-s3-tables-with-dbt-iceberg-based-data-transformations-using-aws-glue/

Amazon S3 Tables, a capability of Amazon Simple Storage Service (Amazon S3), deliver a cloud object store with built-in Apache Iceberg support and streamline storing tabular data at scale. When you integrate them with dbt and AWS Glue, you can run SQL-based data transformations with the reliability and performance of a modern lakehouse, bringing software engineering best practices to the data space.

This post demonstrates how to configure and implement dbt transformations using Amazon S3 Tables with the dbt-glue adapter. Starting with version 1.12.4, the dbt-glue adapter adds incremental merge support for S3 Tables, which the patterns in this post build on. We cover the specific configuration requirements for the dbt-glue adapter and practical implementation patterns built on S3 Tables incremental models: the merge strategy to keep the latest state per record and the append strategy to build an audit-friendly change history.

Example scenario

In this walkthrough, we simulate an ecommerce system that tracks customer profiles and their orders. We first run the pipeline against an initial dataset, then simulate an update to the upstream source data and run it again to demonstrate incremental updates.

Our example scenario follows a data pipeline architecture that uses S3 Tables throughout. Raw ecommerce data (customers.csv and orders.csv) lands in a regular S3 bucket as comma-separated values (CSV). dbt then transforms it through two layers of S3 Tables. A staging layer cleanses and standardizes each source, and a mart layer produces analytics-ready dimension and fact tables. You can query the resulting mart data from a variety of analytics and business intelligence (BI) tools such as Amazon Athena and Amazon Quick Sight. In this post, we query it from Athena.

The mart layer demonstrates two incremental strategies side by side: the fact_orders model uses merge to keep the latest state per order, while fact_order_history uses append to accumulate a full change history.

The data pipeline flow looks like the following chart:

Source Data (Regular S3 - CSV)
    └─ customers.csv, orders.csv
    ↓
Staging Models (S3 Tables)
    ├─ stg_customers
    └─ stg_orders
    ↓
Mart Models (S3 Tables)
    ├─ dim_customers
    ├─ fact_orders                (incremental with merge --- latest state per order)
    └─ fact_order_history         (incremental with append --- change history)
    ↓
Consumption Layer (Athena, Quick Sight, BI tools)

The following diagram shows the architecture behind this pipeline: dbt-glue submits each model as a Spark SQL statement to an AWS Glue interactive session, which reads from the raw S3 bucket and writes the staging and mart tables as S3 Tables within the same data lake.
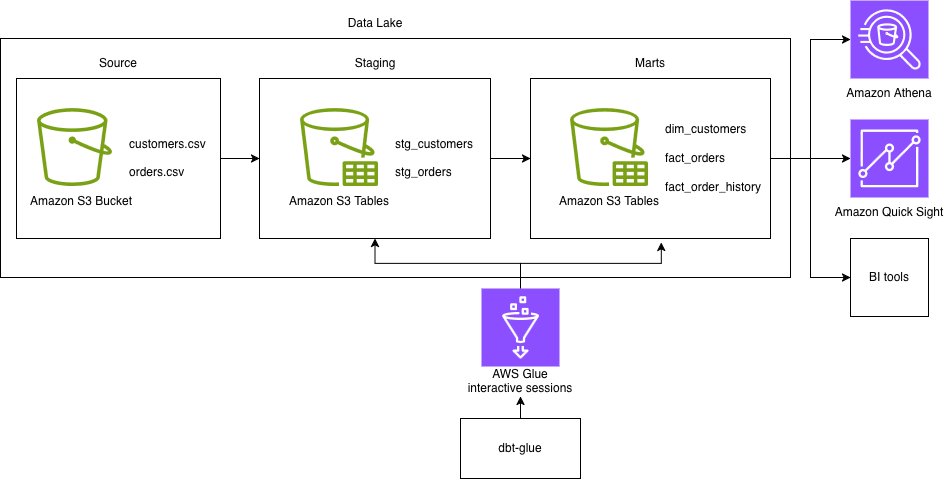
dbt-glue submits each model to an AWS Glue interactive session that reads the raw S3 bucket and writes staging and mart tables as S3 Tables

Figure 1: Architecture of the dbt transformation pipeline on Amazon S3 Tables with AWS Glue

Prerequisites

Before you begin, make sure that you have the following prerequisites:

Create S3 Tables namespace and AWS Glue databases

In this section, you set up the AWS infrastructure that dbt-glue needs: an S3 table bucket and namespace to hold your dbt models, and an AWS Glue database for your source data.

First, set your environment variables. Replace YOUR_ACCOUNT_ID, YOUR-REGULAR-BUCKET, and YOUR_Glue_Role_ARN with your data:

export DBT_GLUE_REGION="us-east-1"
export AWS_ACCOUNT_ID="<YOUR_ACCOUNT_ID>"
export S3_TABLES_BUCKET_NAME="dbt-glue-s3-tables-bucket"
export DBT_ROLE_ARN="<YOUR_Glue_Role_ARN>"
export DBT_S3_LOCATION="s3://<YOUR-REGULAR-BUCKET>/glue/data/"
export DBT_S3_TABLES_BUCKET="${AWS_ACCOUNT_ID}:s3tablescatalog/${S3_TABLES_BUCKET_NAME}"

The DBT_S3_TABLES_BUCKET format is AWS_ACCOUNT_ID:s3tablescatalog/BUCKET_NAME, not an Amazon Resource Name (ARN).

Second, create an S3 table bucket and namespace:

  1. Create S3 table bucket.
    aws s3tables create-table-bucket \
      --region $DBT_GLUE_REGION \
      --name $S3_TABLES_BUCKET_NAME

  2. Create namespace within the table bucket.
    aws s3tables create-namespace \
      --region $DBT_GLUE_REGION \
      --table-bucket-arn "arn:aws:s3tables:${DBT_GLUE_REGION}:${AWS_ACCOUNT_ID}:bucket/${S3_TABLES_BUCKET_NAME}" \
      --namespace dbt_glue_s3_tables

    Note that the S3 Tables namespace is where the S3 Tables corresponding to your dbt models will be created. This is different from regular S3 buckets. Because the “Integration with AWS analytics services” option for S3 Tables is enabled, creating the namespace automatically creates a corresponding AWS Glue database. Verify that it exists in the next step:

  3. Verify that the database exists.
    aws glue get-database \
      --region $DBT_GLUE_REGION \
      --catalog-id "$DBT_S3_TABLES_BUCKET" \
      --name dbt_glue_s3_tables

    Third, create an AWS Glue database for source data tables:

  4. Create an AWS Glue database for source tables.
    aws glue create-database \
      --region $DBT_GLUE_REGION \
      --database-input Name=raw_ecommerce,Description='Raw e-commerce data'

Create sample dataset

In this section, you create sample ecommerce data to transform with dbt: two CSV files (customers and orders), upload them to a general purpose S3 bucket, and register them as AWS Glue tables that your dbt models can read from.

Note: All sample data in this post is synthetic. It was generated to mimic realistic patterns for demonstration purposes only and doesn’t represent any real individuals or transactions.

Complete following steps to create a sample dataset:

  1. Create a directory for sample data and save the following two CSV files:
    customers.csv:

    1,[email protected],Alejandro,Rosalez,2024-01-15,Premium
    2,[email protected],Ana Carolina,Silva,2024-02-20,Standard
    3,[email protected],Arnav,Desai,2024-03-10,Premium
    4,[email protected],Carlos,Salazar,2024-04-05,Standard
    5,[email protected],Diego,Ramirez,2024-05-12,Basic

    orders.csv:

    1001,1,2024-06-01,150.00,completed,2024-06-01T10:00:00
    1002,2,2024-06-02,75.50,completed,2024-06-02T10:00:00
    1003,1,2024-06-03,200.00,completed,2024-06-03T10:00:00
    1004,3,2024-06-04,125.75,pending,2024-06-04T10:00:00
    1005,4,2024-06-05,89.99,completed,2024-06-05T10:00:00

  2. Create the bucket for source data if it doesn’t exist, and upload the CSV files to the S3 bucket. Replace YOUR-SOURCE-DATA-BUCKET with your bucket name.
    export SOURCE_BUCKET="<YOUR-SOURCE-DATA-BUCKET>"
    
    # Create S3 bucket for source data
    aws s3 mb s3://${SOURCE_BUCKET} --region ${DBT_GLUE_REGION}
    
    # Upload CSV files
    aws s3 cp customers.csv s3://${SOURCE_BUCKET}/raw/customers/ --region ${DBT_GLUE_REGION}
    aws s3 cp orders.csv s3://${SOURCE_BUCKET}/raw/orders/ --region ${DBT_GLUE_REGION}

  3. Create an AWS Glue database and tables for source data.
    export SOURCE_DATABASE="raw_ecommerce"
    
    # Create Glue table for customers
    aws glue create-table \
      --database-name ${SOURCE_DATABASE} \
      --table-input '{
        "Name": "customers",
        "StorageDescriptor": {
          "Columns": [
            {"Name": "customer_id", "Type": "bigint"},
            {"Name": "email", "Type": "string"},
            {"Name": "first_name", "Type": "string"},
            {"Name": "last_name", "Type": "string"},
            {"Name": "registration_date", "Type": "string"},
            {"Name": "customer_segment", "Type": "string"}
          ],
          "Location": "s3://'${SOURCE_BUCKET}'/raw/customers/",
          "InputFormat": "org.apache.hadoop.mapred.TextInputFormat",
          "OutputFormat": "org.apache.hadoop.hive.ql.io.HiveIgnoreKeyTextOutputFormat",
          "SerdeInfo": {
            "SerializationLibrary": "org.apache.hadoop.hive.serde2.OpenCSVSerde",
            "Parameters": {
              "separatorChar": ","
            }
          }
        },
        "TableType": "EXTERNAL_TABLE"
      }' \
      --region ${DBT_GLUE_REGION}
    
    # Create Glue table for orders
    aws glue create-table \
      --database-name ${SOURCE_DATABASE} \
      --table-input '{
        "Name": "orders",
        "StorageDescriptor": {
          "Columns": [
            {"Name": "order_id", "Type": "bigint"},
            {"Name": "customer_id", "Type": "bigint"},
            {"Name": "order_date", "Type": "string"},
            {"Name": "order_amount", "Type": "double"},
            {"Name": "order_status", "Type": "string"},
            {"Name": "updated_at", "Type": "string"}
          ],
          "Location": "s3://'${SOURCE_BUCKET}'/raw/orders/",
          "InputFormat": "org.apache.hadoop.mapred.TextInputFormat",
          "OutputFormat": "org.apache.hadoop.hive.ql.io.HiveIgnoreKeyTextOutputFormat",
          "SerdeInfo": {
            "SerializationLibrary": "org.apache.hadoop.hive.serde2.OpenCSVSerde",
            "Parameters": {
              "separatorChar": ","
            }
          }
        },
        "TableType": "EXTERNAL_TABLE"
      }' \
      --region ${DBT_GLUE_REGION}

Install dbt, the dbt CLI, and the dbt adapter

The dbt CLI is a command-line interface for running dbt projects. It’s free to use and available as an open source project. Before installing dbt-core, make sure your Python version is 3.10, 3.11, or 3.12.

  1. Install dbt and the dbt CLI with the following code:
    $ pip3 install --no-cache-dir dbt-core

    For more information, refer to How to install dbt, What is dbt?, Viewpoint, and What version of Python can I use?.

  2. Install the dbt-glue adapter with the following code:
    $ pip3 install --no-cache-dir dbt-glue

    Note that you need to install dbt-glue 1.12.4 or higher, which adds support for incremental append and merge models on S3 Tables.

Create a dbt project

In this section, you create a new dbt project using dbt init, which generates the standard directory structure (such as models, macros, and tests) that you will populate with the S3 Tables models in the next sections.

  1. Run the dbt init command to create and initialize a new empty dbt project.
    $ dbt init

  2. For a project name, enter dbt_glue_s3_tables.
  3. For a database, choose [1] glue.

Please ignore dbt_project.yml file [ERROR not found] message as we are going to create it in the next step.

Configure dbt profile

The dbt profile configuration is critical for S3 Tables integration. In this section, you create a dbt profile that connects to AWS Glue Interactive Sessions and configures Spark to read and write S3 Tables through the Iceberg catalog, then validate the connection with dbt debug.

  1. Create ~/.dbt/profiles.yml with the following structure:
    dbt_glue_s3_tables:
      target: dev
      outputs:
        dev:
          type: glue
          glue_version: "6.0"
          role_arn: "{{ env_var('DBT_ROLE_ARN') }}"
          region: "{{ env_var('DBT_GLUE_REGION') }}"
          workers: 2
          worker_type: G.1X
          schema: dbt_glue_s3_tables
    
          # S3 Tables Spark configuration (space-delimited format)
          conf: "spark.sql.extensions=org.apache.iceberg.spark.extensions.IcebergSparkSessionExtensions --conf spark.sql.catalog.spark_catalog=org.apache.iceberg.spark.SparkSessionCatalog --conf spark.sql.catalog.spark_catalog.type=glue --conf spark.sql.catalog.glue_catalog=org.apache.iceberg.spark.SparkCatalog --conf spark.sql.catalog.glue_catalog.warehouse={{ env_var('DBT_S3_LOCATION') }} --conf spark.sql.catalog.glue_catalog.catalog-impl=org.apache.iceberg.aws.glue.GlueCatalog --conf spark.sql.catalog.glue_catalog.io-impl=org.apache.iceberg.aws.s3.S3FileIO --conf spark.sql.catalog.glue_catalog.glue.id={{ env_var('DBT_S3_TABLES_BUCKET') }} --conf spark.sql.defaultCatalog=glue_catalog"
    
          # Enable S3 Tables support
          datalake_formats: "iceberg"

  2. Run the following command to validate the configurations:
    cd dbt_glue_s3_tables
    dbt debug --profiles-dir ~/.dbt/

    Expected output is Connection test: [OK connection ok].

Configure dbt project

The dbt_project.yml configuration determines which models use S3 Tables. Create or update dbt_glue_s3_tables/dbt_project.yml with the following structure:

name: 'dbt_glue_s3_tables'
version: '1.0.0'
config-version: 2
profile: 'dbt_glue_s3_tables'
model-paths: ["models"]
test-paths: ["tests"]
macro-paths: ["macros"]
models:
  dbt_glue_s3_tables:
    # S3 Tables for staging
    staging:
      +materialized: table
      +file_format: 's3tables'  # S3 Tables for staging
      +table_properties:
        'format': 'iceberg'
        'write.format.default': 'parquet'
        'write.parquet.compression-codec': 'snappy'

    # S3 Tables for marts
    marts:
      +materialized: table
      +file_format: 's3tables'  # S3 Tables for marts
      +table_properties:
        'format': 'iceberg'
        'write.format.default': 'parquet'
        'write.parquet.compression-codec': 'snappy'

Create dbt models

In this section, you build out the full model layer: a sources.yml that registers your raw AWS Glue tables, two staging models that clean and prepare the customer and order data, and three mart models that turn those staged data into a dimension table and two fact tables, one using incremental merge and one using incremental append.

First, create sources.yml defines your raw data tables:

  1. Delete the example folder under dbt_glue_s3_tables/models. This is an example folder created by default and unnecessary now.
  2. Define source tables in models/sources.yml with the following structure:
    version: 2
    
    sources:
      - name: raw_ecommerce
        description: "Raw e-commerce data in regular S3 buckets"
        schema: raw_ecommerce
    
        tables:
          - name: customers
            description: "Customer master data"
            columns:
              - name: customer_id
                tests:
                  - unique
                  - not_null
              - name: email
                tests:
                  - unique
                  - not_null
    
          - name: orders
            description: "Order transactions"
            columns:
              - name: order_id
                tests:
                  - unique
                  - not_null
              - name: customer_id
                tests:
                  - not_null
                  - relationships:
                      arguments:
                        to: source('raw_ecommerce', 'customers')
                        field: customer_id
              - name: updated_at
                tests:
                  - not_null

    This sources.yml defines your raw data tables, so you can reference them with the {{ source() }} function in your models. With this file, you can also define data tests like unique, not_null, and referential integrity checks in one central place.

    Second, create the staging and mart models. Staging models are where you unpack and transform raw data. Mart models are what downstream consumers actually query.

  3. Create models/staging/stg_customers.sql:
    -- Staging model as S3 Tables with incremental merge
    {{ config(
        materialized='incremental',
        incremental_strategy='merge',
        unique_key='customer_id',
        on_schema_change='sync_all_columns',
        file_format='s3tables'
    ) }}
    
    SELECT
        customer_id,
        LOWER(TRIM(email)) AS email,
        first_name,
        last_name,
        CAST(registration_date AS DATE) AS registration_date,
        customer_segment
    FROM spark_catalog.{{ source('raw_ecommerce', 'customers') }}
    WHERE customer_id IS NOT NULL

    stg_customers.sql reads from the raw customers source, applies light cleansing (email normalization, date casting, null filtering), and writes to S3 Tables using an incremental merge on customer_id to update existing records rather than duplicating them.

  4. Create models/staging/stg_orders.sql:
    -- Staging model as S3 Tables with incremental merge
    {{ config(
        materialized='incremental',
        incremental_strategy='merge',
        unique_key='order_id',
        on_schema_change='sync_all_columns',
        file_format='s3tables'
    ) }}
    
    SELECT
        order_id,
        customer_id,
        CAST(order_date AS DATE) AS order_date,
        CASE
            WHEN LOWER(TRIM(order_status)) = 'completed'  THEN 'completed'
            WHEN LOWER(TRIM(order_status)) = 'shipped'    THEN 'shipped'
            WHEN LOWER(TRIM(order_status)) = 'processing' THEN 'processing'
            WHEN LOWER(TRIM(order_status)) = 'cancelled'  THEN 'cancelled'
            ELSE 'unknown'
        END AS status,
        CAST(order_amount AS DECIMAL(10,2)) AS total_amount,
        EXTRACT(YEAR  FROM CAST(order_date AS DATE)) AS order_year,
        EXTRACT(MONTH FROM CAST(order_date AS DATE)) AS order_month,
        CAST(updated_at AS TIMESTAMP) AS updated_at
    FROM spark_catalog.{{ source('raw_ecommerce', 'orders') }}
    WHERE order_id IS NOT NULL

    stg_orders.sql reads from the raw orders source, normalizes status to a fixed set of values (defaulting to unknown for anything unexpected), casts order_date, total_amount, and updated_at to their proper types, and derives order_year and order_month for downstream partitioning.

  5. Create models/marts/dimensions/dim_customers.sql:
    -- Dimension table using S3 Tables
    {{ config(
        materialized='table',
        file_format='s3tables',
        partition_by=['registration_year'],
        table_properties={
            'format': 'iceberg',
            'write.format.default': 'parquet'
        }
    ) }}
    
    SELECT
        customer_id,
        email,
        first_name,
        last_name,
        registration_date,
        YEAR(registration_date) as registration_year,
        customer_segment,
        CASE
            WHEN customer_segment = 'Premium' THEN 1
            WHEN customer_segment = 'Regular' THEN 2
            ELSE 3
        END as segment_priority,
        CURRENT_TIMESTAMP() as dbt_updated_at
    FROM {{ ref('stg_customers') }}

  6. Create models/marts/facts/fact_orders.sql:
    -- Fact table using S3 Tables with incremental merge
    {{ config(
        materialized='incremental',
        file_format='s3tables',
        incremental_strategy='merge',
        unique_key='order_id',
        partition_by=['order_year', 'order_month'],
        table_properties={
            'format': 'iceberg',
            'write.format.default': 'parquet'
        }
    ) }}
    
    SELECT
        o.order_id,
        o.customer_id,
        o.order_date,
        YEAR(o.order_date)  AS order_year,
        MONTH(o.order_date) AS order_month,
        o.status,
        o.total_amount,
        c.customer_segment,
        c.segment_priority,
        CURRENT_TIMESTAMP() AS dbt_updated_at
    FROM {{ ref('stg_orders') }} o
    LEFT JOIN {{ ref('dim_customers') }} c
      ON o.customer_id = c.customer_id

  7. Create models/marts/facts/fact_order_history.sql:
    -- Fact table using S3 Tables with incremental append
    {{ config(
        materialized='incremental',
        file_format='s3tables',
        incremental_strategy='append',
        partition_by=['event_year', 'event_month'],
        table_properties={
            'format': 'iceberg',
            'write.format.default': 'parquet'
        }
    ) }}
    
    SELECT
        order_id,
        customer_id,
        status,
        order_date,
        total_amount,
        updated_at,
        CURRENT_TIMESTAMP() AS recorded_at,
        YEAR(updated_at)    AS event_year,
        MONTH(updated_at)   AS event_month
    FROM {{ ref('stg_orders') }}
    
    {% if is_incremental() %}
        WHERE updated_at > (SELECT MAX(updated_at) FROM {{ this }})
    {% endif %}

Run the dbt project

Now it’s time to run the dbt project. Complete following steps:

  1. To run the project dbt, you should be in the project folder:
    cd dbt_glue_s3_tables

  2. Run the dbt command:
    dbt run --profiles-dir ~/.dbt/ --full-refresh

This command starts an AWS Glue interactive session, compiles the dbt models, and materializes all five tables (stg_customers, stg_orders, dim_customers, fact_orders, and fact_order_history) in your S3 Tables namespace. The --full-refresh flag rebuilds the incremental models from scratch, so it’s the right choice for the first run.

Query using Amazon Athena

Before testing the incremental merge and append behavior in the next section, confirm what the initial --full-refresh run loaded into the mart tables. Query the target tables.

  1. In the Athena console, choose the data source and database that correspond to your S3 Tables catalog:
    • Catalog: s3tablescatalog/dbt-glue-s3-tables-bucket.
    • Database: dbt_glue_s3_tables.
  2. Run the following query to view the data loaded into the fact_orders table:
    SELECT * FROM dbt_glue_s3_tables.fact_orders ORDER BY order_id;

    The result returns the five order records:

    #    order_id    customer_id    order_date    order_year    order_month    status    total_amount    customer_segment    segment_priority    dbt_updated_at
    1    1001    1    2024-06-01    2024    6    completed    150.00    Premium    1    2026-10-16 09:41:46.590373 UTC
    2    1002    2    2024-06-02    2024    6    completed    75.50    Standard    3    2026-10-16 09:41:46.590373 UTC
    3    1003    1    2024-06-03    2024    6    completed    200.00    Premium    1    2026-10-16 09:41:46.590373 UTC
    4    1004    3    2024-06-04    2024    6    unknown    125.75    Premium    1    2026-10-16 09:41:46.590373 UTC
    5    1005    4    2024-06-05    2024    6    completed    89.99    Standard    3    2026-10-16 09:41:46.590373 UTC

  3. Run the following query to view the data loaded into the fact_order_history table:
    SELECT * FROM dbt_glue_s3_tables.fact_order_history ORDER BY updated_at;

    The result returns the five order history records.

    #    order_id    customer_id    status    order_date    total_amount    updated_at    recorded_at    event_year    event_month
    1    1001    1    completed    2024-06-01    150.00    2024-06-01 10:00:00.000000 UTC    2026-10-16 09:41:22.801835 UTC    2024    6
    2    1002    2    completed    2024-06-02    75.50    2024-06-02 10:00:00.000000 UTC    2026-10-16 09:41:22.801835 UTC    2024    6
    3    1003    1    completed    2024-06-03    200.00    2024-06-03 10:00:00.000000 UTC    2026-10-16 09:41:22.801835 UTC    2024    6
    4    1004    3    unknown    2024-06-04    125.75    2024-06-04 10:00:00.000000 UTC    2026-10-16 09:41:22.801835 UTC    2024    6
    5    1005    4    completed    2024-06-05    89.99    2024-06-05 10:00:00.000000 UTC    2026-10-16 09:41:22.801835 UTC    2024    6

Incremental merge and append on Iceberg table

After the initial --full-refresh run succeeds, verify that the merge and append incremental strategies behave as expected when the source data changes. This demonstrates the row-level update capability that Iceberg on S3 Tables provides.

Update the sample source data

To simulate a real-world scenario where upstream source data changes over time (for example, a customer updating their profile, or new customers signing up), modify customers.csv to include both an update to an existing record and a new record.

    1. Update two CSV files:

customers.csv:

1,[email protected],Alejandro,Rosalez,2024-01-15,Premium
2,[email protected],Ana Carolina,Silva,2024-02-20,Standard
3,[email protected],Arnav,Desai,2024-03-10,Premium
4,[email protected],Carlos,Salazar,2024-04-05,Standard
5,[email protected],Diego,Ramirez,2024-05-12,Basic
6,[email protected],Jane,Doe,2024-07-01,Premium

Changes:

      • customer_id=1: email updated to [email protected] (to test the merge UPDATE).
      • customer_id=6: new record added (to test the merge INSERT).

orders.csv:

1001,1,2024-06-01,150.00,completed,2024-06-01T10:00:00
1002,2,2024-06-02,75.50,completed,2024-06-02T10:00:00
1003,1,2024-06-03,200.00,completed,2024-06-03T10:00:00
1004,3,2024-06-04,125.75,completed,2024-06-11T09:30:00
1005,4,2024-06-05,89.99,completed,2024-06-05T10:00:00
1006,6,2024-07-02,45.00,completed,2024-07-02T10:00:00

Changes:

    • order_id=1004: status updated from pending to completed with a later updated_at (to test the merge UPDATE).
    • order_id=1006: new record added with a later updated_at, associated with the new customer customer_id=6 (to test both the merge INSERT in fact_orders and the append in fact_order_history).
  1. Upload the updated files to S3.
    # Upload CSV files
    aws s3 cp customers.csv s3://${SOURCE_BUCKET}/raw/customers/ --region ${DBT_GLUE_REGION}
    aws s3 cp orders.csv s3://${SOURCE_BUCKET}/raw/orders/ --region ${DBT_GLUE_REGION}

Re-run dbt project

  1. Run the following command.
    dbt run --profiles-dir ~/.dbt/

By running without --full-refresh, dbt runs its normal incremental logic instead of rebuilding the tables from scratch. In the staging layer, stg_customers and stg_orders apply the changes with a MERGE INTO statement that updates customer_id=1 and order_id=1004 in place and inserts customer_id=6 and order_id=1006. Downstream, fact_orders (merge) reflects the 1004 update and the 1006 insert as the latest state, while fact_order_history (append) records both 1004 and 1006 as new history rows.

Verify the results in Amazon Athena

After the re-run completes, use Athena to confirm that the merge and append strategies behaved as expected.

  1. Run the following query to view the updated data in the fact_orders table:
    SELECT * FROM dbt_glue_s3_tables.fact_orders ORDER BY order_id;

    fact_orders returns 6 rows (one per order), with 1004 now completed and 1006 added.

    #    order_id    customer_id    order_date    order_year    order_month    status    total_amount    customer_segment    segment_priority    dbt_updated_at
    1    1001    1    2024-06-01    2024    6    completed    150.00    Premium    1    2026-10-16 10:06:55.944983 UTC
    2    1002    2    2024-06-02    2024    6    completed    75.50    Standard    3    2026-10-16 10:06:55.944983 UTC
    3    1003    1    2024-06-03    2024    6    completed    200.00    Premium    1    2026-10-16 10:06:55.944983 UTC
    4    1004    3    2024-06-04    2024    6    completed    125.75    Premium    1    2026-10-16 10:06:55.944983 UTC
    5    1005    4    2024-06-05    2024    6    completed    89.99    Standard    3    2026-10-16 10:06:55.944983 UTC
    6    1006    6    2024-07-02    2024    7    completed    45.00    Premium    1    2026-10-16 10:06:55.944983 UTC

  2. Run the following query to view the updated data in the fact_order_history table:
    SELECT * FROM dbt_glue_s3_tables.fact_order_history ORDER BY updated_at;

    fact_order_history grows from 5 rows to 7 rows on the second run (the 2 rows whose updated_at advanced: 1004 and 1006). Order 1004 now has two history rows: the original unknown status and the new completed status.

    #    order_id    customer_id    status    order_date    total_amount    updated_at    recorded_at    event_year    event_month
    1    1001    1    completed    2024-06-01    150.00    2024-06-01 10:00:00.000000 UTC    2026-10-16 09:41:22.801835 UTC    2024    6
    2    1002    2    completed    2024-06-02    75.50    2024-06-02 10:00:00.000000 UTC    2026-10-16 09:41:22.801835 UTC    2024    6
    3    1003    1    completed    2024-06-03    200.00    2024-06-03 10:00:00.000000 UTC    2026-10-16 09:41:22.801835 UTC    2024    6
    4    1004    3    unknown    2024-06-04    125.75    2024-06-04 10:00:00.000000 UTC    2026-10-16 09:41:22.801835 UTC    2024    6
    5    1005    4    completed    2024-06-05    89.99    2024-06-05 10:00:00.000000 UTC    2026-10-16 09:41:22.801835 UTC    2024    6
    6    1004    3    completed    2024-06-04    125.75    2024-06-11 09:30:00.000000 UTC    2026-10-16 10:06:35.291993 UTC    2024    6
    7    1006    6    completed    2024-07-02    45.00    2024-07-02 10:00:00.000000 UTC    2026-10-16 10:06:35.291993 UTC    2024    7

Clean up

To avoid ongoing charges, clean up the resources you created during this walkthrough. Complete these steps in the specified order to facilitate proper resource deletion.

  1. Drop the tables dbt created in the S3 Tables namespace.
  2. Remove the namespace from the table bucket.
  3. Delete the table bucket.
  4. Delete the Data Catalog database.
  5. Delete the data this walkthrough wrote to your S3 bucket: the dbt warehouse data under s3://<YOUR-REGULAR-BUCKET>/glue/data/ and the sample CSV files under s3://<YOUR-REGULAR-BUCKET>/raw/. Leave the bucket itself in place if you use it for other workloads.
  6. (Optional) Remove the local dbt project directory (dbt_glue_s3_tables) and the sample customers.csv / orders.csv files.

Conclusion

In this post, we showed how to build an end-to-end dbt transformation pipeline on Amazon S3 Tables with AWS Glue 6.0, using a staging and mart architecture. At the core of this pipeline are incremental models on S3 Tables, which let us transform and maintain data incrementally with SQL. We demonstrated two incremental strategies working together: the merge strategy to keep the latest state per order in fact_orders, and the append strategy to build an audit-friendly change history in fact_order_history.

S3 Tables support in the dbt-glue adapter is currently experimental (as of version 1.12.4) and will continue to evolve in upcoming releases. As with any experimental feature, we recommend thoroughly testing it in your own environment before use.

To learn more, see Amazon S3 Tables and the dbt-glue adapter.


About the authors

Yukiko Iwazumi

Yukiko Iwazumi

Yukiko is a Cloud Support Engineer on the AWS Big Data Support team. She enjoys helping customers build and optimize their ETL workloads. In her spare time, she enjoys taking walks and playing games.

Chiho Sugimoto

Chiho Sugimoto

Chiho is a Go-to-market Data & AI solutions architect at AWS in Japan. She is passionate about helping customers build data lakes using ETL workloads. She loves planetary science and enjoys studying the asteroid Ryugu on weekends.

Neela Kulkarni

Neela Kulkarni

Neela is a Senior Solutions Architect at Amazon Web Services (AWS). She primarily serves independent software vendors (ISVs), helping them build and scale solutions in the Data, Analytics space by providing architectural guidance and best-practice recommendations for new and existing workloads.

Yota Hamaoka

Yota Hamaoka

Yota is a Senior Big Data Specialist Solutions Architect at Amazon Web Services. He helps customers accelerate their analytics journeys by leveraging his expertise in data lakes, big data processing, and data warehousing.

Srishti Mittal

Srishti Mittal

Srishti is a Product Manager at AWS, with a focus on making open data lakes performant and interoperable across analytics engines. She leads product strategy for open table formats such as Apache Iceberg, partnering with customers and field teams to turn real-world data lake challenges into product capabilities.