Транспорт в с. Марково няма, но и визия в Община Родопи няма

Post Syndicated from VassilKendov original http://kendov.com/matkovo-village-transport/

В Село Марково пак недоволстват хората, че нямало рейс.
Лошото е, че само се констатира без да се потърси реалния проблем. А без да се дефинира няма как да  бъде решен.

Понеже в групата на с. Марково не ми одобряват публикациите (май причината е някакви политически възгледи на админите)  я поствам на моята стена и моля някой, който има достъп, да я шерне.

Та има една фирма – Хеброс Бус, която би трябвало да осъществява превоза от с. Марково до гр. Пловдив по предварително договорен график.
Злите езици обаче кават, че тази фирма има договор с Община Пловдив, а не с Община Родопи, където е с. Марково. Евала на местните жители и кметицата, че се организират и дават гласност на проблема, обаче надали той ще се реши от кмета на Община Родопи, просто защото реално няма визия за решението му.
Между другото същият проблем съществува във всички останали села от Община Родопи, но само с. Марково повдига този въпрос публично (респект за което).

Какъв е случаят и каква си решенията?
Фирмата Хебрус бус има договор с Община Пловдив за извършването на тези превози, а не с Община Родопи. Ако на администрацията на Родопи това не и харесва, може тя да си подпише договор с друг превозвач, но това няма как да стане по няколко причини.
Първо този превозвач трябва да спира на някоя автогара и то в пределите на гр. Пловдив. Тоест те ще бъдат на 100% зависими от Община Пловдив, а не от Родопи, защото няма да имат Автогара където да оперират.
Да преположим, колкото и да е невероятно, че Община Пловдив се съгласи и определи Автогара за целта (макар в Пловдив мисля, че остана само една Общинска Автогара – от другата страна на града), тогава „ползите” от договорът за превоз ще се взимат от Община Родопи, а Пловдив само ще обслужва „за сините им очи”. Но нека предположим, че изобщо не иде реч за „ползи”, колкото и смело да е това предположение. То тогава по пътя на логиката, Пловдив ще се наложи да „забие” толкова тлъста такса на този нов оператор, че жителите на Община Родопи надали ще могат и искат да я плащат. И това ще е нормално. В случая с Хебрус бус автогарата си е тяхна и поне за това не плащат. Дори и в най-смелите си мечти не виждам как Община Пловдив ще се съгласи да предостави парцел и обслужване на оператор, който се е „заиграл” със съседната община.

Нали не сте забравили за референдума в Белащица, който уж бил незаконен, пък се оказа съвсем законен, според Областия управител? Виж ако Белащица е част от Пловдив, то тогава ще си има и градски транспорт, което е и първото възможно решение на проблема.
Но на повечето хора това решение не им се струва удачно, защото данъкът МПС в Родопи е по-нисък и това им е по-важно. Само да уточня, защото з атов аще говорим в друг материал – данъкът е веднъж годишно, а транспорта ежедневен.

Уточнихме вече, че няма как превозвач да има договор с Община Родопи, а да се обслужва от Община Пловдив. Мисля, че по този въпрос две мнения няма или поне не би трябвало да има. Но ако има, то тогава приемете, че написаното до тук са пълни глупости и не си губете времето с по-нататъчно четене.

Ако обаче сте схванали идеята и сте на мнение, че има резон, то тогава нека разгледаме варианта с обществен превозвач. Тоест Община Родопи закупува бусове или маршрутки и създава Общинско предприятие. Да си призная честно, като знам капацитета на администрацията и най-вече липсата на всякаква визия мисля направо да отхвърля този вариант и да не го обсъждам. Излишно е. Тук се опитваме да направим анализ, а не да развиваме фантастични истории. Финансирането на това начинане пък съвсем не е по силите на община Родопи. Така е по-цял свят – превозвачът или е с договор от Областта или е държавен.

Друг изключително съществен проблем е дотацията и цената на билета. У наше село – Бойково (пак в община Родопи), транспортът е спонсориран. Плащат се по 3.00 лв (мисля) за 12 места при всеки курс. Има, няма хора на превозвача са гарантирани тези  36 лева (или нещо подобно).
Сега моля всеки с ръка на сърцето да си каже, колко са му важни 36 лева на курс, в които се включват гориво, заплата, осигуровка, печалба и амортизация, м? Като имате предвид обаче, че пътят е планински – завои, дупки, наклони…
Аз ще Ви кажа как расъждава един превозвач. „- То шофьора го няма днес, пък и да е тук, кой знае колко хора ще се качат… Я изкарам 20-30 лева от тоя курс, я не. По-добре да го чакам да се върне на работа, вместо да поддържам още един шофьор.”
Как се решава този проблем ли? Ами Община Родопи се бърка с една допълнителна дотация за всеки курс и тогава на превозвача започва да му пука дали ще направи курса или не.

Е да де, ама то бюджета на общината е изпълнен едва на 55%. Откъде да дойдат тези пари?

А и кметовете на селата като гледам не се заинтересуваха много от изпълнението на бюджета. Познайте кой кмет единствено присъства на заседанието за отчета на изпълнението на Бюджет 2022? – Правилно, единствено кметицата на с. Марково. И двама общински съветници въпреки, че тяхна е работата да контролират и гласуват този бюджет. Но за тази среща ще направя отделно видео, понеже е важно да знаете защо няма пари за това и онова във Вашето село.

Е как искате тогава да имате редовен траспорт бе хора? Мислите ли, че друга фирма ще е по-съвестна при този начин на заплащане?
А мислите ли, че при 55% изпълнение на бюджета ще можете да си позволите разходи за дотации на транспорт?
Айде… казахме, че към Пловдив няма да се присъдиняваме и не можем да разчитаме на градски транспорт, който между другото и в Пловдив е гола вода, но май е по-добър от междуградския.

За  срещa с мен моля използвайте посочената форма.

[contact-form-7]

Ако очакваме, че с констатация ще се промени нещо, жестоко се лъжем. На срещите за бюджета и неговия отчет сме обикновено по 5-10 човка граждани. А тези заседания не случайно са регламентирани по закон. Те са предвидени за да можем да упражняваме контрол, доколкото можем. Ами ние и това не правим. Ами няма как да се промени нещо, ако ние самите не направим или не изискаме нещо да се промени.
Да…! възможно е да се намери някакво временно решение до изборите (примерно), но лично аз и в това се съмнявам. Въпреки че от друга страна в тази община  PR-ът е издигнат в култ, та не се знае. Едно е сигурно обаче – дългосрочно не са на лице предпоставките проблемът с транспорта да се реши. Няма я и визията. PR – ДА, Визия – НЕ!

The post Транспорт в с. Марково няма, но и визия в Община Родопи няма appeared first on Kendov.com.

On the Cybersecurity Jobs Shortage

Post Syndicated from Bruce Schneier original https://www.schneier.com/blog/archives/2023/09/on-the-cybersecurity-jobs-shortage.html

In April, Cybersecurity Ventures reported on extreme cybersecurity job shortage:

Global cybersecurity job vacancies grew by 350 percent, from one million openings in 2013 to 3.5 million in 2021, according to Cybersecurity Ventures. The number of unfilled jobs leveled off in 2022, and remains at 3.5 million in 2023, with more than 750,000 of those positions in the U.S. Industry efforts to source new talent and tackle burnout continues, but we predict that the disparity between demand and supply will remain through at least 2025.

The numbers never made sense to me, and Ben Rothke has dug in and explained the reality:

…there is not a shortage of security generalists, middle managers, and people who claim to be competent CISOs. Nor is there a shortage of thought leaders, advisors, or self-proclaimed cyber subject matter experts. What there is a shortage of are computer scientists, developers, engineers, and information security professionals who can code, understand technical security architecture, product security and application security specialists, analysts with threat hunting and incident response skills. And this is nothing that can be fixed by a newbie taking a six-month information security boot camp.

[…]

Most entry-level roles tend to be quite specific, focused on one part of the profession, and are not generalist roles. For example, hiring managers will want a network security engineer with knowledge of networks or an identity management analyst with experience in identity systems. They are not looking for someone interested in security.

In fact, security roles are often not considered entry-level at all. Hiring managers assume you have some other background, usually technical before you are ready for an entry-level security job. Without those specific skills, it is difficult for a candidate to break into the profession. Job seekers learn that entry-level often means at least two to three years of work experience in a related field.

That makes a lot more sense, and matches what I experience.

Спирам свалянето на данни за въздуха

Post Syndicated from Боян Юруков original https://yurukov.net/blog/2023/air-pollution-data/

В последните почти петнадесет години съм отварял, визуализирал и анализирал доста данни. Една част от тях пускам в отворен формат, някои – в реално време. Едни такива данни бяха замерванията за въздуха в София. В началото на 2016-та година започнах да ги тегля със свой скрейпър, който интерпретираше графиките на общината и ги записваше в разбираем и отворен формат.

Това се случи във време, когато въпреки многобройните призиви и запитвания по ЗДОИ, ИАОС отказваше да публикува суровите данни от измерванията. Официалните данни бяха само от пет станции в София с ясна методология. Година по-късно се появиха първите частни станции, но данните от институциите все така бяха недостъпни. Затова данните отваряни в реално време от моя скрипт бяха използвани дълго време от няколко сайта и приложения като отправна точка.

Всичко това спря на 1-ви септември. Тогава съответните антични графики на общината спряха да работят и скриптовете се счупиха. Почти осем години по-късно слагам край на проекта и за това има няколко причини. Архивът му ще остане активен на този сайт.

Първо, след масиран натиск, но най-вече съвестни хора на ключови позиции в определени кабинети, които натискаха за прозрачност и дигитализация, ИАОС все пак публикува данните си. Това става в профила им в портала за отворени данни на кабинета.

Второ, покрай популярността на airbg Столична община подобри визуализацията на сайта си и данните са по-достъпни, включително от ИАОС. Добавиха и още станции в рамките на проекта AirThings, където има удобно api.

Трето, института Gates започна пилотен проект за следене на не само на замърсяването, но и на редица други параметри и проблеми от градската ни среда. Картата им може да намерите на сайта.

Всъщност, именно разговор с Петър от Gates днес на кошера на Тук-Там ме накара да погледна пак скриптовете и да забележа, че са спрели да работят също както и съобщенията за грешки. На практика голяма част от scraper-ите ми вървят от години без поддръжка или да им обръщам особено внимание. Това важи както за документите на институциите, така и за спиранията на ток, парно и вода в София, безследно изчезналите, строежите в София, производството на енергия и прочие.

За разлика от преди 8 години, днес има предостатъчно източници на данни за замърсяването. Това е резултат от инвестираното време, нерви и внимание на множество хора. Продуктът е огромно количество информация, което трябва да се превърне в ефективни политики базирани и оценени като ефект с данни.

Именно заради тази достъпност няма да обръщам внимание на Столична община, че им са се скапали графиките и ще спра скриптовете. В линковете горе ще намерите данните от другите източници.

Ето някои от статии по темата, които съм писал през годините:

The post Спирам свалянето на данни за въздуха first appeared on Блогът на Юруков.

New – Amazon EC2 M2 Pro Mac Instances Built on Apple Silicon M2 Pro Mac Mini Computers

Post Syndicated from Channy Yun original https://aws.amazon.com/blogs/aws/new-amazon-ec2-m2-pro-mac-instances-built-on-apple-silicon-m2-pro-mac-mini-computers/

Today, we are announcing the general availability of Amazon EC2 M2 Pro Mac instances. These instances deliver up to 35 percent faster performance over the existing M1 Mac instances when building and testing applications for Apple platforms.

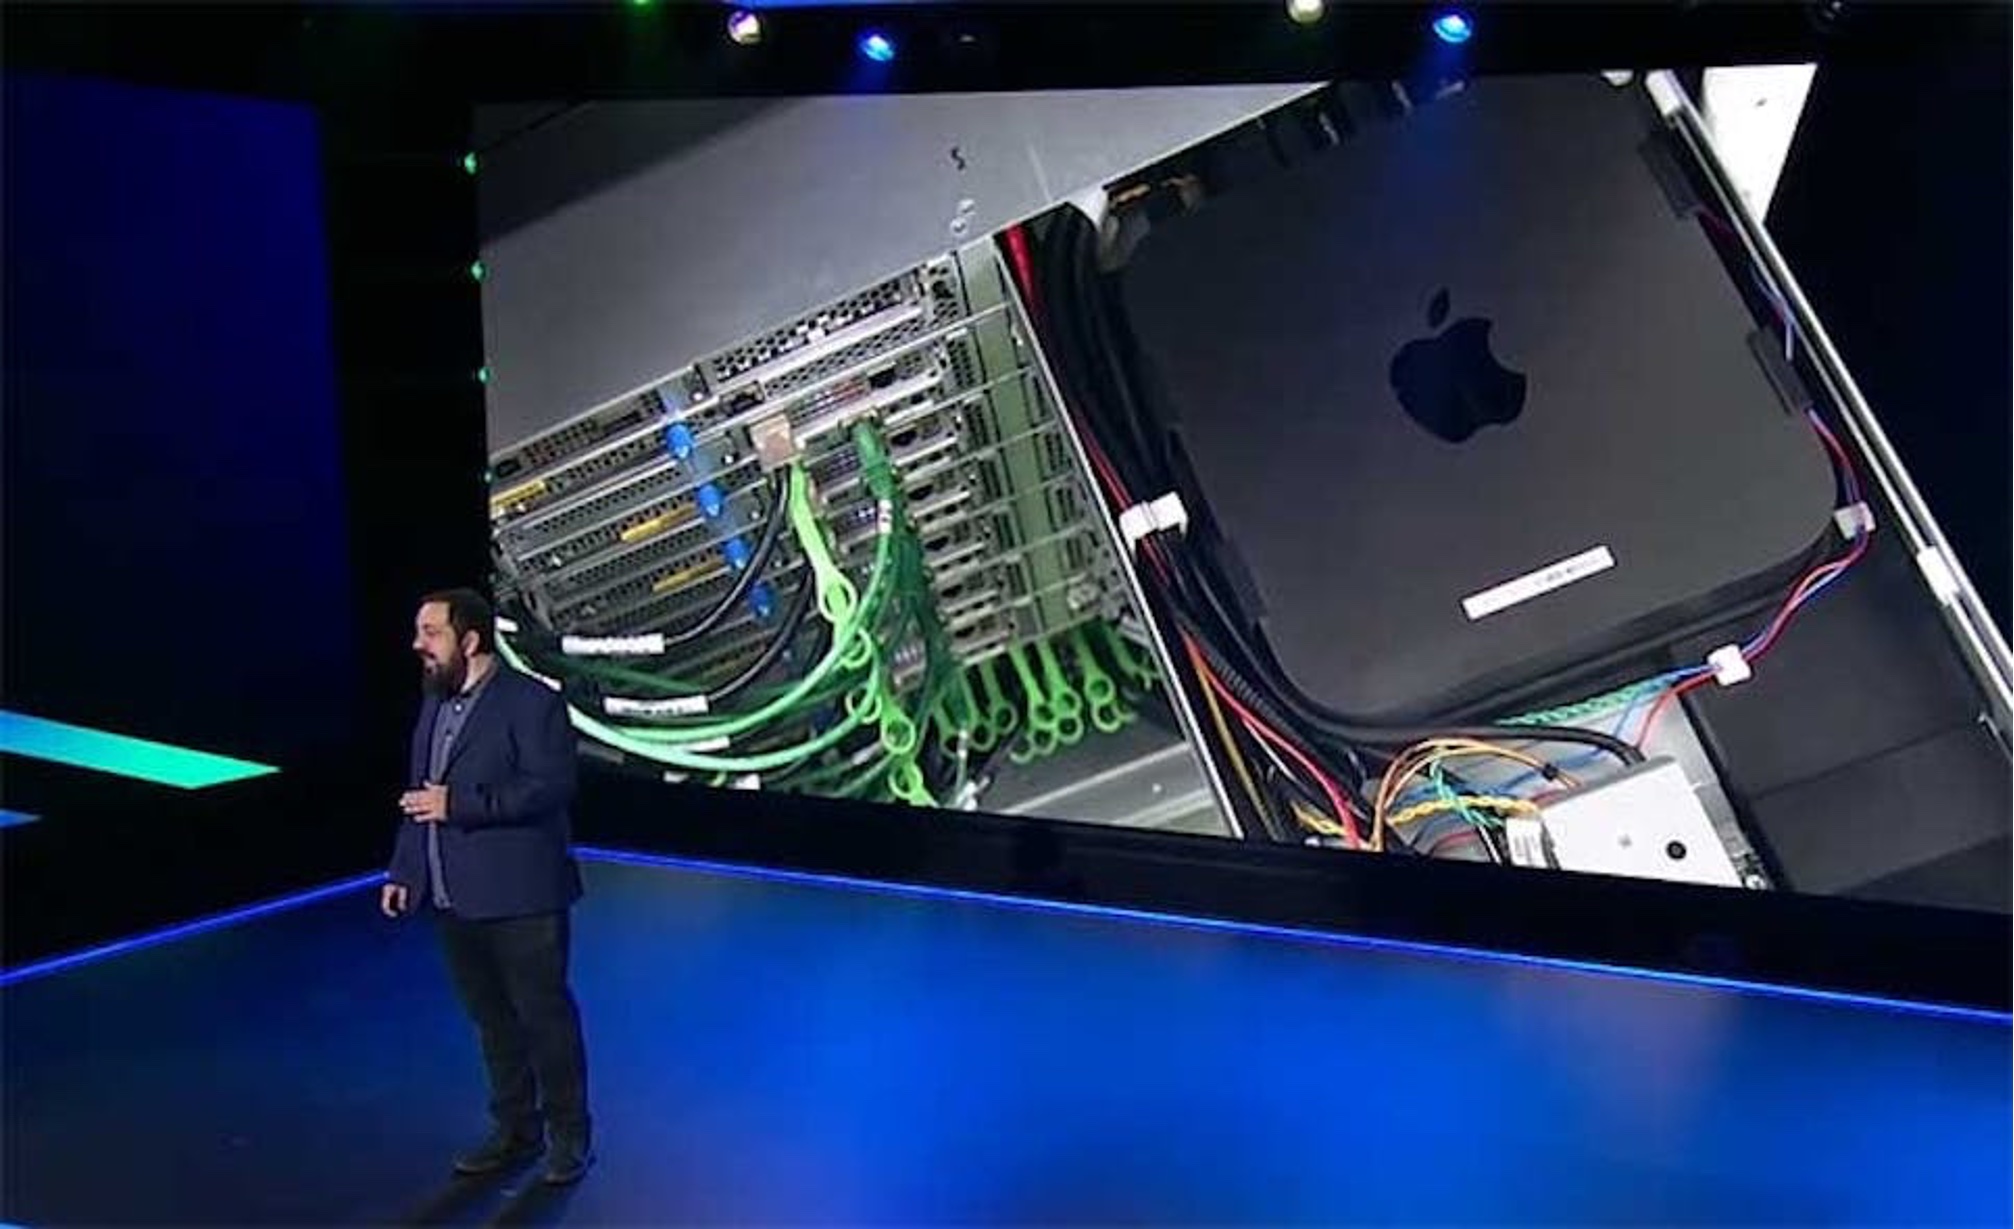
New EC2 M2 Pro Mac instances are powered by Apple M2 Pro Mac Mini computers featuring 12 core CPU, 19 core GPU, 32 GiB of memory, and 16 core Apple Neural Engine and uniquely enabled by the AWS Nitro System through high-speed Thunderbolt connections, offering these Mac mini computers as fully integrated and managed compute instances with up to 10 Gbps of Amazon VPC network bandwidth and up to 8 Gbps of Amazon EBS storage bandwidth. EC2 M2 Pro Mac instances support macOS Ventura (version 13.2 or later) as AMIs.

A Story of EC2 Mac Instances
When Jeff Barr first introduced Amazon EC2 Mac Instances in 2020, customers were surprised to be able to run macOS on Amazon EC2 to build, test, package, and sign applications developed with Xcode applications for the Apple platform, including macOS, iOS, iPadOS, tvOS, and watchOS.

In his keynote in AWS re:Invent 2020, Peter DeSantis revealed the secret to build EC2 Mac instances powered by the AWS Nitro System, which makes it possible to offer Apple Mac mini computers as fully integrated and managed compute instances with Amazon VPC networking and Amazon EBS storage, just like any other EC2 instances.

“We did not need to make any changes to the Mac hardware. We simply connected a Nitro controller via the Mac’s Thunderbolt connection. When you launch a Mac instance, your Mac-compatible Amazon Machine Image (AMI) runs directly on the Mac Mini, with no hypervisor. The Nitro controller sets up the instance and provides secure access to the network and any storage attached. And that Mac Mini can now natively use any AWS service.”

In July 2022, we introduced Amazon EC2 M1 Mac Instances built around the Apple-designed M1 System on Chip (SoC). Developers building for iPhone, iPad, Apple Watch, and Apple TV applications can choose either x86-based EC2 Mac instances or Arm-based EC2 M1 instances. If you want to re-architect your apps to natively support Macs with Apple Silicon using EC2 M1 instances, you can build and test your apps to deliver up to 60 percent better price performance over the EC2 Mac instances for iPhone and Mac app build workloads with all the benefits of AWS.

Many customers take advantage of EC2 Mac instances to deliver a complete end-to-end build pipeline on macOS on AWS. With EC2 Mac instances, they can scale their iOS build fleet; easily use custom macOS environments with AMIs; and debug any build or test failures with fully reproducible macOS environments.

Customers have reported up to 4x reduction in build times, up to 3x increase in parallel builds, up to 80 percent reduction in machine-related build failures, and up to 50 percent reduction in fleet size. They can continue to prioritize their time on innovating products and features while reducing the tedious effort required to manage on-premises macOS infrastructure.

To accelerate this innovation, EC2 Mac instances recently began to support replacing root volumes on a running EC2 Mac instance, enabling you to restore the root volume of an EC2 Mac instance to its initial launch state or to a specific snapshot, without requiring you to stop or terminate the instance.

You can also use in-place operating system updates from within the guest environment on EC2 M1 Mac instances to a specific or latest macOS version, including the beta version, by registering your instances with the Apple Developer Program. Developers can now integrate the latest macOS features into their applications and test existing applications for compatibility before public macOS releases.

Getting Started with EC2 M2 Pro Instances
As with other EC2 Mac instances, EC2 M2 Pro Mac instances also support Dedicated Host tenancy with a minimum host allocation duration of 24 hours to align with macOS licensing.

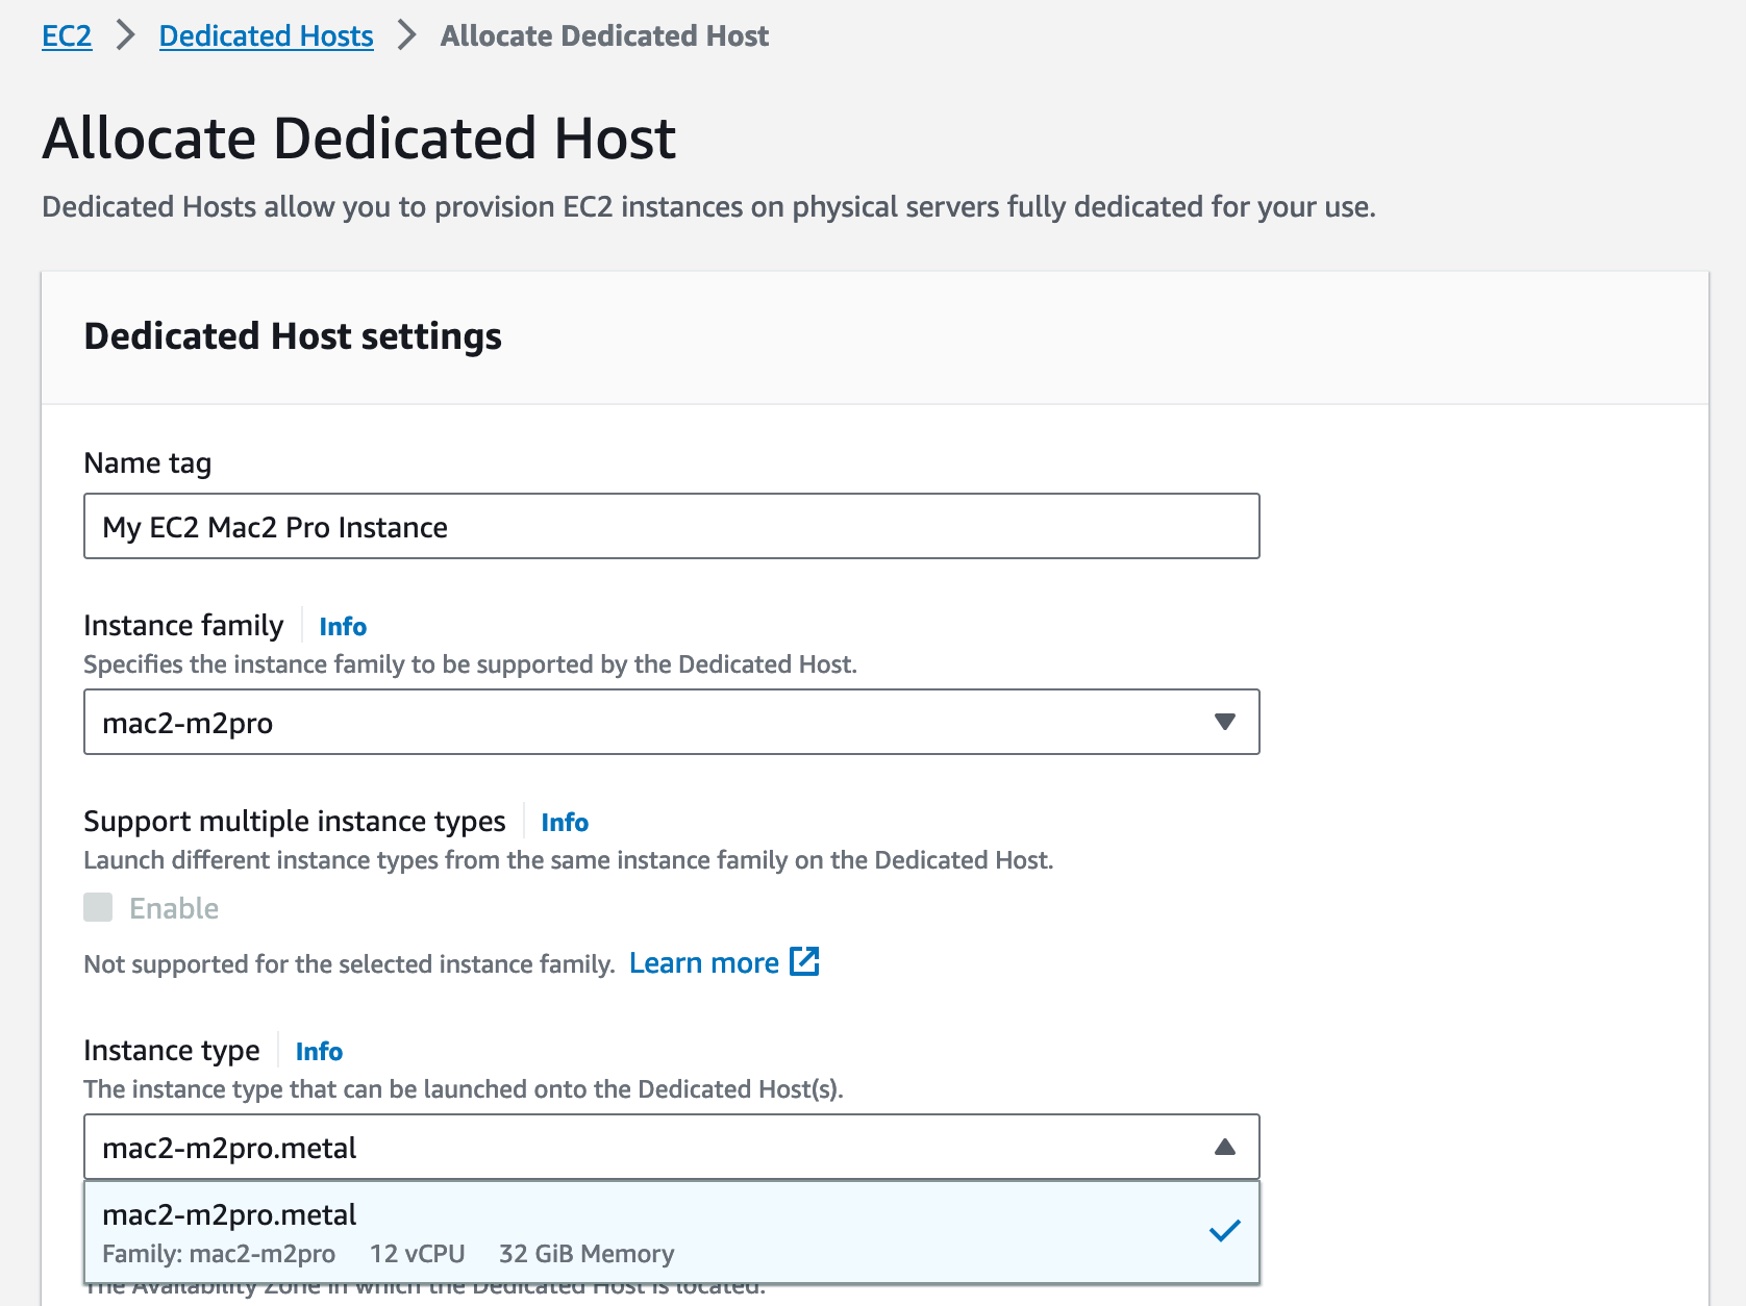
To get started, you should allocate a Mac-dedicated host, a physical server fully dedicated for your own use in your AWS account. After the host is allocated, you can launch, stop, and start your own macOS environment as one instance on that host for one dedicated host.

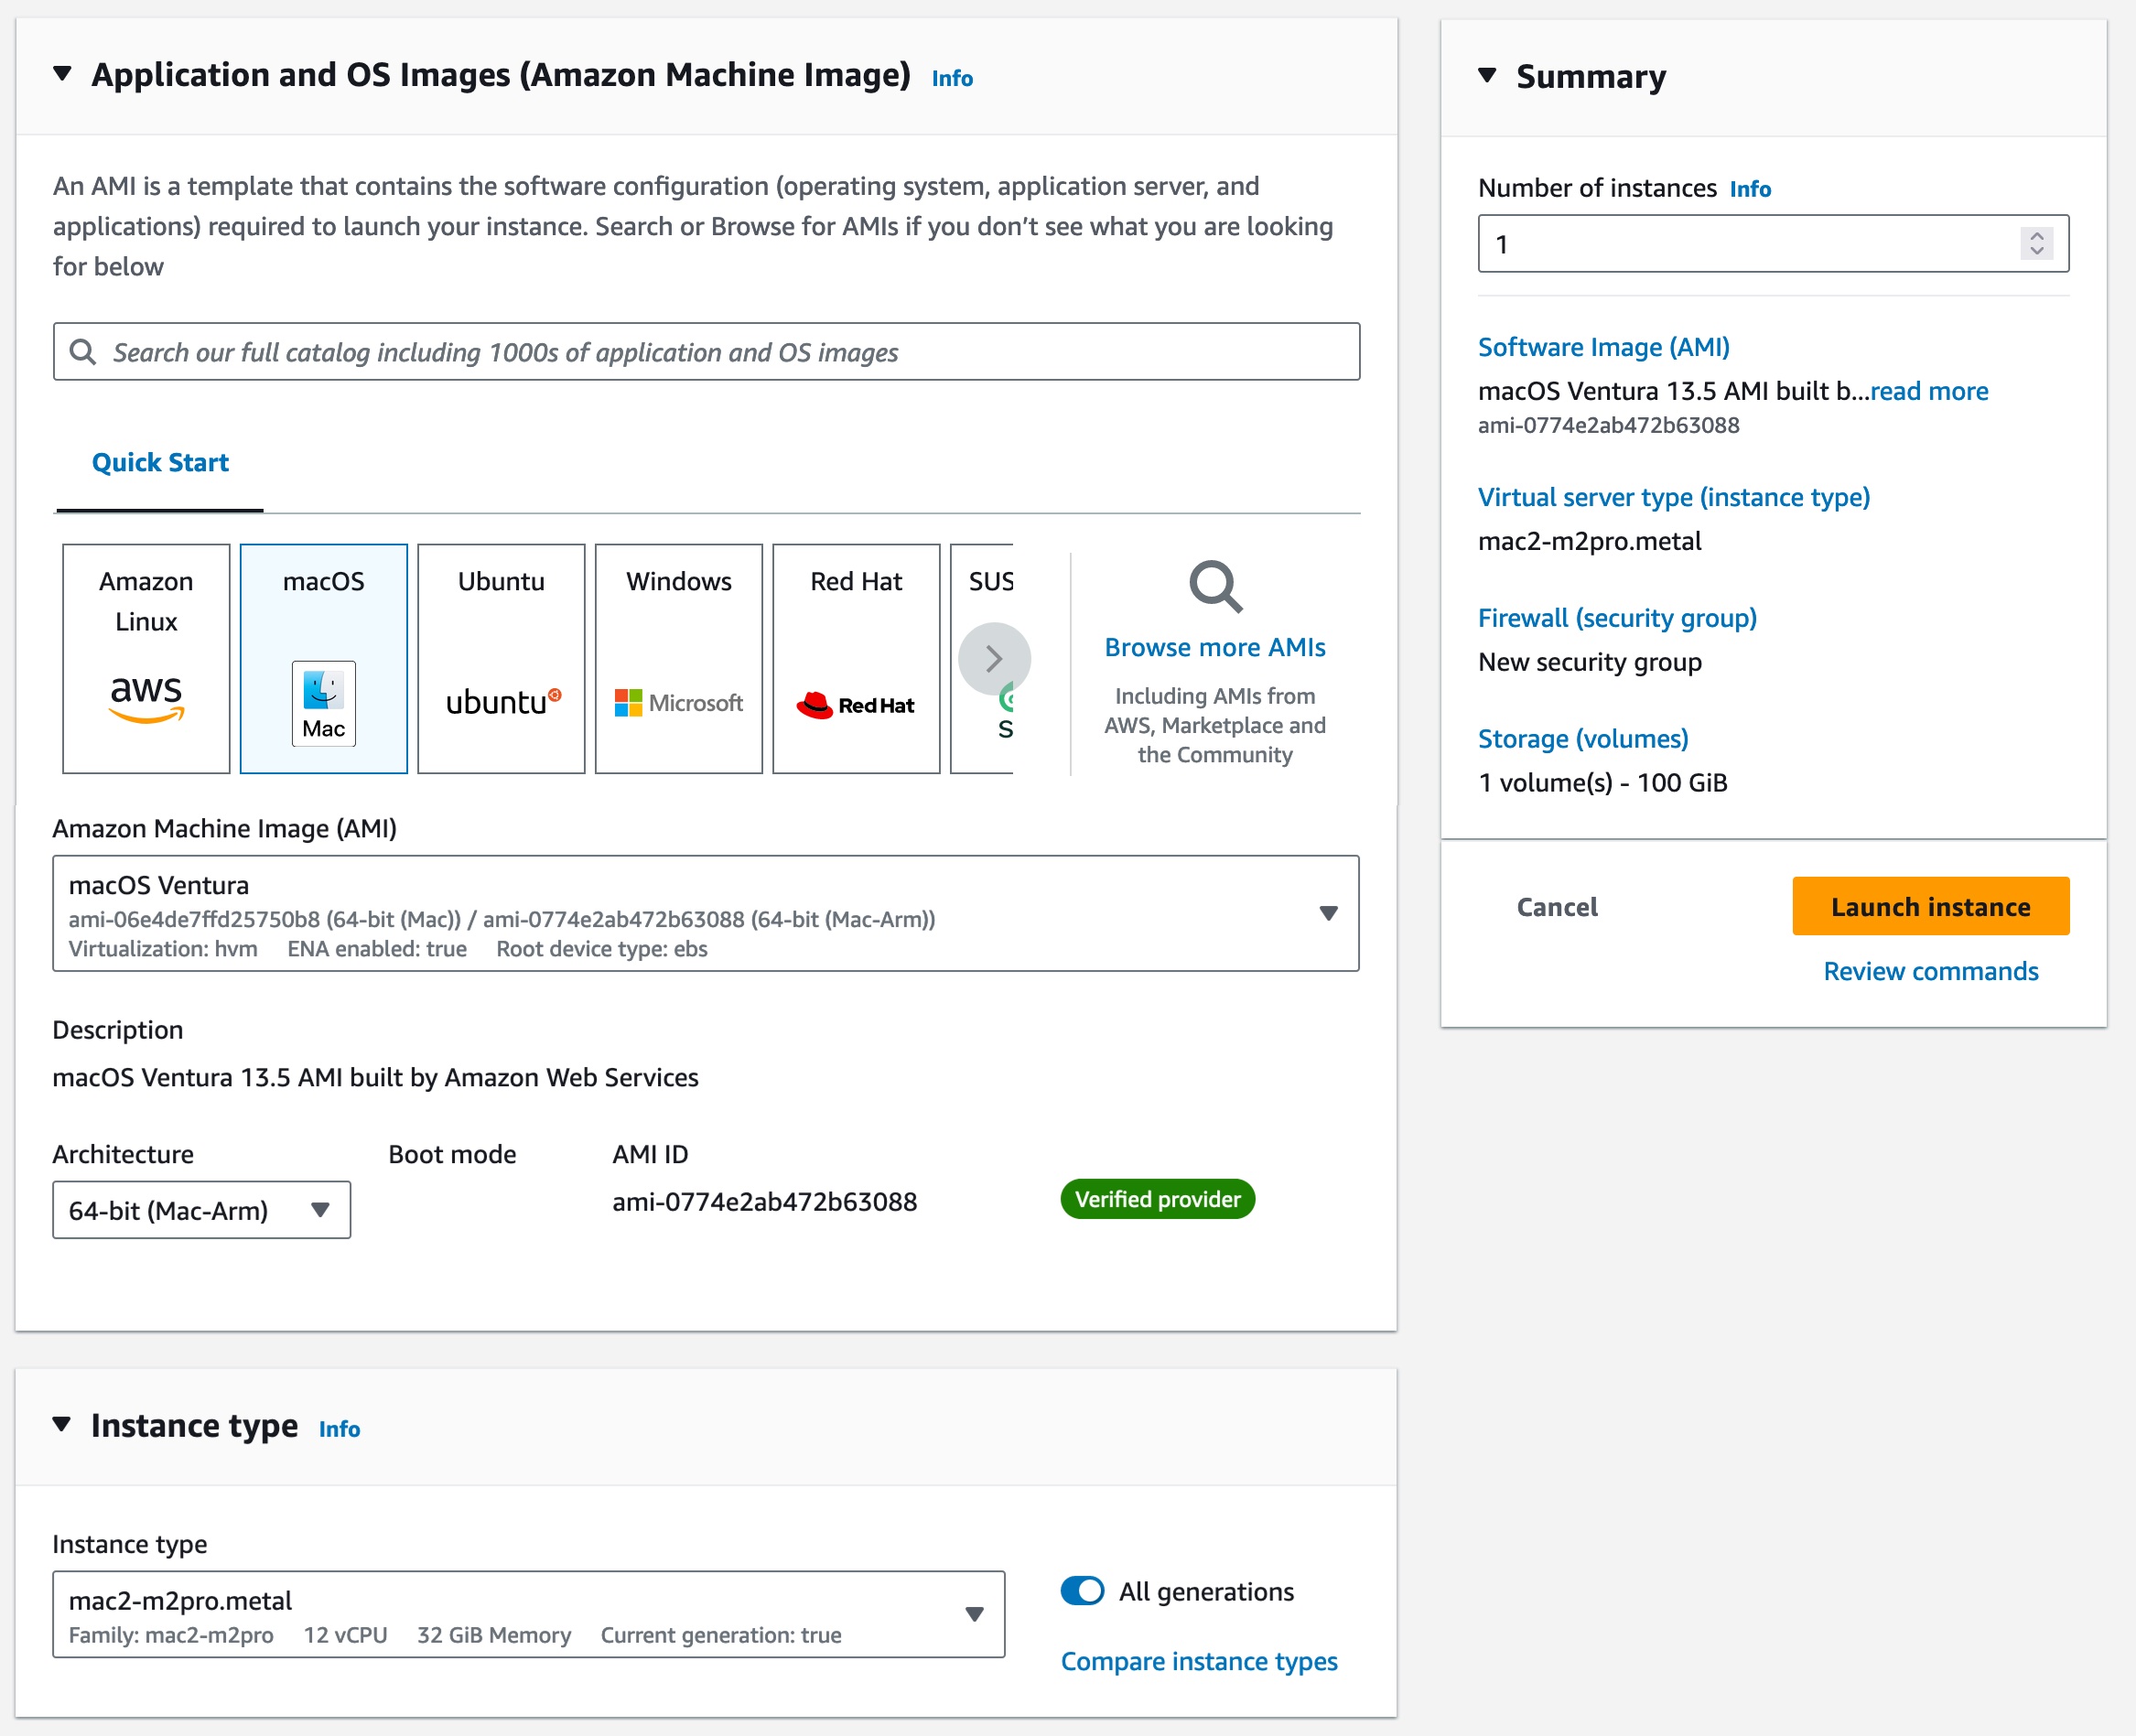
After the host is allocated, you can start an EC2 Mac instance on it. The procedure is no different from starting any EC2 instance type. Choose your macOS AMI version and select the mac2-m2pro.metal instance type in the Application and OS Images section.

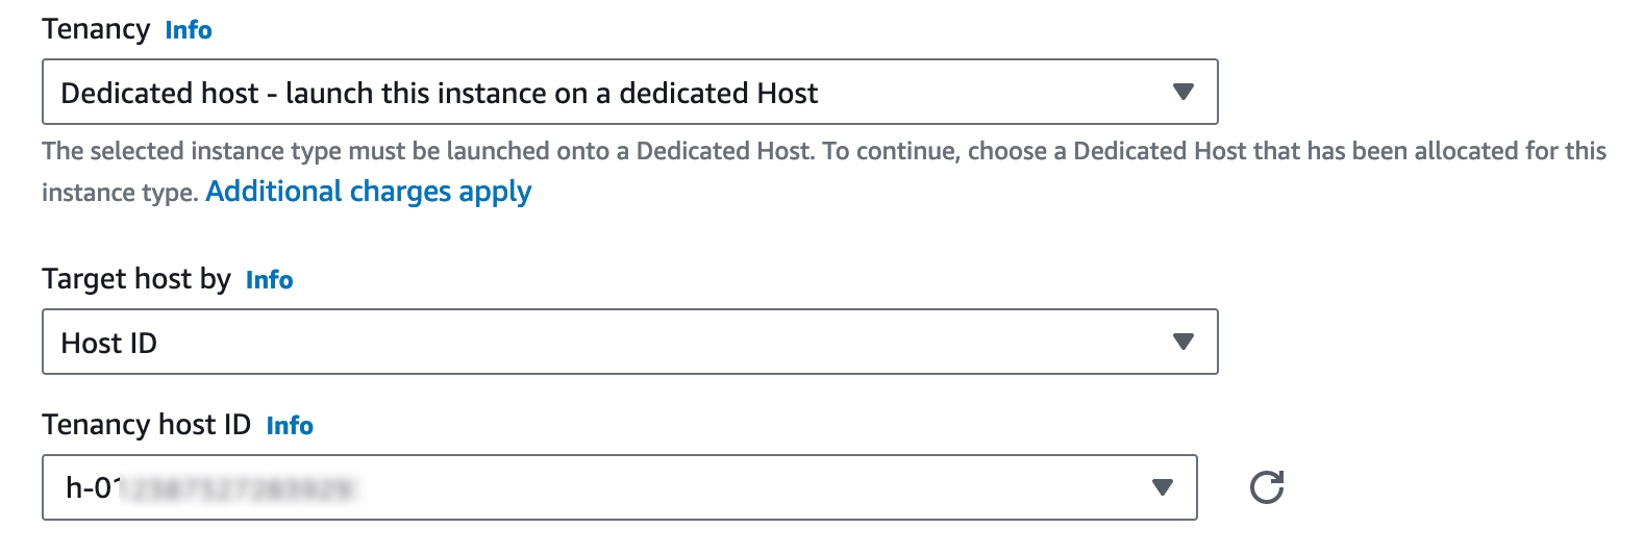
In the Advanced details section, select Dedicated host in Tenancy and a dedicated host you just created in Tenancy host ID.

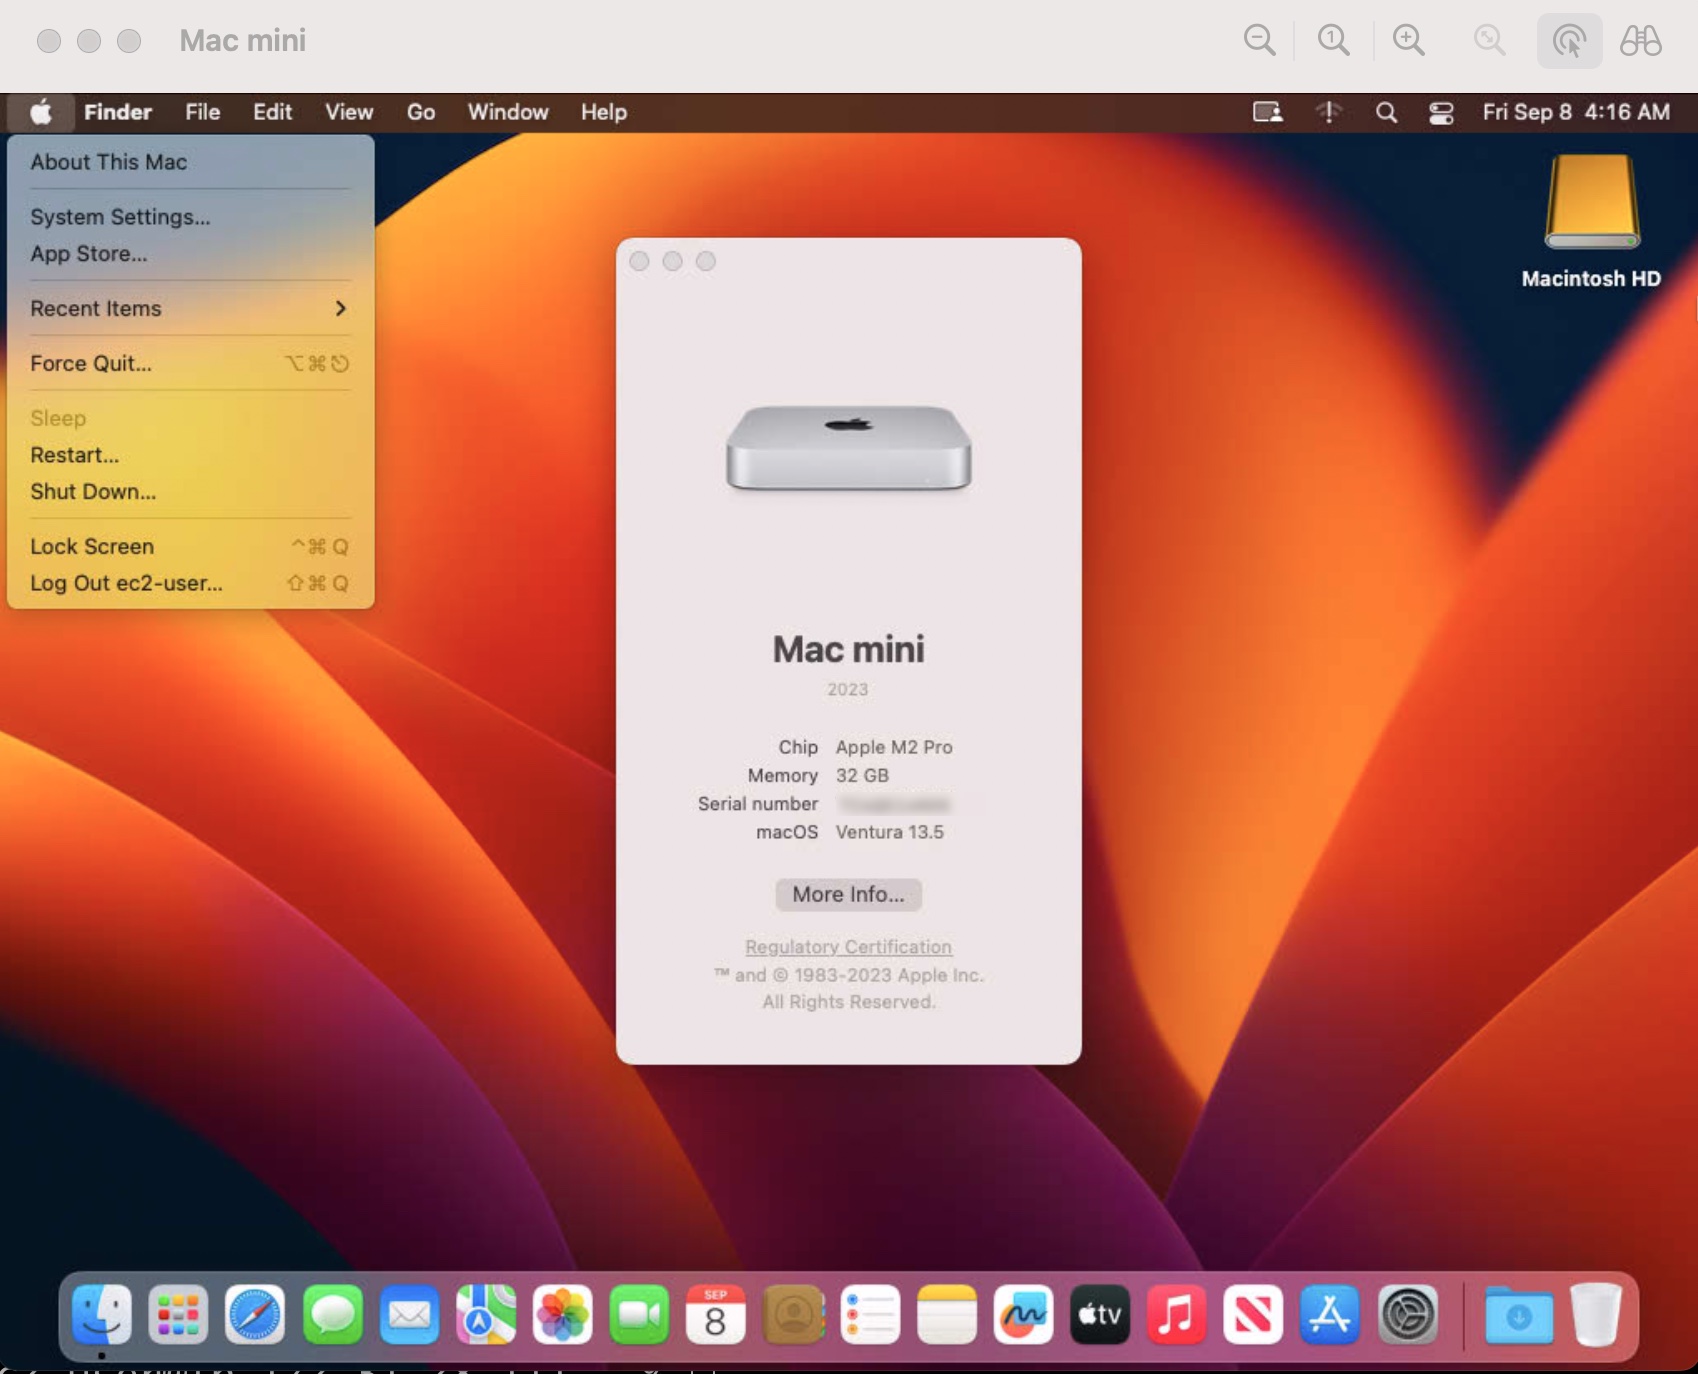
When you use EC2 Mac instances for the first time, you can use SSH to connect to the newly launched instance as usual or enable Apple Remote Desktop and start a VNC session to the EC2 instance. To learn more, see Sebastien’s series of articles to launch and connect your Mac instance.

When you no longer need the Mac dedicated host, you can terminate your running Mac instance and release the underlying host. Note again that after being allocated, a Mac dedicated host can only be released after 24 hours to align with Apple’s macOS licensing.

Now Available
Amazon EC2 M2 Pro Mac instances are available in the US West (Oregon) and US East (Ohio) AWS Regions, with additional regions coming soon.

To learn more or get started, see Amazon EC2 Mac Instances or visit the EC2 Mac documentation.  You can send feedback to AWS re:Post for EC2 or through your usual AWS Support contacts.

— Channy

Centralizing management of AWS Lambda layers across multiple AWS Accounts

Post Syndicated from James Beswick original https://aws.amazon.com/blogs/compute/centralizing-management-of-aws-lambda-layers-across-multiple-aws-accounts/

This post is written by Debasis Rath, Sr. Specialist SA-Serverless, Kanwar Bajwa, Enterprise Support Lead, and Xiaoxue Xu, Solutions Architect (FSI).

Enterprise customers often manage an inventory of AWS Lambda layers, which provide shared code and libraries to Lambda functions. These Lambda layers are then shared across AWS accounts and AWS Organizations to promote code uniformity, reusability, and efficiency. However, as enterprises scale on AWS, managing shared Lambda layers across an increasing number of functions and accounts is best handled with automation.

This blog post centralizes the management of Lambda layers to ensure compliance with your enterprise’s governance standards, and promotes consistency across your infrastructure. This centralized management uses a detective configuration approach to identify non-compliant Lambda functions systematically using outdated Lambda layer versions, and corrective measures to remediate these Lambda functions by updating them with the right layer version.

This solution uses AWS services such as AWS Config, Amazon EventBridge Scheduler, AWS Systems Manager (SSM) Automation, and AWS CloudFormation StackSets.

Solution overview

This solution offers two parts for layers management:

  1. On-demand visibility into outdated Lambda functions.
  2. Automated remediation of the affected Lambda functions.

1.	On-demand visibility into outdated Lambda functions

This is the architecture for the first part. Users with the necessary permissions can use AWS Config advanced queries to obtain a list of outdated Lambda functions.

The current configuration state of any Lambda function is captured by the configuration recorder within the member account. This data is then aggregated by the AWS Config Aggregator within the management account. The aggregated data can be accessed using queries.

2.	Automated remediation of the affected Lambda functions

This diagram depicts the architecture for the second part. Administrators must manually deploy CloudFormation StackSets to initiate the automatic remediation of outdated Lambda functions.

The manual remediation trigger is used instead of a fully automated solution. Administrators schedule this manual trigger as part of a change request to minimize disruptions to the business. All business stakeholders owning affected Lambda functions should receive this change request notification and have adequate time to perform unit tests to assess the impact.

Upon receiving confirmation from the business stakeholders, the administrator deploys the CloudFormation StackSets, which in turn deploy the CloudFormation stack to the designated member account and Region. After the CloudFormation stack deployment, the EventBridge scheduler invokes an AWS Config custom rule evaluation. This rule identifies the non-compliant Lambda functions, and later updates them using SSM Automation runbooks.

Centralized approach to layer management

The following walkthrough deploys the two-part architecture described, using a centralized approach to layer management as in the preceding diagram. A decentralized approach scatters management and updates of Lambda layers across accounts, making enforcement more difficult and error-prone.

This solution is also available on GitHub.

Prerequisites

For the solution walkthrough, you should have the following prerequisites:

Writing an on-demand query for outdated Lambda functions

First, you write and run an AWS Config advanced query to identify the accounts and Regions where the outdated Lambda functions reside. This is helpful for end users to determine the scope of impact, and identify the responsible groups to inform based on the affected Lambda resources.

Follow these procedures to understand the scope of impact using the AWS CLI:

  1. Open CloudShell in your AWS account.
  2. Run the following AWS CLI command. Replace YOUR_AGGREGATOR_NAME with the name of your AWS Config aggregator, and YOUR_LAYER_ARN with the outdated Lambda layer Amazon Resource Name (ARN).
    aws configservice select-aggregate-resource-config \
    --expression "SELECT accountId, awsRegion, configuration.functionName, configuration.version WHERE resourceType = 'AWS::Lambda::Function' AND configuration.layers.arn = 'YOUR_LAYER_ARN'" \
    --configuration-aggregator-name 'YOUR_AGGREGATOR_NAME' \
    --query "Results" \
    --output json | \
    jq -r '.[] | fromjson | [.accountId, .awsRegion, .configuration.functionName, .configuration.version] | @csv' > output.csv
    
  3. The results are saved to a CSV file named output.csv in the current working directory. This file contains the account IDs, Regions, names, and versions of the Lambda functions that are currently using the specified Lambda layer ARN. Refer to the documentation on how to download a file from AWS CloudShell.

To explore more configuration data and further improve visualization using services like Amazon Athena and Amazon QuickSight, refer to Visualizing AWS Config data using Amazon Athena and Amazon QuickSight.

Deploying automatic remediation to update outdated Lambda functions

Next, you deploy the automatic remediation CloudFormation StackSets to the affected accounts and Regions where the outdated Lambda functions reside. You can use the query outlined in the previous section to obtain the account IDs and Regions.

Updating Lambda layers may affect the functionality of existing Lambda functions. It is essential to notify affected development groups, and coordinate unit tests to prevent unintended disruptions before remediation.

To create and deploy CloudFormation StackSets from your management account for automatic remediation:

  1. Run the following command in CloudShell to clone the GitHub repository:
    git clone https://github.com/aws-samples/lambda-layer-management.git
  2. Run the following CLI command to upload your template and create the stack set container.
    aws cloudformation create-stack-set \
      --stack-set-name layers-remediation-stackset \
      --template-body file://lambda-layer-management/layer_manager.yaml
    
  3. Run the following CLI command to add stack instances in the desired accounts and Regions to your CloudFormation StackSets. Replace the account IDs, Regions, and parameters before you run this command. You can refer to the syntax in the AWS CLI Command Reference. “NewLayerArn” is the ARN for your updated Lambda layer, while “OldLayerArn” is the original Lambda layer ARN.
    aws cloudformation create-stack-instances \
    --stack-set-name layers-remediation-stackset \
    --accounts <LIST_OF_ACCOUNTS> \
    --regions <YOUR_REGIONS> \
    --parameter-overrides ParameterKey=NewLayerArn,ParameterValue='<NEW_LAYER_ARN>' ParameterKey=OldLayerArn,ParameterValue='=<OLD_LAYER_ARN>'
    
  4. Run the following CLI command to verify that the stack instances are created successfully. The operation ID is returned as part of the output from step 3.
    aws cloudformation describe-stack-set-operation \
      --stack-set-name layers-remediation-stackset \
      --operation-id <OPERATION_ID>

This CloudFormation StackSet deploys an EventBridge Scheduler that immediately triggers the AWS Config custom rule for evaluation. This rule, written in AWS CloudFormation Guard, detects all the Lambda functions in the member accounts currently using the outdated Lambda layer version. By using the Auto Remediation feature of AWS Config, the SSM automation document is run against each non-compliant Lambda function to update them with the new layer version.

Other considerations

The provided remediation CloudFormation StackSet uses the UpdateFunctionConfiguration API to modify your Lambda functions’ configurations directly. This method of updating may lead to drift from your original infrastructure as code (IaC) service, such as the CloudFormation stack that you used to provision the outdated Lambda functions. In this case, you might need to add an additional step to resolve drift from your original IaC service.

Alternatively, you might want to update your IaC code directly, referencing the latest version of the Lambda layer, instead of deploying the remediation CloudFormation StackSet as described in the previous section.

Cleaning up

Refer to the documentation for instructions on deleting all the created stack instances from your account. After, proceed to delete the CloudFormation StackSet.

Conclusion

Managing Lambda layers across multiple accounts and Regions can be challenging at scale. By using a combination of AWS Config, EventBridge Scheduler, AWS Systems Manager (SSM) Automation, and CloudFormation StackSets, it is possible to streamline the process.

The example provides on-demand visibility into affected Lambda functions and allows scheduled remediation of impacted functions. AWS SSM Automation further simplifies maintenance, deployment, and remediation tasks. With this architecture, you can efficiently manage updates to your Lambda layers and ensure compliance with your organization’s policies, saving time and reducing errors in your serverless applications.

To learn more about using Lambda layer, visit the AWS documentation. For more serverless learning resources, visit Serverless Land.

5th Gen Intel Xeon Scalable Overview at Intel Innovation 2023

Post Syndicated from Patrick Kennedy original https://www.servethehome.com/5th-gen-intel-xeon-scalable-overview-at-intel-innovation-2023/

Intel showed off details on the new 5th Gen Intel Xeon Scalable Emerald Rapids server CPUs with more L3 cache, more cores, and new features

The post 5th Gen Intel Xeon Scalable Overview at Intel Innovation 2023 appeared first on ServeTheHome.

New – NVMe Reservations for Amazon Elastic Block Store io2 Volumes

Post Syndicated from Jeff Barr original https://aws.amazon.com/blogs/aws/new-nvme-reservations-for-amazon-elastic-block-store-io2-volumes/

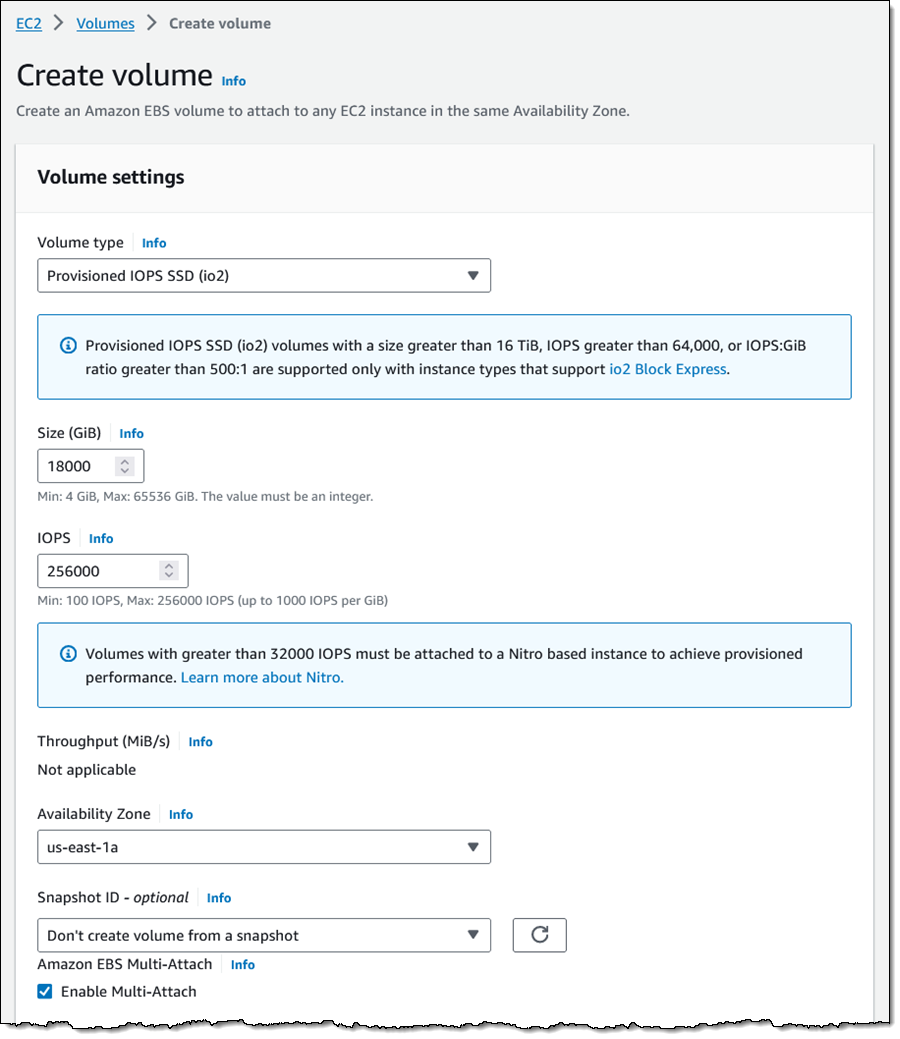
Amazon Elastic Block Store (Amazon EBS) io2 and io2 Block Express volumes now support storage fencing using NVMe reservations. As I learned while writing this post, storage fencing is used to regulate access to storage for a compute or database cluster, ensuring that just one host in the cluster has permission to write to the volume at any given time. For example, you can set up SQL Server Failover Cluster Instances (FCI) and get higher application availability within a single Availability Zone without the need for database replication.

As a quick refresher, io2 Block Express volumes are designed to meet the needs of the most demanding I/O-intensive applications running on Nitro-based Amazon Elastic Compute Cloud (Amazon EC2) instances. Volumes can be as big as 64 TiB, and deliver SAN-like performance with up to 256,000 IOPS/volume and 4,000 MB/second of throughput, all with 99.999% durability and sub-millisecond latency. The volumes support other advanced EBS features including encryption and Multi-Attach, and can be reprovisioned online without downtime. To learn more, you can read Amazon EBS io2 Block Express Volumes with Amazon EC2 R5b Instances Are Now Generally Available.

Using Reservations
To make use of reservations, you simply create an io2 volume with Multi-Attach enabled, and then attach it to one or more Nitro-based EC2 instances (see Provisioned IOPS Volumes for a full list of supported instance types):

If you have existing io2 Block Express volumes, you can enable reservations by detaching the volumes from all of the EC2 instances, and then reattaching them. Reservations will be enabled as soon as you make the first attachment. If you are running Windows Server using AMIs data-stamped 2023.08 or earlier you will need to install the aws_multi_attach driver as described in AWS NVMe Drivers for Windows Instances.

Things to Know
Here are a couple of things to keep in mind regarding NVMe reservations:

Operating System Support – You can use NVMe reservations with Windows Server (2012 R2 and above, 2016, 2019, and 2022), SUSE SLES 12 SP3 and above, RHEL 8.3 and above, and Amazon Linux 2 & later (read NVMe reservations to learn more).

Cluster and Volume Managers – Windows Server Failover Clustering is supported; we are currently working to qualify other cluster and volume managers.

Charges – There are no additional charges for this feature. Each reservation counts as an I/O operation.

— Jeff;

Externalize Amazon MSK Connect configurations with Terraform

Post Syndicated from Ramc Venkatasamy original https://aws.amazon.com/blogs/big-data/externalize-amazon-msk-connect-configurations-with-terraform/

Managing configurations for Amazon MSK Connect, a feature of Amazon Managed Streaming for Apache Kafka (Amazon MSK), can become challenging, especially as the number of topics and configurations grows. In this post, we address this complexity by using Terraform to optimize the configuration of the Kafka topic to Amazon S3 Sink connector. By adopting this strategic approach, you can establish a robust and automated mechanism for handling MSK Connect configurations, eliminating the need for manual intervention or connector restarts. This efficient solution will save time, reduce errors, and provide better control over your Kafka data streaming processes. Let’s explore how Terraform can simplify and enhance the management of MSK Connect configurations for seamless integration with your infrastructure.

Solution overview

At a well-known AWS customer, the management of their constantly growing MSK Connect S3 Sink connector topics has become a significant challenge. The challenges lie in the overhead of managing configurations, as well as dealing with patching and upgrades. Manually handling Kubernetes (K8s) configs and restarting connectors can be cumbersome and error-prone, making it difficult to keep track of changes and updates. At the time of writing this post, MSK Connect does not offer native mechanisms to easily externalize the Kafka topic to S3 Sink configuration.

To address these challenges, we introduce Terraform, an infrastructure as code (IaC) tool. Terraform’s declarative approach and extensive ecosystem make it an ideal choice for managing MSK Connect configurations.

By externalizing Kafka topic to S3 configurations, organizations can achieve the following:

  • Scalability – Effortlessly manage a growing number of topics, ensuring the system can handle increasing data volumes without difficulty
  • Flexibility – Seamlessly integrate MSK Connect configurations with other infrastructure components and services, enabling adaptability to changing business needs
  • Automation – Automate the deployment and management of MSK Connect configurations, reducing manual intervention and streamlining operational tasks
  • Centralized management – Achieve improved governance with centralized management, version control, auditing, and change tracking, ensuring better control and visibility over the configurations

In the following sections, we provide a detailed guide on establishing Terraform for MSK Connect configuration management, defining and decentralizing Topic configurations, and deploying and updating configurations using Terraform.

Prerequisites

Before proceeding with the solution, ensure you have the following resources and access:

  • You need access to an AWS account with sufficient permissions to create and manage resources, including AWS Identity and Access Management (IAM) roles and MSK clusters.
  • To simplify the setup, use the provided AWS CloudFormation template. This template will create the necessary MSK cluster and required resources for this post.
  • For this post, we are using the latest Terraform version (1.5.6).

By ensuring you have these prerequisites in place, you will be ready to follow the instructions and streamline your MSK Connect configurations with Terraform. Let’s get started!

Setup

Setting up Terraform for MSK Connect configuration management includes the following:

  • Installation of Terraform and setting up the environment
  • Setting up the necessary authentication and permissions

Defining and decentralizing topic configurations using Terraform includes the following:

  • Understanding the structure of Terraform configuration files
  • Determining the required variables and resources
  • Utilizing Terraform’s modules and interpolation for flexibility

The decision to externalize the configuration was primarily driven by the customer’s business requirement. They anticipated the need to add topics periodically and wanted to avoid the need to bring down and write specific code each time. Given the limitations of MSK Connect (as of this writing), it’s important to note that MSK Connect can handle up to 300 workers. For this proof of concept (POC), we opted for a configuration with 100 topics directed to a single Amazon Simple Storage Service (Amazon S3) bucket. To ensure compatibility within the 300-worker limit, we set the MCU count to 1 and configured auto scaling with a maximum of 2 workers. This ensures that the configuration remains within the bounds of the 300-worker maximum.

To make the configuration more flexible, we specify the variables that can be utilized in the code.(variables.tf):

variable "aws_region" {
description = "The AWS region to deploy resources in."
type = string
}

variable "s3_bucket_name" {
description = "s3_bucket_name."
type = string
}

variable "topics" {
description = "topics"
type = string
}

variable "msk_connect_name" {
description = "Name of the MSK Connect instance."
type = string
}

variable "msk_connect_description" {
description = "Description of the MSK Connect instance."
type = string
}

# Rest of the variables...

To set up the AWS MSK Connector for the S3 Sink, we need to provide various configurations. Let’s examine the connector_configuration block in the code snippet provided in the main.tf file in more detail:

connector_configuration = {
"connector.class" = "io.confluent.connect.s3.S3SinkConnector"
"s3.region" = "us-east-1"
"flush.size" = "5"
"schema.compatibility" = "NONE"
"tasks.max" = "1"
"topics" = var.topics
"format.class" = "io.confluent.connect.s3.format.json.JsonFormat"
"partitioner.class" = "io.confluent.connect.storage.partitioner.DefaultPartitioner"
"value.converter.schemas.enable" = "false"
"value.converter" = "org.apache.kafka.connect.json.JsonConverter"
"storage.class" = "io.confluent.connect.s3.storage.S3Storage"
"key.converter" = "org.apache.kafka.connect.storage.StringConverter"
"s3.bucket.name" = var.s3_bucket_name
"topics.dir" = "cxdl-data/KairosTelemetry"
}

The kafka_cluster block in the code snippet defines the Kafka cluster details, including the bootstrap servers and VPC settings. You can reference the variables to specify the appropriate values:

kafka_cluster {
apache_kafka_cluster {
bootstrap_servers = var.bootstrap_servers

vpc {
security_groups = [var.security_groups]
subnets = [var.aws_subnet_example1_id, var.aws_subnet_example2_id, var.aws_subnet_example3_id]
}
}
}

To secure the connection between Kafka and the connector, the code snippet includes configurations for authentication and encryption:

  • The kafka_cluster_client_authentication block sets the authentication type to IAM, enabling the use of IAM for authentication
  • The kafka_cluster_encryption_in_transit block enables TLS encryption for data transfer between Kafka and the connector
  kafka_cluster_client_authentication {
    authentication_type = "IAM"
  }

  kafka_cluster_encryption_in_transit {
    encryption_type = "TLS"
  }

You can externalize the variables and provide dynamic values using a var.tfvars file. Let’s assume the content of the var.tfvars file is as follows:

aws_region = "us-east-1"
msk_connect_name = "confluentinc-MSK-connect-s3-2"
msk_connect_description = "My MSK Connect instance"
s3_bucket_name = "msk-lab-xxxxxxxxxxxx-target-bucket"
topics = "salesdb.salesdb.CUSTOMER,salesdb.salesdb.CUSTOMER_SITE,salesdb.salesdb.PRODUCT,salesdb.salesdb.PRODUCT_CATEGORY,salesdb.salesdb.SALES_ORDER,salesdb.salesdb.SALES_ORDER_ALL,salesdb.salesdb.SALES_ORDER_DETAIL,salesdb.salesdb.SALES_ORDER_DETAIL_DS,salesdb.salesdb.SUPPLIER"
bootstrap_servers = "b-2.mskclustermskconnectl.4xwlfx.c11.kafka.us-east-1.amazonaws.com:9098,b-3.mskclustermskconnectl.4xwlfx.c11.kafka.us-east-1.amazonaws.com:9098,b-1.mskclustermskconnectl.4xwlfx.c11.kafka.us-east-1.amazonaws.com:9098“
aws_subnet_example1_id = "subnet-016ef7bb5f5db5759"
aws_subnet_example2_id = "subnet-0114c390d379134fa"
aws_subnet_example3_id = "subnet-0f6352ad89a1454f2"
security_groups = "sg-07eb8f8e4559334e7"
aws_mskconnect_custom_plugin_example_arn = "arn:aws:kafkaconnect:us-east-1:xxxxxxxxxxxx:custom-plugin/confluentinc-kafka-connect-s3-10-0-3/e9aeb52e-d172-4dba-9de5-f5cf73f1cb9e-2"
aws_mskconnect_custom_plugin_example_latest_revision = "1"
aws_iam_role_example_arn = "arn:aws:iam::xxxxxxxxxxxx:role/msk-connect-lab-S3ConnectorIAMRole-3LBTU7YAV9CM"

Deploy and update configurations using Terraform

Once you’ve defined your MSK Connect infrastructure using Terraform, applying these configurations is a straightforward process for creating or updating your infrastructure. This becomes particularly convenient when a new topic needs to be added. Thanks to the externalized configuration, incorporating this change is now a seamless task. The steps are as follows:

  1. Download and install Terraform from the official website (https://www.terraform.io/downloads.html) for your operating system.
  2. Confirm the installation by running the terraform version command on your command line interface.
  3. Ensure that you have configured your AWS credentials using the AWS Command Line Interface (AWS CLI) or by setting environment variables. You can use the aws configure command to configure your credentials if you’re using the AWS CLI.
  4. Place the main.tf, variables.tf, and var.tfvars files in the same Terraform directory.
  5. Open a command line interface, navigate to the directory containing the Terraform files, and run the command terraform init to initialize Terraform and download the required providers.
  6. Run the command terraform plan -var-file="var.tfvars" to review the run plan.

This command shows the changes that Terraform will make to the infrastructure based on the provided variables. This step is optional but is often used as a preview of the changes Terraform will make.

  1. If the plan looks correct, run the command terraform apply -var-file="var.tfvars" to apply the configuration.

Terraform will create the MSK_Connect in your AWS account. This will prompt you for confirmation before proceeding.

  1. After the terraform apply command is complete, verify the infrastructure has been created or updated on the console.
  2. For any changes or updates, modify your Terraform files (main.tf, variables.tf, var.tfvars) as needed, and then rerun the terraform plan and terraform apply commands.
  3. When you no longer need the infrastructure, you can use terraform destroy -var-file="var.tfvars" to remove all resources created by your Terraform files.

Be careful with this command because it will delete all the resources defined in your Terraform files.

Conclusion

In this post, we addressed the challenges faced by a customer in managing MSK Connect configurations and described a Terraform-based solution. By externalizing Kafka topic to Amazon S3 configurations, you can streamline your configuration management processes, achieve scalability, enhance flexibility, automate deployments, and centralize management. We encourage you to use Terraform to optimize your MSK Connect configurations and explore further possibilities in managing your streaming data pipelines efficiently.

To get started with externalizing MSK Connect configurations using Terraform, refer to the provided implementation steps and the Getting Started with Terraform guide, MSK Connect documentation, Terraform documentation, and example GitHub repository.

Using Terraform to externalize the Kafka topic to Amazon S3 Sink configuration in MSK Connect offers a powerful solution for managing and scaling your streaming data pipelines. By automating the deployment, updating, and central management of configurations, you can ensure efficiency, flexibility, and scalability in your data processing workflows.


About the Author

RamC Venkatasamy is a Solutions Architect based in Bloomington, Illinois. He helps AWS Strategic customers transform their businesses in the cloud. With a fervent enthusiasm for Serverless, Event-Driven Architecture and GenAI.

A Beginner’s Guide to External Hard Drives

Post Syndicated from Nicole Gale original https://www.backblaze.com/blog/a-beginners-guide-to-external-hard-drives/

A while back, I received a frantic phone call from a long time friend who teaches ninth grade English. Now, don’t get me wrong, this friend, let’s call her Alex, is a tech-savvy person. She has more apps on her smartphone than I knew existed, but she had never used an external hard drive before. 

Her school district had given them out to help make remote learning easier on teachers, but she was nervous about using it incorrectly, breaking it, or even just being able to find it on her computer. And she was a little embarrassed because it seemed like something everyone else already knew how to use.

If you’ve ever felt a bit lost when it comes to hard drives, don’t worry—you’re not alone. If you’re one of many folks who’ve asked themselves, “What is this thing?” and “How will it be helpful to me?” and “What if I break it?” then I’m here to walk you through everything I walked Alex through. Lots of folks have the same questions, and we’ll answer them in this guide for setting up and protecting your new hard drive.

A Guide to Setting Up Your First External Hard Drive

Getting Started

While it might seem like a no-brainer, the first step for setting up your hard drive is to plug it into your computer. Small, external, portable hard drives typically have one cord that plugs into your computer so you can transfer data. It also powers the hard drive. Some models may have another cord for added power—if so, you’ll want to plug in both.

Finding Your Hard Drive on Your Computer

On a Mac, locating your connected external drive is straightforward. Open Finder, which you can access by clicking the default Finder icon in your applications Dock, using Command + Space bar to search for Finder, or pressing Shift + Command + C. Once in Finder, your drives should appear either immediately or in the left-hand navigation column under “Locations.” Click on the specific drive you want to access to view its contents.

For Windows computers, the steps may vary depending on your Windows version. In general, you can find your drives in File Explorer by clicking on Computer or This PC in the left-hand navigation bar of a File Explorer window. If you’re unsure how to open File Explorer, look for it in your Start Menu, or try clicking on your desktop and pressing Windows Key + E together. Once you’ve located your drives, simply click on the one you wish to explore to access its contents.

Saving Files to Your External Hard Drive

External hard drives are a breeze to use. Once you’ve plugged them in and found them on your computer, you can simply copy files onto the hard drive by clicking and dragging them into the Finder or File Explorer window. This creates a copy on your hard drive, while leaving the original on your computer or laptop. 

External Hard Drive Best Practices

Once you know how to use your external hard drive, there are a number of things you can do to maintain it and keep it organized. Your hard drive will fail eventually (more on that later), but there are things you can do to keep it working as long as possible. And there are things you can do to make sure you can easily find what you’re looking for. 

1. Keep Your Drive Clean

Maintaining the cleanliness of your external hard drive involves two essential steps: caring for the hard drive itself and keeping the surrounding computer area tidy. The biggest priority is to ensure that both your hard drive and its immediate environment remain free from dust. A dust-free environment contributes to unimpeded airflow within your device, reducing the risk of overheating. If your hard drive has already been exposed to a dusty environment, compressed air is the most effective cleaning tool to remove it.

To effectively use compressed air, first identify key areas for cleaning. Look for the fan vent, inspect the USB ports, and examine other spots on the external hard drive that may accumulate dust over time. Then, simply blast those areas with the compressed air to remove some of the built up dust. (Bonus: it’s super fun.)

Lastly, it’s crucial to maintain an uncluttered area around your external hard drive to facilitate optimal airflow. Take the time to relocate any objects that might obstruct the airflow, such as books, papers, and other potential obstructions. This simple step can significantly enhance the longevity and performance of your external hard drive.

2. Keep Your Operating System Up to Date

The second best practice has more to do with your computer or laptop than your hard drive, but that’s what your hard drive connects to—so it’s important to keep it working, too. 

We have all hit “remind me later” on an update dialog from our computer at some point in our lives, but updating your operating system (OS) will ensure that your computer is secure, that your system can run better, and that hard drives are able to properly connect to your files. Updating your OS can vary depending on what kind of computer you have. The best place to look for how to update your OS is in your system’s preferences.

Depending on the age of your computer, however, you should reach out to your local IT person before updating. Some older computers are not able to run, or run very poorly, on newer systems.

3. Know What’s On Your External Hard Drive

External hard drives are simple: you plug them in, they appear on your computer, and you can simply click and drag your files onto them to copy the files onto the hard drive. If you’re a more advanced user, you may have set up your external hard drive so that there are files that only exist on that device. Either way, it’s important to monitor what’s on your external hard drive and minimize digital clutter, just like you would with your computer or laptop. You can do this by periodically checking your drive to make sure your files are up to date and still needed.

4. Delete Duplicates

When you’re reviewing the contents of your external hard drive, keep in mind the significance of deleting duplicates. There are times when we unintentionally generate multiple copies of a project or document or save several versions of the same file, especially when finalizing edits. Removing redundant duplicates not only contributes to a speedier hard drive performance but also creates room for additional files. You can either manually inspect your files for duplications or use specialized applications designed to detect and delete duplicate files residing on your drive.

Protecting Your Data on an External Hard Drive

3-2-1 Backup

Implementing a 3-2-1 backup strategy means maintaining a minimum of three complete copies of your data. Two of these copies should reside locally but on distinct types of media, such as an external hard drive. The third copy must be stored offsite, away from your primary location. For instance, if you have your files on your computer and an external hard drive (which should be stored separately from your computer when not in use), you should maintain one additional copy stored independently, beyond the confines of your home. This is where the cloud comes in.

There are several cloud-based services that will back up your computer and your attached drives. We’re partial to our own, of course, and, here’s our guide to making sure your external hard drives are backed up. And, with Backblaze’s Forever Version History, you’ll always have a copy of your hard drive data, updated from the most recent time you plugged it in.

Prepare for a Drive Failure

The only truth about computer hardware is that it will fail eventually. We know a little bit about that. Most hard drive manufacturer warranties span only three to five years, and budget-friendly drives often have even shorter lifespans. These time frames don’t factor in variables like physical wear and tear, specific make or model, or storage conditions.

When using an external hard drive, you have to prepare for the day that it fails. Fortunately, there are several methods to monitor your external hard drive’s health, with telltale signs that it’s approaching the end of its service life. These signs may include unusual clicking or screeching sounds, sluggish performance, and frequent errors when attempting to access folders on the drive. You can also manually assess your drives’ status directly from your computer.

How to Find Out if Your Drive Is Failing

For a Windows computer, you’ll use a simple command prompt that will tell your computer where to look and what to check. Just right-click the Start menu on your computer, select Run, and type “cmd” or type “cmd” into the search bar. In the Command Line window that opens, copy and paste wmic diskdrive get status and hit enter. This command will run and it will return “Pred Fail” if your drive is not performing, or “OK” if the drive is performing well.

For a Mac computer, you can monitor the status of your external hard drive by opening Disk Utility. You can find it by going to Applications and then Utilities. Next, you will click on the drive you would like to test to see how it’s performing. Click the View button in the toolbar, then select Show SMART Status. This will display the SMART status of your hard drive as either “Verified” (healthy) or “Failing” (indicating a potential problem). Disk Utility will not detect or repair all problems that a disk may have, but it can give you a general picture.

Note: The process for running these diagnostics may vary slightly depending on your OS and the specific utility you use. 

How to Run SMART Diagnostics on Your Hard Drive

Running SMART (Self-Monitoring, Analysis, and Reporting Technology) diagnostics on your hard drive is a smart (see what we did there?) way to assess its health and predict potential issues. SMART diagnostics provide valuable insights into your drive’s performance and can help you detect problems before they lead to data loss. 
You can use third-party software utilities like CrystalDiskInfo or HDDScan to access more detailed SMART data and view drive health in a user-friendly interface. Download and install one of these tools, then launch it and select your hard drive to view its SMART attributes and health status.

In Conclusion

Starting out with an external hard drive is exactly like starting out with any piece of technology you might own. The more you educate yourself on the ins and outs of taking care of it, the better it will run for you. But if something bad were to happen, you should always have a backup plan (we suggest Backblaze, but you probably already know that) to protect your new piece of equipment.

External Hard Drive FAQs

1. How do I find a hard drive on my computer?

On a Mac, open Finder. Once in Finder, your drives should appear either immediately or in the left-hand navigation column under “Locations.” For Windows computers, the steps may vary depending on your Windows version. In general, you can find your drives in File Explorer by clicking on Computer or This PC in the left-hand navigation bar of a File Explorer window. 

2. How do I save files to a hard drive?

Once you’ve plugged in your hard drive and found it on your computer, you can simply copy files onto the hard drive by clicking and dragging them into the Finder or File Explorer window. This creates a copy on your hard drive, while leaving the original on your computer or laptop. 

3. How do I keep my hard drive maintained?

Keeping your drive clean and dust-free is the best way to maintain it. This involves two essential steps: caring for the hard drive itself and keeping the surrounding computer area tidy. The biggest priority is to ensure that both your hard drive and its immediate environment remain free from dust. A dust-free environment contributes to unimpeded airflow within your device, reducing the risk of overheating. If your hard drive has already been exposed to a dusty environment, compressed air is the most effective cleaning tool to remove it.

4. How do I know if my hard drive is failing?

There are several telltale signs that your hard drive is approaching the end of its service life. These signs may include unusual clicking or screeching sounds, sluggish performance, and frequent errors when attempting to access folders on the drive. You can also manually assess your drives’ status directly from your computer.

The post A Beginner’s Guide to External Hard Drives appeared first on Backblaze Blog | Cloud Storage & Cloud Backup.

How Chime Financial uses AWS to build a serverless stream analytics platform and defeat fraudsters

Post Syndicated from Khandu Shinde original https://aws.amazon.com/blogs/big-data/how-chime-financial-uses-aws-to-build-a-serverless-stream-analytics-platform-and-defeat-fraudsters/

This is a guest post by Khandu Shinde, Staff Software Engineer and Edward Paget, Senior Software Engineering at Chime Financial.

Chime is a financial technology company founded on the premise that basic banking services should be helpful, easy, and free. Chime partners with national banks to design member first financial products. This creates a more competitive market with better, lower-cost options for everyday Americans who aren’t being served well by traditional banks. We help drive innovation, inclusion, and access across the industry.

Chime has a responsibility to protect our members against unauthorized transactions on their accounts. Chime’s Risk Analysis team constantly monitors trends in our data to find patterns that indicate fraudulent transactions.

This post discusses how Chime utilizes AWS Glue, Amazon Kinesis, Amazon DynamoDB, and Amazon SageMaker to build an online, serverless fraud detection solution — the Chime Streaming 2.0 system.

Problem statement

In order to keep up with the rapid movement of fraudsters, our decision platform must continuously monitor user events and respond in real-time. However, our legacy data warehouse-based solution was not equipped for this challenge. It was designed to manage complex queries and business intelligence (BI) use cases on a large scale. However, with a minimum data freshness of 10 minutes, this architecture inherently didn’t align with the near real-time fraud detection use case.

To make high-quality decisions, we need to collect user event data from various sources and update risk profiles in real time. We also need to be able to add new fields and metrics to the risk profiles as our team identifies new attacks, without needing engineering intervention or complex deployments.

We decided to explore streaming analytics solutions where we can capture, transform, and store event streams at scale, and serve rule-based fraud detection models and machine learning (ML) models with milliseconds latency.

Solution overview

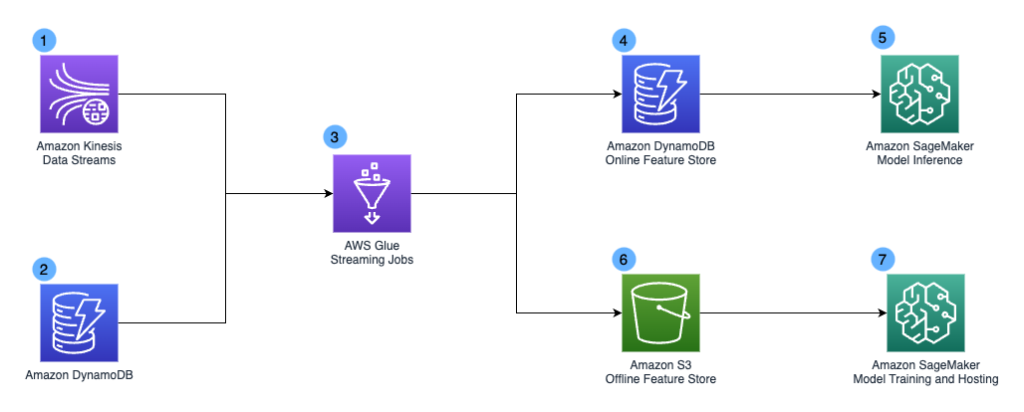
The following diagram illustrates the design of the Chime Streaming 2.0 system.

The design included the following key components:

  1. We have Amazon Kinesis Data Streams as our streaming data service to capture and store event streams at scale. Our stream pipelines capture various event types, including user enrollment events, user login events, card swipe events, peer-to-peer payments, and application screen actions.
  2. Amazon DynamoDB is another data source for our Streaming 2.0 system. It acts as the application backend and stores data such as blocked devices list and device-user mapping. We mainly use it as lookup tables in our pipeline.
  3. AWS Glue jobs form the backbone of our Streaming 2.0 system. The simple AWS Glue icon in the diagram represents thousands of AWS Glue jobs performing different transformations. To achieve the 5-15 seconds end-to-end data freshness service level agreement (SLA) for the Steaming 2.0 pipeline, we use streaming ETL jobs in AWS Glue to consume data from Kinesis Data Streams and apply near-real-time transformation. We choose AWS Glue mainly due to its serverless nature, which simplifies infrastructure management with automatic provisioning and worker management, and the ability to perform complex data transformations at scale.
  4. The AWS Glue streaming jobs generate derived fields and risk profiles that get stored in Amazon DynamoDB. We use Amazon DynamoDB as our online feature store due to its millisecond performance and scalability.
  5. Our applications call Amazon SageMaker Inference endpoints for fraud detections. The Amazon DynamoDB online feature store supports real-time inference with single digit millisecond query latency.
  6. We use Amazon Simple Storage Service (Amazon S3) as our offline feature store. It contains historical user activities and other derived ML features.
  7. Our data scientist team can access the dataset and perform ML model training and batch inferencing using Amazon SageMaker.

AWS Glue pipeline implementation deep dive

There are several key design principles for our AWS Glue Pipeline and the Streaming 2.0 project.

  • We want to democratize our data platform and make the data pipeline accessible to all Chime developers.
  • We want to implement cloud financial backend services and achieve cost efficiency.

To achieve data democratization, we needed to enable different personas in the organization to use the platform and define transformation jobs quickly, without worrying about the actual implementation details of the pipelines. The data infrastructure team built an abstraction layer on top of Spark and integrated services. This layer contained API wrappers over integrated services, job tags, scheduling configurations and debug tooling, hiding Spark and other lower-level complexities from end users. As a result, end users were able to define jobs with declarative YAML configurations and define transformation logic with SQL. This simplified the onboarding process and accelerated the implementation phase.

To achieve cost efficiency, our team built a cost attribution dashboard based on AWS cost allocation tags. We enforced tagging with the above abstraction layer and had clear cost attribution for all AWS Glue jobs down to the team level. This enabled us to track down less optimized jobs and work with job owners to implement best practices with impact-based priority. One common misconfiguration we found was sizing of AWS Glue jobs. With data democratization, many users lacked the knowledge to right-size their AWS Glue jobs. The AWS team introduced AWS Glue auto scaling to us as a solution. With AWS Glue Auto Scaling, we no longer needed to plan AWS Glue Spark cluster capacity in advance. We could just set the maximum number of workers and run the jobs. AWS Glue monitors the Spark application execution, and allocates more worker nodes to the cluster in near-real time after Spark requests more executors based on our workload requirements. We noticed a 30–45% cost saving across our AWS Glue Jobs once we turned on Auto Scaling.

Conclusion

In this post, we showed you how Chime’s Streaming 2.0 system allows us to ingest events and make them available to the decision platform just seconds after they are emitted from other services. This enables us to write better risk policies, provide fresher data for our machine learning models, and protect our members from unauthorized transactions on their accounts.

Over 500 developers in Chime are using this streaming pipeline and we ingest more than 1 million events per second. We follow the sizing and scaling process from the AWS Glue streaming ETL jobs best practices blog and land on a 1:1 mapping between Kinesis Shard and vCPU core. The end-to-end latency is less than 15 seconds, and it improves the model score calculation speed by 1200% compared to legacy implementation. This system has proven to be reliable, performant, and cost-effective at scale.

We hope this post will inspire your organization to build a real-time analytics platform using serverless technologies to accelerate your business goals.


About the Authors

Khandu Shinde Khandu Shinde is a Staff Engineer focused on Big Data Platforms and Solutions for Chime. He helps to make the platform scalable for Chime’s business needs with architectural direction and vision. He’s based in San Francisco where he plays cricket and watches movies.

Edward Paget Edward Paget is a Software Engineer working on building Chime’s capabilities to mitigate risk to ensure our members’ financial peace of mind. He enjoys being at the intersection of big data and programming language theory. He’s based in Chicago where he spends his time running along the lake shore.

Dylan Qu is a Specialist Solutions Architect focused on Big Data & Analytics with Amazon Web Services. He helps customers architect and build highly scalable, performant, and secure cloud-based solutions on AWS.

Intel Announces 288 E-Core Sierra Forest Variant at Innovation 2023

Post Syndicated from Patrick Kennedy original https://www.servethehome.com/intel-announces-288-e-core-sierra-forest-variant-at-innovation-2023/

At Intel Innovation 2023 Intel formally disclosed that it will have a 288 core Sierra Forest Xeon with all E-cores for cloud-native servers

The post Intel Announces 288 E-Core Sierra Forest Variant at Innovation 2023 appeared first on ServeTheHome.

5th Gen Intel Xeon Scalable Emerald Rapids Launches on December 14

Post Syndicated from Cliff Robinson original https://www.servethehome.com/5th-gen-intel-xeon-scalable-emerald-rapids-launches-on-december-14/

The 5th Gen Intel Xeon Scalable launch is set for December 14, 2023 as an update to the current generation servers before 2024’s big changes

The post 5th Gen Intel Xeon Scalable Emerald Rapids Launches on December 14 appeared first on ServeTheHome.

The collective thoughts of the interwebz