Sending Amazon EventBridge events to private endpoints in a VPC

Post Syndicated from James Beswick original https://aws.amazon.com/blogs/compute/sending-amazon-eventbridge-events-to-private-endpoints-in-a-vpc/

This post is written by Emily Shea, Senior GTM Specialist, Event-Driven Architectures.

Building with events can help you accelerate feature velocity and build scalable, fault tolerant applications. You can achieve loose coupling in your application using asynchronous communication via events. Loose coupling allows each development team to build and deploy independently and each component to scale and fail without impacting the others. This approach is referred to as event-driven architecture.

Amazon EventBridge helps you build event-driven architectures. You can publish events to the EventBridge event bus and EventBridge routes those events to targets. You can write rules to filter events and only send them to the interested targets. For example, an order fulfillment service may only be interested in events of type ‘new order created.’

EventBridge is serverless, so there is no infrastructure to manage and the service scales automatically. EventBridge has native integrations with over 100 AWS services and over 40 SaaS providers.

Amazon EventBridge has a native integration with AWS Lambda, and many AWS customers use events to trigger Lambda functions to process events. You may also want to send events to workloads running on Amazon EC2 or containerized workloads deployed with Amazon ECS or Amazon EKS. These services are deployed into an Amazon Virtual Private Cloud, or VPC.

For some use cases, you may be able to expose public endpoints for your VPC. You can use EventBridge API destinations to send events to any public HTTP endpoint. API destinations include features like OAuth support and rate limiting to control the number of events you are sending per second.

However, some customers are not able to expose public endpoints for security or compliance purposes. This tutorial shows you how to send EventBridge events to a private endpoint in a VPC using a Lambda function to relay events. This solution deploys the Lambda function connected to the VPC and uses IAM permissions to enable EventBridge to invoke the Lambda function. Learn more about Lambda VPC connectivity here.

In this blog post, you learn how to send EventBridge events to a private endpoint in a VPC. You set up an example application with an EventBridge event bus, a Lambda function to relay events, a Flask application running in an EKS cluster to receive events behind an Application Load Balancer (ALB), and a secret stored in Secrets Manager for authenticating requests. This application uses EKS and Secrets Manager to demonstrate sending and authenticating requests to a containerized workload, but the same pattern applies for other container orchestration services like ECS and your preferred secret management solution.

Continue reading for the full example application and walkthrough. If you have an existing application in a VPC, you can deploy just the event relay portion and input your VPC details as parameters.

Solution overview

Architecture

  1. An event is sent to the EventBridge bus.
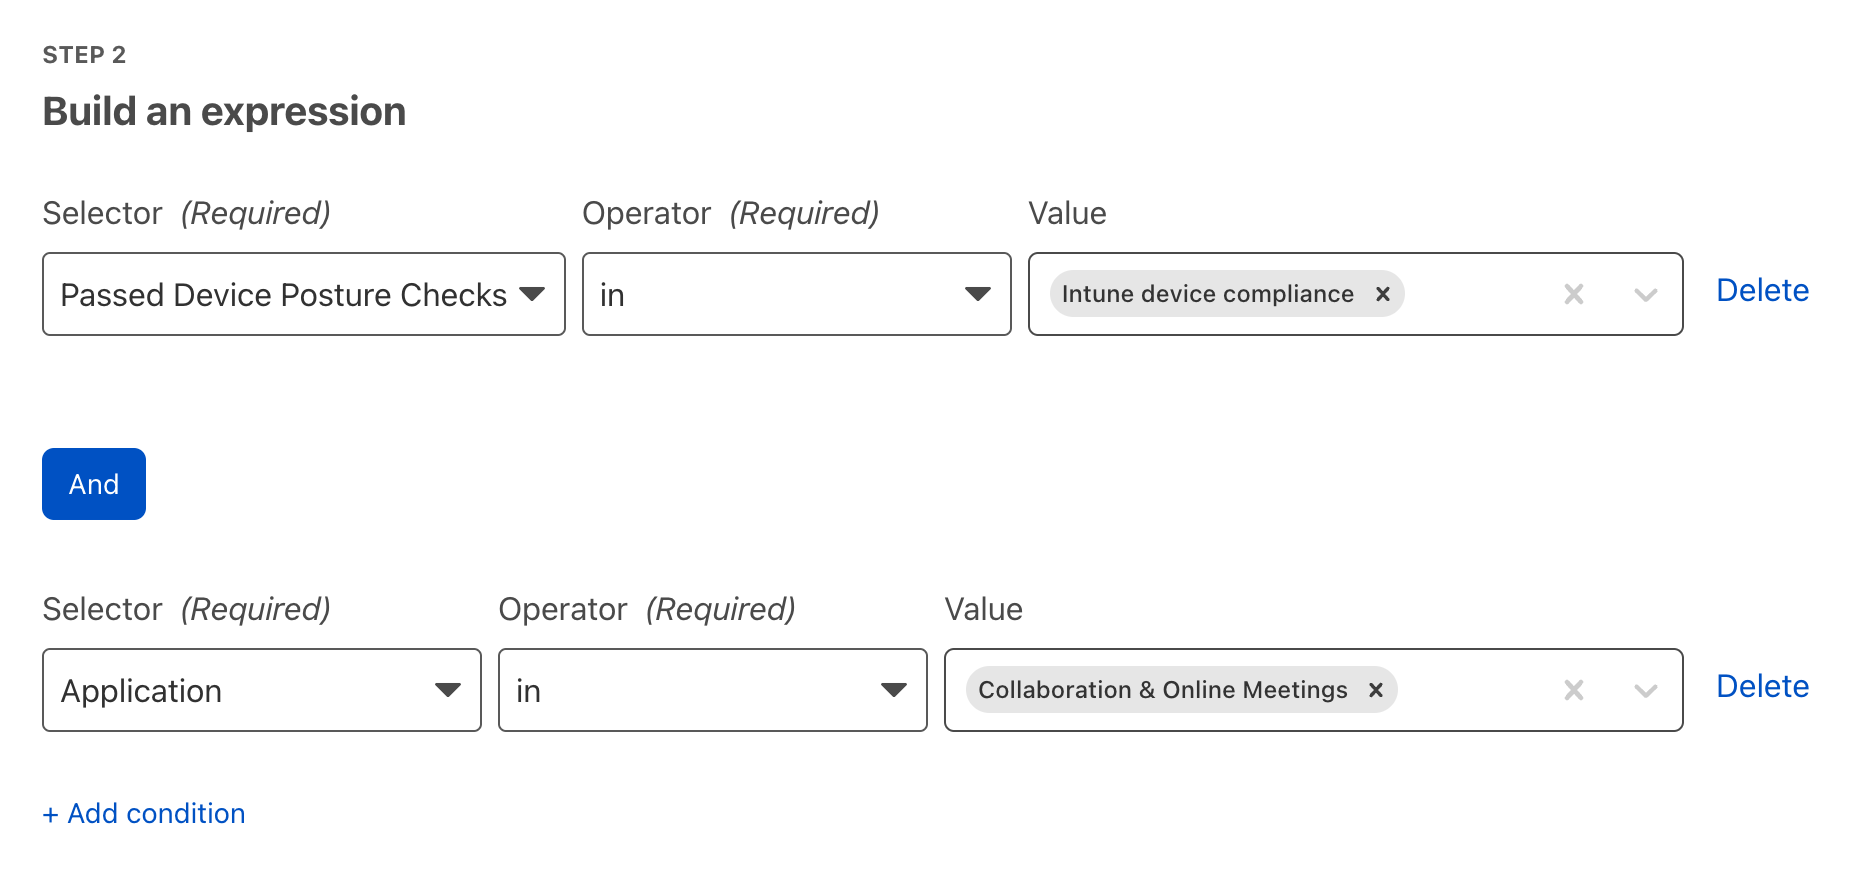
  2. If the event matches a certain pattern (ex, if ‘detail-type’ is ‘inbound-event-sent’), an EventBridge rule uses EventBridge’s input transformer to format the event as an HTTP call.
  3. The EventBridge rule pushes the event to a Lambda function connected to the VPC and a CloudWatch Logs group for debugging.
  4. The Lambda function calls Secrets Manager and retrieves a secret key. It appends the secret key to the event headers and then makes an HTTP call to the ALB URL endpoint.
  5. ALB routes this HTTP call to a node group in the EKS cluster. The Flask application running on the EKS cluster calls Secret Manager, confirms that the secret key is valid, and then processes the event.
  6. The Lambda function receives a response from ALB.
    1. If the Flask application fails to process the event for any reason, the Lambda function raises an error. The function’s failure destination is configured to send the event and the error message to an SQS dead letter queue.
    2. If the Flask application successfully processes the event and the ‘return-response-event’ flag in the event was set to ‘true’, then the Lambda function publishes a new ‘outbound-event-sent’ event to the same EventBridge bus.
  7. Another EventBridge rule matches detail-type ‘outbound-event-sent’ events and routes these to the CloudWatch Logs group for debugging.

Prerequisites

To run the application, you must install the AWS CLI, Docker CLI, eksctl, kubectl, and AWS SAM CLI.

To clone the repository, run:

git clone https://github.com/aws-samples/eventbridge-events-to-vpc.git

Creating the EKS cluster

  1. In the example-vpc-application directory, use eksctl to create the EKS cluster using the config file.
    cd example-vpc-application
    eksctl create cluster --config-file eksctl_config.yaml

    This takes a few minutes. This step creates an EKS cluster with one node group in us-east-1. The EKS cluster has a service account with IAM permissions to access the Secrets Manager secret you create later.

  2. Use your AWS account’s default Amazon Elastic Container Registry (ECR) private registry to store the container image. First, follow these instructions to authenticate Docker to ECR. Next, run this command to create a new ECR repository. The create-repository command returns a repository URI (for example, 123456789.dkr.ecr.us-east-1.amazonaws.com/events-flask-app).
    aws ecr create-repository --repository-name events-flask-app 

    Use the repository URI in the following commands to build, tag, and push the container image to ECR.

    docker build --tag events-flask-app .
    docker tag events-flask-app:latest {repository-uri}:1
    docker push {repository-uri}:1
  3. In the Kuberenetes deployment manifest file (/example-vpc-application/manifests/deployment.yaml), fill in your repository URI and container image version (for example, 123456789.dkr.ecr.us-east-1.amazonaws.com/events-flask-app:1)

Deploy the Flask application and Application Load Balancer

  1. Within the example-vpc-application directory, use kubectl to apply the Kubernetes manifest files. This step deploys the ALB, which takes time to create and you may receive an error message during the deployment (‘no endpoints available for service “aws-load-balancer-webhook-service”‘). Rerun the same command until the ALB is deployed and you no longer receive the error message.
    kubectl apply --kustomize manifests/
  2. Once the deployment is completed, verify that the Flask application is running by retrieving the Kubernetes pod logs. The first command retrieves a pod name to fill in for the second command.
    kubectl get pod --namespace vpc-example-app
    kubectl logs --namespace vpc-example-app {pod-name} --follow

    You should see the Flask application outputting ‘Hello from my container!’ in response to GET request health checks.

    Hello message

Get VPC and ALB details

Next, you retrieve the security group ID, private subnet IDs, and ALB DNS Name to deploy the Lambda function connected to the same VPC and private subnet and send events to the ALB.

  1. In the AWS Management Console, go to the VPC dashboard and find Subnets. Copy the subnet IDs for the two private subnets (for example, subnet name ‘eksctl-events-cluster/SubnetPrivateUSEAST1A’).
    Subnets
  2. In the VPC dashboard, under Security, find the Security Groups tab. Copy the security group ID for ‘eksctl-events-cluster/ClusterSharedNodeSecurityGroup’.
    Security groups
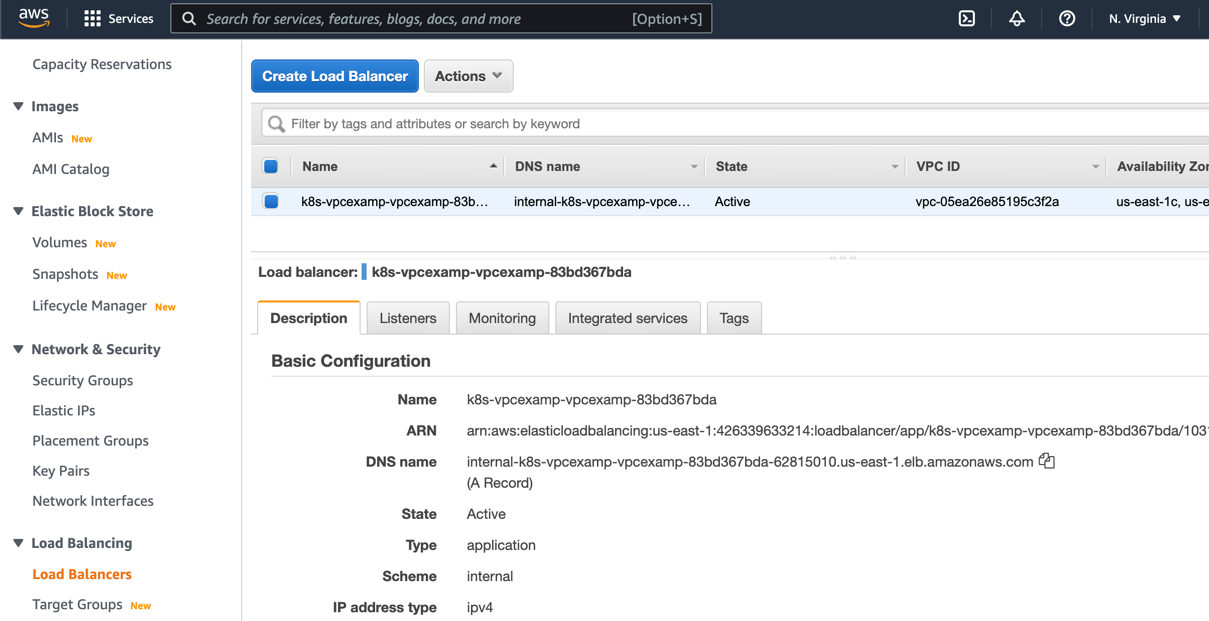
  3. Go to the EC2 dashboard. Under Load Balancing, find the Load Balancer tab. There is a load balancer associated with your VPC ID. Copy the DNS name for the load balancer, adding ‘http://’ as a prefix (for example, http://internal-k8s-vpcexamp-vpcexamp-c005e07d1a-1074647274.us-east-1.elb.amazonaws.com).
    Load balancer

Create the Secrets Manager VPC endpoint

You need a VPC endpoint for your application to call Secrets Manager.

  1. In the VPC dashboard, find the Endpoints tab and choose Create Endpoint. Select Secrets Manager as the service, and then select the VPC, private subnets, and security group that you copied in the previous step. Choose Create.VPC endpoint

Deploy the event relay application

Deploy the event relay application using the AWS Serverless Application Model (AWS SAM) CLI:

  1. Open a new terminal window and navigate to the event-relay directory. Run the following AWS SAM CLI commands to build the application and step through a guided deployment.
    cd event-relay
    sam build
    sam deploy --guided

    The guided deployment process prompts for input parameters. Enter ‘event-relay-app’ as the stack name and accept the default Region. For other parameters, submit the ALB and VPC details you copied: Url (ALB DNS name), security group ID, and private subnet IDs. For the Secret parameter, pass any value.The AWS SAM template saves this value as a Secrets Manager secret to authenticate calls to the container application. This is an example of how to pass secrets in the event relay HTTP call. Replace this with your own authentication method in production environments.

  2. Accept the defaults for the remaining options. For ‘Deploy this changeset?’, select ‘y’. Here is an example of the deployment parameters.
    Parameters

Test the event relay application

Both the Flask application in a VPC and the event relay application are now deployed. To test the event relay application, keep the Kubernetes pod logs from a previous step open to monitor requests coming into the Flask application.

  1. You can open a new terminal window and run this AWS CLI command to put an event on the bus, or go to the EventBridge console, find your event bus, and use the Send events UI.
    aws events put-events \
    --entries '[{"EventBusName": "event-relay-bus" ,"Source": "eventProducerApp", "DetailType": "inbound-event-sent", "Detail": "{ \"event-id\": \"123\", \"return-response-event\": true }"}]'

    When the event is relayed to the Flask application, a POST request in the Kubernetes pod logs confirms that the application processed the event.

    Terminal response

  2. Navigate to the CloudWatch Logs groups in the AWS Management Console. In the ‘/aws/events/event-bus-relay-logs’ group, there are logs for the EventBridge events. In ‘/aws/lambda/EventRelayFunction’ stream, the Lambda function relays the inbound event and puts a new outbound event on the EventBridge bus.
  3. You can test the SQS dead letter queue by creating an error. For example, you can manually change the Lambda function code in the console to pass an incorrect value for the secret. After sending a test event, navigate to the SQS queue in the console and poll for messages. The message shows the error message from the Flask application and the full event that failed to process.

Cleaning up

In the VPC dashboard in the AWS Management Console, find the Endpoints tab and delete the Secrets Manager VPC endpoint. Next, run the following commands to delete the rest of the example application. Be sure to run the commands in this order as some of the resources have dependencies on one another.

sam delete --stack-name event-relay-app
kubectl --namespace vpc-example-app delete ingress vpc-example-app-ingress

From the example-vpc-application directory, run this command.

eksctl delete cluster --config-file eksctl_config.yaml

Conclusion

Event-driven architectures and EventBridge can help you accelerate feature velocity and build scalable, fault tolerant applications. This post demonstrates how to send EventBridge events to a private endpoint in a VPC using a Lambda function to relay events and emit response events.

To learn more, read Getting started with event-driven architectures and visit EventBridge tutorials on Serverless Land.

Stream change data to Amazon Kinesis Data Streams with AWS DMS

Post Syndicated from Sukhomoy Basak original https://aws.amazon.com/blogs/big-data/stream-change-data-to-amazon-kinesis-data-streams-with-aws-dms/

In this post, we discuss how to use AWS Database Migration Service (AWS DMS) native change data capture (CDC) capabilities to stream changes into Amazon Kinesis Data Streams.

AWS DMS is a cloud service that makes it easy to migrate relational databases, data warehouses, NoSQL databases, and other types of data stores. You can use AWS DMS to migrate your data into the AWS Cloud or between combinations of cloud and on-premises setups. AWS DMS also helps you replicate ongoing changes to keep sources and targets in sync.

CDC refers to the process of identifying and capturing changes made to data in a database and then delivering those changes in real time to a downstream system. Capturing every change from transactions in a source database and moving them to the target in real time keeps the systems synchronized, and helps with real-time analytics use cases and zero-downtime database migrations.

Kinesis Data Streams is a fully managed streaming data service. You can continuously add various types of data such as clickstreams, application logs, and social media to a Kinesis stream from hundreds of thousands of sources. Within seconds, the data will be available for your Kinesis applications to read and process from the stream.

AWS DMS can do both replication and migration. Kinesis Data Streams is most valuable in the replication use case because it lets you react to replicated data changes in other integrated AWS systems.

This post is an update to the post Use the AWS Database Migration Service to Stream Change Data to Amazon Kinesis Data Streams. This new post includes steps required to configure AWS DMS and Kinesis Data Streams for a CDC use case. With Kinesis Data Streams as a target for AWS DMS, we make it easier for you to stream, analyze, and store CDC data. AWS DMS uses best practices to automatically collect changes from a data store and stream them to Kinesis Data Streams.

With the addition of Kinesis Data Streams as a target, we’re helping customers build data lakes and perform real-time processing on change data from your data stores. You can use AWS DMS in your data integration pipelines to replicate data in near-real time directly into Kinesis Data Streams. With this approach, you can build a decoupled and eventually consistent view of your database without having to build applications on top of a database, which is expensive. You can refer to the AWS whitepaper AWS Cloud Data Ingestion Patterns and Practices for more details on data ingestion patters.

AWS DMS sources for real-time change data

The following diagram illustrates that AWS DMS can use many of the most popular database engines as a source for data replication to a Kinesis Data Streams target. The database source can be a self-managed engine running on an Amazon Elastic Compute Cloud (Amazon EC2) instance or an on-premises database, or it can be on Amazon Relational Database Service (Amazon RDS), Amazon Aurora, or Amazon DocumentDB (with MongoDB availability).

Kinesis Data Streams can collect, process, and store data streams at any scale in real time and write to AWS Glue, which is a serverless data integration service that makes it easy to discover, prepare, and combine data for analytics, machine learning, and application development. You can use Amazon EMR for big data processing, Amazon Kinesis Data Analytics to process and analyze streaming data , Amazon Kinesis Data Firehose to run ETL (extract, transform, and load) jobs on streaming data, and AWS Lambda as a serverless compute for further processing, transformation, and delivery of data for consumption.

You can store the data in a data warehouse like Amazon Redshift, which is a cloud-scale data warehouse, and in an Amazon Simple Storage Service (Amazon S3) data lake for consumption. You can use Kinesis Data Firehose to capture the data streams and load the data into S3 buckets for further analytics.

Once the data is available in Kinesis Data Streams targets (as shown in the following diagram), you can visualize it using Amazon QuickSight; run ad hoc queries using Amazon Athena; access, process, and analyze it using an Amazon SageMaker notebook instance; and efficiently query and retrieve structured and semi-structured data from files in Amazon S3 without having to load the data into Amazon Redshift tables using Amazon Redshift Spectrum.

Solution overview

In this post, we describe how to use AWS DMS to load data from a database to Kinesis Data Streams in real time. We use a SQL Server database as example, but other databases like Oracle, Microsoft Azure SQL, PostgreSQL, MySQL, SAP ASE, MongoDB, Amazon DocumentDB, and IBM DB2 also support this configuration.

You can use AWS DMS to capture data changes on the database and then send this data to Kinesis Data Streams. After the streams are ingested in Kinesis Data Streams, they can be consumed by different services like Lambda, Kinesis Data Analytics, Kinesis Data Firehose, and custom consumers using the Kinesis Client Library (KCL) or the AWS SDK.

The following are some use cases that can use AWS DMS and Kinesis Data Streams:

  • Triggering real-time event-driven applications – This use case integrates Lambda and Amazon Simple Notification Service (Amazon SNS).
  • Simplifying and decoupling applications – For example, moving from monolith to microservices. This solution integrates Lambda and Amazon API Gateway.
  • Cache invalidation, and updating or rebuilding indexes – Integrates Amazon OpenSearch Service (successor to Amazon Elasticsearch Service) and Amazon DynamoDB.
  • Data integration across multiple heterogeneous systems – This solution sends data to DynamoDB or another data store.
  • Aggregating data and pushing it to downstream system – This solution uses Kinesis Data Analytics to analyze and integrate different sources and load the results in another data store.

To facilitate the understanding of the integration between AWS DMS, Kinesis Data Streams, and Kinesis Data Firehose, we have defined a business case that you can solve. In this use case, you are the data engineer of an energy company. This company uses Amazon Relational Database Service (Amazon RDS) to store their end customer information, billing information, and also electric meter and gas usage data. Amazon RDS is their core transaction data store.

You run a batch job weekly to collect all the transactional data and send it to the data lake for reporting, forecasting, and even sending billing information to customers. You also have a trigger-based system to send emails and SMS periodically to the customer about their electricity usage and monthly billing information.

Because the company has millions of customers, processing massive amounts of data every day and sending emails or SMS was slowing down the core transactional system. Additionally, running weekly batch jobs for analytics wasn’t giving accurate and latest results for the forecasting you want to do on customer gas and electricity usage. Initially, your team was considering rebuilding the entire platform and avoiding all those issues, but the core application is complex in design, and running in production for many years and rebuilding the entire platform will take years and cost millions.

So, you took a new approach. Instead of running batch jobs on the core transactional database, you started capturing data changes with AWS DMS and sending that data to Kinesis Data Streams. Then you use Lambda to listen to a particular data stream and generate emails or SMS using Amazon SNS to send to the customer (for example, sending monthly billing information or notifying when their electricity or gas usage is higher than normal). You also use Kinesis Data Firehose to send all transaction data to the data lake, so your company can run forecasting immediately and accurately.

The following diagram illustrates the architecture.

In the following steps, you configure your database to replicate changes to Kinesis Data Streams, using AWS DMS. Additionally, you configure Kinesis Data Firehose to load data from Kinesis Data Streams to Amazon S3.

It’s simple to set up Kinesis Data Streams as a change data target in AWS DMS and start streaming data. For more information, see Using Amazon Kinesis Data Streams as a target for AWS Database Migration Service.

To get started, you first create a Kinesis data stream in Kinesis Data Streams, then an AWS Identity and Access Management (IAM) role with minimal access as described in Prerequisites for using a Kinesis data stream as a target for AWS Database Migration Service. After you define your IAM policy and role, you set up your source and target endpoints and replication instance in AWS DMS. Your source is the database that you want to move data from, and the target is the database that you’re moving data to. In our case, the source database is a SQL Server database on Amazon RDS, and the target is the Kinesis data stream. The replication instance processes the migration tasks and requires access to the source and target endpoints inside your VPC.

A Kinesis delivery stream (created in Kinesis Data Firehose) is used to load the records from the database to the data lake hosted on Amazon S3. Kinesis Data Firehose can load data also to Amazon Redshift, Amazon OpenSearch Service, an HTTP endpoint, Datadog, Dynatrace, LogicMonitor, MongoDB Cloud, New Relic, Splunk, and Sumo Logic.

Configure the source database

For testing purposes, we use the database democustomer, which is hosted on a SQL Server on Amazon RDS. Use the following command and script to create the database and table, and insert 10 records:

create database democustomer

use democustomer

create table invoices (
	invoice_id INT,
	customer_id INT,
	billing_date DATE,
	due_date DATE,
	balance INT,
	monthly_kwh_use INT,
	total_amount_due VARCHAR(50)
);
insert into invoices (invoice_id, customer_id, billing_date, due_date, balance, monthly_kwh_use, total_amount_due) values (1, 1219578, '4/15/2022', '4/30/2022', 25, 6, 28);
insert into invoices (invoice_id, customer_id, billing_date, due_date, balance, monthly_kwh_use, total_amount_due) values (2, 1365142, '4/15/2022', '4/28/2022', null, 41, 20.5);
insert into invoices (invoice_id, customer_id, billing_date, due_date, balance, monthly_kwh_use, total_amount_due) values (3, 1368834, '4/15/2022', '5/5/2022', null, 31, 15.5);
insert into invoices (invoice_id, customer_id, billing_date, due_date, balance, monthly_kwh_use, total_amount_due) values (4, 1226431, '4/15/2022', '4/28/2022', null, 47, 23.5);
insert into invoices (invoice_id, customer_id, billing_date, due_date, balance, monthly_kwh_use, total_amount_due) values (5, 1499194, '4/15/2022', '5/1/2022', null, 39, 19.5);
insert into invoices (invoice_id, customer_id, billing_date, due_date, balance, monthly_kwh_use, total_amount_due) values (6, 1221240, '4/15/2022', '5/2/2022', null, 38, 19);
insert into invoices (invoice_id, customer_id, billing_date, due_date, balance, monthly_kwh_use, total_amount_due) values (7, 1235442, '4/15/2022', '4/27/2022', null, 50, 25);
insert into invoices (invoice_id, customer_id, billing_date, due_date, balance, monthly_kwh_use, total_amount_due) values (8, 1306894, '4/15/2022', '5/2/2022', null, 16, 8);
insert into invoices (invoice_id, customer_id, billing_date, due_date, balance, monthly_kwh_use, total_amount_due) values (9, 1343570, '4/15/2022', '5/3/2022', null, 39, 19.5);
insert into invoices (invoice_id, customer_id, billing_date, due_date, balance, monthly_kwh_use, total_amount_due) values (10, 1465198, '4/15/2022', '5/4/2022', null, 47, 23.5);

To capture the new records added to the table, enable MS-CDC (Microsoft Change Data Capture) using the following commands at the database level (replace SchemaName and TableName). This is required if ongoing replication is configured on the task migration in AWS DMS.

EXEC msdb.dbo.rds_cdc_enable_db 'democustomer';
GO
EXECUTE sys.sp_cdc_enable_table @source_schema = N'SchemaName', @source_name =N'TableName', @role_name = NULL;
GO
EXEC sys.sp_cdc_change_job @job_type = 'capture' ,@pollinginterval = 3599;
GO

You can use ongoing replication (CDC) for a self-managed SQL Server database on premises or on Amazon Elastic Compute Cloud (Amazon EC2), or a cloud database such as Amazon RDS or an Azure SQL managed instance. SQL Server must be configured for full backups, and you must perform a backup before beginning to replicate data.

For more information, see Using a Microsoft SQL Server database as a source for AWS DMS.

Configure the Kinesis data stream

Next, we configure our Kinesis data stream. For full instructions, see Creating a Stream via the AWS Management Console. Complete the following steps:

  1. On the Kinesis Data Streams console, choose Create data stream.
  2. For Data stream name¸ enter a name.
  3. For Capacity mode, select On-demand.When you choose on-demand capacity mode, Kinesis Data Streams instantly accommodates your workloads as they ramp up or down. For more information, refer to Choosing the Data Stream Capacity Mode.
  4. Choose Create data stream.
  5. When the data stream is active, copy the ARN.

Configure the IAM policy and role

Next, you configure your IAM policy and role.

  1. On the IAM console, choose Policies in the navigation pane.
  2. Choose Create policy.
  3. Select JSON and use the following policy as a template, replacing the data stream ARN:
    {
        "Version": "2012-10-17",
        "Statement": [
            {
                "Effect": "Allow",
                "Action": [
                    "kinesis:PutRecord",
                    "kinesis:PutRecords",
                    "kinesis:DescribeStream"
                ],
                "Resource": "<streamArn>"
            }
        ]
    }

  4. In the navigation pane, choose Roles.
  5. Choose Create role.
  6. Select AWS DMS, then choose Next: Permissions.
  7. Select the policy you created.
  8. Assign a role name and then choose Create role.

Configure the Kinesis delivery stream

We use a Kinesis delivery stream to load the information from the Kinesis data stream to Amazon S3. To configure the delivery stream, complete the following steps:

  1. On the Kinesis console, choose Delivery streams.
  2. Choose Create delivery stream.
  3. For Source, choose Amazon Kinesis Data Streams.
  4. For Destination, choose Amazon S3.
  5. For Kinesis data stream, enter the ARN of the data stream.
  6. For Delivery stream name, enter a name.
  7. Leave the transform and convert options at their defaults.
  8. Provide the destination bucket and specify the bucket prefixes for the events and errors.
  9. Under Buffer hints, compression and encryption, change the buffer size to 1 MB and buffer interval to 60 seconds.
  10. Leave the other configurations at their defaults.

Configure AWS DMS

We use an AWS DMS instance to connect to the SQL Server database and then replicate the table and future transactions to a Kinesis data stream. In this section, we create a replication instance, source endpoint, target endpoint, and migration task. For more information about endpoints, refer to Creating source and target endpoints.

  1. Create a replication instance in a VPC with connectivity to the SQL Server database and associate a security group with enough permissions to access to the database.
  2. On the AWS DMS console, choose Endpoints in the navigation pane.
  3. Choose Create endpoint.
  4. Select Source endpoint.
  5. For Endpoint identifier, enter a label for the endpoint.
  6. For Source engine, choose Microsoft SQL Server.
  7. For Access to endpoint database, select Provide access information manually.
  8. Enter the endpoint database information.
  9. Test the connectivity to the source endpoint.
    Now we create the target endpoint.
  10. On the AWS DMS console, choose Endpoints in the navigation pane.
  11. Choose Create endpoint.
  12. Select Target endpoint.
  13. For Endpoint identifier, enter a label for the endpoint.
  14. For Target engine, choose Amazon Kinesis.
  15. Provide the AWS DMS service role ARN and the data stream ARN.
  16. Test the connectivity to the target endpoint.

    The final step is to create a database migration task. This task replicates the existing data from the SQL Server table to the data stream and replicates the ongoing changes. For more information, see Creating a task.
  17. On the AWS DMS console, choose Database migration tasks.
  18. Choose Create task.
  19. For Task identifier, enter a name for your task.
  20. For Replication instance, choose your instance.
  21. Choose the source and target database endpoints you created.
  22. For Migration type, choose Migrate existing data and replicate ongoing changes.
  23. In Task settings, use the default settings.
  24. In Table mappings, add a new selection rule and specify the schema and table name of the SQL Server database. In this case, our schema name is dbo and the table name is invoices.
  25. For Action, choose Include.

When the task is ready, the migration starts.

After the data has been loaded, the table statistics are updated and you can see the 10 records created initially.

As the Kinesis delivery stream reads the data from Kinesis Data Streams and loads it in Amazon S3, the records are available in the bucket you defined previously.

To check that AWS DMS ongoing replication and CDC are working, use this script to add 1,000 records to the table.

You can see 1,000 inserts on the Table statistics tab for the database migration task.

After about 1 minute, you can see the records in the S3 bucket.

At this point the replication has been activated, and a Lambda function can start consuming the data streams to send emails SMS to the customers through Amazon SNS. More information, refer to Using AWS Lambda with Amazon Kinesis.

Conclusion

With Kinesis Data Streams as an AWS DMS target, you now have a powerful way to stream change data from a database directly into a Kinesis data stream. You can use this method to stream change data from any sources supported by AWS DMS to perform real-time data processing. Happy streaming!

If you have any questions or suggestions, please leave a comment.


About the Authors

Luis Eduardo Torres is a Solutions Architect at AWS based in Bogotá, Colombia. He helps companies to build their business using the AWS cloud platform. He has a great interest in Analytics and has been leading the Analytics track of AWS Podcast in Spanish.

Sukhomoy Basak is a Solutions Architect at Amazon Web Services, with a passion for Data and Analytics solutions. Sukhomoy works with enterprise customers to help them architect, build, and scale applications to achieve their business outcomes.

New – Amazon SageMaker Ground Truth Now Supports Synthetic Data Generation

Post Syndicated from Antje Barth original https://aws.amazon.com/blogs/aws/new-amazon-sagemaker-ground-truth-now-supports-synthetic-data-generation/

Today, I am happy to announce that you can now use Amazon SageMaker Ground Truth to generate labeled synthetic image data.

Building machine learning (ML) models is an iterative process that, at a high level, starts with data collection and preparation, followed by model training and model deployment. And especially the first step, collecting large, diverse, and accurately labeled datasets for your model training, is often challenging and time-consuming.

Let’s take computer vision (CV) applications as an example. CV applications have come to play a key role in the industrial landscape. They help improve manufacturing quality or automate warehouses. Yet, collecting the data to train these CV models often takes a long time or can be impossible.

As a data scientist, you might spend months collecting hundreds of thousands of images from the production environments to make sure you capture all variations in data the model will come across. In some cases, finding all data variations might even be impossible, for example, sourcing images of rare product defects, or expensive, if you have to intentionally damage your products to get those images.

And once all data is collected, you need to accurately label the images, which is often a struggle in itself. Manually labeling images is slow and open to human error, and building custom labeling tools and setting up scaled labeling operations can be time-consuming and expensive. One way to mitigate this data challenge is by adding synthetic data to the mix.

Advantages of Combining Real-World Data with Synthetic Data
Combining your real-world data with synthetic data helps to create more complete training datasets for training your ML models.

Synthetic data itself is created by simple rules, statistical models, computer simulations, or other techniques. This allows synthetic data to be created in enormous quantities and with highly accurate labels for annotations across thousands of images. The label accuracy can be done at a very fine granularity, such as on a sub-object or pixel level, and across modalities. Modalities include bounding boxes, polygons, depth, and segments. Synthetic data can also be generated for a fraction of the cost, especially when compared to remote sensing imagery that otherwise relies on satellite, aerial, or drone image collection.

If you combine your real-world data with synthetic data, you can create more complete and balanced data sets, adding data variety that real-world data might lack. With synthetic data, you have the freedom to create any imagery environment, including edge cases that might be difficult to find and replicate in real-world data. You can customize objects and environments with variations, for example, to reflect different lighting, colors, texture, pose, or background. In other words, you can “order” the exact use case you are training your ML model for.

Now, let me show you how you can start sourcing labeled synthetic images using SageMaker Ground Truth.

Get Started on Your Synthetic Data Project with Amazon SageMaker Ground Truth
To request a new synthetic data project, navigate to the Amazon SageMaker Ground Truth console and select Synthetic data.

Amazon SageMaker Ground Truth Synthetic Data

Then, select Open project portal. In the project portal, you can request new projects, monitor projects that are in progress, and view batches of generated images once they become available for review. To initiate a new project, select Request project.

Amazon SageMaker Ground Truth Synthetic Data Project Portal

Describe your synthetic data needs and provide contact information.

Request a synthetic data project

After you submit the request form, you can check your project status in the project dashboard.

Amazon SageMaker Ground Truth Synthetic Data Project Created

In the next step, an AWS expert will reach out to discuss your project requirements in more detail. Upon review, the team will share a custom quote and project timeline.

If you want to continue, AWS digital artists will start by creating a small test batch of labeled synthetic images as a pilot production for you to review.

They collect your project inputs, such as reference photos and available 2D and 3D assets. The team then customizes those assets, adds the specified inclusions, such as scratches, dents, and textures, and creates the configuration that describes all the variations that need to be generated.

They can also create and add new objects based on your requirements, configure distributions and locations of objects in a scene, as well as modify object size, shape, color, and surface texture.

Once the objects are prepared, they are rendered using a photorealistic physics engine, capturing an image of the scene from a sensor that is placed in the virtual world. Images are also automatically labeled. Labels include 2D bounding boxes, instance segmentation, and contours.

You can monitor the progress of the data generation jobs on the project detail page. Once the pilot production test batch becomes available for review, you can spot-check the images and provide feedback for any rework that might be required.

Review available batches of synthetic data

Select the batch you want to review and View details
Sample batch of synthetic data in Amazon SageMaker Ground Truth

In addition to the images, you will also receive output image labels, metadata such as object positions, and image quality metrics as Amazon SageMaker compatible JSON files.

Synthetic Image Fidelity and Diversity Report
With each available batch of images, you also receive a synthetic image fidelity and diversity report. This report provides image and object level statistics and plots that help you make sense of the generated synthetic images.

The statistics are used to describe the diversity and the fidelity of the synthetic images and compare them with real images. Examples of the statistics and plots provided are the distributions of object classes, object sizes, image brightness, and image contrast, as well as the plots evaluating the indistinguishability between synthetic and real images.

Synthetic Image Fidelity and Diversity Report

Once you approve the pilot production test batch, the team will move to the production phase and start generating larger batches of labeled synthetic images with your desired label types, such as 2D bounding boxes, instance segmentation, and contours. Similar to the test batch, each production batch of images will be made available for you together with the image fidelity and diversity report to spot-check, accept, or reject.

All images and artifacts will be available for you to download from your S3 bucket once final production is complete.

Availability
Amazon SageMaker Ground Truth synthetic data is available in US East (N. Virginia). Synthetic data is priced on a per-label basis. You can request a custom quote that is tailored to your specific use case and requirements by filling out the project requirement form.

Learn more about SageMaker Ground Truth synthetic data on our Amazon SageMaker Data Labeling page.

Request your synthetic data project through the Amazon SageMaker Ground Truth console today!

— Antje

DeVault: GitHub Copilot and open source laundering

Post Syndicated from original https://lwn.net/Articles/898772/

Drew DeVault takes
issue
with GitHub’s “Copilot” offering and the licensing issues that it raises:

GitHub’s Copilot is trained on software governed by these terms,
and it fails to uphold them, and enables customers to accidentally
fail to uphold these terms themselves. Some argue about the risks
of a “copyleft surprise”, wherein someone incorporates a GPL
licensed work into their product and is surprised to find that they
are obligated to release their product under the terms of the GPL
as well. Copilot institutionalizes this risk and any user who
wishes to use it to develop non-free software would be well-advised
not to do so, else they may find themselves legally liable to
uphold these terms, perhaps ultimately being required to release
their works under the terms of a license which is undesirable for
their goals.

Chances are that many people will disagree with DeVault’s reasoning, but
this is an issue that merits some discussion still.

Now in Preview – Amazon CodeWhisperer- ML-Powered Coding Companion

Post Syndicated from Jeff Barr original https://aws.amazon.com/blogs/aws/now-in-preview-amazon-codewhisperer-ml-powered-coding-companion/

As I was getting ready to write this post I spent some time thinking about some of the coding tools that I have used over the course of my career. This includes the line-oriented editor that was an intrinsic part of the BASIC interpreter that I used in junior high school, the IBM keypunch that I used when I started college, various flavors of Emacs, and Visual Studio. The earliest editors were quite utilitarian, and grew in sophistication as CPU power become more plentiful. At first this increasing sophistication took the form of lexical assistance, such as dynamic completion of partially-entered variable and function names. Later editors were able to parse source code, and to offer assistance based on syntax and data types — Visual Studio‘s IntelliSense, for example. Each of these features broke new ground at the time, and each one had the same basic goal: to help developers to write better code while reducing routine and repetitive work.

Announcing CodeWhisperer
Today I would like to tell you about Amazon CodeWhisperer. Trained on billions of lines of code and powered by machine learning, CodeWhisperer has the same goal. Whether you are a student, a new developer, or an experienced professional, CodeWhisperer will help you to be more productive.

We are launching in preview form with support for multiple IDEs and languages. To get started, you simply install the proper AWS IDE Toolkit, enable the CodeWhisperer feature, enter your preview access code, and start typing:

CodeWhisperer will continually examine your code and your comments, and present you with syntactically correct recommendations. The recommendations are synthesized based on your coding style and variable names, and are not simply snippets.

CodeWhisperer uses multiple contextual clues to drive recommendations including the cursor location in the source code, code that precedes the cursor, comments, and code in other files in the same projects. You can use the recommendations as-is, or you can enhance and customize them as needed. As I mentioned earlier, we trained (and continue to train) CodeWhisperer on billions of lines of code drawn from open source repositories, internal Amazon repositories, API documentation, and forums.

CodeWhisperer in Action
I installed the CodeWhisperer preview in PyCharm and put it through its paces. Here are a few examples to show you what it can do. I want to build a list of prime numbers. I type # See if a number is pr. CodeWhisperer offers to complete this, and I press TAB (the actual key is specific to each IDE) to accept the recommendation:

On the next line, I press Alt-C (again, IDE-specific), and I can choose between a pair of function definitions. I accept the first one, and CodeWhisperer recommends the function body, and here’s what I have:

I write a for statement, and CodeWhisperer recommends the entire body of the loop:

CodeWhisperer can also help me to write code that accesses various AWS services. I start with # create S3 bucket and TAB-complete the rest:

I could show you many more cool examples, but you will learn more by simply joining the preview and taking CodeWhisperer for a spin.

Join the Preview
The preview supports code written in Python, Java, and JavaScript, using VS Code, IntelliJ IDEA, PyCharm, WebStorm, and AWS Cloud9. Support for the AWS Lambda Console is in the works and should be ready very soon.

Join the CodeWhisperer preview and let me know what you think!

Jeff;

Server Backup 101: On-premises vs. Cloud-only vs. Hybrid Backup Strategies

Post Syndicated from Kari Rivas original https://www.backblaze.com/blog/server-backup-101-on-premises-vs-cloud-only-vs-hybrid-backup-strategies/

As an IT leader or business owner, establishing a solid, working backup strategy is one of the most important tasks on your plate. Server backups are an essential part of a good security and disaster recovery stance. One decision you’re faced with as part of setting up that strategy is where and how you’ll store server backups: on-premises, in the cloud, or in some mix of the two.

As the cloud has become more secure, affordable, and accessible, more organizations are using a hybrid cloud strategy for their cloud computing needs, and server backups are particularly well suited to this strategy. It allows you to maintain existing on-premises infrastructure while taking advantage of the scalability, affordability, and geographic separation offered by the cloud.

If you’re confused about how to set up a hybrid cloud strategy for backups, you’re not alone. There are as many ways to approach it as there are companies backing up to the cloud. Today, we’re discussing different server backup approaches to help you architect a hybrid server backup strategy that fits your business.

Server Backup Destinations

Learning about different backup destinations can help administrators craft better backup policies and procedures to ensure the safety of your data for the long term. When structuring your server backup strategy, you essentially have three choices for where to store data: on-premises, in the cloud, or in a hybrid environment that uses both. First, though, let’s explain what a hybrid environment truly is.

Refresher: What Is Hybrid Cloud?

Hybrid cloud refers to a cloud environment made up of both private cloud resources (typically on-premises, although they don’t have to be) and public cloud resources with some kind of orchestration between them. Let’s define private and public clouds:

  • A public cloud essentially lives in a data center that’s used by many different tenants and maintained by a third-party company. Tenants share the same physical hardware, and their data is virtually separated so one tenant can’t access another tenant’s data.
  • A private cloud is dedicated to a single tenant. Private clouds are traditionally thought of as on-premises. Your company provisions and maintains the infrastructure needed to run the cloud at your office. Now, though, you can rent rackspace or even private, dedicated servers in a data center, so a private cloud can be off-premises, but it’s still dedicated only to your company.

Hybrid clouds are defined by a combined management approach, which means they have some type of orchestration between the public and private cloud that allows data to move between them as demands, needs, and costs change, giving businesses greater flexibility and more options for data deployment and use.

Here are some examples of different server backup destinations according to where your data is located:

  • Local backup destinations.
  • Cloud-only backups.
  • Hybrid cloud backups.

Local Backup Destinations

On-premises backup, also known as a local backup, is the process of backing up your system, applications, and other data to a local device. Tape and network-attached storage (NAS) are examples of common local backup solutions.

  • Tape: With tape backup, data is copied from its primary storage location to a tape cartridge using a tape drive. Tape creates a physical air gap, meaning there’s a literal gap of air between the data on the tape and the network—they are not connected in any way. This makes tape a highly secure option, but it comes at a cost. Tape requires physical storage space some businesses may not have. Tape maintenance and management can be very time consuming. And tapes can degrade, resulting in data loss.
  • NAS: NAS is a type of storage device that is connected to a network to allow data processing and storage through a secure, centralized location. With NAS, authorized users can access stored data from anywhere with a browser and a LAN connection. NAS is flexible, relatively easy to scale, and cost-effective.

Cloud-only Backups

Cloud-only backup strategies are becoming more commonplace as startups take a cloud-native approach and existing companies undergo digital transformations. A cloud-only backup strategy involves eliminating local, on-premises backups and sending files and databases to the cloud vendor for storage. It’s still a great idea to keep a local copy of your backup so you comply with a 3-2-1 backup strategy (more on that below). You could also utilize multiple cloud vendors or multiple regions with the same vendor to ensure redundancy. In the event of an outage, your data is stored safely in a separate cloud or a different cloud region and can easily be restored.

With services like Cloud Replication, companies can easily achieve a solid cloud-only server backup solution within the same cloud vendor’s infrastructure. It’s also possible to orchestrate redundancy between two different cloud vendors in a multi-cloud strategy.

Hybrid Cloud Backups

When you hear the term “hybrid” when it comes to servers, you might initially think about a combination of on-premises and cloud data. That’s typically what people think of when they imagine a hybrid cloud, but as we mentioned earlier, a hybrid cloud is a combination of a public cloud and a private cloud. Today, private clouds can live off-premises, but for our purposes, we’ll consider private clouds as being on-premises. A hybrid server backup strategy is an easy way to accomplish a 3-2-1 backup strategy, generally considered the gold standard when it comes to backups.

Refresher: What Is the 3-2-1 Backup Strategy?

The 3-2-1 backup strategy is a tried and tested way to keep your data accessible, yet safe. It includes:

  • 3: Keep three copies of any important file—one primary and two backups.
  • 2: Keep the files on two different media types to protect against different types of hazards.
  • 1: Store one copy off-site.

A hybrid server backup strategy can be helpful for fulfilling this sage backup advice as it provides two backup locations, one in the private cloud and one in the public cloud.

Choosing a Backup Strategy

Choosing a backup strategy that is right for you involves carefully evaluating your existing systems and your future goals. Can you get there with your current backup strategy? What if a ransomware or distributed denial of service (DDoS) attack affected your organization tomorrow? Decide what gaps need to be filled and take into consideration a few more crucial points:

  • Evaluate your vulnerabilities. Is your location susceptible to a local data disaster? How often do you think you might need to access your backups? How quickly would you need them?
  • Price. Various backup strategies will incur costs for hardware, service, expansions, and more. Carefully evaluate your organization’s finances to decide on a budget. And keep in mind that monthly fees and service charges may go up over time as you add more storage or use enhanced backup tools.
  • Storage capacity. How much storage capacity do you have on-site? How much data does your business generate over a given period of time? Do you have IT personnel to manage on-premises systems?
  • Access to hardware. Provisioning a private cloud on-premises involves purchasing hardware. Increasing supply chain issues can slow down factories, so be mindful of shortages and increased delivery times.
  • Scalability. As your organization grows, it’s likely that your data backup needs will grow, too. If you’re projecting growth, choose a data backup strategy that can keep up with rapidly expanding backup needs.

Backup Strategy Pros and Cons

Local Backup Strategy

  • Pros: A major benefit to using a local backup strategy is that organizations have fast access to data backups in case of emergencies. Backing up to NAS can also be faster locally depending on the size of your data set.
  • Cons: Maintaining on-premises hardware can be costly, but more important, your data is at a higher risk of loss from local disasters like floods, fires, or theft.

Cloud Backup Strategy

  • Pros: With a cloud-only backup strategy, there is no need for on-site hardware, and backup and recovery can be initiated from any location. Cloud resources are inherently scalable, so the stress of budgeting for and provisioning hardware is gone.
  • Cons: A cloud-only strategy is susceptible to outages if your data is consolidated with one vendor, however this risk can be mitigated by diversifying vendors and regions within the same vendor. Similarly, if your network goes down, then you won’t have access to your data.

Hybrid Cloud Backup Strategy

  • Pros: Hybrid cloud server backup strategies combine the best features of public and private clouds: You have fast access to your data locally while protecting your data from disaster by adding an off-site location to your backup strategy.
  • Cons: Setting up and running a private cloud server can be very costly. Businesses also need to plan their backup strategy a bit more thoughtfully because they must decide what to keep in a public cloud versus a private cloud or on local storage.

Hybrid Server Backup Considerations

Once you’ve decided a hybrid server backup strategy is right for you, there are many ways you can structure it. Here are just a few examples:

  • Keep backups of active working files on-premises and move all archives to the cloud.
  • Choose a cutover date if your business is ready to move mostly to the cloud going forward. All backups and archives prior to the cutover date could remain on-premises and everything after the cutover date gets stored in cloud storage.
  • Store all incremental backups in cloud storage and keep all full backups and archives stored locally. Or, following the Grandfather-Father-Son (GFS) approach, put the father and son backups in the cloud and grandfather backups in local storage. (Or vice versa.)

As you’re structuring your server backup strategy, consider any GDPR, HIPAA, or cybersecurity requirements. Does it call for off-site, air-gapped backups? If so, you may want to move that data (like customer or patient records) to the cloud and keep other, non-regulated data local. Some industries, particularly government and heavily regulated industries, may require you to keep some data in a private cloud.

Ready to get started? Back up your server using our joint solution with MSP360 or get started with Veeam or any one of our many other integrations.

The post Server Backup 101: On-premises vs. Cloud-only vs. Hybrid Backup Strategies appeared first on Backblaze Blog | Cloud Storage & Cloud Backup.

Early Hints update: How Cloudflare, Google, and Shopify are working together to build a faster Internet for everyone

Post Syndicated from Alex Krivit original https://blog.cloudflare.com/early-hints-performance/

Early Hints update: How Cloudflare, Google, and Shopify are working together to build a faster Internet for everyone

Early Hints update: How Cloudflare, Google, and Shopify are working together to build a faster Internet for everyone

A few months ago, we wrote a post focused on a product we were building that could vastly improve page load performance. That product, known as Early Hints, has seen wide adoption since that original post. In early benchmarking experiments with Early Hints, we saw performance improvements that were as high as 30%.

Now, with over 100,000 customers using Early Hints on Cloudflare, we are excited to talk about how much Early Hints have improved page loads for our customers in production, how customers can get the most out of Early Hints, and provide an update on the next iteration of Early Hints we’re building.

What Are Early Hints again?

As a reminder, the browser you’re using right now to read this page needed instructions for what to render and what resources (like images, fonts, and scripts) need to be fetched from somewhere else in order to complete the loading of this (or any given) web page. When you decide you want to see a page, your browser sends a request to a server and the instructions for what to load come from the server’s response. These responses are generally composed of a multitude of resources that tell the browser what content to load and how to display it to the user. The servers sending these instructions to your browser often need time to gather up all of the resources in order to compile the whole webpage. This period is known as “server think time.” Traditionally, during the “server think time” the browser would sit waiting until the server has finished gathering all the required resources and is able to return the full response.

Early Hints was designed to take advantage of this “server think time” to send instructions to the browser to begin loading readily-available resources while the server finishes compiling the full response. Concretely, the server sends two responses: the first to instruct the browser on what it can begin loading right away, and the second is the full response with the remaining information. By sending these hints to a browser before the full response is prepared, the browser can figure out what it needs to do to load the webpage faster for the end user.

Early Hints uses the HTTP status code 103 as the first response to the client. The “hints” are HTTP headers attached to the 103 response that are likely to appear in the final response, indicating (with the Link header) resources the browser should begin loading while the server prepares the final response. Sending hints on which assets to expect before the entire response is compiled allows the browser to use this “think time” (when it would otherwise have been sitting idle) to fetch needed assets, prepare parts of the displayed page, and otherwise get ready for the full response to be returned.

Early Hints on Cloudflare accomplishes performance improvements in three ways:

  • By sending a response where resources are directed to be preloaded by the browser. Preloaded resources direct the browser to begin loading the specified resources as they will be needed soon to load the full page. For example, if the browser needs to fetch a font resource from a third party, that fetch can happen before the full response is returned, so the font is already waiting to be used on the page when the full response returns from the server.
  • By using preconnect to initiate a connection to places where content will be returned from an origin server. For example, if a Shopify storefront needs content from a Shopify origin to finish loading the page, preconnect will warm up the connection which improves the performance for when the origin returns the content.
  • By caching and emitting Early Hints on Cloudflare, we make an efficient use of the full waiting period – not just server think time – which includes transit latency to the origin. Cloudflare sits within 50 milliseconds of 95% of the Internet-connected population globally. So while a request is routed to an origin and the final response is being compiled, Cloudflare can send an Early Hint from much closer and the browser can begin loading.
Early Hints update: How Cloudflare, Google, and Shopify are working together to build a faster Internet for everyone

Early Hints is like multitasking across the Internet – at the same time the origin is compiling resources for the final response and making calls to databases or other servers, the browser is already beginning to load assets for the end user.

What’s new with Early Hints?

While developing Early Hints, we’ve been fortunate to work with Google and Shopify to collect data on the performance impact. Chrome provided web developers with experimental access to both preload and preconnect support for Link headers in Early Hints. Shopify worked with us to guide the development by providing test frameworks which were invaluable to getting real performance data.

Today is a big day for Early Hints. Google announced that Early Hints is available in Chrome version 103 with support for preload and preconnect to start. Previously, Early Hints was available via an origin trial so that Chrome could measure the full performance benefit (A/B test). Now that the data has been collected and analyzed, and we’ve been able to prove a substantial improvement to page load, we’re excited that Chrome’s full support of Early Hints will mean that many more requests will see the performance benefits.

That’s not the only big news coming out about Early Hints. Shopify battle-tested Cloudflare’s implementation of Early Hints during Black Friday/Cyber Monday 2021 and is sharing the performance benefits they saw during the busiest shopping time of the year:


While talking to the audience at Cloudflare Connect London last week, Colin Bendell, Director, Performance Engineering at Shopify summarized it best: “when a buyer visits a website, if that first page that (they) experience is just 10% faster, on average there is a 7% increase in conversion“. The beauty of Early Hints is you can get that sort of speedup easily, and with Smart Early Hints that can be one click away.

You can see his entire talk here:

The headline here is that during a time of vast uncertainty due to the global pandemic, a time when everyone was more online than ever before, when people needed their Internet to be reliably fast — Cloudflare, Google, and Shopify all came together to build and test Early Hints so that the whole Internet would be a faster, better, and more efficient place.

So how much did Early Hints improve performance of customers’ websites?

Performance Improvement with Early Hints

In our simple tests back in September, we were able to accelerate the Largest Contentful Paint (LCP) by 20-30%. Granted, this result was on an artificial page with mostly large images where Early Hints impact could be maximized. As for Shopify, we also knew their storefronts were particularly good candidates for Early Hints. Each mom-and-pop.shop page depends on many assets served from cdn.shopify.com – speeding up a preconnect to that host should meaningfully accelerate loading those assets.

But what about other zones? We expected most origins already using Link preload and preconnect headers to see at least modest improvements if they turned on Early Hints. We wanted to assess performance impact for other uses of Early Hints beyond Shopify’s.

However, getting good data on web page performance impact can be tricky. Not every 103 response from Cloudflare will result in a subsequent request through our network. Some hints tell the browser to preload assets on important third-party origins, for example. And not every Cloudflare zone may have Browser Insights enabled to gather Real User Monitoring data.

Ultimately, we decided to do some lab testing with WebPageTest of a sample of the most popular websites (top 1,000 by request volume) using Early Hints on their URLs with preload and preconnect Link headers. WebPageTest (which we’ve written about in the past) is an excellent tool to visualize and collect metrics on web page performance across a variety of device and connectivity settings.

Lab Testing

In our earlier blog post, we were mainly focused on Largest Contentful Paint (LCP), which is the time at which the browser renders the largest visible image or text block, relative to the start of the page load. Here we’ll focus on improvements not only to LCP, but also FCP (First Contentful Paint), which is the time at which the browser first renders visible content relative to the start of the page load.

We compared test runs with Early Hints support off and on (in Chrome), across four different simulated environments: desktop with a cable connection (5Mbps download / 28ms RTT), mobile with 3G (1.6Mbps / 300ms RTT), mobile with low-latency 3G (1.6Mbps / 150ms RTT) and mobile with 4G (9Mbps / 170ms RTT). After running the tests, we cleaned the data to remove URLs with no visual completeness metrics or less than five DOM elements. (These usually indicated document fragments vs. a page a user might actually navigate to.) This gave us a final sample population of a little more than 750 URLs, each from distinct zones.

In the box plots below, we’re comparing FCP and LCP percentiles between the timing data control runs (no Early Hints) and the runs with Early Hints enabled. Our sample population represents a variety of zones, some of which load relatively quickly and some far slower, thus the long whiskers and string of outlier points climbing the y-axis. The y-axis is constrained to the max p99 of the dataset, to ensure 99% of the data are reflected in the graph while still letting us focus on the p25 / p50 / p75 differences.

Early Hints update: How Cloudflare, Google, and Shopify are working together to build a faster Internet for everyone

The relative shift in the box plot quantiles suggest we should expect modest benefits for Early Hints for the majority of web pages. By comparing FCP / LCP percentage improvement of the web pages from their respective baselines, we can quantify what those median and p75 improvements would look like:

Early Hints update: How Cloudflare, Google, and Shopify are working together to build a faster Internet for everyone

A couple observations:

  • From the p50 values, we see that for 50% of web pages on desktop, Early Hints improved FCP by more than 9.47% and LCP by more than 6.03%. For the p75, or the upper 25%, FCP improved by more than 20.4% and LCP by more than 15.97%.
  • The sizable improvements in First Contentful Paint suggest many hints are for render-blocking assets (such as critical but dynamic stylesheets and scripts that can’t be embedded in the HTML document itself).
  • We see a greater percentage impact on desktop over cable and on mobile over 4G. In theory, the impact of Early Hints is bounded by the load time of the linked asset (i.e. ideally we could preload the entire asset before the browser requires it), so we might expect the FCP / LCP reduction to increase in step with latency. Instead, it appears to be the other way around. There could be many variables at play here – for example, the extra bandwidth the 4G connection provides seems to be more influential than the decreased latency between the two 3G connection settings. Likely that wider bandwidth pipe is especially helpful for URLs we observed that preloaded larger assets such as JS bundles or font files. We also found examples of pages that performed consistently worse on lower-grade connections (see our note on “over-hinting” below).
  • Quite a few sample zones cached their HTML pages on Cloudflare (~15% of the sample). For CDN cache hits, we’d expect Early Hints to be less influential on the final result (because the “server think time” is drastically shorter). Filtering them out from the sample, however, yielded almost identical relative improvement metrics.

The relative distributions between control and Early Hints runs, as well as the per-site baseline improvements, show us Early Hints can be broadly beneficial for use cases beyond Shopify’s. As suggested by the p75+ values, we also still find plenty of case studies showing a more substantial potential impact to LCP (and FCP) like the one we observed from our artificial test case, as indicated from these WebPageTest waterfall diagrams:

Early Hints update: How Cloudflare, Google, and Shopify are working together to build a faster Internet for everyone

These diagrams show the network and rendering activity on the same web page (which, bucking the trend, had some of its best results over mobile – 3G settings, shown here) for its first ten resources. Compare the WebPageTest waterfall view above (with Early Hints disabled) with the waterfall below (Early Hints enabled). The first green vertical line in each indicates First Contentful Paint. The page configures Link preload headers for a few JS / CSS assets, as well as a handful of key images. When Early Hints is on, those assets (numbered 2 through 9 below) get a significant head start from the preload hints. In this case, FCP and LCP improved by 33%!

Early Hints update: How Cloudflare, Google, and Shopify are working together to build a faster Internet for everyone

Early Hints Best Practices and Strategies for Better Performance

The effect of Early Hints can vary widely on a case-by-case basis. We noticed particularly successful zones had one or more of the following:

  • Preconnect Link headers to important third-party origins (e.g. an origin hosting the pages’ assets, or Google Fonts).
  • Preload Link headers for a handful of critical render-blocking resources.
  • Scripts and stylesheets split into chunks, enumerated in preload Links.
  • A preload Link for the LCP asset, e.g. the featured image on a blog post.

It’s quite possible these strategies are already familiar to you if you work on web performance! Essentially the best practices that apply to using Link headers or <link> elements in the HTML <head> also apply to Early Hints. That is to say: if your web page is already using preload or preconnect Link headers, using Early Hints should amplify those benefits.

A cautionary note here: while it may be safer to aggressively send assets in Early Hints versus Server Push (as the hints won’t arbitrarily send browser-cached content the way Server Push might), it is still possible to over-hint non-critical assets and saturate network bandwidth in a similar manner to overpushing. For example, one page in our sample listed well over 50 images in its 103 response (but not one of its render-blocking JS scripts). It saw improvements over cable, but was consistently worse off in the higher latency, lower bandwidth mobile connection settings.

Google has great guidelines for configuring Link headers at your origin in their blog post. As for emitting these Links as Early Hints, Cloudflare can take care of that for you!

How to enable on Cloudflare

  • To enable Early Hints on Cloudflare, simply sign in to your account and select the domain you’d like to enable it on.
  • Navigate to the Speed Tab of the dashboard.
  • Enable Early Hints.

Enabling Early Hints means that we will harvest the preload and preconnect Link headers from your origin responses, cache them, and send them as 103 Early Hints for subsequent requests so that future visitors will be able to gain an even greater performance benefit.

For more information about our Early Hints feature, please refer to our announcement post or our documentation.

Smart Early Hints update

In our original blog post, we also mentioned our intention to ship a product improvement to Early Hints that would generate the 103 on your behalf.

Smart Early Hints will generate Early Hints even when there isn’t a Link header present in the origin response from which we can harvest a 103. The goal is to be a no-code/configuration experience with massive improvements to page load. Smart Early Hints will infer what assets can be preloaded or prioritized in different ways by analyzing responses coming from our customer’s origins. It will be your one-button web performance guru completely dedicated to making sure your site is loading as fast as possible.

This work is still under development, but we look forward to getting it built before the end of the year.

Try it out!

The promise Early Hints holds has only started to be explored, and we’re excited to continue to build products and features and make the web performance reliably fast.

We’ll continue to update you along our journey as we develop Early Hints and look forward to your feedback (special thanks to the Cloudflare Community members who have already been invaluable) as we move to bring Early Hints to everyone.

AWS re:Inforce 2022: Threat detection and incident response track preview

Post Syndicated from Celeste Bishop original https://aws.amazon.com/blogs/security/aws-reinforce-2022-threat-detection-and-incident-response-track-preview/

Register now with discount code SALXTDVaB7y to get $150 off your full conference pass to AWS re:Inforce. For a limited time only and while supplies last.

Today we’re going to highlight just some of the sessions focused on threat detection and incident response that are planned for AWS re:Inforce 2022. AWS re:Inforce is a learning conference focused on security, compliance, identity, and privacy. The event features access to hundreds of technical and business sessions, an AWS Partner expo hall, a keynote featuring AWS Security leadership, and more. AWS re:Inforce 2022 will take place in-person in Boston, MA on July 26-27.

AWS re:Inforce organizes content across multiple themed tracks: identity and access management; threat detection and incident response; governance, risk, and compliance; networking and infrastructure security; and data protection and privacy. This post highlights some of the breakout sessions, chalk talks, builders’ sessions, and workshops planned for the threat detection and incident response track. For additional sessions and descriptions, see the re:Inforce 2022 catalog preview. For other highlights, see our sneak peek at the identity and access management sessions and sneak peek at the data protection and privacy sessions.

Breakout sessions

These are lecture-style presentations that cover topics at all levels and delivered by AWS experts, builders, customers, and partners. Breakout sessions typically include 10–15 minutes of Q&A at the end.

TDR201: Running effective security incident response simulations
Security incidents provide learning opportunities for improving your security posture and incident response processes. Ideally you want to learn these lessons before having a security incident. In this session, walk through the process of running and moderating effective incident response simulations with your organization’s playbooks. Learn how to create realistic real-world scenarios, methods for collecting valuable learnings and feeding them back into implementation, and documenting correction-of-error proceedings to improve processes. This session provides knowledge that can help you begin checking your organization’s incident response process, procedures, communication paths, and documentation.

TDR202: What’s new with AWS threat detection services
AWS threat detection teams continue to innovate and improve the foundational security services for proactive and early detection of security events and posture management. Keeping up with the latest capabilities can improve your security posture, raise your security operations efficiency, and reduce your mean time to remediation (MTTR). In this session, learn about recent launches that can be used independently or integrated together for different use cases. Services covered in this session include Amazon GuardDuty, Amazon Detective, Amazon Inspector, Amazon Macie, and centralized cloud security posture assessment with AWS Security Hub.

TDR301: A proactive approach to zero-days: Lessons learned from Log4j
In the run-up to the 2021 holiday season, many companies were hit by security vulnerabilities in the widespread Java logging framework, Apache Log4j. Organizations were in a reactionary position, trying to answer questions like: How do we figure out if this is in our environment? How do we remediate across our environment? How do we protect our environment? In this session, learn about proactive measures that you should implement now to better prepare for future zero-day vulnerabilities.

TDR303: Zoom’s journey to hyperscale threat detection and incident response
Zoom, a leader in modern enterprise video communications, experienced hyperscale growth during the pandemic. Their customer base expanded by 30x and their daily security logs went from being measured in gigabytes to terabytes. In this session, Zoom shares how their security team supported this breakneck growth by evolving to a centralized infrastructure, updating their governance process, and consolidating to a single pane of glass for a more rapid response to security concerns. Solutions used to accomplish their goals include Splunk, AWS Security Hub, Amazon GuardDuty, Amazon CloudWatch, Amazon S3, and others.

Builders’ sessions

These are small-group sessions led by an AWS expert who guides you as you build the service or product on your own laptop.

TDR351: Using Kubernetes audit logs for incident response automation
In this hands-on builders’ session, learn how to use Amazon CloudWatch and Amazon GuardDuty to effectively monitor Kubernetes audit logs—part of the Amazon EKS control plane logs—to alert on suspicious events, such as an increase in 403 Forbidden or 401 Unauthorized Error logs. Also learn how to automate example incident responses for streamlining workflow and remediation.

TDR352: How to mitigate the risk of ransomware in your AWS environment
Join this hands-on builders’ session to learn how to mitigate the risk from ransomware in your AWS environment using the NIST Cybersecurity Framework (CSF). Choose your own path to learn how to protect, detect, respond, and recover from a ransomware event using key AWS security and management services. Use Amazon Inspector to detect vulnerabilities, Amazon GuardDuty to detect anomalous activity, and AWS Backup to automate recovery. This session is beneficial for security engineers, security architects, and anyone responsible for implementing security controls in their AWS environment.

Chalk talks

Highly interactive sessions with a small audience. Experts lead you through problems and solutions on a digital whiteboard as the discussion unfolds.

TDR231: Automated vulnerability management and remediation for Amazon EC2
In this chalk talk, learn about vulnerability management strategies for Amazon EC2 instances on AWS at scale. Discover the role of services like Amazon Inspector, AWS Systems Manager, and AWS Security Hub in vulnerability management and mechanisms to perform proactive and reactive remediations of findings that Amazon Inspector generates. Also learn considerations for managing vulnerabilities across multiple AWS accounts and Regions in an AWS Organizations environment.

TDR332: Response preparation with ransomware tabletop exercises
Many organizations do not validate their critical processes prior to an event such as a ransomware attack. Through a security tabletop exercise, customers can use simulations to provide a realistic training experience for organizations to test their security resilience and mitigate risk. In this chalk talk, learn about Amazon Managed Services (AMS) best practices through a live, interactive tabletop exercise to demonstrate how to execute a simulation of a ransomware scenario. Attendees will leave with a deeper understanding of incident response preparation and how to use AWS security tools to better respond to ransomware events.

Workshops

These are interactive learning sessions where you work in small teams to solve problems using AWS Cloud security services. Come prepared with your laptop and a willingness to learn!

TDR271: Detecting and remediating security threats with Amazon GuardDuty
This workshop walks through scenarios covering threat detection and remediation using Amazon GuardDuty, a managed threat detection service. The scenarios simulate an incident that spans multiple threat vectors, representing a sample of threats related to Amazon EC2, AWS IAM, Amazon S3, and Amazon EKS, that GuardDuty is able to detect. Learn how to view and analyze GuardDuty findings, send alerts based on the findings, and remediate findings.

TDR371: Building an AWS incident response runbook using Jupyter notebooks
This workshop guides you through building an incident response runbook for your AWS environment using Jupyter notebooks. Walk through an easy-to-follow sample incident using a ready-to-use runbook. Then add new programmatic steps and documentation to the Jupyter notebook, helping you discover and respond to incidents.

TDR372: Detecting and managing vulnerabilities with Amazon Inspector
Join this workshop to get hands-on experience using Amazon Inspector to scan Amazon EC2 instances and container images residing in Amazon Elastic Container Registry (Amazon ECR) for software vulnerabilities. Learn how to manage findings by creating prioritization and suppression rules, and learn how to understand the details found in example findings.

TDR373: Industrial IoT hands-on threat detection
Modern organizations understand that enterprise and industrial IoT (IIoT) yields significant business benefits. However, unaddressed security concerns can expose vulnerabilities and slow down companies looking to accelerate digital transformation by connecting production systems to the cloud. In this workshop, use a case study to detect and remediate a compromised device in a factory using security monitoring and incident response techniques. Use an AWS multilayered security approach and top ten IIoT security golden rules to improve the security posture in the factory.

TDR374: You’ve received an Amazon GuardDuty EC2 finding: What’s next?
You’ve received an Amazon GuardDuty finding drawing your attention to a possibly compromised Amazon EC2 instance. How do you respond? In part one of this workshop, perform an Amazon EC2 incident response using proven processes and techniques for effective investigation, analysis, and lessons learned. Use the AWS CLI to walk step-by-step through a prescriptive methodology for responding to a compromised Amazon EC2 instance that helps effectively preserve all available data and artifacts for investigations. In part two, implement a solution that automates the response and forensics process within an AWS account, so that you can use the lessons learned in your own AWS environments.

If any of the sessions look interesting, consider joining us by registering for re:Inforce 2022. Use code SALXTDVaB7y to save $150 off the price of registration. For a limited time only and while supplies last. Also stay tuned for additional sessions being added to the catalog soon. We look forward to seeing you in Boston!

Celeste Bishop

Celeste Bishop

Celeste is a Product Marketing Manager in AWS Security, focusing on threat detection and incident response solutions. Her background is in experience marketing and also includes event strategy at Fortune 100 companies. Passionate about soccer, you can find her on any given weekend cheering on Liverpool FC, and her local home club, Austin FC.

Charles Goldberg

Charles Goldberg

Charles leads the Security Services product marketing team at AWS. He is based in Silicon Valley and has worked with networking, data protection, and cloud companies. His mission is to help customers understand solution best practices that can reduce the time and resources required for improving their company’s security and compliance outcomes.

A stronger bridge to Zero Trust

Post Syndicated from Annika Garbers original https://blog.cloudflare.com/stronger-bridge-to-zero-trust/

A stronger bridge to Zero Trust

A stronger bridge to Zero Trust

We know that migration to Zero Trust architecture won’t be an overnight process for most organizations, especially those with years of traditional hardware deployments and networks stitched together through M&A. But part of why we’re so excited about Cloudflare One is that it provides a bridge to Zero Trust for companies migrating from legacy network architectures.

Today, we’re doubling down on this — announcing more enhancements to the Cloudflare One platform that make a transition from legacy architecture to the Zero Trust network of the future easier than ever: new plumbing for more Cloudflare One on-ramps, expanded support for additional IPsec parameters, and easier on-ramps from your existing SD-WAN appliances.

Any on- or off-ramp: fully composable and interoperable

When we announced our vision for Cloudflare One, we emphasized the importance of allowing customers to connect to our network however they want — with hardware devices they’ve already deployed, with any carrier they already have in place, with existing technology standards like IPsec tunnels or more Zero Trust approaches like our lightweight application connector. In hundreds of customer conversations since that launch, we’ve heard you reiterate the importance of this flexibility. You need a platform that meets you where you are today and gives you a smooth path to your future network architecture by acting as a global router with a single control plane for any way you want to connect and manage your network traffic.

We’re excited to share that over the past few months, the last pieces of this puzzle have fallen into place, and customers can now use any Cloudflare One on-ramp and off-ramp together to route traffic seamlessly between devices, offices, data centers, cloud properties, and self-hosted or SaaS applications. This includes (new since our last announcement, and rounding out the compatibility matrix below) the ability to route traffic from networks connected with a GRE tunnel, IPsec tunnel, or CNI to applications connected with Cloudflare Tunnel.

Fully composable Cloudflare One on-ramps

From ↓ To → BYOIP WARP client CNI GRE tunnel IPSec tunnel Cloudflare Tunnel
BYOIP
WARP client
CNI
GRE tunnel
IPSec tunnel

This interoperability is key to organizations’ strategy for migrating from legacy network architecture to Zero Trust. You can start by improving performance and enhancing security using technologies that look similar to what you’re used to today, and incrementally upgrade to Zero Trust at a pace that makes sense for your organization.

Expanded options and easier management of Anycast IPsec tunnels

We’ve seen incredibly exciting demand since our launch of Anycast IPsec as an on-ramp for Cloudflare One back in December. Since IPsec has been the industry standard for encrypted network connectivity for almost thirty years, there are many implementations and parameters available to choose from, and our customers are using a wide variety of network devices to terminate these tunnels. To make the process of setting up and managing IPsec tunnels from any network easier, we’ve built on top of our initial release with support for new parameters, a new UI and Terraform provider support, and step-by-step guides for popular implementations.

  • Expanded support for additional configuration parameters: We started with a small set of default parameters based on industry best practices, and have expanded from there – you can see the up-to-date list in our developer docs. Since we wrote our own IPsec implementation from scratch (read more about why in our announcement blog), we’re able to add support for new parameters with just a single (quick!) development cycle. If the settings you’re looking for aren’t on our list yet, contact us to learn about our plans for supporting them.
  • Configure and manage tunnels from the Cloudflare dashboard: Anycast IPsec and GRE tunnel configuration can be managed with just a few clicks from the Cloudflare dashboard. After creating a tunnel, you can view connectivity to it from every Cloudflare location worldwide and run traceroutes or packet captures on-demand to get a more in-depth view of your traffic for troubleshooting.
  • Terraform provider support to manage your network as code: Busy IT teams love the fact that they can manage all their network configuration from a single place with Terraform.
  • Step-by-step guides for setup with your existing devices: We’ve developed and will continue to add new guides in our developer docs to walk you through establishing IPsec tunnels with Cloudflare from a variety of devices.

(Even) easier on-ramp from your existing SD-WAN appliances

We’ve heard from you consistently that you want to be able to use whatever hardware you have in place today to connect to Cloudflare One. One of the easiest on-ramp methods is leveraging your existing SD-WAN appliances to connect to us, especially for organizations with many locations. Previously, we announced partnerships with leading SD-WAN providers to make on-ramp configuration even smoother; today, we’re expanding on this by introducing new integration guides for additional devices and tunnel mechanisms including Cisco Viptela. Your IT team can follow these verified step-by-step instructions to easily configure connectivity to Cloudflare’s network.

Get started on your Zero Trust journey today

Our team is helping thousands of organizations like yours transition from legacy network architecture to Zero Trust – and we love hearing from you about the new products and features we can continue building to make this journey even easier. Learn more about Cloudflare One or reach out to your account team to talk about how we can partner to transform your network, starting today!

Two Rapid7 Solutions Take Top Honors at SC Awards Europe

Post Syndicated from Rapid7 original https://blog.rapid7.com/2022/06/23/two-rapid7-solutions-take-top-honors-at-sc-awards-europe/

Two Rapid7 Solutions Take Top Honors at SC Awards Europe

LONDON—We are pleased to announce that two Rapid7 solutions were recognized on Tuesday, June 21, at the prestigious SC Awards Europe, which were presented at the London Marriott, Grosvenor Square. InsightIDR took the top spot in the Best SIEM Solution category, and Threat Command brought home the award for Best Threat Intelligence Technology for the second year in a row.

The SC Awards Europe recognize and reward products and services that stand out from the crowd and exceed customer expectations. This year’s awards, which come at a time of rapid digital transformation and technology innovation, were assessed by a panel of highly experienced judges from a variety of industries. SC Media UK, which hosts the awards, is a leading information resource for cybersecurity professionals across Europe.

InsightIDR named “Best SIEM”

Security practitioners are using Rapid7 InsightIDR to address the challenges most everyone shares: Digital transformation is driving constant change, the attack surface continues to sprawl, and the skills gap drags on.

Traditional security information and event management (SIEM) solutions put the burden of heavy rule configuration, detection telemetry integration, dashboard and reporting content curation, and incident response on the customer. But industry-leading InsightIDR has always been different. It ties together disparate data from across a customer’s environment, including user activity, logs, cloud, endpoints, network traffic, and more into one place, ending tab-hopping and multi-tasking. Security teams get curated out-of-the box detections, high-context actionable insights, and built-in automation.

With easy SaaS deployment and lightning fast time-to-value, 72% of users report greatly improved team efficiency, 71% report accelerated detection of compromised assets, and most report reducing time to address an incident by 25-50%.  

Threat Command named “Best Threat Intelligence Technology”

Rapid7 Threat Command is an external threat protection solution that proactively monitors thousands of sources across the clear, deep, and dark web. It enables security practitioners to anticipate threats, mitigate business risk, increase efficiency, and make informed decisions.

Threat Command delivers industry-leading AI/ML threat intelligence technology along with expert human intelligence analysis to continuously discover threats and map intelligence to organizations’ digital assets and vulnerabilities. This includes:

  • Patented technology and techniques for the detection, removal, and/or blocking of malicious threats
  • Dark web monitoring from analysts with unique access to invitation-only hacker forums and criminal marketplaces
  • The industry’s only 24/7/365 intelligence support from experts for deeper investigation into critical alerts
  • Single-click remediation including takedowns, facilitated by our in-house team of experts

100% of Threat Command users surveyed said the tool delivered faster time to value than other threat intelligence solutions they’d used, and 85% said adopting Threat Command improved their detection and response capabilities.

InsightIDR + Threat Command

Using InsightIDR and Threat Command together can further increase security teams’ efficiency and reduce risk. Users get a 360-degree view of internal and external threats, enabling them to avert attacks, accelerate investigations with comprehensive threat context, and flag the most relevant information — minimizing the time it takes to respond. With InsightIDR and Threat Command, customers are able to more effectively and efficiently see relevant threat data across their attack surface and quickly pivot to take immediate action – in the earliest stages of attack, even before a threat has fully evolved.

Learn more about how InsightIDR and Threat Command can fit into your organization’s security strategy.

Additional reading:

NEVER MISS A BLOG

Get the latest stories, expertise, and news about security today.

[$] Whatever happened to SHA-256 support in Git?

Post Syndicated from original https://lwn.net/Articles/898522/

The news has been proclaimed
loudly and often: the SHA-1 hash algorithm is terminally broken and should
not be used in any situation where security matters. Among other things,
this news gave some impetus to the longstanding
effort
to support a more robust hash algorithm in the Git source-code
management system. As time has passed, though, that work seems to have
slowed to a stop, leaving some users wondering when, if ever, Git will
support a hash algorithm other than SHA-1.

Postgres cluster user access

Post Syndicated from Robert McNeil original https://blog.cloudflare.com/cloudflare-tunnel-for-postgres/

Postgres cluster user access

Postgres cluster user access

For a long time we used the traditional method of accessing internal database clusters by SSHing to a bastion host. Due to the overhead and limitations of maintaining the SSH configuration, we’ve moved to using Cloudflare Tunnels combined with Cloudflare Access to dramatically improve the user experience and onboarding times related to database access.

How we used to work

Internally we rely heavily on PostgreSQL to power many services at Cloudflare – including Stream, Images and the Cloudflare Dashboard itself. We run our Postgres clusters on our own hardware within our data centers, and they are not accessible to the public Internet, including employee laptops.

When an employee requires access to one of these databases – be it for staging environments, incident management, or supporting production services – an SSH user account is required. This SSH account has limited access on a bastion host, purely for querying databases within the data center.

Postgres cluster user access

The pain we experienced

Provisioning an SSH account to these bastion hosts requires submitting a pull request to our main Infrastructure-as-Code git repository. For engineers this is a cumbersome process, and for non-engineers it is either an unnecessary learning experience, or a burden to whomever they have to ask to complete the work for them.

Both the Security and Site Reliability Engineering (SRE) teams had tolerated this solution as a necessary evil, but had reservations about handing out shell access to machines for this purpose. While the user accounts had few privileges within the bastion hosts, this still allowed users to run commands within a host and requires a lot of trust that the whole stack is secure.

The solution: Cloudflare Zero Trust

As it turns out, the problems we encountered were the same as problems many of our customers encounter as well. We also knew these concerns could be easily addressed with our own products, Cloudflare Tunnel and Cloudflare Access.

To get started, we deployed Cloudflare Tunnel on a pod set up within our internal Kubernetes cluster that maintains access to the database clusters. This established connectivity from our origin to the Cloudflare global network. At this point, our newly created Tunnel was ready to serve traffic to our origin, in this case our PostgreSQL database server. This already simplified orchestration and management as we no longer needed to manage any Access Control List (ACL) changes for the pod itself in order for cloudflared to connect to it.

Postgres cluster user access

Next, to ensure that only eligible Cloudflare employees could access the database endpoints, we implemented Cloudflare Access and created identity-driven Zero Trust policies. Access then handled all user authentication for each incoming request over Tunnel and enforced a set of pre-defined identity-based policies to ensure that only certain Cloudflare employees could make connections to our database.

We were also able to better delineate access to staging and production databases by creating independent Tunnels for each. This allowed us to enforce more granular restrictions for production access without impeding our more accessible staging environments. It also had the added benefit of clearly separating the network policies used internally.

Postgres cluster user access

Finally, in order for our internal users to connect to these databases, they simply needed to install cloudflared client side on their machine. Once installed, they could run cloudflared access from their endpoint to establish a long-lived TCP connection from their local laptop to the desired database cluster. Each request was then routed to Cloudflare first for policy evaluation through Cloudflare Access. This prompted the user to complete an authentication event which ensured only the Cloudflare engineers defined within our Zero Trust policies were able to establish a connection to the database.

Postgres cluster user access

With cloudflared running locally, the user is then free to fire up their favorite database client to connect to the local port and run queries against the remote database cluster as if it is running locally. In short, our users were now able to run a lightweight daemon, cloudflared, on their local machine to route traffic to Cloudflare. Cloudflare Access then evaluated each request against the identity-driven Zero Trust security policies we defined. If the user met these requirements, the request was forwarded onto Cloudflare Tunnel which securely connected internal users to our databases behind Tunnel.

While we enjoy the benefits this workflow gives us, we needed to include a break glass procedure to ensure that we aren’t locked out of fixing our infrastructure if our infrastructure itself is having issues. For this reason, we continue to maintain SSH-based jump-hosts for a limited number of senior staff members to get in and re-establish connectivity.

What we learned

By implementing our own solutions, we were able to enhance our security posture and improve the overall experience for our internal users. We were also able to become a customer of our own products and provide value feedback, insight, and feature requests to the Access and Tunnel teams internally. Oftentimes, we get to be the first to try new features or report regressions in beta builds which ultimately leads to a better experience for our customers as well.

Overall, by implementing Access and Tunnel to forward arbitrary TCP connections, users are able to focus on their job rather than worrying about the nuances of sending strings of complex commands through an SSH client. Our Security and SRE teams are also happier knowing that any connection to our data centers have been authenticated, authorized and logged by Cloudflare Access. If you’d like to get started Cloudflare Tunnel is free for any user and any use case. To get started, sign-up for a Cloudflare Zero Trust account and create your first Tunnel directly from the Zero Trust dashboard.

Cloudflare integrates with Microsoft Intune to give CISOs secure control across devices, applications, and corporate networks

Post Syndicated from Abhi Das original https://blog.cloudflare.com/cloudflare-microsoft-intune-partner-to-give-cisos-secure-control-across-devices-applications/

Cloudflare integrates with
Microsoft Intune to give CISOs
secure control across devices,
applications, and corporate networks

Cloudflare integrates with
Microsoft Intune to give CISOs
secure control across devices,
applications, and corporate networks

Today, we are very excited to announce our new integration with Microsoft Endpoint Manager (Intune). This integration combines the power of Cloudflare’s expansive network and Zero Trust suite, with Endpoint Manager. Via our existing Intune integration, joint customers can check if a device management profile such as Intune is running on the device or not and grant access accordingly.

With this expanded integration, joint customers can identify, investigate, and remediate threats faster. The integration also includes the latest information from Microsoft Graph API which provides many added, real-time device posture assessments and enables organizations to verify users’ device posture before granting access to internal or external applications.

“In today’s work-from-anywhere business culture, the risk of compromise has substantially increased as employees and their devices are continuously surrounded by a hostile threat environment outside the traditional castle-and-moat model. By expanding our integration with Cloudflare, we are making it easier for joint customers to strengthen their Zero Trust security posture across all endpoints and their entire corporate network.”
– Dave Randall, Sr Program Manager, Microsoft Endpoint Manager

Before we get deep into how the integration works, let’s first recap Cloudflare’s Zero Trust Services.

Cloudflare Access and Gateway

Cloudflare Access determines if a user should be allowed access to an application or not. It uses our global network to check every request or connection for identity, device posture, location, multifactor method, and many more attributes to do so. Access also logs every request and connection — providing administrators with high-visibility. The upshot of all of this: it enables customers to deprecate their legacy VPNs.

Cloudflare Gateway protects users as they connect to the rest of the Internet. Instead of backhauling traffic to a centralized location, users connect to a nearby Cloudflare data center where we apply one or more layers of security, filtering, and logging, before accelerating their traffic to its final destination.

Zero Trust integration with Microsoft Endpoint Manager

Cloudflare’s customers can now build Access and Gateway policies based on the device being managed by Endpoint Manager (Intune) with a compliance policy defined. In conjunction with our Zero Trust client, we are able to leverage the enhanced telemetry that Endpoint Manager (Intune) provides surrounding a user’s device.

Microsoft’s Graph API delivers continuous real-time security posture assessments such as Compliance State across all endpoints in an organization regardless of the location, network or user. Those key additional device posture data enable enforcement of conditional policies based on device health and compliance checks to mitigate risks. These policies are evaluated each time a connection request is made, making the conditional access adaptive to the evolving condition of the device.

With this integration, organizations can build on top of their existing Cloudflare Access and Gateway policies ensuring that a ‘Compliance State’ has been met before a user is granted access. Because these policies work across our entire Zero Trust platform, organizations can use these to build powerful rules invoking Browser Isolation, tenant control, antivirus or any part of their Cloudflare deployment.

Cloudflare integrates with
Microsoft Intune to give CISOs
secure control across devices,
applications, and corporate networks

How the integration works

Customers using our Zero Trust suite can add Microsoft Intune as a device posture provider in the Cloudflare Zero Trust dashboard under Settings → Devices → Device Posture Providers. The details required from the Microsoft Endpoint Manager admin center to set up policies on Cloudflare dashboard include: ClientID, Client Secret, and Customer ID.

Cloudflare integrates with
Microsoft Intune to give CISOs
secure control across devices,
applications, and corporate networks

After creating the Microsoft Endpoint Manager Posture Provider, customers can create specific device posture checks requiring users’ devices to meet certain criteria such as device ‘Compliance State’.

Cloudflare integrates with
Microsoft Intune to give CISOs
secure control across devices,
applications, and corporate networks

These rules can now be used to create conditional Access and Gateway policies to allow or deny access to applications, networks, or sites. Administrators can choose to block or isolate users or user groups with malicious or insecure devices.

Cloudflare integrates with
Microsoft Intune to give CISOs
secure control across devices,
applications, and corporate networks

What comes next?

In the coming months, we will be further strengthening our integrations with the Microsoft Graph API by allowing customers to correlate many other fields in the Graph API to enhance our joint customers’ security policies.

If you’re using Cloudflare Zero Trust products today and are interested in using this integration with Microsoft Intune, please visit our documentation to learn about how you can enable it. If you want to learn more or have additional questions, please fill out the form or get in touch with your Cloudflare CSM or AE, and we’ll be happy to help you.

Ексклузивни данни в “Биволъ” OLAF за #КъщиЗаТъщи: 55% са опорочени

Post Syndicated from Николай Марченко original https://bivol.bg/olaf-%D0%B7%D0%B0-%D0%BA%D1%8A%D1%89%D0%B8%D0%B7%D0%B0%D1%82%D1%8A%D1%89%D0%B8-55-%D1%81%D0%B0-%D0%BE%D0%BF%D0%BE%D1%80%D0%BE%D1%87%D0%B5%D0%BD%D0%B8.html

четвъртък 23 юни 2022


Изчисленията ни за финансови щети при 347 проекта показаха неизпълнение от 54,7%, като е взето предвид и максималното ниво на погрешност на извадката. Това констатира прессекретарят на Европейската служба за…

Cloudflare Gateway dedicated egress and egress policies

Post Syndicated from Ankur Aggarwal original https://blog.cloudflare.com/gateway-dedicated-egress-policies/

Cloudflare Gateway dedicated egress and egress policies

Cloudflare Gateway dedicated egress and egress policies

Today, we are highlighting how Cloudflare enables administrators to create security policies while using dedicated source IPs. With on-premise appliances like legacy VPNs, firewalls, and secure web gateways (SWGs), it has been convenient for organizations to rely on allowlist policies based on static source IPs. But these hardware appliances are hard to manage/scale, come with inherent vulnerabilities, and struggle to support globally distributed traffic from remote workers.

Throughout this week, we’ve written about how to transition away from these legacy tools towards Internet-native Zero Trust security offered by services like Cloudflare Gateway, our SWG. As a critical service natively integrated with the rest of our broader Zero Trust platform, Cloudflare Gateway also enables traffic filtering and routing for recursive DNS, Zero Trust network access, remote browser isolation, and inline CASB, among other functions.

Nevertheless, we recognize that administrators want to maintain the convenience of source IPs as organizations transition to cloud-based proxy services. In this blog, we describe our approach to offering dedicated IPs for egressing traffic and share some upcoming functionality to empower administrators with even greater control.

Cloudflare’s dedicated egress IPs

Source IPs are still a popular method of verifying that traffic originates from a known organization/user when accessing applications and third party destinations on the Internet. When organizations use Cloudflare as a secure web gateway, user traffic is proxied through our global network, where we apply filtering and routing policies at the closest data center to the user. This is especially powerful for globally distributed workforces or roaming users. Administrators do not have to make updates to static IP lists as users travel, and no single location becomes a bottleneck for user traffic.

Today the source IP for proxied traffic is one of two options:

  • Device client (WARP) Proxy IP – Cloudflare forward proxies traffic from the user using an IP from the default IP range shared across all Zero Trust accounts
  • Dedicated egress IP – Cloudflare provides customers with a dedicated IP (IPv4 and IPv6) or range of IPs geolocated to one or more Cloudflare network locations

The WARP Proxy IP range is the default egress method for all Cloudflare Zero Trust customers. It is a great way to preserve the privacy of your organization as user traffic is sent to the nearest Cloudflare network location which ensures the most performant Internet experience. But setting source IP security policies based on this default IP range does not provide the granularity that admins often require to filter their user traffic.

Dedicated egress IPs are useful in situations where administrators want to allowlist traffic based on a persistent identifier. As their name suggests, these dedicated egress IPs are exclusively available to the assigned customer—and not used by any other customers routing traffic through Cloudflare’s network.

Additionally, leasing these dedicated egress IPs from Cloudflare helps avoid any privacy concerns which arise when carving them out from an organization’s own IP ranges. And furthermore, alleviates the need to protect your any of the IP ranges that are assigned to your on-premise VPN appliance from DDoS attacks or otherwise.

Dedicated egress IPs are available as add-on to for any Cloudflare Zero Trust enterprise-contracted customer. Contract customers can select the specific Cloudflare data centers used for their dedicated egress, and all subscribing customers receive at least two IPs to start, so user traffic is always routed to the closest dedicated egress data center for performance and resiliency. Finally, organizations can egress their traffic through Cloudflare’s dedicated IPs via their preferred on-ramps. These include Cloudflare’s device client (WARP), proxy endpoints, GRE and IPsec on-ramps, or any of our 1600+ peering network locations, including major ISPs, cloud providers, and enterprises.

Customer use cases today

Cloudflare customers around the world are taking advantage of Gateway dedicated egress IPs to streamline application access. Below are three most common use cases we’ve seen deployed by customers of varying sizes and across industries:

  • Allowlisting access to apps from third parties: Users often need to access tools controlled by suppliers, partners, and other third party organizations. Many of those external organizations still rely on source IP to authenticate traffic. Dedicated egress IPs make it easy for those third parties to fit within these existing constraints.
  • Allowlisting access to SaaS apps: Source IPs are still commonly used as a defense-in-depth layer for how users access SaaS apps, alongside other more advanced measures like multi-factor authentication and identity provider checks.
  • Deprecating VPN usage: Often hosted VPNs will be allocated IPs within the customers advertised IP range. The security flaws, performance limitations, and administrative complexities of VPNs are well-documented in our recent Cloudflare blog. To ease customer migration, users will often choose to maintain any IP allowlist processes in place today.

Through this, administrators are able to maintain the convenience of building policies with fixed, known IPs, while accelerating performance for end users by routing through Cloudflare’s global network.

Cloudflare Zero Trust egress policies

Today, we are excited to announce an upcoming way to build more granular policies using Cloudflare’s dedicated egress IPs. With a forthcoming egress IP policy builder in the Cloudflare Zero Trust dashboard, administrators can specify which IP is used for egress traffic based on identity, application, network and geolocation attributes.

Administrators often want to route only certain traffic through dedicated egress IPs—whether for certain applications, certain Internet destinations, and certain user groups. Soon, administrators can set their preferred egress method based on a wide variety of selectors such as application, content category, domain, user group, destination IP, and more. This flexibility helps organizations take a layered approach to security, while also maintaining high performance (often via dedicated IPs) to the most critical destinations.

Furthermore, administrators will be able to use the egress IP policy builder to geolocate traffic to any country or region where Cloudflare has a presence. This geolocation capability is particularly useful for globally distributed teams which require geo-specific experiences.

For example, a large media conglomerate has marketing teams that would verify the layouts of digital advertisements running across multiple regions. Prior to partnering with Cloudflare, these teams had clunky, manual processes to verify their ads were displaying as expected in local markets: either they had to ask colleagues in those local markets to check, or they had to spin up a VPN service to proxy traffic to the region. With an egress policy these teams would simply be able to match a custom test domain for each region and egress using their dedicated IP deployed there.

What’s Next

You can take advantage of Cloudflare’s dedicated egress IPs by adding them onto a Cloudflare Zero Trust Enterprise plan or contacting your account team. If you would like to be contacted when we release the Gateway egress policy builder, join the waitlist here.

MPLS to Zero Trust in 30 days

Post Syndicated from Adi Mukadam original https://blog.cloudflare.com/mpls-to-zerotrust/

MPLS to Zero Trust in 30 days

MPLS to Zero Trust in 30 days

Employees returning to the office are experiencing that their corporate networks are much slower compared to what they’ve been using at home. It’s partly due to outdated line speeds, and also partly due to security requirements that force all traffic to get backhauled through centralized data centers. While 44% of the US currently has access to fiber-based broadband Internet with speeds reaching 1 Gbps, many MPLS sites are still on old 1.5 Mbps circuits. This is a reality check and a reminder that the current MPLS based networks are unable to support the shift from centralized applications in the datacenter to a distributed SaaS and hybrid multi-cloud world.

In this post, we are going to outline the steps required to take your network from MPLS to Zero Trust. But, before we do — a little about how we ended up in this situation.

Enterprise networks today

Over the past 10 years, most enterprise networks have evolved from perimeter hub and spoke networks into franken-networks as a means to solve connectivity and security issues. We have not had a chance to redesign them holistically for distributed application access. The band-aid and point solutions have only pushed the problems further down the road — to a future day for someone else to solve.

MPLS to Zero Trust in 30 days

The advent of cloud adoption put additional pressure on the already ailing legacy WAN. Increased Internet use for business, mining data for actionable insights, advanced security monitoring multiplied bandwidth demand at customer branches. This puts additional pressure on companies seeking to manage their WAN cost. Below is a graphical representation of business loss due to growing bandwidth needs on.

Business loss = (X) cost of project delay  + (Y) loss of productivity due to outages

MPLS to Zero Trust in 30 days

Excitement about SD-WAN

Organizations have been looking to Software-Defined WAN (SD-WAN) to solve some of these challenges. It allows organizations to shift from MPLS private lines to broadband Internet and significantly reduce their cost per Mbps. SD-WAN offers other valuable features like application-aware intelligent routing based on path quality. Orchestrator and analytics help to provide much-needed deployment speed and network visibility, respectively.

Despite the incremental improvement that SD-WAN offers over traditional network architectures, some fundamental challenges remain. SD-WAN is a hardware-dependent edge routing technology that does not always account for the middle mile. While broadband Internet is reasonably fast and available everywhere, it doesn’t offer the end-to-end security and reliability that mission-critical applications require. Further, managing security policies and Internet breakouts across hundreds of edge devices is complex, and many organizations are still choosing to backhaul traffic to centralized data centers. We require a new architecture — with security, speed, and reliability built-in.

Cloudflare Magic WAN

Cloudflare Magic WAN simplifies legacy WAN architectures by enabling customers to use the Cloudflare global network to interconnect their branch offices, data centers, and public cloud services. It includes Zero Trust security services that can be enabled as needed, improve performance, and can be managed through a single dashboard.

MPLS to Zero Trust in 30 days

Magic WAN has many advantages over traditional WAN architectures. It eliminates the need to manage a mesh of tunnels. A single Anycast IPSec or GRE tunnel from a site provides connectivity to all other sites and applications, with the Cloudflare network acting as the network hub, simplifying operational overhead. It removes the requirement for all traffic to be backhauled to a centralized data center to enforce security policies. Cloud-native firewall-as-a-service (FWaaS) for inbound and site-to-site traffic and security web gateway (SWG) for outbound traffic is available at the same data centers where WAN traffic enters the Cloudflare network. Organizations can deploy consistent security policies globally which get enforced at the Cloudflare data center closest to the user at any of our 270+ cities. SaaS and consumer application traffic can be routed directly to the Internet from the edge of the network. With Cloudflare serving millions of websites, the destination might be available on the same server, resulting in better performance for users.

Furthermore, with no appliances to manage or scale, Magic WAN gives you an elastic WAN with zero capital investment that you can quickly scale up or down depending on business needs.

Bridge to Zero Trust

The ultimate goal for many organizations is to move their network and security architecture from a castle & moat model to a Zero Trust model where there’s no longer a hard boundary between “private” and “public” networks. Instead, security is enforced at the user and the application level, using identity, endpoint health and location as key attributes. So an employee on a managed laptop in their home country may have access to all corporate applications, but if they log in from a personal laptop, they might have limited access to only certain applications. Or if the network detects malware on their managed laptop, their access can be quickly revoked, preventing the spread of ransomware, for example, through their organization.

This requires a WAN that is intelligent enough to understand user identities and endpoint health and make intelligent enforcement decisions based on these attributes. This also requires enforcement points that can apply consistent security policies regardless of whether the users are coming from a corporate branch office or from a home office over the Internet.

Cloudflare Magic WAN, part of the Cloudflare One product suite, enables this transition to a true Zero Trust architecture by building in security natively into the network.

Prep work for successful transformation from MPLS to Zero Trust

Planning leads to awareness, while preparation leads to readiness.

MPLS to Zero Trust transformation is a team effort. Traditionally, network managers are responsible for the WAN; security managers for the security perimeter & policies; infrastructure team for the cloud; application teams for application development. Future transformed state has built-in security for seamless on-demand, secured and reliable distributed application access.

1) Network, security, infrastructure, and application project management teams should collectively discuss and document the current/future state.  Sample document below

Current state Future state
Applications List Example: 1600 apps Example: 2400 apps
Location Local: 300, DC: 600, Public cloud: 400, Private cloud:100, SaaS: 200 TBD
Regional application needs Local File servers Cloud
Location/branch # of branch locations 80 85
Availability Example: Platinum 99%, Gold 95%, Silver: 90%, bronze: best effort Platinum 100%, Gold 99%, Silver: 95%, bronze: best effort
Current set up Platinum: Dual MPLS, Gold: MPLS + Internet etc Platinum: 2 x 1G DIA, Gold: 2 x 1G DIA etc
Bandwidth Platinum: 100M, Gold 50M etc Platinum 1G, Gold 500M etc
CSP with location Azure/GCP/AWS 1G ExpressRoute 1G Direct Connect 10G 10G
Internet breakout Capacity 500M On demand
DC: XXX Firewall HA Cloud based local break out
Features Limited security control Identity based granular ZT based policies
Remote Access Quantity 1000 seats 2000 seats
Technology SSL VPN Zero Trust Network Access
Cloud security None CASB, RBI
Device posture None Yes

2) Conduct transformation workshop to

  • Map all combinations of future traffic flows: Device Type – User profile – Application – Enforcement technology – Zero Trust rules
  • Traffic flows help to determine future architecture baseline

3) Invite vendors, partners, and providers for discussion to validate the design and identify technology readiness to support traffic flows and architecture.

4) Carry out budgeting exercises and a business plan to map current pain points with solutions and pricing. Involve specialized experts to develop business plans if needed.

5) Form a special project team that includes project managers, engineering point of contact from all technical groups, local site contacts, escalation team, stakeholder representatives, business owners.

Transition plan

A transition plan is a critical step toward a successful transformation. A good transition and project plan will ensure minimal downtime, while a bad plan will result in outages, business disruption, increased transition time, and cost. The plan should include detailed steps and milestones.

Sample transition plan below:

MPLS to Zero Trust in 30 days

  1. Identify bridging point

    • Bridging point will act as a bridge between transitioned and non-transitioned branch locations.
    • Ideally, regional and global data centers are preferred bridging points between existing MPLS and the new Cloudflare based WAN.
  2. Create user acceptance test (UAT)

    • Collaborate with internal teams and site contacts to create a UAT.
    • Perform UAT before and after cutover for each site to ensure users can access their applications as expected performance after transition.
  3. Migration schedule

    • Develop a migration schedule to ensure minimal business impact.
  4. Prep for Magic WAN

    • Connect applications: Leverage Cloudflare onramp options to connect your various applications to Cloudflare platform.
    • Connect branch: Configure your WAN Edge device (router, SD-WAN device, firewall etc) and connect to Cloudflare platform
    • Please refer https://developers.cloudflare.com/magic-wan/ for detailed step-by-step instructions to configure Magic WAN

Note: Above step will NOT impact existing traffic flows via the existing MPLS path. Take precautions to ensure no production impact. Please follow your change control guidelines and request a maintenance window if applicable.

MPLS to Zero Trust in 30 days

  1. Ready for cutover

    • We are ready for cutover after steps 4 & 5, i.e., ready to migrate and transition branches to Cloudflare based network.
  2. Cutover window

    • During the cutover window, production traffic will stop traversing the existing MPLS path and transition to the new Cloudflare based network..
    • Perform UAT before and after cutover.
  3. Disconnect MPLS

    • MPLS circuits can be disconnected, as sites are migrated.

Additional:

  • Retire legacy VPN
    • Customers can leverage Cloudflare’s Zero Trust Network Access to access their applications and retire legacy VPN based access.
  • Assumption
    • Customer is responsible for Internet circuit procurement and installation to replace MPLS circuits.

MPLS to Zero Trust in 30 days

We’re proud of how we’ve been able to help some of Cloudflare customers reinvent their corporate networks. It makes sense to close with their own words

MPLS to Zero Trust in 30 days

Summary

Replacing MPLS, modernizing network and network security to provide business agility is a must for the digital future. Move to Zero Trust is inevitable for most organizations. Temporary band-aids and point solutions have resulted in business losses, poor employee experience and increased security risk. Moving from MPLS to Zero Trust sounds like a daunting task but teamwork, proper planning, preparation, and right solution will make transformation easily achievable and more manageable.

If you’d like to get started, contact us today and get started on your journey.

Replacing MPLS lines is a great project to fit into your overall Zero Trust roadmap. For a full summary of Cloudflare One Week and what’s new, tune in to our recap webinar.

Announcing the Cloudflare One Partner Program

Post Syndicated from Matthew Harrell original https://blog.cloudflare.com/cloudflare-one-partner-program/

Announcing the Cloudflare One Partner Program

This post is also available in 简体中文, 日本語, Deutsch, Français.

Announcing the Cloudflare One Partner Program

Today marks the launch of the Cloudflare One Partner Program, a program built around our Zero Trust, Network as a Service and Cloud Email Security offerings. The program helps channel partners deliver on the promise of Zero Trust while monetizing this important architecture in tangible ways – with a comprehensive set of solutions, enablement and incentives. We are delighted to have such broad support for the program from IT Service companies, Distributors, Value Added Resellers, Managed Service Providers and other solution providers.

This represents both a new go-to-market channel for Cloudflare, and a new way for companies of all sizes to adopt Zero Trust solutions that have previously been difficult to procure, implement and support.

The Cloudflare One Partner Program consists of the following elements:

  • New, fully cloud-native Cloudflare One product suites that help partners streamline and accelerate the design of holistic Zero Trust solutions that are easier to implement. The product suites include our Zero Trust products and Cloud Email Security products from our recent acquisition of Area 1 Security.
  • All program elements are fully operationalized through Cloudflare’s Distributors to make it easier to evaluate, quote and deliver Cloudflare One solutions in a consistent and predictable way.
  • The launch of new Partner Accreditations to enable partners to assess, implement and support Zero Trust solutions for their customers. This includes a robust set of training to help partners deliver the margin-rich services their customers need to realize the full value of their Zero Trust investments.
  • One of the most robust partner incentive structures in the industry, rewarding partners for the value they add throughout the entire customer lifecycle.

For more details visit our website here Cloudflare One Partner Program. For partners, we’ve added a dedicated Cloudflare One page in the Partner Portal.

TD Synnex has been working hand-in-hand with Cloudflare on the launch of their new Cloudflare One Partner Program for Zero Trust. This program takes Zero Trust from a term that’s broadly and loosely used and cuts through the hype with the solution bundles, enablement resources, and incentives that help the channel deliver true business value“, said Tracy Holtz, Vice President, Security and Networking at TD Synnex. “TD Synnex being the world’s leading IT distributor and solutions aggregator is thrilled to be furthering our partnership with Cloudflare to build and enable this Program of partners as it is encompassing the solution that all organizations need today.

Why is Cloudflare making this investment in the Cloudflare One Partner Program now?

The Cloudflare One Partner Program is launching to address the explosive demand to implement Zero Trust architectures that help organizations of all sizes safely and securely accelerate their digital transformations. In the face of ever-increasing cyber threats, Zero Trust moves from a concept to an imperative. Cloudflare is in a unique position to make this happen to one of the richest Zero Trust product suites in the industry including a Secure Web Gateway, ZTNA Access Management, CASB, Browser Isolation, DLP and Cloud Email Security. These products are tightly integrated and easy-to-use enabling a holistic, implementable solution.

Additionally, our Zero Trust suite has a comprehensive tech partner ecosystem that makes it easy for our customers to integrate our solutions in their existing tech stack. We integrate and closely partner with industry leaders across all major categories — identity, endpoint detection and response, mobile device management, and email service providers — to make Cloudflare One flexible and robust for our diverse customer base. Our strategic partners include Microsoft, CrowdStrike, SentinelOne, Mandiant, and others.

Enterprises have come to terms with the notion of a disintegrating traditional perimeter. The distributed and dynamic perimeter of today requires a fundamentally new approach to security. In partnership with Cloudflare, our AI-powered cybersecurity platform offers modern organizations a robust Zero Trust security solution that spans devices, network, and mission-critical applications.” said Chuck Fontana, Senior Vice President, Business Development, SentinelOne

But it takes more than just the products to realize the promise of Zero Trust. It requires the skills and expertise of the channel, as trusted advisors to their customers, to optimize the solutions to drive the specific required business outcomes, or time-to-value for the customer’s investment.

“We’ve been humbled by how our existing partners have contributed to the explosive growth of our Zero Trust business, but increased customer demand is creating an opportunity for our partners to play a bigger role in how we go to market. More than ever before we are relying on our partners to help customers evaluate, implement and support Zero Trust solutions”, said Matthew Price, CEO of Cloudflare.

By furthering our partnership with Cloudflare in the new Cloudflare One Partner Program, Rackspace Technology is able to deliver Cloudflare’s leading Zero Trust solutions paired with Rackspace Elastic Engineering and professional services at their massive scale and with continued implementation support,” said Gary Alterson, Vice President, Security Solutions at Rackspace Technology. “Since partnering with Cloudflare to develop Zero Trust solutions, we’ve already seen strong engagement with clients and prospects such as the likes of one of the world’s largest creative companies.

With the launch of this new Cloudflare One Partner Program including integrated zero trust focused solution bundles and partner enablement, we look forward to further expanding our go-to-market with Cloudflare and helping customers smoothly and quickly transform their network security by adopting a zero trust strategy for protecting their infrastructure, teams and applications,” stated Deborah Jones, Senior Product Marketing Manager, Alliances, IBM Security Services.

Assurance Data’s charter is to deliver integrated security solutions for next-generation cyber defense. We’re thrilled to work with Cloudflare, adding their innovative, 100% cloud-native Zero Trust solutions to our technology portfolio and appreciate the significant investment they are making in the partner channel, with deep partner enablement and service delivery support along with rich incentives.  The new Cloudflare One Partner Program is truly a triple win: a win for us, for our Cloudflare partnership and for our customers,” stated Randy Stephens, COO, Assurance Data.

Zero Trust is no-brainer, but many people still believe it’s too complex,” stated Scott McCrady, CEO, SolCyber. “Cloudflare has made it easy with the new Cloudflare One Partner Program. We love it because it helps our customers get integrated Zero Trust solutions in place fast, with all the enablement and incentives you would expect from a first-rate partner program.”

How is the Cloudflare One Partner program different from Cloudflare’s general Partner Program?

This new program builds on top of the benefits of the existing partner program. So all the current benefits provided to partners are available, but there are a few valuable additions for Cloudflare One partners: Product suites are listed with Distribution partners and available for VARs and other partners to quote and fulfill; We’ve added Accreditations and new training packages, so that partners have rich resources and training on which to build and enhance their own service practices; Incentives for partners are enhanced with well-structured discounts off the list prices available to partners at our Distribution partners including extra incentives that follow a “reward for value” model.

As a member of AVANT’s Security Council, Cloudflare has been a close innovation partner of AVANT’s as we enable our network of Trusted Advisors to help their customers adopt the very latest in cloud technologies,” stated Shane McNamara, EVP, Engineering and Operations, AVANT Communications. “With this new Cloudflare One Partner Program for Zero Trust, Cloudflare has launched a first-of-kind set of integrated product suites and partner services packages that will give our Trusted Advisors a compelling set of solutions to take to market.

Cloudflare’s product suite has an important role to play in advanced threat detection and in Wipro’s Zero Trust offers to clients,” said Tony Buffomante, SVP, Global CRS Leader of Wipro. “The Cloudflare One Partner Program has provided a quick ramp to build our practice. We’re already seeing significant market use cases from our partnership, with Wipro CyberSecurists providing application security, implementation services and ongoing managed services from Wipro’s 16 global cyber defense centers.

Cloudflare has made Zero Trust adoption easy, with these integrated product bundles and partner services speeding customers’ journeys to comprehensive, Zero Trust-based security for teams, infrastructure and applications. We’re excited to be one of Cloudflare’s initial launch partners for these innovative solutions,” stated Dave Trader, Field CISO, Presidio.

We are a services provider delivering cybersecurity and IT transformation solutions to private equity and mid-market organizations. The Cloudflare One Partner Program fits with our integrated services and support model, and we’re already seeing strong customer interest in the Cloudflare One product suites. We’re excited to be one of Cloudflare’s initial partners for this strategic new channel program,” stated Chris Hueneke, Chief Information Security Officer, RKON.

We’re thrilled to announce that we officially provide managed services to support Cloudflare One solutions to help customers mitigate cyber security threats with a holistic Zero Trust approach to security,” according to Joey Campione, Managing Director, Opticca Security.

Cloudflare is making it easy for us to design and deliver a Zero Trust solution, especially for our mid-market customers where the bundles ensure a complete, integrated solution,” said Katie Hanahan, vCISO and Vice President, Cybersecurity Strategy at ITsavvy, a leading IT solution provider. “And we love the investment in tools and training to help us build out our own professional services offerings to help drive the best possible outcomes for our clients.

A program built around comprehensive Zero Trust product suites

Announcing the Cloudflare One Partner Program

Cloudflare One offers comprehensive Zero Trust solutions that raise visibility, eliminate complexity, and reduce risks as remote and office users connect to applications and the Internet. In a single-pass architecture, traffic is verified, filtered, inspected, and isolated from threats. There is no performance trade-off: users connect through data centers nearby in 270+ cities in over 100 countries.

Announcing the Cloudflare One Partner Program
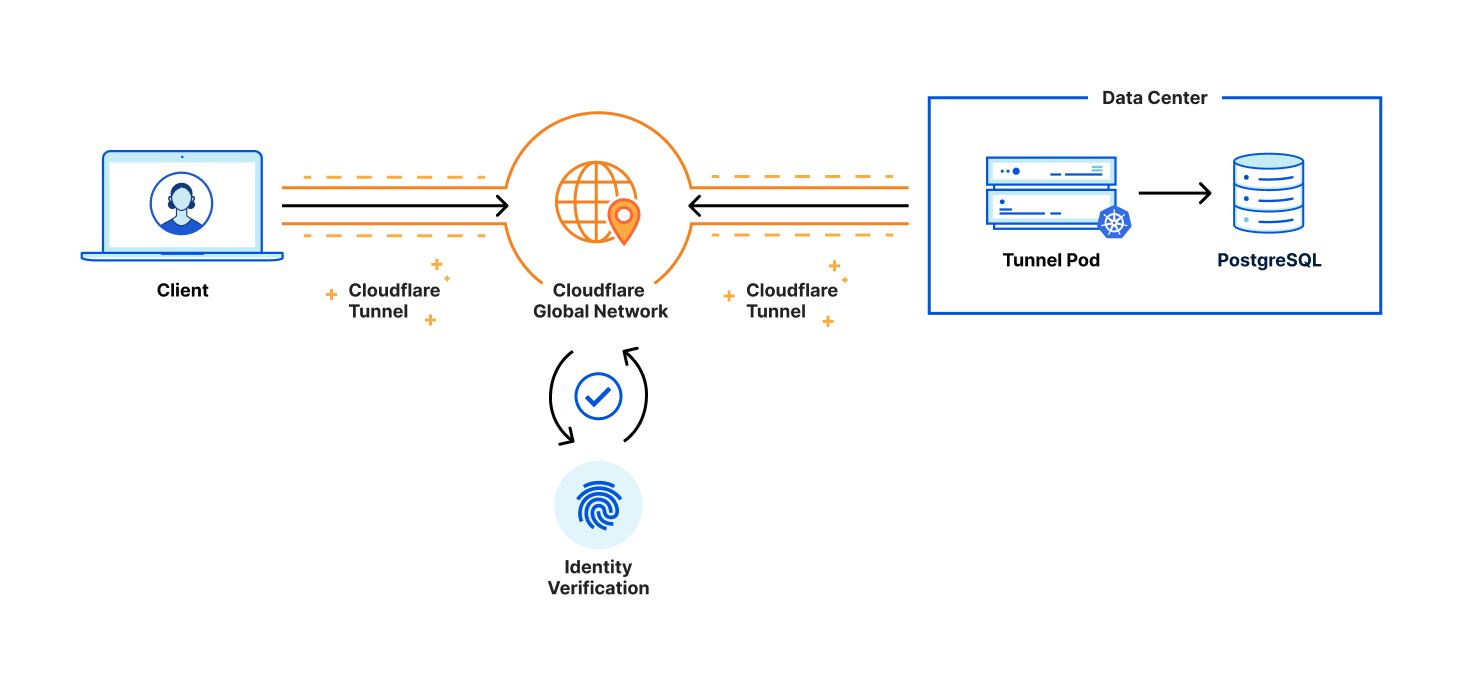
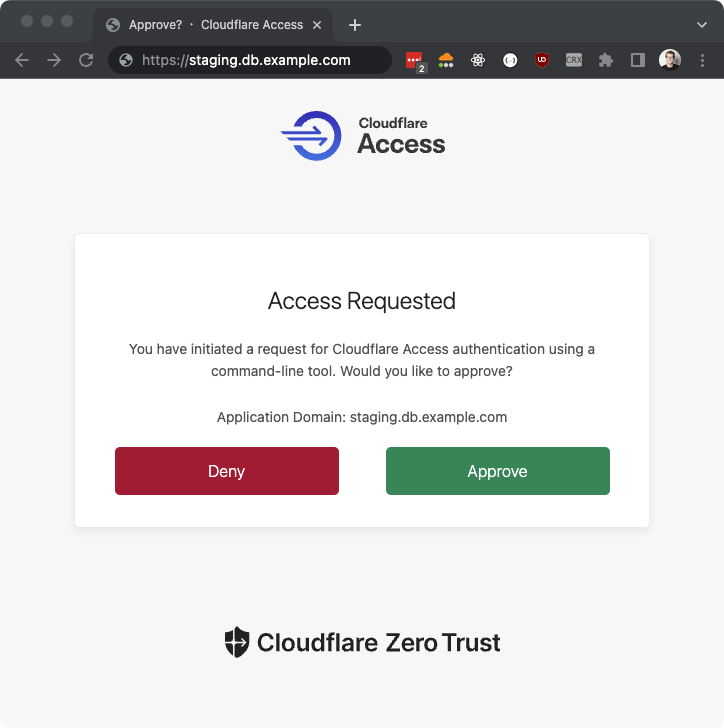
Cloudflare Access augments or replaces corporate VPN clients by securing SaaS and internal applications. Access works with your identity providers and endpoint protection platforms to enforce default-deny, Zero Trust rules limiting access to corporate applications, private IP spaces, and hostnames.

Announcing the Cloudflare One Partner ProgramCloudflare Gateway is our threat and data protection solution. It keeps data safe from malware, ransomware, phishing, command and control, Shadow IT, and other Internet risks over all ports and protocols.

Announcing the Cloudflare One Partner ProgramCloudflare Area 1 Email Security crawls the Internet to stop phishing, Business Email Compromise (BEC), and email supply chain attacks at the earliest stage of the attack cycle, and enhances built-in security from cloud email providers.

Announcing the Cloudflare One Partner ProgramCloudflare Browser Isolation makes web browsing safer and faster, running in the cloud away from your network and endpoints, insulating devices from attacks.

Announcing the Cloudflare One Partner ProgramCloudflare CASB (Cloud Access Security Broker) gives customers comprehensive visibility and control over SaaS apps to easily prevent data leaks, block insider threats, and avoid compliance violations.

Announcing the Cloudflare One Partner ProgramCloudflare Data Loss Prevention enables customers to detect and prevent data exfiltration or data destruction. Analyze network traffic and internal “endpoint” devices to identify leakage or loss of confidential information, and stay compliant with industry and data privacy regulations.

For more information on the program and Zero Trust product suites go here.

What’s Next?

Today’s launch of the Cloudflare One Partner Program represents just one step in a multi-step journey to invest in our partners and help customers implement and support Zero Trust solutions. Over the coming months we will be expanding the program internationally and continuing to add training resources around Cloudflare Zero Trust accreditations. We are also hosting a series of partner webinars on this new program. Please check the Partner Portal for details and future partner events.

Rapid7 MDR Delivered 549% ROI via Headcount Avoidance, Time Savings, and Breach Risk Reduction

Post Syndicated from Jake Godgart original https://blog.rapid7.com/2022/06/23/rapid7-mdr-delivered-549-roi-via-headcount-avoidance-time-savings-and-breach-risk-reduction/

Rapid7 MDR Delivered 549% ROI via Headcount Avoidance, Time Savings, and Breach Risk Reduction

In-house security organizations these days are operating at an extreme deficit. Skeleton crews are running entire security operations centers (SOCs). A constant barrage of alerts is making it difficult for these teams to detect and investigate every alert and stay ahead of today’s evolving threats. The odds are heavily in favor of the attacker.

But there is hope. Managed security service providers (MSSPs) – and more specifically, managed detection and response (MDR) providers – enable access to specialized detection and response expertise and headcount, bypassing the talent- and skill-gap challenges that plague the industry.

MDR offers a way for internal security teams to extend their capabilities in threat detection, alert triage, malware analysis, incident investigation, and response capabilities quickly and at scale. For under-resourced teams, MDR is a turnkey solution for a fully operational SOC at a fraction of the cost to build one out internally. How much, exactly?

A June 2022 Total Economic Impact™ study by Forrester Consulting commissioned by Rapid7 found that Rapid7’s “secret sauce” – a blend of extended detection and response (XDR) technology, improved visibility, and SOC expertise – enabled a composite Rapid7 MDR customer to capture an estimated 549% return on their investment (ROI) over three years and to see a payback for that investment in less than 3 months! That’s almost a 5.5x ROI!

The analysis was conducted using a hypothetical composite organization created for the purposes of the study, using insights gleaned from four real-life MDR customers. This composite reflects a security team profile we see often: a small team of two security professionals tasked with protecting 1,800 employees and 2,100 assets. A tall order, and one that (unfortunately) represents the state of security operations today.

The study concluded that Rapid7 MDR services experts integrate with an existing security organization to quickly cut down on detection and response times. Subsequently, the interviewed customers saw substantial returns from working alongside the MDR team as a trusted partner to mature their program.

Here are four key takeaways from the Forrester Consulting study.

Rapid7 MDR offered improved visibility through XDR technology

Detection can only be as good as the visibility the technology provides and what’s being monitored. In the words of an interviewed director of information security for a financial services company, “I didn’t have full visibility into the security activity of all devices across my enterprise. It was a ‘fingers-crossed’ [hope] that there isn’t something going on within my network.”

Luckily, MDR as a partner can ensure complete monitoring and visibility across the entire environment – comprehensive coverage to detect across all endpoints, user accounts, network traffic, deception technologies, the cloud, and more – offering a winning strategy.

In the study, Forrester found that Rapid7 MDR utilizes XDR capabilities to help customers see beyond the confines of a traditional security information and event management (SIEM) and endpoint detection and response (EDR) tools, with coverage across the entire modern environment.

Combined with the latest threat intelligence and machine learning to continuously analyze attacker activity, the MDR provider can help you anticipate that threat and form a more proactive response. That’s a winning strategy.

Rapid7 MDR saved time for security teams

Alerts can fire constantly. Each of them needs triaging and investigation. Every confirmed incident then needs a response plan, remediation, mitigation actions, and a post-incident report. The challenge is, all of this takes time.

With MDR, those alerts are handled without spending countless cycles from the customer’s internal teams. Investigation, response, and reporting are, too. This frees up the security team to focus on other aspects of their program.

Going from understaffed to capably staffed can be an incredible time saver. As a director of information security in financial services said to Forrester, “If we didn’t acquire MDR, I would have had to do a lot more manual work and it would have kept me from other tasks.”

The Forrester study concluded that Rapid7 MDR – by providing improved focus and outsourcing of detection and response activities – reduced the amount of time spent by:

  • 87.5% on alert investigation
  • 97.5% on response, remediation, and recovery
  • 83.3% on research and reporting

Rapid7 MDR helped avoid the hefty costs of hiring security talent

The Gartner® 2021 SOC Model Guide report suggests that “by 2025, 33% of organizations that currently have internal security functions will attempt and fail to build an effective internal SOC due to resource constraints, such as lack of budget, expertise, and staffing.” This is partially because of the difficulty to hire and retain top detection and response talent.

Hiring a full SOC team is incredibly expensive. For example, the Gartner SOC Model Guide suggested an industry benchmark closer to “at least 10-12 personnel for 24/7 coverage,” with the Forrester TEI study placing one full-time employee (FTE) at $135,000 annually.

Because of this, many teams are turning to MDR to implement a hybrid-SOC model that integrates an MDR SOC alongside an internal SOC team. Gartner suggests, “By 2025, 90% of SOCs in the G2000 will use a hybrid model by outsourcing at least 50% of the operational workload.” This approach has certainly become the most optimal and economic option.

Partnering with an MDR provider is certainly one way to avoid prohibitive time and hiring costs. According to the Forrester Consulting study, Rapid7 was able to save the composite organization $1.5 million over the course of three years by avoiding the need to hire five full-time security analysts in order to achieve 24×7 coverage (in year 1). And those numbers might be low compared to other industry SOC FTE benchmarks.

Rapid7 MDR greatly reduced the risk of a security breach

There will always be new zero-days, new TTPs, and emerging threats that make it impossible to prevent (and stop) every breach. The Forrester Consulting Cost Of A Cybersecurity Breach Survey from 2020 Q4 estimated that an organization will have an average of 2.5 significant security breaches each year with an average cost of $654,846 per breach.

That’s where partnering with an MDR provider can help reduce that number. In fact, the Forrester study notes that Rapid7 MDR reduced the likelihood of a major security breach by 90% for the composite organization!

At Rapid7, some of our MDR capabilities that help prevent breaches from occurring are:

  • XDR technology to see complete visibility across your attack surface (with an ability for customers to have full access to InsightIDR for log search, data storage, reporting, and more)
  • 24x7x365 monitoring of the environment from a global, follow-the-sun SOC team of detection and response experts
  • Proactive, hypothesis-driven threat hunts from human MDR analysts
  • Active Response to contain assets and users instantly when there’s a validated incident

What about the 10% of incidents that get through? We at Rapid7 offer an industry-first, unlimited Incident/Breach Response baked into our MDR service, leveraging our integrated Digital Forensics and Incident Response (DFIR) team to ensure we’re able to assist customers with any security incident, no matter how minor or major.

All of this is why a director of information security in financial services who was interviewed for the Forrester study said, “I’d say we’re 100% more prepared to handle a security incident with Rapid7 MDR.”

MDROI

Ultimately, the goal of the security department is to invest in technology and services that help protect the organization. But when that investment is able to positively impact the company’s bottom line, it’s a win-win.

It’s not just about alleviating some of the stress on the security team. It’s also about having access to that MDR provider’s technology, their library of advanced detection methodologies and resources, and the collaboration that can lead to strengthening your security posture.

You can read the entire Forrester TEI study to get the full breakdown on Rapid7 MDR alongside the numbers and stories from customers.

But what the study does not quantify is our commitment to partnering with our customers to improve their security maturity, providing expertise that drives returns for your detection and response program where and when you need it.

Considering MDR but don’t know where to start? We put together an MDR Buyer’s Guide that includes the questions to ask and what to look for to help the decision-making process.

Forrester Consulting Study, “The Total Economic Impact™ Of Rapid7 Managed Detection And Response (MDR)” commissioned by Rapid7.

The Gartner® 2021 SOC Model Guide, 19 October 2021, John Collins, Mitchell Schneider, Pete Shoard

Gartner® is a registered trademark and service mark of Gartner, Inc. and/or its affiliates in the U.S. and internationally and are used herein with permission. All rights reserved.

Additional reading:

NEVER MISS A BLOG

Get the latest stories, expertise, and news about security today.

Security updates for Thursday

Post Syndicated from original https://lwn.net/Articles/898720/

Security updates have been issued by Debian (chromium, firejail, and request-tracker4), Fedora (ghex, golang-github-emicklei-restful, and openssl1.1), Oracle (postgresql), Scientific Linux (postgresql), Slackware (openssl), SUSE (salt and tor), and Ubuntu (apache2 and squid, squid3).

The collective thoughts of the interwebz