Post Syndicated from Raghavarao Sodabathina original https://aws.amazon.com/blogs/architecture/building-saml-federation-for-amazon-opensearch-dashboards-with-auth0/
Amazon OpenSearch is a fully managed, distributed, open search, and analytics service that is powered by the Apache Lucene search library. OpenSearch is derived from Elasticsearch 7.10.2, and is used for real-time application monitoring, log analytics, and website search. It’s ideal for use cases that require fast access and response for large volumes of data. OpenSearch Dashboards is derived from Kibana 7.10.2, and used for visual data exploration. With Security Assertion Markup Language (SAML)-based federation for OpenSearch, Dashboards lets you use your existing identity provider (IdP) like Auth0. You can use Auth0 to provide single sign-on (SSO) for OpenSearch Dashboards on Amazon OpenSearch search domains. It also gives you fine-grained access control, and the ability to search your data and build visualizations. Amazon OpenSearch supports providers that use the SAML 2.0 standard, such as Auth0, Okta, Keycloak, Active Directory Federation Services (AD FS), and Ping Identity (PingID).
In this post, we provide step-by-step guidance to show you how to set up a trial Auth0 account. We’ll demonstrate how to build users and groups within your organization’s directory, and enable SP-initiated single sign-on (SSO) into OpenSearch Dashboards.
To use this feature, you must enable fine-grained access control. Rather than authenticating through Amazon Cognito or an internal user database, SAML authentication for OpenSearch Dashboards lets you use third-party identity providers to log in to the OpenSearch Dashboards. SAML authentication for OpenSearch Dashboards is only for accessing the OpenSearch Dashboards through a web browser. Your SAML credentials do not let you make direct HTTP requests to OpenSearch or OpenSearch Dashboards APIs.
Auth0 is an AWS Competency Partner and popular Identity-as-a-Service (IDaaS) solution. It supports both service provider (SP)-initiated and identity provider (IdP)-initiated SSO. For SP-initiated SSO, when you sign into the OpenSearch Dashboards login page it sends an authorization request to Auth0. Once it authenticates your identity, you are redirected to OpenSearch Dashboards. In IdP-initiated SSO, you log in to the Auth0 SSO page, and choose OpenSearch Dashboards to open the application.
Overview of AuthO SAML authenticated solution
Figure 1 depicts a sample architecture of a generic, integrated solution between Auth0 and OpenSearch Dashboards over SAML authentication.

Figure 1. A high-level view of a SAML transaction between Amazon OpenSearch and Auth0
The sign-in flow is as follows:
- User opens browser window and navigates to Amazon OpenSearch Dashboards
- Amazon OpenSearch generates SAML authentication request
- Amazon OpenSearch redirects request back to browser
- Browser redirects to Auth0 URL
- Auth0 parses SAML request, authenticates user, and generates SAML response
- Auth0 returns encoded SAML response to browser
- Browser sends SAML response back to Amazon OpenSearch Assertion Consumer Service (ACS) URL
- ACS verifies SAML response
- User logs into Amazon OpenSearch domain
Prerequisites
For this walkthrough, you should have the following prerequisites:
- An AWS account
- A virtual private cloud (VPC) based Amazon OpenSearch domain with fine-grained access control enabled
- An Auth0 account with user and a group
- A browser with network connectivity to Auth0, Amazon OpenSearch domain, and Amazon OpenSearch Dashboards.
The steps in this post are structured into the following sections:
- Identity provider (Auth0) setup
- Prepare Amazon OpenSearch for SAML configuration
- Identity provider (Auth0) SAML configuration
- Finish Amazon OpenSearch for SAML configuration
- Validation
- Cleanup
Identity provider (Auth0) setup
Step 1: Sign up for an Auth0 account
- Sign up for an Auth0 account, then click on the Sign up button to complete your account setup.
- If you already have an account with Auth0, log in to your Auth0 account.
Step 2: Create Groups in Auth0
- Choose User Management in the left menu and click Users, then click on the +Create User button.
- Provide an email, password, and connection to your users. Click on the Create button to create your user.
- Add more users to your Auth0 account.
Step 3: Install Auth0 Extension to create a group and assign users to the group
- Click on Extensions in the left menu and search for “Auth0 Authorization”. Click on Auth0 Authorization to install the extension, shown in Figure 2.
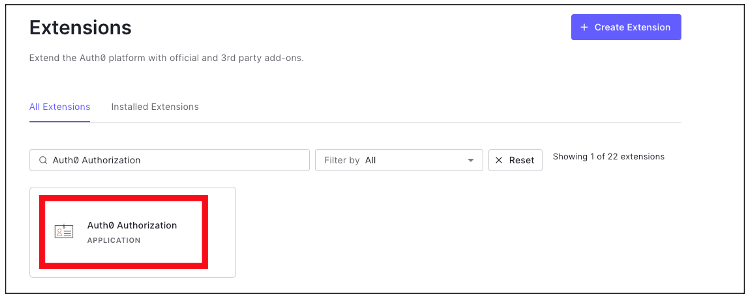
Figure 2. Installing Auth0 Authorization extension
- Use all default options and click on the Install button to install the extension.
- Click on the Auth0 Authorization extension and choose the Accept button to provide access to your Auth0 account.
- The Auth0 Authorization extension must be configured. Click on Go to Configuration (Figure 3).

Figure 3. Configuring the Auth0 Authorization extension
- Rotate your API keys and check Groups, Roles, and Permissions to provide authorization to the extension and then click on PUBLISH RULE to complete the configuration, see Figure 4.
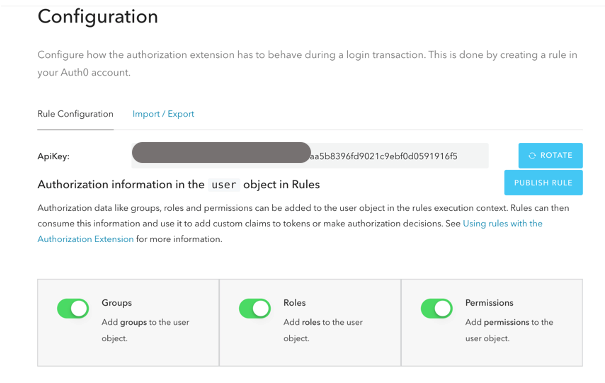
Figure 4. Providing the permissions to Auth0 Authorization extension
Step 4: Create a group in Auth0
- Choose Groups from the left menu and click on the Create your first Group button. For this example, we will create a group called opensearch for OpenSearch Dashboards access.
- Add your users to opensearch by clicking on ADD MEMBERS BUTTON, then click on the CONFIRM button to complete your group assignment (Figure 5).
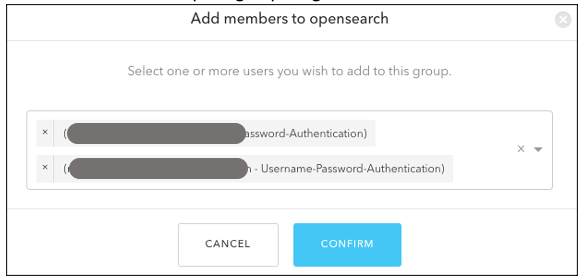
Figure 5. Adding users to Auth0 Group
Step 5: Create an Auth0 Application
- Choose Applications from the left menu. Click on the +Create Application button.
- For this example, we are creating an application called “opensearch”.
- Select Single Page Web Applications, then click on the CREATE button to proceed.
- Click on the Addons tab on the application Kibana (Figure 6).
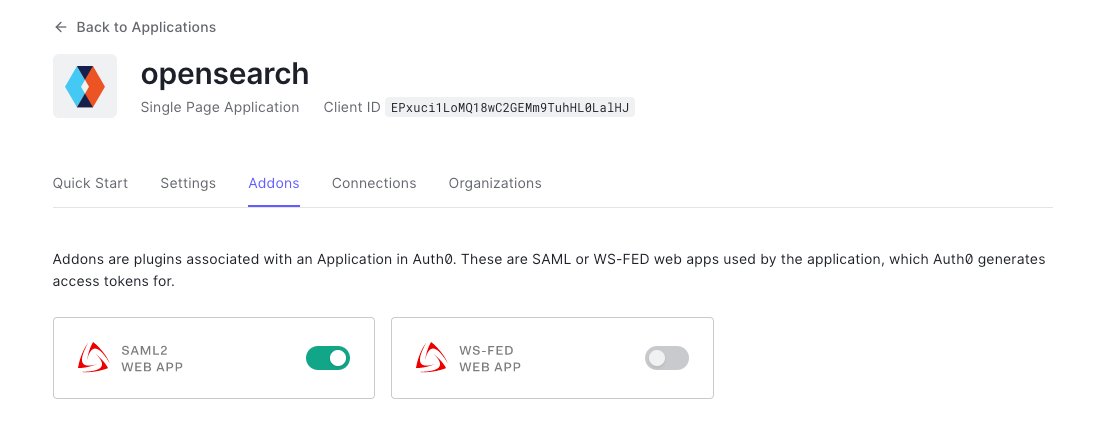
Figure 6. Creating an Auth0 SAML application
- Click on the SAML2 WEB APP, then select settings to provide SAML URLs from Amazon OpenSearch. We will configure these details after preparing the Amazon OpenSearch cluster for SAML.
Prepare Amazon OpenSearch for SAML configuration
Once the Amazon OpenSearch domain is up and running, we can proceed with configuration.
- Under Actions, choose Edit security configuration (Figure 7).

Figure 7. Enabling Amazon OpenSearch security configuration for SAML
- Under SAML authentication for OpenSearch Dashboards/Kibana, select the Enable SAML authentication check box (Figure 8). When we enable SAML, it will create different URLs required for configuring SAML with your identity provider.
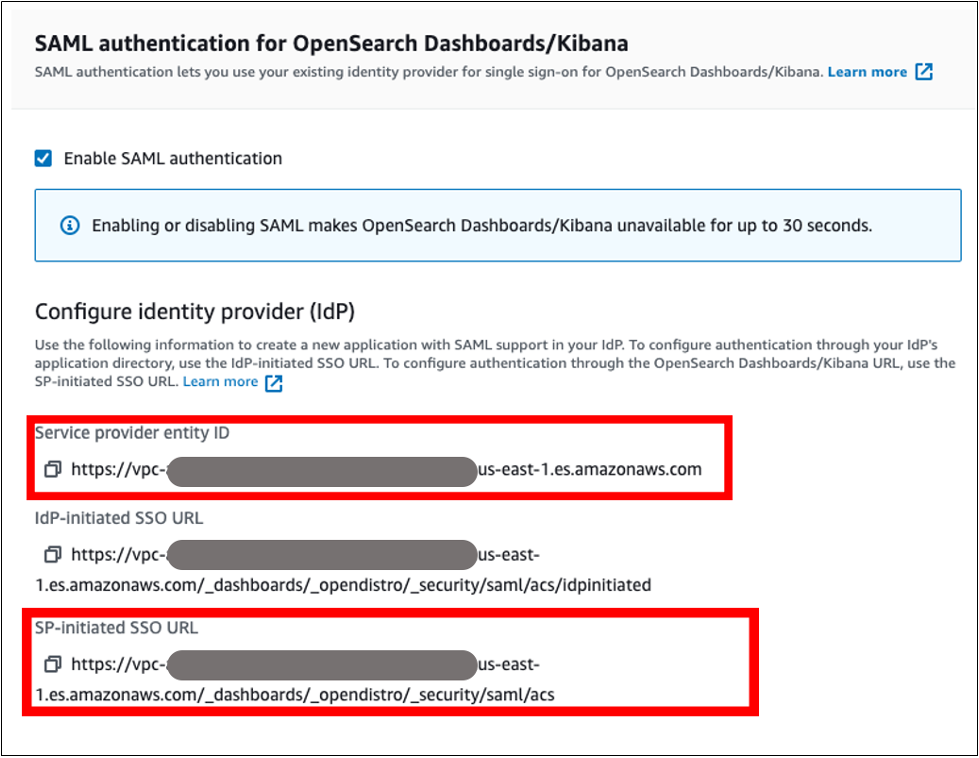
Figure 8. Amazon OpenSearch URLs for SAML configuration
We will be using the Service Provider entity ID and SP-initiated SSO URL (highlighted in Figure 8) for Auth0 SAML configuration. We will complete the rest of the Amazon OpenSearch SAML configuration after the Auth0 SAML configuration.
Auth0 SAML configuration
Go back to Auth0.com, and navigate to Applications from the left menu. Then select the opensearch application that you created as a part of the Auth0 setup.
- Click on the Addons tab on the application opensearch.
- Click on the SAML2 WEB APP, then select Settings to provide SAML URLs from Amazon OpenSearch, as shown in Figure 9:
- Application Callback URL = https://vpc-XXXXX-XXXXX.us-east-1.es.amazonaws.com/_dashboards/_opendistro/_security/saml/acs (SP-initiated SSO URL)
- audience”: “https://vpc-XXXXX-XXXXX.us-east-1.es.amazonaws.com” (Service provider entity ID)
- destination”: “ https://vpc-XXXXX-XXXXX.us-east-1.es.amazonaws.com/_plugin/kibana/_opendistro/_security/saml/acs” (SP-initiated SSO URL)
- Mappings and other configurations shown in Figure 9
{
"audience": "https://vpc-XXXXX-XXXXX.us-east-1.es.amazonaws.com",
"destination": "https://vpc-XXXXX-XXXXX.us-east-1.es.amazonaws.com/_plugin/kibana/_opendistro/_security/saml/acs",
"mappings":
{
"email":
"http://schemas.xmlsoap.org/ws/2005/05/identity/claims/emailaddress",
"name": "http://schemas.xmlsoap.org/ws/2005/05/identity/claims/name",
"groups": "http://schemas.xmlsoap.org/claims/Group"
},
"createUpnClaim": false,
"passthroughClaimsWithNoMapping": false,
"mapUnknownClaimsAsIs": false,
"mapIdentities": false,
"nameIdentifierFormat":
"urn:oasis:names:tc:SAML:1.1:nameid-format:emailAddress", "nameIdentifierProbes": [
"http://schemas.xmlsoap.org/ws/2005/05/identity/claims/emailaddress" ]
}
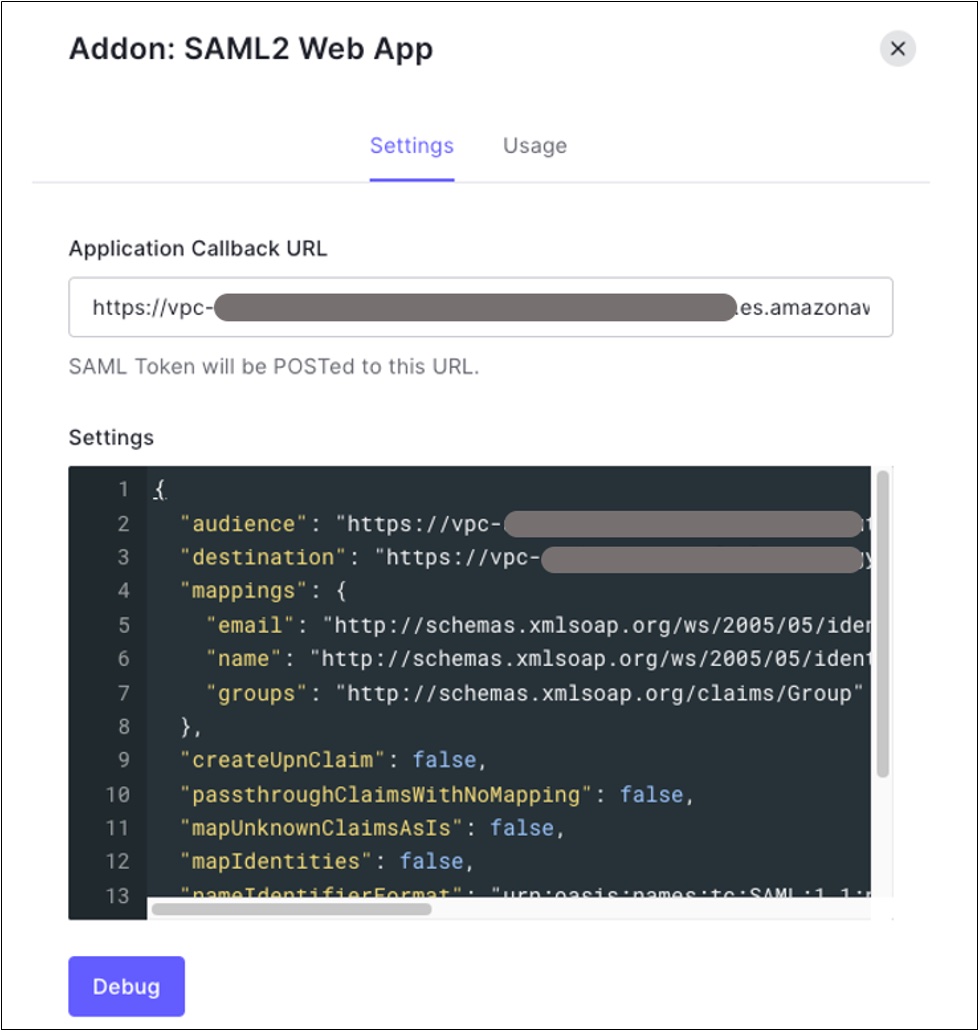
Figure 9. Configuring Auth0 SAML parameters
- Click on Enable to save the SAML configurations.
- Go to the Usage tab, and click on the Download button to download Identity Provider Metadata, see Figure 10.
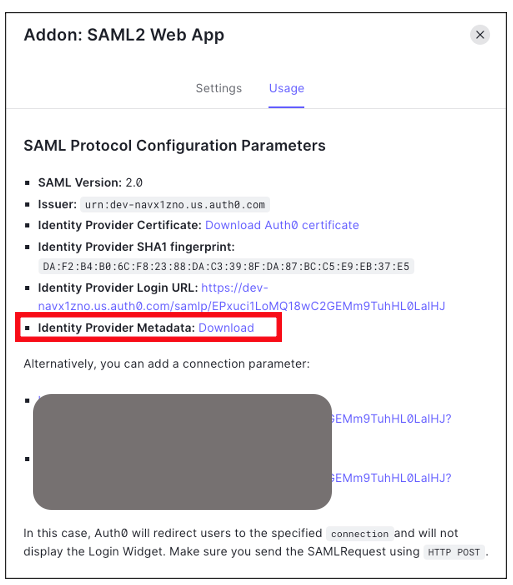
Figure 10. Downloading Auth0 identity provider metadata for SAML configuration
Amazon OpenSearch SAML configuration
- Switch back to Amazon OpenSearch domain:
- Navigate to Amazon OpenSearch console
- Click on Actions, then click on Modify Security configuration
- Select Enable SAML authentication check box
- Under Import IdP metadata section (Figure 11):
- Metadata from IdP: Import the Auth0 identity provider metadata from downloaded XML file
- SAML master backend role: opensearch (Auth0 group). Provide a SAML backend role/group SAML assertion key for group SSO into Kibana
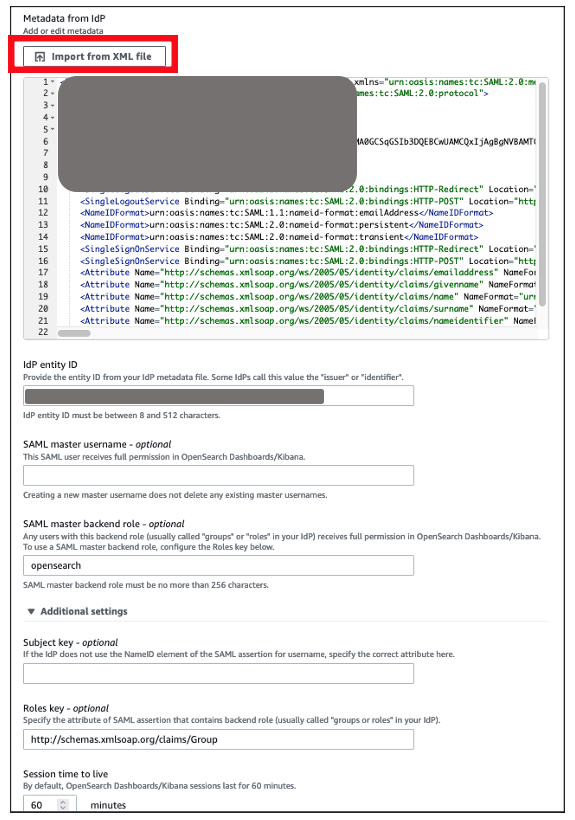
Figure 11. Configuring Amazon OpenSearch SAML parameters
- Under Optional SAML settings (Figure 12):
- Leave Subject Key as blank, as Auth0 provides NameIdentifier
- Role key should be http://schemas.xmlsoap.org/claims/Group. Auth0 lets you view a sample assertion during the configuration process by clicking on the DEBUG button on SAML2 WebApp. Tools like SAML-tracer can help you examine and troubleshoot the contents of real assertions.
- Session time to live (mins): 60
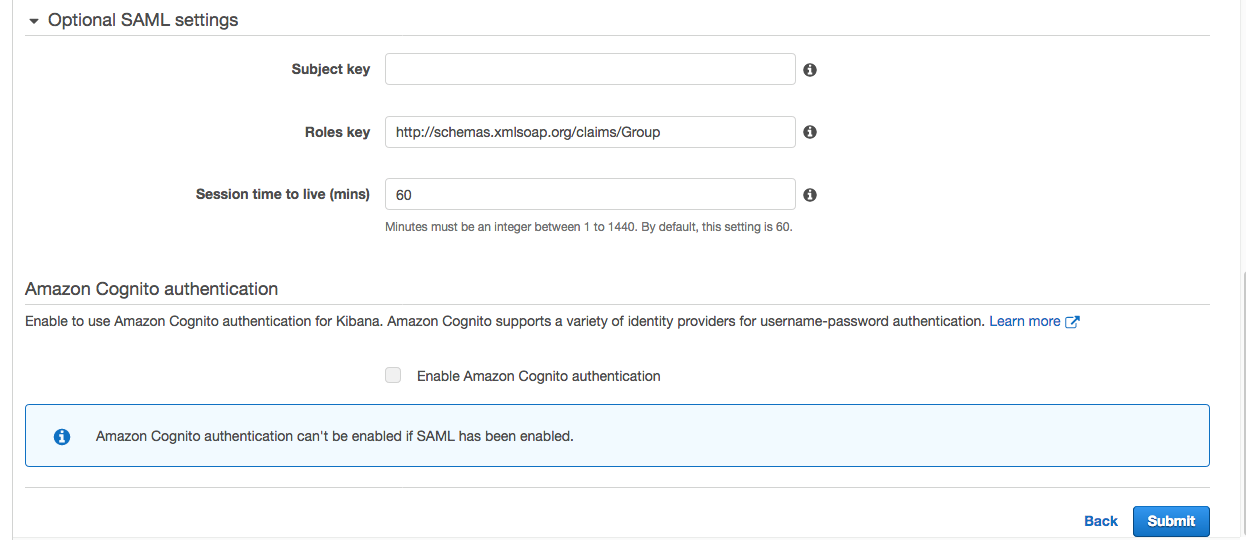
Figure 12. Configuring Amazon OpenSearch optional SAML parameters
Click on the Save changes button to complete Amazon OpenSearch SAML configuration for Kibana. We have successfully completed SAML configuration and are now ready for testing.
Validating access with Auth0 users
- Access OpenSearch Dashboards from the previously created OpenSearch cluster. The OpenSearch Dashboards URL can be found as shown in Figure 13. The first access to the OpenSearch Dashboards URL redirects you to the Auth0 login screen.
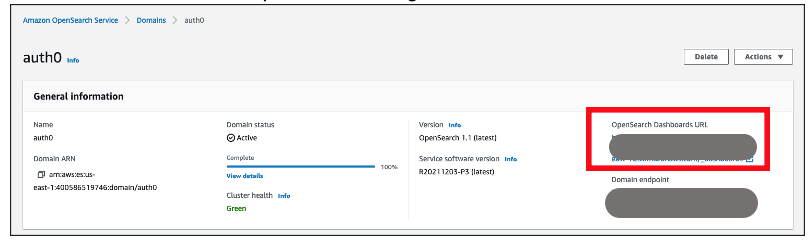
Figure 13. Validating Auth0 users access with Amazon OpenSearch
- Now copy and paste the OpenSearch Dashboards URL in your browser, and enter the user credentials.
- If your OpenSearch domain is hosted within a private VPC, you will not be able to access your OpenSearch Dashboard over the public internet. But you can still use SAML as long as your browser can communicate with both your OpenSearch cluster and your identity provider.
- You can create a Mac or Windows EC2 instance within the same VPC. This way you can access Amazon OpenSearch Dashboards from your EC2 instance’s web browser to validate your SAML configuration. You can also access Amazon OpenSearch Dashboards through Site-to-Site VPN from an on-premises environment.
- After successful login, you will be redirected into the OpenSearch Dashboards home page. Explore our sample data and visualizations in OpenSearch Dashboards, as shown in Figure 14.
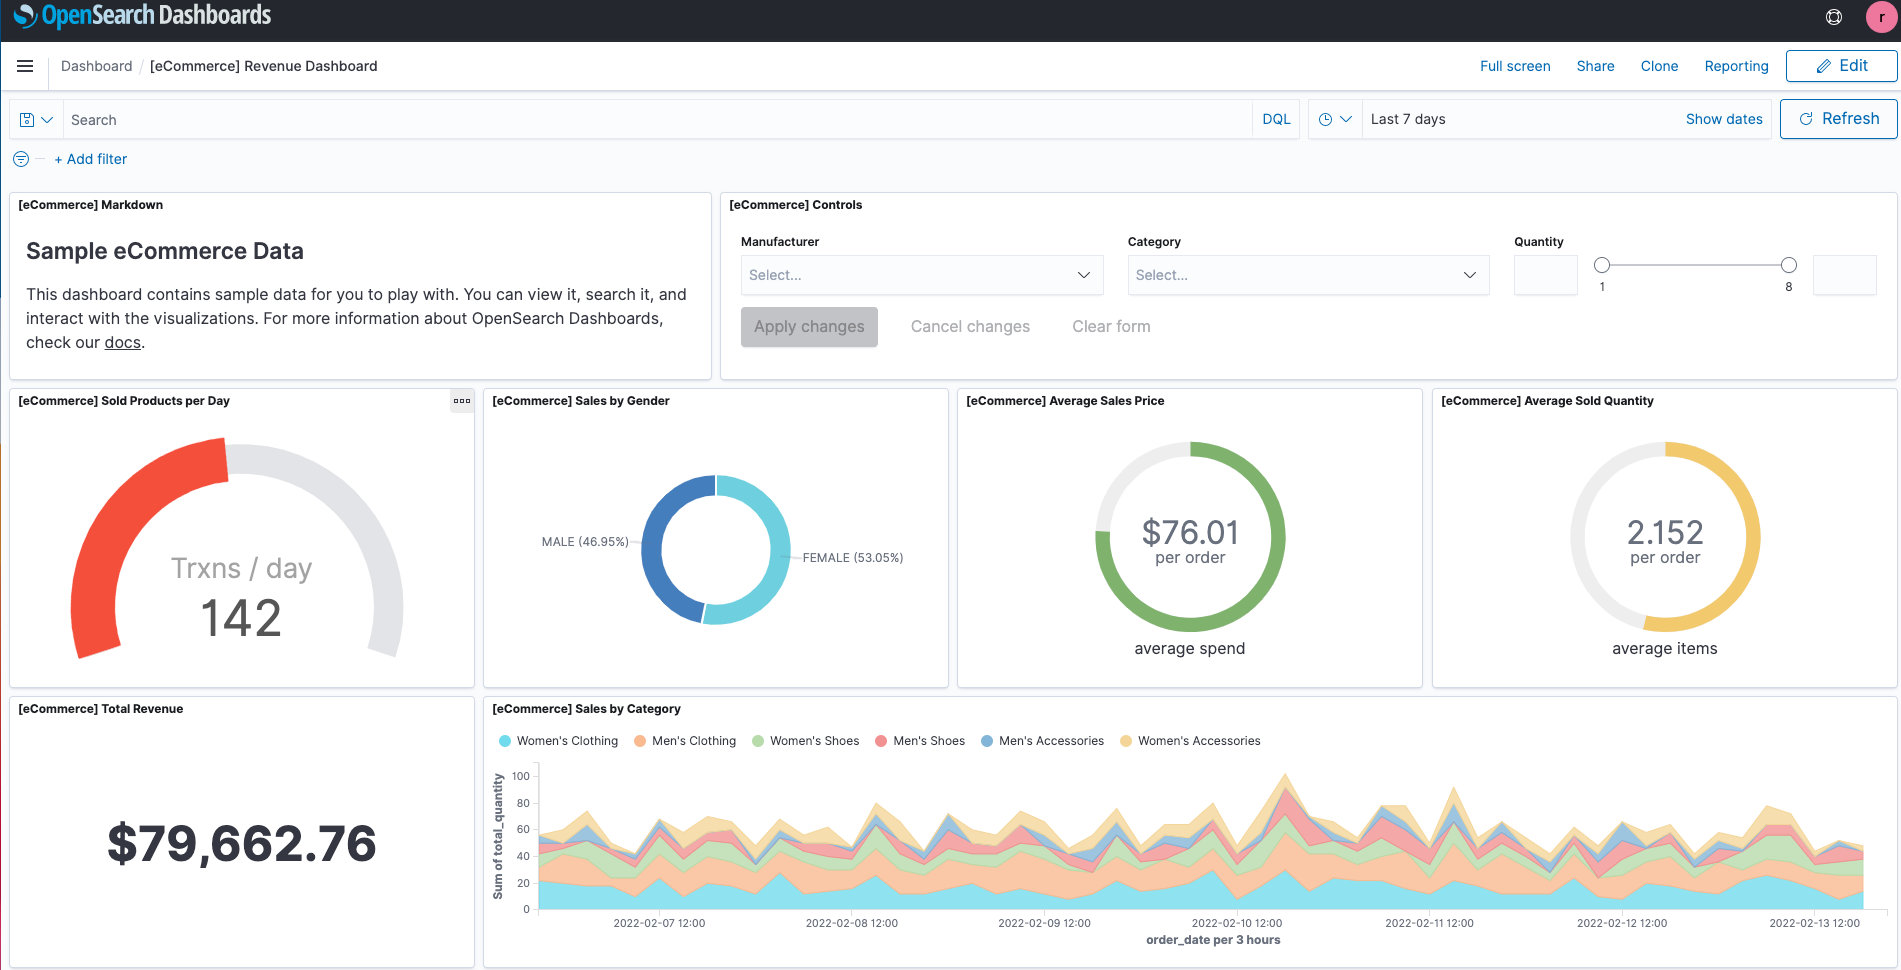
Figure 14. SAML authenticated Amazon OpenSearch Dashboards
- You now have successfully federated Amazon OpenSearch Dashboards with Auth0 as an identity provider. You can connect OpenSearch Dashboards by using your Auth0 credentials.
Cleaning up
After you test out this solution, remember to delete all the resources you created to avoid incurring future charges. Refer to these links:
Conclusion
In this blog post, we have demonstrated how to set up Auth0 as an identity provider over SAML authentication for Amazon OpenSearch Dashboards access. With this solution, you now have an OpenSearch Dashboard that uses Auth0 as the custom identity provider for your users. This reduces the customer login process to one set of credentials and improves employee productivity.
Get started by checking the Amazon OpenSearch Developer Guide, which provides guidance on how to build applications using Amazon OpenSearch for your operational analytics.