Post Syndicated from Abe Carryl original https://blog.cloudflare.com/cloudflare-sse-gartner-magic-quadrant-2025/
For the third consecutive year, Gartner has named Cloudflare in the Gartner® Magic Quadrant™ for Security Service Edge (SSE) report. This analyst evaluation helps security and network leaders make informed choices about their long-term partners in digital transformation. We are excited to share that Cloudflare is one of only nine vendors recognized in this year’s report. You can read more about our position in the report here.
What’s more exciting is that we’re just getting started. Since 2018, starting with our Zero Trust Network Access (ZTNA) service Cloudflare Access, we’ve continued to push the boundaries of how quickly we can build and deliver a mature SSE platform. In that time, we’ve released multiple products each year, delivering hundreds of features across our platform. That’s not possible without our customers. Today, tens of thousands of customers have chosen to connect and protect their people, devices, applications, networks, and data with Cloudflare. They tell us our platform is faster and easier to deploy and provides a more consistent and reliable user experience, all on a more agile architecture for longer term modernization. We’ve made a commitment to those customers to continue to deliver innovative solutions with the velocity and resilience they have come to expect from us. If you want to join them on this journey today, contact us to discuss your own SSE journey.
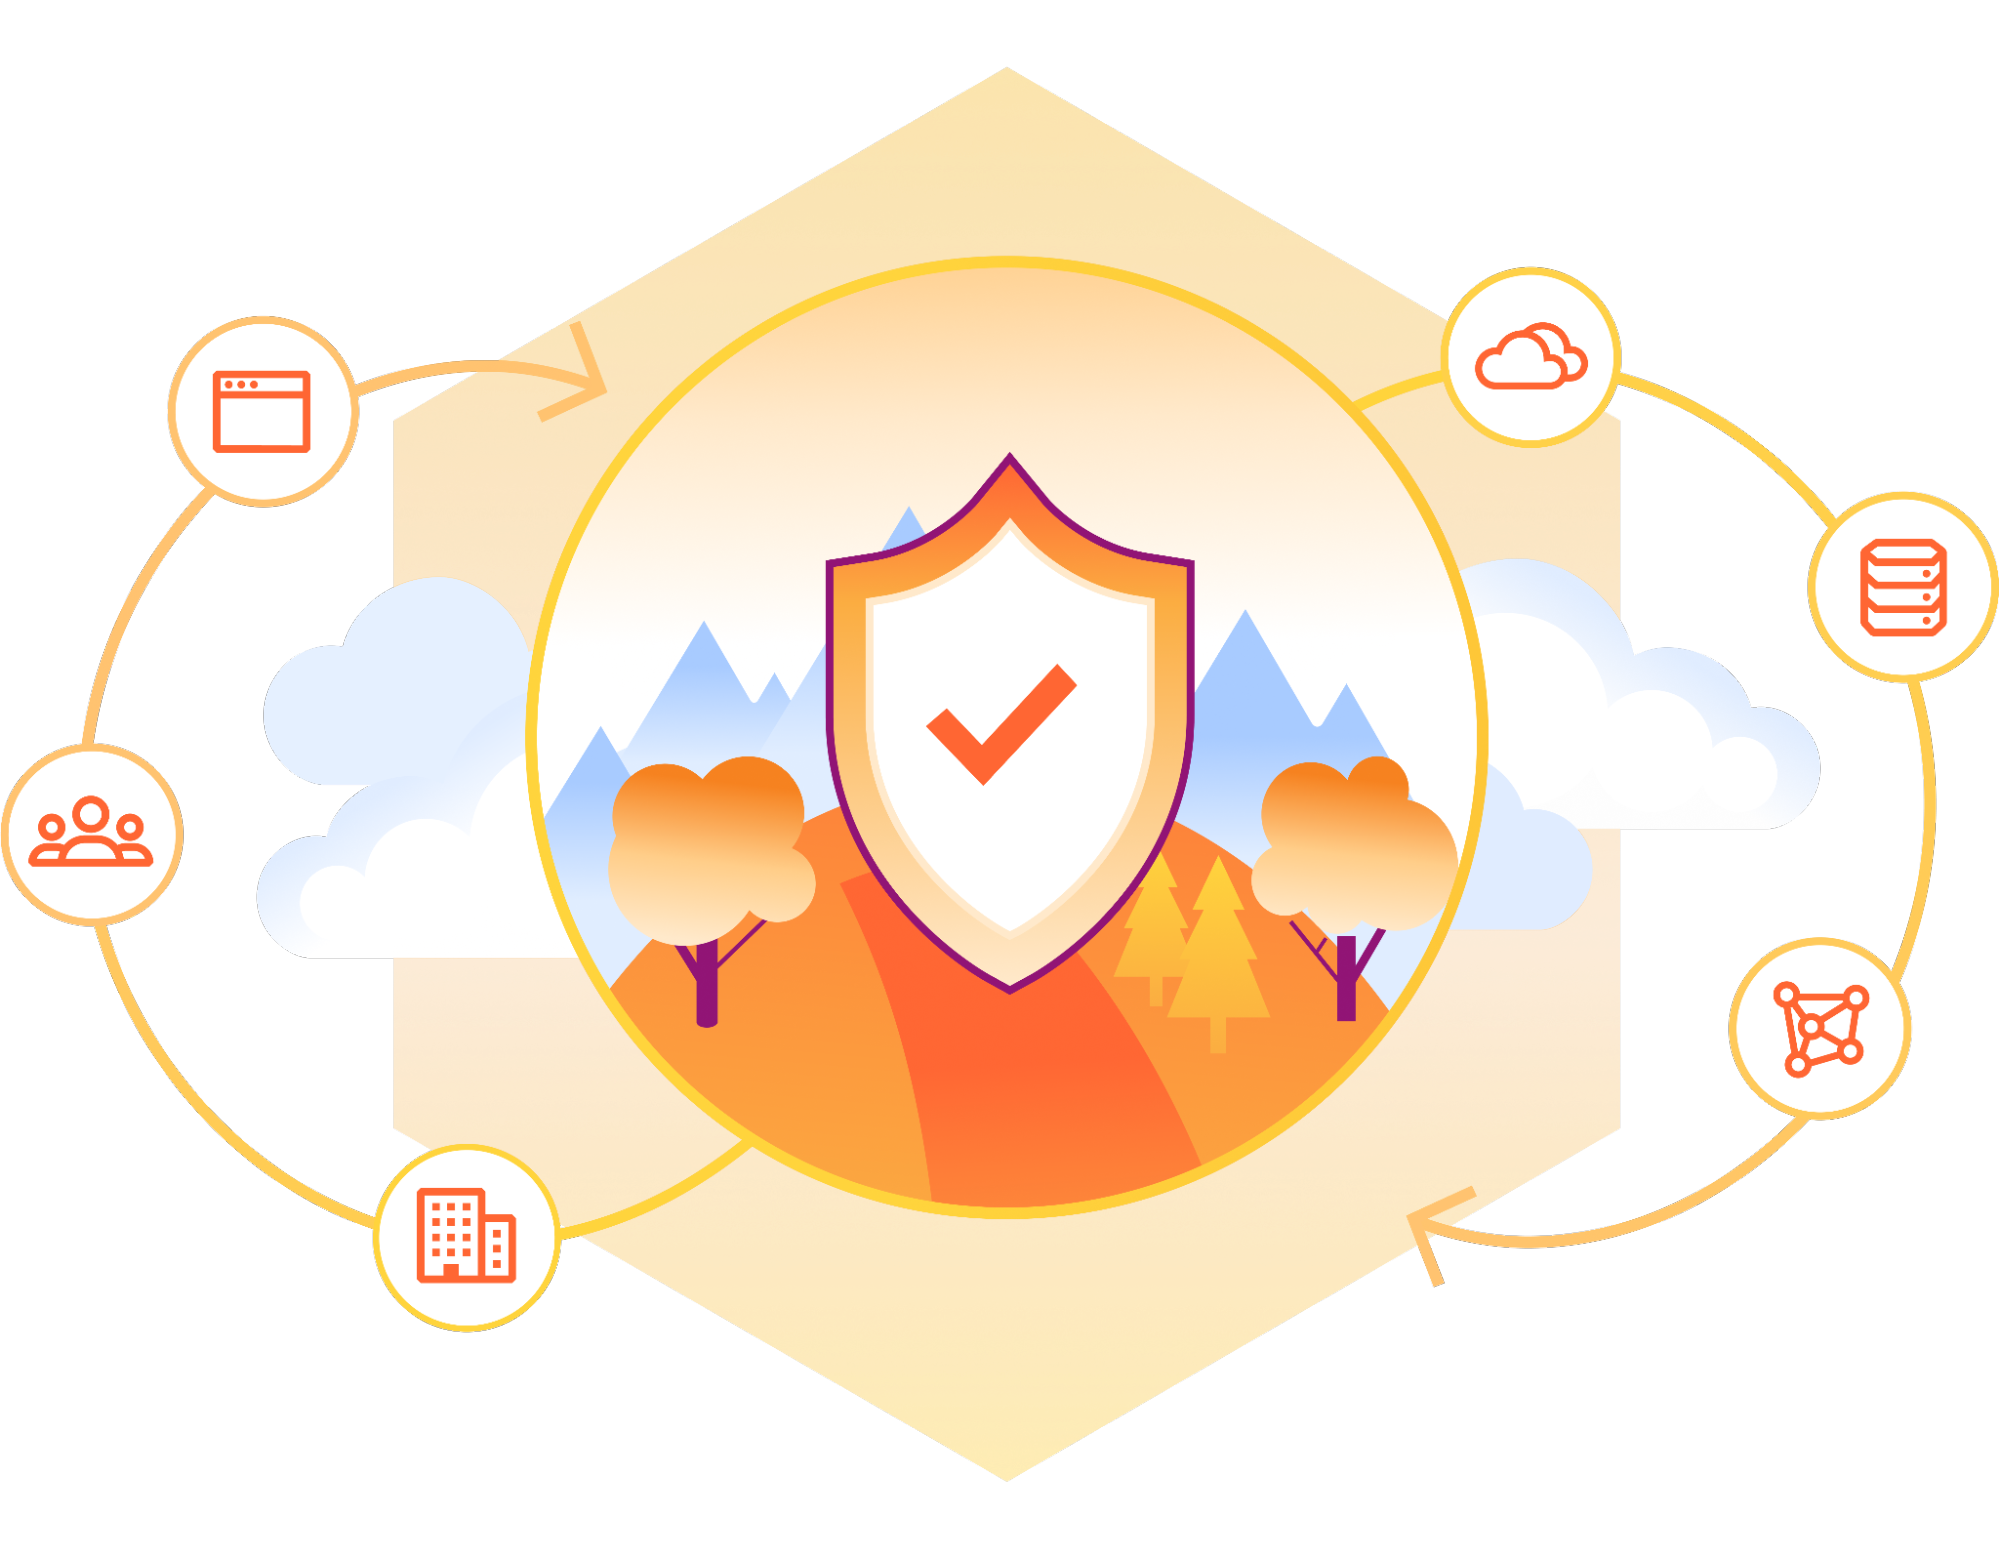
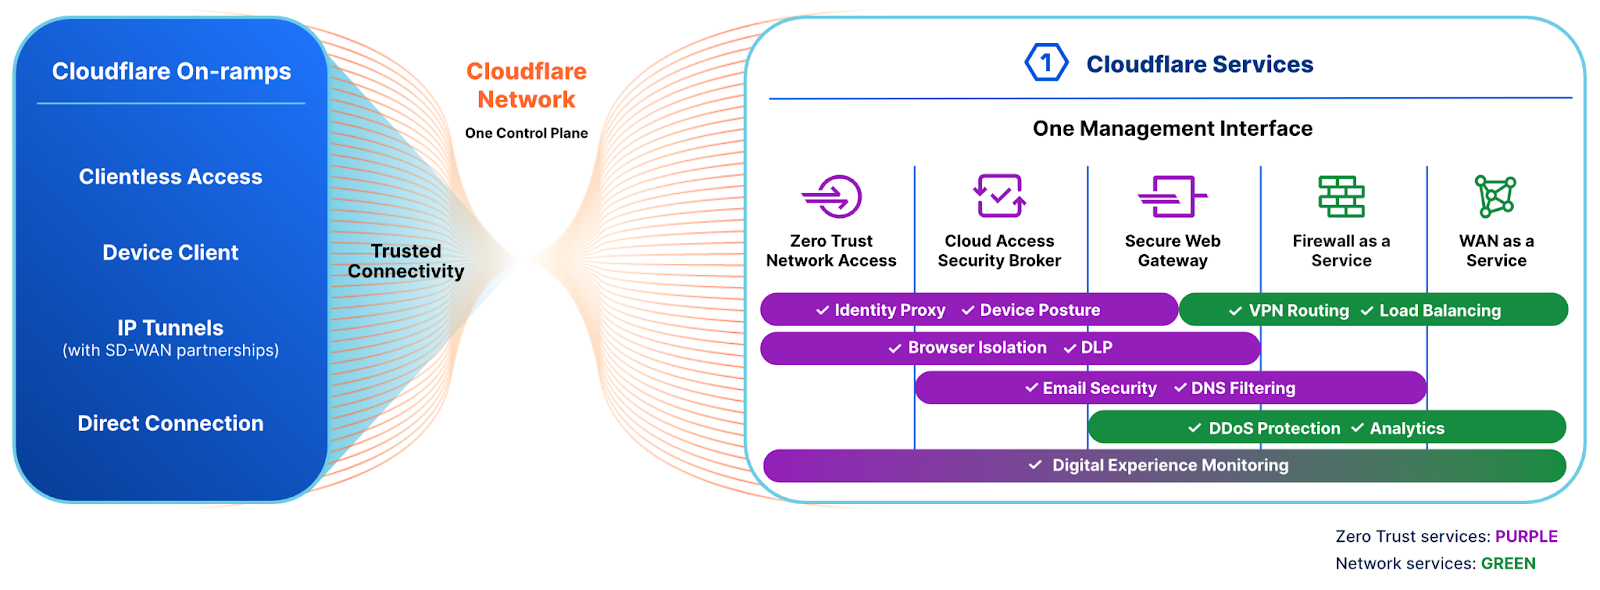
In general, a Security Service Edge (SSE) provides a helpful framing that gives teams guardrails as they adopt a Zero Trust architecture. The concept breaks down into a few typical buckets:
-
Zero Trust access control: Protect applications that hold sensitive data by creating least privilege rules that check for identity, device posture, and other signals on each and every request or connection.
-
Outbound filtering: Keep people and devices safe as they connect to the rest of the Internet by filtering and logging network traffic, DNS queries, and HTTP requests.
-
Secure SaaS usage: Analyze traffic to SaaS applications and scan the data sitting inside of SaaS applications for potential Shadow IT policy violations, misconfigurations, or data mishandling.
-
Data protection: Scan for data leaving your organization towards destinations that do not comply with your organization’s policies. Find data stored inside your organization, even in trusted tools, that should not be retained or that needs tighter access controls.
-
Employee experience: Monitor and improve the experience that your team members have when using tools and applications on the Internet or hosted inside your own organization.
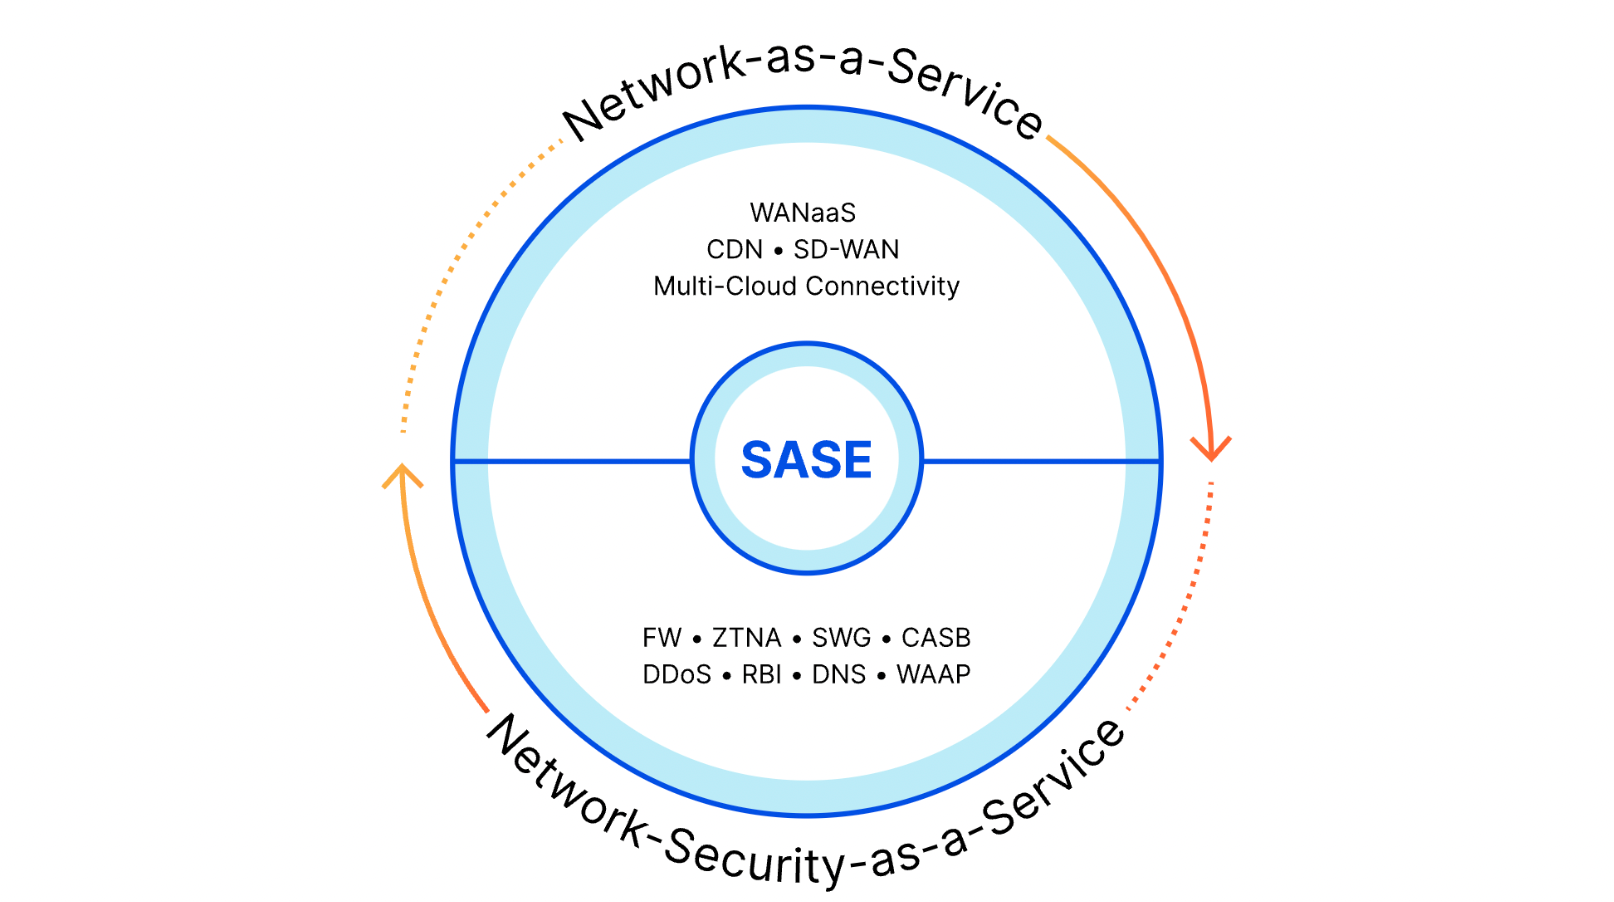
The SSE space is a component of the larger Secure Access Service Edge (SASE) market. You can think of the SSE capabilities as the security half of SASE, while the other half consists of the networking technologies that connect offices and data centers to each other along with everything that SSE connects. Some vendors only focus on the SSE side and rely on partners to connect customers to their security solutions. Other companies just provide the networking pieces. While today’s announcement highlights our SSE capabilities, Cloudflare offers both components as a unified SASE platform.
Cloudflare’s global network was built for this. We’ve developed a unified, programmable network in which every service runs in every data center, spanning more than 330 cities across the globe. Cloudflare operates within approximately 50 milliseconds of 95% of the Internet-connected population globally. That means that regardless of where your people, apps, and data are located, your Security Service Edge is not far away.
Our SSE services operate on the same infrastructure and locations that support many of the world’s most prominent Internet platforms. We’ve integrated proven strengths including the world’s fastest DNS resolver, our robust serverless compute platform, intelligence from our leading Web Application and API Protection (WAAP) platform and advanced global traffic routing capabilities developed as a result of proxying and protecting approximately 20% of websites. Our architecture ensures single-pass inspection, regardless of how customers connect. We also consistently hear that this performance is core to why customers chose Cloudflare. When customers choose Cloudflare, they’re choosing a unified, resilient platform built for the future.
By building our SSE platform on top of our own network, it puts Cloudflare in the driver’s seat. Whether that’s implementing best practices like IPv6, incorporating new technologies like WireGuard or MASQUE, or safeguarding against the future with post-quantum encryption, by building on our own network we’re able to react quickly as new Internet security standards mature.
Customers can rely on Cloudflare to solve a broad range of security problems represented by the SSE category. They can also just start with a single component. We know that an entire modernization journey can be an overwhelming prospect for any organization. While all the use cases below are built to work better together, we make it simple for teams to start by just solving one problem at a time.
Traditional VPNs have been the backbone of enterprise remote access for decades. However, organizations are rapidly moving away from VPNs due to security vulnerabilities, performance bottlenecks, and poor user experience. As businesses adopt Zero Trust principles, they expect modern solutions that:
-
Improve security posture by enforcing least privilege access and per-resource authorization, eliminating dependence on perimeter-based defenses
-
Enhance user experience with seamless, high-performance connectivity.
-
Reduce complexity and operational overhead by consolidating tools and automating access policies.
Cloudflare enables identity-driven, context-aware policies which replace the traditional castle-and-moat model that come with VPN-based solutions. Applications can be made available to employees as well as third parties through a completely clientless deployment. Policies can also be applied to the applications that sit outside your infrastructure to ensure a consistent experience across SaaS applications as well.
By mid-2026, we plan to ship a number of new access control capabilities, including:
-
Identity provider (IdP) agnostic multi-factor authentication (MFA): Admins can enforce step-up MFA without having to direct a user back to an identity provider.
-
Just-in-time access controls: Review and approve timely access requests to sensitive resources. Users can request access via tools like Slack and Google Chat.
-
Browser-based RDP: Traditionally, vendors provide a limited number of PoPs which can support clientless RDP. With Cloudflare, customers get highly performant clientless RDP from the browser by connecting to any of Cloudflare’s data centers. This feature enables access to RDP targets without any software installed on the user’s machine.
For decades, organizations relied on on-prem hardware firewalls to secure Internet access. Like applications, users have moved beyond the perimeter and cloud-based security services have become essential. Modern businesses expect solutions that:
-
Protect users across locations from malware, ransomware, and other Internet threats
-
Enforce those protections with real-time, comprehensive threat intelligence that adapts with emerging attack vectors
-
Reduce management complexity while maintaining granular policy control across the entire network
Cloudflare Gateway, our secure web gateway (SWG), inspects and filters DNS, network, HTTP, and egress traffic with consistent protections across the Internet and internal resources. Customers adopt our SWG to block threats across remote and office workers, enforce acceptable use policies, encrypt traffic, and block unauthorized SaaS and cloud destinations. In a single-pass architecture, all traffic is verified, filtered, and inspected without the performance penalties seen with hardware-based firewalls and proxies. Threat intelligence is derived from unique real-time visibility across our global network, including 4.3 trillion DNS queries per day, which powers AI-backed threat hunting models to identify, for example, new / newly seen domains before other vendors.
Browser isolation capabilities are also natively built-in, enabling organizations to insulate users from threats online and protect data in applications with a seamless user experience. For example, isolating web browsing safeguards users from unknown threats, including zero-days, while isolating apps like AI tools can restrict oversharing of proprietary information.
Customers can get started with a variety of deployment methods including device agents, network locations, PAC files, or DNS over HTTPS (DoH) endpoints. Regardless of implementation, consistent policy enforcement and comprehensive logging is easily accessible through our dashboard, our SQL-based Log Explorer experience, or third-party tools via LogPush.
By mid-2026, we plan to ship a number of new filtering and traffic handling capabilities, including:
-
Deep packet inspection to apply filtering to non-standard ports for protocols like HTTP, SSH, and many others.
-
Filtering using Fully Qualified Domain Names (FQDNs): Admins will no longer need to filter packets or egress connections based on destination IP addresses. They will be able to use the FQDN, application name, or destination category with the egress and network policy builders.
-
Identity + PAC files, providing identity-based filtering without having to install the device client.
Our comprehensive cloud firewall delivers “firewall as a service” protection that helps organizations manage traffic flows globally. All traffic passing through Cloudflare has firewall policies evaluated first, thus providing the first layer of defense, eliminating unnecessary/unwanted traffic before being further evaluated against security policies. The Cloudflare firewall applies configuration changes globally in seconds, thus providing immediate response to emerging needs. With Cloudflare’s network and data center capacity, you get virtually limitless firewall capacity, without the constraints of traditional hardware firewalls, making it a vital component of your Zero Trust and defense-in-depth architecture.
SaaS applications relieve IT teams of the burden to host, maintain, and monitor the tools behind their business. However, they also create entirely new headaches for corresponding security teams. Modern organizations need solutions that:
-
Provide visibility into unauthorized application usage that creates compliance and security risks
-
Enable granular control over data flows within both sanctioned and unsanctioned applications
-
Automate discovery and remediation of security misconfigurations in approved SaaS tools
Any user in an enterprise now needs to connect to an application on the public Internet to do their work, and some users prefer to use their favorite application rather than the ones vetted and approved by the IT department. This kind of Shadow IT infrastructure can lead to surprise fees, compliance violations, and data loss.
Cloudflare offers comprehensive scanning and filtering to detect when team members are using unapproved tools. With a single click, administrators can block those tools outright or control how those applications can be used. If your marketing team needs to use Google Drive to collaborate with a vendor, you can quickly apply a rule that makes sure they can only download files and never upload. Alternatively, you can allow users to visit an application and read from it while blocking all text input. Cloudflare’s Shadow IT policies offer easy-to-deploy controls to help manage how your organization uses the Internet.
Beyond unsanctioned applications, even approved resources can cause trouble. Your organization might rely on Microsoft OneDrive for day-to-day work, but your compliance policies prohibit your HR department from storing files with employee Social Security numbers in the tool. Cloudflare’s Cloud Access Security Broker (CASB) can routinely scan the SaaS applications your team relies on to detect improper usage, missing controls, or potential misconfiguration.
By mid-2026, we look forward to bringing our customers a slew of new capabilities designed to give teams even better visibility and control over their SaaS and cloud applications, including:
-
Robust remediation capabilities: Resolve detected issues right from the dashboard, both automatically and on-demand with a single click.
-
Advanced workflows: Configure automated behavior when new issues are detected, like custom alerting outputs and business justification prompts.
-
User and Entity Behavior Analytics (UEBA) & suspicious activity monitoring: Monitor live events across your SaaS apps and detect anomalous/suspicious activity that could indicate compromise.
Over the past year, CIOs and CISOs have consistently identified data protection as a top concern, particularly regarding artificial intelligence and large language models. As organizations increasingly rely on cloud services and AI tools, they require modern solutions that:
-
Protect sensitive information across all environments without hampering productivity
-
Provide visibility into how data flows through both internal and external systems
-
Enforce consistent security policies that adapt to evolving regulatory requirements
Cloudflare provides comprehensive visibility and control over data movement and data at rest. This helps organizations avoid the financial impact and reputational consequences of data loss and theft.
Our data security is an integral component of our SASE platform, providing granular control over how users interact with applications. This approach allows organizations to establish nuanced policies that safeguard sensitive information without completely blocking access to productivity-enhancing technologies.
We are introducing a number of exciting data protection capabilities by mid-2026, including AI-based DLP detections, delivering simple, innovative forensics, classifying sensitive data in the public cloud, and innovative, preventative cloud security controls. These features provide administrators with robust controls while maintaining the seamless performance and user experience that organizations expect from Cloudflare.
Organizations today struggle with limited visibility into their users’ digital experiences. When performance or availability issues arise, internal support teams often lack the tools to determine whether problems originate in the first, middle, or last mile, resulting in multiple support tickets and delayed resolutions.
Cloudflare addresses this challenge with a comprehensive monitoring toolkit built on the same systems we use to manage our massive global network in-house. This solution empowers IT teams to:
-
Collect on-demand forensic and diagnostic information
-
Systematically gather telemetry data
-
Analyze patterns to anticipate issues before they impact productivity
Cloudflare provides unmatched insight into Internet outages and performance trends that affect your users. This intelligence allows administrators to refine their deployments and quickly identify whether issues are localized to their environment or part of broader global disruptions.
By mid-2026, we plan to ship a number of new digital experience monitoring capabilities, including:
-
Real user monitoring (RUM) that measures the performance of every user’s request.
-
Advanced monitoring for communication applications like Zoom and Microsoft Teams.
-
Contextualizing user performance in terms of global Internet performance data.
Security Service Edge forms a critical component of modern enterprise protection, but organizations have modernization requirements across their network infrastructure. Cloudflare designed our capabilities with these needs in mind, because we deliver true convergence of both networking and security from our connectivity cloud.
Across the industry, we’ve seen many instances where vendors start with either networking or security as their primary focus, and acquire a vendor with an entirely different architecture to enter the SASE market. In such scenarios, there is no convergence with security and networking, because internal traffic is handled through different security controls than the cloud traffic.
Cloudflare delivers networking services using the same global data centers and backbone as our security components. Our composable architecture ensures all of our services are designed to work together, in any order. This means that your security and networking stays consistent and provides a common destination for your SASE journey, no matter where you start.
We’re proud of the work that we’ve done to solve customer problems. Cloudflare continues to receive industry-wide recognition, earning additional positions in 2024 for our comprehensive suite of security solutions beyond SSE, built for the enterprise.
-
Cloudflare named in Gartner® Magic Quadrant™ for Cloud Application Platforms2
-
Cloudflare named in Gartner® Magic Quadrant™ for Email Security Platforms3
-
Cloudflare named in Gartner® Magic Quadrant™ for Single-Vendor SASE4
We believe this recognition underscores our position as a pioneering security and networking platform built for tomorrow’s challenges. When organizations choose Cloudflare, they gain more than just another SSE vendor; they’re establishing a partnership with a holistic platform capable of addressing their broader spectrum of requirements for both public and private resources, both today and in the future.
Tens of thousands of organizations trust Cloudflare to secure their teams every day. We talk to customers directly about that feedback, and they have helped us understand why CIOs and CISOs choose Cloudflare One. For some teams we offer a cost-efficient opportunity to consolidate point solutions. Others appreciate that the ease-of-use means that many practitioners have set up our solution before they even talk to our team. We know that speed matters when we are 46% faster than Zscaler, 56% faster than Netskope, and 10% faster than Palo Alto Networks.
We kicked off 2025 with a week focused on new security features that teams can begin deploying now. In the year ahead, look forward to announcements for our Secure Web Gateway, data protection capabilities, digital experience monitoring, and our inline and API CASB tools. And stay tuned for exciting innovations with AI-driven analytics and monitoring tools, too.
Our commitment in 2025 is the same as it was in 2024. We are going to continue to help your teams solve more security problems so that you can focus on your own mission.
Ready to hold us to that commitment? Cloudflare offers something unique among the players in this space — you can start using nearly every feature in our SSE platform right now at no cost. Teams of up to 50 users can adopt the solution for free to jumpstart a proof of concept. We believe that organizations of any size should be able to quickly and easily start their journey to modernize security.
Footnotes:
1 Gartner, Magic Quadrant for Security Service Edge, Analyst(s): Charlie Winckless, Thomas Lintemuth, Dale Koeppen, Charanpal Bhogal, May 20, 2025
2 Gartner, Magic Quadrant for Cloud Application Platforms, Analyst(s): Tigran Egiazarov, Mukul Saha, Anne Thomas, Steve Schwent, November 1, 2024
3 Gartner, Magic Quadrant for Email Security Platforms, Analyst(s): Max Taggett, Nikul Patel, Franz Hinner, Deepak Mishra, December 16, 2024
4 Gartner, Magic Quadrant for Single-Vendor SASE, Analyst(s): Andrew Lerner, Neil MacDonald, Jonathan Forest, Charlie Winckless, July 3, 2024
GARTNER is a registered trademark and service mark of Gartner, Inc. and/or its affiliates in the U.S. and internationally, and MAGIC QUADRANT is a registered trademark of Gartner, Inc. and/or its affiliates and are used herein with permission. All rights reserved.
Gartner does not endorse any vendor, product or service depicted in its research publications, and does not advise technology users to select only those vendors with the highest ratings or other designation. Gartner research publications consist of the opinions of Gartner’s research organization and should not be construed as statements of fact. Gartner disclaims all warranties, expressed or implied, with respect to this research, including any warranties of merchantability or fitness for a particular purpose.