Post Syndicated from Kaituo Li original https://aws.amazon.com/blogs/big-data/a-deep-dive-into-high-cardinality-anomaly-detection-in-elasticsearch/
In May 2020, we announced the general availability of real-time anomaly detection for Elasticsearch. With that release we leveraged the Random Cut Forest (RCF) algorithm to identify anomalous behaviors in the multi-dimensional data streams generated by Elasticsearch queries. We focused on aggregation first, to enable our users to quickly and accurately detect anomalies in their data streams. However, consider the example data in the following table.
| timestamp | avg. latency | region |
| 12:00 pm | 3.1 | Seattle |
| 12:00 pm | 4.1 | New York |
| 12:00 pm | 5.9 | Berlin |
| 12:01 pm | 2.6 | Seattle |
| 12:01 pm | 5.3 | New York |
| 12:01 pm | 5.8 | Berlin |
| … | … | … |
The data consists of one data field, avg. latency, and one attribute or categorical field, time. If we want to perform anomaly detection on this data, we could take the following strategy:
- Separate the data by the
regionattribute to create a separate data stream entity for each region. - Construct an anomaly detector for each entity. If the cardinality of the
regionattribute, that is the number of possible choices ofregionvalue, is small, we can create separate anomaly detectors by filtering on each possible value ofregion.
But what if the cardinality of this attribute is large? Or what if the set of possible values changes over time, such as a source IP address or product ID? The existing anomaly detection tool doesn’t scale well in this situation.
We define the high-cardinality anomaly detection (HCAD) problem as performing anomaly detection on a data stream where individual entities in the stream are defined by a choice of attribute. In this use case, our goal is to perform anomaly detection on each data stream defined by a particular choice of region. That is, the Seattle region produces its own latency data stream, as well as the New York and Berlin regions.
In this post, we dive into the motivation, design, and development of the HCAD capability. We begin with an in-depth description of the HCAD problem and its properties. We then share the details of our solution and the challenges and questions we encountered during our research and development. Finally, we describe the system and architecture of our solution, especially the components tackling scalability concerns.
High-cardinality anomaly detection
In this section, we elaborate on the definition of the HCAD problem. As described earlier, we can think of HCAD as a way to produce multiple data streams by defining each data stream by a particular choice of attribute. For each data stream, we want to perform streaming anomaly detection as usual—we want to detect anomalies relative to that individual data stream’s own history.
We define an individual entity by fixing a particular value of one or more attributes and aggregating values over all remaining attributes. In the language of table manipulation in SQL, each entity is defined using GROUPBY on an attribute. Specifically, a group of entities is defined by selecting one or more attributes, where each entity is given by the data fields for each particular value of those attributes. For example, applying GROUPBY to the region attribute in the preceding example data produces three data stream entities: one for Seattle, one for New York, and one for Berlin. Within each of these data streams, we want to find anomalies with respect to that data stream’s history.
This idea of defining a data stream entity by attribute values extends to multiple attribute fields. When multiple attribute fields exist but we group by only one of those attributes, we aggregate each entity over the remaining attribute fields. For example, suppose you have network traffic data consisting of two attribute fields and one data field. The attribute fields are a source_ip address and a dest_ip address. The data field is the number of bytes_transferred in that particular network transaction between the given two IP addresses. The following table gives an example of such a dataset.
| timestamp | source_ip | dest_ip | bytes_transferred |
| 12:00 pm | 192.168.1.1 | 192.168.1.20 | 138 |
| 12:00 pm | 192.168.1.1 | 192.168.1.300 | 21 |
| 12:00 pm | 192.168.1.20 | 192.168.1.300 | 5 |
| 12:01 pm | 192.168.1.1 | 192.168.1.20 | 289 |
| 12:01 pm | 192.168.1.1 | 192.168.1.300 | 10 |
| 12:02 pm | 192.168.1.1 | 192.168.1.20 | 244 |
| 12:02 pm | 192.168.1.1 | 192.168.1.300 | 16 |
| 12:02 pm | 192.168.1.20 | 192.168.1.300 | 8 |
| … | … | … | … |
One way to define an entity is to group by both source IP address and destination IP address combinations. Under this method of defining entities, we end up with the following data streams.
| entity: (source_ip, dest_ip) | 12:00 pm | 12:01 pm | 12:02 pm | 12:03 pm |
| (192.168.1.1, 192.168.1.20) | 138 | 289 | 244 | … |
| (192.168.1.1, 192.168.1.300) | 25 | 10 | 16 | … |
| (192.168.1.20, 192.168.1.300) | 5 | 0 | 8 | … |
On the other hand, if we define an entity only by its source IP address, we aggregate bytes transferred over the possible destination IP addresses.
| entity: (source_ip,) | 12:00 pm | 12:01 pm | 12:02 pm | 12:03 pm |
| (192.168.1.1,) | 159 | 299 | 260 | … |
| (192.168.1.20,) | 5 | 0 | 8 | … |
HCAD is distinct from another anomaly detection technique called population analysis. The goal of population analysis is to discover entire entities with values and patterns distinct from other entities. For example, the bytes transferred data stream associated with the entity (192.168.1.1, 192.168.1.20) is much larger in value than either of the other entities. Assuming many entities exist with values in the range of 1 to 30, this entity is considered a population anomaly. An entity can be a population data stream contains no anomalies relative to its own history.
Depending on the way we define entities from attributes, the number of data stream entities changes. This is an important consideration with regards to scale and density of the data streams: grouping by too many attributes may leave you with entities that have too few observations for a meaningful data stream. This is not uncommon in real-world datasets. Even in a dataset with only one attribute, real-world data tends to adhere to a power-law scaling of data density. Simply put, the majority of data stream activity occurs in a minority of entities. There is likely a long tail of sparse entities. Given this observation, if the stream aggregation window is too small, there are many missing data points in these sparse entities.
Data stream models for HCAD
We described the HCAD problem, but how do we build a machine learning solution? Furthermore, how is this solution different from the currently available non-HCAD single-stream solution? In this section, we explain our process for model selection and why we arrived at using Random Cut Forests for the high-cardinality regime. We then address scalability problems by exploring RCF’s hyperparameter space. Finally, we address certain issues that arise when dealing with sparse data streams.
Model selection
Designing an HCAD solution has several scientific challenges. Whatever algorithmic solution we arrive at must satisfy several systems constraints:
- The algorithm must work in a streaming context: aggregated feature queries are streaming in Elasticsearch and the anomaly detection models only receive each new feature aggregate one at a time
- The HCAD solution must respect the business needs of the customer hardware and should have restricted CPU and memory impact
- The solution should be scalable with respect to data throughput, number of entities, and number of nodes in the cluster
- The algorithm must be unsupervised, because the goal is to classify anomalous data in a streaming context without any labeled training set
Our team identified three classes of anomaly detection model based on the relationship between number of entities and number of models:
- 1:1 model – Each entity is given its own AD model. No data or anomaly information is shared between the models, but because the number of models scales with the number of entities, we must keep the model small to satisfy customer scaling needs.
- N:1 model – A single AD model is responsible for detecting each entity’s anomalies. Deep learning-based AD models typically fall under this category.
- N:K model – A subset of entities is assigned to one of several individual models. Typically, some clustering algorithm is used to determine an appropriate partition of entities by identifying common features in the data streams.
Each general class of solution has its own tradeoffs with respect to the ability to distribute across cluster nodes, scale with respect to the number of entities, and detect anomalies on benchmark datasets. After some analysis of these tradeoffs and experimentation, we decided on the 1:1 approach. Within this class of HCAD solution, there are many candidate data stream anomaly detection algorithms. We explored many of these algorithms and tested different lightweight models before deciding on using Random Cut Forests. RCF works particularly well across a wide variety of data stream behaviors. This fit well with our goal of providing support for as wide of a range of customer use cases as possible.
Scaling Random Cut Forests
To keep memory costs down when using RCFs as our AD model, we started by exploring the algorithm’s hyperparameter space. The model has three main hyperparameters:
- T – Number of trees
- S – Sample size per free
- D – Shingle dimension
The RCF model size is O(TDS). Sample size per tree is related to expected anomaly rate, and based on our experiments with a wide variety of datasets, it was best to leave this hyperparameter at its default value of 256 from the single-stream solution. The dimensionality is a function of the customer input but also of the model’s shingle size. We discuss the role of shingle size in the next section. Primarily to satisfy the scaling and model size constraints of the HCAD system, we focused on studying the effect of the number of trees on algorithm performance.
Experiments show that 10 trees per forest gives acceptable results on benchmark datasets; a default number of 100 trees is used in the single-stream solution. In the original plugin, we chose this large number of trees to ensure that the model can keep an accurate sketch of a long enough period of data samples. In doing so, we can recognize long time-scale changes to the data stream. However, we found in our benchmark high-cardinality data streams that this large of a model is unnecessary and that 10 trees is often sufficient for summarizing each high-cardinality data stream’s statistics.
Our experiments measured the precision and recall on labeled data streams. Labels were of the form of anomaly windows: regions in time where an anomaly is known to occur at some point inside the window. A true positive is the positive identification of such a window by the anomaly detection method. Any positively predicted point outside a window is considered a false positive. For an example labeled dataset, see Using Random Cut Forests for real-time anomaly detection in Amazon Elasticsearch Service.
Handling sparse data streams
As mentioned earlier, real-world high-cardinality datasets typically exhibit a power-law like distribution in entity activity. That is, a minority of the entities produce the majority of the data. The earlier source and destination IP address use case is an example: for many websites, the majority of traffic comes from a small collection of sources, whereas individual visitors make up a long tail of sparse activity. Under this assumption, the choice of shingle size is important in defining our entity data streams.
Shingling is a standard preprocessing technique for transforming a one-dimensional data stream xt into a d-dimensional data stream st by converting subsequences of length d into d-dimensional vectors: st = (xt−d+1, …, xt−1, xt). The following diagram illustrates the shingling process using a shingle size of four.
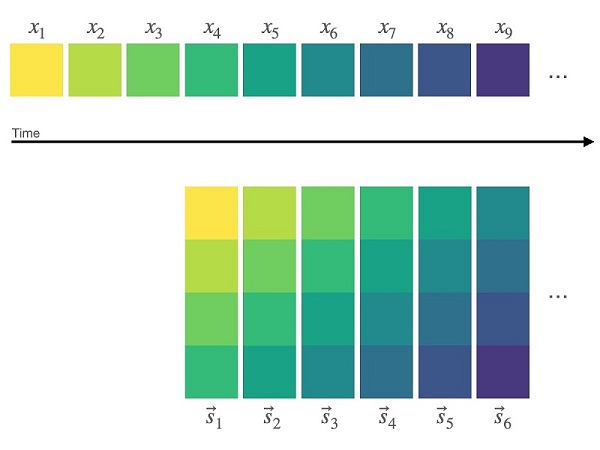
These vectors, instead of the raw stream values, are then fed into the RCF model. In anomaly detection, using shingling has several benefits. First, shingling filters out small-scale noise in the data. Second, shingles allow the model to detect breaks in certain local patterns or frequency changes. That is, a shingled RCF model learns some of the local temporal behavior of your data stream.
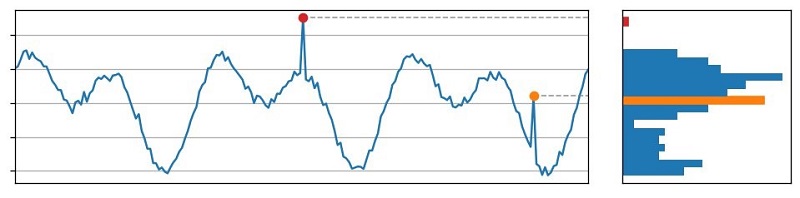
From discussions with our customers and analysis of real-world anomalies, we realized that many customers are looking for distributional anomalies: values that are outside the normal range of values of a data stream. This is in contrast to contextual anomalies, where a data point is considered anomalous in the context of just the data stream’s local history. The following figure depicts this distinction. On the left is a plot of a data stream, and on the right is a histogram of the values attained by this stream in the time window shown. The red data point is a distributional anomaly because its value falls within a low-density regime of the value distribution. The orange data point, on the other hand, is a contextual anomaly: its value is commonly occurring within this span of time but the presence of a spike at this particular point in time is unexpected.
The use of a shingle dimension greater than one allows the RCF model to detect these contextual anomalies in addition to the distributional anomalies.
One challenge with using shingles, however, is how to handle missing data. When data is unavailable at a particular time t, the shingles at times t, t+1, …, t+d−1 cannot be constructed. This results in a delay in the model’s ability to report anomalies. Our the impact of the occasional missing datum by using interpolation. However, when a data stream is sparse, it’s unlikely that any shingle can be constructed, thus turning interpolation into a prediction problem. Whether or not shingling is appropriate for your data is a function of the aggregation window used in the Elasticsearch query and the entity data density.
Scaling anomaly detection in Elasticsearch
In this section, we deep dive into the engineering challenges encountered in building the HCAD tool, particularly regarding the scalability with respect to the number of entities. We first describe the challenges we faced. Then we explain how our HCAD solution balances scalability and resource usage. Finally, we collected these ideas into a description of the overall HCAD framework.
The challenge
As described earlier, our goal was to support filtering the data by attribute or categorical fields and create a separate model for each attribute or categorical value. After examining several real-world use cases, we needed the HCAD plugin to handle millions of categorical values. Processing this many unique values was a challenging scalability issue that affected several key resources:
- Storage – At the extreme, with 100 1-minute interval detectors and millions of entities for each detector running on our evaluation workload, we have seen the checkpoint index reach up to 170 GB in 1 day.
- Memory – Compared to the single-stream detector, we could decrease the model size by approximately 20 times by decreasing shingle size and the number of RCF trees. But the number of entities is unbounded.
- CPU – A single-stream detector mostly runs serial processing. During an HC detector run, multiple entities compete for CPU cycles for model update and inference. The CPU time grows linearly relative to the number of entities processed in each AD job run.
Designing for scalability and resource control
Based on these scalability issues, we chose to extend the current AD architecture because it already had these attributes:
- Easy to scale out
- Powerful enough to handle unpredictable scaling requirements
- Able to control resource usage
However, meeting these challenges for HCAD required three key changes to our existing AD architecture.
First, we placed embarrassingly parallel computations on multiple nodes instead of a coordinating node. The coordinating node acts as the start of the task workflow. It only fetches features and assigns each node in the cluster a portion of the features that is roughly the same in size for all nodes. Other nodes process the features, train and run local models, and write results. Therefore, increasing the number of nodes by a factor of K asymptotically increases the number of categorical values we can handle by the same factor.
Second, in a single-stream detector, the amount of memory used is proportional to the number of features and is fixed when the detector is defined. However, with the introduction of HCAD, the number of entities is not fixed and the number of active entities is likely to change. Therefore, the size of the required memory may continuously change in the lifetime of a detector. Caching can accommodate such requirements without the need to pre-allocate memory for a detector in a fixed amount. If enough memory exists, we create models for all entities and monitor anomalies. Otherwise, we cache the hottest entities’ models up to the amount that the cache memory can contain. For example, if our memory can host only 100 models and there are millions of entities, the maximum active entities in the cache are the hottest 100 entities. We maintain a time-decayed count of each entity. The cache uses this information to measure an entity’s hotness.
Finally, we implemented various strategies for combating the extra overhead of running HC detectors:
- Rate limiting – We limit concurrent computations and throttle bursty usage. For example, when replacing models in the cache, the cache sends get and search requests to fetch and potentially train models. If there is bursty traffic to replace models, the number of requests might exceed Elasticsearch’s get and search thread pool’s maximum queue size and cause Elasticsearch to reject all get and search requests. We install rate limiting to restrict models’ replacing speed.
- Active cleanup – This keeps resource usage under a safe level before it’s too late. For example, we keep checkpoints within 3 days. When any of the checkpoint shards is larger than 50 GB (recommended maximum shard size), we start deleting checkpoints more aggressively.
- Minimizing space usage – For example, in single-stream anomaly detection, we record a model’s running results during each interval. An entity’s model may take time to get ready when there is not enough historical data for training. We don’t need to record such entities’ results because we won’t record anything useful other than that anomaly grade and confidence are both equal to zero. This optimization can reduce the result index size by 4–8 times in one of our experiments.
Architecture
The following figure summarizes the HCAD architecture.
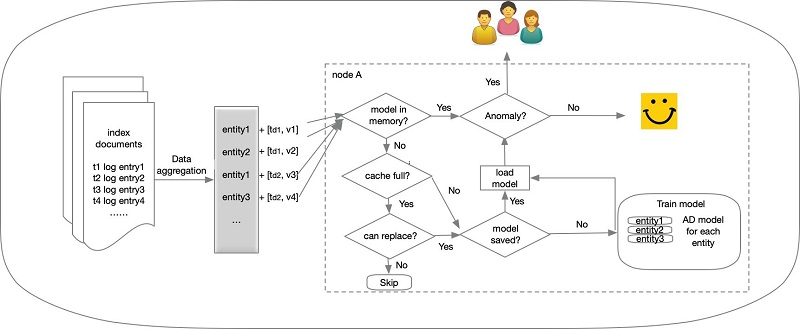
The end-to-end story of HCAD is as follows:
- A user wants to get alerts when an anomaly for a particular entity in the whole corpus arises (for example, high CPU usage on a host).
- The user creates an HCAD detector to describe the source data (index name), feature (for example, average CPU usage within an interval), and sampling frequency (for example, 1 minute).
- Based on the detector configuration, the AD plugin issues a query to fetch feature data for each host regularly (every 1 minute). Users don’t need to know what hosts to query for in the first place.
- A coordinating node infers the entities from the query result.
- The coordinating node distributes entities’ features to all nodes in the cluster.
- On each node, models are trained for the incoming entities, and anomaly grades are inferred, indicating how different the current CPU usage is from the trends that have recently been observed for the same hosts’ CPU usage.
- If cache memory is enough for all incoming entities, the cache admits entities’ models based on the entities’ hotness.
The Kibana workflow
In this section, we show how to use the HCAD in Kibana. Let’s imagine that we need to monitor the high or low CPU usage of our hosts. To do that, we create a detector, define its features, and choose a category field.
Creating a detector
To create and configure a detector, complete the following steps:
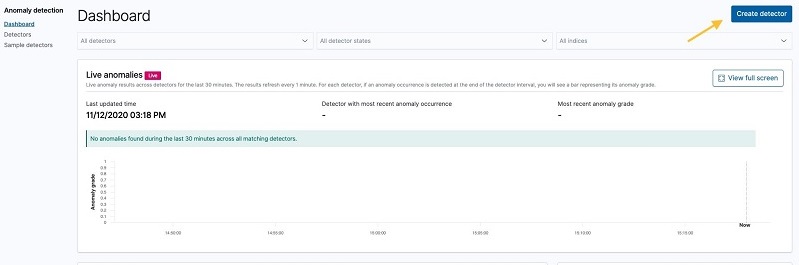
- On the navigation bar, choose Anomaly detection.
- Choose Create detector.
- Enter a name and description for the detector.
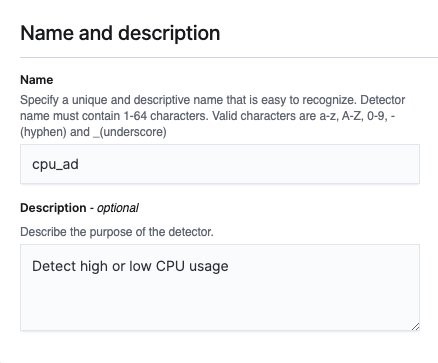
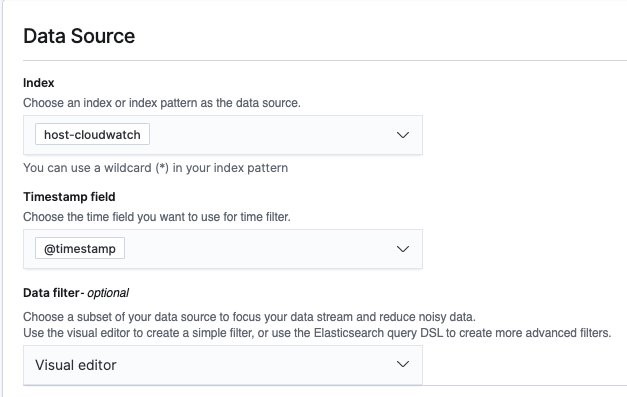
- Choose index or enter
index patternfor the data source. - For Timestamp field, choose a field so the detector can create a time series profile of the data.
- If you want the detector to ignore specific data (such as invalid CPU usage number), you can configure a data filter.
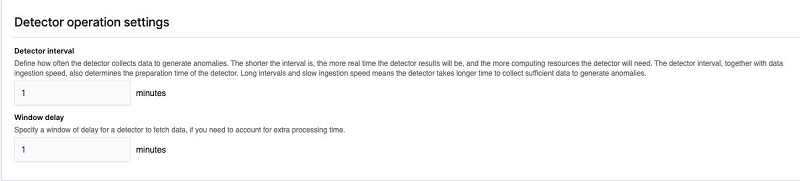
- Specify time frames for detection interval and window delay.
Window delay time should be a conservative estimate. Otherwise, the detector may query for documents within an interval that has not been indexed yet. For this post, we want to have an average CPU usage per minute, and we expect the index processing time to be 1 minute at most.
Defining features
In addition to the preceding settings, we need to add features. The detector aggregates a set of values within a time interval (shingle) to compute the single value according to the feature definition.
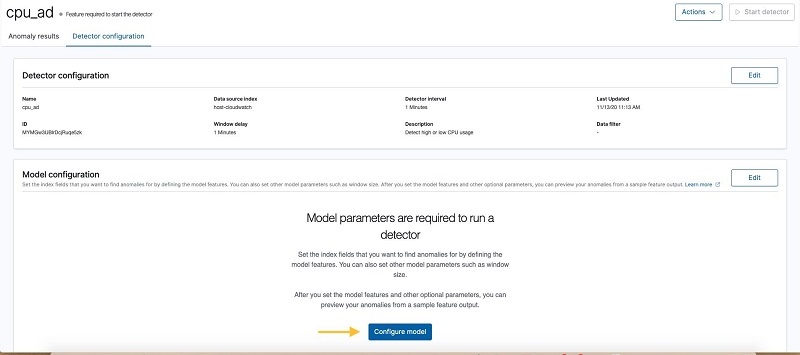
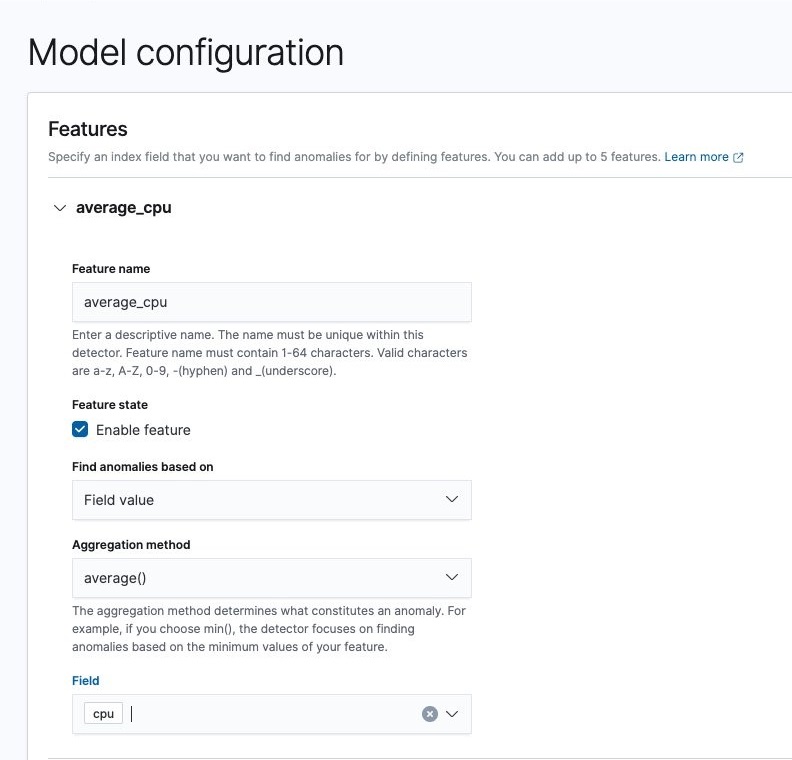
- Choose Configure model.
- For Feature name, enter a name.
- Specify your aggregation functions and fields.
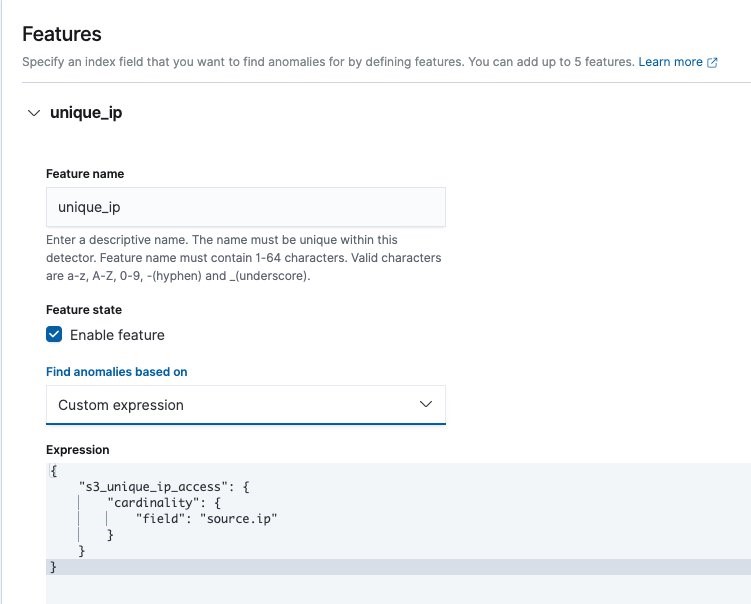
We provide five built-in single metric aggregations: Min, Max, Sum, Average, and Count. You can add a customized aggregation by choosing Custom expression for Find anomalies based on. For this post, we add a feature that returns the average of CPU usage values.
As mentioned earlier, you can customize the aggregation method as long as it returns a single value. For example, when a DevOps engineer wants to monitor the count of distinct IPs accessing their company’s Amazon Simple Storage Service (Amazon S3) buckets, they can define a cardinality aggregation that counts unique source IPs.
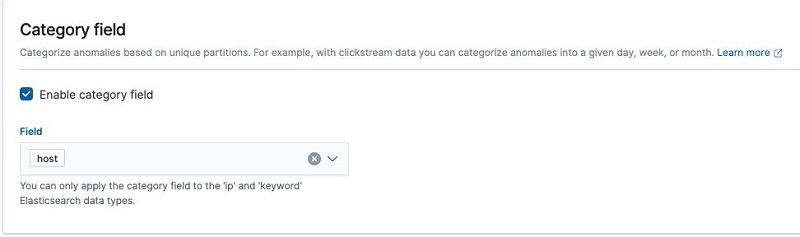
Choosing a category field
The host-cloudwatch index in our example has CPU usage per host per minute. We can define a single-stream detector to model all of the hosts’ average CPU usage together. But if each host’s CPU values have different distributions, we can split the hosts’ time series and model them separately. Giving each categorical value a separate baseline is the main change that HCAD introduces.
Previewing and starting the detector
You might want to try out different choices of detector configurations and feature definitions before finalizing them. You can use Sample anomalies for iterative experiments.
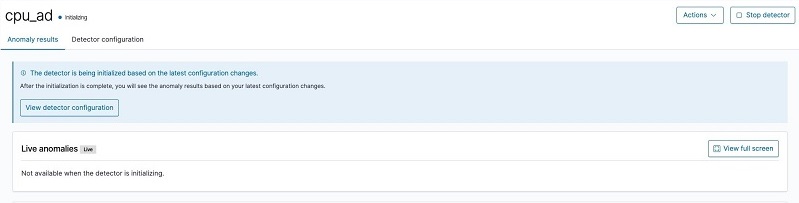
Start the detector by choosing Save and start detector. After confirming, the anomaly detector starts collecting data in real time and performing detection.

The detector starts in an initializing state.
We can use the profile API to check initialization progress (see the following code). A detector is initialized if its hottest entities’ models are fully initialized and ready to emit anomaly grade. Because the hottest entity may change, the initialization progress may go backward.
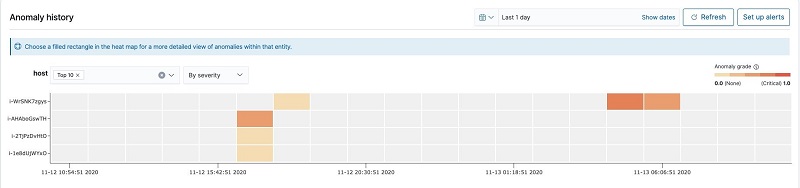
After the detector runs for a while, we can check its result on the detector’s Anomaly results tab. The following heatmap gives an overview of anomalies per entity across a timeline, by showing the hostname along the Y-axis and the timeline along the X-axis. A colored block means there is an anomaly, and a gray block means there is no anomaly.
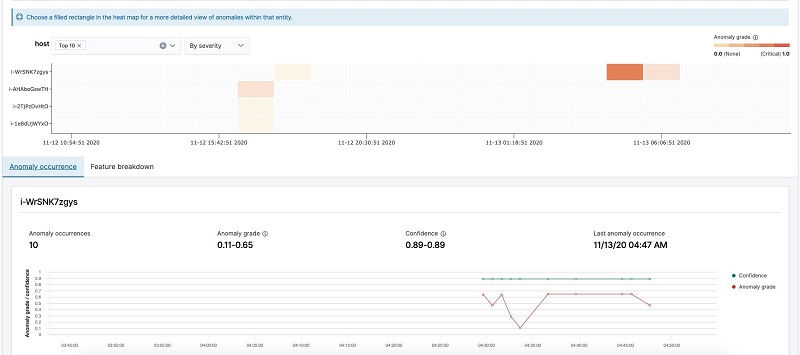
Choosing one of the blocks shows you a more detailed view of the anomaly grade and confidence and the feature values causing the anomalies. We can observe the detector reports anomalies between 4:30 and 4:50 because the CPU usage is approaching 100%.
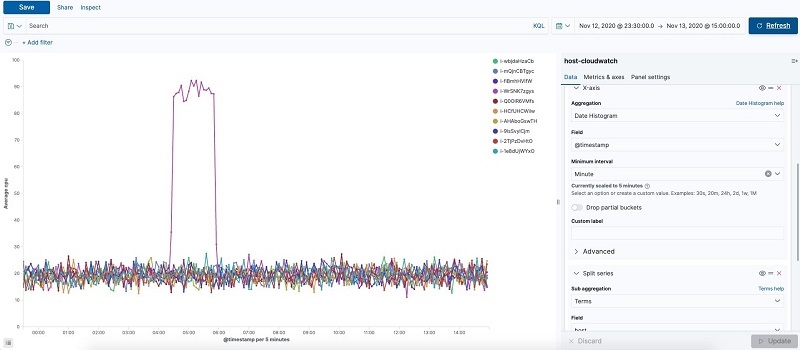
The time series of the host-cloudwatch index confirms host i-WrSNK7zgys has a CPU usage spike between 4:30–4:50.
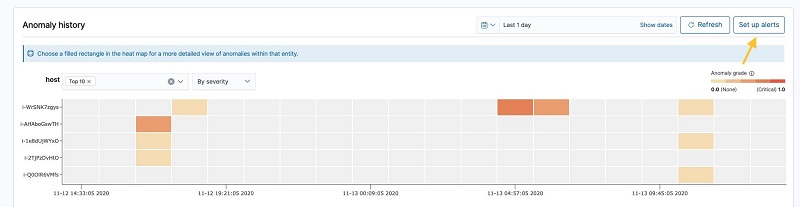
We can set up alerts for the detection results. For instructions, see Anomaly Detection.
Conclusion
General-purpose anomaly detection is challenging. Earlier in 2020, we launched a tool that can find anomalies in your feature queries. In this work, we extended the anomaly detection capabilities to the high-cardinality case. We can now find anomalies within your data when the data contains attribute or categorical fields. Our solution can discover anomalies across many entities defined by these attribute values and also scale with respect to increasing or decreasing number of entities in your data. We look forward to hearing your questions, comments, and feedback.
About the Authors
Kaituo Li is an engineer in Amazon Elasticsearch Service. He has worked on distributed systems, applied machine learning, monitoring, and database storage in Amazon. Before Amazon, Kaituo was a PhD student in Computer Science at the University of Massachusetts Amherst. He likes reading, watching TV, and sports.
 Chris Swierczewski is an applied scientist at AWS. He enjoys reading, weightlifting, painting, and board games.