Post Syndicated from Sapna Maheshwari original https://aws.amazon.com/blogs/big-data/new-charts-formatting-and-layout-options-in-amazon-quicksight/
Amazon QuickSight is a fast, cloud-powered business intelligence (BI) service that makes it easy to create and deliver insights to everyone in your organization. In this post, we explore how authors of QuickSight dashboards can use some of the new chart types, layout options, and dashboard formatting controls to deliver dashboards that intuitively deliver insights to all your users, whether within QuickSight or embedded in your websites or multi-tenant apps.
This blog post explores some of the visualization and dashboard customization features offered in Amazon QuickSight with the following datasets:
- Ads dataset for stacked area and funnel charts
- P&L dataset for waterfall charts
- Student Performance dataset for histograms and box plots
- Patient Info dataset for filled/choropleth maps
Picking the right chart for your use case
In this section, we explore some of the new charts QuickSight introduced in 2020 and how these help with various use cases.
Funnel charts
Funnel charts help visualize the progressive reduction of data as it passes from one phase to another. Data in each of these phases is represented as different portions of 100% (the whole). The most common use of the funnel chart is in visualizing conversion data. For example, you can represent sales lead generation showing different stages of sales conversion from first contact to lead generation.
To build a funnel chart with our Ads dataset, complete the following steps:
- On the analysis page, choose Visualize.
- Choose Add, then choose Add visual.
- In the Visual types pane, choose the funnel chart icon.
- For Group by, choose Stage.
- For Value, choose Ad name.
- To change default configuration, choose the gear icon.
- In the Data labels section, for Metric label style, choose Value and percent of first.

The video below demonstrates these steps.
Stacked area charts
Stacked area charts are best used to visualize part-to-whole relationships, to show how each category contributes to the cumulative total. For this post, we create a stacked area chart with the Ads dataset.
- On the analysis page, choose Visualize.
- Choose Add, then choose Add visual.
- In the Visual types pane, choose the stacked area chart icon.
- For X axis, choose Date (MONTH).
- For Value, choose Cost (Sum).
- For Color, choose Segment.
- Choose the gear icon.
- Under Legend, deselect Legend title.
- Under Y-Axis, select Show Y axis label.
- Under Data labels, select Show data labels.
- Choose your desired position, font size, font color, and label pattern.

Histograms
Histograms help visualize the frequency distribution of a dataset and display numerical data by grouping data into bins of equal width. Each bin is plotted as a bar whose height corresponds to the number of data points within the bin.
For this post, we use the Student Performance dataset to create a histogram.
- On the analysis page, choose Visualize.
- Choose Add, then choose Add visual.
- In the Visual types pane, choose the histogram icon.
- For Value, choose math score.
You can customize the histogram to show bins by bin count, bin width, or a custom start value. For this post, we sort by bin width.
- Under Histogram, select Bin width.
- For Bin width, enter 5.

Box plots
Box plot (also called box or whisker plot) is a standardized way of displaying distribution of data based on a five-number summary (minimum, first quartile (Q1), median, third quartile (Q3), and maximum). This is useful to determine if data is symmetrical, skewed, or tightly grouped. Box plots also show outliers.
For this post, we create a box plot on the Student Performance dataset.
- On the analysis page, choose Visualize.
- Choose Add, then choose Add visual.
- In the Visual types pane, choose the box plot icon.
- For Group by, choose Gender.
- For Value, choose writing score and reading score.
- In the visual settings, under Box plot, select Show outliers and Show all data points.
- Under Legend, deselect Show legend title.

Waterfall charts
Waterfall charts help you understand the cumulative effect of sequentially introduced positive or negative values. This is great to understand contributions to a whole, for example the main contributors to a monthly increase in revenue, or the breakdown of revenue vs costs.
We use the P&L dataset to create a waterfall chart.
- On the analysis page, choose Visualize.
- Choose Add, then choose Add visual.
- In the Visual selection pane, choose the waterfall chart icon.
- For Category, choose Line item.
- For Value¸ choose Value (Sum).
- Under Legend, deselect Show legend title.
- For Position, select Bottom.
- Under Title, deselect Show title.

Choropleth maps
Choropleth maps use differences in shading or coloring within geographical areas or regions to indicate the value of a variable in those areas
We use the Patient Info dataset to create a choropleth map.
- On the analysis page, choose Visualize.
- Choose Add, then choose Add visual.
- In the Visual types pane, choose the funnel chart icon.
- For Location, choose State.
- For Color, choose Revenue (Sum).
- Choose the menu options icon (…) and choose Conditional formatting.
- For Column, choose Revenue.
- For Fill type, select Gradient.
- For Max value, choose a color (for this post, we choose blue).

The video below demonstrates these steps.
You can also control the color and shading of the geographic areas using conditional formatting as shown below.

The video below demonstrates these steps.
Additionally, you can configure the alignment of column headers and content within. You can change the vertical alignment – top, middle, bottom and also the horizontal alignment – left, center and right.

Customization and formatting options
QuickSight also supports several formatting options that allow you to streamline visualizations and convey additional information in your dashboards.
Table/pivot table formatting
Pin or unpin and add custom text totals
You can now pin totals to the top or bottom of tables and pivot tables in QuickSight. This feature helps you view the totals even while scrolling through the tables.
- Go to visual setting (gear icon on the visual menu).
- Under Total, select Pin totals.
- For Position, choose a position (for this post, we choose Bottom).
Additionally, you can edit the text you want to show on totals and subtotals.
- For Total label, enter your custom text (for this post, we enter
Grand Total).

Table alignment and wrapping
You can now align horizontal (left, right, center, auto) and vertical (top, middle, bottom) alignment on column headers and cell values in a table visual. Additionally, you can apply text wrapping on table and pivot table headers so that long headers are readable versus having to scroll over the header.
These options are available under Table options.

Hide +/- buttons on pivot tables
You can now show or hide +/- buttons on pivot tables. This allows you to improve presentation of pivot tables by removing these icons and keeping the pivot table simple. This option is available under Styling.

Visual customization options
In this section, we discuss additional customization options in QuickSight.
Custom sorting
If you want to sort your charts in a custom defined order different from the default alphabetic order, you can now do so on QuickSight. For example, you can sort geographical regions in the order of East, West, Central, and South, by ranking these regions 1– 4 and then sorting on this rank field. See video below to learn how to.
You can also therefore sort using any other critical metric fields that aren’t part of the visual. Choose your field well and choose Sort options to see available sort order options.
You can also therefore sort on any other critical metric fields that aren’t part of the visual. Choose your field well and choose Sort options to see available sort order options.

The following screenshot shows your sorted visualizations.

Adding descriptive text, images, and links
You can add images or logos to your dashboard using QuickSight’s narrative component available in Enterprise Edition.
- On the analysis page, choose Visualize.
- Choose Add, then choose Add visual.
- In the Visual types pane, choose the insights icon.
- Choose Customize insight.
- Remove any existing text and add your custom text.
You can also add hyperlinks to text and images. Upload your image to a secure location where the image is accessible to QuickSight and your users.

The video below demonstrates these steps.
Customizing colors and fonts
QuickSight offers easy-to-build themes that allow customization of the color palette, background and foreground colors, spacing, fonts, and more. Themes can be created by authors and shared within an account, and are also accessible via APIs for programmatic management. Themes can also be defaulted for all users in the organization using APIs.

You can also prioritize the colors that you want to use in your dashboard by prioritizing them within your theme’s color palette.

You can apply predefined themes available out of the box or create your own themes that fit your corporate branding. The following screenshots show how a dashboard looks in both dark and light themes.


For more information, see Evolve your analytics with Amazon QuickSight’s new APIs and theming capabilities.
Null value customization
You may occasionally have null values in your data and want to represent nulls with different annotations. For each of the dimensions and metrics in the dataset, you can provide custom text for null values. Go to More formatting options for any field.

The option is available under Null values.

Reference lines
You can draw reference lines based on a calculated field or a constant value. Choose the gear icon and navigate to reference lines section. In the following screenshot, the orange reference line is based off a calculation (average profit) and the black reference line is plotted on a constant value of 1,000.

You can also link reference lines to parameters via a calculated field, which allows you to create what-if scenarios within your dashboard.
Custom colors on heat and tree maps
Color gradient customization on heat and tree maps allows you to select colors for lower, intermediate, and upper limits so that the gradient is applied within these colors. You can configure this under Color in the visual settings.

Using logarithmic scale
If your metric numbers aren’t in the same order of magnitude, where some are extremely on the higher end and others on the lower end (for example, representing stock price for different entities or pandemic spread rates), you can represent them on a logarithmic scale so they’re normalized, yet relative. To use logarithmic scale, go to visual setting and under Y-Axis, for Scale, select Logarithmic.

The following screenshot shows your visualization after applying logarithmic scale.

Adjustable font size
You can now apply different font sizes on all visual content and visuals titles. In pivot tables and tables, you can see font sizes for table headers, cells, totals, and subtotals. In key performance indicators (KPIs), you can set font sizes for primary and comparison values, which allows you to keep dashboards dense and add more KPIs.

Actions
Finally, to all these charts, you can apply the following actions:
- Filter actions– Select points on a chart to filter across the dashboard. QuickSight supports hierarchical filter actions that allow you to trigger one filter action from more than one chart. For more information, see Enhancing dashboard interactivity with Amazon QuickSight Actions.
- URL actions – Trigger navigation from the dashboard to an external website and pass dynamic values within a URL.

Layout enhancements
QuickSight dashboards default to auto-fit mode, which makes them responsive based on screen size. However, in many situations, it’s preferable that the view you design is exactly what end-users see, whether on a laptop or a large monitor. QuickSight offers optimized layouts that allow you to pick a specific screen resolution to optimize for (such as the screen size most of your users use on a daily basis), and QuickSight automatically scales the dashboard view to render appropriately on larger or smaller screens. This doesn’t affect mobile devices—QuickSight automatically optimizes for mobile devices using a single-column layout. To adjust the scaling mode, choose Settings in the navigation pane while in dashboard authoring (analysis) mode.
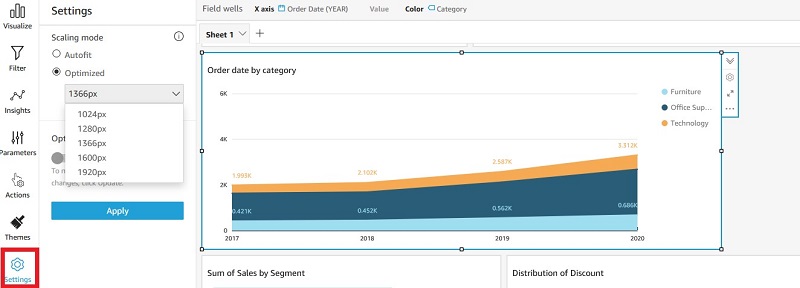
If you build your dashboard for a 1024 px screen, for example, QuickSight scales that view to a larger or smaller screen to ensure that all users see the same content (mobile devices continue to fall back to a single-column, mobile-specific layout to ensure usability). Opting for the optimized mode also makes sure that your email reports look exactly like the dashboard that your viewers interact with.
On-sheet filter controls
You can now add filters to your dashboard directly without having to create parameters. Choose the field that you need to filter on choose Add filter for this field. Choose the newly added filter and choose Add to sheet.

If you need to pin it to the controls section, choose the filter and choose Pin to top.

The video below demonstrates these steps.
Thus, QuickSight allows you to choose from any of these control types to add to dashboards – single-select drop-downs, multi-select drop-downs, date and time picker, single-sided slider, single-line text box, time range picker, relative date selection, and numeric range slider. Learn more about on-sheet controls from the blog post here.
Other launches in 2020
While this blog covers all key charting and visualization launches in 2020, you can take a look at all new features enabled across other areas within QuickSight from this blog post here.
Conclusion
With these new QuickSight feature releases, you can now choose the chart type that is best suited to represent your data. You can provide richer dashboards for your readers by using the new formatting table options, dynamic titles, and reference lines. For more information about authoring dashboards in QuickSight, watch the virtual workshop Build Advanced Analytics and Dashboards with Amazon QuickSight and consider subscribing to the Amazon QuickSight YouTube channel for the latest training and feature walkthroughs.
About the Author
 Sapna Maheshwari is a Specialist Solutions Architect for Amazon QuickSight. She is passionate about telling stories with data. In her previous roles at American Express and Early Warning services , she managed and led several projects in the data and analytics space.She enjoys helping customers unearth actionable insights from their data.