Post Syndicated from Jobin George original https://aws.amazon.com/blogs/big-data/embed-amazon-appflow-in-your-applications-using-apis/
Software as a service (SaaS) based applications are in demand today, and organizations have a growing need to adopt them in order to make data-driven decisions. As such SaaS adoption grows, extracting data from various SaaS applications and running analytics across them gets complicated. You have to rely on a set of third-party tools to extract the data from such SaaS providers and transform it to do analysis on it. The growing dependency on licensed third parties to provide data integration increases the overall cost of ownership and maintenance requirements in terms of skill and infrastructure.
In this post, you learn how to use Amazon AppFlow APIs to create data flows to extract data from SaaS providers in order to extend the connectivity of applications. This is particularly relevant for customer applications or individual software vendors (ISVs) who natively don’t have the connectivity capability.
Amazon AppFlow is a fully managed integration service that enables you to securely transfer data between SaaS and cloud applications like Salesforce, Marketo, Slack, and ServiceNow, as well as AWS services like Amazon Simple Storage Service (Amazon S3) and Amazon Redshift, in just a few clicks.
Solution overview
ISVs and customers can embed a data flow solution into their application using Amazon AppFlow APIs and ensure fast and secure data integration between SaaS solutions and supported targets for supporting end-user use cases.
Integrating Amazon AppFlow into your application has the following advantages:
- Seamless experience for end-users without having to toggle between multiple user interfaces (UIs)
- No need for building custom connectors to help end-users ingest data from popular SaaS providers
- No need to rely on expensive third-party tools, and you pay only for what you use
In this post, I walk you through some of the common steps to create a connection to a SaaS provider, create a data flow, and run the flow with API calls. I show how each step equates to steps in the Amazon AppFlow UI and how that can be embedded into your application’s UI to provide a seamless experience to your end-users.
You can embed Amazon AppFlow inside your application through two different methods:
- Create and run flows in Amazon AppFlow under the end-user’s AWS account and ingest data into targets owned by end-users
- Create and run flows in Amazon AppFlow under the ISV’s AWS account and ingest data into targets owned by end-users
Let’s look at those two approaches in detail.
Create and run Amazon AppFlow data flows in the end-user’s AWS account
In this scenario, the partner or ISV hosts an application (which doesn’t nessesarily have to run out of an AWS account) with a UI and needs to support data integration with third-party SaaS providers to bring data for downstream processing. The ISV can use Amazon Appflow APIs to provide features within their product or application that enable end-users to create flows to bring data directly from SaaS providers such as Salesforce, Slack, Google Analytics, and more into targets supported by Amazon AppFlow for downstream processing.
For example, let’s assume an ISV wants to provide extract, transform, and load (ETL) and ELT capabilities with Amazon Redshift as a supported target. The end-user needs to bring data from Salesforce and ServiceNow for analytics in Amazon Redshift, but for this use case, let’s assume that the ISV doesn’t have the functionality to connect to Salesforce or ServiceNow. To quickly provide this functionality, rather than building custom connectors, the ISV can simply use the Amazon AppFlow API, incorporate it in their UI, and provide a seamless experience to run data flows in the end-user’s AWS account and ingest data from Salesforce and ServiceNow into Amazon Redshift for downstream processing.
The following diagram illustrates the architecture of this solution.
The architecture shows how the ISV’s application is running on the ISV’s AWS account, and Amazon AppFlow is running on the end-user’s AWS account, extracting data from various sources and ingesting data into various targets supported. The API doesn’t have to be called from another AWS account. Later in this post, we provide the authentication mechanism as an example and discuss it based on the assumption that the end-user-facing application runs on AWS.
In this approach, because Amazon AppFlow is running inside the end-user’s AWS account, you need an AWS Identity and Access Management (IAM) role that has permission to list, create, and run the flow and connectors, and cross-account access to the ISV’s AWS account so the ISV can assume that role and control Amazon AppFlow.
Create and run Amazon AppFlow data flows in the ISV’s AWS account
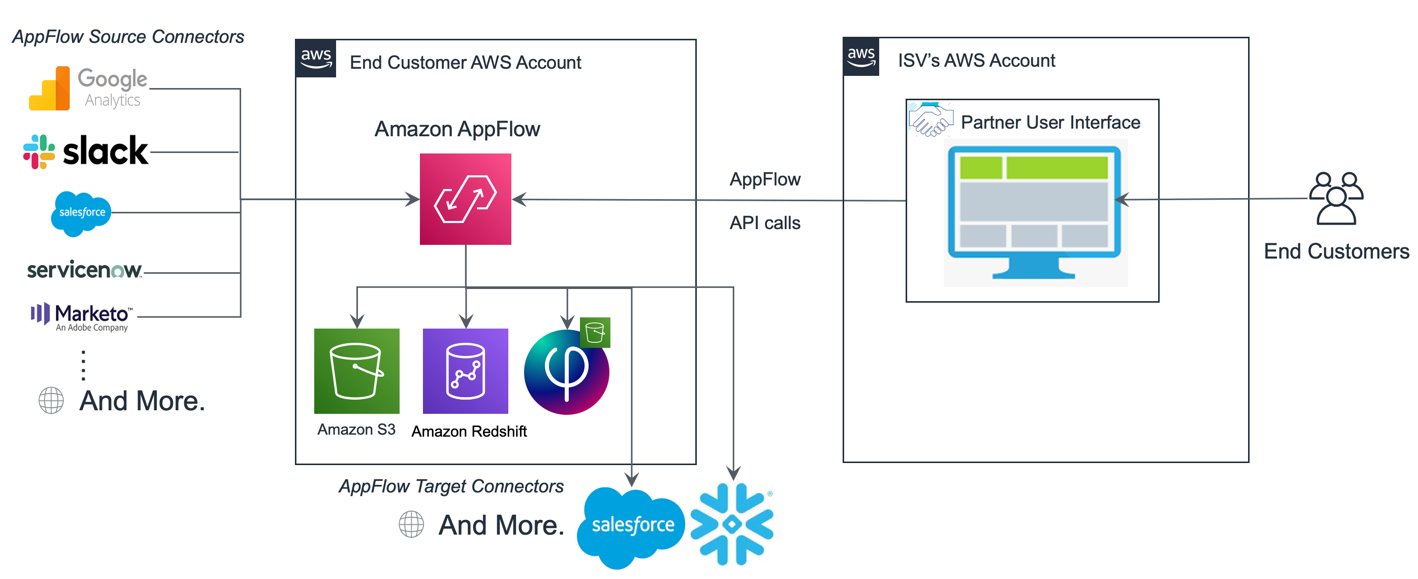
In this scenario, the partner or ISV hosts a application running on AWS with a UI in which they want to support data integration with third-party SaaS providers to bring data for downstream processing. The ISV can use Amazon Appflow APIs to provide functionality within their product and application that enables end-users to create flows to bring data directly from SaaS providers such as Salesforce, Slack, Google Analytics, and more into targets supported by Amazon AppFlow for downstream processing.
For example, let’s assume an ISV provides an analytics capability on data in Amazon Redshift. The end-user needs to bring data from Salesforce and ServiceNow for analytics into Amazon Redshift, but the ISV doesn’t have the functionality to connect to Salesforce or ServiceNow. To quickly provide this functionality, rather than building custom connectors to fulfill the customer requirement, the ISV can simply use the Amazon AppFlow API, incorporate it in their UI, and provide a seamless experience to run data flows in the ISV’s AWS account and ingest data from Salesforce and ServiceNow into the end-user’s Amazon Redshift cluster for downstream analytics processing.
The following diagram illustrates this architecture.

The architecture shows how the ISV’s application is running, as well as how the Amazon AppFlow data flows are run out of the ISV’s AWS account. The access to authenticate and save extracted data into customer-owned data destinations needs to be provided to the ISV in this case. This can be done by creating cross-account roles or similar mechanisms, except for Amazon S3. Amazon AppFlow doesn’t support cross-account access to S3 buckets, in order to prevent unauthorized access.
Create an Amazon AppFlow data flow using an API
Now let’s look at a few basic steps to create and run an Amazon AppFlow data flow using an API. We also discuss how to implement those steps within an application’s UI and what it looks like when configuring the flow on the Amazon AppFlow console directly. Let’s focus on the first design we discussed, in which the ISV runs Amazon AppFlow data flows in the end-user’s AWS account.
Set up a cross-account role for Amazon AppFlow access
Before we begin, if the ISV implementing this solution is using an AWS account to run the application, we recommend setting up cross-account roles to gain access to create and run Amazon AppFlow data flows. For more information, see IAM tutorial: Delegate access across AWS accounts using IAM roles.
In this scenario, the ISV assumes the role using AWS Security Token Service (AWS STS) to create resources and control the Amazon AppFlow lifecycle. You can use the following Python code to assume roles in another account after it’s created. This function just needs the role ARN to be passed; the role has necessary permissions to manage Amazon AppFlow.
Confirm that Amazon AppFlow has permission to use Amazon S3 as the target
As a next step, let’s make sure Amazon AppFlow has the proper access to the S3 bucket used as the target. Your S3 buckets must be in the same AWS Region as your Amazon AppFlow data flow. Amazon AppFlow doesn’t support cross-account access to S3 buckets, in order to prevent unauthorized access.
Complete the following steps to add a bucket policy and make sure it’s attached to the S3 bucket that you’re using as a target. In the example code, we use the bucket name appflow-sfdata:
Provide a list of connector types available before creating a connection
After the cross-account role is assumed and the application has permission to create and manage Amazon AppFlow data flows, navigate to a page where you can list and select the type of connectors vended by Amazon AppFlow. You could also skip this step and create connections as part of the create flow step, which gives you the option to set up connections from the same page. But providing the selection option lets you manage connections effectively.
You can use the following code snippet to list the connectors available in Amazon AppFlow. Let’s assume that the IAM role we’re assuming belongs to user account 999999999999 and is named appflow-remote-role.
The following screenshot shows the response to this step; you can display those options for users to choose from.

The following screenshot shows how this part is implemented on the Amazon AppFlow console.

Create an Amazon AppFlow connection
Now it’s time to create a connection in Amazon AppFlow using the API. After the connector types are listed, you can provide a page with text boxes that accept credentials required for that specific connector type.
Let’s see how to create a Salesforce connector. If you want to test it out, make sure you have created a global connected app in Salesforce. Make sure you have the consumer key and consumer secret for your application and the InstanceURL value for your Salesforce instance. We use that later in the configuration.
We recommend using Amazon AppFlow to manage and refresh the credentials you need to establish connectivity because after initial credentials are stored in AWS Secrets Manager by Amazon AppFlow, it automatically takes care of refreshing accessToken. For that, you have to implement the OAuth 2.0 web server flow by authenticating with code grant type. After it’s authenticated, store the clientId and clientSecret into Secrets Manager and pass its ARN as well as the accessToken and refreshToken values you received while creating the flow using the Amazon AppFlow API. After Amazon AppFlow has this information, it automatically takes care of refreshing the credentials and provides uninterrupted connectivity while your flow is running. See the following code snippet:
To make the customer experience better, this should be wrapped within a UI to capture the required input parameters for the connection being created. For more information about setting up permissions between services, see Connection instructions.
If you’re not using the Amazon AppFlow capability to refresh the credentials, make sure you have a logic to keep the accessToken refreshed to have uninterrupted connectivity to Salesforce while using this connection in a scheduled flow. Ideally, you should have a UI that accepts all these parameters from the customer, stores it in Secrets Manager, and passes it into the API code.
The following sample code grants type password and manages refreshing the connection’s accessToken before you run the flow each time. For more information about how it works, see OAuth 2.0 Username-Password Flow for Special Scenarios. In case of a scheduled flow, the Amazon AppFlow system triggers it, so you don’t have an opportunity to pass a new accessToken after the flow is up and running. However, you could invoke update_connector_profile() at regular intervals to make sure the flows can run without interruption by updating the connection’s accessToken. For more information about creating security tokens, client IDs, and secrets, see Getting the Security Token for Your Salesforce Account and Generating a Client ID and Client Secret Key for Salesforce Connections.
After you create the connection, Amazon AppFlow validates the connection details you provide. If an exception occurs, it returns the same and doesn’t create the connection. The Amazon AppFlow create_connector_profile() API sends a response back with the ARN for the connector profile just created.
Create an Amazon AppFlow data flow
You can create a connection as part of the create flow UI, similar to how the Amazon AppFlow UI does it, but for this post I walk you through each step. To create a flow, you may need to call multiple APIs to list the connections of a particular type, list the entities specific to that connector, and even describe the fields specific to an entity.
Let’s walk through how to do that, in order to provide a great experience for the end-users of your application. Our flow collects data from an account object in Salesforce (the fields Id, Name, and CreatedDate) and stores it in a specific S3 bucket. You can use the following Python code to call the create_flow() API in Amazon AppFlow:
You receive the following response:
To create the flow, we need to give dynamic inputs.
For ease of creating flows, users should be able to list the connection type available for both source and target. The line of code from earlier has Salesforce as a source and Amazon S3 as a target hard-coded, but we should make it dynamic and easy for customers using other API methods.
describe_connectors() helps you describe the connectors vended by Amazon AppFlow for specified connector types. If you don’t specify a connector type, this operation describes all the connectors vended by Amazon AppFlow. Also, describe_connector_profiles()returns details of connector profiles created and available already. You can use these to list types of connectors similar to what Amazon AppFlow does in its UI (see the following screenshot).
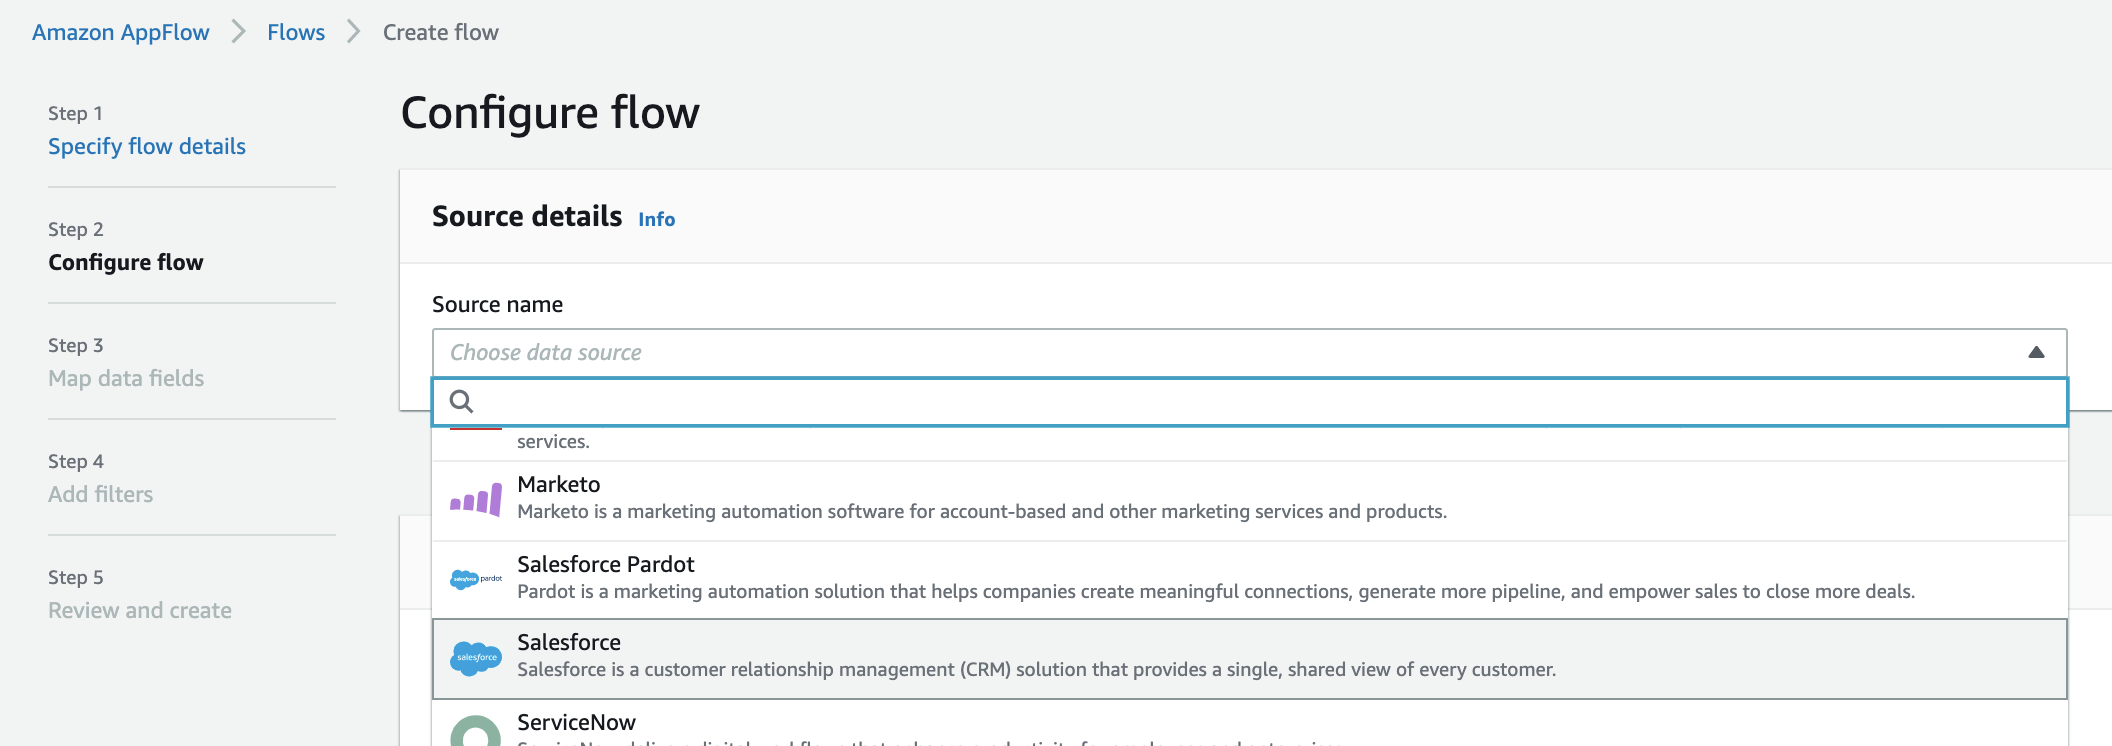
In the preceding flow for the target, you can simply list S3 buckets that are available.
Start, stop, and delete an Amazon AppFlow data flow
After you create the Amazon AppFlow data flow, you can use the start_flow() API to start the flow. To do so, simply pass the flowName:
To stop the flow, invoke stop_flow(), which deactivates the existing flow. For on-demand flows, like the one we created earlier, this operation returns an unsupportedOperationException error message. For scheduled and event-triggered flows, the following operation deactivates the flow:
You need to invoke delete_flow(), which enables your application to delete an existing flow. Before deleting the flow, Amazon AppFlow validates the request by checking the flow configuration and status. You can delete flows one at a time. See the following code:
You can also update your connection and flow with update_connector_profile() and update_flow().
With these APIs, you can use Amazon AppFlow to build delightful experiences for your customers by extending connectivity to multiple SaaS applications.
Conclusion
In this post, you learned about using Amazon AppFlow APIs to create an experience in your application to connect and extract data from SaaS providers by running it either in your AWS account or the end-user’s account, depending on how you want to implement the solution. This approach helps you no longer depend on third-party connector providers to extract data from SaaS providers, and therefore reduces the overall cost and complications of developing your application. The sample Python API code is available on GitHub. For additional details, refer to the Amazon AppFlow Boto3 API documentation or the Amazon AppFlow API Reference.
About the Author
 Jobin George is a Big Data Solutions Architect with more than a decade of experience with designing and implementing large scale Big Data and Analytics solutions. He provides technical guidance, design advice and thought leadership to some of the key AWS customers and Big Data partners.
 Vinay Kondapi is Head of Product for Amazon AppFlow. He specializes in application and data integration, scaling strategy for connectivity between SaaS products and AWS