Post Syndicated from Dr. Yannick Misteli original https://aws.amazon.com/blogs/big-data/build-a-modern-data-architecture-on-aws-with-amazon-appflow-aws-lake-formation-and-amazon-redshift/
This is a guest post written by Dr. Yannick Misteli, lead cloud platform and ML engineering in global product strategy (GPS) at Roche.
Recently the Roche Data Insights (RDI) initiative was launched to achieve our vision using new ways of working and collaboration in order to build shared, interoperable data & insights with federated governance. Furthermore, a simplified & integrated data landscape shall be established in order to empower insights communities. One of the first domains to engage in this program is the Go-to-Market (GTM) area which comprises sales, marketing, medical access and market affairs in Roche. GTM domain enables Roche to understand customers and to ultimately create and deliver valuable services that meet their needs. GTM as a domain extends beyond health care professionals (HCPs) to a larger healthcare ecosystem consisting of patients, communities, health authorities, payers, providers, academia, competitors, so on and so forth. Therefore, Data & Analytics are key in supporting the internal and external stakeholders in their decision-making processes through actionable insights.
Roche GTM built a modern data and machine learning (ML) platform on AWS while utilizing DevOps best practices. The mantra of everything as code (EaC) was key in building a fully automated, scalable data lake and data warehouse on AWS.
In this this post, you learn about how Roche used AWS products and services such as Amazon AppFlow, AWS Lake Formation, and Amazon Redshift to provision and populate their data lake; how they sourced, transformed, and loaded data into the data warehouse; and how they realized best practices in security and access control.
In the following sections, you dive deep into the scalable, secure, and automated modern data platform that Roche has built. We demonstrate how to automate data ingestion, security standards, and utilize DevOps best practices to ease management of your modern data platform on AWS.
Data platform architecture
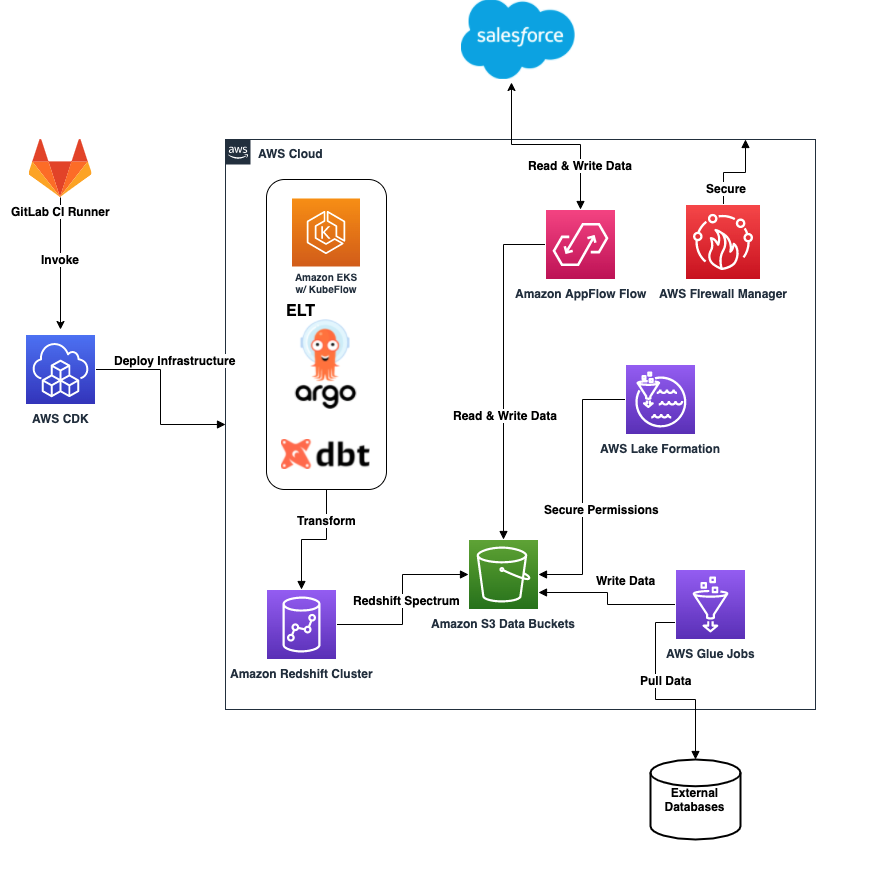
The following diagram illustrates the data platform architecture.

The architecture contains the following components:
Lake Formation security
We use Lake Formation to secure all data as it lands in the data lake. Separating each data lake layer into distinct S3 buckets and prefixes enables fine-grained access control policies that Lake Formation implements. This concept also extends to locking down access to specific rows and columns and applying policies to specific IAM roles and users. Governance and access to data lake resources is difficult to manage, but Lake Formation simplifies this process for administrators.
To secure access to the data lake using Lake Formation, the following steps are automated using the AWS CDK with customized constructs:
- Register the S3 data buckets and prefixes, and corresponding AWS Glue databases with Lake Formation.
- Add data lake administrators (GitLab runner IAM deployment role and administrator IAM role).
- Grant the AWS Glue job IAM roles access to the specific AWS Glue databases.
- Grant the AWS Lambda IAM role access to the Amazon AppFlow databases.
- Grant the listed IAM roles access to the corresponding tables in the AWS Glue databases.
AWS Glue Data Catalog
The AWS Glue Data Catalog is the centralized registration and access point for all databases and tables that are created in both the data lake and in Amazon Redshift. This provides centralized transparency to all resources along with their schemas and the location of all data that is referenced. This is a critical aspect for any data operations performed within the lake house platform.
Data sourcing and ingestion
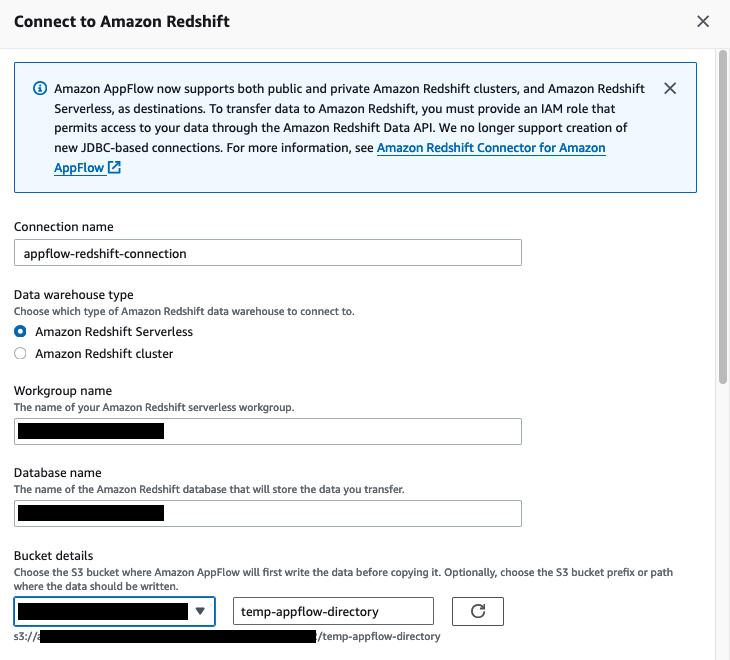
Data is sourced and loaded into the data lake through the use of AWS Glue jobs and Amazon AppFlow. The ingested data is made available in the Amazon Redshift data warehouse through Amazon Redshift Spectrum using external schemas and tables. The process of creating the external schemas and linking it to the Data Catalog is outlined later in this post.
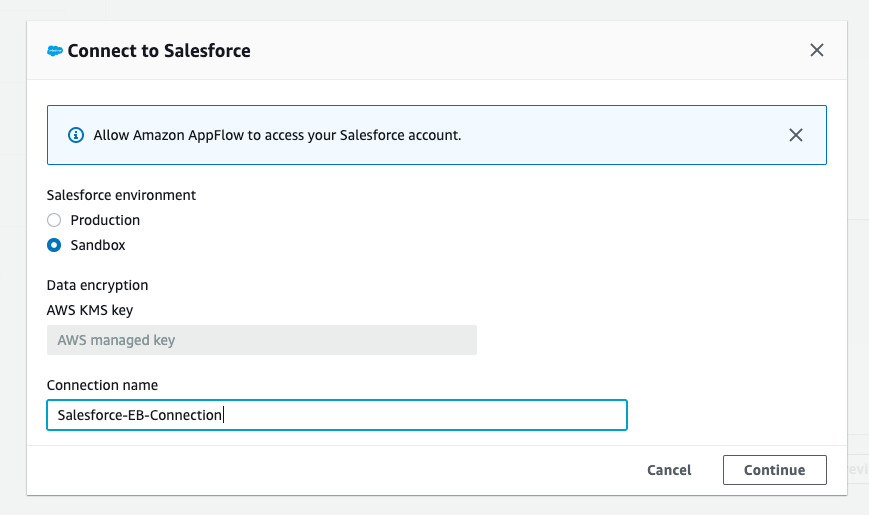
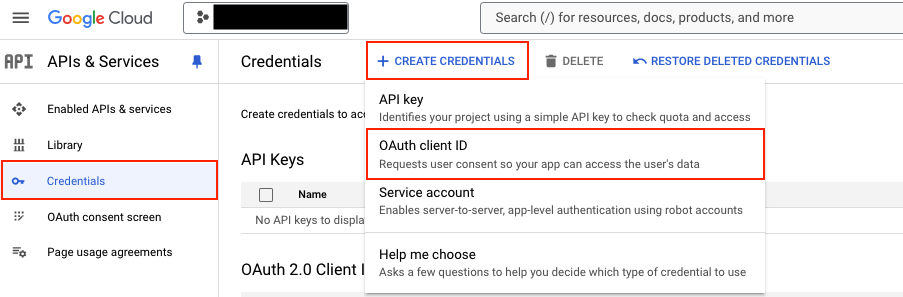
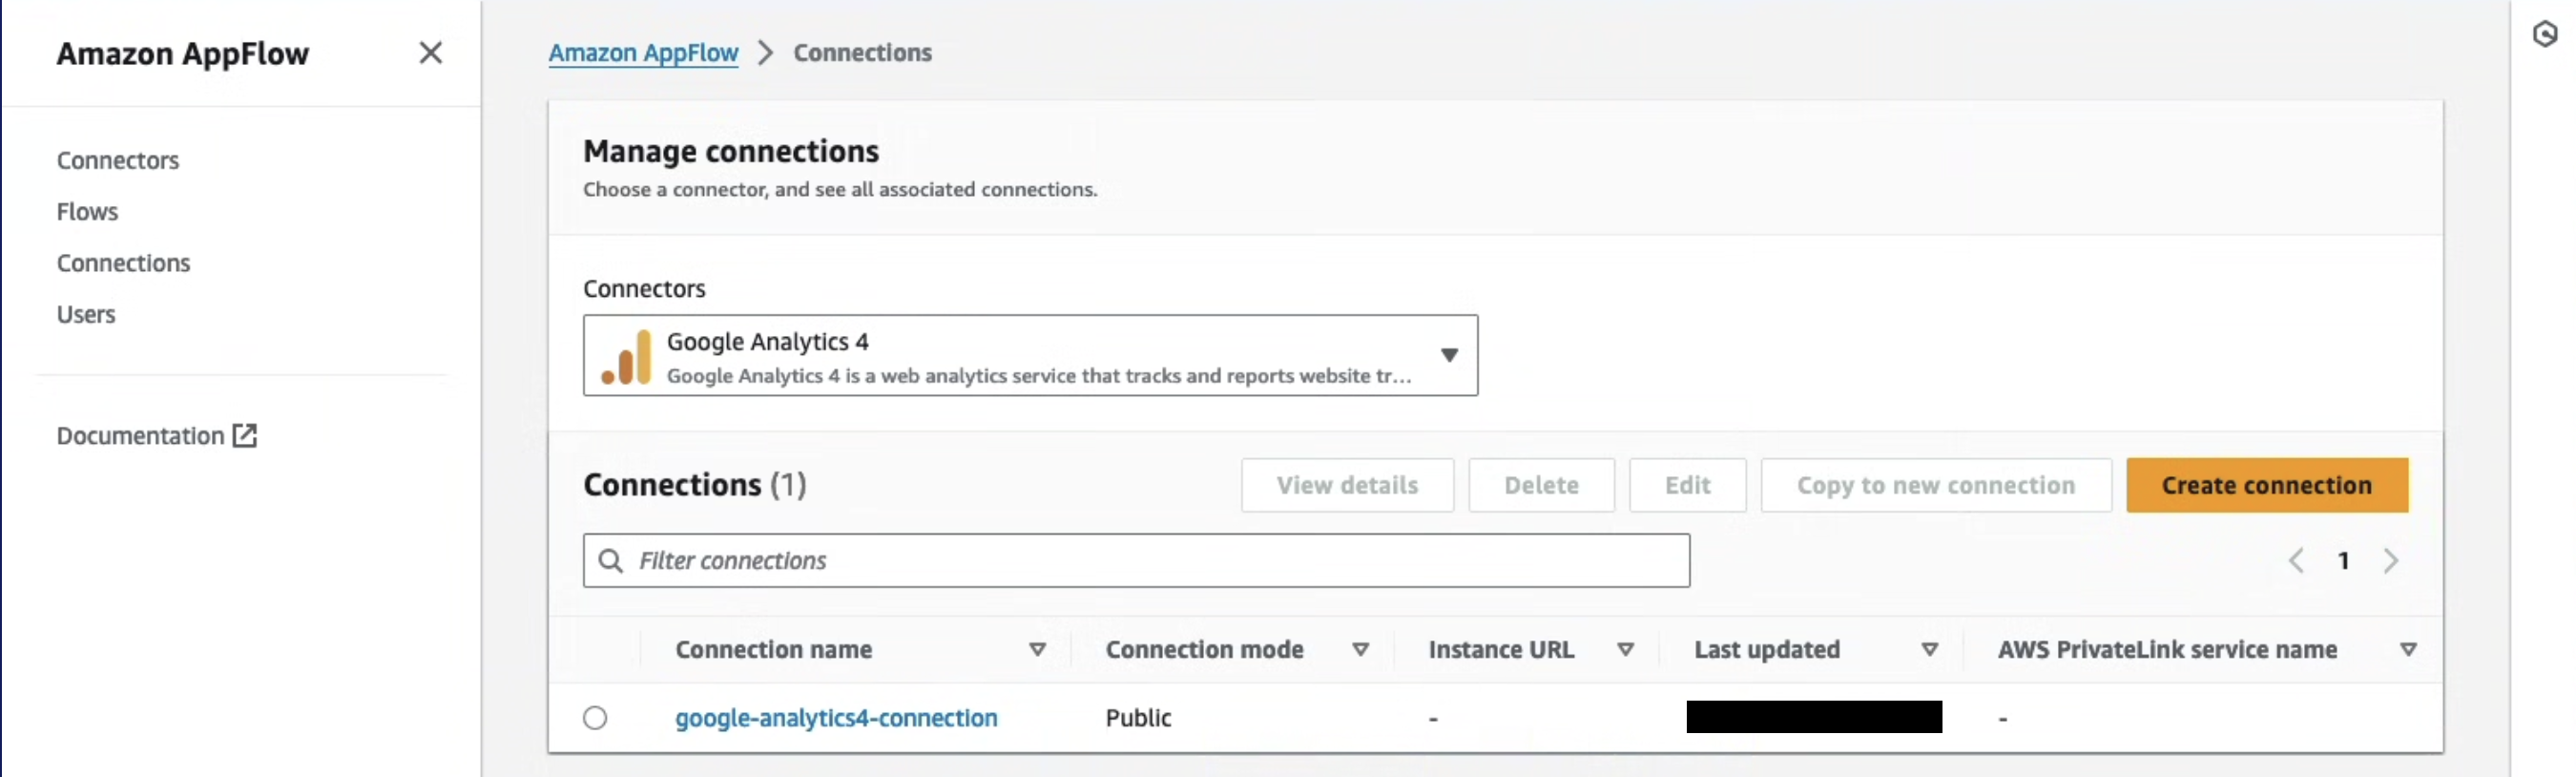
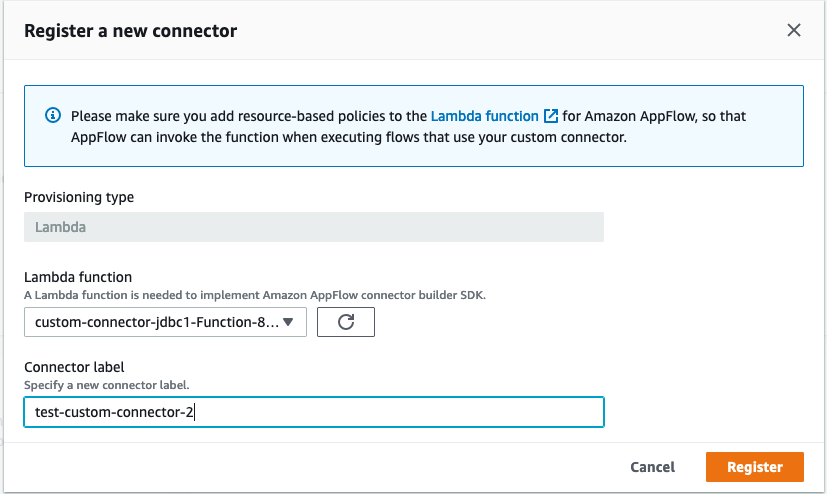
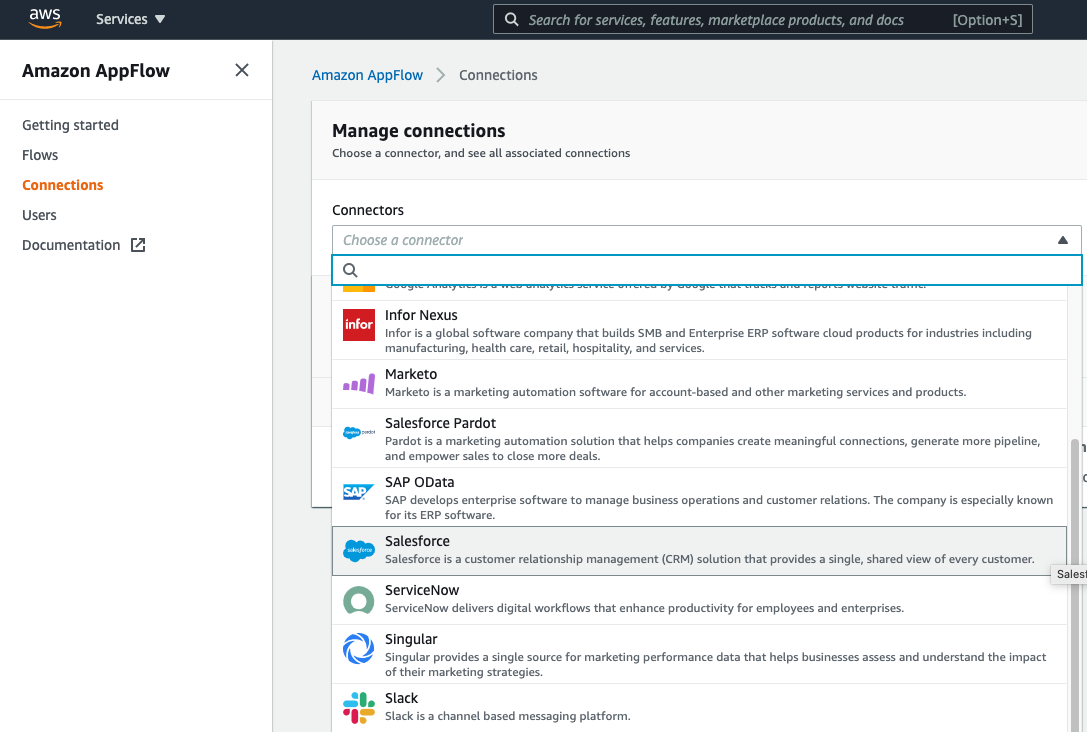
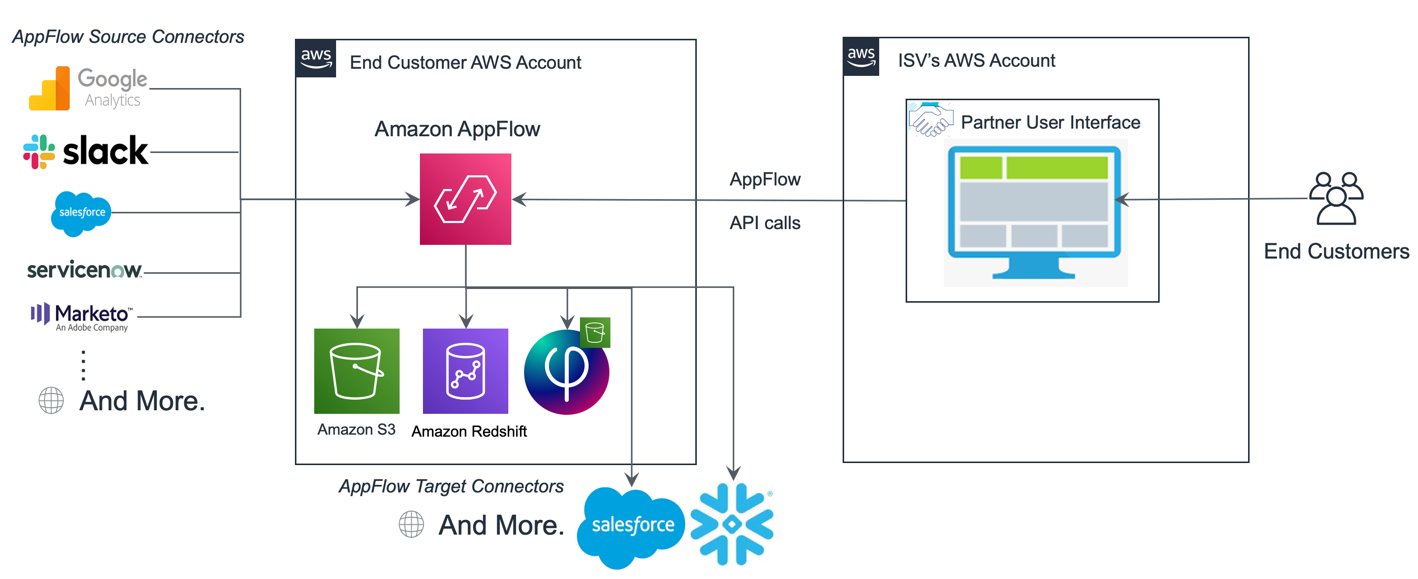
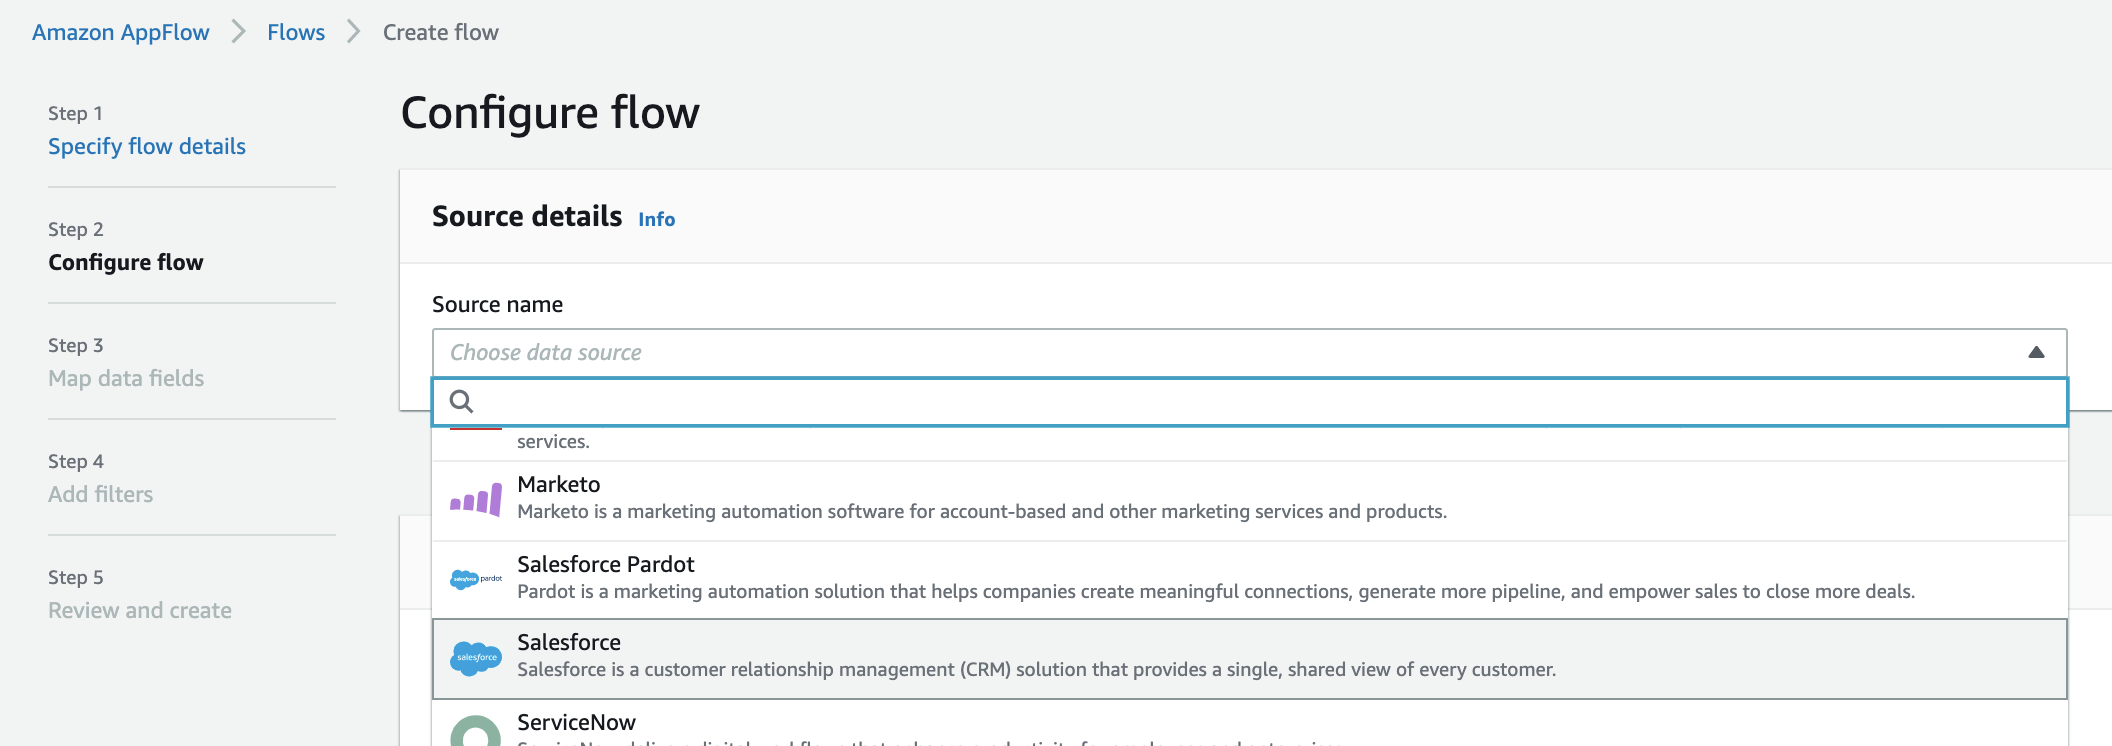
Amazon AppFlow Salesforce ingestion
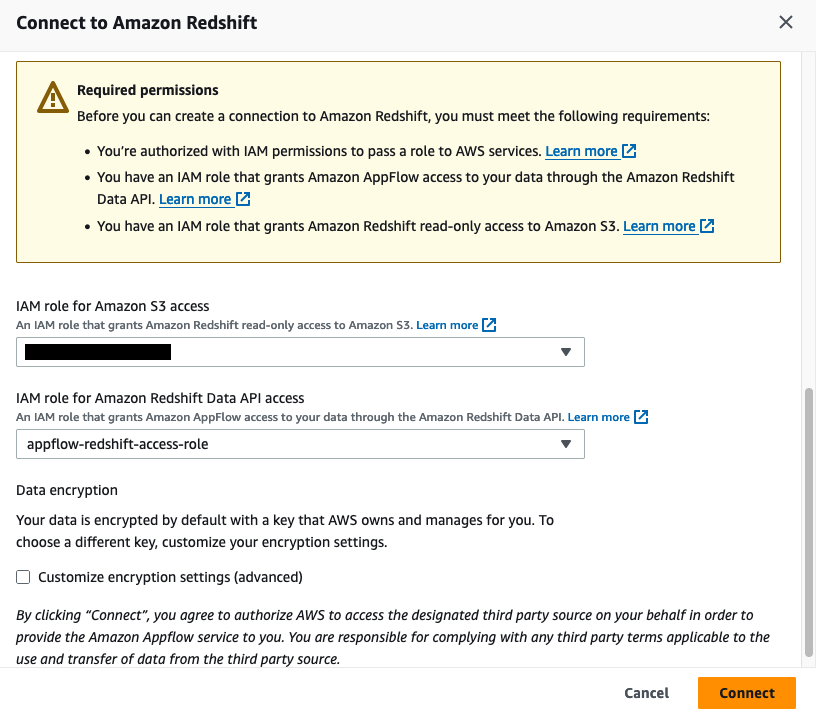
Amazon AppFlow is a fully-managed integration service that allows you to pull data from sources such as Salesforce, SAP, and Zendesk. Roche integrates with Salesforce to load Salesforce objects securely into their data lake without needing to write any custom code. Roche also pushes ML results back to Salesforce using Amazon AppFlow to facilitate the process.
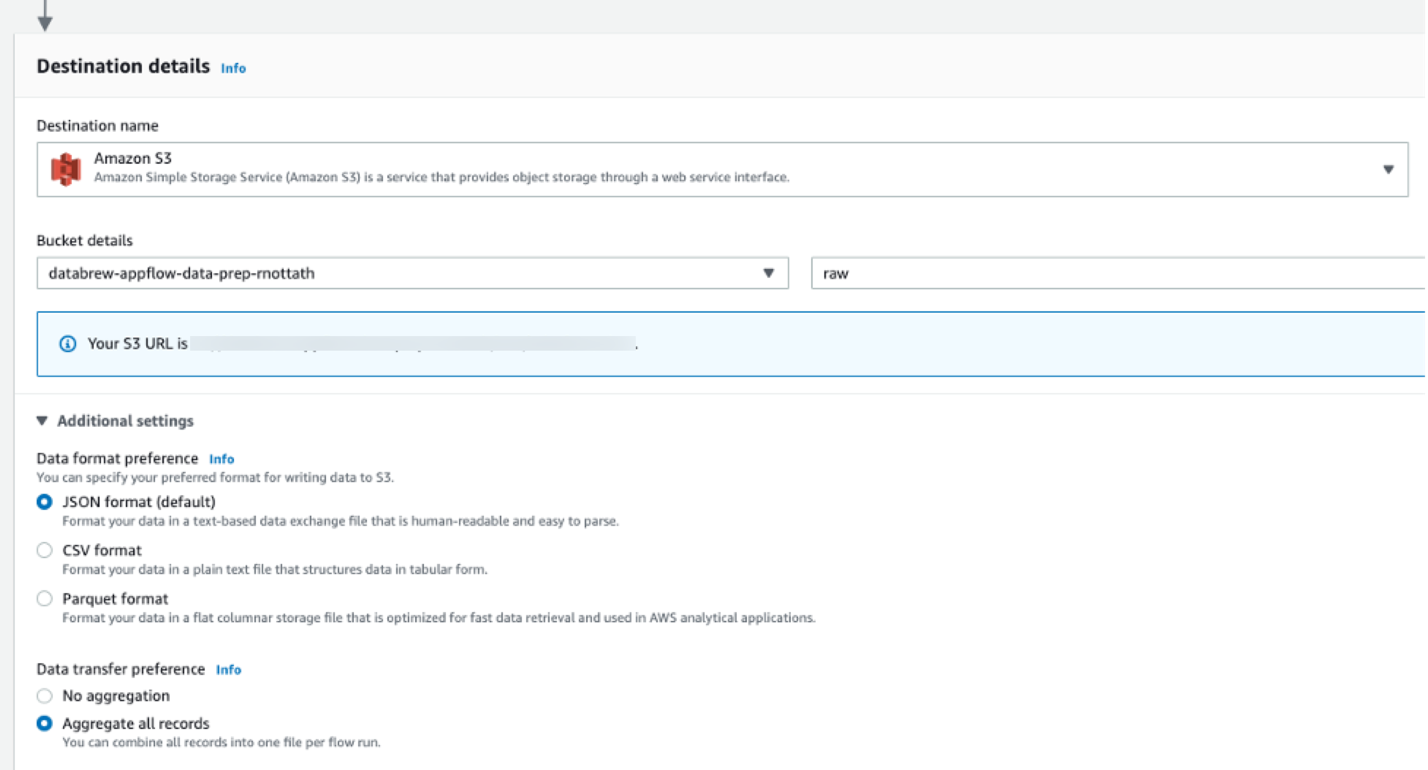
Salesforce objects are first fully loaded into Amazon S3 and then are flipped to a daily incremental load to capture deltas. The data lands in the raw zone bucket in Parquet format using the date as a partition. The Amazon AppFlow flows are created through the use of a YAML configuration file (see the following code). This configuration is consumed by the AWS CDK deployment to create the corresponding flows.
appflow:
  flow_classes:
    salesforce:
      source: salesforce
      destination: s3
      incremental_load: 1
      schedule_expression: "rate(1 day)"
      s3_prefix: na
      connector_profile: roche-salesforce-connector-profile1,roche-salesforce-connector-profile2
      description: appflow flow flow from Salesforce
      environment: all
  - name: Account
    incremental_load: 1
    bookmark_col: appflow_date_str
  - name: CustomSalesforceObject
    pii: 0
    bookmark_col: appflow_date_str
    upsert_field_list: upsertField
    s3_prefix: prefix
    source: s3
    destination: salesforce
    schedule_expression: na
    connector_profile: roche-salesforce-connector-profile
The YAML configuration makes it easy to select whether data should be loaded from an S3 bucket back to Salesforce or from Salesforce to an S3 bucket. This configuration is subsequently read by the AWS CDK app and corresponding stacks to translate into Amazon AppFlow flows.
The following options are specified in the preceding YAML configuration file:
- source – The location to pull data from (Amazon S3, Salesforce)
- destination – The destination to put data to (Amazon S3, Salesforce)
- object_name – The name of the Salesforce object to interact with
- incremental_load – A Boolean specifying if the load should be incremental or full (0 means full, 1 means incremental)
- schedule_expression – The cron or rate expression to run the flow (
na makes it on demand)
- s3_prefix – The prefix to push or pull the data from in the S3 bucket
- connector_profile – The Amazon AppFlow connector profile name to use when connecting to Salesforce (can be a CSV list)
- environment – The environment to deploy this Amazon AppFlow flow to (
all means deploy to dev and prod, dev means development environment, prod means production environment)
- upsert_field_list – The set of Salesforce object fields (can be a CSV list) to use when performing an upsert operation back to Salesforce (only applicable when loaded data back from an S3 bucket back to Salesforce)
- bookmark_col – The name of the column to use in the Data Catalog for registering the daily load date string partition
Register Salesforce objects to the Data Catalog
Complete the following steps to register data loaded into the data lake with the Data Catalog and link it to Amazon Redshift:
- Gather Salesforce object fields and corresponding data types.
- Create a corresponding AWS Glue database in the Data Catalog.
- Run a query against Amazon Redshift to create an external schema that links to the AWS Glue database.
- Create tables and partitions in the AWS Glue database and tables.
Data is accessible via the Data Catalog and the Amazon Redshift cluster.
Amazon AppFlow dynamic field gathering
To construct the schema of the loaded Salesforce object in the data lake, you invoke the following Python function. The code utilizes an Amazon AppFlow client from Boto3 to dynamically gather the Salesforce object fields to construct the Salesforce object’s schema.
import boto3

client = boto3.client('appflow')

def get_salesforce_object_fields(object_name: str, connector_profile: str):
    """
    Gathers the Salesforce object and its corresponding fields.

    Parameters:
        salesforce_object_name (str) = the name of the Salesforce object to consume.
        appflow_connector_profile (str) = the name of AppFlow Connector Profile.

    Returns:
        object_schema_list (list) =  a list of the object's fields and datatype (a list of dictionaries).
    """
    print("Gathering Object Fields")

    object_fields = []

    response = client.describe_connector_entity(
        connectorProfileName=connector_profile,
        connectorEntityName=object_name,
        connectorType='Salesforce'
    )

    for obj in response['connectorEntityFields']:
        object_fields.append(
            {'field': obj['identifier'], 'data_type': obj['supportedFieldTypeDetails']['v1']['fieldType']})

    return object_fields
We use the function for both the creation of the Amazon AppFlow flow via the AWS CDK deployment and for creating the corresponding table in the Data Catalog in the appropriate AWS Glue database.
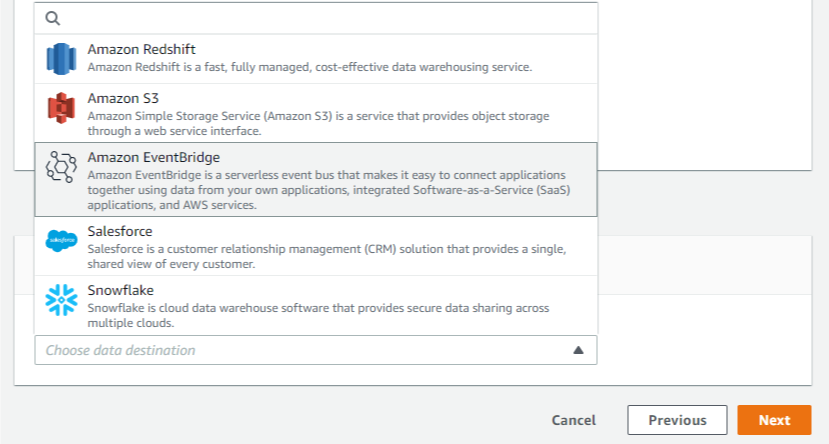
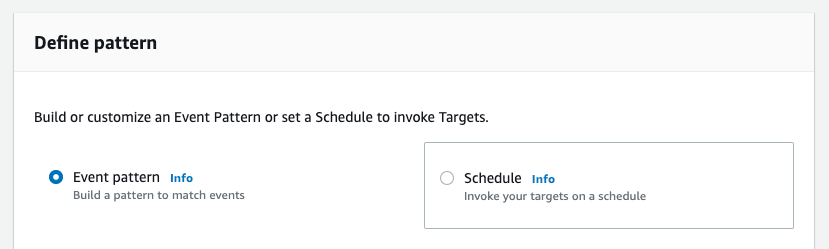
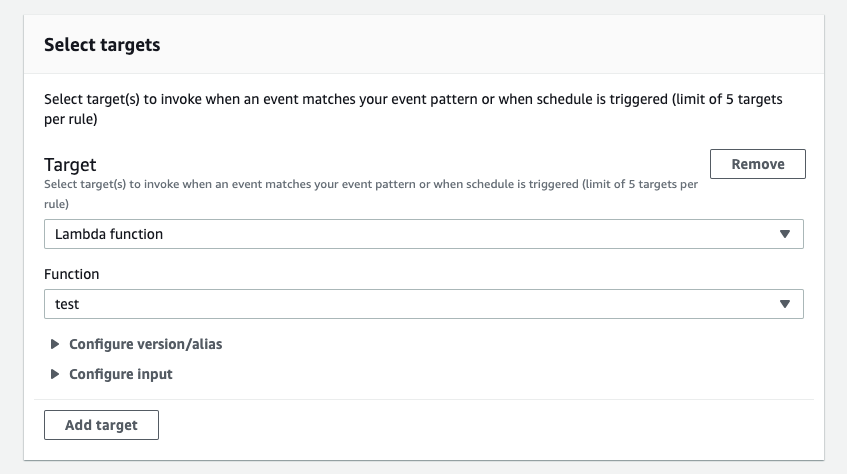
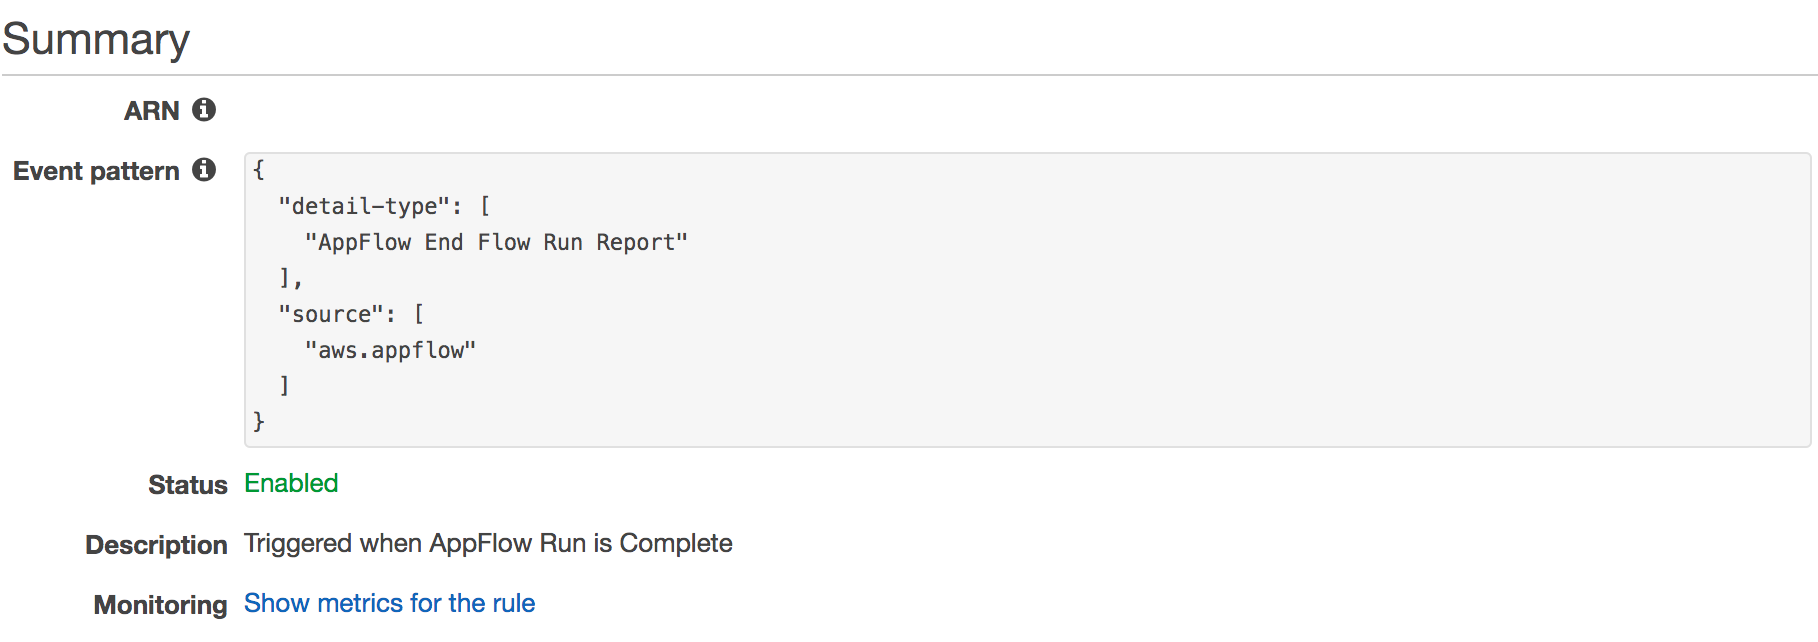
Create an Amazon CloudWatch Events rule, AWS Glue table, and partition
To add new tables (one per Salesforce object loaded into Amazon S3) and partitions into the Data Catalog automatically, you create an Amazon CloudWatch Events rule. This function enables you to query the data in both AWS Glue and Amazon Redshift.
After the Amazon AppFlow flow is complete, it invokes a CloudWatch Events rule and a corresponding Lambda function to either create a new table in AWS Glue or add a new partition with the corresponding date string for the current day. The CloudWatch Events rule looks like the following screenshot.

The invoked Lambda function uses the Amazon SageMaker Data Wrangler Python package to interact with the Data Catalog. Using the preceding function definition, the object fields and their data types are accessible to pass to the following function call:
import awswrangler as wr

def create_external_parquet_table(
    database_name: str,
    table_name: str,
    s3_path: str,
    columns_map: dict,
    partition_map: dict
):
    """
    Creates a new external table in Parquet format.

    Parameters:
        database_name (str) = the name of the database to create the table in.
        table_name (str) = the name of the table to create.
        s3_path (str) = the S3 path to the data set.
        columns_map (dict) = a dictionary object containing the details of the columns and their data types from appflow_utility.get_salesforce_object_fields
        partition_map (dict) = a map of the paritions for the parquet table as {'column_name': 'column_type'}

    Returns:
        table_metadata (dict) = metadata about the table that was created.
    """

    column_type_map = {}

    for field in columns_map:
        column_type_map[field['name']] = field['type']

    return wr.catalog.create_parquet_table(
        database=database_name,
        table=table_name,
        path=s3_path,
        columns_types=column_type_map,
        partitions_types=partition_map,
        description=f"AppFlow ingestion table for {table_name} object"
    )
If the table already exists, the Lambda function creates a new partition to account for the date in which the flow completed (if it doesn’t already exist):
import awswrangler as wr

def create_parquet_table_date_partition(
    database_name: str,
    table_name: str,
    s3_path: str,
    year: str,
    month: str,
    day: str
):
    """
    Creates a new partition by the date (YYYY-MM-DD) on an existing parquet table.

    Parameters:
        database_name (str) = the name of the database to create the table in.
        table_name (str) = the name of the table to create.
        s3_path (str) = the S3 path to the data set.
        year(str) = the current year for the partition (YYYY format).
        month (str) = the current month for the partition (MM format).
        day (str) = the current day for the partition (DD format).

    Returns:
        table_metadata (dict) = metadata about the table that has a new partition
    """

    date_str = f"{year}{month}{day}"

    return wr.catalog.add_parquet_partitions(
        database=database_name,
        table=table_name,
        partitions_values={
            f"{s3_path}/{year}/{month}/{day}": [date_str]
        }
    )

def table_exists(
    database_name: str,
    table_name: str
):
    """
    Checks if a table exists in the Glue catalog.

    Parameters:
        database_name (str) = the name of the Glue Database where the table should be.
        table_name (str) = the name of the table.

    Returns:
        exists (bool) = returns True if the table exists and False if it does not exist.
    """

    try:
        wr.catalog.table(database=database_name, table=table_name)
        return True
    except ClientError as e:
        return False
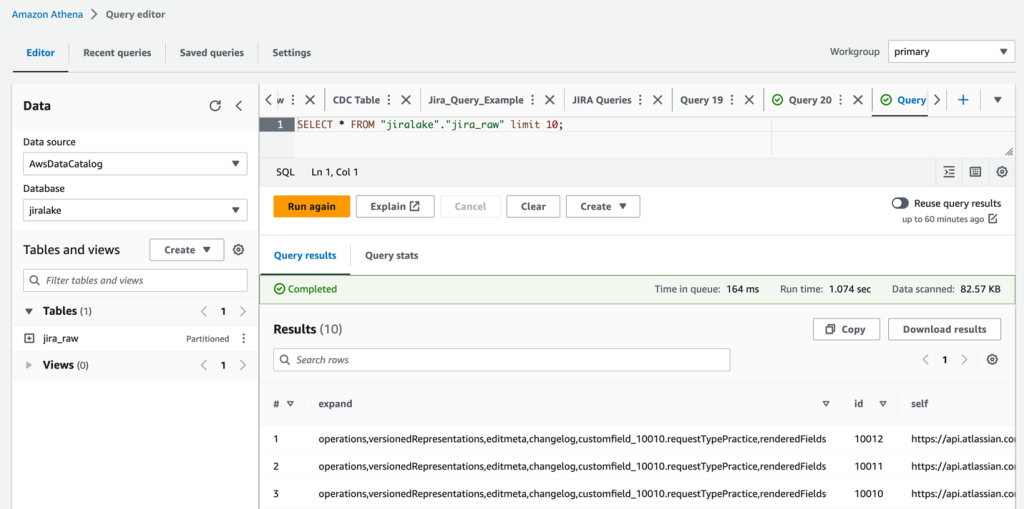
Amazon Redshift external schema query
An AWS Glue database is created for each Amazon AppFlow connector profile that is present in the preceding configuration. The objects that are loaded from Salesforce into Amazon S3 are registered as tables in the Data Catalog under the corresponding database. To link the database in the Data Catalog with an external Amazon Redshift schema, run the following query:
CREATE EXTERNAL SCHEMA ${connector_profile_name}_ext from data catalog
database '${appflow_connector_profile_name}'
iam_role 'arn:aws:iam::${AWS_ACCOUNT_ID}:role/RedshiftSpectrumRole'
region 'eu-west-1';
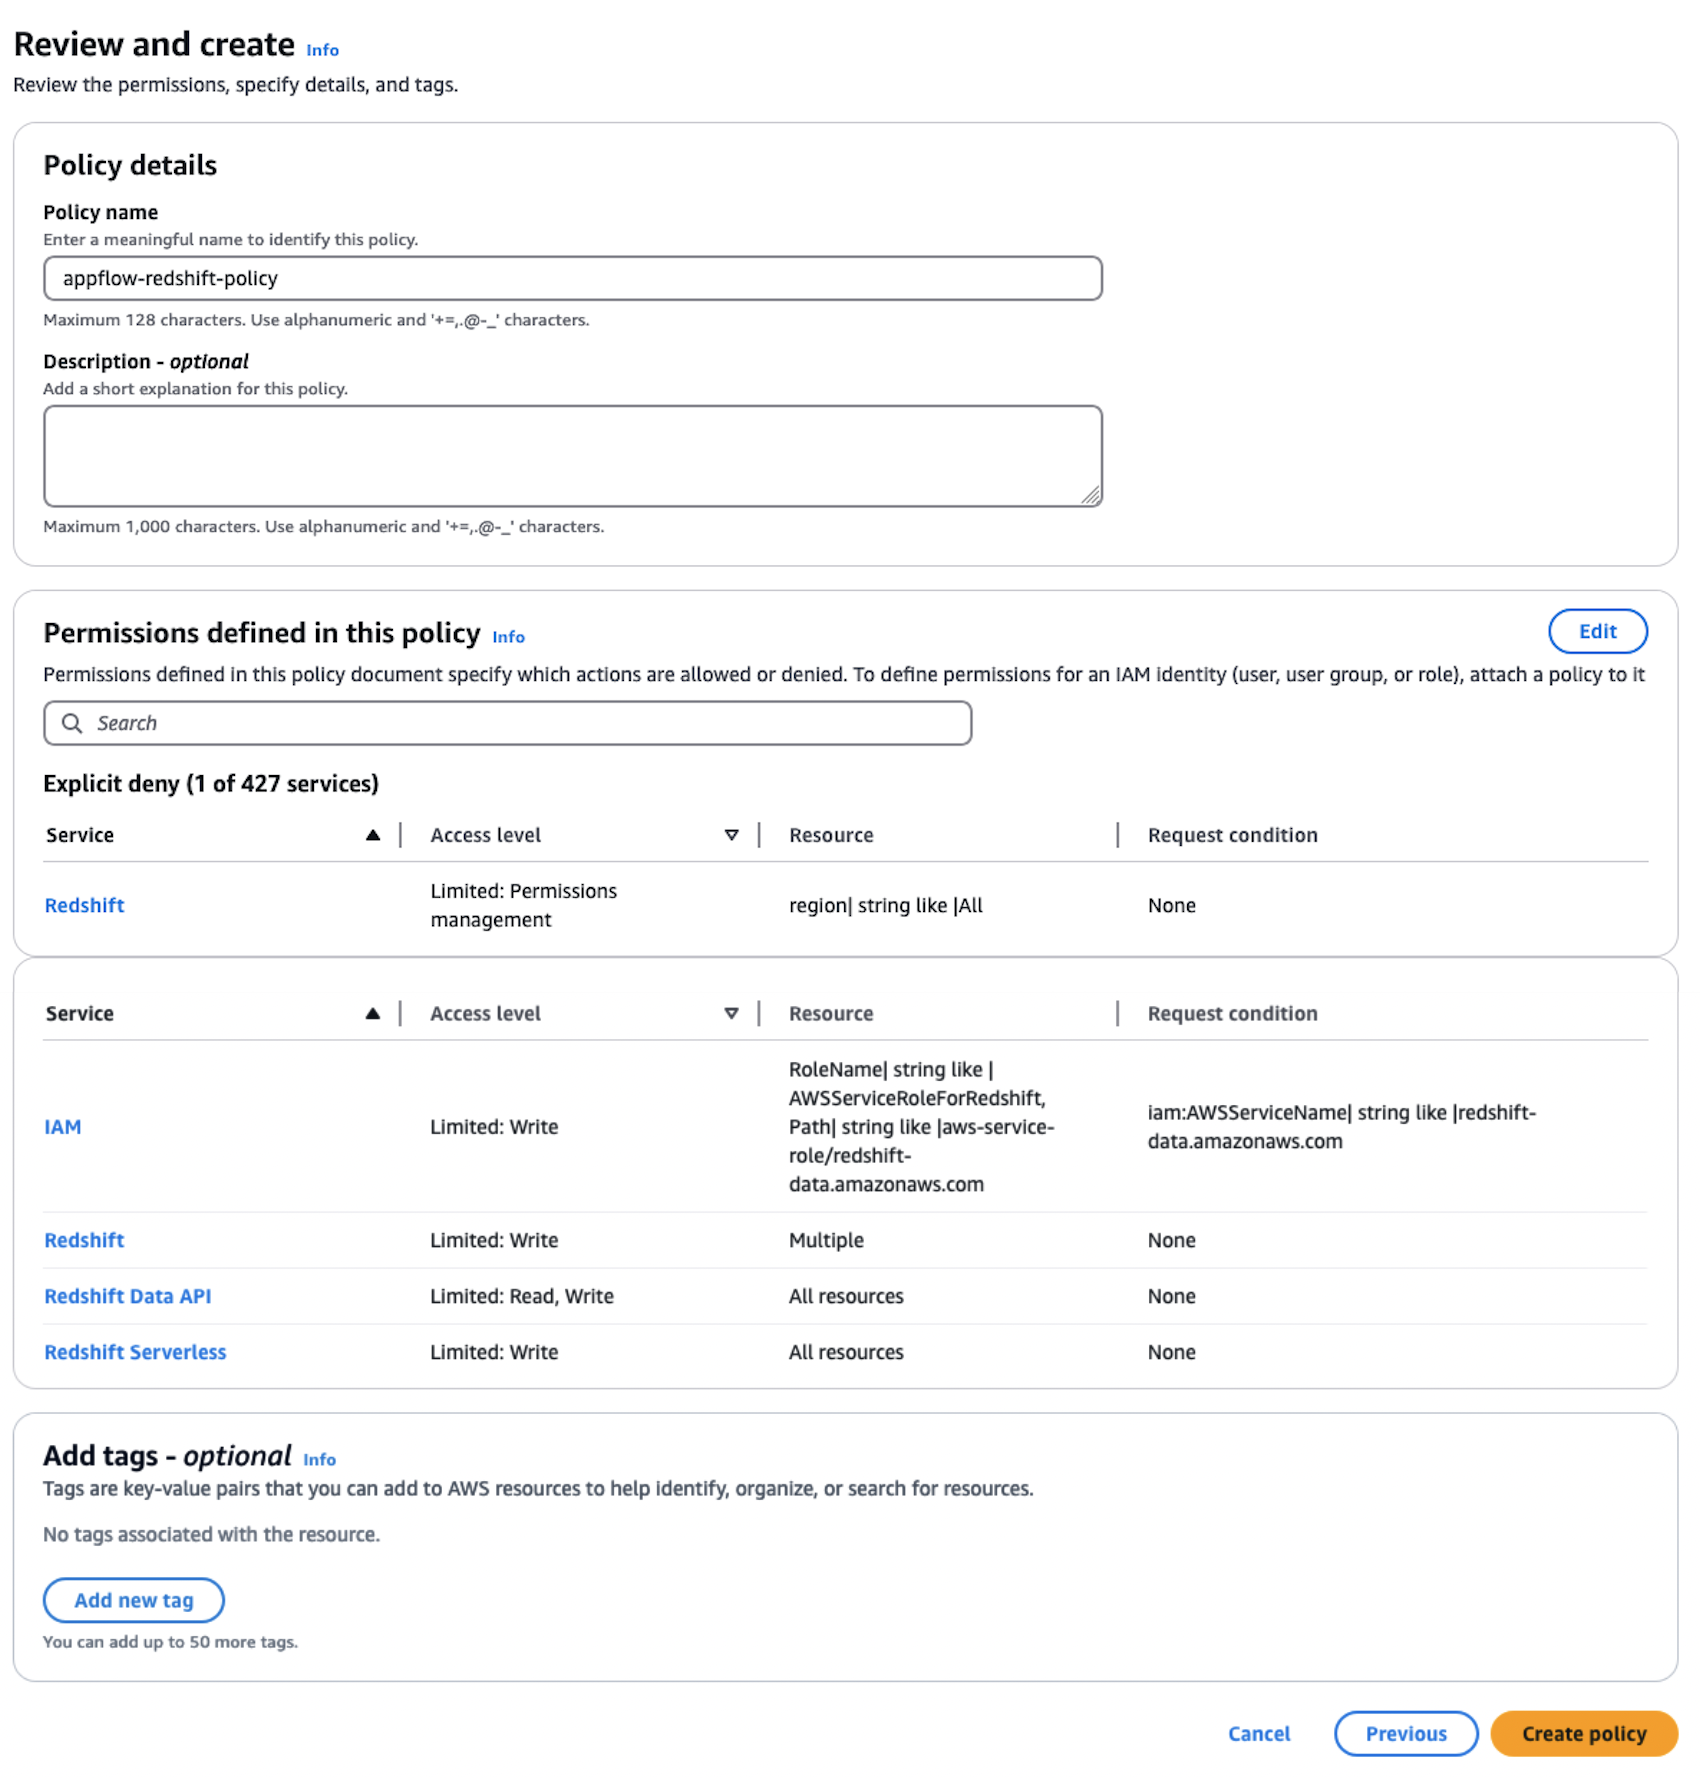
The specified iam_role value must be an IAM role created ahead of time and must have the appropriate access policies specified to query the Amazon S3 location.
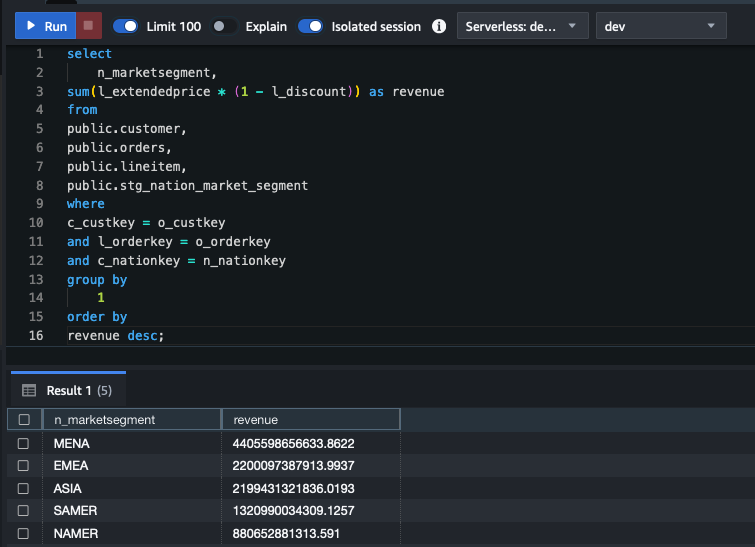
Now, all the tables available in the Data Catalog can be queried using SQL locally in Amazon Redshift Spectrum.
Amazon AppFlow Salesforce destination
Roche trains and invokes ML models using data found in the Amazon Redshift data warehouse. After the ML models are complete, the results are pushed back into Salesforce. Through the use of Amazon AppFlow, we can achieve the data transfer without writing any custom code. The schema of the results must match the schema of the corresponding Salesforce object, and the format of the results must be written in either JSON lines or CSV format in order to be written back into Salesforce.
AWS Glue Jobs
To source on-premises data feeds into the data lake, Roche has built a set of AWS Glue jobs in Python. There are various external sources including databases and APIs that are directly loaded into the raw zone S3 bucket. The AWS Glue jobs are run on a daily basis to load new data. The data that is loaded follows the partitioning scheme of YYYYMMDD format in order to more efficiently store and query datasets. The loaded data is then converted into Parquet format for more efficient querying and storage purposes.
Amazon EKS and KubeFlow
To deploy ML models on Amazon EKS, Roche uses Kubeflow on Amazon EKS. The use of Amazon EKS as the backbone infrastructure makes it easy to build, train, test, and deploy ML models and interact with Amazon Redshift as a data source.
Firewall Manager
As an added layer of security, Roche takes extra precautions through the use of Firewall Manager. This allows Roche to explicitly deny or allow inbound and outbound traffic through the use of stateful and stateless rule sets. This also enables Roche to allow certain outbound access to external websites and deny websites that they don’t want resources inside of their Amazon VPC to have access to. This is critical especially when dealing with any sensitive datasets to ensure that data is secured and has no chance of being moved externally.
CI/CD
All the infrastructure outlined in the architecture diagram was automated and deployed to multiple AWS Regions using a continuous integration and continuous delivery (CI/CD) pipeline with GitLab Runners as the orchestrator. The GitFlow model was used for branching and invoking automated deployments to the Roche AWS accounts.
Infrastructure as code and AWS CDK
Infrastructure as code (IaC) best practices were used to facilitate the creation of all infrastructure. The Roche team uses the Python AWS CDK to deploy, version, and maintain any changes that occur to the infrastructure in their AWS account.
AWS CDK project structure
The top level of the project structure in GitLab includes the following folders (while not limited to just these folders) in order to keep infrastructure and code all in one location.

To facilitate the various resources that are created in the Roche account, the deployment was broken into the following AWS CDK apps, which encompass multiple stacks:
coredata_lakedata_warehouse
The core app contains all the stacks related to account setup and account bootstrapping, such as:
- VPC creation
- Initial IAM roles and policies
- Security guardrails
The data_lake app contains all the stacks related to creating the AWS data lake, such as:
- Lake Formation setup and registration
- AWS Glue database creation
- S3 bucket creation
- Amazon AppFlow flow creation
- AWS Glue job setup
The data_warehouse app contains all the stacks related to setting up the data warehouse infrastructure, such as:
- Amazon Redshift cluster
- Load balancer to Amazon Redshift cluster
- Logging
The AWS CDK project structure described was chosen to keep the deployment flexible and to logically group together stacks that relied on each other. This flexibility allows for deployments to be broken out by function and deployed only when truly required and needed. This decoupling of different parts of the provisioning maintains flexibility when deploying.
AWS CDK project configuration
Project configurations are flexible and extrapolated away as YAML configuration files. For example, Roche has simplified the process of creating a new Amazon AppFlow flow and can add or remove flows as needed simply by adding a new entry into their YAML configuration. The next time the GitLab runner deployment occurs, it picks up the changes on AWS CDK synthesis to generate a new change set with the new set of resources. This configuration and setup keeps things dynamic and flexible while decoupling configuration from code.
Network architecture
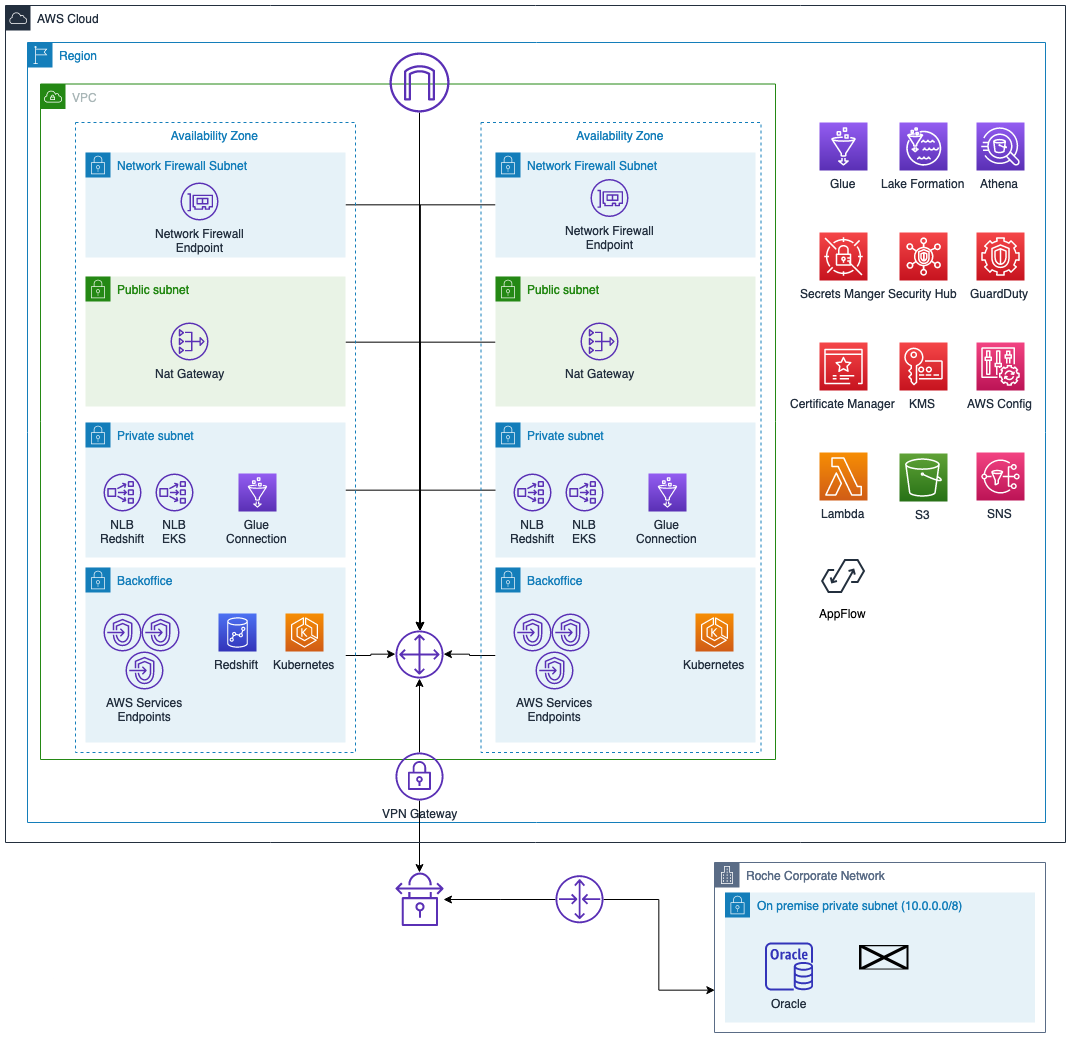
The following diagram illustrates the network architecture.

We can break down the architecture into the following:
- All AWS services are deployed in two Availability Zones (except Amazon Redshift)
- Only private subnets have access to the on-premises Roche environment
- Services are deployed in backend subnets
- Perimeter protection using AWS Network Firewall
- A network load balancer publishes services to the on premises environment
Network security configurations
Infrastructure, configuration, and security are defined as code in AWS CDK, and Roche uses a CI/CD pipeline to manage and deploy them. Roche has an AWS CDK application to deploy the core services of the project: VPC, VPN connectivity, and AWS security services (AWS Config, Amazon GuardDuty, and AWS Security Hub). The VPC contains four network layers deployed in two Availability Zones, and they have VPC endpoints to access AWS services like Amazon S3, Amazon DynamoDB, and Amazon Simple Queue Service (Amazon SQS). They limit internet access using AWS Network Firewall.
The infrastructure is defined as code and the configuration is segregated. Roche performed the VPC setup by running the CI/CD pipeline to deploy their infrastructure. The configuration is in a specific external file; if Roche wants to change any value of the VPC, they need to simply modify this file and run the pipeline again (without typing any new lines of code). If Roche wants to change any configurations, they don’t want to have to change any code. It makes it simple for Roche to make changes and simply roll them out to their environment, making the changes more transparent and easier to configure. Traceability of the configuration is more transparent and it makes it simpler for approving the changes.
The following code is an example of the VPC configuration:
"test": {
        "vpc": {
            "name": "",
            "cidr_range": "192.168.40.0/21",
            "internet_gateway": True,
            "flow_log_bucket": shared_resources.BUCKET_LOGGING,
            "flow_log_prefix": "vpc-flow-logs/",
        },
        "subnets": {
            "private_subnets": {
                "private": ["192.168.41.0/25", "192.168.41.128/25"],
                "backend": ["192.168.42.0/23", "192.168.44.0/23"],
            },
            "public_subnets": {
                "public": {
                    "nat_gateway": True,
                    "publics_ip": True,
                    "cidr_range": ["192.168.47.64/26", "192.168.47.128/26"],
                }
            },
            "firewall_subnets": {"firewall": ["192.168.47.0/28", "192.168.47.17/28"]},
        },
        ...
         "vpc_endpoints": {
            "subnet_group": "backend",
            "services": [
                "ec2",
                "ssm",
                "ssmmessages",
                "sns",
                "ec2messages",
                "glue",
                "athena",
                "secretsmanager",
                "ecr.dkr",
                "redshift-data",
                "logs",
                "sts",
            ],
            "gateways": ["dynamodb", "s3"],
            "subnet_groups_allowed": ["backend", "private"],
        },
        "route_53_resolvers": {
            "subnet": "private",
        ...
The advantages of this approach are as follows:
- No need to modify the AWS CDK constructor and build new code to change VPC configuration
- Central point to manage VPC configuration
- Traceability of changes and history of the configuration through Git
- Redeploy all the infrastructure in a matter of minutes in other Regions or accounts
Operations and alerting
Roche has developed an automated alerting system if any part of the end-to-end architecture encounters any issues, focusing on any issues when loading data from AWS Glue or Amazon AppFlow. All logging is published to CloudWatch by default for debugging purposes.
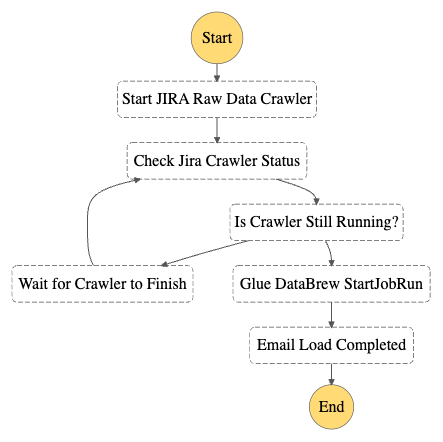
The operational alerts have been built for the following workflow:
- AWS Glue jobs and Amazon AppFlow flows ingest data.
- If a job fails, it emits an event to a CloudWatch Events rule.
- The rule is triggered and invokes an Lambda function to send failure details to an Amazon Simple Notification Service (Amazon SNS) topic.
- The SNS topic has a Lambda subscriber that gets invoked:
- The Lambda function reads out specific webhook URLs from AWS Secrets Manager.
- The function fires off an alert to the specific external systems.
- The external systems receive the message and the appropriate parties are notified of the issue with details.
The following architecture outlines the alerting mechanisms built for the lake house platform.

Conclusion
The GTM (Go-To-Market) domain has been successful in enabling their business stakeholders, data engineers and data scientists providing a platform that is extendable to many use-cases that Roche faces. It is a key enabler and an accelerator for the GTM organization in Roche. Through a modern data platform, Roche is now able to better understand customers and ultimately create and deliver valuable services that meet their needs. It extends beyond health care professionals (HCPs) to a larger healthcare ecosystem. The platform and infrastructure in this blog help to support and accelerate both internal and external stakeholders in their decision-making processes through actionable insights.
The steps in this post can help you plan to build a similar modern data strategy using AWS managed services to ingest data from sources like Salesforce, automatically create metadata catalogs and share data seamlessly between the data lake and data warehouse, and create alerts in the event of an orchestrated data workflow failure. In part 2 of this post, you learn about how the data warehouse was built using an agile data modeling pattern and how ELT jobs were quickly developed, orchestrated, and configured to perform automated data quality testing.
Special thanks go to the Roche team: Joao Antunes, Krzysztof Slowinski, Krzysztof Romanowski, Bartlomiej Zalewski, Wojciech Kostka, Patryk Szczesnowicz, Igor Tkaczyk, Kamil Piotrowski, Michalina Mastalerz, Jakub Lanski, Chun Wei Chan, Andrzej Dziabowski for their project delivery and support with this post.
About The Authors
 Dr. Yannick Misteli, Roche – Dr. Yannick Misteli is leading cloud platform and ML engineering teams in global product strategy (GPS) at Roche. He is passionate about infrastructure and operationalizing data-driven solutions, and he has broad experience in driving business value creation through data analytics.
 Simon Dimaline, AWS – Simon Dimaline has specialised in data warehousing and data modelling for more than 20 years. He currently works for the Data & Analytics team within AWS Professional Services, accelerating customers’ adoption of AWS analytics services.
 Matt Noyce, AWS – Matt Noyce is a Senior Cloud Application Architect in Professional Services at Amazon Web Services. He works with customers to architect, design, automate, and build solutions on AWS for their business needs.
Chema Artal Banon, AWS – Chema Artal Banon is a Security Consultant at AWS Professional Services and he works with AWS’s customers to design, build, and optimize their security to drive business. He specializes in helping companies accelerate their journey to the AWS Cloud in the most secure manner possible by helping customers build the confidence and technical capability.
A special Thank You goes out to the following people whose expertise made this post possible from AWS:
- Thiyagarajan Arumugam – Principal Analytics Specialist Solutions Architect
- Taz Sayed – Analytics Tech Leader
- Glenith Paletta – Enterprise Service Manager
- Mike Murphy – Global Account Manager
- Natacha Maheshe – Senior Product Marketing Manager
- Derek Young – Senior Product Manager
- Jamie Campbell – Amazon AppFlow Product Manager
- Kamen Sharlandjiev – Senior Solutions Architect – Amazon AppFlow
- Sunil Jethwani – Principal Customer Delivery Architect
- Vinay Shukla – Amazon Redshift Principal Product Manager
- Nausheen Sayed – Program Manager


 Michael Davies is a Data Engineer at OUA. He has extensive experience within the education industry, with a particular focus on building robust and efficient data architecture and pipelines.
 Emma Arrigo is a Solutions Architect at AWS, focusing on education customers across Australia. She specializes in leveraging cloud technology and machine learning to address complex business challenges in the education sector. Emma’s passion for data extends beyond her professional life, as evidenced by her dog named Data.


 Ritesh Kumar Sinha is an Analytics Specialist Solutions Architect based out of San Francisco. He has helped customers build scalable data warehousing and big data solutions for over 16 years. He loves to design and build efficient end-to-end solutions on AWS. In his spare time, he loves reading, walking, and doing yoga.
 Tahir Aziz is an Analytics Solution Architect at AWS. He has worked with building data warehouses and big data solutions for over 13 years. He loves to help customers design end-to-end analytics solutions on AWS. Outside of work, he enjoys traveling and cooking.
 Raza Hafeez is a Senior Product Manager at Amazon Redshift. He has over 13 years of professional experience building and optimizing enterprise data warehouses and is passionate about enabling customers to realize the power of their data. He specializes in migrating enterprise data warehouses to AWS Modern Data Architecture.
 Amit Ghodke is an Analytics Specialist Solutions Architect based out of Austin. He has worked with databases, data warehouses and analytical applications for the past 16 years. He loves to help customers implement analytical solutions at scale to derive maximum business value.

 Hemant Aggarwal is a senior Data Engineer at Kaplan India Pvt Ltd, helping in developing and managing ETL pipelines leveraging AWS and process/strategy development for the team.
 Naveen Kambhoji is a Senior Manager at Kaplan Inc. He works with Data Engineers at Kaplan for building data lakes using AWS Services. He is the facilitator for the entire migration process. His passion is building scalable distributed systems for efficiently managing data on cloud.Outside work, he enjoys travelling with his family and exploring new places.
 Jimy Matthews is an AWS Solutions Architect, with expertise in AI/ML tech. Jimy is based out of Boston and works with enterprise customers as they transform their business by adopting the cloud and helps them build efficient and sustainable solutions. He is passionate about his family, cars and Mixed martial arts.


 Kartikay Khator is a Solutions Architect on the Global Life Science at Amazon Web Services. He is passionate about helping customers on their cloud journey with focus on AWS analytics services. He is an avid runner and enjoys hiking.
 Kamen Sharlandjiev is a Sr. Big Data and ETL Solutions Architect and Amazon AppFlow expert. He’s on a mission to make life easier for customers who are facing complex data integration challenges. His secret weapon? Fully managed, low-code AWS services that can get the job done with minimal effort and no coding.
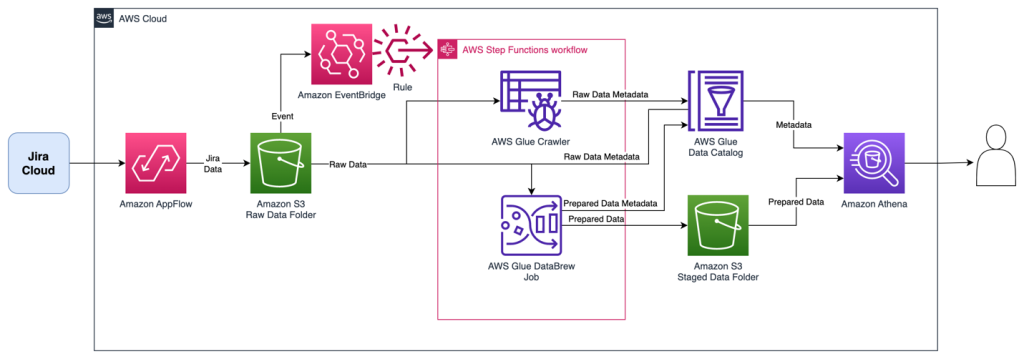


 Tom Romano is a Sr. Solutions Architect for AWS World Wide Public Sector from Tampa, FL, and assists GovTech and EdTech customers as they create new solutions that are cloud native, event driven, and serverless. He is an enthusiastic Python programmer for both application development and data analytics, and is an Analytics Specialist. In his free time, Tom flies remote control model airplanes and enjoys vacationing with his family around Florida and the Caribbean.
 Shane Thompson is a Sr. Solutions Architect based out of San Luis Obispo, California, working with AWS Startups. He works with customers who use AI/ML in their business model and is passionate about democratizing AI/ML so that all customers can benefit from it. In his free time, Shane loves to spend time with his family and travel around the world.


 Debaprasun Chakraborty is an AWS Solutions Architect, specializing in the analytics domain. He has around 20 years of software development and architecture experience. He is passionate about helping customers in cloud adoption, migration and strategy.
 Suraj Subramani Vineet is a Senior Cloud Architect at Amazon Web Services (AWS) Professional Services in Sydney, Australia. He specializes in designing and building scalable and cost-effective data platforms and AI/ML solutions in the cloud. Outside of work, he enjoys playing soccer on weekends.


 Ramesh Ranganathan is a Senior Partner Solution Architect at AWS. He works with AWS customers and partners to provide guidance on enterprise cloud adoption, application modernization and cloud native development. He is passionate about technology and enjoys experimenting with AWS Serverless services.
 Kamen Sharlandjiev is an Analytics Specialist Solutions Architect and Amazon AppFlow expert. He’s on a mission to make life easier for customers who are facing complex data integration challenges. His secret weapon? Fully managed, low-code AWS services that can get the job done with minimal effort and no coding.
 Amit Shah is a cloud based modern data architecture expert and currently leading AWS Data Analytics practice in Atos. Based in Pune in India, he has 20+ years of experience in data strategy, architecture, design and development. He is on a mission to help organization become data-driven.


 Ninad Phatak is a Principal Data Architect at Amazon Development Center India. He specializes in data engineering and datawarehousing technologies and helps customers architect their analytics use cases and platforms on AWS.


 Gopalakrishnan Ramaswamy is a Solutions Architect at AWS based out of India with extensive background in database, analytics, and machine learning. He helps customers of all sizes solve complex challenges by providing solutions using AWS products and services. Outside of work, he likes the outdoors, physical activities and spending time with friends and family.