Post Syndicated from Rajat Kashyap original https://aws.amazon.com/blogs/messaging-and-targeting/how-to-log-amazon-ses-details-using-amazon-cloudwatch/
One of the use cases Amazon Simple Email Service (Amazon SES) users try to implement is to centralize various SES notifications from different domains or email addresses to get insights about how many of those emails were delivered, bounced or complaint. If you have these details, they can be valuable to help you take appropriate business decisions to further strengthen your mail delivery process. Currently SES provides various metrics like number of sends, reject etc. but there is no direct way to log information like From email identity, recipient email identity, Subject, timestamp, source IP address, messageId etc. when sending emails.
In this blog post, you will learn how to capture detailed notifications about your bounces, complaints, and deliveries and log those in Amazon CloudWatch. With a centralized logging solution, customers can keep track of domains or email addresses from which they received complaints, identify email issues, stay informed, and even build custom dashboard capabilities. Logging the notifications in CloudWatch will help you to store these notifications for the long term and also will allow you to set up a process to back up this data and setup life-cycle policies for data retention.
Let’s quickly understand how Amazon SES categorizes if any email got delivered, bounced or received a complaint.
Types of notifications
Bounce occurs when a message cannot be delivered to the intended recipient. And there are two types of Bounce, hard bounce and soft bounce.
- Hard bounces occur when email cannot be delivered because of a persistent issue, such as when a recipient’s email address or domain does not exist and Amazon SES will no longer attempt to deliver the message.
- Soft bounces occur when there is a temporary issue preventing the email from being delivered, such as when the recipient’s mailbox is full, when the connection to the receiving email server times out, or when there are too many simultaneous connections to the receiving mail server. When there are soft bounces, Amazon will attempt to redeliver it again.
Complaint occurs when a recipient,
- Reports that they don’t want to receive an email.
- Clicks the “Report spam” button in their email client, and complains to their email provider that such emails belong to the Spam category.
Delivery occurs when,
- An email is delivered successfully to recipient’s mail server.
Prerequisites
For this post, you should be familiar with the following:
- Managing an AWS account
- Amazon Simple Email Service
- Amazon Simple Notification Service
- Amazon CloudWatch
- AWS Lambda
- AWS CloudFormation
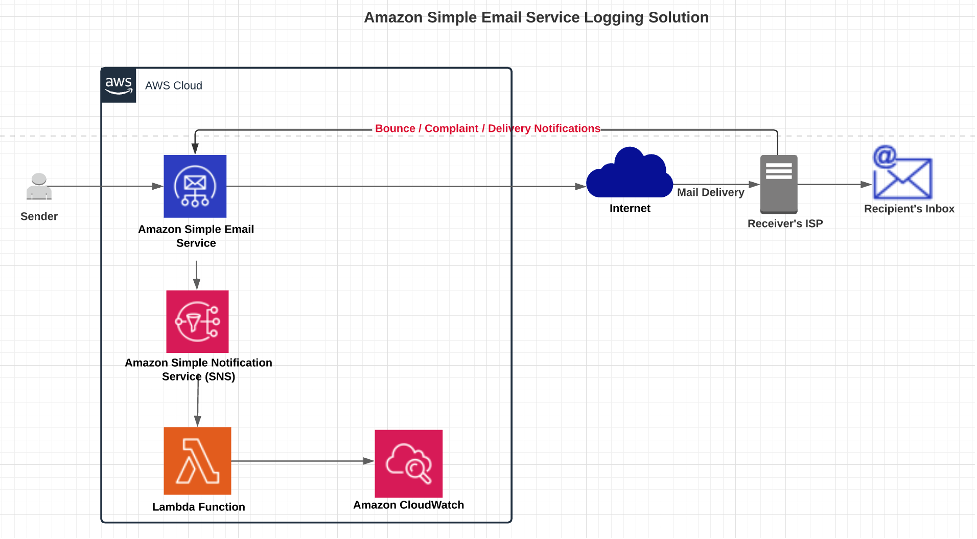
Architecture Overview
The AWS CloudFormation template given in this post automatically sets up the different architecture components, to capture detailed notifications about your bounces, complaints, and deliveries and log those in Amazon CloudWatch. You still have to perform some manual tasks of configuring and validating components. For details, please follow the below steps in sequence.
Getting Started with Solution Deployment
Prerequisite tasks to be completed before deploying the logging solution:
- Domain and Email Address are verified

- Creation of Amazon Simple Notification Service (Amazon SNS) Topic to capture detailed notifications for bounces, complaints or deliveries, please refer Create SNS Topic.

- Setup notifications at domain or from email address level, for the notifications you want to log into CloudWatch.
- Click on the Verified Identity domain name you want to setup bounce notifications.
- In the Notifications tab, click on Feedback Notifications section -> Click edit button to navigate on next page.

- From the drop down select and Update Bounce Notifications topic with the SNS Topic ARN that you created in prior step and click Save Changes.


Note: For this blog post, you will learn how to log bounce notifications. To capture complaints or delivery notifications you can configure SNS topic and redeploy the CloudFormation template multiple times choosing the Complaint and Delivery event types to capture all notifications.
Once the prerequisite tasks are completed, the logging solution is ready to be deployed.
As a very first step, download ses_bounce_logging_blog.yml CloudFormation file from the below given link, once you saved this on your local machine, follow the next steps to install this solution.
Steps to run the CloudFormation template:
- Go to CloudFormation Console and Click Create Stack.
- Select Upload template file radio button and Click Choose file to upload ses_bounce_logging_blog.yml file you downloaded earlier.

- Click Next on Create Stack screen.
- Specify Stack Name, for example ses-bounce-logging.
- Change default value of CloudWatchGroupName if needed.
- Select the Event Type “Bounce”, “Complaint”, or “Delivery” you wish to track.
- Enter Amazon Resource Name (ARN) of Amazon SNS topic created in prior step, to capture bounce notification in SNSTopicName parameters field, and click Next.

- Click Next on Configure stack options screen.
- Select “I acknowledge that AWS CloudFormation might create IAM resources” and click Create Stack.


Wait for the CloudFormation template to complete and then verify resources in the CloudFormation stack has been created. Click on individual resources and verify.
- IAM Role was created.
- Lambda function to log capture bounce notification was created.

- Verify that Lambda function subscription to SNS topic has been created and confirmed.

- You can also verify SNS and Lambda integration in Lambda console.


How to test the solution?
You can test the Bounce scenario using Amazon SES mailbox simulators. When you send an email to selected mailbox simulator scenario, you will get a simulated detailed notification back to the Amazon SNS topic configured in the notification section described in the pre-requisite section. You can use AWS CLI, an AWS SDK, or Amazon SES console for the particular domain that you have configured to receive notifications.
[email protected] (In scope of this blog post and applies to test bounce notifications)
Use below in case you want to test other scenario:
Screenshots showing how to send bounce email using AWS Console
- Go to Amazon SES -> Select Verified Domain Identity Checkbox.
- Click on Send a Test Email Button.
- Fill in the required information, as given in the below snapshot like From-address, test Scenario (Bounce) and click Send Test Email.

- As soon as bounce notification is received in the SNS topic it will be sent to the Lambda function and finally logged in the /aws /ses/bounce_logs CloudWatch log group.


Clean up
When you’re done with this exercise, complete the following steps to delete your resources and stop incurring costs:
- Delete the SNS topic that you created.
- On the CloudFormation console, select your stack and choose Delete.
This cleans up all the resources created by the stack.
Conclusion
In this blog post, we have shown you how to capture and build a solution for Bounce notifications. We explained how to combine Amazon Simple Notification Service, AWS Lambda, and Amazon CloudWatch to create the logging solution. To enhance the visualization, you can filter Metrics in Amazon CloudWatch, allowing you to graph metrics and make it searchable. As the notifications are stored in Amazon CloudWatch, you can export the logs to Amazon S3 for the long term. You can modify the CloudFormation template in this blog and deploy it multiple times to capture complaints or delivery notifications for your business use cases.
About the Authors
 Rajat Kashyap is a Solutions Architect at AWS. He is Containers, DevOps, BigData, Analytics and AI/ML enthusiast and loves helping customers design secure, reliable, scalable and cost-effective solutions on AWS. As a trusted customer advisor, he help organizations understand best practices for advanced AWS cloud-based solutions and help them in migration and modernization of their workload using Well Architected design principles and best practices.
 Ashish Mehra is a Solutions Architecture Manager at AWS. He is a Middleware, Serverless, IoT and Containers enthusiast and loves helping customers design secure, reliable and cost-effective solutions on AWS.