Post Syndicated from Rommel Sunga original https://aws.amazon.com/blogs/messaging-and-targeting/implement-tenants-in-your-amazon-ses-environment-part-3-implementation-guide/
This is part 3 in a series covering the new tenants feature in Amazon Simple Email Service (SES). The first post in this series discussed how users can improve email deliverability with tenant management in Amazon SES. Part 2 covered key aspects involved in planning the migration of existing Amazon SES infrastructure to use tenant-based reputation isolation.
With Amazon SES tenants, users can:
- Manage individual tenant onboardings and their reputations in isolation
- Provision isolated tenants within a single SES account
- Apply automated reputation policies to manage email sending
- Detect and isolate deliverability issues within isolated email streams
- Preserve sender reputation and improve inbox placement with mailbox providers
This post provides a step-by-step migration guide to Tenants for key AWS components like AWS Identity and Access Management (IAM) permissions, Amazon CloudWatch logging and Amazon EventBridge monitoring. Additionally, we provide several code examples that show how to programmatically provision tenants in real time as customers are onboarded. The goal is to demonstrate how to use the Tenants feature to achieve reputation isolation between customers or business units (BUs), get more control over sending policies, and enable the automatic pause mechanism to limit the damage from problematic senders.
Step-by-step migration guide
Having completed the inventory and configuration planning prescribed in part 2 of this series, we are ready to start the 4-step migration (or implementation) of the tenants feature in the AWS SES account.
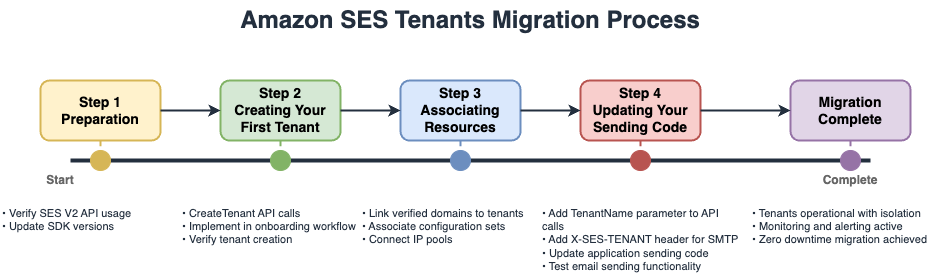
The Amazon SES Tenants Migration process is as follows:
- Preparation
- Verify SES V2 API usage
- Update SDK versions
- Create Your First Tenant
- Create Tenant API calls
- Implement in onboarding workflow
- Verify tenant creation
- Associating Resources
- Link verified domains to tenants
- Associate configuration sets
- Connect IP pools
- Updating Your Sending Code
- Add Tenant/Name parameter to API calls
- Add X-SES-TENANT header for SMTP
- Update application sending code
- Test email sending functionality
Preparation
When sending email through a tenant, be sure to specify the tenant in the API calls or SMTP headers and ensure that all resources used are associated with that tenant. Before getting started, keep in mind that there’s an additional charge per tenant per month based on the number of emails. For more detailed information, see the SES Pricing page.
For applications that use SMTP, see the SMTP Implementation section later in this document.
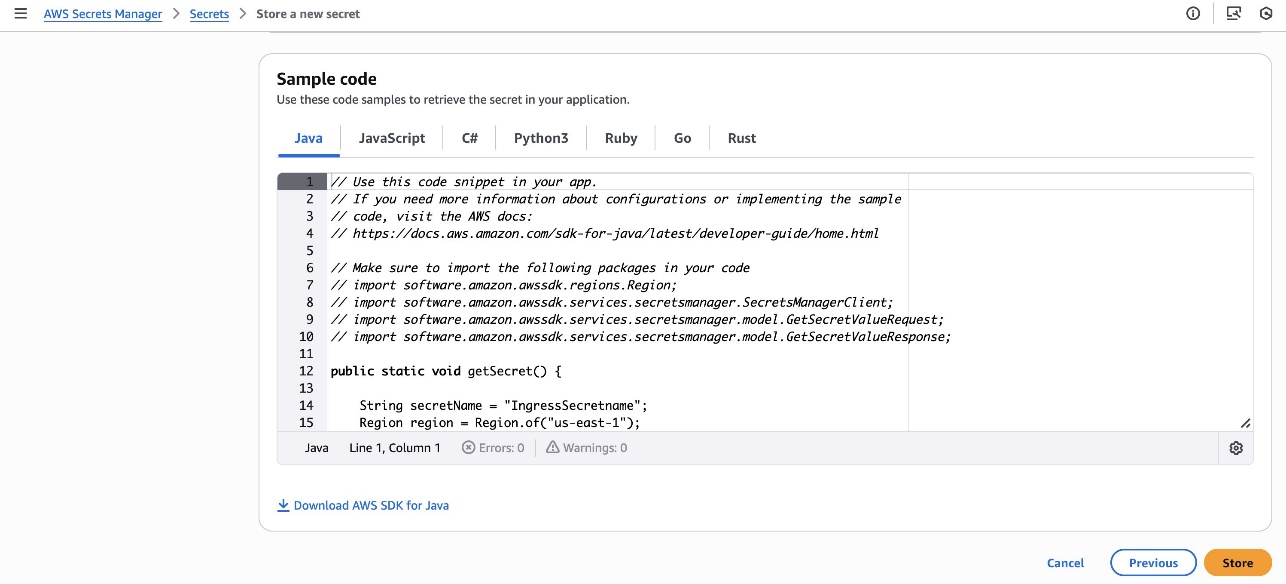
For applications that use the SES API, confirm that the latest Amazon SES V2 API is being used, as tenant management capabilities are only available in this version (see SES V2 API migration guide). We also recommend verifying that the AWS SDK version being used supports these operations, otherwise you may need to update to a version that supports them.
The SES V2 API includes the seven essential operations for managing the tenant architecture that the application will need to leverage throughout the migration (or implementation) and tenant lifecycle:
- CreateTenant for establishing new tenant containers
- CreateTenantResourceAssociation for linking resources like domains and configuration sets to tenants
- DeleteTenant for removing tenants when workloads offboard
- DeleteTenantResourceAssociation to unlink resources from tenants
- GetTenant retrieves specific tenant details
- ListTenants provides an overview of all tenants in an account
- ListTenantResources shows which resources are associated with each tenant
Implementation Steps
Creating the tenant(s)
The following Python code example uses the AWS SDK for Python (Boto3) and CreateTenant to demonstrate tenant creation. We’ve added optional tags to better organize the tenant resource for billing or logging purposes.
This example code can be used when a customer first onboards onto the platform to send email. By creating a tenant for this customer, resources under that tenant will be associated together whenever the tenant is used as explained in the next steps.
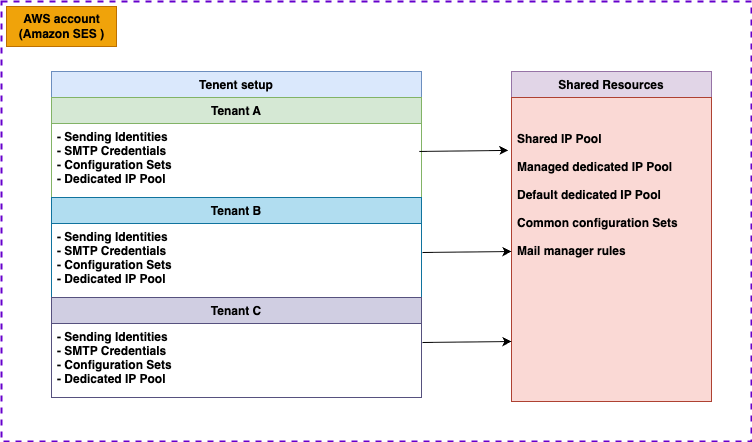
Associating resources with the tenant
Each tenant needs appropriate resources—configuration sets, sending identities, and potentially dedicated IP pools—to begin sending email. The association process should align with the resource sharing strategy as established during the migration planning phase.
The following Python code example uses the AWS SDK for Python (Boto3) and CreateTenantResourceAssociation to associate resources to the tenant that was created in the previous step.
Consider implementing batch association for email streams with multiple domains or configuration sets. This approach reduces API calls and improves provisioning efficiency. Remember that resources can be shared across multiple tenants if the architecture requires it, allowing flexible resource allocation strategies.
Update the applications
The transition to tenant-based sending requires minimal code changes in the apps, namely adding the TenantName and ConfigurationSetName to the sending process.
API Implementations
For applications that use the SES V2 API, add the tenant and configuration set parameters to the send calls as demonstrated below using the AWS SDK for Python (Boto3) :
SMTP Implementations
For sending applications that use SMTP, add the X-SES-TENANT and the ConfigurationSetName header parameters to every message. In the code block that follows, we demonstrate the proper header configuration for SMTP sending using Python:
Configuring IAM policies and permissions for tenants
This section explains how to configure IAM permissions for SES tenants, including how to set up different permission levels for tenant management, email sending, and monitoring while following security best practices to control access based on organizational roles. Remember that IAM policies for tenants follow the principle of least privilege. Start with minimal permissions and expand as needed, regularly reviewing and removing unused permissions to maintain security.
Tenant management permissions
SES Tenants can be controlled through specific IAM permissions that determine who can create, modify, and use specific tenant(s) in the organization. The tenant management system’s core API actions discussed previously can be granted with granular access through IAM policies for administrative operations. The Service Authorization Reference for Amazon Simple Email Service v2 page contains the latest documentation for the service-specific actions used below for Amazon Simple Email Service.
We recommend limiting each IAM role’s permission based on the minimum capabilities required by that role. This helps mitigate the potential for negative effects if an SMTP credential is misused. What follows is a basic IAM policy that demonstrates full tenant management capabilities; this is NOT demonstrating the principle of least privilege (yet):
Configuring sending permissions with tenants
Applications that send emails through tenants need different permissions than those managing tenants. The key distinction is using the ses:TenantName condition to restrict which tenants an application can use for sending.
The IAM policy below allows sending emails only through the specified CustomerA-Tenant tenant, ensuring applications can’t accidentally or maliciously send through other customers’ tenants.
Separating administrative and operational access
Production environments implement role separation between tenant management and email sending operations. Administrative roles handle tenant creation and resource association during customer onboarding, while application roles can only send emails through assigned tenants. The IAM policy below is an example of an administrative role; it allows creating and configuring tenants for use during customer onboarding but does not allow the tenant deletion action to prevent accidental deletions.
Resource-level permissions
Tenants support resource-level permissions using Amazon Resource Names (ARNs), enabling fine-grained access control. Grant access to specific tenants by specifying the tenant name and tenant id (ex. CustomerA-Tenant/tn-1a2b3c4d5e6f7890abcdef1234567890) rather than granting blanket permissions using the “*/tn-*” wildcard as above. To obtain the tenant id you can use the list-tenants command of the AWS SESv2 CLI.
The IAM policy below grants access only to tenants CustomerA-Tenant and CustomerB-Tenant where the following tenant id is a placeholder that should be replaced by the correct tenant id that you obtained from list-tenants.
Monitoring and compliance access
Security and compliance teams often need read-only access to monitor tenant usage. The following IAM policy grants read-only access to all tenants, but does not permit modifications or deletions of any tenants:
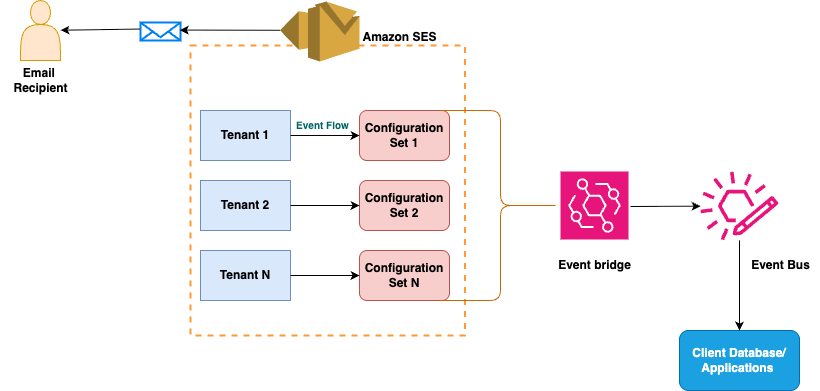
Monitoring Tenants with EventBridge and CloudWatch
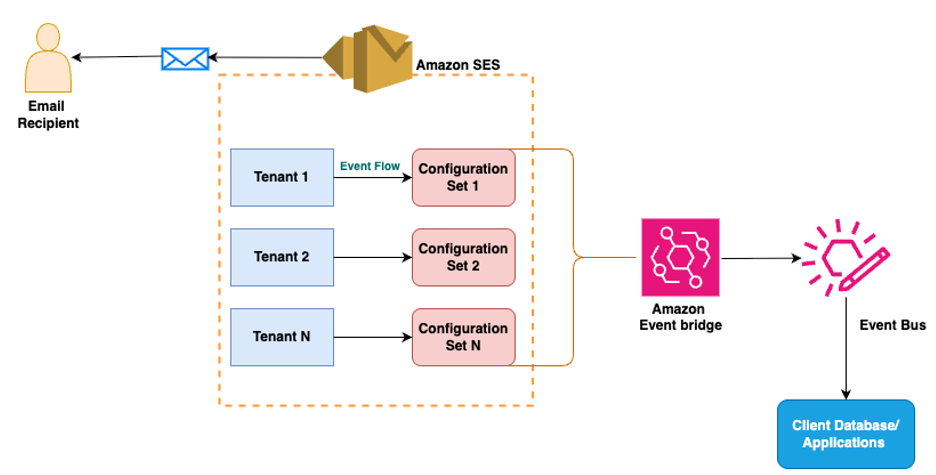
Amazon SES integrates with Amazon EventBridge to deliver comprehensive monitoring capabilities for tenant management, providing real-time visibility into reputation changes and enabling automated response workflows. EventBridge is a serverless service that uses JSON-formatted events to connect application components, making it straightforward to build scalable event-driven applications. Amazon SES’s tenant feature’s integration with EventBridge enables organizations to track tenant-specific metrics and other metrics, such as reputation findings and reputation status changes, and tenant status changes.
Understanding EventBridge Integration with SES
EventBridge operates as a router that receives events from SES and delivers them to one or many destinations (aka targets). When SES features experience state changes or status updates, they automatically send events to the EventBridge default event bus. Rules associated with the event bus evaluate events as they arrive, checking whether each event matches the rule’s pattern before routing to specified targets. For SES tenant management, organizations can receive real-time alerts through Amazon EventBridge when tenant reputation findings are detected or when tenant status changes occur. These events are delivered on a best-effort basis; they might be delivered out of order, requiring users to deploy processing logic to handle such scenarios gracefully.
The code block that follows can guide users through the basic EventBridge integration with the SES tenant feature. For more extensive documentation on integrating with EventBridge please consult AWS documentation.
Setting up EventBridge integration
Create an EventBridge rule using the AWS SDK for Python (Boto3) to capture tenant status changes and reputation findings:
Routing events from EventBridge to CloudWatch Logs
CloudWatch provides the capability to collect raw data and process it into readable, near real-time metrics. Follow these steps to set up a CloudWatch log group for SES tenant events and configure the appropriate IAM permissions:
- Create a CloudWatch log group for tenant events:
aws logs create-log-group --log-group-name "/aws/ses/tenants"
- Add resource-based policy to CloudWatch Logs:
- Add the EventBridge target:
An example event of a paused (“disabled”) tenant is shown below for reference:
Managing tenant reputation with key Tenants features
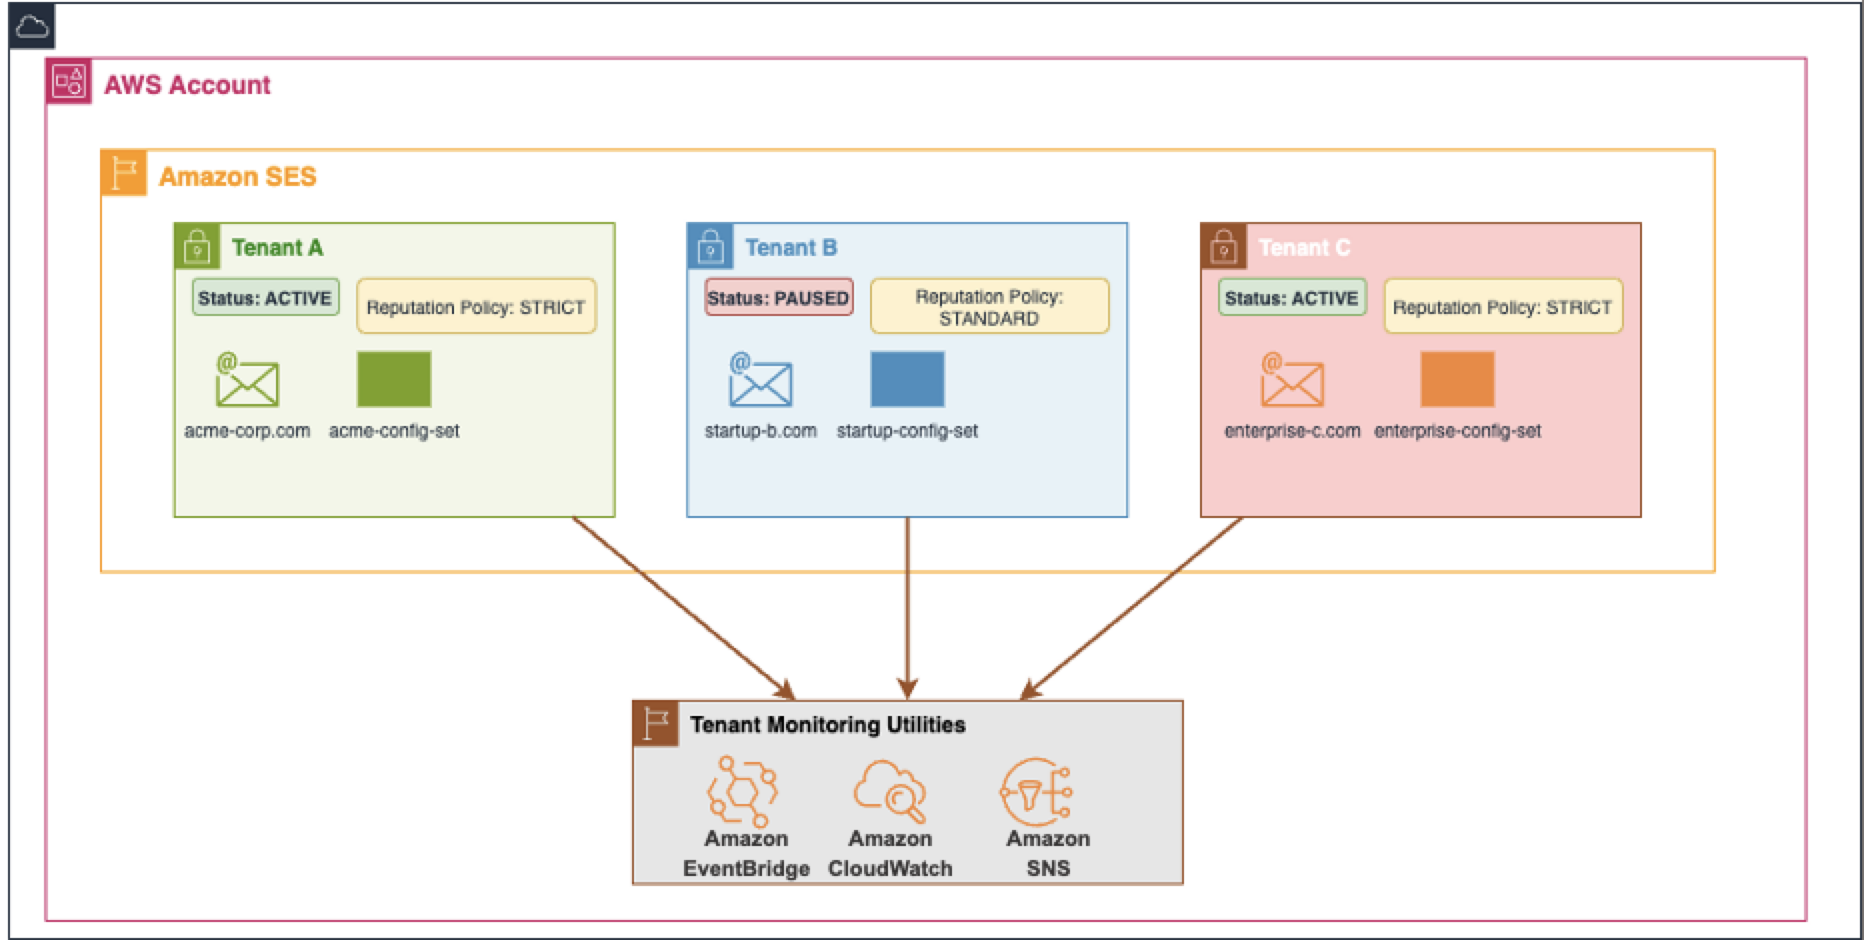
Reputation management for individual tenants is one of the core benefits of using Amazon SES’s tenant feature, providing automated protection against deliverability issues that could damage overall account reputation. This section demonstrates how to configure reputation policies that can automatically pause tenants when they experience high bounce rates or reputation issues, as well as how to manually control tenant sending status for custom workflows.
Setting reputation policies
Amazon SES provides three reputation policy enforcement levels that determine how the system responds to reputation findings.
- The Standard policy (recommended) pauses sending only for high-impact findings, providing a balance between protection and operational flexibility.
- The Strict policy pauses sending for any reputation finding, offering maximum protection for sensitive environments.
- The None option disables automated pausing while continuing to track findings, useful for manual monitoring scenarios.
Reputation findings are generated in two severity levels—low and high—based on metrics like bounce rates and complaint rates. When these metrics indicate a potential deliverability issue, SES creates findings that can trigger automatic pausing based on a chosen policy.
In the following code block, we demonstrate how to set a reputation policy on the CustomerA-Tenant
Our recommendation is to choose the Standard policy for most production tenants, as this policy provides automatic protection against severe reputation issues while avoiding unnecessary disruptions. Reserve the Strict policy for new or untrusted tenants where maximum caution is warranted. Use the None option during initial monitoring periods or when implementing custom reputation management logic.
Handling paused tenants
When a tenant is paused, either automatically through reputation policies or manually, the sending status prevents any emails from being sent through that tenant. The system derives this aggregate status from both customer-managed and AWS-managed statuses; if either is set to DISABLED, the tenant cannot send emails.
Amazon SES publishes notifications to EventBridge when tenant status changes occur or new reputation findings are detected, enabling real-time response to reputation events. After investigating and resolving the underlying issues, the tenant’s sending capabilities can be reinstated. During reinstatement (REINSTATED status), the tenant can continue sending while metrics are monitored to verify improvement.
The REINSTATED status allows the tenant to continue sending even with active reputation findings. Once metrics return to healthy levels, the tenant automatically transitions back to ENABLED status. This approach ensures minimal disruption while protecting the overall account reputation from problematic email streams.
Managing tenant lifecycle
When customers modify a service tier or leave the platform, proper cleanup ensures resource efficiency and maintains account organization.
Removing resource associations
Before deleting a tenant, remove all resource associations to prevent orphaned configurations:
Deleting tenants
Once all resources are disassociated, remove the tenant entirely:
Tenant lifecycle management ensures clean transitions when customers change service tiers or leave the platform. Implement these operations in customer offboarding workflows to maintain optimal account organization and resource utilization.
Resource Management
Resource Sharing Capabilities
Resources can be assigned to multiple tenants simultaneously. This enables sharing common resources between tenants while maintaining separate reputation tracking. For example, the reputation for marketing and transactional email could be tracked separately across independent tenants while using the same sending domain. SES validates tenant-resource associations at send time, rejecting requests if the specified tenant lacks access to the requested resources.
Resource Migration Between Tenants
Resource migration involves two API calls. First, remove the association from the current tenant using DeleteTenantResourceAssociation, then create a new association with the target tenant using CreateTenantResourceAssociation. This process can be automated for bulk migrations during reorganizations.
Reputation Management
Tenant Isolation Protection
Each tenant maintains independent reputation metrics and sending status. When one tenant experiences deliverability issues, it can be automatically paused without affecting other tenants’ ability to send, protecting both shared resources and account-level reputation.
Tenant Pausing Triggers
Tenants can either be paused manually using the UpdateReputationEntityCustomerManagedStatus API or paused automatically based on the reputation policy assigned to the tenant. Reputation policies pause tenants based on reputation findings generated from bounce rates, complaint rates, and third-party feedback reports. The Standard policy (recommended) pauses only for high-severity findings (bounce rate > 15%, complaint rate > 1%), while Strict pauses even for low severity findings (bounce rate > 10%, complaint rate > 0.5%).
Tenant Reactivation Process
For tenants paused by automated reputation policies, use the UpdateReputationEntityCustomerManagedStatus API to reinstate sending after addressing root causes. Tenants paused by AWS Trust & Safety require case resolution through AWS Support.
Migrating Existing Customers
Creating tenants for existing email streams can be completed with no disruption to email sending. Start by creating tenants for each customer or business unit, then associate existing resources like email identities, configuration sets, and templates using the tenant association APIs. Once those steps are complete, update the application, or inform the customer or BU they now need to specify the tenant name and configuration set in their SES SendEmail API calls or SMTP headers which enables SES to route emails through the appropriate tenant.
Reputation Metrics Transition
New reputation metrics will be tracked separately for each tenant from the point of creation and use. Historical metrics from before tenant implementation are not available. Tenant metrics contribute to the overall account-level reputation. For example, if tenant-a, tenant-b, and tenant-c each send 1,000 emails and:
- Tenant-a receives 150 bounce notifications over 1,000 emails (for a bounce rate of 15%), tenant reputation protection will pause this tenant before the issue escalates.
- Tenant-b receives 0 bounces over 1,000 emails, for a bounce rate of 0%
- Tenant-c receives 0 bounces over 1,000 emails, for a bounce rate of 0%
The SES Account Level Bounce Rate (all tenants) is 150 out of 3,000, or 5%
Account Activation Requirements
No account-level activation is required to configure and use the Tenant feature, it is immediately available through the SES V2 API or the AWS SES Console. Users can also start using the tenant management APIs (CreateTenant, CreateTenantResourceAssociation, DeleteTenant, etc.) without any account modifications or support requests.
Conclusion
This post covered detailed migration steps, monitoring setup, practical implementation examples and troubleshooting steps. From running a SaaS platform, to managing multiple brands, to operating separate business units, tenant-based reputation isolation ensures Amazon SES email infrastructure scales reliably as an organization grows.
Additional resources
- Blog: Improve email deliverability with tenant management in Amazon SES
- Tenants in Developer Guide
- CreateTenant API SES V2 Documentation


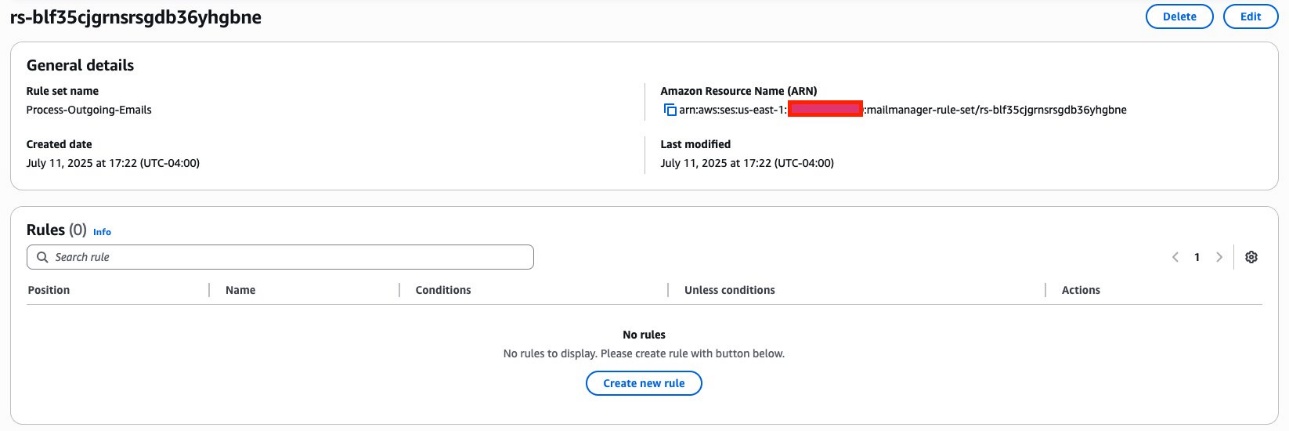
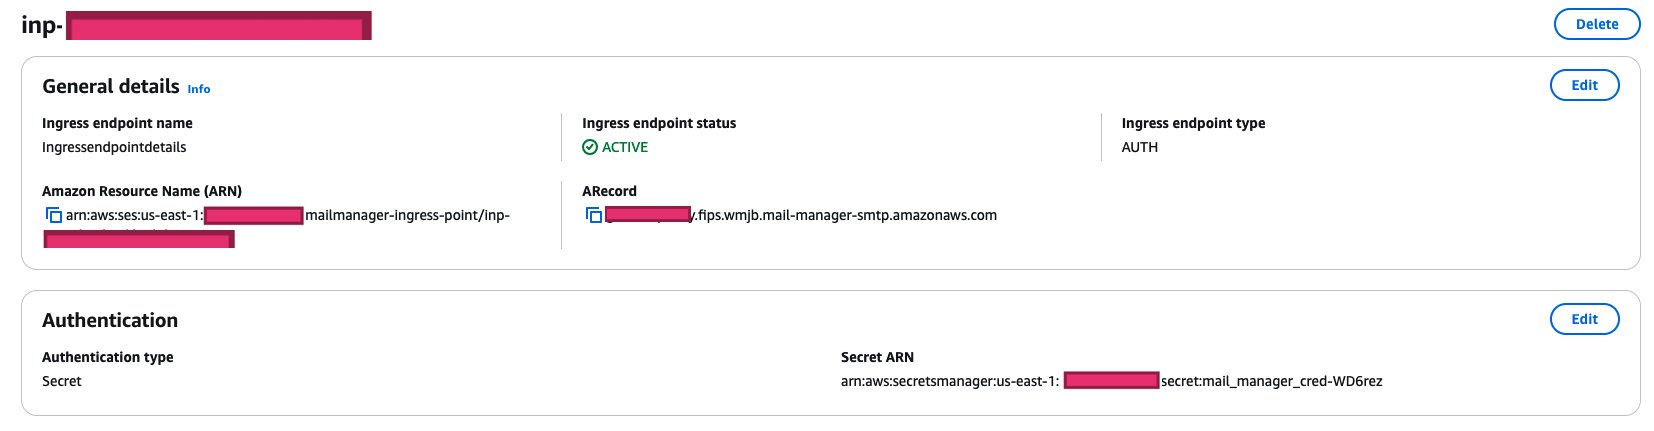
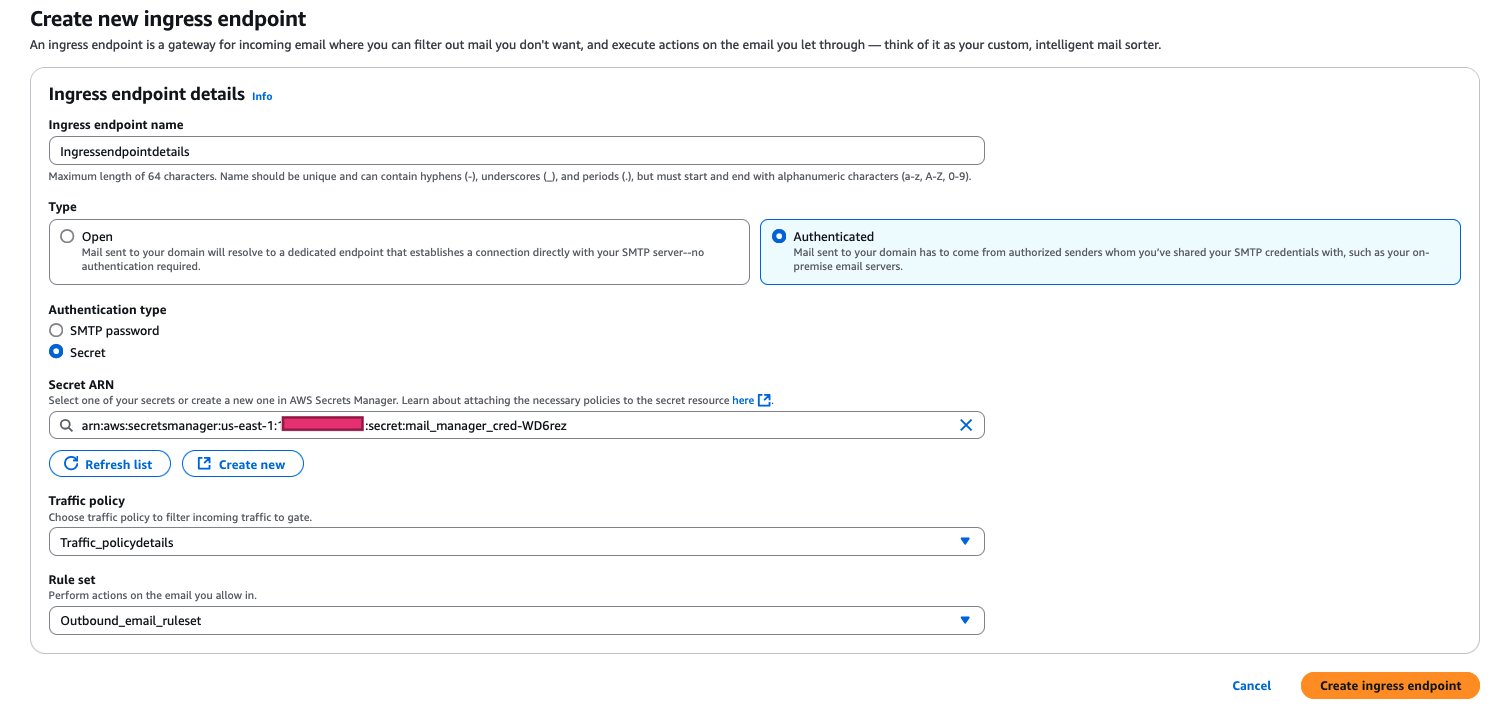 After your ingress endpoint is created, note down the following details from the General details section: