Post Syndicated from Emma White original https://aws.amazon.com/blogs/compute/use-amazon-ec2-for-cost-efficient-cloud-gaming-with-pay-as-you-go-pricing/
This post is written by Markus Ziller, Solutions Architect
Since AWS launched in 2006, cloud computing disrupted traditional IT operations by providing a more cost-efficient, scalable, and secure alternative to owning hardware and data centers. Similarly, cloud gaming today enables gamers to play video games with pay-as-you go pricing. This removes the need of high upfront investments in gaming hardware. Cloud gaming platforms like Amazon Luna are an entryway, but customers are limited to the games available on the service. Furthermore, many customers also prefer to own their games, or they already have a sizable collection. For those use cases, vendor-neutral software like NICE DCV or Parsec are powerful solutions for streaming your games from anywhere.
This post shows a way to stream video games from the AWS Cloud to your local machine. I will demonstrate how you can provision a powerful gaming machine with pay-as-you-go pricing that allows you to play even the most demanding video games with zero upfront investment into gaming hardware.
The post comes with code examples on GitHub that let you follow along and replicate this post in your account.
In this example, I use the AWS Cloud Development Kit (AWS CDK), an open source software development framework, to model and provision cloud application resources. Using the CDK can reduce the complexity and amount of code needed to automate resource deployment.
Overview of the solution
The main services in this solution are Amazon Elastic Compute Cloud (Amazon EC2) and Amazon Elastic Block Store (Amazon EBS). The architecture is as follows:
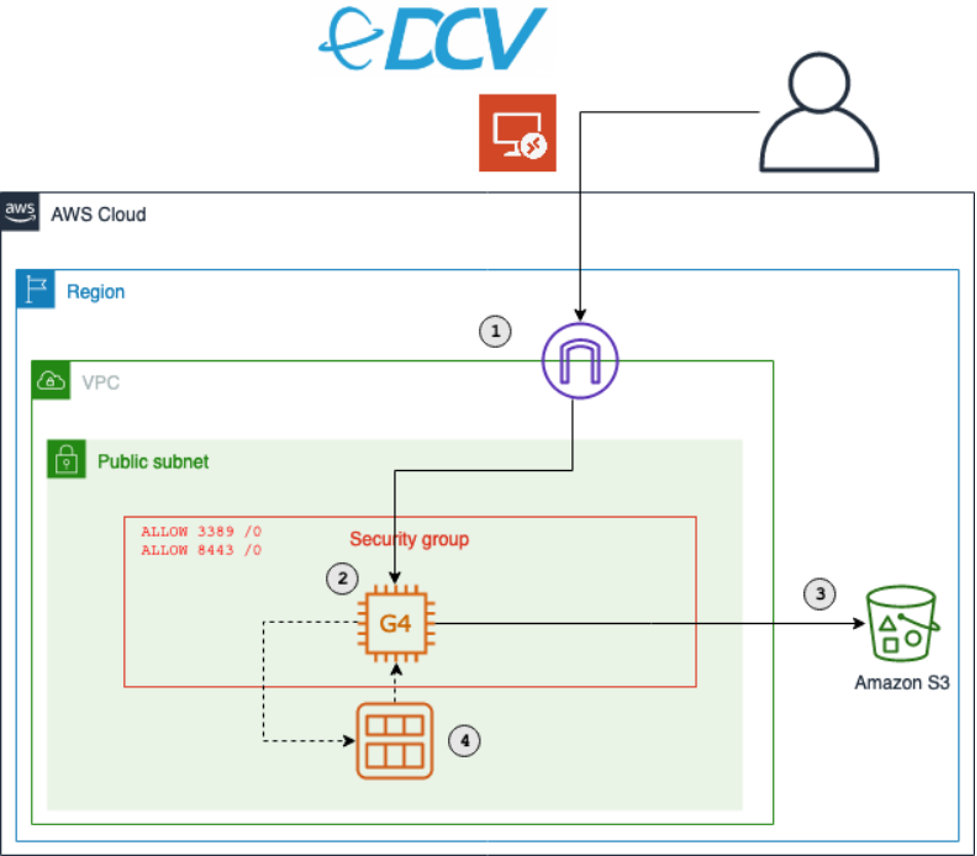
The key components of this solution are described in the following list. During this post, I will explain each component in detail. Deploy this architecture with the sample CDK project that comes with this blog post.
- An Amazon Virtual Private Cloud (Amazon VPC) that lets you launch AWS resources in a logically isolated virtual network. This includes a network configuration that lets you connect with instances in your VPC on ports 3389 and 8443.
- An Amazon EC2 instance of the G4 instance family. Amazon EC2 G4 instances are the most cost-effective and versatile GPU instances. Utilize G4 instances to run your games.
- Access to an Amazon Simple Storage Service (Amazon S3) bucket. S3 is an object storage that contains the graphics drivers required for GPU instances.
- A way to create a personal gaming Amazon Machine Images (AMI). AMIs mean that you only need to conduct the initial configuration of your gaming instance once. After that, create new gaming instances on demand from your AMI.
Walkthrough
The following sections walk through the steps required to set up your personal gaming AMI. You will only have to do this once.
For this walkthrough, you need:
- An AWS account
- Installed and authenticated AWS CLI
- Installed Node.js, TypeScript
- Installed git
- Installed AWS CDK
You will also need an EC2 key pair for the initial instance setup. List your available key pairs with the following CLI command:
aws ec2 describe-key-pairs --query 'KeyPairs[*].KeyName' --output table
Alternatively, create a new key pair with the CLI. You will need the created .pem file later, so make sure to keep it.
KEY_NAME=Gaming
aws ec2 create-key-pair --key-name $KEY_NAME –query 'KeyMaterial' --output text > $KEY_NAME.pem
Checkout and deploy the sample stack
- After completing the prerequisites, clone the associated GitHub repository by running the following command in a local directory:
git clone [email protected]:aws-samples/cloud-gaming-on-ec2-instances
- Open the repository in your preferred local editor, and then review the contents of the
*.tsfiles incdk/bin/andcdk/lib/
- In
gaming-on-g4-instances.tsyou will find two CDK stacks:G4DNStackandG4ADStack. A CDK stack is a unit of deployment. All AWS resources defined within the scope of a stack, either directly or indirectly, are provisioned as a single unit.
The architecture for both stacks is similar, and it only differs in the instance type that will be deployed.
G4DNStack and G4ADStack share parameters that determine the configuration of the EC2 instance, the VPC network and the preinstalled software. The stacks come with defaults for some parameters – I recommend keeping the default values.
EC2
- instanceSize: Sets the EC2 size. Defaults to g4dn.xlarge and g4ad.4xlarge, respectively. Check the service page for a list of valid configurations.
- sshKeyName: The name of the EC2 key pair you will use to connect to the instance. Ensure you have access to the respective .pem file.
- volumeSizeGiB: The root EBS volume size. Around 20 GB will be used for the Windows installation, the rest will be available for your software.
VPC
- openPorts: Access from these ports will be allowed. Per default, this will allow access for Remote Desktop Protocol (RDP) (3389) and NICE DCV (8443).
- associateElasticIp: Controls if an Elastic IP address will be created and added to the EC2 instance. An Elastic IP address is a static public IPv4 address. Contrary to dynamic IPv4 addresses managed by AWS, it will not change after an instance restart. This is an optional convenience that comes at a small cost for reserving the IP address for you.
- allowInboundCidr: Access from this CIDR range will be allowed. This limits the IP space from where your instance is routable. It can be used to add an additional security layer. Per default, traffic from any IP address will be allowed to reach your instance. Notwithstanding allowInboundCidr, an RDP or NICE DCV connection to your instance requires valid credentials and will be rejected otherwise.
Software
- niceDCVDisplayDriverUrl: The download URL of the NICE DCV Virtual Display Driver for EC2.
- niceDCVServerUrl: The download URL of the NICE DCV 2021.0 Server.
For g4dn instances, one more parameter is required (see process of installing NVIDIA drivers):
- gridSwCertUrl: The NVIDIA driver requires a certificate file, which can be downloaded from Amazon S3.
Choose an instance type based on your performance and cost requirements, and then adapt the config accordingly. I recommend starting with the G4DNStack, as it comes at the lowest hourly instance cost. If you need more graphics performance, then choose the G4ADStack for up to 40% improvement in graphics performance.
After choosing an instance, follow the instructions in the README.md in order to deploy the stack.
The CDK will create a new Amazon VPC with a public subnet. It will also configure security groups to allow inbound traffic from the CIDR range and ports specific in the config. By default, this will allow inbound traffic from any IP address. I recommend restricting access to your current IP address by going to checkip.amazonaws.com and replacing 0.0.0.0/0 with <YOUR_IP>/32 for the allowInboundCidr config parameter.
Besides the security groups, the CDK also manages all required IAM permissions.
It creates the following resources in your VPC:
- An EC2 GPU instance running Windows Server 2019. Depending on the stack you chose, the default instance type will be g4dn.xlarge or g4ad.4xlarge. You can override this in the template. When the EC2 instance is launched, the CDK runs an instance-specific PowerShell script. This PowerShell script downloads all drivers and NICE DCV. Check the code to see the full script or add your own commands.
- An EBS gp3 volume with your defined size (default: 150 GB).
- An EC2 launch template.
- (Optionally) An Elastic IP address as a static public IP address for your gaming instances.
After the stack has been deployed, you will see the following output:

Click the first link, and download the remote desktop file in order to connect to your instance. Use the .pem file from the previous step to receive the instance password.
Install drivers on EC2
You will use the RDP to initially connect to your instance. RDP provides a user with a graphical interface to connect to another computer over a network connection. RDP clients are available for a large number of platforms. Use the public IP address provided by the CDK output, the username Administrator, and the password displayed by the EC2 dialogue.
Ensure that you note the password for later steps.
Most configuration process steps are automated by the CDK. However, a few actions (e.g., driver installation) cannot be properly automated. For those, the following manual steps are required once.
Navigate to $home\Desktop\InstallationFiles. If the folder contains an empty file named “OK”, then everything was downloaded correctly and you can proceed with the installation. If you connect while the setup process is still in progress, then wait until the OK file gets created before proceeding. This typically takes 2-3 minutes.
The next step differs slightly for g4ad and g4dn instances.
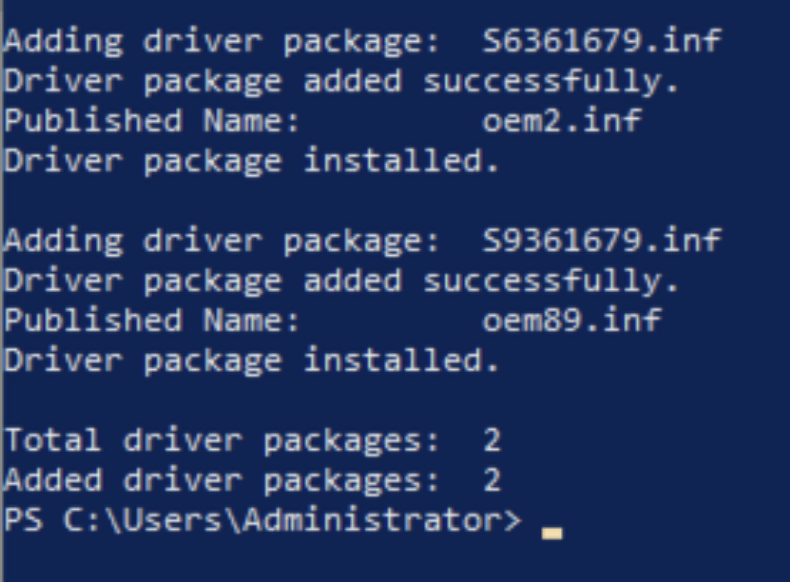
g4ad instances with AMD Radeon Pro V520
Follow the instructions in the EC2 documentation to install the AMD driver from the InstallationFiles folder. The installation may take a few minutes, and it will display the following output when successfully finished.
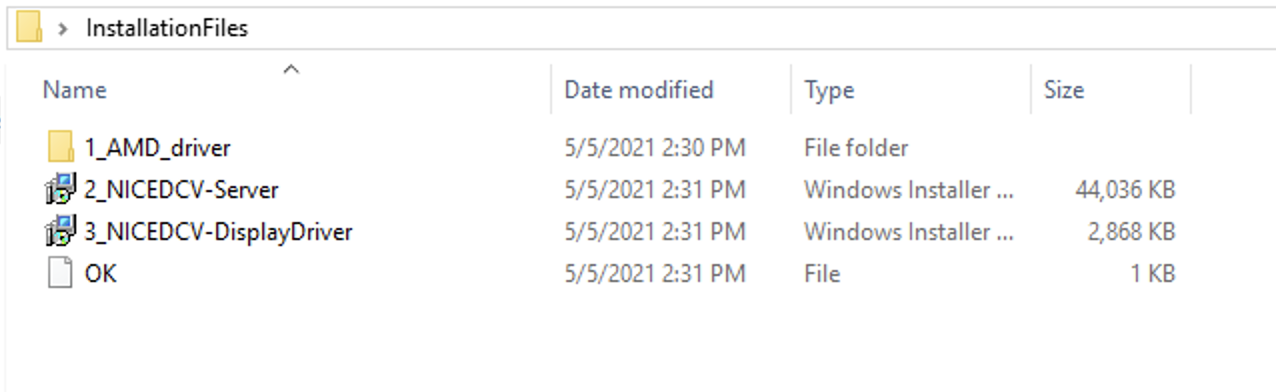
Next, install NICE DCV Server and Display driver by double-clicking the respective files. Finally, restart the instance by running the Restart-Computer PowerShell command.
g4dn instances with NVIDIA T4
Navigate to 1_NVIDIA_drivers, run the NVIDIA driver installer for Windows Server 2019 and follow the instructions.
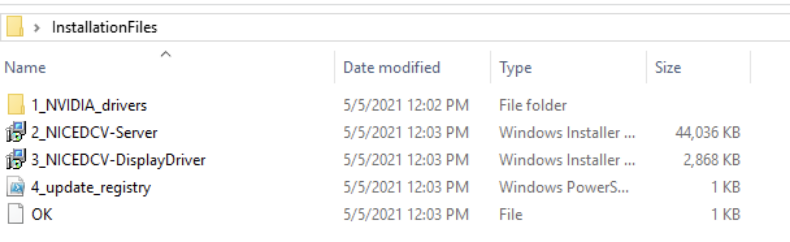
Next, double-click the respective files in the InstallationFiles folder in order to install NICE DCV Server and Display driver.
Finally, right-click on 4_update_registry.ps1, and select “Run with PowerShell” to activate the driver. In order to complete the setup, restart the instance.
Install your software
After the instance restart, you can connect from your local machine to your EC2 instance with NICE DCV. The NICE DCV bandwidth-adaptive streaming protocol allows near real-time responsiveness for your applications without compromising the image accuracy. This is the recommended way to stream latency sensitive applications.
Download the NICE DCV viewer client and connect to your EC2 instance with the same credentials that you used for the RDP connection earlier. After testing the NICE DCV connection, I recommend disabling RDP by removing the corresponding rule in your security group.
You are now all set to install your games and tools on the EC2 instance. Make sure to install it on the C: drive, as you will create an AMI with the contents of C: later.
Start and stop your instance on demand
At this point, you have fully set up the EC2 instance for cloud gaming on AWS. You can now start and stop the instance when needed. The following CLI commands are all you need to remember:
aws ec2 start-instances --instance-ids <INSTANCE_ID>
aws ec2 stop-instances --instance-ids <INSTANCE_ID>
This will use the regular On-Demand instance capacity of EC2, and you will be billed hourly charges for the time that your instance is running. If your instance is stopped, you will only be charged for the EBS volume and the Elastic IP address if you chose to use one.
Launch instances from AMI
Make sure you have installed all of the applications you require on your EC2, and then create your personal gaming AMI by running the following AWS CLI command.
aws ec2 create-image --instance-id <YOUR_INSTANCE_ID> --name <THE_NAME_OF_YOUR_AMI>
Use the following command to get details about your AMI creation. When the status changes from pending to available, then your AMI is ready.
aws ec2 describe-images --owners self --query 'Images[*].[Name, ImageId, BlockDeviceMappings[0].Ebs.SnapshotId, State]' --output table
The CDK created an EC2 launch template when it deployed the stack. Run the following CLI command to spin up an EC2 instance from this template.
aws ec2 run-instances --image-id <YOUR_AMI_ID> --launch-template LaunchTemplateName=<LAUNCH_TEMPLATE_NAME> --query "Instances[*].[InstanceId, PublicIpAddress]" --output table
This command will start a new EC2 instance with the exact same configuration as your initial EC2, but with all your software already installed.
Conclusion
This post walked you through creating your personal cloud gaming stack. You are now all set to lean back and enjoy the benefits of per second billing while playing your favorite video games in the AWS cloud.
Visit the Amazon EC2 G4 instances service page to learn more about how AWS continues to push the boundaries of cost-effectiveness for graphic-intensive applications.