Post Syndicated from Soujanya Konka original https://aws.amazon.com/blogs/big-data/resize-amazon-redshift-from-dc2-to-ra3-with-minimal-or-no-downtime/
Amazon Redshift is a popular cloud data warehouse that allows you to process exabytes of data across your data warehouse, operational database, and data lake using standard SQL. Amazon Redshift offers different node types like DC2 (dense compute) and RA3, which you can use for your different workloads and use cases. For more information about the benefits of migrating from DS2 to RA3, refer to Scale your cloud data warehouse and reduce costs with the new Amazon Redshift RA3 nodes with managed storage and Amazon Redshift Benchmarking: Comparison of RA3 vs. DS2 Instance Types.
Many customers use DC2 nodes for their compute-intensive workloads. It’s natural to scale with your growing workload, namely separating compute from storage so they’re right-sized as per your needs. RA3 nodes with managed storage enable you to optimize your data warehouse by scaling and paying for compute and managed storage independently. Amazon Redshift managed storage uses large, high-performance SSDs in each RA3 node for fast local storage and Amazon S3 for longer-term durable storage. If the data in a node grows beyond the size of the large local SSDs, Amazon Redshift managed storage automatically offloads that data to Amazon S3. RA3 nodes keep track of the frequency of access for each data block and cache the hottest blocks. If the blocks aren’t cached, the large networking bandwidth and precise storing techniques return the data in sub-seconds. Also, if you’re looking for features like cross-cluster data sharing and cross-Availability Zone cluster relocation, these are a few of the reasons for migrating to RA3. Many customers on DC2 have benefitted from migrating to RA3 to serve their growing performance requirements and business use cases.
As a first step of the migration, we always recommend finding the correct load of your system and determining the number of RA3 nodes that will meet your workload and give you the best cost-performance benefit. For this evaluation, you can use the simple Replay tool to conduct a what-if analysis and evaluate how your workload performs in different scenarios. For example, you can use the tool to benchmark your actual workload on a new instance type like RA3, evaluate a new feature, or assess different cluster configurations. To choose the right cluster type, you can compare different node types for your workload and choose the right configuration of RA3 with the Simple Replay utility.
Once you know the cluster type and nodes, the next question is how to migrate your current workload to RA3 with minimum downtime or without disrupting your current workload. In this post, we describe an approach to do this with minimum downtime.
Resizing an Amazon Redshift cluster
There are three ways to resize or migrate an Amazon Redshift cluster from DC2 to RA3 :
- Elastic resize – If it’s available as an option, use elastic resize to change the node type, number of nodes, or both. Note that when you only change the number of nodes, the queries are temporarily paused and connections are kept open. An elastic resize can take between 10–15 minutes. During a resize operation, the cluster is read-only.
- Classic resize – Use classic resize to change the node type, number of nodes, or both. Choose this option when you’re resizing to a configuration that isn’t available through elastic resize. A resize operation can take 2 hours or more, or last up to several days depending on your data size. During the resize operation, the source cluster is read-only.
- Snapshot, restore, and resize – To keep your cluster available during a classic resize, make a copy of the existing cluster, then resize the new cluster. If data is written to the source cluster after a snapshot is taken, the data must be manually copied over after the migration is complete.
Checkpoints for resize
When a cluster is resized using elastic resize with the same node type, the operation doesn’t create a new cluster. As a result, the operation completes quickly. In case of resize, there could be one or more challenges causing the delay in resize:
- Data volumes – The time required to complete a classic resize or a snapshot and restore operation might vary, depending on factors like the workload on the source cluster, the number and volume of tables being transformed, how evenly data is distributed across the compute nodes and slices, and the node configuration in the source and target clusters.
- Snapshots – Automated snapshots are automatically deleted when their retention period expires, when you disable automated snapshots, or when you delete a cluster. If you want to keep an automated snapshot, you can copy it to a manual snapshot. You can take a manual snapshot of the cluster before the migration, which is used for resize operations, but it may not include live data from the time the snapshot was captured.
- Cluster unavailable during resize – It’s critical to know roughly how long the resize will take. To do so, you can try creating a cluster from the snapshot in a test account. However, this only gives a ballpark idea because resize times can vary, especially if you intend to query your cluster during the resize. If the cluster is live almost all the time with minimal or zero non-business hours, a resize can be a challenge because the cluster can’t upsert live data and serve read requests on this data during this window.
- Cluster endpoint retention – Elastic resize and cluster resize allow you to change the node type, number of nodes, or both, but the endpoint is retained. With snapshot resize, a new cluster endpoint is created, which may require a change in your application to replace the endpoint.
- Reconciliation – Validate the target cluster data with the source to make sure migration was completed without data loss and ensure data quality. Reconciliation at the table level isn’t sufficient, you need to ensure records have also been copied from the source. You can run a matching record count check followed by data validation using checksum for accuracy of data.
Solution overview
The steps to prepare for migration are as follows:
- Take a snapshot of the existing production Amazon Redshift cluster running on DC2.
- Create another Amazon Simple Storage Service (Amazon S3) bucket, where AWS Glue writes the curated data in parallel.
- Use the snapshot to create an RA3 cluster.
- Configure AWS Database Migration Service (AWS DMS) to load data from the migrated bucket to Amazon S3.
- After you confirm that the data is synced between the two clusters (DC and RA3) and all other downstream applications, stop the DC cluster and change the endpoint of your dependent downstream application to the newly created RA3 cluster.
Following is the current architecture depicting a live workload.
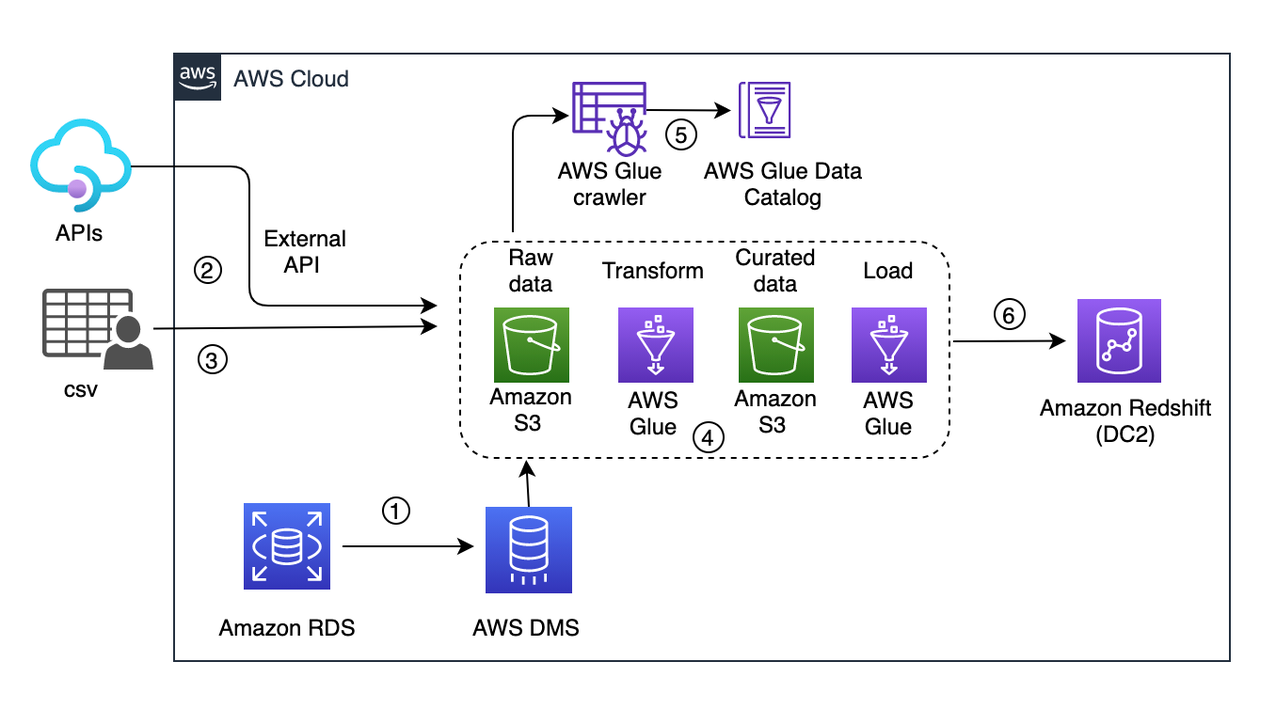
In this solution, data comes from three source systems and are written into a raw S3 bucket:
- Change data capture (CDC) from an RDS instance via AWS DMS (1 in the preceding diagram)
- Events captured via an external API (2)
- CSV files from an external source copied to the raw bucket (3)
These sources don’t have a pattern or an interval of pushing new data.
Every few minutes, the ingested data is picked up by an S3 event trigger to run an AWS Glue workflow (4 in the preceding diagram). It provides an orchestration layer to manage and run jobs and crawlers. This workflow includes a crawler (5) that updates the metadata schema and partitions of the dataset to the AWS Glue Data Catalog. Then the crawler triggers an AWS Glue job that writes the curated data to the S3 curated bucket. From there, another AWS Glue job uploads data into Amazon Redshift (6).
In this scenario, if your workload is critical and you can’t afford a long downtime, then you need to plan your migration accordingly.
Dual write and transient data curation pipeline
As a first step of the migration, you need a parallel data process pipeline as the AWS Glue job, which writes the data into the curated S3 bucket. Create another S3 bucket and name it migrated-curated-bucket and modify the AWS Glue transform job. You can also replicate another transform job to write data to a new reserve S3 bucket in parallel.
In this scenario, live data ingestion occurs every 30 minutes. When an iteration of the extract, transform, and load (ETL) job is complete, this triggers a manual snapshot of the Amazon Redshift cluster. After the snapshot is captured, a new Amazon Redshift cluster is created using that snapshot. Cluster creation time can vary depending on the snapshot volume.
If snapshot creation takes more than 30 minutes, then the ETL job should be stopped, and resume after the snapshot creation is complete. For example, if the ETL job is triggered at 8:00 AM and finishes at 8:10 AM, then snapshot creation starts at 8:10 AM. If it finishes by 8:30 AM (the next ETL job will run at 8:30 AM as per the half-hour interval), then the ETL process continues according to the schedule. Otherwise, the job stops, and resumes after the snapshot completion.
Now we use the snapshot to launch a new RA3 redshift cluster. The process doesn’t pause the existing ETL pipeline, rather it starts writing curated data in parallel to the reserve S3 bucket. The following diagram illustrates this updated workflow.
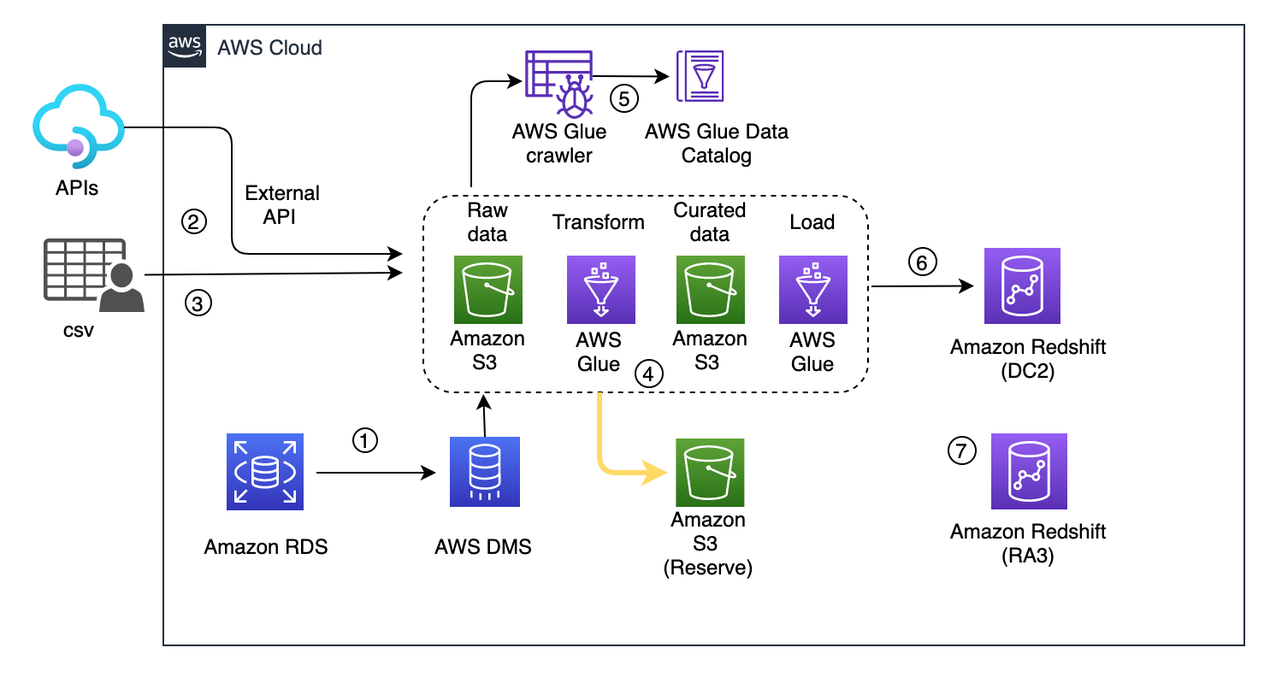
At this point, the existing cluster is still live and continues to process the live workload. Even if creation of the Amazon Redshift cluster takes time (owing to the huge volume of data), you should still be covered. The curated data in the S3 bucket acts as a staging reserve, and this data should be loaded into the RA3 cluster after its cluster is launched.
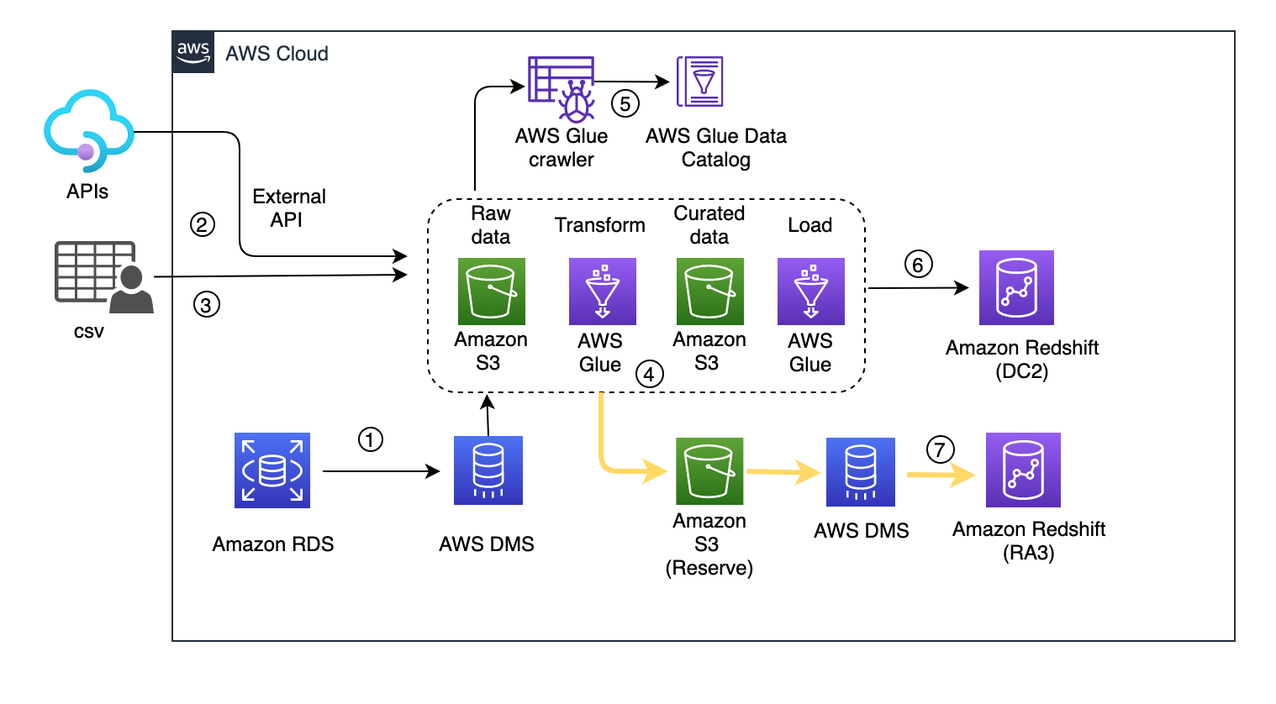
Backfill the new RA3 cluster with missing data
After the RA3 cluster has been launched, you need to playback the captured live data from the reserve S3 bucket to the newly created cluster. Playback is only for the duration of the snapshot capture to the current timestamp. With this process, you’re trying to bring the RA3 cluster in sync with the existing live DC2 cluster.
You need to configure an AWS DMS migration task with the reserve S3 bucket as the source endpoint and the newly created RA3 cluster as the target endpoint.
AWS DMS captures ongoing changes to the target data store. This process is called ongoing replication or change data capture (CDC). AWS DMS uses this process when replicating ongoing changes from a source data store. This process works by collecting changes to the database logs using the database engine’s native API. The following diagram illustrates this workflow.
Reconciliation and cutover
Data reconciliation is the process of verification of data between source and target. In this process, target data is compared with source data to ensure that the data is transferred completely without any alterations. To ensure reliability in the pipeline and the data processed, you should create an end-to-end reconciliation report. This report verifies the percentage of matching tables, columns, and data records. It also identifies missing records, missing values, incorrect values, badly formatted values, and duplicated records.
You can define the reconciliation process to check whether both clusters are running in sync. For that you can create simple Python scripts or shell scripts to query the source and target clusters, fetch the results, and compare.
Cutover is the final step of migration, and involves switching the existing cluster with the newly launched cluster. At this point, the clusters are running in parallel. Next, you validate that the downstream data consumption flows are up to date. Verify the reconciliation metrics from the DC2 and RA3 clusters such that table updates are in sync.
You can keep dual write while you switch from the migration data pipeline. If you discover any issues after cutting over, you can switch back to the old data pipeline, which is the source of truth until cutover. In this case, cutover involves updating the DC2 cluster endpoint to the new RA3 cluster endpoint in the application. Make sure to identify a relatively quiet window during the day to update the endpoint. To keep the same endpoint for your applications and users, you can rename the new RA3 cluster with the same name as the original DC2 cluster. To rename the cluster, modify the cluster in the Amazon Redshift console or ModifyCluster API operation. For more information, see Renaming clusters or ModifyCluster API operation in the Amazon Redshift API Reference.
Up to this point, AWS DMS is continuing to update RA3. After you cut over to RA3, the DC2 cluster is no longer live and you can stop the AWS DMS replication job to RA3. Pause the last snapshot. Delete the reserve S3 bucket and AWS DMS resources used for RA3 load.
Conclusion
In this post, we presented an approach to migrate an existing Amazon Redshift cluster with minimal to no data loss, which also allows the cluster to serve both read and write operations during the resize window. Elastic resize is a quick way to resize your cluster to maintain the same number of slices in the target cluster. Slice mapping reduces the time required to resize a cluster. If you choose a resize configuration that isn’t available on elastic resize, you can choose classic resize or perform a snapshot, restore, and resize.
To learn more about what’s new with RA3 instances, refer to Amazon Redshift RA3 instances with managed storage. Amazon Redshift delivers better price performance and at the same time helps you keep your costs predictable. Amazon Redshift Serverless automatically provisions and scales the data warehouse capacity to deliver high performance for demanding and unpredictable workloads, and you pay only for the resources you use. This provides greater flexibility to choose either or both based on custom requirements. After you’ve made your choice, try the hands-on labs on Amazon Redshift.
About the Authors
 Soujanya Konka is a Solutions Architect and Analytics specialist at AWS, focused on helping customers build their ideas on cloud. Expertise in design and implementation of business information systems and Data warehousing solutions. Before joining AWS, Soujanya has had stints with companies such as HSBC, Cognizant.
 Dipayan Sarkar is a Specialist Solutions Architect for Analytics at AWS, where he helps customers to modernise their data platform using AWS Analytics services. He works with customer to design and build analytics solutions enabling business to make data-driven decisions.