Post Syndicated from Noritaka Sekiyama original https://aws.amazon.com/blogs/big-data/part-1-integrate-apache-hudi-delta-lake-apache-iceberg-datasets-at-scale-aws-glue-studio-notebook/
Cloud data lakes provides a scalable and low-cost data repository that enables customers to easily store data from a variety of data sources. Data scientists, business analysts, and line of business users leverage data lake to explore, refine, and analyze petabytes of data. AWS Glue is a serverless data integration service that makes it easy to discover, prepare, and combine data for analytics, machine learning, and application development. Customers use AWS Glue to discover and extract data from a variety of data sources, enrich and cleanse the data before storing it in data lakes and data warehouses.
Over years, many table formats have emerged to support ACID transaction, governance, and catalog usecases. For example, formats such as Apache Hudi, Delta Lake, Apache Iceberg, and AWS Lake Formation governed tables, enabled customers to run ACID transactions on Amazon Simple Storage Service (Amazon S3). AWS Glue supports these table formats for batch and streaming workloads. This post focuses on Apache Hudi, Delta Lake, and Apache Iceberg, and summarizes how to use them in AWS Glue 3.0 jobs. If you’re interested in AWS Lake Formation governed tables, then visit Effective data lakes using AWS Lake Formation series.
Bring libraries for the data lake formats
Today, there are three available options for bringing libraries for the data lake formats on the AWS Glue job platform: Marketplace connectors, custom connectors (BYOL), and extra library dependencies.
Marketplace connectors
AWS Glue Connector Marketplace is the centralized repository for cataloging the available Glue connectors provided by multiple vendors. You can subscribe to more than 60 connectors offered in AWS Glue Connector Marketplace as of today. There are marketplace connectors available for Apache Hudi, Delta Lake, and Apache Iceberg. Furthermore, the marketplace connectors are hosted on Amazon Elastic Container Registry (Amazon ECR) repository, and downloaded to the Glue job system in runtime. When you prefer simple user experience by subscribing to the connectors and using them on your Glue ETL jobs, the marketplace connector is a good option.
Custom connectors as bring-your-own-connector (BYOC)
AWS Glue custom connector enables you to upload and register your own libraries located in Amazon S3 as Glue connectors. You have more control over the library versions, patches, and dependencies. Since it uses your S3 bucket, you can configure the S3 bucket policy to share the libraries only with specific users, you can configure private network access to download the libraries using VPC Endpoints, etc. When you prefer having more control over those configurations, the custom connector as BYOC is a good option.
Extra library dependencies
There is another option – to download the data lake format libraries, upload them to your S3 bucket, and add extra library dependencies to them. With this option, you can add libraries directly to the job without a connector and use them. In Glue job, you can configure in Dependent JARs path. In API, it’s the --extra-jars parameter. In Glue Studio notebook, you can configure in the %extra_jars magic. To download the relevant JAR files, see the library locations in the section Create a Custom connection (BYOC).
Create a Marketplace connection
To create a new marketplace connection for Apache Hudi, Delta Lake, or Apache Iceberg, complete the following steps.
Apache Hudi 0.10.1
Complete the following steps to create a marketplace connection for Apache Hudi 0.10.1:
- Open AWS Glue Studio.
- Choose Connectors.
- Choose Go to AWS Marketplace.
- Search for Apache Hudi Connector for AWS Glue, and choose Apache Hudi Connector for AWS Glue.
- Choose Continue to Subscribe.
- Review the Terms and conditions, pricing, and other details, and choose the Accept Terms button to continue.
- Make sure that the subscription is complete and you see the Effective date populated next to the product, and then choose Continue to Configuration.
- For Delivery Method, choose
Glue 3.0. - For Software version, choose
0.10.1. - Choose Continue to Launch.
- Under Usage instructions, choose Activate the Glue connector in AWS Glue Studio. You’re redirected to AWS Glue Studio.
- For Name, enter a name for your connection.
- Optionally, choose a VPC, subnet, and security group.
- Choose Create connection.
Delta Lake 1.0.0
Complete the following steps to create a marketplace connection for Delta Lake 1.0.0:
- Open AWS Glue Studio.
- Choose Connectors.
- Choose Go to AWS Marketplace.
- Search for Delta Lake Connector for AWS Glue, and choose Delta Lake Connector for AWS Glue.
- Choose Continue to Subscribe.
- Review the Terms and conditions, pricing, and other details, and choose the Accept Terms button to continue.
- Make sure that the subscription is complete and you see the Effective date populated next to the product, and then choose Continue to Configuration.
- For Delivery Method, choose
Glue 3.0. - For Software version, choose
1.0.0-2. - Choose Continue to Launch.
- Under Usage instructions, choose Activate the Glue connector in AWS Glue Studio. You’re redirected to AWS Glue Studio.
- For Name, enter a name for your connection.
- Optionally, choose a VPC, subnet, and security group.
- Choose Create connection.
Apache Iceberg 0.12.0
Complete the following steps to create a marketplace connection for Apache Iceberg 0.12.0:
- Open AWS Glue Studio.
- Choose Connectors.
- Choose Go to AWS Marketplace.
- Search for Apache Iceberg Connector for AWS Glue, and choose Apache Iceberg Connector for AWS Glue.
- Choose Continue to Subscribe.
- Review the Terms and conditions, pricing, and other details, and choose the Accept Terms button to continue.
- Make sure that the subscription is complete and you see the Effective date populated next to the product, and then choose Continue to Configuration.
- For Delivery Method, choose
Glue 3.0. - For Software version, choose
0.12.0-2. - Choose Continue to Launch.
- Under Usage instructions, choose Activate the Glue connector in AWS Glue Studio. You’re redirected to AWS Glue Studio.
- For Name, enter
iceberg-0120-mp-connection. - Optionally, choose a VPC, subnet, and security group.
- Choose Create connection.
Create a Custom connection (BYOC)
You can create your own custom connectors from JAR files. In this section, you can see the exact JAR files that are used in the marketplace connectors. You can just use the files for your custom connectors for Apache Hudi, Delta Lake, and Apache Iceberg.
To create a new custom connection for Apache Hudi, Delta Lake, or Apache Iceberg, complete the following steps.
Apache Hudi 0.9.0
Complete following steps to create a custom connection for Apache Hudi 0.9.0:
- Download the following JAR files, and upload them to your S3 bucket.
- https://repo1.maven.org/maven2/org/apache/hudi/hudi-spark3-bundle_2.12/0.9.0/hudi-spark3-bundle_2.12-0.9.0.jar
- https://repo1.maven.org/maven2/org/apache/hudi/hudi-utilities-bundle_2.12/0.9.0/hudi-utilities-bundle_2.12-0.9.0.jar
- https://repo1.maven.org/maven2/org/apache/parquet/parquet-avro/1.10.1/parquet-avro-1.10.1.jar
- https://repo1.maven.org/maven2/org/apache/spark/spark-avro_2.12/3.1.1/spark-avro_2.12-3.1.1.jar
- https://repo1.maven.org/maven2/org/apache/calcite/calcite-core/1.10.0/calcite-core-1.10.0.jar
- https://repo1.maven.org/maven2/org/datanucleus/datanucleus-core/4.1.17/datanucleus-core-4.1.17.jar
- https://repo1.maven.org/maven2/org/apache/thrift/libfb303/0.9.3/libfb303-0.9.3.jar
- Open AWS Glue Studio.
- Choose Connectors.
- Choose Create custom connector.
- For Connector S3 URL, enter comma separated Amazon S3 paths for the above JAR files.
- For Name, enter
hudi-090-byoc-connector. - For Connector Type, choose
Spark. - For Class name, enter
org.apache.hudi. - Choose Create connector.
- Choose
hudi-090-byoc-connector. - Choose Create connection.
- For Name, enter
hudi-090-byoc-connection. - Optionally, choose a VPC, subnet, and security group.
- Choose Create connection.
Apache Hudi 0.10.1
Complete the following steps to create a custom connection for Apache Hudi 0.9.0:
- Download following JAR files, and upload them to your S3 bucket.
- Open AWS Glue Studio.
- Choose Connectors.
- Choose Create custom connector.
- For Connector S3 URL, enter comma separated Amazon S3 paths for the above JAR files.
- For Name, enter
hudi-0101-byoc-connector. - For Connector Type, choose Spark.
- For Class name, enter
org.apache.hudi. - Choose Create connector.
- Choose
hudi-0101-byoc-connector. - Choose Create connection.
- For Name, enter
hudi-0101-byoc-connection. - Optionally, choose a VPC, subnet, and security group.
- Choose Create connection.
Note that the above Hudi 0.10.1 installation on Glue 3.0 does not fully support Merge On Read (MoR) tables.
Delta Lake 1.0.0
Complete the following steps to create a custom connector for Delta Lake 1.0.0:
- Download the following JAR file, and upload it to your S3 bucket.
- Open AWS Glue Studio.
- Choose Connectors.
- Choose Create custom connector.
- For Connector S3 URL, enter a comma separated Amazon S3 path for the above JAR file.
- For Name, enter
delta-100-byoc-connector. - For Connector Type, choose
Spark. - For Class name, enter
org.apache.spark.sql.delta.sources.DeltaDataSource. - Choose Create connector.
- Choose
delta-100-byoc-connector. - Choose Create connection.
- For Name, enter
delta-100-byoc-connection. - Optionally, choose a VPC, subnet, and security group.
- Choose Create connection.
Apache Iceberg 0.12.0
Complete the following steps to create a custom connection for Apache Iceberg 0.12.0:
- Download the following JAR files, and upload them to your S3 bucket.
- https://search.maven.org/remotecontent?filepath=org/apache/iceberg/iceberg-spark3-runtime/0.12.0/iceberg-spark3-runtime-0.12.0.jar
- https://repo1.maven.org/maven2/software/amazon/awssdk/bundle/2.15.40/bundle-2.15.40.jar
- https://repo1.maven.org/maven2/software/amazon/awssdk/url-connection-client/2.15.40/url-connection-client-2.15.40.jar
- Open AWS Glue Studio.
- Choose Connectors.
- Choose Create custom connector.
- For Connector S3 URL, enter comma separated Amazon S3 paths for the above JAR files.
- For Name, enter
iceberg-0120-byoc-connector. - For Connector Type, choose
Spark. - For Class name, enter
iceberg. - Choose Create connector.
- Choose
iceberg-0120-byoc-connector. - Choose Create connection.
- For Name, enter
iceberg-0120-byoc-connection. - Optionally, choose a VPC, subnet, and security group.
- Choose Create connection.
Apache Iceberg 0.13.1
Complete the following steps to create a custom connection for Apache Iceberg 0.13.1:
- Download the following JAR files, and upload them to your S3 bucket.
- Open AWS Glue Studio.
- Choose Connectors.
- Choose Create custom connector.
- For Connector S3 URL, enter comma separated Amazon S3 paths for the above JAR files.
- For Name, enter
iceberg-0131-byoc-connector. - For Connector Type, choose
Spark. - For Class name, enter
iceberg. - Choose Create connector.
- Choose
iceberg-0131-byoc-connector. - Choose Create connection.
- For Name, enter
iceberg-0131-byoc-connection. - Optionally, choose a VPC, subnet, and security group.
- Choose Create connection.
Prerequisites
To continue this tutorial, you must create the following AWS resources in advance:
- AWS Identity and Access Management (IAM) role for your ETL job or notebook as instructed in Set up IAM permissions for AWS Glue Studio. Note that
AmazonEC2ContainerRegistryReadOnlyor equivalent permissions are needed when you use the marketplace connectors. - Amazon S3 bucket for storing data.
- Glue connection (one of the marketplace connector or the custom connector corresponding to the data lake format).
Reads/writes using the connector on AWS Glue Studio Notebook
The following are the instructions to read/write tables using each data lake format on AWS Glue Studio Notebook. As a prerequisite, make sure that you have created a connector and a connection for the connector using the information above.
The example notebooks are hosted on AWS Glue Samples GitHub repository. You can find 7 notebooks available. In the following instructions, we will use one notebook per data lake format.
Apache Hudi
To read/write Apache Hudi tables in the AWS Glue Studio notebook, complete the following:
- Download hudi_dataframe.ipynb.
- Open AWS Glue Studio.
- Choose Jobs.
- Choose Jupyter notebook and then choose Upload and edit an existing notebook. From Choose file, select your ipynb file and choose Open, then choose Create.
- On the Notebook setup page, for Job name, enter your job name.
- For IAM role, select your IAM role. Choose Create job. After a short time period, the Jupyter notebook editor appears.
- In the first cell, replace the placeholder with your Hudi connection name, and run the cell:
%connections hudi-0101-byoc-connection(Alternatively you can use your connection name created from the marketplace connector). - In the second cell, replace the S3 bucket name placeholder with your S3 bucket name, and run the cell.
- Run the cells in the section Initialize SparkSession.
- Run the cells in the section Clean up existing resources.
- Run the cells in the section Create Hudi table with sample data using catalog sync to create a new Hudi table with sample data.
- Run the cells in the section Read from Hudi table to verify the new Hudi table. There are five records in this table.

- Run the cells in the section Upsert records into Hudi table to see how upsert works on Hudi. This code inserts one new record, and updates the one existing record. You can verify that there is a new record
product_id=00006, and the existing recordproduct_id=00001’s price has been updated from250to400.

- Run the cells in the section Delete a Record. You can verify that the existing record
product_id=00001has been deleted.

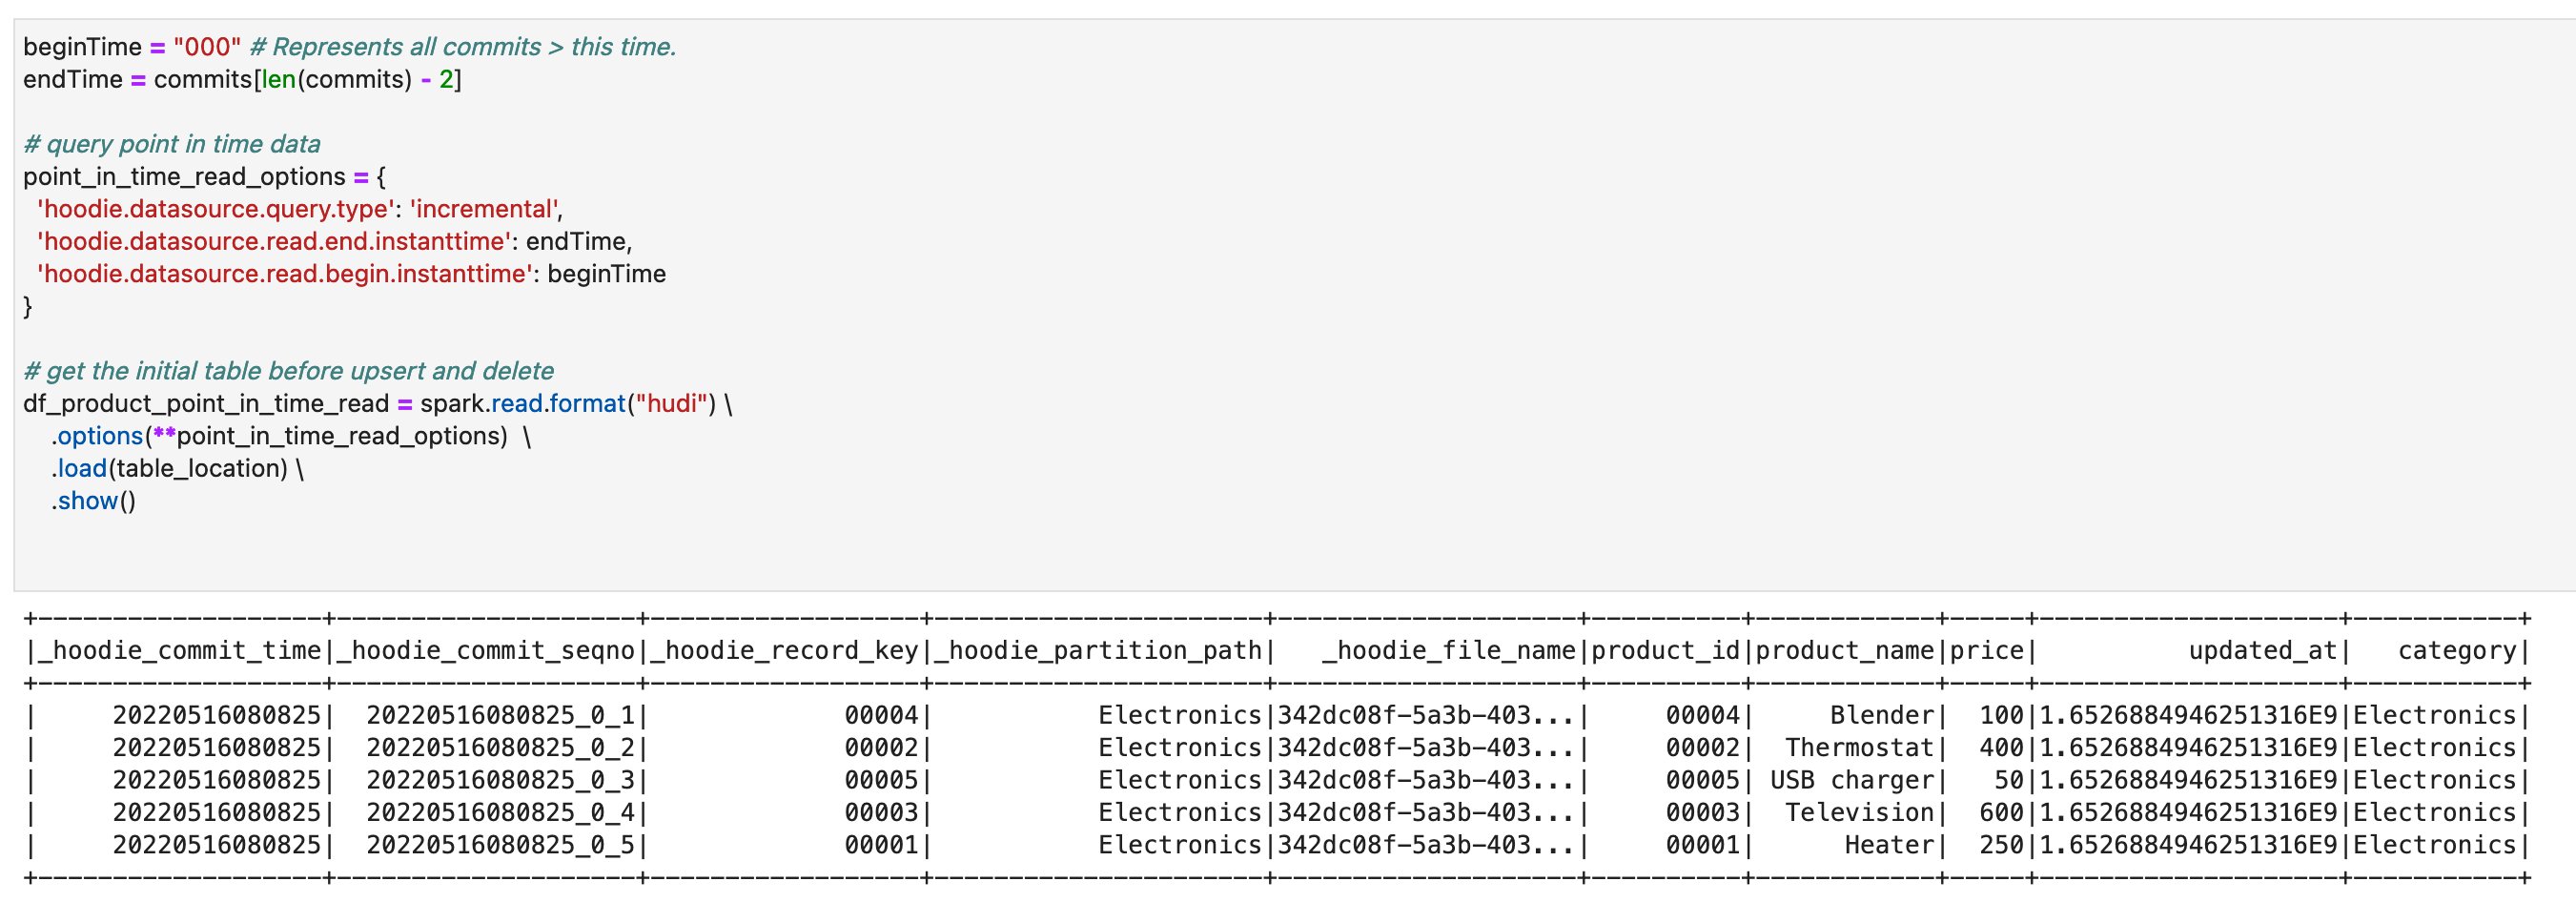
- Run the cells in the section Point in time query. You can verify that you’re seeing the previous version of the table where the upsert and delete operations haven’t been applied yet.

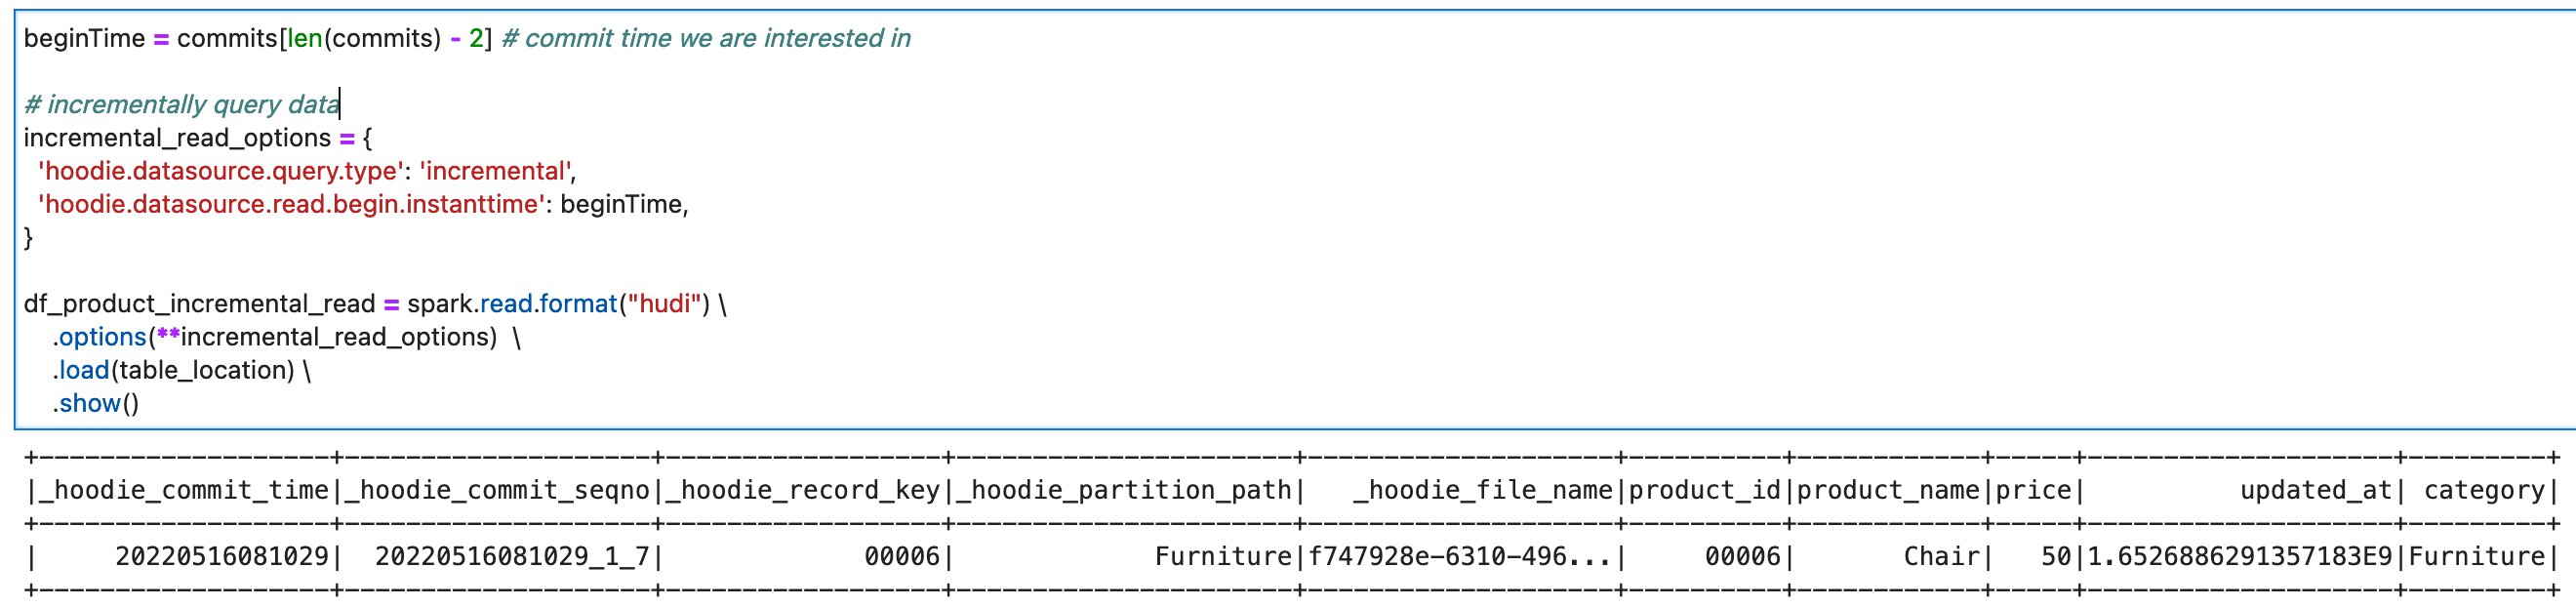
- Run the cells in the section Incremental Query. You can verify that you’re seeing only the recent commit about
product_id=00006.


On this notebook, you could complete the basic Spark DataFrame operations on Hudi tables.
Delta Lake
To read/write Delta Lake tables in the AWS Glue Studio notebook, complete following:
- Download delta_sql.ipynb.
- Open AWS Glue Studio.
- Choose Jobs.
- Choose Jupyter notebook, and then choose Upload and edit an existing notebook. From Choose file, select your ipynb file and choose Open, then choose Create.
- On the Notebook setup page, for Job name, enter your job name.
- For IAM role, select your IAM role. Choose Create job. After a short time period, the Jupyter notebook editor appears.
- In the first cell, replace the placeholder with your Delta connection name, and run the cell:
%connections delta-100-byoc-connection - In the second cell, replace the S3 bucket name placeholder with your S3 bucket name, and run the cell.
- Run the cells in the section Initialize SparkSession.
- Run the cells in the section Clean up existing resources.
- Run the cells in the section Create Delta table with sample data to create a new Delta table with sample data.
- Run the cells in the section Create a Delta Lake table.

- Run the cells in the section Read from Delta Lake table to verify the new Delta table. There are five records in this table.

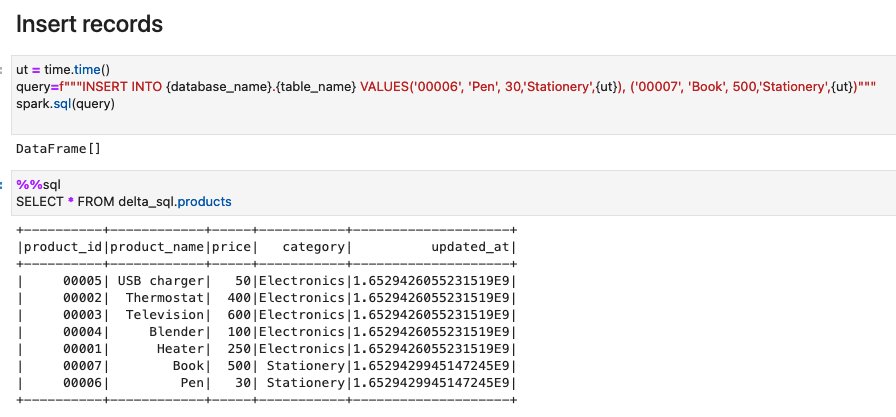
- Run the cells in the section Insert records. The query inserts two new records:
record_id=00006, andrecord_id=00007.

- Run the cells in the section Update records. The query updates the price of the existing records
record_id=00007, andrecord_id=00007from500to300.

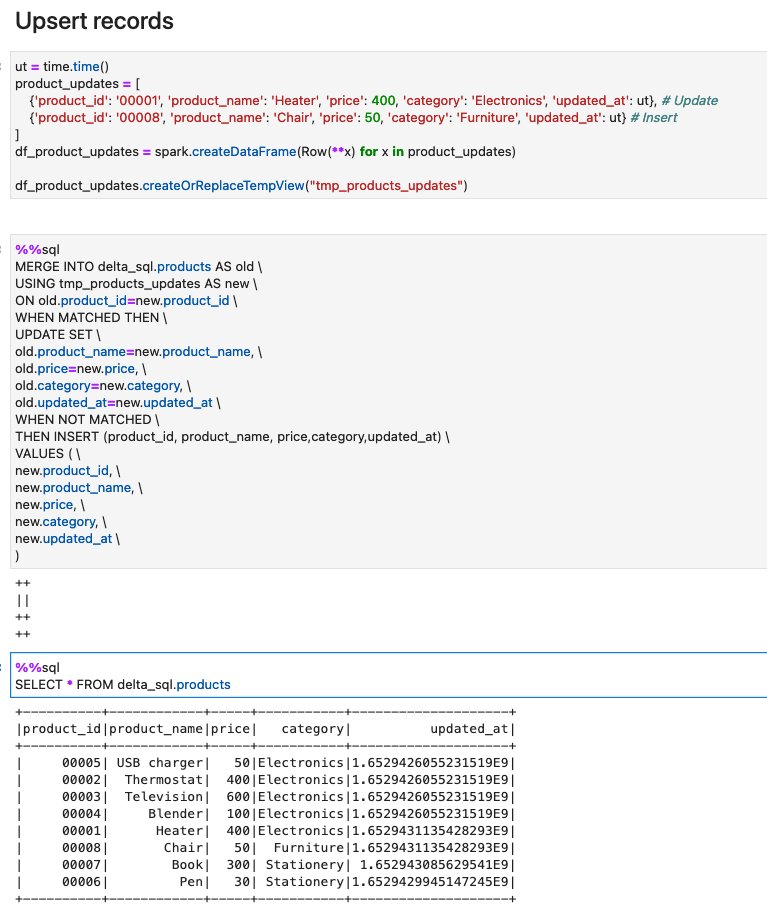
- Run the cells in the section Upsert records. to see how upsert works on Delta. This code inserts one new record, and updates the one existing record. You can verify that there is a new record
product_id=00008, and the existing recordproduct_id=00001’s price has been updated from250to400.

- Run the cells in the section Alter DeltaLake table. The queries add one new column, and update the values in the column.

- Run the cells in the section Delete records. You can verify that the record
product_id=00006because it’sproduct_nameisPen.

- Run the cells in the section View History to describe the history of operations that was triggered against the target Delta table.


On this notebook, you could complete the basic Spark SQL operations on Delta tables.
Apache Iceberg
To read/write Apache Iceberg tables in the AWS Glue Studio notebook, complete the following:
- Download iceberg_sql.ipynb.
- Open AWS Glue Studio.
- Choose Jobs.
- Choose Jupyter notebook and then choose Upload and edit an existing notebook. From Choose file, select your ipynb file and choose Open, then choose Create.
- On the Notebook setup page, for Job name, enter your job name.
- For IAM role, select your IAM role. Choose Create job. After a short time period, the Jupyter notebook editor appears.
- In the first cell, replace the placeholder with your Delta connection name, and run the cell:
%connections iceberg-0131-byoc-connection(Alternatively you can use your connection name created from the marketplace connector). - In the second cell, replace the S3 bucket name placeholder with your S3 bucket name, and run the cell.
- Run the cells in the section Initialize SparkSession.
- Run the cells in the section Clean up existing resources.
- Run the cells in the section Create Iceberg table with sample data to create a new Iceberg table with sample data.
- Run the cells in the section Read from Iceberg table.

- Run the cells in the section Upsert records into Iceberg table.

- Run the cells in the section Delete records.

- Run the cells in the section View History and Snapshots.


On this notebook, you could complete the basic Spark SQL operations on Iceberg tables.
Conclusion
This post summarized how to utilize Apache Hudi, Delta Lake, and Apache Iceberg on AWS Glue platform, as well as demonstrate how each format works with a Glue Studio notebook. You can start using those data lake formats easily in Spark DataFrames and Spark SQL on the Glue jobs or the Glue Studio notebooks.
This post focused on interactive coding and querying on notebooks. The upcoming part 2 will focus on the experience using AWS Glue Studio Visual Editor and Glue DynamicFrames for customers who prefer visual authoring without the need to write code.
About the Authors
 Noritaka Sekiyama is a Principal Big Data Architect on the AWS Glue team. He enjoys learning different use cases from customers and sharing knowledge about big data technologies with the wider community.
 Dylan Qu is a Specialist Solutions Architect focused on Big Data & Analytics with AWS. He helps customers architect and build highly scalable, performant, and secure cloud-based solutions on AWS.
 Monjumi Sarma is a Data Lab Solutions Architect at AWS. She helps customers architect data analytics solutions, which gives them an accelerated path towards modernization initiatives.