Post Syndicated from Noritaka Sekiyama original https://aws.amazon.com/blogs/big-data/part-2-integrate-apache-hudi-delta-lake-apache-iceberg-dataset-at-scale-using-aws-glue-studio-visual-editor/
Transactional data lake technologies such as Apache Hudi, Delta Lake, Apache Iceberg, and AWS Lake Formation governed tables is evolving rapidly, and gaining great popularity. These technologies simplified the data processing pipeline significantly, and they provided further useful capabilities like upserts, rolling back, and time travel queries.
In the first post of this series, we went through how to process Apache Hudi, Delta Lake, and Apache Iceberg datasets using AWS Glue connectors. AWS Glue simplifies reading and writing your data in those data lake formats, and building the data lakes on top of those technologies. Running the sample notebooks on AWS Glue Studio notebook, you could interactively develop and run your code, then immediately see the results. The notebooks let you explore how those technologies work when you have coding experience.
This second post focuses on other use cases for customers who prefer visual job authoring without writing custom code. Even without coding experience, you can easily build your transactional data lakes on AWS Glue Studio visual editor, and take advantage of those transactional data lake technologies. In addition, you can also use Amazon Athena to query the data stored using Hudi and Iceberg. This tutorial demonstrates how to read and write each format on AWS Glue Studio visual editor, and then how to query from Athena.
Process Apache Hudi, Delta Lake, Apache Iceberg dataset at scale
|
Prerequisites
The following are the instructions to read/write tables using each data lake format on AWS Glue Studio Visual Editor. You can use any of the marketplace connector or the custom connector based on your requirements.
To continue this tutorial, you must create the following AWS resources in advance:
- AWS Identity and Access Management (IAM) role for your ETL job or notebook as instructed in Set up IAM permissions for AWS Glue Studio.
- Amazon Simple Storage Service (Amazon S3) bucket for storing data.
- AWS Glue connection created in the previous post.
Reads/writes using the connector on AWS Glue Studio Visual Editor
In this tutorial, you read and write each of the transaction data lake format data on the AWS Glue Studio Visual Editor. There are three main configurations: connection, connection options, and job parameters that you must configure per the data lake format. Note that no code is included in this tutorial. Let’s see how it works.
Apache Hudi writes
Complete following steps to write into Apache Hudi table using the connector:
- Open AWS Glue Studio.
- Choose Jobs.
- Choose Visual with a source and target.
- For Source, choose Amazon S3.
- For Target, choose
hudi-0101-byoc-connector. - Choose Create.
- Under Visual, choose Data source – S3 bucket.
- Under Node properties, for S3 source type, choose S3 location.
- For S3 URL, enter
s3://covid19-lake/rearc-covid-19-world-cases-deaths-testing/json/. - Choose Data target – Connector.
- Under Node properties, for Connection, choose hudi-0101-byoc-connection.
- For Connection options, enter the following pairs of Key and Value (choose Add new option to enter a new pair).
- Key:
path. Value: <Your S3 path for Hudi table location> - Key:
hoodie.table.name, Value:test - Key:
hoodie.datasource.write.storage.type, Value:COPY_ON_WRITE - Key:
hoodie.datasource.write.operation, Value:upsert - Key:
hoodie.datasource.write.recordkey.field, Value:location - Key:
hoodie.datasource.write.precombine.field, Value:date - Key:
hoodie.datasource.write.partitionpath.field, Value:iso_code - Key:
hoodie.datasource.write.hive_style_partitioning, Value:true - Key:
hoodie.datasource.hive_sync.enable, Value:true - Key:
hoodie.datasource.hive_sync.database, Value:hudi - Key:
hoodie.datasource.hive_sync.table, Value:test - Key:
hoodie.datasource.hive_sync.partition_fields, Value:iso_code - Key:
hoodie.datasource.hive_sync.partition_extractor_class, Value:org.apache.hudi.hive.MultiPartKeysValueExtractor - Key:
hoodie.datasource.hive_sync.use_jdbc, Value:false - Key:
hoodie.datasource.hive_sync.mode, Value:hms
- Key:
- Under Job details, for IAM Role, choose your IAM role.
- Under Advanced properties, for Job parameters, choose Add new parameter.
- For Key, enter
--conf. - For Value, enter
spark.serializer=org.apache.spark.serializer.KryoSerializer. - Choose Save.
- Choose Run.

Apache Hudi reads
Complete following steps to read from the Apache Hudi table that you created in the previous section using the connector:
- Open AWS Glue Studio.
- Choose Jobs.
- Choose Visual with a source and target.
- For Source, choose
hudi-0101-byoc-connector. - For Target, choose Amazon S3.
- Choose Create.
- Under Visual, choose Data source – Connection.
- Under Node properties, for Connection, choose
hudi-0101-byoc-connection. - For Connection options, choose Add new option.
- For Key, enter
path. For Value, enter your S3 path for your Hudi table that you created in the previous section. - Choose Transform – ApplyMapping, and choose Remove.
- Choose Data target – S3 bucket.
- Under Data target properties, for Format, choose JSON.
- For S3 Target type. choose S3 location.
- For S3 Target Location enter your S3 path for output location.
- Under Job details, for IAM Role, choose your IAM role.
- Choose Save.
- Choose Run.

Delta Lake writes
Complete the following steps to write into the Delta Lake table using the connector:
- Open AWS Glue Studio.
- Choose Jobs.
- Choose Visual with a source and target.
- For Source, choose Amazon S3.
- For Target, choose
delta-100-byoc-connector. - Choose Create.
- Under Visual, choose Data source – S3 bucket.
- Under Node properties, for S3 source type, choose S3 location.
- For S3 URL, enter
s3://covid19-lake/rearc-covid-19-world-cases-deaths-testing/json/. - Choose Data target – Connector.
- Under Node properties, for Connection, choose your
delta-100-byoc-connection. - For Connection options, choose Add new option.
- For Key, enter
path. For Value, enter your S3 path for Delta table location. Choose Add new option. - For Key, enter
partitionKeys. For Value, enteriso_code. - Under Job details, for IAM Role, choose your IAM role.
- Under Advanced properties, for Job parameters, choose Add new parameter.
- For Key, enter
--conf. - For Value, enter
spark.sql.extensions=io.delta.sql.DeltaSparkSessionExtension --conf spark.sql.catalog.spark_catalog=org.apache.spark.sql.delta.catalog.DeltaCatalog. - Choose Save.
- Choose Run.

Delta Lake reads
Complete the following steps to read from the Delta Lake table that you created in the previous section using the connector:
- Open AWS Glue Studio.
- Choose Jobs.
- Choose Visual with a source and target.
- For Source, choose
delta-100-byoc-connector. - For Target, choose Amazon S3.
- Choose Create.
- Under Visual, choose Data source – Connection.
- Under Node properties, for Connection, choose
delta-100-byoc-connection. - For Connection options, choose Add new option.
- For Key, enter
path. For Value, enter your S3 path for Delta table that you created in the previous section. Choose Add new option. - For Key, enter
partitionKeys. For Value, enteriso_code. - Choose Transform – ApplyMapping, and choose Remove.
- Choose Data target – S3 bucket.
- Under Data target properties, for Format, choose JSON.
- For S3 Target type, choose S3 location.
- For S3 Target Location enter your S3 path for output location.
- Under Job details, for IAM Role, choose your IAM role.
- Under Advanced properties, for Job parameters, choose Add new parameter.
- For Key, enter
--conf. - For Value, enter
spark.sql.extensions=io.delta.sql.DeltaSparkSessionExtension --conf spark.sql.catalog.spark_catalog=org.apache.spark.sql.delta.catalog.DeltaCatalog. - Choose Save.
- Choose Run.

Apache Iceberg writes
Complete the following steps to write into Apache Iceberg table using the connector:
- Open AWS Glue console.
- Choose Databases.
- Choose Add database.
- For database name, enter iceberg, and choose Create.
- Open AWS Glue Studio.
- Choose Jobs.
- Choose Visual with a source and target.
- For Source, choose Amazon S3.
- For Target, choose
iceberg-0131-byoc-connector. - Choose Create.
- Under Visual, choose Data source – S3 bucket.
- Under Node properties, for S3 source type, choose S3 location.
- For S3 URL, enter
s3://covid19-lake/rearc-covid-19-world-cases-deaths-testing/json/. - Choose Data target – Connector.
- Under Node properties, for Connection, choose
iceberg-0131-byoc-connection. - For Connection options, choose Add new option.
- For Key, enter
path. For Value, enterglue_catalog.iceberg.test. - Choose SQL under Transform to create a new AWS Glue Studio node.
- Under Node properties, for Node parents, choose ApplyMapping.
- Under Transform, for SQL alias, verify that
myDataSourceis entered. - For SQL query, enter
CREATE TABLE glue_catalog.iceberg.test AS SELECT * FROM myDataSource WHERE 1=2. This is to create a table definition with no records because the Iceberg target requires table definition before data ingestion. - Under Job details, for IAM Role, choose your IAM role.
- Under Advanced properties, for Job parameters, choose Add new parameter.
- For Key, enter
--conf. - For Value, enter the following value (replace the placeholder
your_s3_bucketwith your S3 bucket name):spark.sql.catalog.glue_catalog=org.apache.iceberg.spark.SparkCatalog --conf spark.sql.catalog.glue_catalog.warehouse=s3://your_s3_bucket/iceberg/warehouse --conf spark.sql.catalog.glue_catalog.catalog-impl --conf park.sql.catalog.glue_catalog.io-impl=org.apache.iceberg.aws.s3.S3FileIO --conf spark.sql.catalog.glue_catalog.lock-impl=org.apache.iceberg.aws.glue.DynamoLockManager --conf spark.sql.catalog.glue_catalog.lock.table=iceberg_lock --conf spark.sql.extensions=org.apache.iceberg.spark.extensions.IcebergSparkSessionExtensions - Choose Save.
- Choose Run.

Apache Iceberg reads
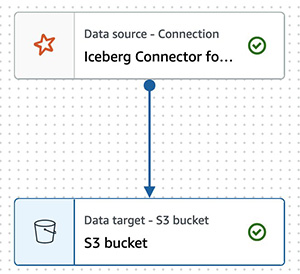
Complete the following steps to read from Apache Iceberg table that you created in the previous section using the connector:
- Open AWS Glue Studio.
- Choose Jobs.
- Choose Visual with a source and target.
- For Source, choose Apache Iceberg Connector for AWS Glue 3.0.
- For Target, choose Amazon S3.
- Choose Create.
- Under Visual, choose Data source – Connection.
- Under Node properties, for Connection, choose your Iceberg connection name.
- For Connection options, choose Add new option.
- For Key, enter
path. For Value, enterglue_catalog.iceberg.test. - Choose Transform – ApplyMapping, and choose Remove.
- Choose Data target – S3 bucket.
- Under Data target properties, for Format, choose JSON.
- For S3 Target type, choose S3 location.
- For S3 Target Location enter your S3 path for the output location.
- Under Job details, for IAM Role, choose your IAM role.
- Under Advanced properties, for Job parameters, choose Add new parameter.
- For Key, enter
--conf. - For Value, enter the following value (replace the placeholder
your_s3_bucketwith your S3 bucket name):spark.sql.catalog.glue_catalog=org.apache.iceberg.spark.SparkCatalog --conf spark.sql.catalog.glue_catalog.warehouse=s3://your_s3_bucket/iceberg/warehouse --conf spark.sql.catalog.glue_catalog.catalog-impl --conf park.sql.catalog.glue_catalog.io-impl=org.apache.iceberg.aws.s3.S3FileIO --conf spark.sql.catalog.glue_catalog.lock-impl=org.apache.iceberg.aws.glue.DynamoLockManager --conf spark.sql.catalog.glue_catalog.lock.table=iceberg_lock --conf spark.sql.extensions=org.apache.iceberg.spark.extensions.IcebergSparkSessionExtensions - Choose Save.
- Choose Run.
Query from Athena
The Hudi table and the iceberg tables created with the above instructions are also queryable from Athena.
- Open the Athena console.
- Run the following SQL to query the Hudi table:

- Run the following SQL to query the Iceberg table:


If you want to query the Delta table from Athena, follow Presto, Trino, and Athena to Delta Lake integration using manifests.
Conclusion
This post summarized how to utilize Apache Hudi, Delta Lake, and Apache Iceberg on AWS Glue platform, as well as demonstrated how each format works with the AWS Glue Studio Visual Editor. You can start using those data lake formats easily in any of the AWS Glue DynamicFrames, Spark DataFrames, and Spark SQL on the AWS Glue jobs, the AWS Glue Studio notebooks, and the AWS Glue Studio visual editor.
About the Author
 Noritaka Sekiyama is a Principal Big Data Architect on the AWS Glue team. He enjoys collaborating with different teams to deliver results like this post. In his spare time, he enjoys playing video games with his family.