Post Syndicated from Kumar Karra original https://aws.amazon.com/blogs/devops/using-workflows-to-build-test-and-deploy-with-amazon-codecatalyst/
Amazon CodeCatalyst workflows are continuous integration and continuous delivery (CI/CD) pipelines that enable you to easily build, test and deploy applications. CodeCatalyst was announced at re:Invent 2022 and is currently in preview.
Introduction:
I recently read The Unicorn Project, the follow-up to the bestselling title The Phoenix Project from Gene Kim. After a few years at Amazon, I had forgotten how some companies write software, but it all came back to me as I read. In the book, the main character, Maxine, struggles with a complicated software development lifecycle (SLDC) after joining a new team. Some of the challenges she encounters include:
- Continually delivering high-quality updates is complicated and slow
- Collaborating efficiently with others is challenging
- Managing application environments is increasingly complex
- Setting up a new project is a time consuming chore
Amazon CodeCatalyst can help address all of these issues. CodeCatalyst is an integrated DevOps service that makes it easy for development teams to quickly build and deliver applications on AWS. Over the next few weeks, my colleagues and I will release a series of blog posts describing the individual features of CodeCatalyst and how they will help you overcome the challenges that Maxine encountered in The Unicorn Project. In this first post, I focus on Workflows and address the first bullet above, “continually delivering high-quality updates is complicated and slow”.
CodeCatalyst Workflows help you reliably deliver high-quality application updates frequently, quickly and securely. CodeCatalyst uses a visual editor — or if you prefer YAML — to quickly assemble and configure actions to compose workflows that automate your CI/CD pipeline, test reporting and other manual processes. Workflows use provisioned compute, lambda compute, custom container images and a managed build infrastructure to scale execution easily without sacrificing flexibility
Prerequisites
If you would like to follow along with this walkthrough, you will need to:
- Have an AWS Builder ID for signing in to CodeCatalyst.
- Belong to a space and have the space administrator role assigned to you in that space. For more information, see Creating a space in CodeCatalyst, Managing members of your space, and Space administrator role.
- Have an AWS account associated with your space and have the IAM role in that account. For more information about the role and role policy, see Creating a CodeCatalyst service role.
Walkthrough
For this walkthrough, I am going use the Modern Three-tier Web Application blueprint. A CodeCatalyst blueprint provides a template for a new project. If you would like to follow along, you can launch the blueprint as described in Creating a project in Amazon CodeCatalyst. This will deploy the architecture shown below.
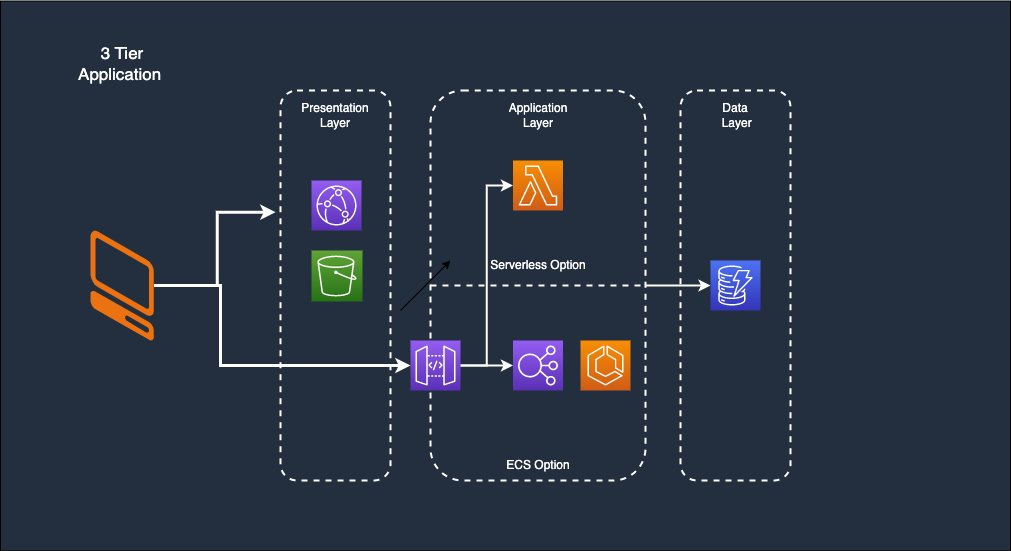
Figure 1. Modern Three-tier Web Application architecture including a presentation, application and data layer
Once the new project is launched, navigate to CI/CD > Workflows. You will see two workflows listed. Click on ApplicationDeploymentPipeline and you will be presented with the workflow pictured below. The workflow consists of six actions: 1) ensures that CDK is configured in the account; 2) builds the backend, written in Python, including unit tests; 3) deploys the backend to either AWS Lambda or AWS Fargate depending on which you selected when you launched the project; 4) runs a series of integration tests on the deployed backend; 5) builds the frontend, written with Vue, including unit tests; and finally, 6) deploys the frontend to Amazon Simple Storage Service (Amazon S3) and Amazon CloudFront.
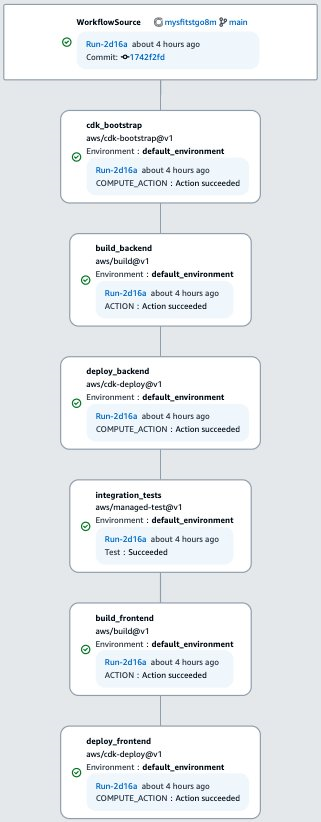
Figure 2. Six step Workflow described in the prior paragraph
Let’s look at a few of these actions. If you click on each action you will see details about the workflow execution. For example, I clicked on build_backend. On the logs tab, I can see the build action executes a series of steps. In this example, pip installs requirements and then pytest and coverage run a series of unit test. If this had been a compiled language — like Java or .NET — there would have been a build step as well.
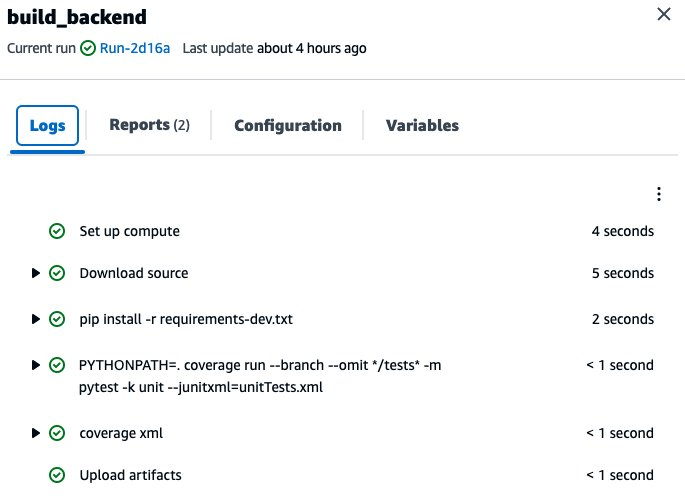
Figure 3. Logs from the build action including pip, pytest, and coverage
If I switch to the Reports tab, I see the result of the unit tests as well as code and branch coverage. In each case the test has exceeded the pass rate, indicated by the black bar on the graph. If they had not, the build would have failed.
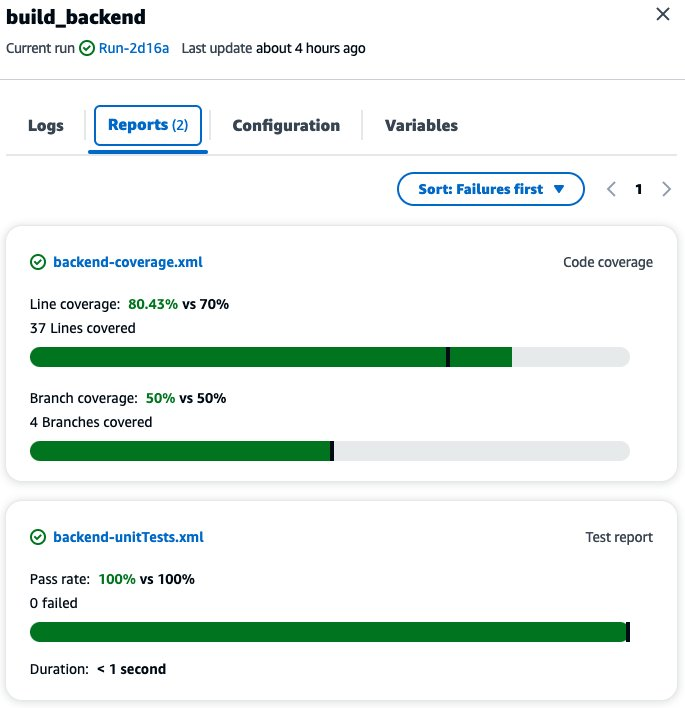
Figure 4. Results of the unit tests including code and branch coverage
Next, let’s examine how the workflow is defined by clicking on the Edit button in the top right corner of the screen. If the editor opens in YAML mode, switch to Visual mode using the toggle above the code. If I click on WorkflowSource, I see that the Workflow is triggered by a push to the main branch. I could add additional triggers. CodeCatalyst supports triggering on Push or Pull Request. In addition, I can trigger off multiple branches, including wildcards (e.g. “release-.*”). Finally, I can trigger branches when only some files in a repository change (e.g. "src/.*")
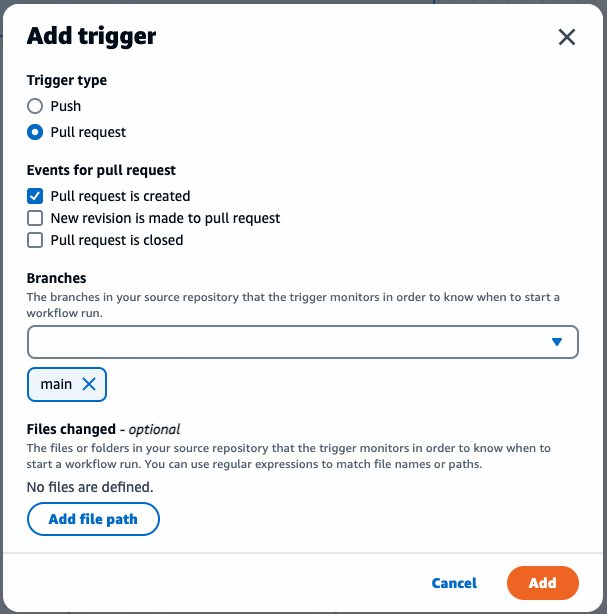
Figure 5. Trigger configuration showing various options
Now, let’s look at the build_frontend action. This is a build action, similar to the build_backend action you looked at earlier. On the Configure tab I can see the Shell commands that will be executed during the build. Remember that the frontend is written using Vue. Here I can see npm install used to install dependencies, npm run test:unit used to run tests, and finally npm run build-only to build the Single Page App (SPA). The resulting artifacts are passed to subsequent actions in the Workflow.
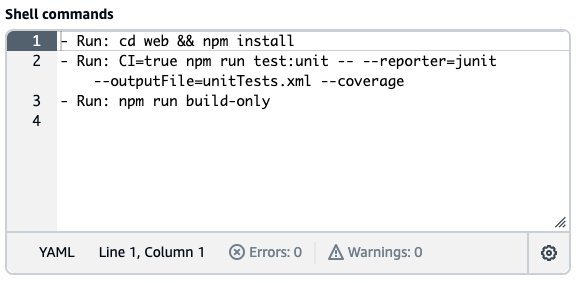
Figure 6. Shell commands run in the build action
Next, let’s look at the integration_test action. A managed test action is very similar to a build action, defining a series of commands to execute. On the configuration tab (not shown), I can see that this action is again running pytest. Switching to the Outputs tab, I see that CodeCatalyst is configured to automatically discover the test reports generated by pytest and other test frameworks. In addition, I have defined a minimum pass rate of 100%. This means that the workflow should fail if any of the integration tests fail.
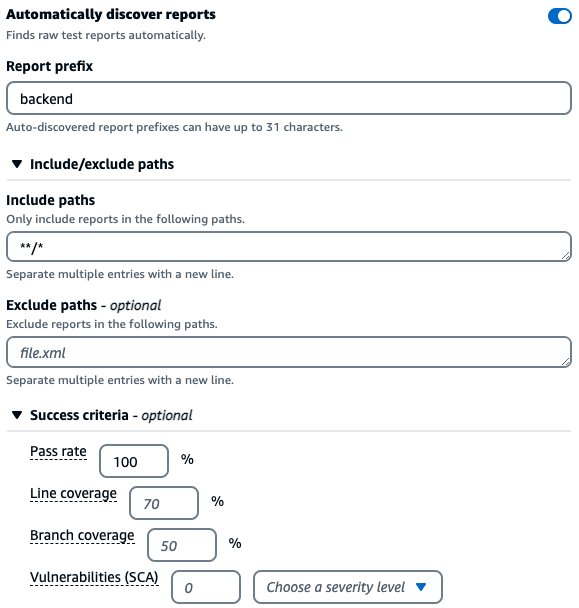
Figure 7. Test report configuration dialog including success criteria
Finally, let’s examine the deploy_frontend action. Note that all of the actions you have looked at so far include a series of commands to run in their configuration. While these actions are highly flexible, CodeCatalyst also supports purpose built actions. The cdk-deploy action is an example of this. As the name implies, this action deploys AWS Cloud Development Kit (CDK) resources. I could have called cdk deploy from the shell commands in a build action. However, using the purpose built action is easier. CodeCatalyst supports many purpose build actions developed by AWS as well as third parties. Click on the + sign in the top left corner of the screen to see a few examples. In addition, CodeCatalyst supports GitHub actions, but that is a topic for another post.
Cleanup
If you have been following along with this workflow, you should delete the resources you deployed so you do not continue to incur charges (See pricing page for more details). First, delete the two stacks that CDK deployed using the AWS CloudFormation console in the AWS account you associated when you launched the blueprint. These stacks will have names like mysfitsXXXXXWebStack and mysfitsXXXXXAppStack. Second, delete the project from CodeCatalyst by navigating to Project settings and clicking the Delete project button.
Conclusion
In this post, you learned how CodeCatalyst can help you rapidly assemble automation workflows by configuring composable, pre-built actions into CI/CD pipelines. I examined actions to build, test and deploy both frontend and backend applications. In future posts, I will discuss how CodeCatalyst can address the rest of the challenges Maxine encountered in The Unicorn Project.
About the authors: