Post Syndicated from Aish Gunasekar original https://aws.amazon.com/blogs/big-data/configure-saml-federation-for-amazon-opensearch-serverless-with-okta/
Modern applications apply security controls across many systems and their subsystems. Keeping all of these systems in sync would be a major undertaking if you tried to implement it separately. Centralized identity management is the way to maintain a single identity provider (IdP) that can authenticate actors and manage and distribute their rights.
OpenSearch is an open-source search and analytics suite that enables you to ingest, store, analyze, and visualize full text and log data. Amazon OpenSearch Serverless makes it simple to deploy, scale, and operate OpenSearch in the AWS Cloud, freeing you from the undifferentiated heavy lifting of sizing, scaling, and operating an OpenSearch cluster. When you use OpenSearch Serverless, you can integrate with your existing Security Assertion Markup Language 2.0 (SAML)-compliant IdP to provide granular access control for your OpenSearch Serverless collections. Our customers use a variety of IdPs, including AWS IAM Identity Center (successor to AWS SSO), Okta, Keycloak, Active Directory Federation Services (AD FS), and Auth0.
In this post, you will learn how to use Okta as your IdP and integrate it with OpenSearch Serverless to securely manage your users and groups for secure access to your data.
Solution overview
The flow of access requests is depicted in the following figure.
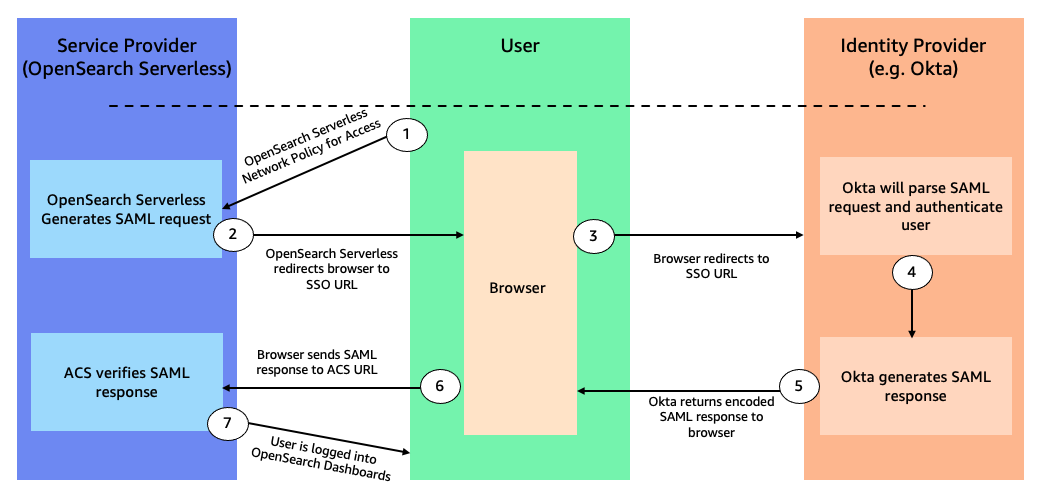
When you navigate to OpenSearch Dashboards, the workflow steps are as follows:
- OpenSearch Serverless generates a SAML authentication request.
- OpenSearch Serverless redirects your request back to the browser.
- The browser redirects to the Okta URL via the Okta application setup.
- Okta parses the SAML request, authenticates the user, and generates a SAML response.
- Okta returns the encoded SAML response to the browser.
- The browser sends the SAML response back to the OpenSearch Serverless Assertion Consumer Services (ACS) URL.
- ACS verifies the SAML response and logs in the user with the permissions defined in the data access policy.
Prerequisites
Complete the following prerequisite steps:
- Create an OpenSearch Serverless collection. For instructions, refer to Preview: Amazon OpenSearch Serverless – Run Search and Analytics Workloads without Managing Clusters.
- Make a note of your AWS account ID to use while configuring your application in Okta.
- Create an Okta account, which you will use as an IdP.
- Create users and a group in Okta:
- Log in to your Okta account, and in the navigation pane, choose Directory, then choose Groups.
- Choose Add Group and name it
opensearch-serverless, then choose Save. - Choose Assign People to add users.
- You can add users to the
opensearch-serverlessgroup by choosing the plus sign next to the user name, or you can choose Add All. - Add your users, then choose Save.
- To create new users, choose People in the navigation pane under Directory, then choose Add Person.
- Provide your first name, last name, user name (email ID), and primary email address.
- For Password, choose Set by admin and First-time password.
- To create your user, choose Save.
- In the navigation pane, choose Groups, then choose the
opensearch-serverlessgroup you created earlier.
The following graphic gives a quick demonstration of setting up a user and group.
Configure an application in Okta
To configure an application in Okta, complete the following steps:
- Navigate to the Applications page on the Okta console.
- Choose App Integration, select SAML 2.0 web application, then choose Next.
- For Name, enter a name for the app (for example,
myweblogs), then choose Next. - Under Application ACS URL, enter the URL using the format
https://collection.<REGION>.aoss.amazonaws.com/_saml/acs(replace <REGION> with the corresponding Region) to generate the IdP metadata. - Select Use this for Recipient URL and Destination URL to use the same ACS URL as the recipient and destination.
- Specify
aws:opensearch:<AWS-Account-ID> under Audience URI (SP Entity ID). This specifies who the assertion is intended for within the SAML assertion. - Under Group Attribute Statements, enter a name that is relevant to your application, such as
mygroup, and select unspecified as the name format. (Don’t forget this name, you’ll need it later.) - Select equals as the filter and enter
opensearch-serverless. - Select I’m a software vendor. I’d like to integrate my app with Okta and choose Finish.
- After an app is created, choose the sign-on tab, scroll down to the metadata details, and copy the value for Metadata URL.
The following graphic gives a quick demonstration of setting up an application in Okta via the preceding steps.

Next, you associate the users and groups to the application that you created in the previous step.
- On the Applications page, choose the app you created earlier.
- On the Assignments tab, choose Assign.
- Select Assign To Groups and choose the group you wish to assign to (
opensearch-serverlessin this case). - Choose Done.
The following graphic gives a quick demonstration of assigning groups to the application via the preceding steps.
Set up SAML on OpenSearch Serverless
In this section, you create a SAML provider that you’ll use for your OpenSearch Serverless collection. Complete the following steps:
- Open the OpenSearch Serverless console on a new tab.
- In the navigation pane, under Serverless, choose SAML authentication.
- Select Add SAML provider.
- Provide a recognizable name (for example,
okta) and a description. - Open a new tab and enter the copied metadata URL into your browser.
You should see the metadata for the Okta application.
- Take note of this metadata and copy it to your clipboard.
- On the OpenSearch Service console tab, enter this metadata in the Provide metadata from your IdP section.
- Under Additional settings, enter
mygroupor the group attribute provided in the Okta configuration. - Choose Create a SAML provider.
The SAML provider has now been created.
The following graphic gives a quick demonstration of setting up the SAML provider in OpenSearch Serverless via the preceding steps.
Update the data access policy
You need to configure the right permissions in the data access policies associated with your OpenSearch collection so your Okta group members can access the OpenSearch Dashboards endpoint.
- On the OpenSearch Serverless console, open your collection.
- Choose the data access policy associated with the collection in the Data Access section.
- Choose Edit.
- Choose Principals and Add a SAML principal.
- Select the SAML provider you created earlier and enter
group/next to it.opensearch-serverless - The OpenSearch Dashboards endpoint can be accessed by all group members. You can grant access to collections, indexes, or both.
- Choose Save.
Log in to OpenSearch Dashboards
Now that you have set permissions to access the dashboards, choose the Dashboards URL under the general information for the OpenSearch Serverless collection. This should take you to the website
https://collection-endpoint/_dashboards/
You will see a list with all the access options. Choose the SAML provider that you created (okta in this case) and log in using your Okta credentials. You will now be logged into OpenSearch Dashboards with the permissions that are part of the data access policy. You can perform searches or create visualizations from the dashboard.

Clean up
To avoid unwanted charges, delete the OpenSearch Serverless collection, data access policy, and SAML provider created as part of this demonstration.
Summary
In this post, you learned how to set up Okta as an IdP to access OpenSearch Dashboards using SAML. You also learned how to set up users and groups within Okta and configure their access to OpenSearch Dashboards. For more details, refer to SAML authentication for Amazon OpenSearch Serverless.
You can also refer to the Getting started with Amazon OpenSearch Serverless workshop to know more about OpenSearch Serverless.
If you have feedback about this post, submit it in the comments section. If you have questions about this post, start a new thread on the OpenSearch Service forum or contact AWS Support.
About the Authors
 Aish Gunasekar is a Specialist Solutions architect with a focus on Amazon OpenSearch Service. Her passion at AWS is to help customers design highly scalable architectures and help them in their cloud adoption journey. Outside of work, she enjoys hiking and baking.
 Prashant Agrawal is a Sr. Search Specialist Solutions Architect with Amazon OpenSearch Service. He works closely with customers to help them migrate their workloads to the cloud and helps existing customers fine-tune their clusters to achieve better performance and save on cost. Before joining AWS, he helped various customers use OpenSearch and Elasticsearch for their search and log analytics use cases. When not working, you can find him traveling and exploring new places. In short, he likes doing Eat → Travel → Repeat.