Post Syndicated from Barry Conway original https://aws.amazon.com/blogs/security/implement-an-early-feedback-loop-with-aws-developer-tools-to-shift-security-left/
Early-feedback loops exist to provide developers with ongoing feedback through automated checks. This enables developers to take early remedial action while increasing the efficiency of the code review process and, in turn, their productivity.
Early-feedback loops help provide confidence to reviewers that fundamental security and compliance requirements were validated before review. As part of this process, common expectations of code standards and quality can be established, while shifting governance mechanisms to the left.
In this post, we will show you how to use AWS developer tools to implement a shift-left approach to security that empowers your developers with early feedback loops within their development practices. You will use AWS CodeCommit to securely host Git repositories, AWS CodePipeline to automate continuous delivery pipelines, AWS CodeBuild to build and test code, and Amazon CodeGuru Reviewer to detect potential code defects.
Why the shift-left approach is important
Developers today are an integral part of organizations, building and maintaining the most critical customer-facing applications. Developers must have the knowledge, tools, and processes in place to help them identify potential security issues before they release a product to production.
This is why the shift-left approach is important. Shift left is the process of checking for vulnerabilities and issues in the earlier stages of software development. By following the shift-left process (which should be part of a wider application security review and threat modelling process), software teams can help prevent undetected security issues when they build an application. The modern DevSecOps workflow continues to shift left towards the developer and their practices with the aim to achieve the following:
- Drive accountability among developers for the security of their code
- Empower development teams to remediate issues up front and at their own pace
- Improve risk management by enabling early visibility of potential security issues through early feedback loops
You can use AWS developer tools to help provide this continual early feedback for developers upon each commit of code.
Solution prerequisites
To follow along with this solution, make sure that you have the following prerequisites in place:
- An AWS account
- Access to these AWS services:
Make sure that you have a general working knowledge of the listed services and DevOps practices.
Solution overview
The following diagram illustrates the architecture of the solution.
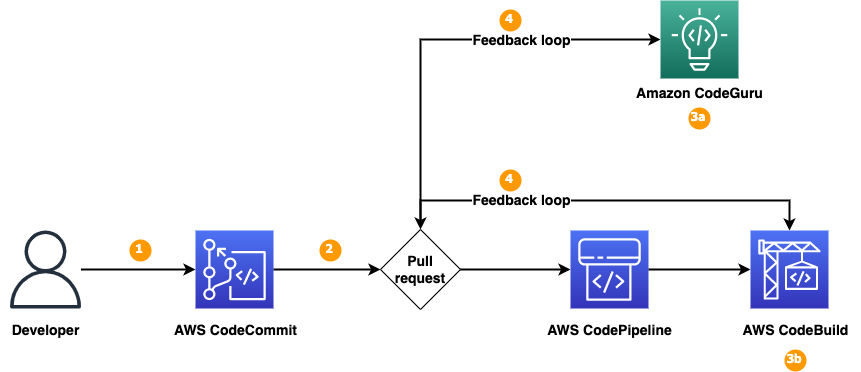
Figure 1: Solution overview
We will show you how to set up a continuous integration and continuous delivery (CI/CD) pipeline by using AWS developer tools—CodeCommit, CodePipeline, CodeBuild, and CodeGuru—that you will integrate with the code repository to detect code security vulnerabilities. As shown in Figure 1, the solution has the following steps:
- The developer commits the new branch into the code repository.
- The developer creates a pull request to the main branch.
- Pull requests initiate two jobs: an Amazon CodeGuru Reviewer code scan and a CodeBuild job.
- CodeGuru Reviewer uses program analysis and machine learning to help detect potential defects in your Java and Python code, and provides recommendations to improve the code. CodeGuru Reviewer helps detect security vulnerabilities, secrets, resource leaks, concurrency issues, incorrect input validation, and deviation from best practices for using AWS APIs and SDKs.
- You can configure the CodeBuild deployment with third-party tools, such as Bandit for Python to help detect security issues in your Python code.
- CodeGuru Reviewer or CodeBuild writes back the findings of the code scans to the pull request to provide a single common place for developers to review the findings that are relevant to their specific code updates.
The following table presents some other tools that you can integrate into the early-feedback toolchain, depending on the type of code or artefacts that you are evaluating:
| Early feedback – security tools | Usage | License |
| cfn-guard , cfn-nag , cfn-lint | Infrastructure linting and validation | cfn-guard license, cfn-nag license, cfn-lint license |
| CodeGuru, Bandit | Python | Bandit license |
| CodeGuru | Java | |
| npm-audit, Dependabot | npm libraries | Dependabot license |
When you deploy the solution in your AWS account, you can review how Bandit for Python has been built into the deployment pipeline by using AWS CodeBuild with a configured buildspec file, as shown in Figure 2. You can implement the other tools in the table by using a similar approach.

Figure 2: Bandit configured in CodeBuild
Walkthrough
To deploy the solution, you will complete the following steps:
- Deploy the solution by using a CloudFormation template
- Associate CodeGuru with a code repository
- Create a pull request to the code repository
- Review the code scan results in the pull request and address the findings
Deploy the solution
The first step is to deploy the required resources into your AWS environment by using CloudFormation.
To deploy the solution
- Choose the following Launch Stack button to deploy the solution’s CloudFormation template:

The solution deploys in the AWS US East (N. Virginia) Region (us-east-1) by default because each service listed in the Prerequisites section is available in this Region. To deploy the solution in a different Region, use the Region selector in the console navigation bar and make sure that the services required for this walkthrough are supported in your newly selected Region. For service availability by Region, see AWS Services by Region.
- On the Quick Create Stack screen, do the following:
- Leave the provided parameter defaults in place.
- Scroll to the bottom, and in the Capabilities section, select I acknowledge that AWS CloudFormation might create IAM resources with custom names.
- Choose Create Stack.
- When the CloudFormation template has completed, open the AWS Cloud9 console.
- In the Environments table, for the provisioned shift-left-blog-cloud9-ide environment, choose Open, as shown in Figure 3.

Figure 3: Cloud9 environments
- The provisioned Cloud9 environment opens in a new tab. Wait for Cloud9 to initialize the two sample code repositories: shift-left-sample-app-java and shift-left-sample-app-python, as shown in Figure 4. For this post, you will work only with the Python sample repository shift-left-sample-app-python, but the procedures we outline will also work for the Java repository.
Figure 4: Cloud9 IDE


Associate CodeGuru Reviewer with a code repository
The next step is to associate the Python code repository with CodeGuru Reviewer. After you associate the repository, CodeGuru Reviewer analyzes and comments on issues that it finds when you create a pull request.
To associate CodeGuru Reviewer with a repository
- Open the CodeGuru console, and in the left navigation pane, under Reviewer, choose Repositories.
- In the Repositories section, choose Associate repository and run analysis.
- In the Associate repository section, do the following:
- For Select source provider, select AWS CodeCommit.
- For Repository location,select shift-left-sample-app-python.
- In the Run a repository analysis section, do the following, as shown in Figure 5:
- For Source branch, select main.
- For Code review name – optional, enter a name.
- For Tags – optional, leave the default settings.
- Choose Associate repository and run analysis.
Figure 5: CodeGuru repository configuration
- CodeGuru initiates the Full repository analysis and the status is Pending, as shown in Figure 6. The full analysis takes about 5 minutes to complete. Wait for the status to change from Pending to Completed.
Figure 6: CodeGuru full analysis pending


Create a pull request
The next step is to create a new branch and to push sample code to the repository by creating a pull request so that the code scan can be initiated by CodeGuru Reviewer and the CodeBuild job.
To create a new branch
- In the Cloud9 IDE, locate the terminal and create a new branch by running the following commands.
- Confirm that you are working from the new branch, which will be highlighted in the Cloud9 IDE terminal, as shown in Figure 7.
Figure 7: Cloud9 IDE terminal

To create a new file and push it to the code repository
- Create a new file called sample.py.
- Copy the following sample code, paste it into the sample.py file, and save the changes, as shown in Figure 8.
Figure 8: Cloud9 IDE noncompliant code
- Commit the changes to the repository.
Note: if you receive a message to set your name and email address, you can ignore it because Git will automatically set these for you, and the Git commit will complete successfully.
- Push the changes to the code repository, as shown in Figure 9.
Figure 9: Git push


To create a new pull request
- Open the CodeCommit console and select the code repository called shift-left-sample-app-python.
- From the Branches dropdown, select the new branch that you created and pushed, as shown in Figure 10.
Figure 10: CodeCommit branch selection
- In your new branch, select the file sample.py, confirm that the file has the changes that you made, and then choose Create pull request, as shown in Figure 11.
Figure 11: CodeCommit pull request
A notification appears stating that the new code updates can be merged.
- In the Source dropdown, choose the new branch python-test. In the Destination dropdown, choose the main branch where you intend to merge your code changes when the pull request is closed.
- To have CodeCommit run a comparison between the main branch and your new branch python-test, choose Compare. To see the differences between the two branches, choose the Changes tab at the bottom of the page. CodeCommit also assesses whether the two branches can be merged automatically when the pull request is closed.
- When you’re satisfied with the comparison results for the pull request, enter a Title and an optional Description, and then choose Create pull request. Your pull request appears in the list of pull requests for the CodeCommit repository, as shown in Figure 12.
Figure 12: Pull request


The creation of this pull request has automatically started two separate code scans. The first is a CodeGuru incremental code review and the second uses CodeBuild, which utilizes Bandit to perform a security code scan of the Python code.
Review code scan results and resolve detected security vulnerabilities
The next step is to review the code scan results to identify security vulnerabilities and the recommendations on how to fix them.
To review the code scan results
- Open the CodeGuru console, and in the left navigation pane, under Reviewer, select Code reviews.
- On the Incremental code reviews tab, make sure that you see a new code review item created for the preceding pull request.
Figure 13: CodeGuru Code review
- After a few minutes, when CodeGuru completes the incremental analysis, choose the code review to review the CodeGuru recommendations on the pull request. Figure 14 shows the CodeGuru recommendations for our example.
Figure 14: CodeGuru recommendations
- Open the CodeBuild console and select the CodeBuild job called shift-left-blog-pr-Python. In our example, this job should be in a Failed state.
- Open the CodeBuild run, and under the Build history tab, select the CodeBuild job, which is in Failed state. Under the Build Logs tab, scroll down until you see the following errors in the logs. Note that the severity of the finding is High, which is why the CodeBuild job failed. You can review the Bandit scanning options in the Bandit documentation.
- Navigate to the CodeCommit console, and on the Activity tab of the pull request, review the CodeGuru recommendations. You can also review the results of the CodeBuild jobs that Bandit performed, as shown in Figure 15.
Figure 15: CodeGuru recommendations and CodeBuild logs


This demonstrates how developers can directly link the relevant information relating to security code scans with their code development and associated pull requests, hence shifting to the left the required security awareness for developers.
To resolve the detected security vulnerabilities
- In the Cloud9 IDE, navigate to the file sample.py in the Python sample repository, as shown in Figure 16.
Figure 16: Cloud9 IDE sample.py
- Copy the following code and paste it in the sample.py file, overwriting the existing code. Save the update.
- Commit the changes by running the following commands.
- Open the CodeCommit console and choose the Activity tab on the pull request that you created earlier. You will see a banner indicating that the pull request was updated. You will also see new comments indicating that new code scans using CodeGuru and CodeBuild were initiated for the new pull request update.
- In the CodeGuru console, on the Incremental code reviews page, check that a new code scan has begun. When the scans are finished, review the results in the CodeGuru console and the CodeBuild build logs, as described previously. The previously detected security vulnerability should now be resolved.
- In the CodeCommit console, on the Activity tab, under Activity history, review the comments to verify that each of the code scans has a status of Passing, as shown in Figure 17.

Figure 17: CodeCommit activity history
- Now that the security issue has been resolved, merge the pull request into the main branch of the code repository. Choose Merge, and under Merge strategy, select Fast Forward merge.


AWS account clean-up
Clean up the resources created by this solution to avoid incurring future charges.
To clean up your account
- Start by deleting the CloudFormation stacks for the Java and Python sample applications that you deployed. In the CloudFormation console, in the Stacks section, select one of these stacks and choose Delete; then select the other stack and choose Delete.
Figure 18: Delete repository stack
- To initiate deletion of the Cloud9 CloudFormation stack, select it and choose Delete.
- Open the Amazon S3 console, and in the search box, enter shift-left to search for the S3 bucket that CodePipeline used.
Figure 19: Select CodePipeline S3 bucket
- Select the S3 bucket, select all of the object folders in the bucket, and choose Delete
Figure 20: Select CodePipeline S3 objects
- To confirm deletion of the objects, in the section Permanently delete objects?, enter permanently delete, and then choose Delete objects. A banner message that states Successfully deleted objects appears at the top confirming the object deletion.
- Navigate back to the CloudFormation console, select the stack named shift-left-blog, and choose Delete.


Conclusion
In this blog post, we showed you how to implement a solution that enables early feedback on code development through status comments in the CodeCommit pull request activity tab by using Amazon CodeGuru Reviewer and CodeBuild to perform automated code security scans on the creation of a code repository pull request.
We configured CodeBuild with Bandit for Python to demonstrate how you can integrate third-party or open-source tools into the development cycle. You can use this approach to integrate other tools into the workflow.
Shifting security left early in the development cycle can help you identify potential security issues earlier and empower teams to remediate issues earlier, helping to prevent the need to refactor code towards the end of a build.
This solution provides a simple method that you can use to view and understand potential security issues with your newly developed code and thus enhances your awareness of the security requirements within your organization.
It’s simple to get started. Sign up for an AWS account, deploy the provided CloudFormation template through the Launch Stack button, commit your code, and start scanning for vulnerabilities.
If you have feedback about this post, submit comments in the Comments section below. If you have questions about this post, start a new thread on AWS re:Post or contact AWS Support.
Want more AWS Security news? Follow us on Twitter.